Mojito Ice - Ice cream maker RGV - Free user manual and instructions
Find the device manual for free Mojito Ice RGV in PDF.


| Product Type | Ice Cream Maker |
| Brand | RGV |
| Model | Mojito Ice |
| Capacity | 1.5 quarts (approx. 1.4 liters) |
| Power Supply | 120 V, 60 Hz, 150 W |
| Dimensions (L x W x H) | 10.2 x 8.7 x 11.4 inches (approx. 26 x 22 x 29 cm) |
| Weight | 7.5 lbs (approx. 3.4 kg) |
| Functions | Makes ice cream, sorbet, and frozen yogurt |
| Preparation Time | 20-30 minutes for most recipes |
| Freezing Method | Pre-freeze bowl required (double-walled) |
| Control Type | Simple on/off switch |
| Material | Plastic housing with stainless steel mixing paddle |
| Dishwasher Safe Parts | Mixing paddle and lid (top rack recommended) |
| Maintenance | Wipe exterior with damp cloth; hand wash bowl |
| Safety Features | Overheat protection; automatic shut-off |
| Spare Parts Availability | Replacement bowls and paddles available from RGV |
| Repairability | Motor unit serviceable by authorized technicians |
| Included Accessories | Freezing bowl, mixing paddle, recipe booklet |
| Warranty | 1 year limited warranty |
Frequently Asked Questions - Mojito Ice RGV
User questions about Mojito Ice RGV
0 question about this device. Answer the ones you know or ask your own.
Ask a new question about this device
Download the instructions for your Ice cream maker in PDF format for free! Find your manual Mojito Ice - RGV and take your electronic device back in hand. On this page are published all the documents necessary for the use of your device. Mojito Ice by RGV.
USER MANUAL Mojito Ice RGV
natural_image
Illustration of a bowl filled with cubic cubes, with three smaller cubes placed below (no text or symbols)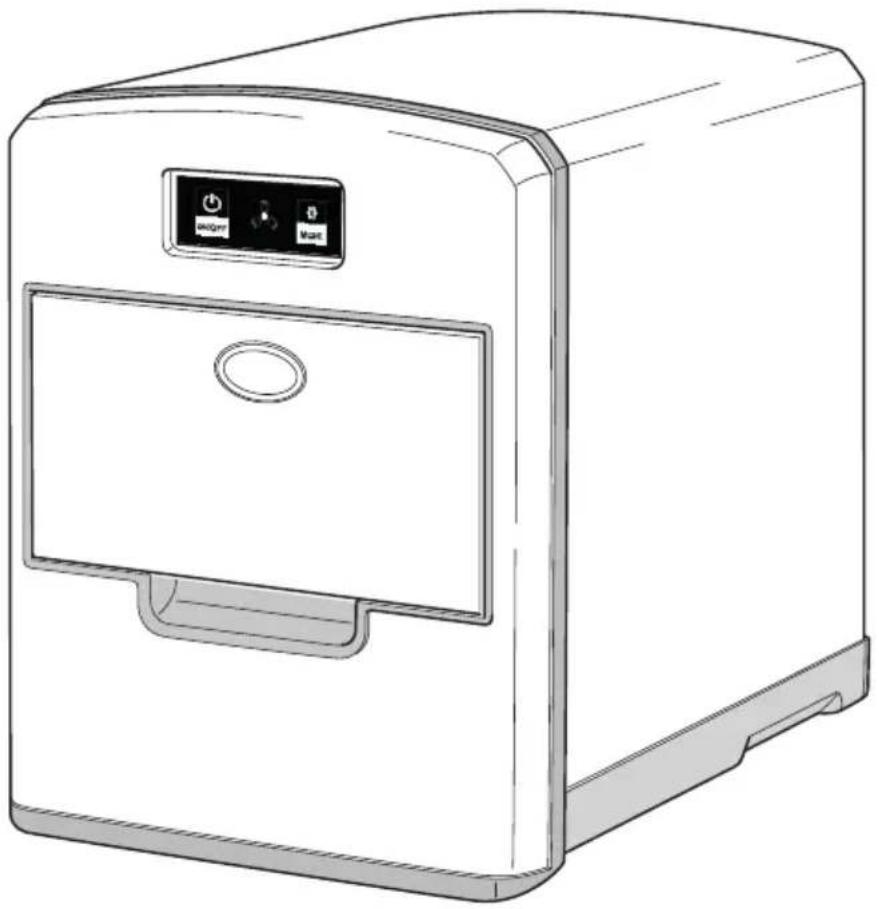
natural_image
Line drawing of a white rectangular appliance with a side panel and control buttons (no text or symbols)(Translation of original instructions)

Introduzione
Gentile Cliente,
natural_image
Line drawing of two hands shaking, no text or symbols presentIllustrazioni

natural_image
Line drawing of a computer tower with ventilation grilles and a power outlet (no text or symbols)

Comandi apparecchio
natural_image
Diagram of a computer ventilation system showing airflow path and power outlet (no text or symbols)natural_image
Hand inserting a plug into an electrical outlet (no text or symbols visible)natural_image
Technical line drawing of a mechanical component with a square base and circular hole, labeled '10' (no text or symbols beyond label)Thank you for choosing our product and we are confident that this choice will meet your expectations in full.
Before using this equipment, please read carefully this "instruction manual" in order to optimize the functional characteristics and eliminate any problems that may arise from incorrect use.
natural_image
Line drawing of two hands shaking, no text or symbols presentIllustrations
Illustrations are grouped in the second pages of the manual.
Index
EN
A- Introduction...... Page 21
B- Safety information.... " 22
C- Warnings for use ...." 23
D- Supplementary warnings .... " 27
E- Appliance characteristics.... " 28
F- Appliance description.... " 29
G- Appliance controls. " 30
H- Appliance preparation.... " 30
L- Use of the appliance .... 31
M- Cleaning and maintenance.... " 33
N- Disposal of the appliance .... " 34
O- Possible inconveniences .... " 35
P- Conventional warranty conditions.... " 37
- How to contact customer service support .... " 37
Meaning of warning signs in the booklet

DANGER: Indicates an imminently hazardous situation which, if not avoided, could result in serious injury or even death. The use of this term is limited to the most extreme situations.
CAUTION: Indicates a potentially hazardous situation which, if not avoided, could result in serious injury (and in extreme cases death).

WARNING: Indicates a potentially hazardous situation which, if not avoided, may result in minor injuries to personnel or damage to equipment. It also alerts the user on incorrect operating modes.

Safety warnings essential before use


Carefully read the instructions in this manual as they provide important information for safe installation, use and maintenance.
Keep this booklet for future reference.
- The packaging elements (plastic bags, expanded polystyrene, etc.) must not be left within the reach of children as they are potentially dangerous.
Carefully read these instructions before using the appliance.
- Only use this appliance for the uses for which it has been intended, as described in this manual. The warnings and important safety instructions indicated in this manual don't cover all the possible conditions and situations that could occur.
Is the user's responsibility to use the appliance with common sense, paying the maximum attention and care during installation, maintenance and functioning phases.

Warnings for Use
For a safe use of the appliance
As special precautions:
- Before each use check and verify the mechanical integrity of the unit and all of its components.
The plug and the insulation of the electrical power cord must not show any wear or breakage.
If there is any evidence of wear or breakage in the cord, immediately disconnect the plug from the outlet and take the appliance to your authorised reseller for the necessary inspections and repairs.

Before connecting the appliance to an electrical power source, make sure that the line voltage rating corresponds to that found on the appliance information tag.
- The packaging materials (plastic bags, polystyrene boxes, etc.) must not be left within reach of children as potential sources of danger.
- The electrical safety of the motor unit is guaranteed only when it is connected to an efficient earth connection system as indicated by the safety regulations in force.
Have this system verified by professionally qualified personnel.
The manufacturer cannot be considered responsible for damages caused by a faulty or non-existent earth connection.
- For your safety, it is recommended that the appliance is powered through a line with a delayed RCD breaker switch with trip current no greater than 30 mA.
- Never immerse the appliance body, the power cord and the plug in water or in other liquids.
- Place the appliance on a horizontal and stable plane whose surface is not delicate (for example lacquered furniture, tablecloths, etc.).
Objects such as covers, vases, etc. must not be placed on the appliance.
EN
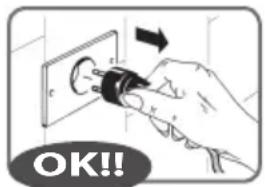
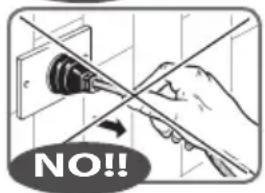
- Do not disconnect the appliance by pulling on the power cord to disconnect it from the wall outlet.
- Do not utilise or keep the appliance outdoors or in the proximity of water.
• After each use of the appliance, disconnect the power cord from the electrical power source wall outlet.

This equipment can be used by children aged 8 years or above and by individuals with physical, sensory or mental disabilities as well as people without sufficient experience or knowledge of it ONLY if supervised by a person responsible for their safety or if instructed about the safe use of the device and aware of the possible risks arising from misuse.
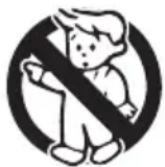

Children should not use the device as a toy and should neither clean nor use the device themselves unless they are aged 8 years and above and assisted by an adult.

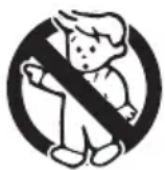

Keep children under 8 years away from the device and the power cord.
- Before cleaning the appliance or carrying out any other operation on it, always disconnect the device from the power outlet.
- Pay close attention that the appliance and its power cord are not too close to the edge of the table or the work surface and that they do not come into contact with heat sources or are not too close to a sink.

Make sure that the power cord is not laying on the floor in order to prevent someone from inadvertently overturning and pulling the unit.

During operation, the power outlet should be easily accessible in the event that it is necessary to disconnect the equipment.
- Do not, for any reason, tamper the appliance.
In the event of malfunction contact your reseller. - To avoid useless and hazardous overheating of the appliance, DO NOT leave the device uselessly connected to the electrical power source. Disconnect the electrical power cord from the wall outlet when the appliance is not being used.
- Unwind the electrical power cord completely when the appliance is being used.
- Inspect and verify the state of wear of the electrical power cord. Its eventual substitution must be performed by specialised personnel.

For domestic use only


The appliance MUST only be verified and/or repaired at an authorized retailer.
Any repair intervention performed by unauthorized personnel on the appliance automatically voids warranty.

This appliance shall only be intended for the use for which it has been expressly conceived, namely to produce ice cubes.
Any other use is considered improper and therefore hazardous. The manufacturer cannot be considered responsible for any eventual damages derived from improper, faulty or unreasonable use.
- While handling the appliance, pay attention to keeping it in vertical position, neither incline it beyond 45^ nor turn it upside down. The appliance could be damaged.
- Place the appliance in well ventilated areas, away from heat sources (burner, oven, radiator, etc.) and from areas filled with contaminated air. Make sure that there are at least 150mm of free space around the appliance in order to ensure a correct air circulation around the appliance itself.
- The appliance components and internal parts (water tank, ice basket, squeegee, etc.) must be cleaned before or after use.
- Regularly clean the appliance. During cleaning, disconnect power supply and remove the ice cubes.
Use a soft cloth or a non-abrasive sponge moistened with a delicate dishwasher detergent diluted in water to clean the appliance internal and external surfaces.
Wash with a wet cloth.
Do not spray water or other liquids on the appliance.
It is advised to use a diluted solution of water and vinegar to clean the appliance internal parts.

Do not use abrasive or aggressive cleaning agents (such as acids or petrol) to clean the appliance.
- Do not move the probe or the cables inside the appliance during cleaning.
- Regularly change water in order to guarantee the ice cube quality. The water contained in the water tank must be replaced at least every 24 hours.
- ONLY use drinking water to create the ice cube.
- Water quantity in the tank MUST NOT be higher than the maximum level marked inside the appliance.
- In order to protect the compressor, it is NOT possible to quickly turn on and off the appliance.
Wait at least 3 minutes between switching off and the next switching on.
- If you do not intend to use the appliance for some days (even only for 3 or 4 days), empty and accurately dry the tank.
Do not leave water in the tank for too long.
- The appliance uses inflammable insulating foam. In case of disposal of the appliance, it is needed to refer to an authorized disposal centre and follow the specific regulatory requirements in force in the country of use.
- Do not obstruct the appliance ventilation apertures.
Clean them with a soft bristled brush if necessary.
- Do not insert any object in the ventilation apertures.
- If the appliance is not used for a long period of time, the water pump might not be able to pump water in sufficient quantity because of an air bubble.
If that happens, the low water indicator turns on.
Press the ON/OFF key again to solve the inconvenience.
- If the compressor stops for any reason (example: lack of water, too much ice, etc.), do not promptly restart it but instead wait at least 3 minutes before pressing the ON/OFF switch.
- This appliance is without HFC (the refrigerating circuit contains R 600 a-isobutane). For more details, please refer to the appliance serial number label.
Isobutane is a natural gas without effects on the environment, but it is inflammable. For this reason, it is essential to make sure that the refrigerating circuiùt hoses are not damaged.
- Do not allow naked flames or ignition sources to enter the appliance.
- If refrigerant escapes: remove any naked flames or sources of ignition from the leakage area. Ventilate the room well. Notify the after-sales service.
D
Supplementary Warnings
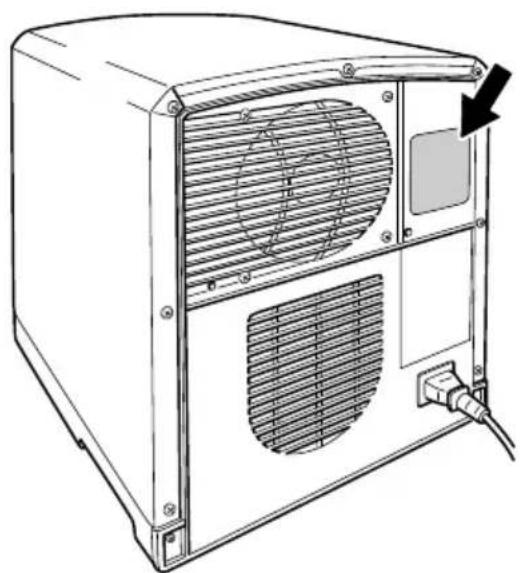
- Before connecting the appliance, make sure that the nameplate data correspond to those of the electricity distribution network. The nameplate is placed on the back of the appliance.
- In case of incompatibility between the socket and the plug of the appliance, have the socket replaced with another one of the suitable type by professionally qualified personnel which shall also make sure that the
natural_image
Line drawing of a computer tower front panel with ventilation grille and power plug (no text or symbols)socket cables cross section is appropriate for the power absorbed by the appliance.
It is strongly recommended that adapters, multiple outlets and/or extensions NOT BE USED.
If their use were to be unavoidable it is then necessary to use only simple, multiple or extension adapters that conform to the safety regulations in force, paying attention to not exceed load limits.
- The use of an electrical device includes the observance of some fundamental rules.
Namely:
- Do not touch or use the device with wet or humid hands or while bare foot.
- Do not pull on the power cord or on the device itself to disconnect it from the electrical power outlet.
- Do not allow that the device be used by children or the mentally incompetent without supervision.
- In the event of malfunction and/or breakage of the device, turn it off and do not tamper with it.
For any eventual repairs only authorised resellers should be contacted.
Lack of respect for what is referred to above may compromise the safety of the device.
- If the unit is not to be used any longer and therefore disposed of, render it unusable by cutting the electrical power cord after having disconnected it from the electrical power outlet.
It is additionally recommended to render harmless any parts of the device that may constitute a hazard, particularly for children who could use the discarded device as a toy.

Installation must be carried out according to the manufacturer's instructions. An incorrect installation could cause damage to persons, animals or things, in the face of which the manufacturer will not be considered responsible.
Should there be problems with the appliance, contact an authorised service centres.
Avoid repairing the appliance on your own.
Any repairs carried out on the device by unauthorised personnel will automatically invalidate the warranty, even if it has not reached the expiry date.

Appliance characteristics
• Appliance dimensions: ....mm 260x345x330
• Ice theoretical production :.....kg/24h 10/12
• Appliance weight (approximate) :...... kg 10
- "Motor unit" electrical specifications
- Voltage: V\~ 220-240
• Frequency: ......Hz 50
• Power:......Watt 150
• Ice drawer capacity: g. 700
- Water tank max. capacity:....I. 2,15
• Refrigerant:.....type R600a
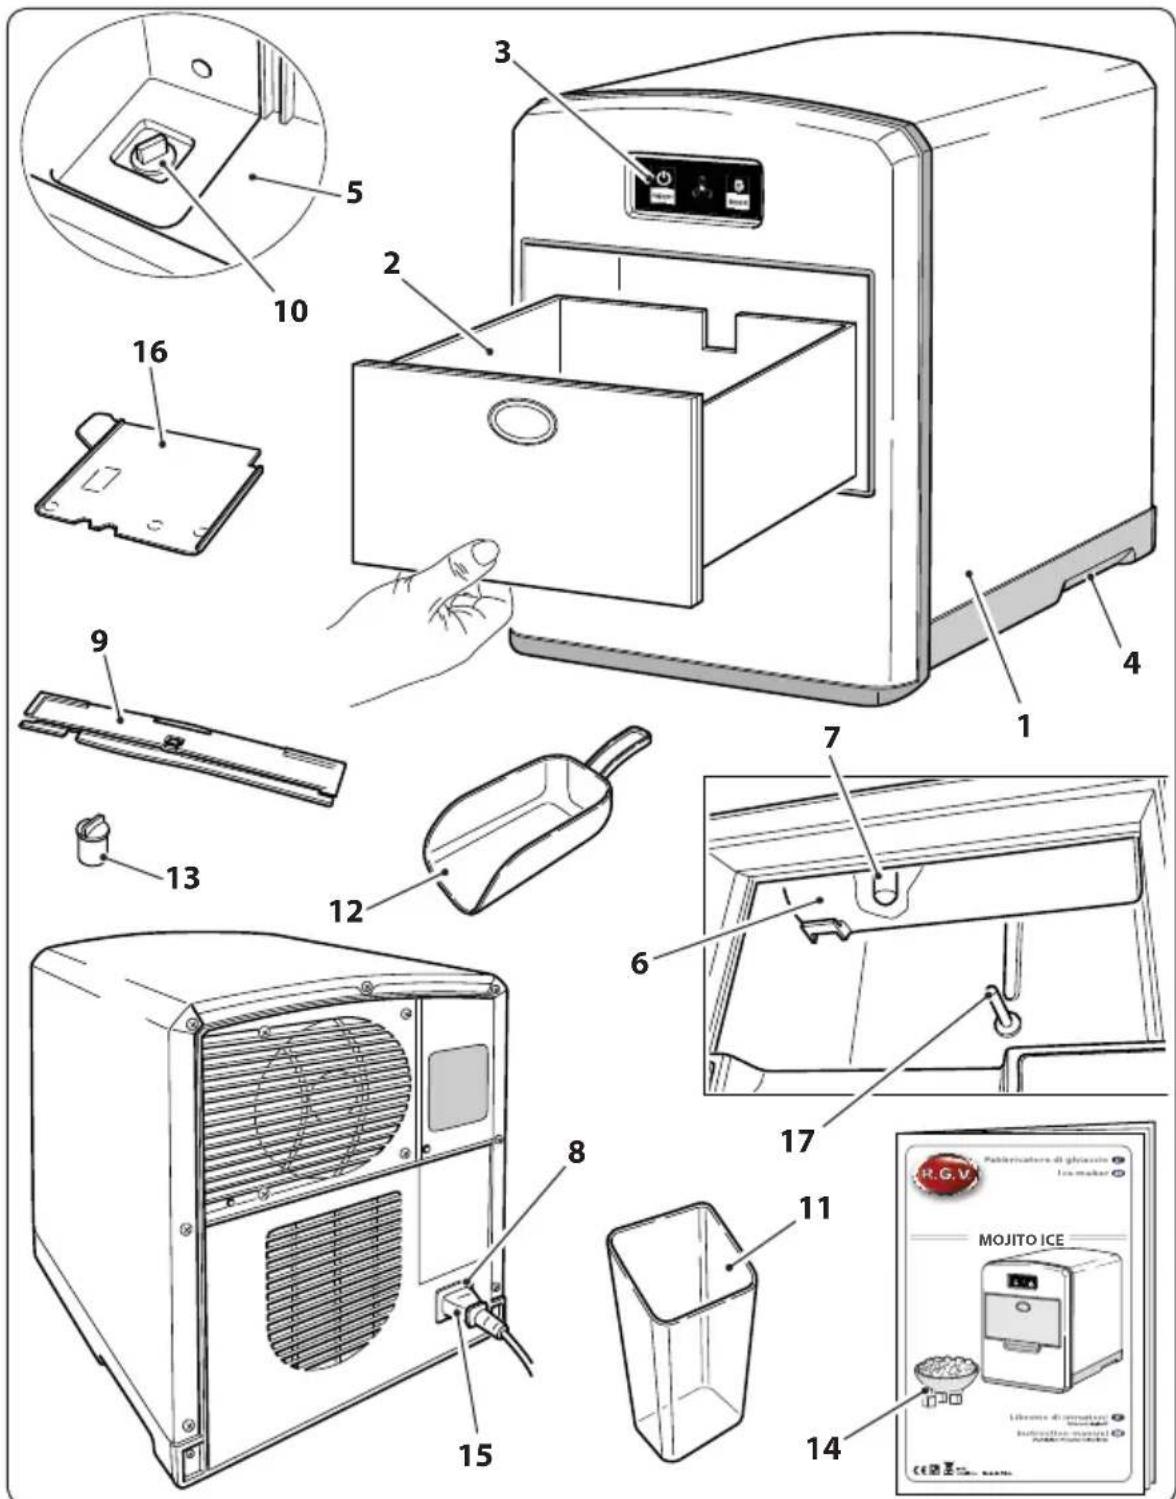
F Appliance description
- Appliance body
- Ice drawer
- Control panel
- Handle
- Water tank
- Water tray
- Evaporator
- Power supply socket
-
Squeegee
-
Water drain cap
- Glass
- Ice scoop
- Water drain cap (additional)
- Instruction manual
- Power cord
- Shutter
- Temperature probe

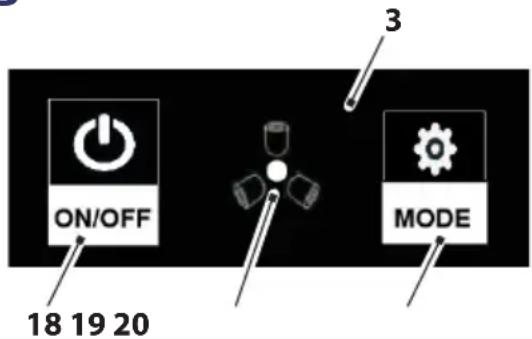
Appliance controls
- ON/OFF key
- Appliance status indicator
- Ice cubes size selection key (S - M - L)

Appliance preparation
H1. CHARACTERISTICS
- Instant ice production
• 3 different ice cubes sizes
• Full ice drawer indicator - Low water indicator
• 9 ice cubes for each cycle
H2. AT FIRST USE

While handling the appliance, pay attention to keeping it in vertical position, neither incline it beyond 45^ nor turn it upside down. The appliance could be damaged.
If that happens, place the appliance on the bearing plane, open the ice drawer and wait at least 2 hours before electrically powering it.
It is advised to respect this indication in any case to safeguard the compressor integrity.
a. Remove all the packaging material and the eventual labels and carefully check that the appliance is intact.

In case of breaks and/or deformities, do not use the appliance and refer to the retailer or to the assistance centre.
b. Position the appliance observing the warnings and the indications provided in the previous pages.
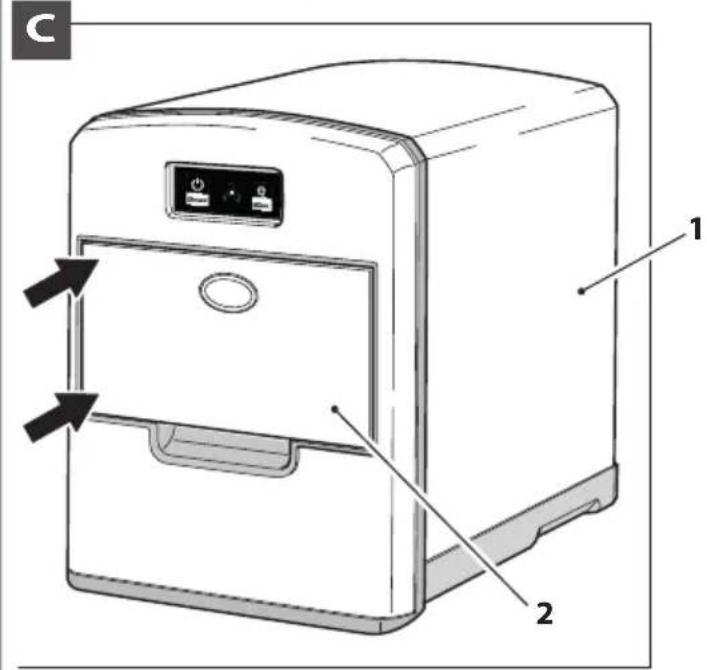
c. Place the appliance on the bearing plane, open the ice drawer (2) and wait at least 2 hours before electrically powering it.

Use drinking water; DO NOT use distilled water.

Use of the appliance
L1. KEYS AND INDICATORS

OFF key
Press it a first time and the appliance turns on. ON/OFF Press it a second time and the appliance turns off.

DE key
- Press it to select the ice cubes size L = Large M = Medium S = Small "M" medium size is selected by default.

ice drawer icon
It turns on when the ice drawer is full of cubes.

water icon
It turns on when water level in the tank is insufficient.

e in progress icon
- It turns on during ice production cycle.
L2. FUNCTIONING (see figures on page 2)
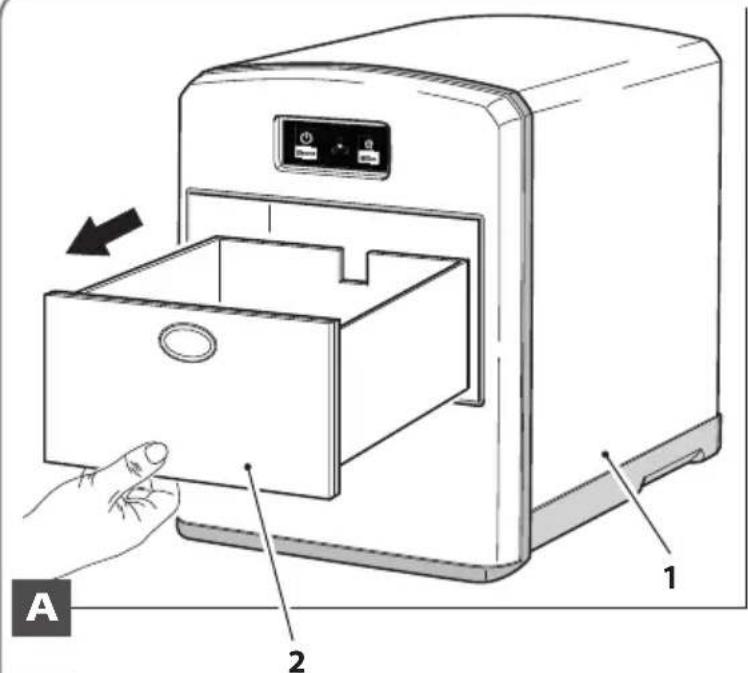
a. Extract the ice drawer (2) from the appliance body (1) (figure "A").
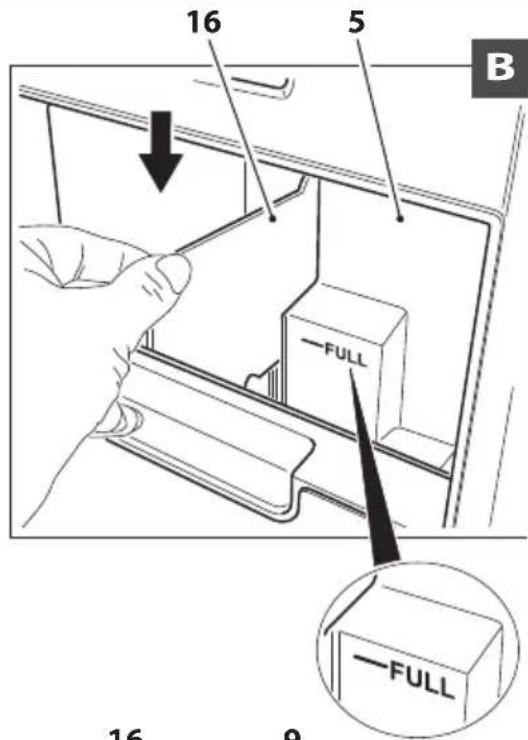
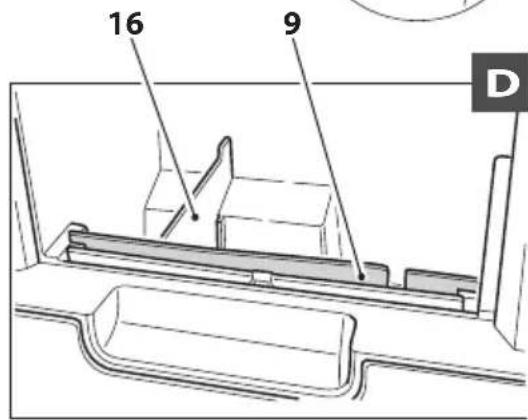
b. Check the presence of the shutter (16) and of the squeegee (9) in the water tank (5). Correctly position them if necessary (figures "B" and "D").
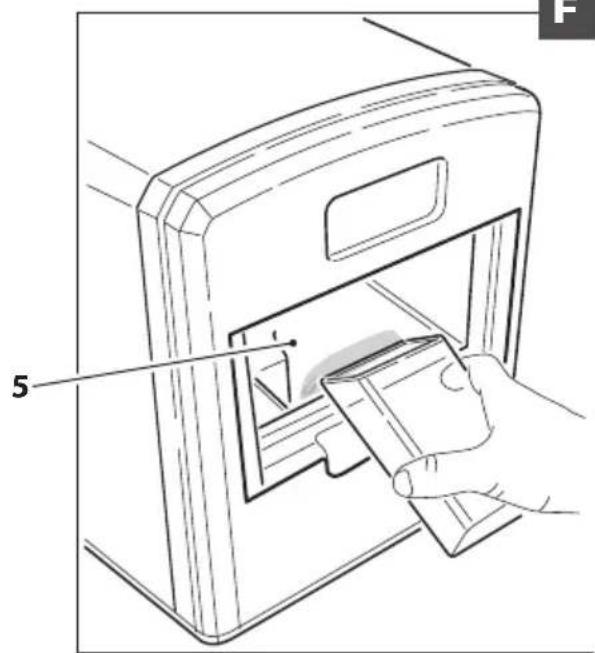
c. Pour water in the tank until you reach the level indicated in the tank itself (figure "F").
d. Correctly insert the ice drawer (2) in the appliance body (1) (figure "C").

DO NOT exceed the indicated level
(MAX 2,15 I) (fig. "B").
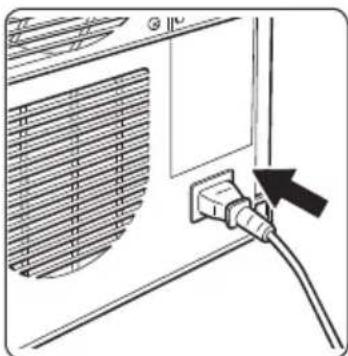
e. Connect the power cord to the appliance socket.
natural_image
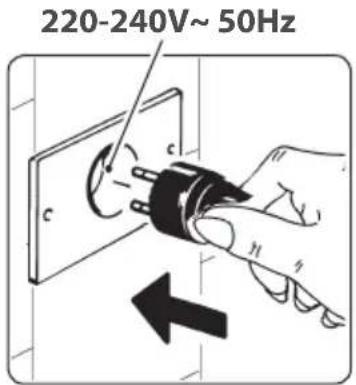
Diagram of a wall-mounted air conditioner unit with a plug inserted, showing airflow direction (no text or symbols)f. Connect the power cord plug to the power socket.

Make sure the mains voltage corresponds to what is indicated on the appliance nameplate.
g. Select the desired ice cube size with the MODE key.
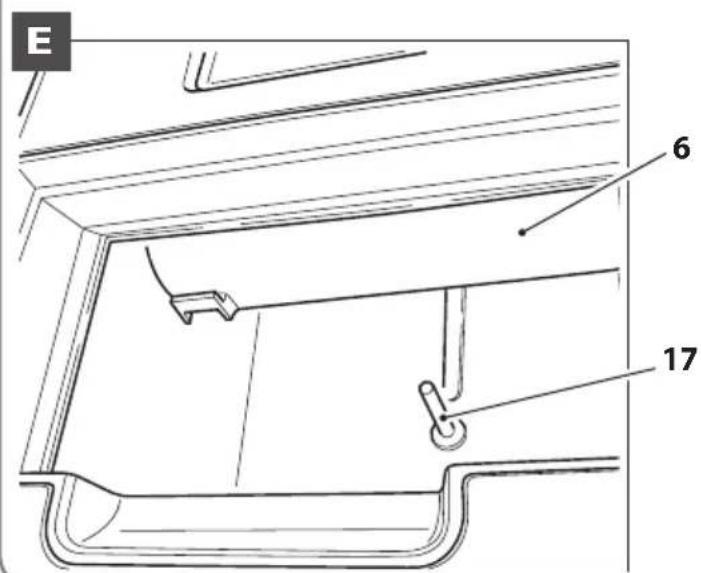
h. Press the ON/OFF key to turn the appliance on. The ice maker starts working. When the cubes have been created, they detach from the evaporators and fall in the water tray (6) that, by rotating, deposits them in the ice drawer (2).

Note: during the first three cycles, ice might be small and of irregular sizes.
i. The indicator switching on indicates that the ice drawer is full.
Extract the ice drawer (2), refill the water level (if necessary) and then reposition the drawer in the appliance body.

- If, even in the presence of water in the tank, water is not pumped in the tray for two consecutive cycles, it is necessary to remove the drain cap and let some water come out, then reposition the cap.
- When the indicator turns on, empty the ice drawer as soon as possible.
I. Press the ON/OFF key to turn the appliance off.
m. Because of quick freezing, the ice cubes may appear "opaque".
This condition is caused by the air trapped in water and it doesn't affect ice quality or taste in any way.

Cleaning and maintenance

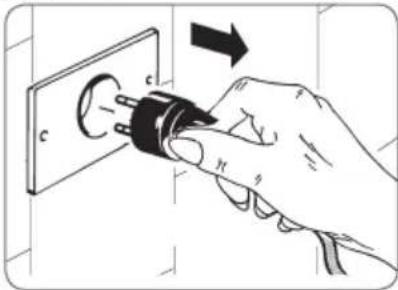
Before performing the cleaning operations, always disconnect the plug from the mains supply network.
natural_image
Hand inserting a plug into an electrical outlet (no text or symbols visible)a. Clean the appliance body (1) with a damp cloth WITHOUT EVER using abrasive products.

Do not use abrasive detergents or steel wool scrubbers for cleaning.
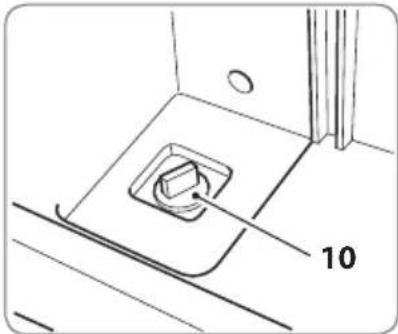
b. In order to guarantee the ice cubes cleaning, water in the water tank must be replaced at least every 24 hours removing the drain cap (10).
natural_image
Technical line drawing of a mechanical component with a square hole and numbered label (10), no readable text or symbols present.
Note: before removing the drain cap (10), make sure that the water coming out doesn't damage the bearing plane or the surrounding area.
c. Regularly clean the appliance.
Remove the ice cubes.
Use a soft cloth or a non-abrasive sponge dampened with a delicate dishwashing detergent diluted with water to clean the internal and external surfaces of the appliance. Rinse using a damp cloth.

Do not spray water or other liquids on the appliance.
It is advised to use a diluted solution of water and vinegar to clean the appliance internal parts.
Do not use aggressive or abrasive detergents (such as acids or petrol) to clean the appliance.
d. During cleaning, pay attention not to damage the probe (17) or the cables inside the appliance.

Never immerse the appliance body (1) in water or in other liquids.
e. If the appliance is not used for a long period of time, the water pump might not be able to pump water in sufficient quantity because of an air bubble.
If that happens, the low water indicator turns on.
Press the ON/OFF key again to solve the inconvenience.

Disposal of the appliance
The symbol of the crossed-out wheeled bin indicated on the product and on the accompanying documentation indicates that the product itself is subject to Directive 2012/19/EU that regulates the collection, the management, the treatment and the disposal of waste from electric and electronic equipment (WEEE).
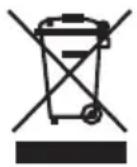
Therefore, when the product reaches the end of its useful life, it must not be disposed of as a normal mixed municipal waste, but instead it must be subject to waste sorting at authorized collection centres.
The responsible disposal of waste from electric and electronic equipment contributes to ease the sustainable reuse and recycling of material resources, as well as to avoid possible damages to the environment and to human health caused by uncontrolled disposal of waste.
Local administrations create specific centres for WEEE waste sorting. For more detailed information regarding WEEE take-back and collection systems, it is possible to refer to your local administration or to the local household waste disposal service.
Moreover, at the time of purchase of a new equivalent equipment intended to be used in a household environment, the customer has the right to freely lend, at the rate of one on one, the used equipment to the distributor which will provide for its disposal as required by law.
Professional purchasers are exhorted to contact their own supplier to check the terms and conditions of the purchase contract.

Possible inconveniences
- If the inconvenience isn't part of the ones described below or if, even after the advised intervention, the appliance doesn't work correctly, please refer to an authorized retailer or please contact the assistance service (technical support).
| Problem Possible cause Suggested solutions | ||
| - The compressor works in an abnormal manner with an annoying noise. | - The mains voltage is lower than the advised one. | - Disconnect the appliance and do not reconnect it until when the mains voltage has normalised. |
| - The low water indicator is turned on. | - There's no water in the tank.- Presence of air in the pump. | - Press the ON/OFF key, fill the tank with water, wait 3 minutes and then press the ON/OFF key to restart the appliance. When water reaches the correct level, the appliance automatically restarts.- Open the drain cap and let some water come out. |
| - The indicators on the display are not turned on. | - The fuse is blown- Lack of electrical voltage. | - Replace the fuse- Check that the electrical power cord is correctly connected and that there's voltage in the mains. |
| - Produced ice is too large and the pieces are glued together. | - The selected ice size is not correct.- Ice cubes produced in the previous cycles remained in the water tank.- The evaporator is too low. | - Immediately stop the appliance and do not restart it until when ice in the water tray melts.- Select the M or S sizes for ice.- Slightly move the evaporator. |
| - Ice production conditions. The cycle is right but ice is not created. | - There's no refrigerant in the compressor. The compressor is defective. The fan motor is broken. | - Contact the technical assistance service. |
| - The full ice and low water indicators light up together. | - The water tank is clogged by an ice cube. | - Remove the ice cube, remove the power cord plug and then reconnect it. Press the ON/OFF key and wait two minutes, the appliance automatically restarts. |
| - The appliance works but water is warmer than normal. | - The magnetic valve is broken. | - Replace the magnetic valve; contact the technical assistance service. |
| - The full ice drawer indicator is turned on but there's little ice in the drawer. | - The room temperature is too low. | - Extract the ice drawer and reposition it in its correct position until the indicator turns off, then restart the appliance. |
| - Ice block issues. - Clean the ice drawer. - If the problem persists, please contact the technical assistance service. | ||
| - The low water indicator is turned on but there's water in the tank. | - The level sensor is broken.- Water low conductivity. | - Contact the technical assistance service.- Add an appropriate quantity of salt. |
| - There's little water in the tank but the indicator doesn't light up. | - The level sensor doesn't work correctly.- The level sensor is broken.- Water low conductivity. | - Empty the water tank and clean the level sensor with a sponge.- Contact the technical assistance service.- Add an appropriate quantity of salt. |
P Conventional warranty conditions
This Warranty does not affect your statutory rights under D. Lgs. 02/022002, n. 24.
With this warranty, the manufacturer suggests the Purchaser to address directly a Point of Sale which to comply with the restoration in a fast, safe and unquestionable quality.
This Warranty is effective regardless of the evidence that the defect - resulting from manufacturing defects present at the time of purchase of the device, except as provided in paragraph "d" of this text.
a) Warranty duration: 24 months from date of purchase.
After the first 12 months of warranty, the warranty on the unit will be managed by the Stores within 12 months of legal warranty in strict application of the provisions of Legislative Decree 02/022002, n. 24.
b) The warranty is effective: In case of a request for assistance, the warranty is valid only if you show the warranty certificate together with a document, valid receipt, showing the identification details of the seller, the product and the date on which the purchase was made.
c) Warranty extension: Repair DOES NOT stop nor change the duration of the warranty which will expire on its legal deadline.
d) Limitations of Warranty:
The warranty does not cover any damage resulting from:
- negligence, incompetence, recklessness and carelessness in use (failure to comply with the rules in this manual);
- maintenance not covered in this booklet or performed by unauthorized personnel;
- tampering or interventions to increase the power or efficacy of the product;
- incorrect installation (power supply with a voltage other than that listed on the nameplate and in this booklet);
- improper use of the appliance;
- damage due to normal wear and tear of the components, impacts, falls, transport damage.
- the warranty does not cover the repair / replacement of parts subject to wear during normal use of the product (hooks, kneader, blades, belts, connectors...).
e) Costs: In cases not covered by the warranty, the manufacturer reserves the right to charge the customer the cost of repair or replacement of the appliance.
f) Manufacturer's responsibility: The manufacturer is not liable for any damage that may directly or indirectly affect persons, property or pets as a consequence of failure to comply with all the requirements set out in this "Instructions for Use" booklet and concerning especially the warnings regarding installation, use and maintenance.
How to contact technical support
• Tel. +39 031 722819
• Fax +39 031 722825
info@rgv.it
www.rgv.it
WHITE PAGE
Stamp and Signature of retailer:
Fill in the fields below for the validity of the Warranty
Modello FG12D - Art. Code: 110820
Model
Cognome
Last Name
Nome
First Name
Via n°
Street No.
Città
City
Nazione
Country

Fabbricato da / Manufactured by / Fabriqué par / Hergestellt von:
R.G.V. srl
Via Giovanni XXIII, 11
22072 Cermenate (CO) - Italia
Tel. +39 031 722819 / fax +39 031 722825
e-mail: info@rgv.it
www.rgv.it
Made in P.R.C.
Ed.: 08/2018
- Introduzione
- Gentile Cliente,
- Illustrazioni
- Comandi apparecchio
- Illustrations
- Index
- EN
- Meaning of warning signs in the booklet
- Safety warnings essential before use
- Warnings for Use
- For domestic use only
- Do not spray water or other liquids on the appliance.
- Do not use abrasive or aggressive cleaning agents (such as acids or petrol) to clean the appliance.
- Do not leave water in the tank for too long.
- D
- Supplementary Warnings
- Appliance characteristics
- F Appliance description
- Appliance controls
- Appliance preparation
- H1. CHARACTERISTICS
- H2. AT FIRST USE
- Use drinking water; DO NOT use distilled water.
- Use of the appliance
- L1. KEYS AND INDICATORS
- OFF key
- DE key
- ice drawer icon
- water icon
- e in progress icon
- L2. FUNCTIONING (see figures on page 2)
- DO NOT exceed the indicated level
- Make sure the mains voltage corresponds to what is indicated on the appliance nameplate.
- Cleaning and maintenance
- Never immerse the appliance body (1) in water or in other liquids.
- Disposal of the appliance
- Possible inconveniences
- P Conventional warranty conditions
- How to contact technical support
- Stamp and Signature of retailer:
- Fill in the fields below for the validity of the Warranty
- Modello FG12D - Art. Code: 110820
- Cognome
- Nome
- Città
- Nazione
Brand : RGV
Model : Mojito Ice
Category : Ice cream maker