
SDA1561 - Blender DAEWOO - Free user manual and instructions
Find the device manual for free SDA1561 DAEWOO in PDF.


| Product Type | Blender |
| Brand | Daewoo |
| Model | SDA1561 |
| Power Consumption | 400 W |
| Voltage | 220-240 V ~ 50/60 Hz |
| Jug Capacity | 1.5 L |
| Jug Material | Glass |
| Blade Material | Stainless steel |
| Number of Speed Settings | 2 + Pulse |
| Ice Crushing Function | Yes |
| Safety Lock | Yes (lid lock) |
| Non-slip Feet | Yes |
| Cord Length | 1.0 m |
| Dimensions (W x D x H) | 20 x 18 x 38 cm |
| Weight | 2.3 kg |
| Dishwasher Safe Parts | Jug and lid (top rack) |
| Replaceable Blade Assembly | Yes |
| Colour | White and silver |
| Warranty | 1 year |
Frequently Asked Questions - SDA1561 DAEWOO
User questions about SDA1561 DAEWOO
0 question about this device. Answer the ones you know or ask your own.
Ask a new question about this device
Download the instructions for your Blender in PDF format for free! Find your manual SDA1561 - DAEWOO and take your electronic device back in hand. On this page are published all the documents necessary for the use of your device. SDA1561 by DAEWOO.
USER MANUAL SDA1561 DAEWOO
with coffee and herb grinder
User Manual

Contents
Page No.
2 Contents
3 Reading and Storing the User Manual
3 Important Safety Instructions for Proper Use
6 Explanation of Symbols
7 Description of Parts
7 Before First Use of Your Glass Jug Blender
8 Using Your Glass Jug Blender
10 Using the Pulse Control
10 Using the Grinder
10 Care and Maintenance
11 Recipe Ideas – Smoothies
12 Technical Specification
12 Plug Wiring Information
13 Recycling Information
13 Customer Support
Back Page Warranty Information
READING AND STORING THE USER MANUAL

Before using this product, please read through this manual carefully paying particular attention to the safety instructions. Failure to do so may result in personal injury or damage to the product.
Carefully save this instruction manual for future reference. Ensure the user manual is included when passing the product on to any third parties.
IMPORTANT SAFETY INSTRUCTIONS FOR PROPER USE
When using electrical appliances, safety precautions should always be followed.
Only use the product as described in this user manual. Any other use is considered improper and may result in damage to property or persons.
The manufacturer or vendor cannot be held liable for damages or injury incurred through improper or incorrect use.
- Read and familiarise yourself with all operating instructions before using this Jug Blender.
- Before plugging your unit into the mains supply, visually check that it is intact and has not suffered any transit damage.
- DO NOT use this product with a programmer, timer, separate remote-control system or any other device.
- Check that the voltage indicated on the data plate corresponds with that of the local network before connecting the appliance to the mains power supply.
- DO NOT immerse this appliance in water or any other liquids.
- Close supervision is required when using this appliance near children.
- Never leave this appliance within reach of children.
- This appliance shall not be used by children.
- Keep the appliance and its cable out of the reach of
children.
- Appliances can be used by persons with reduced physical, sensory or mental capabilities or lack of experience and knowledge if they have been given supervision or instruction concerning use of the appliance in a safe way and understand the hazards involved.
- Children shall not play with the appliance.
- Cleaning and user maintenance shall not be made by children.
- DO NOT leave the appliance unattended during use.
- DO NOT leave the appliance unattended whilst connected to the mains supply.
- Always use this appliance on a solid, level, non-flammable surface.
- Protect the unit from moisture whilst using this appliance outdoors.
- Repairs to electrical appliances should only be performed by qualified personnel. Improper repairs may place user at serious risk.
- It is imperative to unplug the mains cable after the appliance has been used, before it is cleaned and whilst being repaired.
- Regular, periodic checks should be carried out on the mains cable to ensure no damage is evident. Should there be any signs of damage the appliance should not be used.
- DO NOT operate this appliance with a damaged plug or mains cable, after a malfunction or after being dropped or damaged in any way.
- DO NOT allow the mains cable to hang over sharp edges or come in contact with hot surfaces.
-
DO NOT allow the mains cable to hang over sharp edges or come in contact with hot surfaces.
-
DO NOT use this appliance for anything other than its intended use.
- DO NOT push objects into any openings as damage to the appliance and/or electric shock may occur.
- This appliance is intended for household use only and should not be used for industrial or commercial purposes.
- Switch off the appliance and disconnect from the mains supply before changing accessories or approaching parts that move in use.
- Grasp the plug, not the cord.
- DO NOT touch the blades whilst the smoothie and soup maker is connected to the mains.
- Wash the blades in warm soapy water, rinse and dry thoroughly.
WARNING! The blades on this blender are very sharp; extreme caution should be taken when cleaning.
Explanation of Symbols
The following warning symbols or words are used in this instruction manual:

Products labelled with UK Conformity Assessment identifies products conforming to UK statutory requirements.
Products labelled with this symbol conform to applicable provisions of the European Economic Area.
This Class 2 symbol indicates that the product is electrically double insulated and does not require an earth connection.

natural_image
Simple line drawing of a trash bin with crossed lines indicating no waste or discharge (no text or symbols)You should now recycle your waste electrical goods and in doing so help the environment. This symbol means waste electrical products at the end of their useful life should not be disposed of with normal household waste and not sent to land fill. Please ensure it is taken to a suitable facility for disposal. Check with your Local Authority or retailer for recycling advice or visit www.recycle-more.co.uk, enter your postcode to find out your nearest recycling site.

This symbol provides useful additional information on the use of this product.
WARNING!
This designates a hazard with moderate risk, which may result in severe injury if not adhered to.
Description of Parts
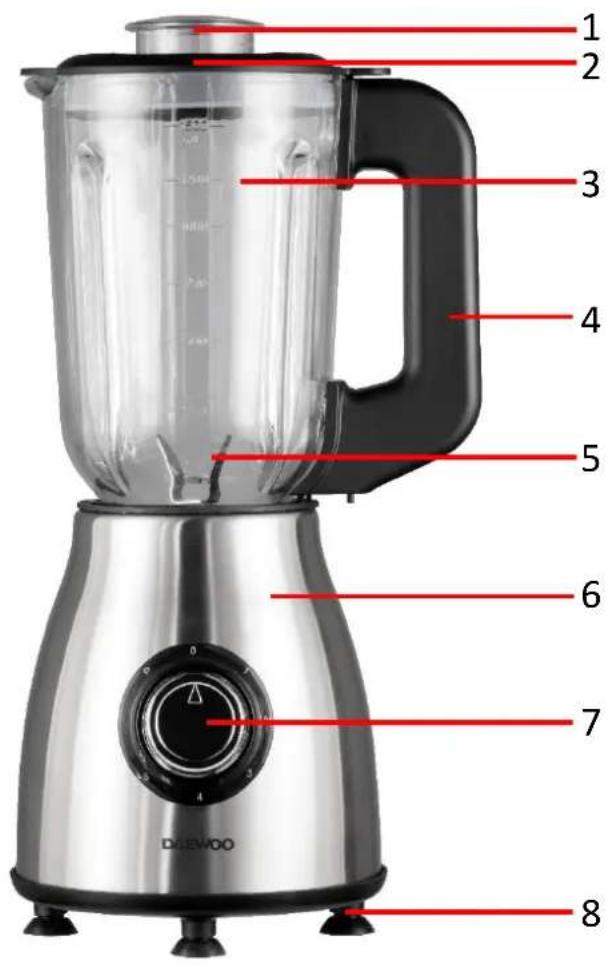
- Measuring Cup
- Jug Lid
- Glass Jug
- Jug Handle
- Blending Blade
- Motor Unit
- Speed Control
- Non-Slip Suction Feet
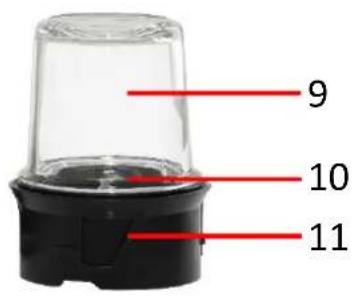
- Glass Grinder Jar
- Grinder Blade
- Grinder Base
*Product may differ from images shown above
Before the First Use of Your Glass Jug Blender
- Remove all packing materials and discard responsibly.
- Ensure all parts are present see Description of Parts above.
- Remove the Glass Jug (3) and wash in warm soapy water, rinse and dry thoroughly.
- Do not immerse the Motor Unit (6) in water or any other liquids.
- Do not use harsh or abrasive cleaners.
- Not Dishwasher safe, do not clean any part of your Jug Blender in a dishwasher. Hand wash only.
WARNING! The blades on this Jug Blender are not removable from the inside of the jug and are very sharp; extreme caution should be taken when cleaning the inside of the jug.
WARNING! DO NOT use the blender to process hot foods or liquids.
i Add a little water when blending fruit and vegetables.
Using Your Glass Jug Blender
-
Place the Motor Unit (6) on a solid level surface.
-
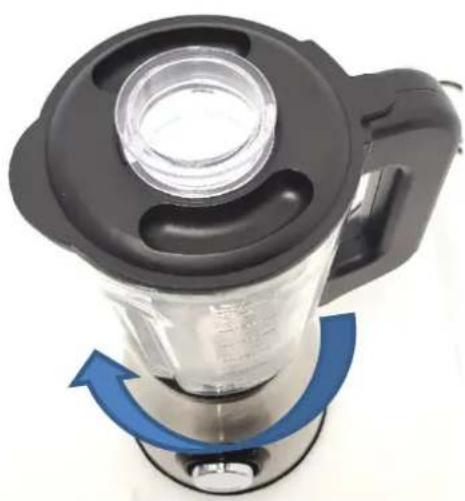
Place the Glass Jug (3) onto the Motor Unit (6) ensuring that the indents on the Glass Jug (3) align with the inner markings on the Motor Unit (6).
natural_image
Close-up of a black blender with blue and white arrows indicating rotation (no text or symbols visible)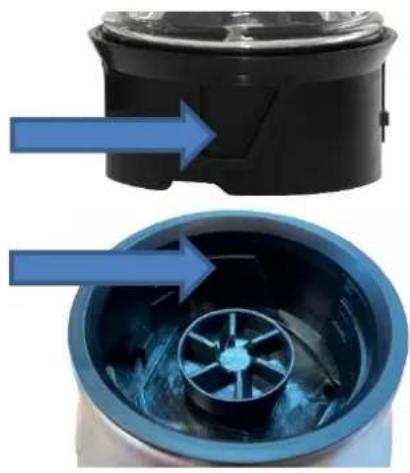
natural_image
Two views of a black electric cooker with blue arrows pointing to internal components (no text or symbols visible)-
Rotate the Glass Jug (3) clockwise, until the Glass Jug (3) clicks and locks into place.
-
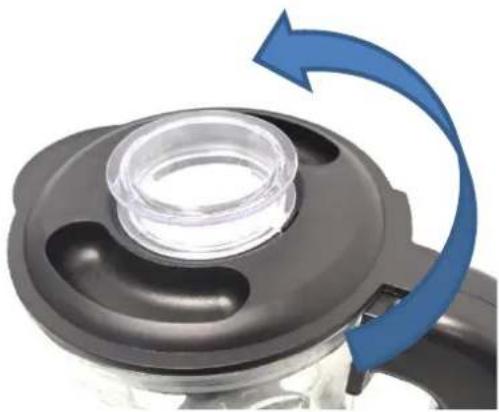
Rotate the Jug Lid (2) anticlockwise to remove, add the ingredients to be blended into the Glass Jug (3), replace the Jug Lid (2) by rotating clockwise, until it clicks and locks into place.
The Jug Lid (2) must be locked in place for the blender to operate.
natural_image
Close-up of a mechanical component with a blue arrow indicating rotational motion (no text or symbols)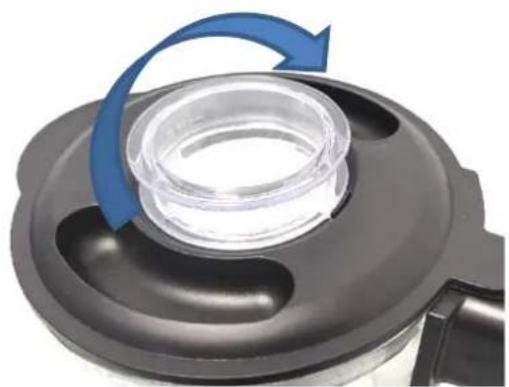
natural_image
Close-up of a black plastic kitchen sink with a blue arrow indicating rotation or movement (no text or symbols)- Remove the Measuring Cup (1) in the centre of the Jug Lid (2) clockwise to add further ingredients. Replace the Measuring Cup (1) before use.
i Ensure the ingredients do not exceed the 1500ml (max) mark on the Glass Jug (3).
- Ensure the Speed Control (7) is in the '0' position and insert the mains plug into the socket (ensuring hands are dry):
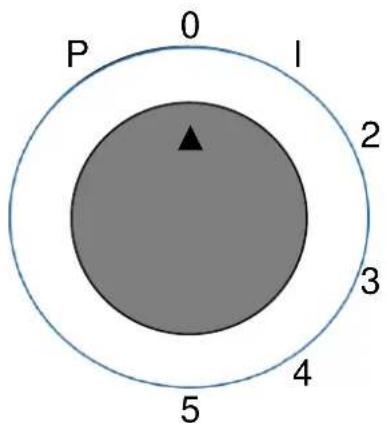
- Turn the Speed Control (7) to pulse 'P' several times for pre-blending.
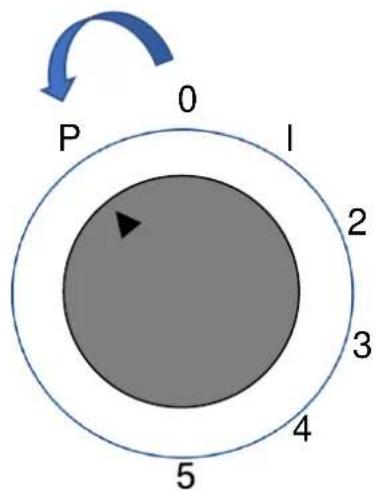
- Rotate the Speed Control (7) clockwise for the speeds from 1 to 5. The speed can be changed at any time during the blending process. Ideally, start blending on speed '1' and increase to a '5' speed if necessary to blend until desired consistency is reached. For ingredients that require short burst of power, use the pulse 'P' function.
- If you wish to add further ingredients during blending, switch off the blender by returning the control knob to the '0' position and twist off the Measuring Cup (1) and add the ingredients through the chute, then refit the Measuring Cup (1) by twisting it back on and continue blending.
- Once the ingredients are blended, return the Speed Control (7) to the '0' position and remove the mains plug. Hold the base unit, grasp the jug handle and lift upwards off the Motor Unit (6), rotate the lid anticlockwise and remove and pour the blended contents out.
i Ensure that the Lid is fitted at all times whilst blending and never remove the lid mid blending cycle.
Using the Pulse Control
The “Pulse” setting allows you to quickly blend ingredients, which is ideal for larger foods such as chunky vegetables. To use this function simply rotate the Speed Control (7) anticlockwise from the ‘0’ off position to the ‘P’ position.
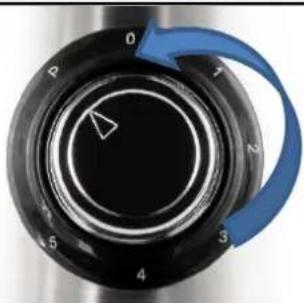
natural_image
Close-up of a black rotary knob with numbered segments and a blue curved arrow indicating rotation (no text or symbols)Using the Grinder
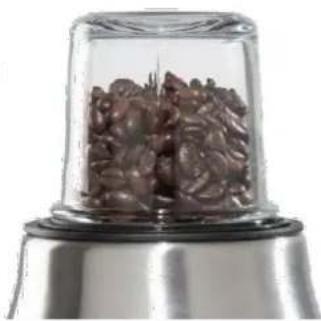
- Place the ingredients into the Glass Grinder Jar (9) and screw the Grinder Base (11) into place.
- Align the Grinder Base (11) with the inner markings of the Motor Unit (6) as per step 2 in Using Your Glass Jug Blender above.
- Rotate the Glass Grinder Jar (9) clockwise until it clicks and locks into place.
-
Ensure that the Speed Control (7) is set to the '0' off position.
-
Plug the unit into the mains supply.
-
Select the desired speed on the Speed Control (7) to grind ingredients.
natural_image
Close-up of a kitchen blender with brown food being filled in liquid (no text or symbols visible)Do not run the grinder for more than 30 seconds at a time.
-
Allow the Grinder Blade (10) to come to a complete stop before removing the Glass Grinder Jar (9) from the Motor Unit (6).
-
Turn the Glass Grinder Jar (9) upside down, allow the ingredients to fall to the bottom of the upturned Jar and carefully remove the Grinder Base (11).
WARNING! DO NOT use the grinder to process hot foods or liquids.
Care and Maintenance
- Always disconnect the Jug Blender from the mains power supply before cleaning.
- Remove the Glass Jug (3) and wash in warm soapy water, rinse and dry thoroughly.
- Do not immerse the Motor Unit (6) in water or any other liquids.
- Do not use harsh or abrasive cleaners.
- Not Dishwasher safe, do not clean any part of your Jug Blender in a dishwasher. Hand wash only.
Recipe Ideas – Smoothies
Your blender is perfect for making refreshing smoothies, the 1.5L capacity provides ample volume for multiple servings. Please see the following smoothie recipe ideas for you to try;
Fruit Smoothie
Ingredients
250g Red Grapes
200g Strawberries
120g Banana (peeled)
150g Ice Cubes
Method
- Place all ingredients into the Glass Jug in the order listed above and secure the lid.
- Start the blender on its lowest speed and then gradually increase to its highest speed.
- Blend for 1 minute, or until desired consistency is reached. If required add a little water to mix to provide a more liquid consistency.
- Serve immediately.
Fruit Salad Smoothie
Ingredients
50g Green Grapes
85g Orange (peeled)
50g Pineapple (peeled)
25g Cucumber (peeled)
1/2 Carrot (peeled and chopped)
20g Apple
150g Ice Cubes
Method
- Place all ingredients into the Jug in the order listed above and secure the lid.
- Start the blender on its lowest speed and then gradually increase to its highest speed.
- Blend for 1 minute and 30 seconds, or until desired consistency is reached. If required add a little water to mix to provide a more liquid consistency.
- Serve immediately.
Peanut Butter Berry Smoothie
Ingredients
150ml Milk
1 Banana (peeled)
30g Peanut Butter
180g Raspberries
75g Ice Cubes
Method
- Place all ingredients into the Jug in the order listed above and secure the lid.
- Start the blender on its lowest speed and then gradually increase to its highest speed.
- Blend for 1 minute, or until desired consistency is reached. If required add a little water to mix to provide a more liquid consistency.
- Serve immediately.
Technical Specification
| Model No. | SDA1561 |
| Voltage | 220-240V~ 50-60Hz |
| Power | 500W |
| Capacity | 1.5L |
| Class | II |
Non-Rewireable Mains Plug
If your appliance is supplied with a non-rewireable plug fitted to the mains lead and should the fuse need replacing, you must use an ASTA approved one (conforming to BS 1362 of the same rating). If in doubt, consult a qualified electrician. Never use a mains plug with the fuse cover missing.
If you need to remove the plug – DISCONNECT FROM THE MAINS – and then cut it off the mains lead and immediately dispose of it safely. Never attempt to reuse the plug or insert it into a socket outlet as there is a danger of electric shock.
Recycling Information
Disposal of the Packaging
Dispose of paper and cardboard in appropriate paper re-cycling facilities.
Dispose of recyclable plastics in appropriate plastic re-cycling facilities.
Dispose of non-recyclable plastics in the appropriate plastics collection service.
Disposal of the Product

You should now recycle your waste electrical goods and in doing so help the environment. This symbol means waste electrical products at the end of their useful life should not be disposed of with normal household waste and not sent to landfill. Please ensure it is taken to a suitable facility for disposal. Check with your Local Authority or retailer for recycling advice or visit www.recycle-more.co.uk, enter your postcode to find out your nearest recycling site.
Customer Support
Should you require any product information, replacement parts or accessories, please contact our customer care team at help@daewooelectricals.com or call 0161 831 7879.
● Replacement parts and accessories are guaranteed for 1 year from the date of purchase.
- It is important to note that your warranty becomes invalid should non Daewoo parts or accessories be used with this appliance
UK CA
CE回

WARRANTY
Thank you for purchasing your Daewoo product.
As part of our commitment to quality, we are offering you an extra 2 years warranty in addition to your 1 year guarantee
Your Daewoo product is guaranteed for 1 year from the date of original purchase, with proof of purchase or receipt. If any defect should occur due to faulty workmanship or material, your faulty product should be returned to the place of purchase, replacement or refund is at the discretion of the retailer.
The guarantee is subject to the following provisions:
- The product must be correctly installed and operated in accordance with the requirements contained in the instruction manual.
- The product must be used solely for domestic purposes.
- It does not cover general wear and tear, damage, misuse or any consumable parts.
- The guarantee will be rendered invalid if the product is re-sold or has been damaged through inexpert repair.
- The guarantee is only valid within the UK and Eire.
Your standard 1 year guarantee will only be extended to the maximum available for your individual product upon registration. (Note: products must be registered individually and covers the main body and housing). If you do not register your product within 28 days of the original purchase date, your product will only be guaranteed for 1 year.
To validate your extended 2 year warranty*please register your purchase online within 28 days of the original purchase date by registering at https://help.daewooelectricals.com
or Contact Us (daewooelectricals.com)
*Your extended warranty is only valid with proof of purchase receipt and subject to the conditions outlined above.
Daewoo is a registered trademark. Produced and imported under license by Eurosonic Group Limited Brightgate House 1 Brightgate Way Manchester M32 0TB UK EU Rep: EuroSonic Magppie (ESM) Ltd. Ireland D05 X006 www.esgld.com
- Contents
- READING AND STORING THE USER MANUAL
- IMPORTANT SAFETY INSTRUCTIONS FOR PROPER USE
- children.
- Explanation of Symbols
- WARNING!
- Description of Parts
- Before the First Use of Your Glass Jug Blender
- Using Your Glass Jug Blender
- Using the Pulse Control
- Using the Grinder
- WARNING! DO NOT use the grinder to process hot foods or liquids.
- Care and Maintenance
- Recipe Ideas – Smoothies
- Fruit Smoothie
- Method
- Fruit Salad Smoothie
- Peanut Butter Berry Smoothie
- Non-Rewireable Mains Plug
- Recycling Information
- Disposal of the Packaging
- Disposal of the Product
- Customer Support
- WARRANTY
Brand : DAEWOO
Model : SDA1561
Category : Blender