
UC1 - Interface hub Grimm Audio - Free user manual and instructions
Find the device manual for free UC1 Grimm Audio in PDF.


| Product Type | USB Audio Interface & Monitor Controller |
| Dimensions (W x D x H) | 435 x 230 x 44 mm (ex. rack ears) |
| Weight | 3.5 kg |
| Power Supply | 90-240 VAC, 50/60 Hz, 30 W, Fuse F630 mA |
| Wood Front Panel | Padauk, oil finish |
| Sample Rates | PCM 44.1 kHz - 192 kHz |
| Analog Inputs | 2x XLR (AES), 1x 6.3mm stereo jack (1 MOhm impedance) |
| Analog Outputs | 4x XLR (AES), 1x 6.3mm headphone |
| Digital I/O | AES3 on XLR (2 in, 1 out), BNC Word Clock (in/out) |
| USB Connectivity | Back USB (USB Audio Class 2, 18 I/O), Front 'i-put' USB (stereo) |
| Monitor Functions | Main, 2nd out, headphones, mono/side/swap, foldback, compare mode, dim, mute |
| Clock Options | Internal, Word Clock, Digital In 1/2, Digital In 3/4 |
| Clock Jitter | <0.6 ps RMS internal |
| Analog Input Clip Level | +18 dBu or +24 dBu (selectable) |
| Analog Output Clip Level | +18 dBu |
| THD+N (Analog Input) | -105 dB |
| THD+N (Analog Output) | -100 dB |
| SNR (Analog Input) | 115 dB |
| SNR (Analog Output) | 114 dB |
| Split Mode | Increases USB channels to 20 I/O, disconnects phones/2nd out from monitor |
| Standalone Mode | Fixed routing without computer (e.g., Analog in to Digital out) |
| Warranty | 2 years standard, extendable to 5 years |
Frequently Asked Questions - UC1 Grimm Audio
User questions about UC1 Grimm Audio
0 question about this device. Answer the ones you know or ask your own.
Ask a new question about this device
Download the instructions for your Interface hub in PDF format for free! Find your manual UC1 - Grimm Audio and take your electronic device back in hand. On this page are published all the documents necessary for the use of your device. UC1 by Grimm Audio.
USER MANUAL UC1 Grimm Audio
UC1 Mixing and mastering requires a point of reference. A modern workflow demands for a tailored setup. UC1: the Swiss army knife of high quality monitoring.

UC1 - manual
Please read this manual before operating the unit.
Grimm AUDIO
Table of Contents
- Introduction 3
- Important Safety Instructions 5
- Installing 7
- Signal Connections 9
- Operation 14
- Menus 27
- Specifications 34
- Grimm Audio Limited Warranty 36
1. Introduction
The UC1 "Universal Converter" combines an 18 I/O channel USB interface with a versatile monitor controller. It offers broad functionality for mixing and mastering at very high audio quality level, in a comp box. Please read this manual before using the UC1 understand its operation and make optimal use of it versatility.
Applications
loudspeaker system can be connected to a dedicated XLR output pair that runs in parallel to the headphone output on the front that offers a third monitor option. Several monitor tools such as mono, side and stereo Next to the monitor paths, the UC1 offers a stereo analog and a stereo digital effect loop. Through these, outboard gear can be used in your DAW project. Audio levels can be monitored on a special meter display with high res peak meters.
The number of application examples for the UC1 is Furthermore the UC1 offers inputs that can be used for endless. Its main intended use however is to function according into your DAW or just for monitoring. These the center piece of a modern mixing or mastering setup a second stereo digital input on the back, a stereo in a professional audio studio. Let's have a look at howalog jack input on the front and a second USB input to use the various inputs and outputs in this context on the front, called 'i-put'. The stereo jack input has high. The back USB is connected to your DAW computer. Input impedance, so it is equally well suited for main monitor loudspeaker can be connected to one of
three options: the digital RJ45 Grimm LS1 ^1 / PMC connector, an analog XLR pair, or the digital AES3 XL output. In the menu you select to which output your main monitor is connected. A secondary smaller
1 The UC1 needs to reboot in PMC mode to send the right instructions to your digital PMC loudspeaker. Please read chapter 4 Signal Connections, under "On the back" for instructions about how to boot the UC1 in PMC mode.
recording a stereo MP3 player as DI instrument recording.
routing setup. In this mode the clock settings need to be changed in the UC1 menu. When using the UC1 with the back USB connector, the computer OS controls all clock
The UC1 offers a 'Foldback' function on a few inputs, options and the clock menu of the UC1 is greyed out. which means it can offer latency free monitoring of these inputs on headphones, mixed with the selected Last but not least the UC1 offers a BNC word clock input main audio source (for instance from the back USB). And output to synchronize the UC1 with other polarity switch makes sure your headphones are in converters in your setup. The clock quality equals that phase with your acoustic sound in case you're using of Grimm Audio's CC1 and CC2 master clocks. microphone.
In 'Split mode', the secondary path ('2nd out' XLR's and phones) is disconnected from the monitor path. Hence there will be no phones and 2nd out monitoring anymore. Instead these channels become an extra fixed output pathway, increasing the total USB channel count to 20 I/O channels. If you like, all 6 analog XLR channels are now available for simultaneous USB playback.
Most people will use the UC1 as a USB interface. It is however also possible to use the UC1 as a standalone converter and monitor controller, without computer connection. The 'Standalone' mode engages a fixed
2. Important Safety Instructions
Please follow these precautions when using this product:
contRead these instructions.
- Keep these instructions.
- Follow all instructions.
- Dangerous voltage is inside this apparatus. Opening is only allowed by qualified service personnel.
Do not defeat the safety purpose of the polarized o grounding-type plug. A polarized plug has two blades with one wider than the other. A groundingtype plug has two blades and a third grounding prong. The wide blade or the third prong are provided for your safety. When the provided plug does not fit into your outlet, consult an electrician for replacement of the obsolete outlet.
- Protect the power cord from being walked on or 13 pinched, particularly at plugs, convenience receptacles, and the point where they exit from the apparatus. 14
- Unplug this apparatus during lightning storms or when unused for long periods of time.
- Do not use this apparatus near water.
- Do not use this apparatus outside.
- Do not expose the apparatus to dripping or splashing. Do not place objects filled with liquids (flower vases, drink cans, coffee cups, etc) on the apparatus.
- Clean only with a dry, soft, non-fluffy cloth. Do not spray any liquid cleaner onto the cabinet, as this may lead to dangerous shocks. Do not spray any 17. liquid cleaner onto the faceplate, as this may damage the wooden front panel.
- Install in accordance with the manufacturer's instructions.
- Do not install near any heat sources such as radiators, heat registers, stoves, or other apparatus (including amplifiers) that produce heat. Avoid exposure to direct sunlight.
- Use only attachments or accessories specified by the manufacturer.
- Use only with a cart, stand, bracket, or table designed for use with professional audio or music equipment. In any installation, make sure that injury or damage will not result from cables pulling on the apparatus and its mounting. If a cart is used, use precaution when moving the cart/apparatus not combination to avoid injury from tip-over.
This apparatus typically runs warm when operated. Install in a normal ventilated area. If the product will be used in a rack, make certain there is sufficient ai movement within the rack. Preferably offer some
empty rack space above the unit and do not place it.3. Installing on top of hot equipment.
Unpacking and Inspection
- Refer all servicing to qualified service personnel.
Servicing is required when the apparatus has been Your UC1 was carefully packed at the factory and the damaged in any way, such as when the power-packaging it came in was designed to protect it from the supply cord or plug is damaged, liquid has been trials and tribulations of shipping. Keep the box and all spilled or objects have fallen into the apparatus, packing materials, so that in the unlikely event that you apparatus has been exposed to rain or moisture, need to return the UC1 for servicing, you can do so does not operate normally, or has been dropped safely.
- WARNING: To reduce the risk of fire or electric shock, do not expose this apparatus to rain or moisture.
AC Power Hookup
The UC1 has a ‘full mains’ switch mode power supply that works with all choices of mains voltage world wide. This SMPS is developed by Grimm Audio and offers the highest possible sound quality. For your safety and for optimal sound quality, always use a power outlet with proper safety earth.
The UC1 is shipped with a mains cable. Grimm Audio cannot be held responsible for problems caused by using the UC1 with improper AC wiring.
The UC1 does not have a power switch on the front. The UC1 does not produce strong RF fields nor is panel, it needs to be powered down with the mains susceptible to them. You can position it near other switch at the back. A convenient way to power down digital gear such as computers and disk recorders unit is to use a power strip equipped with a switch, without worry. In general it is a good idea to keep some power sequencer. distance between monitors (LCD and CRT) and audio cables because of risk of induced low level noise due to
The high sound quality DC coupling of the UC1's analogy magnetic fields.
outputs may result in a popping sound when turning off
the unit while the downstream monitor system is stillGrimm Audio products have a real wooden face plate turned on. We recommend to use a manual or that provides a beautiful and vivid appearance. The UC1 automatic power up and power down sequence as front panel is made of Padauk. The panel is finished follows: first turn the UC1 on and then the monitors with an environmentally friendly oil. To maintain the And at the end of your working day, first turn off that standing looks, one is advised to take some monitors and then the UC1. precautions:
Mounting the UC1
- Use a dry woolen cloth to clean the wood.
- Do not place the UC1 in very dry environments.
Since high quality audio electronics draw above average Do not use chemical or alcohol based cleaner on current, the UC1 runs warm. Note that the bottom plate the wood.
is used as a heat sink, there is no active cooling. Please
allow for sufficient air movement around the unit.
- Avoid exposure to direct sun light, since the padauk wood is susceptible to discolor in UV light.
- Signal Connections

On the back
mastering studios. The analog inputs on the back can optionally be switched to a clip level of +24 dBu so one
The USB connector on the back offers a USB Audio class drive vintage outboard gear to the max without 2 compliant interface. It is natively supported by Macclipping the UC1 input that receives their signal. Of OS, Linux and Windows 10. For Windows 7 and Windows 8 we offer a driver that can be downloaded from the UC1 is then lost.
downloads section of the UC1 page of our website
grimmaudio.com. Note that it is recommended to insta the digital inputs and outputs are in AES3 format.
this driver on Windows 10 too.
Leftmost is the 'LS1 control out' cat5 connector. This is not ethernet but a proprietary combination of AES3 and
The UC1 can also be operated without USB, as a highidi control data. We share this type of connector with quality multi-input DAC. In that case 'standalone modeour friends of PMC. If you own a digital PMC needs to be engaged for a default routing, and the loudspeaker such as the TwoTwo, IB2S or QB1 series, source needs to be selected in the UC1 menu in state of C1 can be setup to send the right control data an the computer OS. Please refer to the menu chapter, control its volume and mute function. To do this, please paragraph 'F2' and 'P2', for instructions. follow these instructions:
All analog inputs and outputs on the back of the U@bot the UC1 as PMC loudspeaker controller are XLR's. Our design aim was to avoid sub-D
connectors since they are not of the same quality as Directly after turning on the UC1 a progress bar startup XLR's. The nominal output voltage of all analog display can be seen on the UC1 screen. While this bar is connections is +4 dBu. This is aligned to -14 dBFS, visible, first press the top button, hold it and then press the clip level is at +18 dBu. These are common level bottom button. Release when the bar is gone. Your UC1 is
now in 'PMC mode'. In case you like to return to 'Grimme UC1 can slave to word clock, Digital in 1 and Dig mode, reset the unit to factory default by only pressinginthe. This enables you to monitor and record digital top button during startup. sources that cannot be slaved to the UC1 word clock
UC1's wordclock input provides 75 Ohm termination for Mark that S/PDIF sources can be connected via an a wordclock source. The wordclock output is a 75 Ohm/PDIF to AES adapter cable (that can be found in the source. The UC1 clock circuitry is of similar reference Grimm Audio webshop).
quality as that of our CC1 and CC2 master clocks.
The PLL that synchronizes the UC1's internal clock to th If you use more than one audio interface with your external clock is of a very special kind. It achieves loc computer, we recommend to make the UC1 master andry fast and then gradually increases its jitter sup-slave the extra devices via word clock. Make sure all pression down to very low jitter frequencies, effectively interfaces are properly synchronized, otherwise glitches only following very slow drift of the source clock. This occur. To use multiple interfaces in Macintosh proprietary 'Hybrid PLL' technology offers the best of computers you need to make an "Aggregate Device" in both worlds: instant lock so there is no gap when the 'Audio Midi Setup' app, which combines the inputswitching sample rates, and high jitter suppression as and outputs of all devices. For more information readwell. Standard PLL's will either lock fast or offer high https://support.apple.com/en-us/HT202000. In Windows jitter suppression.
systems it is more complicated. ASIO does not support
aggregated devices unfortunately. The workaround is toThe UC1 has two digital stereo inputs. Please note that use the ASIO4ALL driver that can combine USB Audio your DAW can only record data from these sources if Class 2 devices such as the UC1 and present them they are synchronous with the UC1 clock. To achieve one ASIO device. For more information visit asio4all.org this, you can slave the UC1 system to digital input 1 c
but not to both at the same time. If you like to from both inputs simultaneously, please make sure all devices that are not used as clock source are synchronized by means of the UC1 word clock or outputs.
On the front
record the UC1 sample rate cannot be controlled from the front USB. As a result the UC1 can only play audio from the front USB input if the playback sample rate of the AED device is the same as the current UC1 sample rate. In case the device playback sample rate does not match the UC1 sample rate, the i-put meters in the main and secondary displays are red lined and the sound is muted.
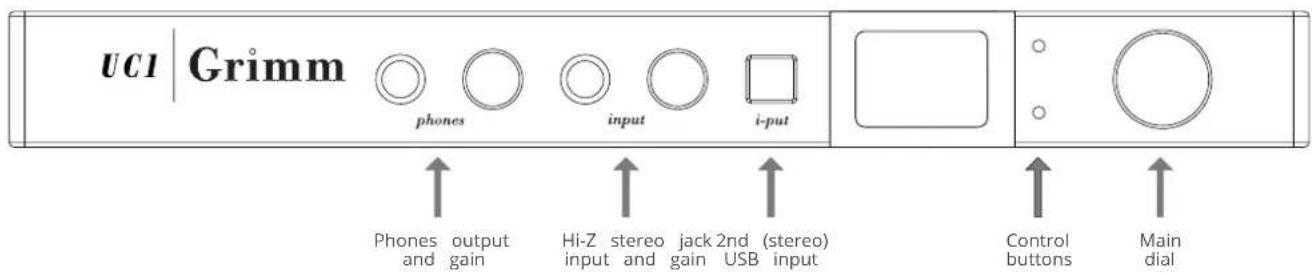
A unique feature of the UC1 is its front USB input, the 'i-
put'. It is intended to connect a secondary stereo USB. If you like to connect an Apple smart device such as source such as a laptop or smart device to the UC1a and iPhone or iPad, a special conversion cable called your DAW. This front USB works without driver on Lightning to USB3 camera adapter cable" or "USB-C to OS, Linux, Windows 10, iOS and Android. USB adapter cable" (depending on your device) is Smart devices are often connected wireless to a computer. The advantage of using the i-put with a s device is that in contrast with wireless connections a sample rates and bit depths are supported and data transferred bit transparent. It may also offer you a reliable connection.
To use the USB front i-put, please note these two important instructions:
Tise front analog input is a stereo unbalanced 6.3mm piece with a gain control next to it. It can be used for instance when someone brings in an analog MP3 player with a reference track. This input has a high input impedance of 1 MOhm so it doubles as an instrument input to for instance dub a guitar or bass line in your
mix. The monitor system of the UC1 can be set to audition this single channel input mono on both channels.
Leftmost on the front is a 6.3mm headphone output with gain control. The acoustic sensitivity of headphones on the market varies by as much as 30 dB. Consumer ear buds are more or less standardised on a sensitivity of approximately -14 dBu for 100 dBA. Some professional 600 Ohm headphones however may need as much as 15 dBu to reach 100 dBA. The UC1 is targeted at the professional audio market and therefore offers enough gain to drive these headphones.
Please be aware that with sensitive headphones the UC1 can produce sound pressure levels that can cause immediate and serious hearing damage! Grimm Audio does not take any liability to hearing loss when using the UC1. Please act responsibly and protect yourself!

flowchart
graph TD
    A["Computer"] --> B["Analog FX"]
    B --> C["Digital FX"]
    C --> D["2nd speakers"]
    D --> E["Main speakers"]
    E --> F["Headphones"]
    G["Digital Emulator"] --> H["(clock)"]
    I["Guitar"] --> J["Bass"]
    K["Laptop"] --> L["Main speakers"]
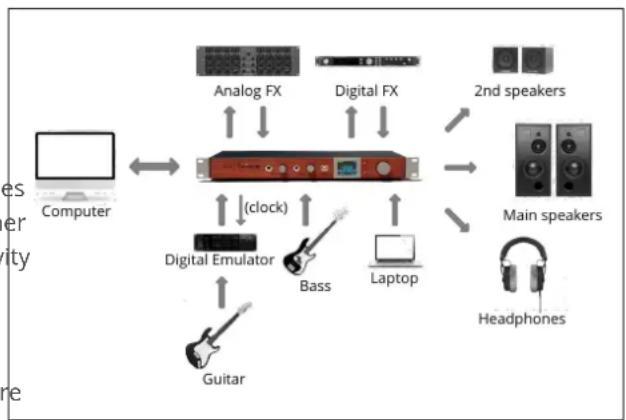
Figure 1. UC1 application example.
Figure 1 shows a typical application example of the UC1. The DAW runs on the Computer on the left, but audio can also be played from the Laptop to the second USB 'i-put'. A Bass guitar is connected directly to the front jack, a Guitar via a Digital Emulator to a digital input on the back. The Emulator is synchronised via word clock, which also improves its sound quality. There's an Analog and Digital effects loop. Monitoring can be done on Main and 2nd speakers and Headphones.
5. Operation
The UC1 functions are controlled with the main dial the right in combination with the two small push
'Hidden functions' of the UC1
- Press the main dial briefly to mute the main speakers and turn on the headphone output. briefly again to return to the main speakers.
- Press-hold the main dial until the indicated so starts blinking. Then turn to change the more source. Release to select. Alternatively, release dial when the blinking starts. Then turn to source. Press briefly to select.
- Press-hold the top control button to enter the metering display. Press-hold again to exit.
- Press-hold the bottom control button to exit a enter Foldback mode, when enabled via the
- Check chapter 4 Signal Connections, "On the for instructions about how to set the cat5 to PMC digital monitor control or reset the factory default settings.
buttons next to it. But before we look at that in more detail, let's first walk through the internal routing of the device.
Routing
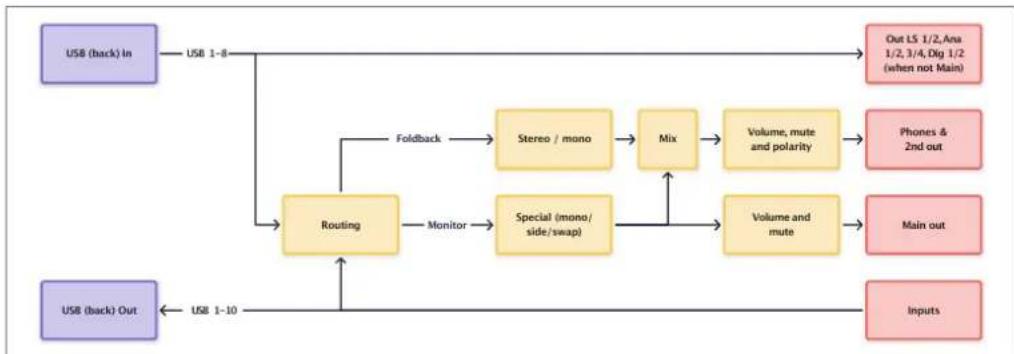
Figure 2 shows the routing diagram of the UC1 in 'normal mode'. All 10 inputs are routed to their respective USB channels transparently without any form of processing. Similarly all 8 USB channels from the DAW flow unaltered to the outputs on the UC1 - except for the 2 USB channels that are associated with the main output. Mark that one can still audition the USB sources of that pair, but only via the monitor path that's described in the next paragraph. We recommend to assign these USB channels to the master channels of your mixing desk.
The yellow blocks in figure 2 show the monitor path of the UC1. All 18 I/O channels can be routed to this monitor path. They can be auditioned in their original stereo form, or in mono (L+R), side (L-R) or in swapped
flowchart
graph TD
    A["USB (back) In"] --> B["USB 1-8"]
    B --> C["Routing"]
    C --> D["Monitor"]
    D --> E["Special (mono/ side/swap)"]
    E --> F["Mix"]
    F --> G["Volume, mute and polarity"]
    G --> H["Phones & 2nd out"]
    C --> I["Folder"]
    I --> J["Stereo / mono"]
    J --> K["Main"]
    E --> L["Volume and mute"]
    L --> M["Main out"]
    A --> N["USB (back) Out"]
    N --> O["USB 1-10"]
    O --> P["Inputs"]
    B --> Q["Out LS 1/2, Ana 1/2, 3/4, Dig 1/2 (when not Main)"]
Figure 2. UC1 internal routing in normal mode.
flowchart
graph TD
    A["USB (back) In"] --> B["USB 1-10"]
    B --> C["Routing"]
    C --> D["Monitor"]
    D --> E["Special (mono/ side/swap)"]
    E --> F["Volume and mute"]
    F --> G["Main out"]
    H["USB (back) Out"] --> I["USB 1-10"]
    I --> C
    C --> J["Folder"]
    J --> K["Stereo / mono"]
    K --> L["Mix"]
    L --> M["Out LS 1/2, Ana 1/2, 3/4, Dig 1/2 (when not Main)"]
    L --> N["Phones & 2nd out"]
    L --> O["Inputs"]
    B --> P["USB 1-8"]
    P --> Q["USB 9-10"]
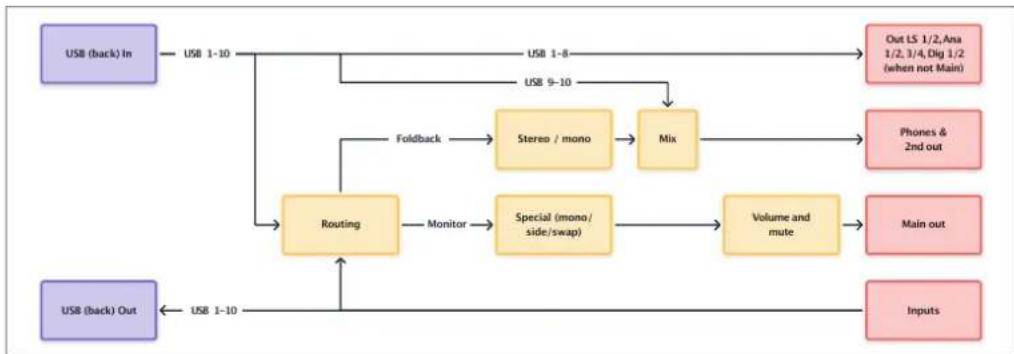
Figure 3. UC1 internal routing in split mode.
channel order form. They then receive digital volume USB inputs 9 & 10, without volume control (except for control & mute (both channels or L or R mute). the knob next to the phones jack). It is still possible to mix in a foldback signal. Read more in the Menu
In a parallel path two other channels can be selected chapter, 'P2'.
'foldback' and mixed with the selected main source. This
is most helpful when recording a live instrument or In case the UC1 is used without computer connected to vocals and the latency through the computer OS the back USB, some physical in- and outputs can get a hampers your performance. The foldback can only be fixed routing by enabling 'standalone mode' in menu P2. heard on the phones and 2nd speaker output, to avoid analog in 1&2 is then routed to digital out 1&2 and possible high SPL feedback. For foldback, the back digital in 3&4 is routed to analog out 3&4. The main ou analog (1&2), front analog (3&4) and back digital (1&2) and monitor path selections remain functional for all inputs are available, both in stereo and mono. inputs.
The foldback mix is static. To change the balance, buttons and display
use the faders of your DAW to align the reference
channel levels with that of the recording channels. After most functions of the UC1 are adjusted via the main dia the mixer block, the monitor gain and mute of the and the two control buttons on its left side. Additionally headphones and 2nd speaker output are controlled, there are knobs for the phones output gain and the jack plus the polarity of the phones. input gain.
Figure 3 shows the routing diagram in 'split mode'. The main dial can be turned and pushed. In normal 'phones & 2nd out' channels are now disconnected for operation, turning will change the gain of all monitor the monitor path. In stead they are directly connected paths (main, 2nd and phones) and pushing mutes the
speakers while engaging the headphones output on the dB of clean gain above '0' on the display. In other words: front. When press-holding the main dial, the current a full scale signal will only reach full scale on a monitor source (indicated top left of the display) starts out if the monitor gain is set to +8 dB. This may be blinking. Keep pressing the main dial while turning it seem odd, but the idea is that the '0' indication of the change the monitor source. All inputs and outputs can display is your reference playback level to which you be selected. Their name is shown in the display and always return after a louder of softer playback. This is their channels are highlighted in the meter. When common practice in mastering. The '0' level is usually releasing the dial the indicated source stays selected. aligned with an SPL of 79dBC when playing a SMPTE Alternatively, release the dial when the blinking starts. reference noise signal on a single channel. The Grimm Then turn to select a source and press to confirm. LS1 is factory aligned to that, you may adjust the gain of your 3rd party amplifier to achieve the same result - or
The large number in the display indicates the current to select another acoustic SPL that suits you as monitor gain level in dB's. The monitor outputs offer reference playback level. In case you feel the need to

bar
| Category | Value | |---|---| | inputs | -8.0 | | outputs | -14 | | master | 48.0 |Main screen, USB 1/2 selected Main screen, Digital 1/2 selected, in phones mode

bar
Digital 1/2 phones | Category | Value | |---|---| | phones | -8.0 | | inputs | -1 | | outputs | -14 | | master | -60 | | 2nd out | 1 |adjust the '0' level of the UC1, you can change it InNote that volume control in the internal DSP of Grimm P2 (see chapter 6. Menus). Audio LS1 or PMC loudspeakers that are connected to the cat5 output is always enabled, even when volume control o
Note that the monitor gain can be set to display values. Main out is disabled or when Main out is for instance up to +18, which means that there is 10 dB of positive to Analog 1&2. In the latter case, the cat5 output is gain available in the UC1 to audition very soft noises always routed from USB 1&2, so it does not follow the Note that any signal above -10 dBFS will in that case monitor selection. But it does still forward the volume - please use this extra gain with caution! setting of the main dial to the speakers.
The volume control is in 0.5 dB steps above -17 dB Then knob to the right of the phones jack can be used dB below it. If you have a Grimm Audio LS1 or PMalign the headphones' acoustic level with that of your digitally controlled loudspeaker connected to the cat 5main monitor system. The idea is to switch between output on the back, the volume control takes place speakers and phones (taking off your headphones when the DSP of the loudspeaker. In all other cases the listening to the speakers) and adjust this knob until volume control is in the DSP of the UC1. At volumespeakers and phones sound equally loud to you. From setting '+8' the data to the digital output and built-inthen on just use the main dial for changing your DACs is put through transparently. At other levels the monitor gain and leave the phones control at its digital gain control is properly dithered at 24 bits. calibrated level.
Optionally, volume control of the main out can be disabled in the menu. In that case the indicated monitor the bottom left corner of the display the clock status gain only applies to the 2nd out and phones. of the UC1 is indicated. When the UC1 is connected to computer via the USB connector on the back, these
settings are controlled from the computer Operating System.
When the back USB is not connected to a computer, the clock source can be set manually. Please refer to the menu chapter for instructions. If the UC1 is set to an external source (BNC Word Clock, AES Digital 2), and it is not locked, the clock status turns red blinks.
The current function of the two small buttons is indicated by the text on the display next to them. main screen the bottom button gives access to the key' function, like switching to the '2nd out'. The top button brings you into the menu. Since the first menu page offers access to various monitor tools, this button may be used quite regularly. More details can be found in the menu chapter.
Meters
In the main screen a simple three stage meter indicates the current levels for all inputs and outputs and the current monitor output. The stages are: -1 dBFS to show you're close to clipping; -14 dBFS which is the nominal level of the UC1; -60 dBFS to show presence of signal. Note: When viewing the 'ana 1/2' inputs on the DAW meters slave your computer you may see a static signal when no input signal is present. This is caused by DC offset from the UC1 and converters (a common thing in most AD converter chips). Grimm Audio has disabled the built-in high pass filters of the chip since they affect the sound quality. The DC offset is calibrated during production and the remainder is not the negligible level of app. -80 dB. Use a DC offset removal tool in your DAW if it still poses a problem.
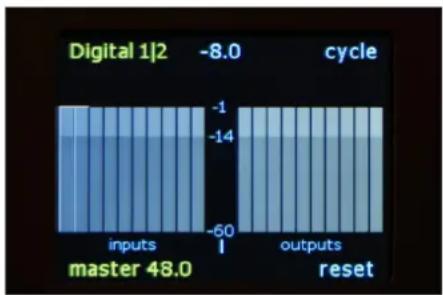
Metering screen, inputs & outputs view
By press-holding the top 'menu' button, the display levels. The nominal level is at -14 dBFS, which is +4 dBFS changes from the main screen to the metering screen on the analog XLR's. The rightmost meters in the "inputs with higher resolution meters. Another press-hold & outputs" and "outputs" screens shows the current brings you back to the main screen. In the metering level and name of the monitor output. In the metering screen the two control buttons have a different screens the current monitor gain setting and destination function: the top button enables cycling through the are indicated at the top in the middle. The monitor three metering screens: inputs & outputs / inputs / source and clock status are indicated just like in the outputs (the latter two offer a larger view with moremain screen. detail, like channel names). The bottom button resets the peak hold. Hint: many mastering engineers use an analog or digital
Hint: many mastering engineers use an analog or digital hardware VU meter. When using Grimm Audio LS1's as
The meters are fast responding sample peak meters, monitors, such a meter can be connected to Analog out 1, intended for quick evaluation of incoming and outgoing. When using 3rd party analog monitors this output is your

Metering screen, inputs view Metering screen, outputs view
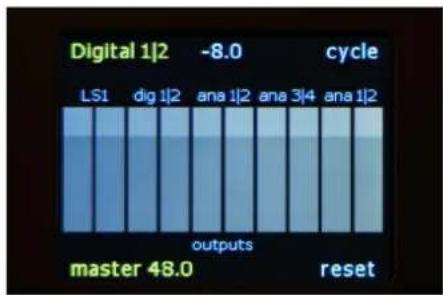
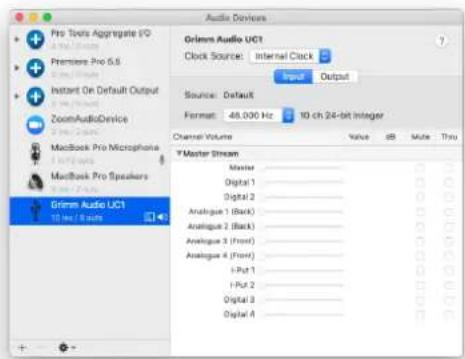
main output. In that case you may consider to assemble a 'Inputs' page all channels have the names of the cat5 to AES conversion cable and connect the VU mete-linked connectors on the UC1 back and front. Note that a spare DAC if the VU is analog) to the 'LS1' cat5 outdigital 1' and 'Digital 2' are from the Digital in 1 XLR. This output is always bit transparent from USB. The catDigital 3' and Digital 4' are from the Digital in 2 XLR. pinning layout can be found in the 'Specifications' chapter control faders in the driver are disabled since the UC1 at the end of this manual. driver transfers all inputs transparently.
USB settings in the computer OS
In the 'Outputs' page, the top 'Master' fader controls the monitor path gain in the UC1. When changing the
The UC1 can be used with Macintosh, Windows and monitor gain in the UC1 you will see this fader move. Linux operating systems. It also works seamlessly with iOS and Android devices, though these will usually only be used with the second (stereo only) USB connector on the front (the 'i-put').
Windows and Linux users, please read the Macintosh description below for general info.
Macintosh
Mac OS offers native support of UC1's USB interface via Core Audio, no driver is needed. All settings are accessible via the Apple 'Audio Midi Setup' app. In the
Mac OS Audio Midi setup UC1 inputs page.
and when moving the fader you will see the monitoramount of digital gain of the monitor path volume gain number on the UC1 display change. In case youcontrol. This is how the OS driver is designed by Apple. disabled 'PC control of midi/volume' in the UC1
preferences menu, the fader can still be moved, but Below the Master fader you see 8 output faders (10 in does not affect the UC1 monitor gain anymore. 'Split' mode). They are disabled (greyed out) since the UC1 transfers the audio data transparent without
Note that when the UC1 display indicates "0", the drive volume control to the outputs. The channel names in will show "-8 dB". This is intentional. The '0' level of the USB driver carry both the USB channel number and UC1 display is a reference level, linked to an acoustic name of the connected physical output. When SPL. The '0' level in the OS driver is related to the monitoring these sources in the UC1, the USB channel

Mac OS Audio Midi setup UC1 outputs page.
numbers are indicated in its display. Mark that 'Digital 1' and 'Digital 2' are the two channels of the single XLR digital output on the back.
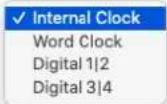
The clock source can be set from the USB driver page. The options are: Internal Clock, Word Clock, Digital 1|2 and Digital 3|4. When the UC1 is in master mode ('Internal Clock'), sample rates from 44.1 to 192 kHz can
Mac OS Audio Midi setup UC1 clock options.
be chosen. In slave mode the UC1 follows the sample Macintosh performance optimization rate of the source, unless this function is disabled in the
UC1 menu. If your DAW is setup for it, the sample when using the UC1 with Cubase / Nuendo you may can be changed from within the application so the UExperience a sudden volume increase when the app is will follow the sample rate of your project automatic started. This is caused by a hidden setting in Cubase/
Nuendo. To change this behavior, please open the 'Studio Setup' under the Studio menu of Cubase/Nuendo, browse to 'Grimm Audio UC1', open the Control Panel and then disable the 'Set Device Attenuation To 0 dB' option.

Disable "Set Device Attenuation to 0 dB" in Cubase / Nuendo.
Some general 'good practice' remarks to optimize Mac OS for use as a DAW are: disable Time Machine, disable Spotlight indexing, disable screen saver and disable energy saver.
Windows
Operating the UC1 on Windows with the Grimm Audio Control Panel is very similar to using it on Macintosh, sc
Windows 10 offers native support of the UC1 via 'US' please read the previous pages for in depth information. Audio Class 2'. However, clock selection is not available below you see screenshots of the Windows Control via this default driver so we recommend to still install Panel Device settings and the Buffer settings. The Grimm Audio Windows driver ('Control Panel'). You optimal ASIO buffer size setting mainly depends on your can find the installer on the UC1 page of the Grimnt computer system performance, it may need some Audio website. Please mind to keep the UC1 turned experimentation to find the best value. The clock and and connected to a USB connector of the PC when output fader settings windows are shown on the next installing this driver.
page. As said, they behave similarly like on a Macintosh, so please refer to that section for more info.

Windows driver Device settings.

Windows driver Buffer settings.

Windows driver Clock settings.
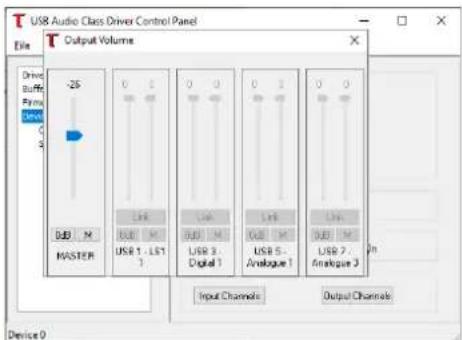
Windows driver Outputs settings.
Updating your UC1 firmware
Occasionally we will release an update to the firmware of your UC1. To keep informed about firmware updates please subscribe to our newsletter at the footer of our website pages. In the downloads section of the UC1 we page at grimmaudio.com the latest firmware can be downloaded. To perform the update you need a Windows computer with the Grimm Audio Control Panel installed. We are sorry that at this moment updating is not possible with a Macintosh or Linux computer.
Before running the update, please check the current firmware version of your UC1 to make sure an update is needed. The firmware version can be found in the UC1 S1 menu (see the next chapter) but also via the OS of your computer. On Windows, open the Grimm Audio Control Panel and select the "Device info" page (as indicated on the previous page). The version is indicated in the "RevisionID" (for instance "0x0100" is version v1.0.0). Compare that to the indicated ID of the update and you will know whether an update of your device is needed.
To check the current firmware version of your UC1 of the latest '.bin' firmware update file can be downloaded Macintosh, open the "System Information" app via from the UC1 page at grimmaudio.com. Store it in a Spotlight, or go to Apple Menu / About this Mac / folder of choice. Next, open the Windows Grimm Audio System Report. Look for 'USB' under 'Hardware'. Here Control Panel and click the 'Firmware Upgrade' tab. the UC1 is listed as "Grimm Audio UC1". Select it and select the downloaded .bin file as 'Firmware Image File'. 'Version' you will find the version of your UC1's firmware. Click 'Start Firmware Upgrade' and wait for the 'Firmware download succeeded' prompt to appear. Do not disconnect the UC1 before the update is finished!
In case an update is needed, first perform a 'Factory
Default' reset as described under the next subheadingPress 'Finish' to finish the firmware upgrade procedure. Click 'Device 0' in the left column, the 'RevisionID' should now indicated the new firmware number.

Windows driver UC1 Firmware update.
Manual UC1 © Grimm Audio
Reset your UC1 to Factory Defaults
In case your UC1 shows odd behavior or when you like to restore all menu items to their original settings, you may restore the factory defaults by pressing the top button while the progress bar is visible during power up.
6. Menus
• Monitor source. You can select all inputs and outputs here by pressing the main dial briefly (the arrow starts
The UC1 has many functions, preferences and system blinking) and then turning the dial. When you reach the setup items that can be controlled from the menu. Last source, the order wraps and the first source enter the menu, press the top button with 'menu' next appears again. To confirm a choice, press the dial again to it on the display. You will see a screen with 6 tables (arrow stops blinking). This item does the same as labeled F1 and F2 for Functions, P1, P2 and P3 for press-hold the main button and then turn. The result is Preferences and S1 for System info. We walk you immediately visible in the left top corner of the display, through all these settings in the pages below. To moved the selected source becomes audible.
to the next tab, press the top button 'next tab'. To exit
the menu, press the bottom button 'exit'. Note that theimm LS1 customers, please note that the UC1 cannot exit button is disabled when an option is selected and select the analog and digital inputs of the LS1 as a its arrow is blinking. Turn the main dial to select a source. In case you need to access these, please use the
function, press to change it, then turn to browse the options and press again to confirm your choice.
F1 menu
Whenever you enter the menu, the F1 page will be available first. This page gives access to monitor functions that are often used.

F1 menu.
LS1 PC Remote software with the UC1. It is not possible to be engaged, this is indicated in the main screen. To combine the UC1 with the LS1r hardware controller. Please mind to not mix the recorded channels into the and LS1i USB interface. The UC1 replaces these. monitor mix of your DAW or you will hear them double.
- Special. After a press of the dial the choices are given in the main screen - as a quick access feature - / mono / side / swap. Note that mono = L+R and 600 press of the bottom button turns off and on L-R (they are also known as 'M' and 'S'). "Swap" flips for back (in case a foldback source was selected in the left and right channels (this changes your mental menu).
perspective of a mix which can sometimes help to make
decisions). At the end of the dial the order wraps back. Mute. To mute the loudspeakers from the main screen stereo again. This makes it possible to AB compare you just press the main dial. This turns off the selected stereo & mono, mono & side and swap & stereo. If speakers and turns on the phones at the same time: it confirm a choice by pressing the dial once more, the toggles between speakers and phones. In some cases arrow stops blinking. If you then exit to the main screen ever it is helpful to listen to the audio on just one the function is shown in the screen (except for 'stereo' channel. This 'mute' menu item is intended for that. It which is the normal state).
enables you to either mute the left channel or the right channel so you can listen to the audio on just one
- Foldback. With this function the signals from Analogspeaker (you will see "L" or "R" in the main screen if you 1&2 (on the back), analog 3&4 (on the front) or digital confirm your choice, the unmuted channel is shown).
1&2 (on the back) can be mixed with the selected
source. In this menu you choose which signal you like possible uses for this feature are when you use the UC1 mix in for foldback. You may choose to mix them as an improvised setup and you like to check if the stereo pair, or select a mono version of one channelsound color of your left and right loudspeaker positions
is similar (please engage 'mono' for that first so both are running a project with a specified sample rate and channels have the same audio). Another good use case should keep running at that rate, even when by accident of mono sound on one channel is mixing on a smalthe source that you sync to changes sample rate. '2nd' speaker. Many experienced engineers know that making the initial mix balance in mono on a single small out. This flips the monitor path to the 2nd speaker speaker helps to make the right decisions faster. output XLR's on the back (main and phones are muted).
F2 menu
- Compare mode. This mode is used when comparing two sources at equal loudness, for instance when
- Clock. This setting is only available when the back evaluating the impact of a compressor/limiter in the is not connected to a computer (normally the USB hastalog loop. Usually the external processor will have controls the UC1 clock). It allows you to choose all changed the signal's loudness and when flipping sample rates from 44.1 to 192kHz in master mode, between the two sources, this loudness jump hampers to slave to word clock, digital in 1 or digital in 2.
- Autoswitch clock. This setting influences the UC1 behavior when in slave mode. When 'yes' the UC1 clock rate will follow any change of the selected clock source. When 'no', the UC1 will maintain the clock rate that it found when first slaving to the selected clock source. If the source then switches sample rate, the clock indication on the display will turn red and start flashing to indicate it lost lock. The 'no' mode is helpful when you

F2 menu.
a proper quality judgement. In compare mode the volume setting is memorized for every source individually instead of global.
Playback of these channels will be interrupted when another monitor source is chosen.
- Max in Analog 1|2. This preference let's you choose
So if you listen to the first source, adjust the volume between 18 dBu or 24 dBu as maximum modulation (0 taste, then switch to the second source and adjust the dBFS) input voltage. The default is 18 dBu, so that an volume to a similar level. Now, flipping between the analog loop with 0 dB gain shows the same return level sources can be done at equal loudness. To indicate that send level (all UC1 outputs have a maximum compare mode is engaged, the volume number turns modulation at 18 dBu). In case your analog effects loop green. has a vintage device that you like to drive to maximum
P1 menu
has a vintage device that you like to drive to maximum swing, you can change this setting to 24 dBu so the UC input will not clip on such high signal levels.
The P1 menu is the first of three Preference menus. These are settings that are usually only changed to tailor the UC1 to your system setup.
- Main out. Here you select your main monitor output. There are three options: LS1 / PMC on cat5, Dig out 1|2 and Ana out 1|2. The selected output receives volume control and plays the audio from the selected source via the UC1's internal routing. Its 'native' USB channels should be used as main output channels of the DAW.

P1 menu.
- Main out volume. By default it is turned on. SomeIn 'split' mode the 2nd speaker and phones paths are people prefer to use an external analog volume controlled from the monitor system and become an in stead of the internal digital one. They can disable independent path for USB 9&10, without any digital main out volume control here. Volume control of 2nd volume control. The 2nd out and phones channels carry out and headphones will still work. the same signal and are always on. The rightmost
- PC control (midi/volume). In some cases apps on y levels in stead of the monitor output levels. computer can interfere with the Grimm Audio LS1 midi commands that control its DSP functions, or vise vers Split' mode is used in cases where more outputs are In case you experience these kind of problems, you needed (all 6 DAC channels are now available turn off midi and USB volume communication between independently). A typical use case is a small studio the computer and the UC1 entirely by turning the recording setup, where a musician is recorded in a preference 'off'. Please mark that the LS1 'PC remote booth. The USB 9&10 path is used to send a dedicated
software' then looses its communication path. If you need to change internal settings of the LS1, you can temporarily enable this preference, run the PC remote, and turn the setting off when you're done.
P2 menu
- Monitor mode. In 'normal' mode the three monitor outputs (main, 2nd speaker and phones) alternate. Only one is active at a time.

P2 menu.
mix for the musician to a headphone amp in the bootphones phase. This flips the polarity of the The UC1 Foldback function can be used to add his headphones output. Since there is no official standard instrument with low latency to the USB 9&10 mix. Then the relationship between the electrical signal polarity headphones output of the UC1 can be used by the and the acoustical pressure polarity of headphones, a engineer to monitor what the talent is hearing, while positive going electric pulse can result in a pressure main monitor output plays the final mix, or copies the decrease on some brands' headphones and a pressure talent mix by selecting USB 9&10 as monitor source. Decrease on others. The UC1 polarity switch can be
used to achieve a positive polarity with your
In 'standalone' mode a fixed routing is set. This is intended to be used when the back USB is not connected to a computer. Analog in 1&2 is then ro to digital out 1&2, and digital in 3&4 is routed to out 3&4. The main out and monitor path selections remain functional for all inputs.
microphone / headphones combination so that an increase in pressure in front of your microphone will result in an increase in pressure inside your headphones.
- Soft key. Here the function of the bottom button and thenic preamplifier. Since headphones always show main screen can be selected. You can choose between some leakage from environmental sounds, selecting the 2nd out (switch to 2nd speaker output); special (enable light polarity will improve the coherence of the leaked the selected 'special' function from menu F1, like monoustic sound of your voice with the folded back or side); dim 12 dB (attenuate the output by 12 dB) electric sound. This usually results in a warmer and compare mode (enable the compare mode of menu F2) more pleasant sound experience when singing or fast 0 dB (set the volume level to the current refer speaking. You can find the optimal polarity by talking level).
This option can improve voice foldback monitoring sound quality when using the UC1 with a microphone
engaged, and then switching between normal and inverted phase. Select the version that has most subjective bass.
P3 menu
In this menu a few display related settings can be changed.
- Ref level. When this line is selected, a press on the
main dial stores the current volume level as the new 'Display brightness. This function controls the dB' reference playback level. The procedure is as brightness of the display from 1 to 10.
follows:
- In normal operation, set the volume to your liking• Display auto dim. If auto dim is turned on the display with the main dial. will turn off a few seconds after a control is used.
- Enter the menu, select the menu item 'ref level' in P2,
and then press the main button. This sets the new refMain screen meters. This enables or disables the level of the display. simple 3-stage meter on the main screen. - The playback volume does not change, but the display now indicates '0.0' at this volume level. The ref level menu item shows the current attenuation at a 0.0 display.
The default setting of the ref level is -8 dB, which means that the UC1 monitor output has 8 dB of gain available above the reference setting. If you need more or less 'excess gain', you can change it here.

P3 menu.
S1 menu
This menu shows the hardware and firmware versions. A of your UC1. It also shows if the UC1 is booted in LS1 mode or PMC mode. Please read chapter 4 Signal Connections to learn how to change the UC1 from LS1 mode to PMC mode or back.

S1 menu.
Manual UC1 © Grimm Audio
7. Specifications
Analogue output specifications
■ Clip level: +18 dBu ±0.2 dB
■ THD+N: -100 dB
■ SNR: 114 dB
- Output impedance: <25 Ohm below 20 kHz
- Headphone 6.3 mm stereo jack max 15 dBu in 600 Ohm (30 mW)
■ Analogue input specifications
- Clip level: XLR +18 or +24 dBu ±0.2 dB, Jack -18 dBu to +18 dBu ±0.2 dB
■ THD+N: -105 dB
■ SNR: 115 dB - Input impedance: 20 kOhm below 20 kHz
■ 6.3mm stereo jack input impedance 1 MOhm
■ Digital input and output specifications
■ AES3 on XLR
■ Impedance 110 Ohm
■ Sensitivity 200 mVpp - 5 Vpp
- Clock specifications
■ Sample rates: PCM 44.1 kHz - 192 kHz
- Internal intrinsic clock jitter <0.6 ps RMS (> 10 Hz)
- Clock frequency master mode: 44.1 or 48 kHz ± 20 PPM, -5 +50 °C
- BNC Word Clock 75 Ohm input and output impedance, 5V
■ General specifications
■ Power supply voltage 90-240 VAC, 50/60 Hz
■ Power consumption: 30 W
■ Fuse: F630 mA
- Maximum ambient temperature for operation: 40 °C
■ Life expectancy power supply electrolytics > 45.000 hr
■ Weight: 3.5 kg
■ Dimensions: 435 x 230 x 44 mm (ex. rack ears)
■ Wood type of front: Padauk
LS1 cat5 to XLR AES3 conversion cable
In case you do not have a Grimm Audio LS1 or PMC digital monitor, the LS1 cat 5 output stays unused. The LS1 cat5 does not carry ethernet signals, but AES3 for audio plus bidirectional midi for control data like volume. When you need an extra output, this cat5 output can be turned into an extra AES3 XLR output means of a simple conversion cable. In figure 4 below, the pinout of the cat5 ("LS1") and male XLR connector are given. Please let a skilled technician make such a conversion cable from a cat5 ethernet cable and a male XLR connector.

flowchart
graph TD
    LS1["LS1"] -->|1| XLR["1"]
    LS1 -->|2| XLR["2"]
    LS1 -->|3| XLR["3"]
    LS1 -->|4| XLR["4"]
    LS1 -->|5| XLR["5"]
    LS1 -->|6| XLR["6"]
    LS1 -->|7| XLR["7"]
    LS1 -->|8| XLR["8"]
    XLR -->|1| XLR2["2"]
    XLR2 -->|2| XLR3["3"]
Figure 4. LS1 cat5 to male XLR AES3 conversion cable pinout.
8. Grimm Audio Limited Warranty
warranty shall be resolved as prescribed by law. To obtain warranty service, the purchaser must first call or
Grimm Audio BV ("Grimm Audio") warrants this product write Grimm Audio at the address and telephone to be free of defects in material and workmanship for number printed below to obtain instructions where to period of two (2) years for parts and for a period of two the unit for service. All enquiries must be (2) years for labor from the date of original purchase accompanied by a description of the problem. All This warranty is linked to the serial number of the authorized returns must be sent to Grimm Audio or an device and can be transferred to second hand owner authorized Grimm Audio repair facility postage prepaid, they can show their purchase bill. insured and properly packaged. Proof of purchase must be presented in the form of a bill of sale or some other
The original owner can extend his limited warranty to positive proof that the product is within the warranty period of five (5) years for labor and parts if he be permitted. Grimm Audio reserves the right to update any member of the Grimm Audio Community and sends visit returned for repair. Grimm Audio reserves the right purchase details to the Grimm Audio factory via the to change or improve design of the product at any time webform at grimmaudio.com/warranty. The extended without prior notice.
warranty is enforceable only by the original retail purchaser and cannot be transferred or assigned.
This warranty does not cover claims for damage due to abuse, neglect, alteration or attempted repair by
During the warranty period Grimm Audio shall, at its unauthorized personnel, and is limited to failures sole and absolute option, either repair or replace freerising during normal use that are due to defects in charge any product that proves to be defective on material or workmanship in the product.
inspection by Grimm Audio or its authorized service representative. In all cases disputes concerning this
In no event will Grimm Audio be liable for incidental,© 2022, Grimm Audio BV. All rights reserved consequential, indirect or other damages resulting from
the breach of any express or implied warranty, Grimm Audio UC1 manual v1.2.6v1, 28/9/22
including, among other things, damage to property,
damage based on inconvenience or on loss of use of reproduction in whole or in part is prohibited.
product, and, to the extent permitted by law, damage specifications subject to change without notice.
for personal injury.
Grimm Audio, Veldhoven, The Netherlands
General questions: info@grimmaudio.com
Support: https://www.grimmaudio.com/support-form/
Tel. +31 40 213 1562
UC1 Grimm

Grimm Audio BV
The Netherlands
+31 40 213 1562
info@grimmaudio.com
www.grimmaudio.com


- UC1 - manual
- Table of Contents
- Introduction
- Applications
- Important Safety Instructions
- Please follow these precautions when using this product:
- Unpacking and Inspection
- AC Power Hookup
- Mounting the UC1
- On the back
- On the front
- Operation
- Routing
- Meters
- USB settings in the computer OS
- Macintosh
- Windows
- Updating your UC1 firmware
- Reset your UC1 to Factory Defaults
- Menus
- F1 menu
- F2 menu
- P1 menu
- P2 menu
- P3 menu
- S1 menu
- Specifications
- LS1 cat5 to XLR AES3 conversion cable
- Grimm Audio Limited Warranty
- UC1 Grimm
Brand : Grimm Audio
Model : UC1
Category : Interface hub