
RM167 - Hand blender ROLLS - Free user manual and instructions
Find the device manual for free RM167 ROLLS in PDF.


| Product Type | Hand Blender |
| Brand | Rolls |
| Model | RM167 |
| Power | 500 W |
| Speed Settings | 2 speeds (low/high) |
| Blending Shaft Material | Stainless steel |
| Handle Material | Plastic with soft grip |
| Weight | 0.75 kg |
| Dimensions (L x W x H) | 25 x 7 x 7 cm |
| Voltage | 220-240 V |
| Frequency | 50/60 Hz |
| Cord Length | 1.2 m |
| Color | White and silver |
| Accessories Included | Measuring beaker (0.5 L) |
| Cleaning Method | Wipe with damp cloth; shaft detachable for rinsing |
| Safety Features | Overheat protection; non-slip base |
| Repairability | Spare parts available through authorized service centers |
| User Manual | Available for free download in PDF |
Frequently Asked Questions - RM167 ROLLS
User questions about RM167 ROLLS
0 question about this device. Answer the ones you know or ask your own.
Ask a new question about this device
Download the instructions for your Hand blender in PDF format for free! Find your manual RM167 - ROLLS and take your electronic device back in hand. On this page are published all the documents necessary for the use of your device. RM167 by ROLLS.
USER MANUAL RM167 ROLLS
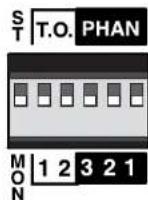
- If a microphone requires phantom power, move the Mic channel's corresponding PHAN DIP switch to the down position. This applies 12 volts DC phantom power to the indicated microphone.
- Talk over switch 1 (T.O. 1), when in the down position, all program material on all source inputs will be "ducked" or muted when a signal is present at Mic 1. NOTE: MIC ONE WILL NOT TALK OVER MIC2 OR MIC3. ONLY THE SOURCE INPUTS WILL BE TALKED OVER. This function is used for paging.
- Talk over switch 2 (T.O. 2), when in the down position, Source 1,2, and 3 will be "ducked" or muted by the signals at Source 4. This function is for jukebox priority. With a jukebox connected to Source input 4, and the Talk over switch 2 on (down), the other Source input signals such as background music, will be muted and only the jukebox will be heard.
- The Mono/Stereo switch selects the output mode. When the switch is up, the unit is in stereo mode. When the switch is down, the stereo signals are mixed to mono and sent to both the Right and Left Main output jacks. Either jack can be used as a mono output.
TO #1 - MIC
TO #2 - PRIOTIRY #4
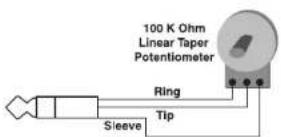
Remote Volume Control
To control the overall volume of the RM167 in a remote location, wire a 100K ohm Linear Taper potentiometer to a 1/4" Tip-Ring-Sleeve plug as shown here.
Mic Insert
To connect a signal processor to the RM167 microphone signal(s), use an insert plug, or cable wired as shown here.
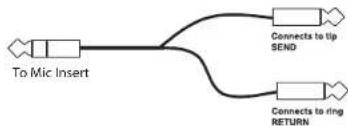
flowchart
graph LR
    A["To Mic Insert"] --> B["Connects to lip SEND"]
    A --> C["Connects to ring RETURN"]
ROLLS CORPORATION SALT LAKE CITY, UTAH 03/24
ROLLS
RM167
Mic/Source Mixer With Bluetooth
SPECIFICATIONS
Input Impedance: Mic: 600 Ohms XLR balanced Line: 22K Ohms
Source: 22K Mic Insert: 22K Ohms 1/4" TS unbal.
Max Input Level: Mic: -14 dBV Mic level +20 dB Line level
Source: 24 dBV
Connectors: 3: XLR, 6: Stereo RCA, 3: 1/4" TRS, 1: 1/4" TS, 1: 3.5mm
Phantom Power: +12 VDC
Output Level: +17 dBV max
Output Impedance: 51 Ohms
Max Gain: Mic: 60 dB
Source: 26 dB
Tone Controls: +/-12 dB 100 Hz Bass
+/-12 dB 11kHz Treble
Noise Floor: - 80 dB, THD: <.025%, S/N Ratio: 96 dB
Size: 19" x 1.75" x 6" (48.3 x 4.5 x 15 cm)
Weight: 5 lbs. (2.3 kg)
Ohms gold plated RCA
NOTE: THIS GUIDE ASSUMES THE USER HAS A WORKING KNOWLEDGE OF AUDIO ELECTRONICS, BALANCED AND UNBALANCED CONNECTIONS, AND PROPER SIGNAL LEVEL SETTING.
Quick Start Guide

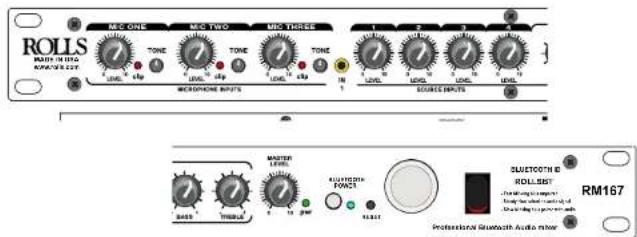
Mic 1 - 3: Adjust the level of signal from the corresponding Mic Input.
Clip 1 - 3: LED indicating overload in the channel. The LED lights 3 dB below clipping.
TONE 1 - 3: Adjusts the frequency content of the signal in the channel. When the control is turned counter-clockwise, the high frequencies are cut, when the control is turned clockwise, the low frequencies are cut.
IN 1: 3.5mm Input jack - resistor mixed to Source Input 1.
Source 1 - 4: Adjust the volume of input from the RCA Source Inputs, and the 3.5mm in.
Bass: Adjusts the low frequencies of the Source signals only.
Treble: Adjusts the high frequencies of the Source signals only.
Master Level: Adjusts the overall volume of the RM167 Main Outputs.
pwr: LED indicating power is applied to the RM167 and the unit is on.
Bluetooth power indicator and switch are to turn off the Bluetooth section of the RM167. The RM167 mixer section will function as normal when the Bluetooth has been turned off. Bluetooth audio is mixed to Source Input 1 level control.
Reset button for disconnection of a paired device that is no longer on, has disconnected from the RM167 or is out of range. If the previously connected device is still on and in range the RM167 will reconnect with the previously paired device.

Mic 1 - 3: XLR inputs for dynamic or condenser microphones, or balanced line-level signals.
Mic/Line Switch: Pads the XLR Mic input by 30 dB when pressed in.
DIP SWITCH: Contains the small switches for engaging Mic 1 - 3 phantom power, the priority (Talk Over) functions, and the Mono/Stereo select.
MIC INSERT: 1/4" TRS insert jack for adding external processing to the Mic signals. Tip = send, ring = return.
SOURCE INPUTS: Stereo RCA jacks, Channels 1 - 4, for connection to stereo sources such as AM/FM tuners, cassette players, CD players, or video players.
RECORD OUT: Stereo RCA jacks, contains all mixed signals before the Remote Volume jack, and Master Level control.
SPARE: This RCA jack is not connected.
MUTE: RCA jack for connection to a tip-to-ground muting circuit. To mute all audio, connect the tip to ground.
REMOTE VOLUME: 1/4"TS jack for connection to a remote potentiometer for master volume control. 100K Ohm audio taper potentiometer is recommended.
MAIN OUTPUTS: 1/4" TRS balanced Right and Left Outputs.
MIC DUCK DEPTH: Adjusts the level of input signal required for ducking to occur. NOTE: The release time is effected by this setting, plus the level of input signal - the higher the input signal, the longer the release time.
PRIORITY #4 DUCK SENSITIVITY: Adjusts the level of input signal required for ducking to occur. NOTE: The release time is effected by this setting, plus the level of input signal - the higher the input signal, the longer the release time.
IEC POWER INPUT: Connect to the IEC power cable - and properly grounded AC outlet.
Brand : ROLLS
Model : RM167
Category : Hand blender