
EMD1500G - Refrigerated display Foster - Free user manual and instructions
Find the device manual for free EMD1500G Foster in PDF.


| Product Type | Refrigerated Display Case |
| Model | EMD1500G |
| Brand | Foster |
| Dimensions (W x D x H) | Approx. 1500 x 800 x 900 mm |
| Weight | Approx. 120 kg |
| Power Supply | 220-240V / 50Hz |
| Power Consumption | Approx. 4.5 kWh/24h |
| Temperature Range | +2°C to +8°C |
| Net Capacity | Approx. 500 L |
| Door Type | Sliding glass doors |
| Defrost Type | Automatic (electric or off-cycle) |
| Refrigerant | R290 (propane) or R134a |
| Climate Class | Class 3 (25°C, 60% RH) |
| Installation Type | Free-standing |
| Interior Lighting | LED |
| Maintenance | Regular cleaning of condenser coils and door gaskets |
| Safety Features | Automatic temperature control, alarm for door open or temperature deviation |
| Spare Parts Availability | Available via Foster service centers |
| Energy Efficiency Class | A (typical) |
Frequently Asked Questions - EMD1500G Foster
User questions about EMD1500G Foster
0 question about this device. Answer the ones you know or ask your own.
Ask a new question about this device
Download the instructions for your Refrigerated display in PDF format for free! Find your manual EMD1500G - Foster and take your electronic device back in hand. On this page are published all the documents necessary for the use of your device. EMD1500G by Foster.
USER MANUAL EMD1500G Foster

Four Steps
to extend the life of your appliance
![graph TD A["1"] --> B["2"] B --> C["3"] C --> D["4"] style A fill:#fff,stroke:#000 style B fill:#fff,stroke:#000 style C fill:#fff,stroke:#000 style D fill:#fff,stroke:#000](/content/2026/05/984345/images/dde1b450c4c5a85d748afff8a505333b7dedaa631b694055c6907e8938f696a2.jpg)
1
Getting to know your new Foster appliance


These instructions should be retained and made readily accessible by personnel using the appliance. The instructions should be read thoroughly prior to appliance installation. Failing to follow the advice contained in this manual may result in damage to the appliance and personal injury to the operator.
All installations must conform to local and municipal regulations and directives. In case of doubt contact your Foster authorised distributor or the Foster Technical Department.
The information contained in this manual is current at the time of publication and is subject to change without notice.

CAREFUL – DANGER
Ignoring this sign and remarks may result in personal danger.

CAREFUL – DANGER
Ignoring this sign and remarks may result in damage to your appliance.

INFORMATION
Useful hints to make the best use of your appliance.
Climate Class
Climate class indicated on the serial plate shows the ambient temperature & humidity at which this appliance has been tested, for the purposes of establishing values in line with European standards.
| Climate Class | Temperature Relative humidity | |
| 3 25°C | 60% | |
Where the product is operated outside the design conditions above excess condensation may occur particularly on (though not limited to) the doors and end panels.
The appliance is delivered with a default operating temperature above the operating temperature to which it is tested to comply with the 'M1' standard. Should it be required to test the product at the M1 standard please follow the link below to obtain the relevant parameter changes necessary.

sterrefrigerator.com/en/erp-testing-parameters

Electrical Safety

This equipment shall be connected to an electrical supply protected by a Residual Current Device (RCD). This may include a residual current circuit breaker (RCCB) type socket, or through a Residual Current Circuit Breaker with overload protection (RCBO) supplied circuit.
Should it be necessary to replace the fuse, the replacement fuse must be of the value stated on the serial label for the appliance.
General Safety

- Do not store explosive substances such as aerosol cans with a flammable propellant in this appliance.
- Keep all ventilation openings in the appliance or in the structure of a built-in unit clear of any obstructions.
- Do not use electrical appliances inside the storage compartment.
- Do not use steam cleaners, pressure washers or other jets/sprays of water on or around the appliance.
- This appliance is heavy. When moving the appliance care should be taken and correct safe practices followed. The appliance should not be moved over uneven surfaces.
- The appliance should not be moved while loaded with product.
-
The appliance should not be moved using the doors as a hand hold or pulling point.
-
Due to the weight of the appliance and that of the product contained within it the appliance may leave indentations in some types of floor coverings.
- The emitted sound level of this appliance is not greater than 70dB(A).
- To ensure stability the appliance should be located on a flat, level surface, correctly loaded.
- Do not use mechanical devices to accelerate the defrost process.
- Care should be taken not to damage the refrigeration circuit and/or system.
- If the supply cord is damaged, it must be replaced by the manufacturer, it's service agent or similarly qualified persons in order to avoid hazards.
- Care should be taken to avoid prolonged contact with cold surfaces with unprotected body parts, correct PPE to be used at all time.
- The handles on the rear of the appliance also serve to maintain an adequate space to the rear of the appliance required for correct operation. These should not be removed.
Disposal Requirements
This appliance contains components and materials which can be harmful to the environment if not disposed of correctly. Disposal of this appliance should be carried out by a suitably licensed waste contractor in accordance with national laws and regulations which may be in force at the time.

Removal of packaging
Prior to carrying out this operation please ensure that these instructions have been read, understood and that the necessary personnel and tools are available to ensure that these instructions are complied with. It is also recommended that a full assessment of the installation conditions and requirements be conducted prior to commencing this operation.
Tools required: A sharp retractable knife or scissors
Pliers or cutters suitable to cut hard plastic
A Philips screwdriver
The appliance weighs up to weight up to 230kg when empty and requires at least 4 people to carry out these instructions.
Never lift more weight than you are comfortable with. Any lifting should be carried out using correct lifting techniques.
Never stand directly in line or under the appliance when it is leaning at an angle while carrying out these instructions.
The appliances are top heavy and care should be taken when manoeuvring on uneven or sloping surfaces. Do not manoeuvre the appliance without assistance.
It is recommended that gloves are worn when carrying out these instructions.
Never move the appliance using the doors as a hand hold or pulling point.
Do not use the doors as a hand hold or pulling point.
1 Position the rear of the pallet against a flat, level surface of a similar height to the pallet.
2 Remove outer plastic and cardboard. Take care not to damage the appliance with any sharp objects used to remove the packaging.

3 Remove remainder of outer packaging.

- Using at least 2 people remove the top packaging.

5 Using the screwdriver remove the securing brackets from the rear of the appliance.

6 Using the handles/spacers at the rear of the appliance carefully slide the appliance off the pallet onto the adjacent level surface.
Note - Do not use the doors as a hand hold or pulling point.

Note - The handles on the rear of the appliance also serve to maintain an adequate space to the rear of the appliance required for correct operation. These should not be removed.
7 If the appliance is not being moved straight to it's final location lock the castors.
8 Ensure that all packaging is disposed of in an appropriate way in accordance with any local regulations for waste disposal.
Start-Up and Test Sequence
After unpacking, clean (cleaning directions supplied within this manual) and allow the appliance to stand for 60 minutes before turning on.
Ensure the appliance is situated on a firm, level surface, away from both hot and cold air sources, as this will affect its performance.
Place the appliance in a location so as not to exceed the maximum rated ambient temperature.
The appliance produces warm air when operating normally and requires adequate ventilation. The dimensions indicated are a minimum.
The air intake slot at the front of the appliance MUST be unobstructed across the full width of the appliance.
Connect the appliance to a suitable power supply. Do not connect or disconnect the appliance with wet hands. The appliance will turn on automatically displaying the actual internal temperature of the appliance and 'PF'. To cancel the alarm press button 1. If this does not happen and the display shows ' - ' press and hold button 1 for 3 seconds to turn on the appliance.


As the operating temperature has been pre-set no adjustments are required. Allow the appliance to reach its normal operating temperature before loading with product.
Display Icons and Buttons
These are located behind the left hand door of the appliance.

| Icon Button | |||
| a | Compressor on / Alarm 1 On / Off / Standby | ||
| b | Evaporator fans on | 2 | Up / Increase value |
| c | Defrost on 3 Back / Exit | ||
| d | 2nd operating function on 4 Down / Decrease value | ||
| e °C | / User menu active 5 Lights on/off | ||
| f | Keypad locked / Service function active | ||
| g | Decimal point / Defrost active | ||
Note - Icons a, b, c, d are only visible after pressing either buttons 1, 2, 3 or 4.

The appliance is designed for the storage of product at the appropriate temperature. It is not designed to chill product from a higher temperature. Using the appliance in this manner may result in malfunction, damage and invalidate the warranty.
Standby
Pressing button 1 for 3 seconds will turn the unit on or into standby. When in standby the display will only display '-'. The remainder of the display will be blank. When operating normally, the display will show the internal temperature of the cabinet.
Set Point
To display the appliance Set Point, with the display showing the temperature, press button 2 for 3 seconds and the display will show 'SP'. Then press button 1 once to display the current set point.
Adjust the set point using button 2 to increase and button 4 to decrease. Press button 1 to save the new value and the display will show 'Loc'. If button 1 is not pressed the new value will not be stored. Exit by pressing button 3.
If the Set Point cannot be adjusted to the value required please contact your authorised Foster dealer for advice.
The display will resume normal operation after 30 seconds or if button 3 is pressed.
Keypad Security Settings
The keypad can be locked to prevent unauthorised adjustment of the appliance and it's operating temperature.
When the keypad is locked no adjustments can be made using the keypad and icon 'f' will be displayed.
To lock or unlock the keypad press and release button 2 for 3 seconds and the display will show 'SP'. Release the button and then press button 2 once and the display will show 'Loc'. Press button 1 to display the current keypad lock status. Adjust using button 2 and button 4 to set the value to 'Yes' to lock the keypad and 'no' to unlock the keypad. Press button 1 to save the new value. If button 1 is not pressed the new value will not be stored. The display will resume normal operation after 30 seconds or if button 3 is pressed.
Internal Light
The lights are operated by pressing button 5. Press once to turn the lights on or off.
Defrost
The appliance has an automatic defrost function and will defrost periodically each day without any user intervention. This process is normal and does not affect product stored in the appliance. During defrost the appliance can be used as normal.
To start a defrost manually press and hold button 1 for 5 seconds. This will turn off the appliance. When this happens do not release the button and after 2 more seconds the display will indicate a defrost has commenced (dEF is briefly displayed) and the button can be released. The appliance set point temperature will be displayed during defrost and icon 'g' will flash to indicate a defrost is in progress.
The defrost will operate for it's full duration, it is not possible to cancel a defrost when it has started.

Keypad Sounds
If the user does not require the keypad to indicate with a sound when a button is pressed this can be turned off. Press and hold button 2 for 3 seconds until the display shows 'SP'. Press button 2 until the display shows 'biP'. Press button 1 to display the current value. 'Yes' indicates keypad sounds are active and 'no' indicates keypad sounds are not active. Select the value required and press button 1 to save the new value. If button 1 is not pressed the new value will not be stored. Exit with button 3.

Shelves, Supports, Loading and Air Flow
The appliance is supplied with adjustable, removable trayslides and shelves. Each shelf is secured at each end for transport in the location as indicated below. These should be removed prior to use.
Each shelf is capable of supporting the maximum weight of product listed below when evenly distributed.;
Appliance Max weight per shelf
| EMD700G | 50kg |
| EMD900G | 65kg |
| EMD1200G | 90kg |
| EMD1500G | 110kg |
| EMD1800G | 135kg |

Do not block air vents with product. A minimum of 25mm should be maintained between the top of the product and the shelf above.
Always ensure air can circulate around/through the stored product. It is important that for optimum energy and temperature performance that adequate airflow is maintained around the perimeter of the shelves, and around all stored products.

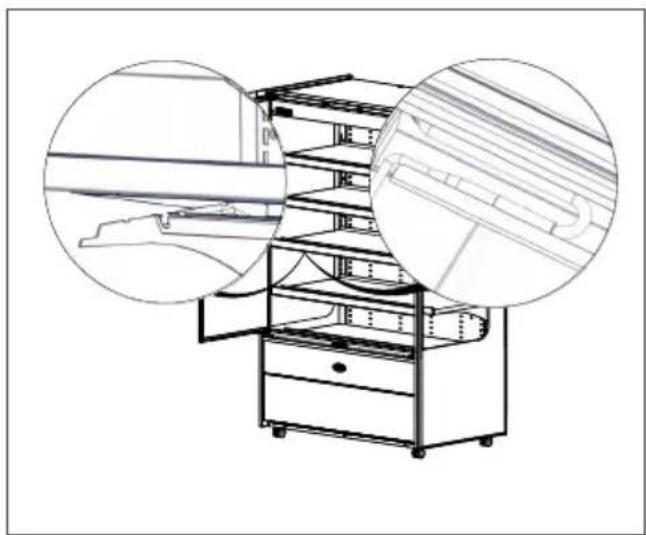
The shelf positions can be adjusted to suit specific requirements by following the procedure outlined below;
Note - We recommend that at least 2 people carry out these instructions. Some items have been removed from the images to aid clarity.
1 Tilt the shelf upwards to reveal the light connection concealed in the shelf centre support.
3 Lift the shelf clear of the shelf support brackets.

2 Disconnect the connector for the shelf light. Lift the shelf from the shelf support brackets and support while the brackets are re-positioned.
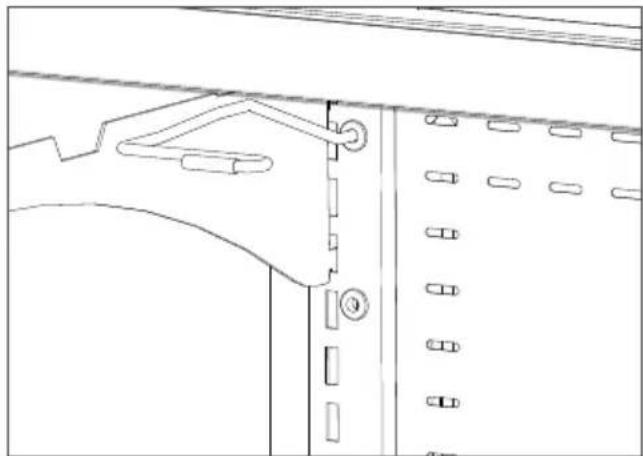
4 Position the shelf support brackets at the desire location. Ensure that the shelf support brackets are engaged correctly. Both locating points should be fully engaged with the vertical rail as shown.

5 Reconnect the shelf light and position the connector inside the shelf centre support.
Lower the shelf into the new position ensuring that the shelf support brackets are fully engaged with the vertical support as shown above.

Door Lock
To lock the door insert the key and turn 90°, turn in the opposite direction to unlock.
Alarms Notification
If an alarm condition occurs the appliance will indicate this with an audible signal, by illuminating icon 'a' and displaying a fault code from the list in the 'Troubleshooting' section of this manual. The audible notification can be muted temporarily by pressing button 1. While the fault is still present icon 'a' will continue to be illuminated and the display will cycle between the fault code and the appliance temperature.
Cleaning and Maintenance
IMPORTANT: This appliance is heavy. When moving the appliance care should be taken and correct safe practices followed. Prior to cleaning ensure that the correct PPE is available and utilised and that the appliance is switched off and disconnected from the power supply. Do not disconnect or connect the appliance from the power supply with wet hands. Following cleaning, only when the appliance is dry should the appliance be reconnected to the power supply and switched on.

Cleaning should be carried out periodically or as required depending on application.
Switch off the appliance, disconnect from the power supply and remove all products, racking and shelves. Care should be taken with the racking and shelves being inspected for any signs of damage resulting in sharp edges. Ensure that body parts do not come into contact with cold surfaces.
Wash all internal and external surfaces with a mild liquid detergent diluted as per the manufacturer's instructions. Rinse surfaces with clean water and dry thoroughly.
Never use wire wool, other abrasive substances, cleaning agents with a high acid or alkaline content (e.g. bleach acid or chlorine) or similar products as they can damage the appliance.
When the appliance has been cleaned and dried, refit the racking and shelves.
Re-connect the appliance to the power supply adhering to the previous guidelines above. Switch the appliance on and allow it to reach its normal operating temperature before re-loading product.

Regular Maintenance
Where the regular cleaning regime previously described does not remove dirt or grease deposits from the condenser, it should be cleaned by a competent engineer. We recommend that an engineer services the appliance every 6 to 12 months to maintain your warranty and ensure optimal performance of your appliance. We recommend that service is carried out by an authorised Foster agent or by contacting the Foster Service team using the contact details in this manual.

Cleaning
Condenser
Regular cleaning of the condenser (located behind the front cover) increases energy efficiency and prolongs the life of your appliance.
Never use a wire brush, abrasive or corrosive materials to clean the condenser. This should be carried out periodically, by a competent engineer as outlined in the Regular Maintenance section of this manual.
Gasket
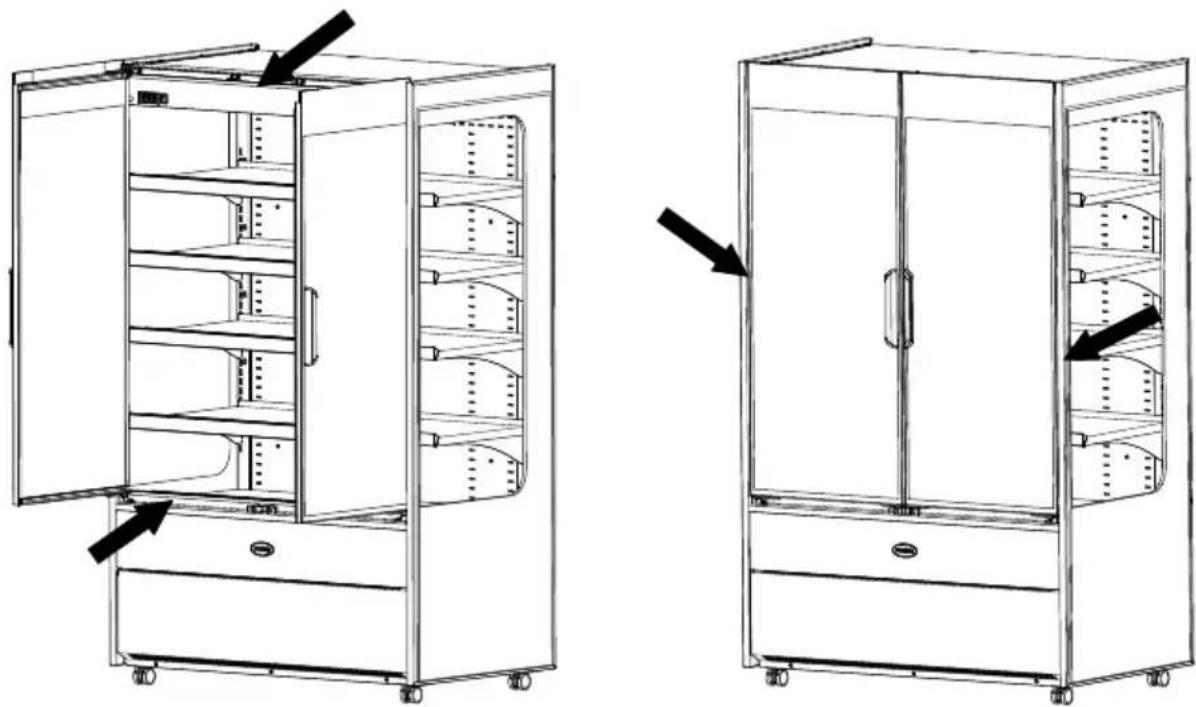
All door gaskets should be inspected on a regular basis and replaced as necessary if damaged. It is normal for there to be a small gap along the vertical edges of the doors. To clean, wipe with a warm damp soapy cloth followed by a clean damp cloth. Finally dry thoroughly.
Shelves and Shelf Supports
The shelves and trayslides in the appliance can be removed for cleaning. The shelves are dishwasher safe however the vertical supports and trayslides should be cleaned with warm soapy water then rinsed and dried.
The interior of the appliance should be cleaned with warm soapy water and a non abrasive cloth then rinsed with a clean cloth, clean water and dried.
Troubleshooting
Alarms/Warnings:
During operation the current temperature inside the appliance will be displayed. At certain times this will change to indicate a particular appliance operation or fault. The indicators you may see are as follows:

hi - The internal temperature of the appliance is higher than it should be.
Ensure that the door is closed and that the air flow inside is not obstructed by excessive or poor loading of product. The alarm will reset if the temperature falls to a normal level. If this does not happen please contact your authorised dealer or Foster Service.
Lo - The internal temperature of the appliance is lower than it should be. Check to ensure that the appliance has not been loaded with product at a lower temperature than the normal appliance operating temperature. If this is not the case please call your authorised dealer or Foster Service.
do - The appliance door is open. Close the door to cancel the alarm.
tA - This indicates that the internal temperature probe has failed. Call your authorised dealer or Foster Service to arrange for this to be replaced. During this time the appliance cannot maintain an accurate temperature and all product should be removed and the appliance switched off.
tE - This indicates that the evaporator probe has failed. Call your authorised dealer or Foster Service to arrange for this to be replaced.
PF - The mains power has been removed from the appliance for a period of time and has now been restored. This may have resulted in a rise in appliance temperature. Caution should be taken when using products stored within to ascertain whether these products are suitable for use. Upon restoration of the power supply the appliance will resume normal operation and the PF can be cancelled by pressing button 1 once.
hC - The condenser temperature is higher than it should be. If the appliance is being subjected to particularly high ambient temperatures steps should be taken to reduce this. If the ambient temperature is not high or reducing the temperature does not rectify the fault please contact your authorised dealer or Foster Service.
Cnd - The condenser clean period has expired. Please contact your authorised dealer or Foster Service.
While in an alarm condition icon 'a' will also be illuminated. The audible alarm can be muted temporarily by pressing button 1.
(Some indications are only visible periodically during specific appliance operations such as defrost or when activated through use of the appliance).
CheckProblem Solution
| The appliance is not functioning Is | the appliance plugged in and the socket switched on? | If the appliance is plugged in check that the socket is ‘live’ by plugging another appliance in to see if that works. |
| Has the fuse blown? Check the fuse | and if necessary change it for a new one | |
| The appliance is not cooling or it is not reaching the required temperature | Is the appliance switched on? Check that the temperature is displayed. If the display shows ‘-’ switch on the appliance as it is in standby | |
| Is the condenser blocked or dirty? | Inspect and clean the condenser if necessary as described in this manual | |
| Is the appliance positioned close to a heat source? | Is the heat source affecting the performance of the appliance. If possible move the appliance away from the heat source. | |
| Is the appliance loaded correctly? | Check the loading of the product contained in the appliance is in accordance with the guidelines in this manual | |
| There is something other than the temperature displayed on the controller | Is the display showing one of the alarms/warnings above? | The display may show indications shown in the ‘Alarms and Warnings’ section of these instructions. For anything else contact your authorised dealer or Foster Service. |
| Condensation on glass surfaces or appliance interior | Appliance is in conditions which are compatible with the conditions outlined in the ‘Climate Class’ section of this manual. Check the door seals. Note that it is normal for a small gap to be present on the vertical edges of the doors. | Ensure the operating conditions are compatible with the conditions outlined in the ‘Climate Class’ section of this manual. If this is the case contact Foster Service. |
If the reason for the malfunction cannot be identified, disconnect the electrical supply from the appliance and contact your authorised dealer or Foster Service. When requesting a service call, please quote the model and serial number which can be found on the inside of the appliance on the right hand wall and begins with 'E'.
Notes:

By Appointment to Her Majesty Queen Elizabeth II Suppliers of Commercial Refrigeration Foster Refrigerator, King's Lynn

The Refrigeration Experts
For more information:
+44 (0) 1553 698485
regional@foster-gamko.com
fosterrefrigerator.com
Document ID code: 00-570880v2
Original Instructions
For service and spares:
For service +44 (0) 1553 780333
service@foster-gamko.com
For parts +44 (0) 1553 780300
parts@foster-gamko.com
- FOUR STEPS
- 1
- GETTING TO KNOW YOUR NEW FOSTER APPLIANCE
- CAREFUL – DANGER
- INFORMATION
- CLIMATE CLASS
- ELECTRICAL SAFETY
- GENERAL SAFETY
- DISPOSAL REQUIREMENTS
- REMOVAL OF PACKAGING
- START-UP AND TEST SEQUENCE
- DISPLAY ICONS AND BUTTONS
- STANDBY
- SET POINT
- KEYPAD SECURITY SETTINGS
- INTERNAL LIGHT
- DEFROST
- KEYPAD SOUNDS
- SHELVES, SUPPORTS, LOADING AND AIR FLOW
- DOOR LOCK
- ALARMS NOTIFICATION
- CLEANING AND MAINTENANCE
- REGULAR MAINTENANCE
- CLEANING
- CONDENSER
- GASKET
- SHELVES AND SHELF SUPPORTS
- TROUBLESHOOTING
- ALARMS/WARNINGS
- NOTES
Brand : Foster
Model : EMD1500G
Category : Refrigerated display