
ICUSB23208FD - Controller StarTech.com - Free user manual and instructions
Find the device manual for free ICUSB23208FD StarTech.com in PDF.


| Product Type | USB to RS-232 Serial Adapter |
| Dimensions | 2.4 x 1.2 x 0.6 in (6.1 x 3.0 x 1.5 cm) |
| Weight | 2.1 oz (60 g) |
| Power Supply | Bus-powered via USB (5V, 500mA) |
| Main Functions | Adds one RS-232 DB9 serial port via USB; supports data rates up to 921.6 kbps; FTDI chipset for broad OS compatibility |
| Maintenance and Cleaning | Wipe with a dry, lint-free cloth; do not use liquids or solvents |
| Safety | Use only with compliant USB ports; avoid exposure to moisture and extreme temperatures |
| Spare Parts and Repairability | No user-serviceable parts; non-repairable; replace unit if defective |
| General Information | Connector: USB Type-A (male) to DB9 (male); supports Windows, macOS, and Linux; plug-and-play with native drivers |
| Compliance | FCC, CE, RoHS |
| Operating Temperature | 14°F to 140°F (-10°C to 60°C) |
| Storage Temperature | -4°F to 176°F (-20°C to 80°C) |
Frequently Asked Questions - ICUSB23208FD StarTech.com
User questions about ICUSB23208FD StarTech.com
0 question about this device. Answer the ones you know or ask your own.
Ask a new question about this device
Download the instructions for your Controller in PDF format for free! Find your manual ICUSB23208FD - StarTech.com and take your electronic device back in hand. On this page are published all the documents necessary for the use of your device. ICUSB23208FD by StarTech.com.
USER MANUAL ICUSB23208FD StarTech.com
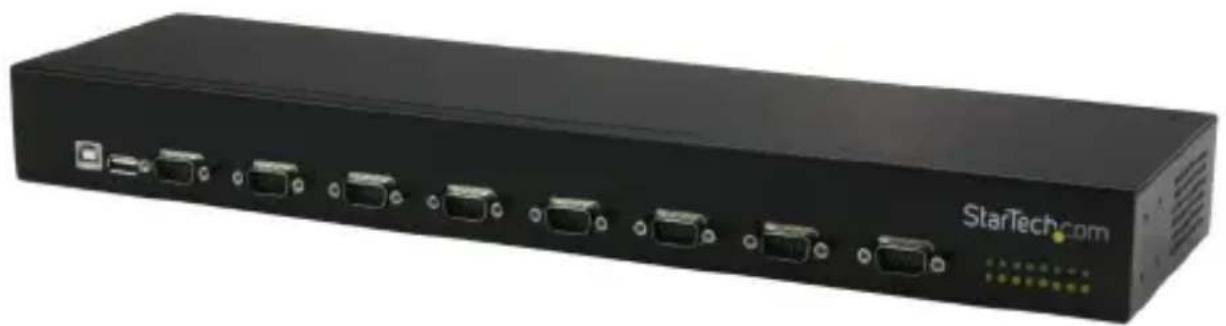
8-Port USB-to-Serial RS232 Adapter Hub with Daisy Chain - Rack Mountable
ICUSB23208FD
natural_image
Black StarTech.com network device with multiple USB ports and ventilation slots (no visible text or symbols on main body)*actual product may vary from photos
For the latest information, technical specifications, and support for this product, please visit www.StarTech.com/ICUSB23208FD.
Important: Read and understand the entire manual before you use this product, and follow the instructions as they are outlined in the manual. Failure to do so might result in damage to your property or equipment.
FCC Compliance Statement
This equipment has been tested and found to comply with the limits for a Class B digital device, pursuant to part 15 of the FCC Rules. These limits are designed to provide reasonable protection against harmful interference in a residential installation. This equipment generates, uses and can radiate radio frequency energy and, if not installed and used in accordance with the instructions, may cause harmful interference to radio communications. However, there is no guarantee that interference will not occur in a particular installation. If this equipment does cause harmful interference to radio or television reception, which can be determined by turning the equipment off and on, the user is encouraged to try to correct the interference by one or more of the following measures:
- Reorient or relocate the receiving antenna.
- Increase the separation between the equipment and receiver.
- Consult the dealer or an experienced radio/TV technician for help
- Connect the equipment into an outlet on a circuit different from that to which the receiver is connected.
This device complies with part 15 of the FCC Rules. Operation is subject to the following two conditions: (1) This device may not cause harmful interference, and (2) this device must accept any interference received, including interference that may cause undesired operation.
Changes or modifications not expressly approved by StarTech.com could void the user's authority to operate the equipment.
Use of Trademarks, Registered Trademarks, and other Protected Names and Symbols
This manual may make reference to trademarks, registered trademarks, and other protected names and/or symbols of third-party companies not related in any way to StarTech.com. Where they occur these references are for illustrative purposes only and do not represent an endorsement of a product or service by StarTech.com, or an endorsement of the product(s) to which this manual applies by the third-party company in question. Regardless of any direct acknowledgement elsewhere in the body of this document, StarTech.com hereby acknowledges that all trademarks, registered trademarks, service marks, and other protected names and/or symbols contained in this manual and related documents are the property of their respective holders.
Table of Contents
Introduction....1
Product diagram....1
Packaging contents....2
System requirements....2
RS232 pinout 3
About the LED indicators....3
Installation 4
Install the USB serial hub using the power adapter .... 4
Install the hub using the terminal block power input....4
Confirm installation....5
Use the daisy chain feature ....5
Perform a serial loopback test ....6
Mount the serial hub in a server rack ....6
Technical support....7
Warranty information....7
Introduction
You can use the ICUSB23208FD to convert a single USB port into eight RS232 serial ports, and connect multiple hubs together to create a scalable and economical solution.
The ICUSB23208FD adds eight RS232 serial ports with data transfer rates up to 921.6 Kbps and can be controlled by a desktop or laptop computer system using a single USB port. The durable metal chassis fits into standard 19-inch server storage racks and supports an extended -40°C to 85°C (-40°F to 185°F) operating temperature range that allows for reliable use even in harsh environments.
The ICUSB23208FD also features daisy chain capability, allowing you to connect multiple hubs through a single USB port.
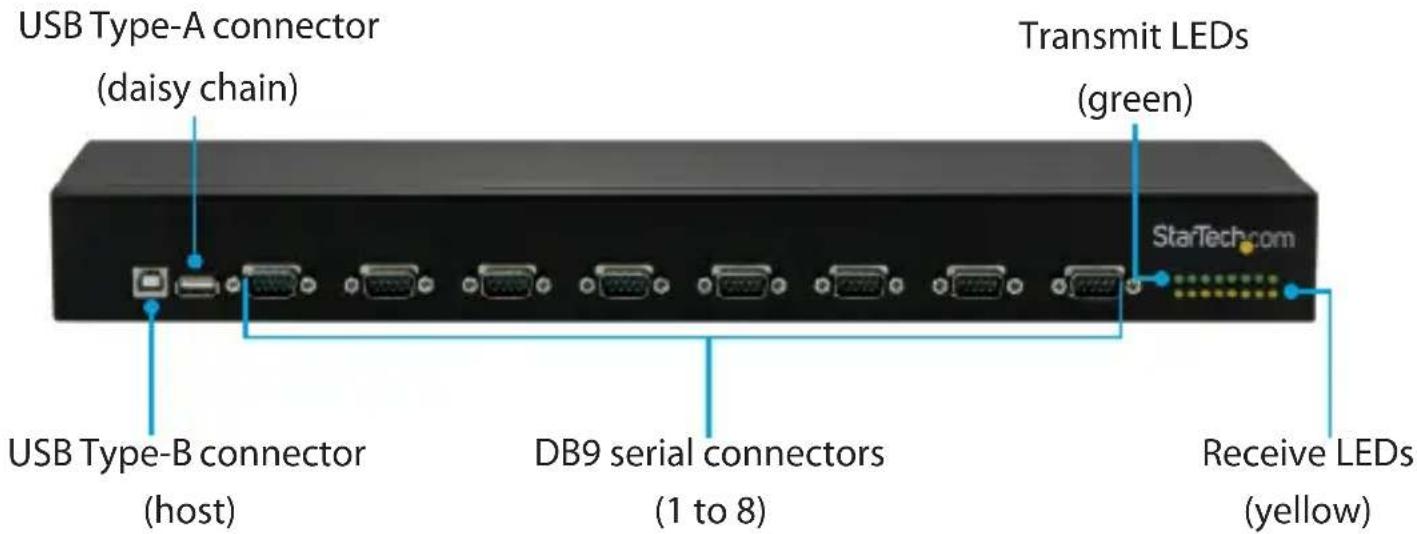
Product diagram
Front view
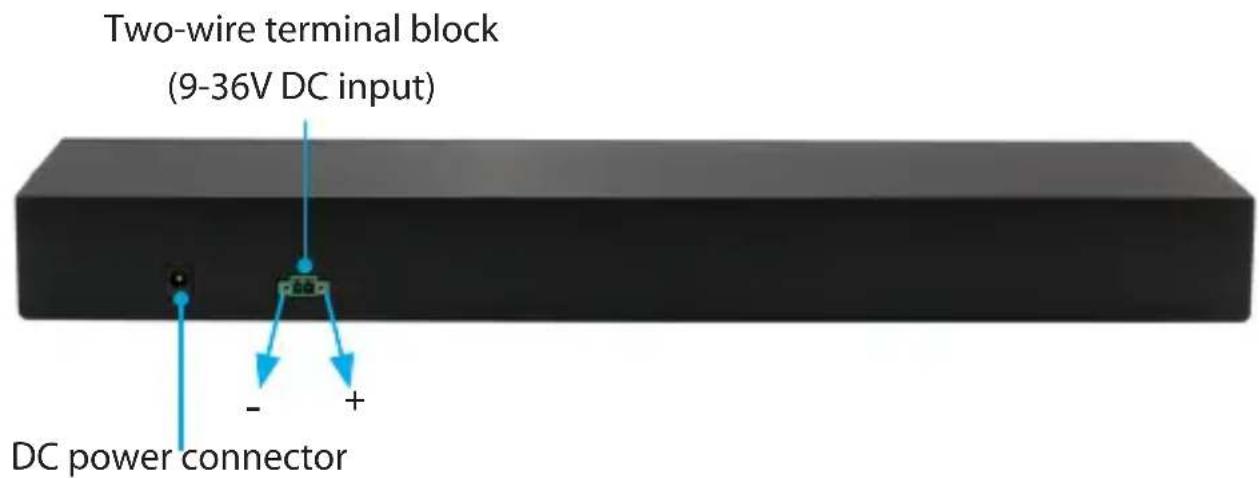
Back view
Packaging contents
• 1 x 8-port USB to RS232 hub
- 1 x USB 2.0 cable
- 2 x rack-mounting brackets
- 8 x rack-mounting screws
- 2 x DIN-rail mounting brackets
- 4 x DIN-rail mounting screws
- 4 x washers
- 4 x nuts
• 1 x universal power adapter (NA/JP, UK, EU, AU)
- 1 x driver CD
- 1 x terminal block plug
- 1 x quick-start guide
System requirements
• USB-equipped host computer system
- Any of the following operating systems:
- Windows® 10 (32-bit or 64-bit)
• Windows 8.1 (32-bit or 64-bit)
• Windows 8 (32-bit or 64-bit)
• Windows 7 (32-bit or 64-bit) - Windows Vista®
- Windows Server® 2012
• Windows Server 2008 R2
• Mac OS 10.7 and later - Linux® 3.5
- System requirements are subject to change. For the latest requirements, please visit www.startech.com/ICUSB23208FD.
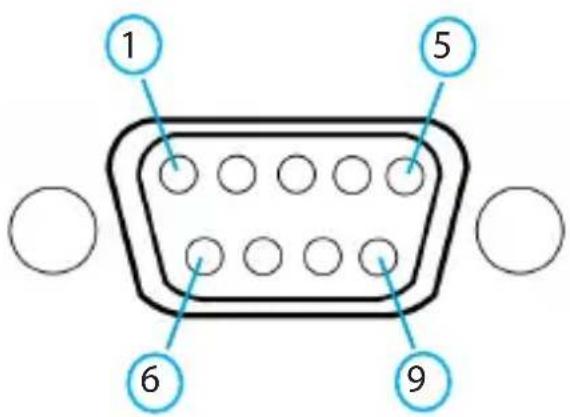
RS232 pinout
PIN Signal
| 1 DCD |
| 2 RxD |
| 3 TxD |
| 4 DTR |
| 5 GND |
| 6 DSR |
| 7 RTS |
| 8 CTS |
| 9 |
About the LED indicators
The ICUSB23208FD features a set of transmit and receive LEDs for all of the eight ports. For more information about what the LEDs signify, see the table below.
LED LED behavior Significance
| Transmit LED (yellow) | Blinking Data is being transmitted through the port. |
| Not illuminated No data is being transmitted through the port. | |
| Receive LED (green) | Blinking Data is being received through the port. |
| Not illuminated No data is being received through the port. |
Installation
You can use the power adapter or the two-wire terminal block power input (9-36V DC) to power the USB serial hub. You can also use redundant power input by connecting both the power adapter and the terminal block power, and in the event that your power source fails, the USB serial hub will switch to use the secondary power source.
Install the USB serial hub using the power adapter
Warning! Make sure that the driver installation is complete before you plug in and connect the USB serial hub.
- Insert the provided driver CD into your host computer.
Note: The CD should automatically open and display all of the folders contained on the CD. If that doesn't happen, navigate to the CD/DVD drive on your computer. - In the driver folder, double-click the appropriate setup file for the OS that you're currently running. The driver installation wizard will begin installing the driver and automatically close when the installation is complete.
- Connect the provided USB cable to the USB Type-B connector (host) port on the USB serial hub and the USB port on your computer.
- Connect the universal power adapter to the DC power connector on the USB serial hub and a wall outlet.
Install the hub using the terminal block power input
Warning! Make sure that the driver installation is complete before you plug in and connect the devices to the USB serial hub.
- Insert the provided driver CD into your host computer.
Note: The CD should automatically open and display all of the folders contained on the CD. If that doesn't happen, navigate to the CD/DVD drive on your computer. - In the driver folder, double-click the appropriate setup file for the OS that you're currently running. The driver installation wizard will begin installing the driver and automatically close when the installation is complete.
- Connect the provided USB cable to the USB Type-B connector (host) port on the USB serial hub and the USB port on your computer.
- If the terminal block connector is already inserted in the USB serial hub, use a small flat-head screwdriver to loosen the screws to the left and right of the terminal block connector until you can remove it from the USB serial hub.
-
Use a small flat-head screwdriver to loosen the two screws located on the top of the terminal block connector.
-
Connect the positive and negative wires from your DC power source to the corresponding terminal block connectors.
Note: Make sure that the polarity of the input power, positive (+) and negative (-), is matched correctly with the terminal block pins.
-
Tighten the two screws located on the top of the terminal block connector.
-
Reinsert the terminal block connector into the USB serial hub and tighten the screws to the left and right of the terminal block connector.
Confirm installation
Windows OS
- On your computer, navigate to Device Manager.
- Expand the Ports (COM & LPT) option.
- Verify that the additional COM ports are listed.
- Double-click a port and review the device properties.
Mac OS
- On your computer, press and hold the Option key and click the Apple menu.
- Click System Information or System Profiler.
- Under Hardware, click USB.
The USB device tree lists all of the devices connected to each port.
Use the daisy chain feature
You can daisy chain up to three devices and add up to 24 ports in total.
- Connect the ICUSB23208FD to your host computer. For more information about how to do this, see "Installation."
- Connect a USB cable to the USB Type-A connector (daisy chain) on the ICUSB23208FD connected to your host computer and to the USB Type-B connector on the serial hub that you want to daisy chain.
- If you're connecting a third serial hub, connect a USB cable to the USB Type-A connector (daisy chain) on the second serial hub and to the USB Type-B connector on the third serial hub that you want to daisy chain.
- On each of the USB serial hubs, connect the universal power adapter to the DC power connector or the Two-wire terminal block input and a wall outlet.
Perform a serial loopback test
To verify that a port is operational and to map the ports, you should perform a serial loopback test. A loopback test sends and receives data to and from the same serial port. To complete the loopback test, you need to temporarily connect pin two and pin three to allow the signals to be sent and received on the same port.
To perform a serial loopback test, you need a loopback adapter and a third-party software program (for example, PuTTY or HyperTerminal®).
- Download a third-party software program.
- Open a connection on the COM port that you want to test.
- Insert the loopback adapter into a serial port.
- Type something in the third-party software.
If what you typed is displayed in the window, you have located the correct port. If the text isn't displayed in the window, move the adapter to another port and try again until you find the correct port.
Mount the serial hub in a server rack
The ICUSB23208FD comes with the necessary hardware to install the serial hub in a regular server rack or on DIN rails.
-
Do one of the following:
-
Use the rack-mounting screws to attach the two rack-mounting brackets to both sides of the serial hub.
-
Use the DIN-rail mounting screws to attach the two DIN-rail mounting brackets to both sides of the serial hub.
-
To mount the serial hub in your server rack or on DIN rails, follow the instructions that came with your server rack or DIN rails.
Technical support
StarTech.com's lifetime technical support is an integral part of our commitment to provide industry-leading solutions. If you ever need help with your product, visit www.startech.com/support and access our comprehensive selection of online tools, documentation, and downloads.
For the latest drivers/software, please visit www.startech.com/downloads
Warranty information
This product is backed by a two-year warranty.
StarTech.com warrants its products against defects in materials and workmanship for the periods noted, following the initial date of purchase. During this period, the products may be returned for repair, or replacement with equivalent products at our discretion. The warranty covers parts and labor costs only. StarTech.com does not warrant its products from defects or damages arising from misuse, abuse, alteration, or normal wear and tear.
Limitation of Liability
In no event shall the liability of StarTech.com Ltd. and StarTech.com USA LLP (or their officers, directors, employees or agents) for any damages (whether direct or indirect, special, punitive, incidental, consequential, or otherwise), loss of profits, loss of business, or any pecuniary loss, arising out of or related to the use of the product exceed the actual price paid for the product. Some states do not allow the exclusion or limitation of incidental or consequential damages. If such laws apply, the limitations or exclusions contained in this statement may not apply to you.
Hard-to-find made easy. At StarTech.com, that isn't a slogan. It's a promise.
StarTech.com is your one-stop source for every connectivity part you need. From the latest technology to legacy products — and all the parts that bridge the old and new — we can help you find the parts that connect your solutions.
We make it easy to locate the parts, and we quickly deliver them wherever they need to go. Just talk to one of our tech advisors or visit our website. You'll be connected to the products you need in no time.
Visit www.startech.com for complete information on all StarTech.com products and to access exclusive resources and time-saving tools.
StarTech.com is an ISO 9001 Registered manufacturer of connectivity and technology parts. StarTech.com was founded in 1985 and has operations in the United States, Canada, the United Kingdom and Taiwan servicing a worldwide market.
- 8-Port USB-to-Serial RS232 Adapter Hub with Daisy Chain - Rack Mountable
- FCC Compliance Statement
- Use of Trademarks, Registered Trademarks, and other Protected Names and Symbols
- Table of Contents
- Introduction....1
- About the LED indicators....3
- Installation 4
- Use the daisy chain feature ....5
- Perform a serial loopback test ....6
- Mount the serial hub in a server rack ....6
- Technical support....7
- Warranty information....7
- Introduction
- Product diagram
- Packaging contents
- System requirements
- RS232 pinout
- About the LED indicators
- Installation
- Install the USB serial hub using the power adapter
- Install the hub using the terminal block power input
- Confirm installation
- Windows OS
- Mac OS
- Use the daisy chain feature
- Perform a serial loopback test
- Mount the serial hub in a server rack
- Technical support
- Warranty information
- Limitation of Liability
Brand : StarTech.com
Model : ICUSB23208FD
Category : Controller