
PEXSAT34SFF - Controller StarTech.com - Free user manual and instructions
Find the device manual for free PEXSAT34SFF StarTech.com in PDF.


| Product Type | PCI Express SATA III Controller Card |
| Model | PEXSAT34SFF |
| Brand | StarTech.com |
| Form Factor | Low Profile / Full Height bracket included |
| Ports | 4 x SATA III (6 Gbps) ports |
| Host Interface | PCI Express 2.0 x4 |
| Data Transfer Rate | Up to 6 Gbps per port |
| Supported Drives | 2.5/3.5 inch SATA SSDs and HDDs |
| RAID Support | No (JBOD mode only) |
| Operating Systems Supported | Windows, Linux, macOS |
| Dimensions (W x H x D) | 101 mm x 120 mm x 18 mm (including bracket) |
| Weight | 45 g |
| Input Voltage | 3.3V (from PCIe slot) |
| Power Consumption | 2.5 W (typical) |
| Operating Temperature | 0°C to 60°C |
| Storage Temperature | -20°C to 85°C |
| Package Contents | Controller card, low-profile bracket, driver CD |
| Mounting Options | Internal PCIe slot |
| Safety Compliance | FCC, CE, RoHS |
| Warranty | 2 years |
| Maintenance | No special maintenance required; keep dry and clean |
| Repairability | Non-serviceable; no user-replaceable parts |
Frequently Asked Questions - PEXSAT34SFF StarTech.com
User questions about PEXSAT34SFF StarTech.com
0 question about this device. Answer the ones you know or ask your own.
Ask a new question about this device
Download the instructions for your Controller in PDF format for free! Find your manual PEXSAT34SFF - StarTech.com and take your electronic device back in hand. On this page are published all the documents necessary for the use of your device. PEXSAT34SFF by StarTech.com.
USER MANUAL PEXSAT34SFF StarTech.com
4 Port PCIe 2.0 SATA III 6Gbps RAID Controller
PEXSAT34SFF
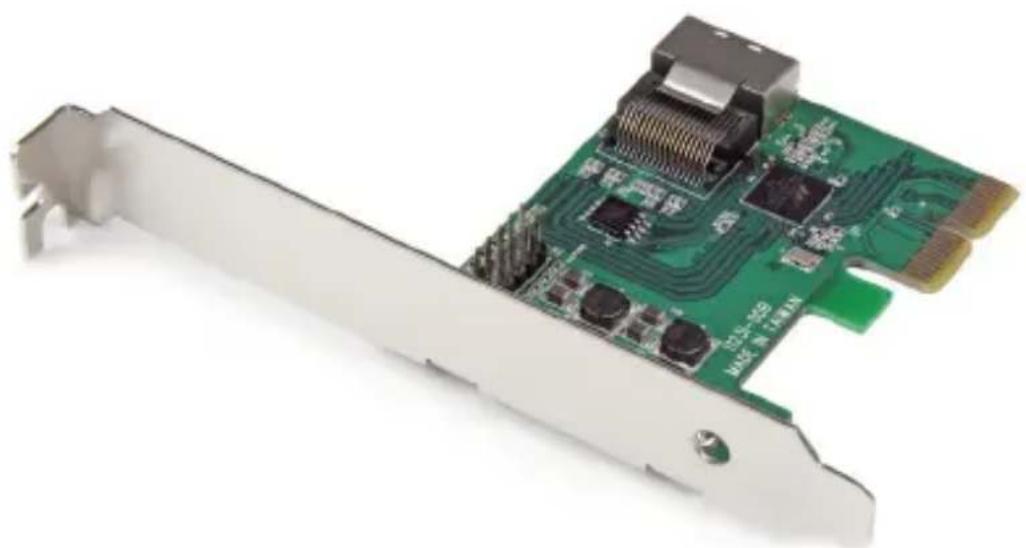
natural_image
Close-up of a green PCI expansion card with visible circuitry and ports (no text or symbols)*actual product may vary from photos
For the most up-to-date information, please visit: www.startech.com
FCC Compliance Statement
This equipment has been tested and found to comply with the limits for a Class B digital device, pursuant to part 15 of the FCC Rules. These limits are designed to provide reasonable protection against harmful interference in a residential installation. This equipment generates, uses and can radiate radio frequency energy and, if not installed and used in accordance with the instructions, may cause harmful interference to radio communications. However, there is no guarantee that interference will not occur in a particular installation. If this equipment does cause harmful interference to radio or television reception, which can be determined by turning the equipment off and on, the user is encouraged to try to correct the interference by one or more of the following measures:
• Reorient or relocate the receiving antenna.
- Increase the separation between the equipment and receiver.
- Connect the equipment into an outlet on a circuit different from that to which the receiver is connected.
- Consult the dealer or an experienced radio/TV technician for help.
Use of Trademarks, Registered Trademarks, and other Protected Names and Symbols
This manual may make reference to trademarks, registered trademarks, and other protected names and/or symbols of third-party companies not related in any way to StarTech.com. Where they occur these references are for illustrative purposes only and do not represent an endorsement of a product or service by StarTech.com, or an endorsement of the product(s) to which this manual applies by the third-party company in question. Regardless of any direct acknowledgement elsewhere in the body of this document, StarTech.com hereby acknowledges that all trademarks, registered trademarks, service marks, and other protected names and/or symbols contained in this manual and related documents are the property of their respective holders.
Table of Contents
Introduction ....1
Packaging Contents ....1
System Requirements....1
Installation ....3
Hardware Installation 3
Driver Installation....4
Management Utility Installation (Optional - Windows only) 5
Verifying Installation....7
Operation 8
RAID Configuration 8
Administration Console Method....9
HyperDuo Configuration....11
Card BIOS Method 11
Administration Console Method....12
HyperDuo Management (Windows only)....13
Specifications ....15
Technical Support 16
Warranty Information 16
Introduction
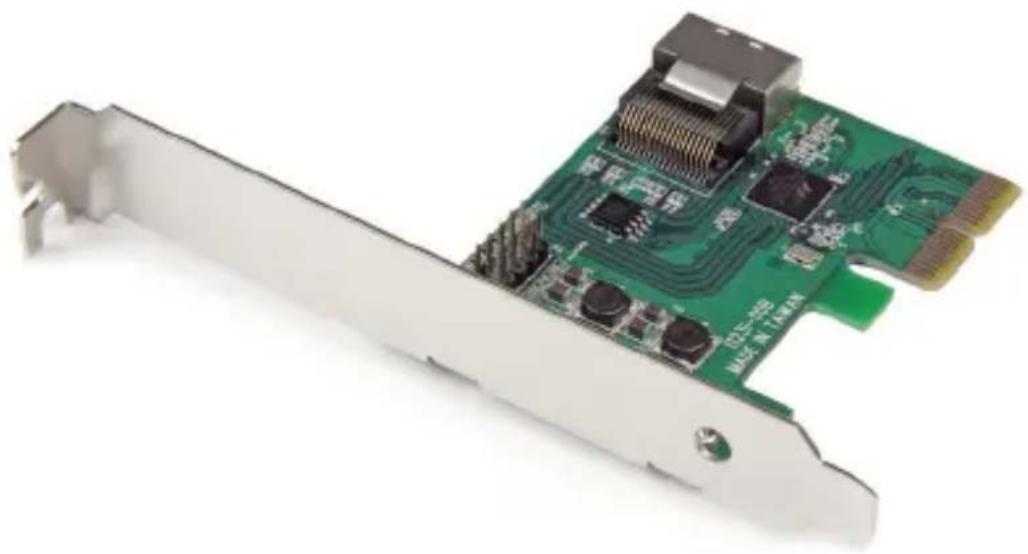
The PEXSAT34SFF PCI Express 2.0 SATA Controller Card enables 4 AHCI SATA III connections to be added to a computer through a single internal Mini-SAS (SFF-8087) port.
The Mini-SAS connector with Port Multiplier support allows for multiple SATA drives (up to 7) to be connected using a single cable. When used with our Mini-SAS to 4x SATA breakout cable or Mini-SAS SFF-8087 backplane (accessories not included, SAS drives not supported), you have a complete internal 6Gbps connectivity solution, all from a single card.
Featuring HyperDuo technology, the SATA card offers SSD auto-tiering which lets you balance the performance advantages of SSD storage with the cost-effectiveness and large capacity of standard hard drives. By combining SSD and HDD drives into a single volume (up to 3 SSD + 1 HDD), HyperDuo discreetly works in the background to identify and move frequently accessed files to the faster SSD drive(s) for improved data throughput – up to 80% of SSD performance! (Note: The HyperDuo automatic storage tiering feature is compatible with Windows® XP, Vista, 7 and 8 only)
Compliant with SATA revision 3.0, this PCI Express SATA RAID card delivers up to 6Gbps of data bandwidth; ideal for high performance hard drives and solid state drives (SSD). Plus, the controller card offers an effective hardware RAID solution, with native RAID (0, 1, 1+0) support.
Packaging Contents
• 1x PCIe SATA Controller Card
- 1x Low Profile Bracket
- 1x Driver CD
• 1x Instruction Manual
System Requirements
- PCI Express enabled computer with an available PCI Express x2 slot
- Windows® XP (32/64-bit)/ Server 2003(32/64-bit)/ Vista (32/64-bit)/ 7 (32/64-bit)/ Server 2008 R2/ 8 (32/64-bit), or Apple® Mac OS® 10.6/ 10.7/ 10.8, or Linux®
natural_image
Close-up of a green PCI E210 card with visible circuitry and ports, mounted on a silver metal frame (no text or symbols)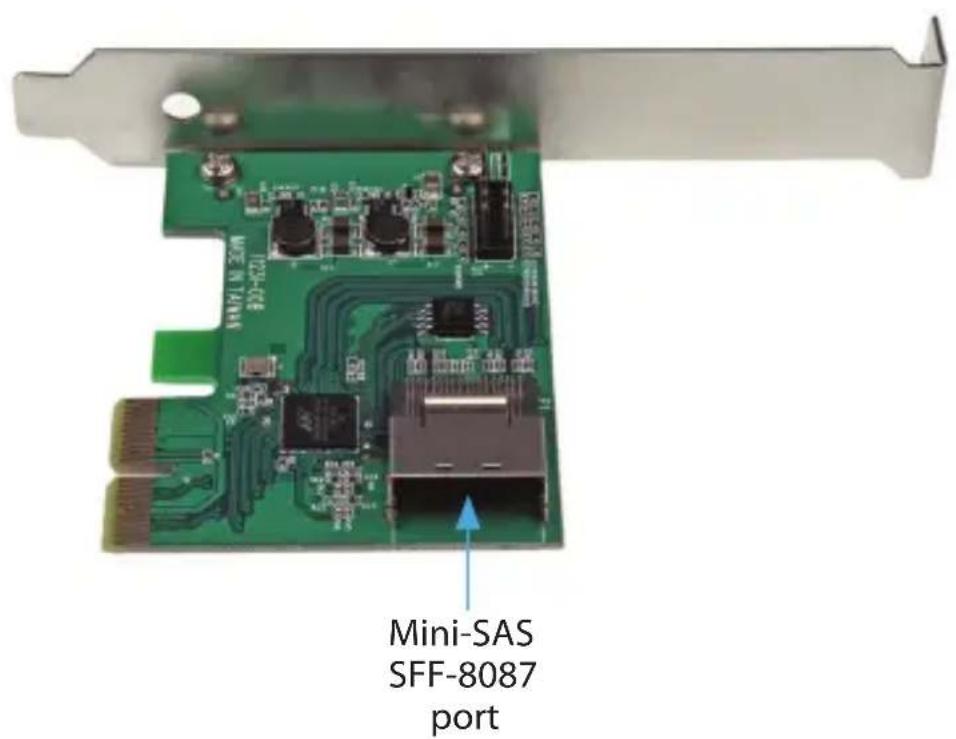
Installation
Hardware Installation
WARNING! PCI Express cards, like all computer equipment, can be severely damaged by static electricity. Be sure that you are properly grounded before opening your computer case or touching your PCI Express card. StarTech.com recommends that you wear an anti-static strap when installing any computer component. If an anti-static strap is unavailable, discharge yourself of any static electricity build-up by touching a large grounded metal surface (such as the computer case) for several seconds. Also be careful to handle the PCI Express card by its edges and not the gold connectors.
- Turn your computer off and any peripherals connected to the computer (i.e. Printers, external hard drives, etc.). Unplug the power cable from the rear of the power supply on the back of the computer and disconnect all peripheral devices.
- Remove the cover from the computer case. See documentation for your computer system for details.
- Locate an open PCI Express x2 slot and remove the metal cover plate on the rear of the computer case (Refer to documentation for your computer system for details.).
NOTE: This card will work in PCI Express slots of additional lanes (i.e. x4, x8, or x16 slots).
- Gently insert the card into the open PCI Express slot and fasten the bracket to the rear of the case.
NOTE: If installing the card into a small form factor/low profile system, replacing the pre-installed full profile bracket with the included low profile installation bracket may be necessary.
-
Connect a SFF-8087 cable (not included) from the card to your SATA device(s).
-
Place the cover back onto the computer case.
-
Insert the power cable into the socket on the power supply and reconnect all other connectors removed in Step 1.
Driver Installation
Windows XP
NOTE: The latest driver is available from www.startech.com.
-
Once the computer has started and the operating system is fully loaded, insert the provided Driver CD into the computer's CD/DVD drive.
-
AutoPlay should give you the option to browse the files on the CD or automatically open the CD.
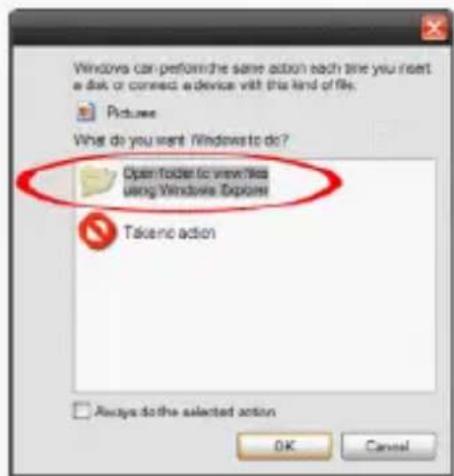
If AutoPlay does not start, go into "My Computer" and access the CD/DVD drive that the CD is in.
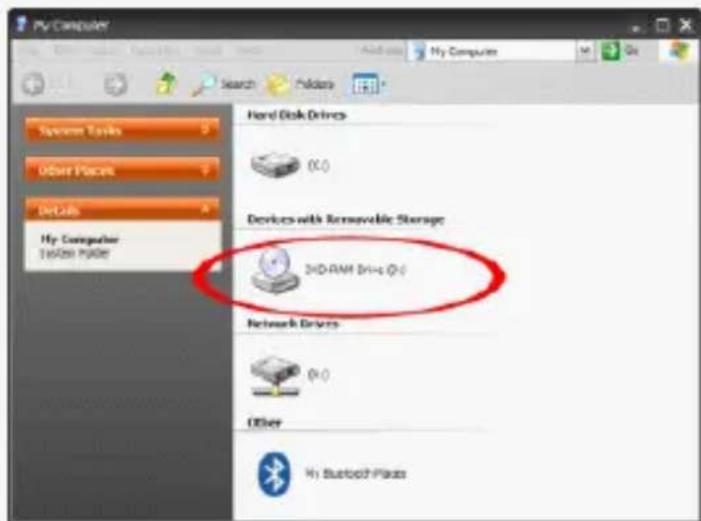
- Open the folder "SATA6G_M9128". Run the file 'drvSetup.exe'. Follow the onscreen instructions to complete the driver installation.
Management Utility Installation (Optional - Windows only)
RAID and/or HyperDuo configuration can be accomplished either through the integrated card-BIOS utility, or through the Marvell Storage Utility (MSU). Details for installing the MSU are below.
To install the Marvell Storage Utility (MSU) in Windows:
-
Run the MSUSetup.exe, selecting Next and accepting the license agreement when prompted – the default installation options are recommended.
-
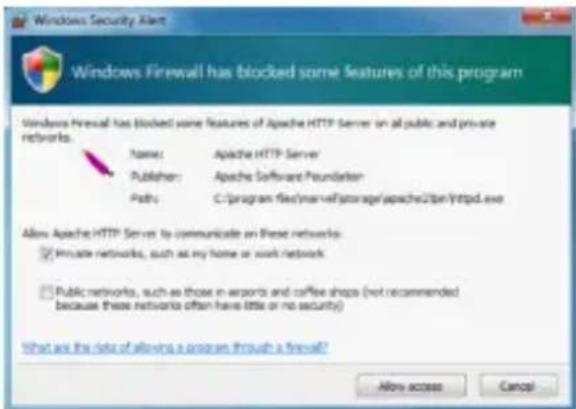
After installing the Apache2 HTTP Server (which is a built-in component of the installation package), the installation may trigger a Windows Security Alert on some versions of Windows, please allow access.
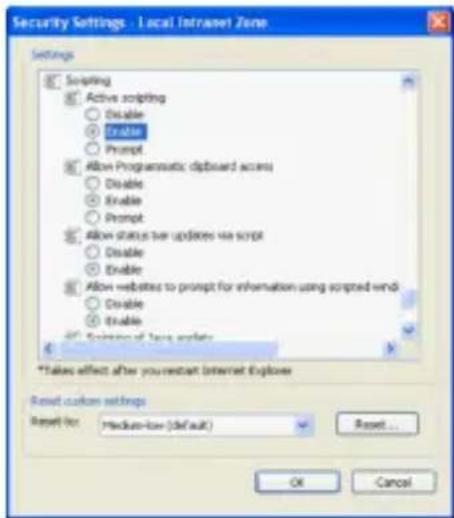
- Before opening the MSU, verify that Active Scripting or JavaScript is enabled in the browser.
a. Internet Explorer
i. From the menu bar, select Tools > Internet Options.
ii. Select the "Security" tab, then "Local Intranet", then "Custom level".
iii. In the list of settings, scroll down to Scripting > Active scripting.
iv. Select "Enable", then click "OK" to confirm the selection.
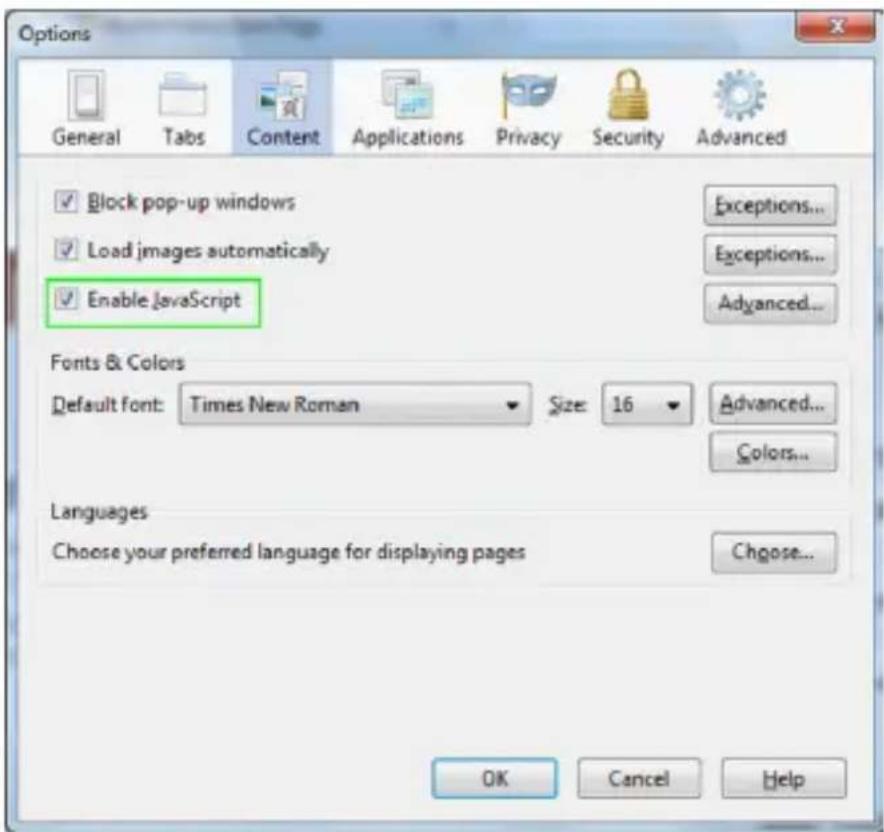
b. Firefox
i. From the menu bar, select Tools > Options
ii. Select the "Content" tab and ensure that the "Enable Javascript" option is checked (should be by default) – if it is not, select it and click "OK"
Windows Vista/ 7/ 8
The driver is natively supported by newer Operating Systems. The driver should automatically install through Windows Update.
Verifying Installation
Windows
From the main desktop, right-click on "My Computer" ("Computer" in Vista/7/8), then select Manage. In the new Computer Management window, select Device Manager from the left window panel.
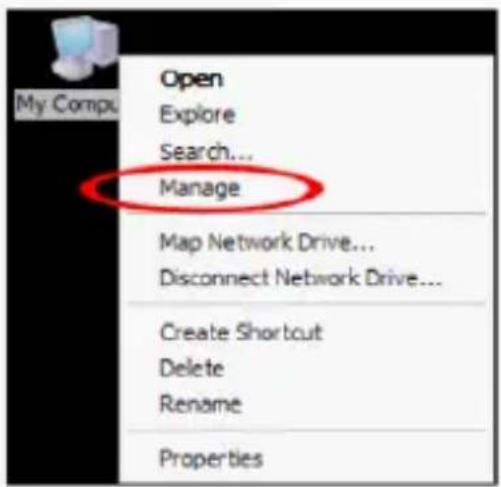
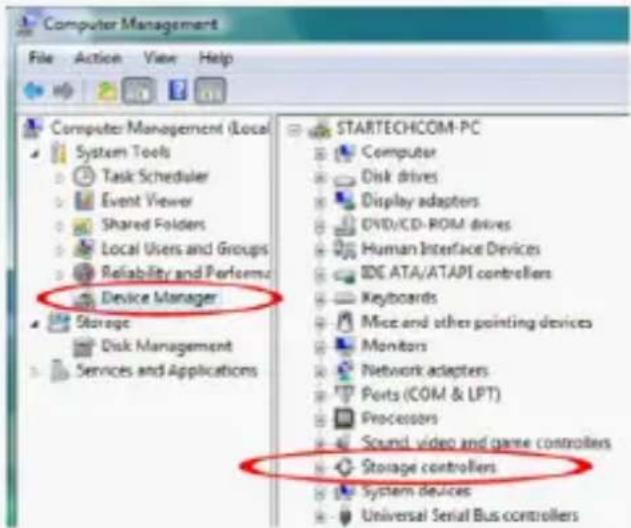
Under the "SCSI and RAID Controllers" category ("Storage Controllers" in Vista or later), should be a "Marvell 92xx" device. Right-click on the device and select "Properties" to make sure it is installed and working correctly.
For Windows 7 and 8, if using the native drivers, the card will instead be listed under the "IDE ATA/ATAPI Controller" category as a "Standard AHCI" device.
Operation
RAID Configuration
Card BIOS Method
WARNING! Creating a RAID virtual disk destroys all data on the physical disks included in the virtual disk set. Make sure to back up all data before continuing.
- When prompted on startup, press Ctrl+M to enter the card BIOS utility
Press <Ctrl>+<M> to enter BIOS Setup or <Space> to continue_
-
Using the arrow keys to navigate, move to "HBA0: Marvell 0" and press Enter to select
-
Press Enter again to open the Configuration Wizard
![Marvell BIOS Setup (c) 2009 Marvell Technology Group Ltd. Topology Information HBA 0: Marvell 0 [Configuration Wizard] : 1B48 - Virtual Disks : 91xx - Free Physical D : B1 - HDD 0: MDC WD1002FAEX BIOS Version : 1.0.0.1029 - HDD 1: MDC WD1002FAEX Firmware Version : 2.2.0.1108 PCIe Speed Rate : 5.0Gbps Configure SATA as: AHCI Mode Supported Mode : RAID0 RAID1 Safe Capacity](/content/2026/05/960072/images/6b33086514a210514a86ac57afc56fbee0795bc272fbd5a9fa9e60a8f0877fbd.jpg)
- Use the arrow keys to scroll through the list of free physical disks to select the drives that will be part of the RAID set. Press Space to select/de-select a disk.
NOTE: When a disk is selected, an asterisk (*) appears to the left of the disk label.
-
After selecting the required disks, press Enter to continue.
-
The "Create Virtual Disk" configuration options appear in the "Information" pane (right-side), here you are able to select the RAID level and other configuration options:
a. Select 2 HDDs for RAID 0 or RAID 1
b. Select 3 HDDs for RAID 0
c. Select 4 HDDs for RAID 0 or RAID 10
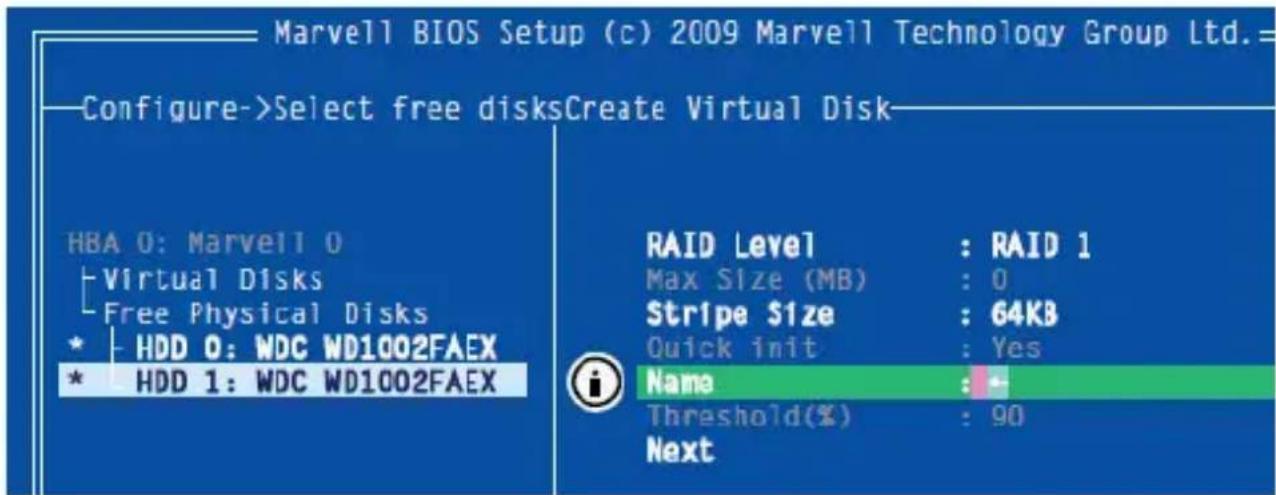
- After configuring the virtual disk, highlight "Next" and press Enter. Press Y to confirm the creation of the virtual disk. It will now be listed in the Topology Pane (left).
Administration Console Method
WARNING! Creating a RAID virtual disk destroys all data on the physical disks included in the virtual disk set. Make sure to back up all data before continuing.
- From the left pane of main screen of the Marvell Storage Utility (MSU), select the adapter and hover the mouse over the "Operation" tab.
- Select "Create RAID"
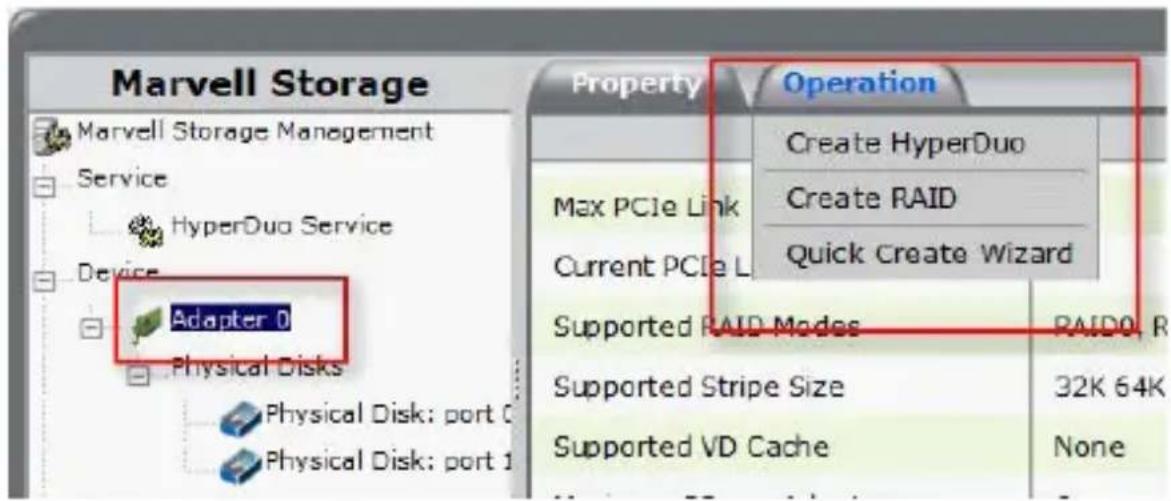
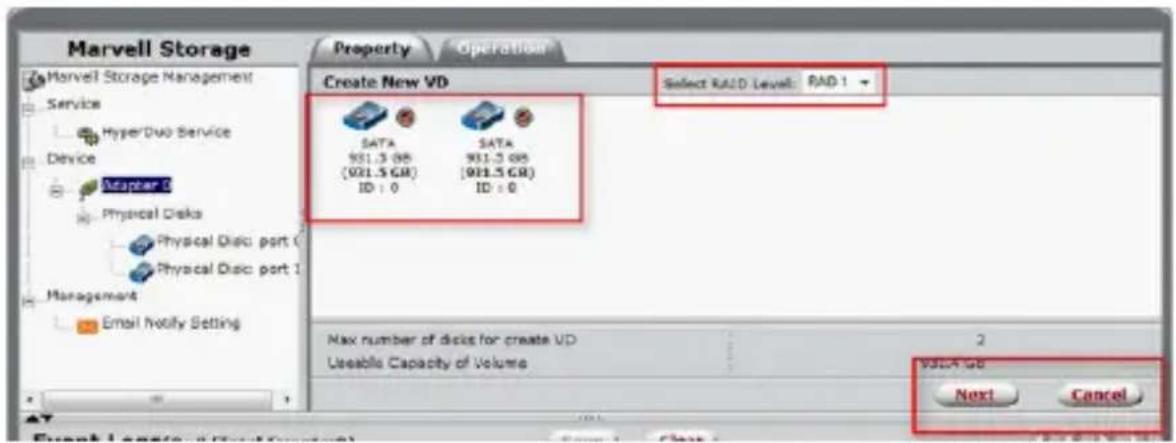
- From the "Create new VD" screen that appears, click the "Select RAID Level" drop-down to choose the appropriate RAID type
- This will enable you to place a checkbox beside the disks that you would like to use as part of the RAID set. Once you have selected, click "Next" to confirm your selection.
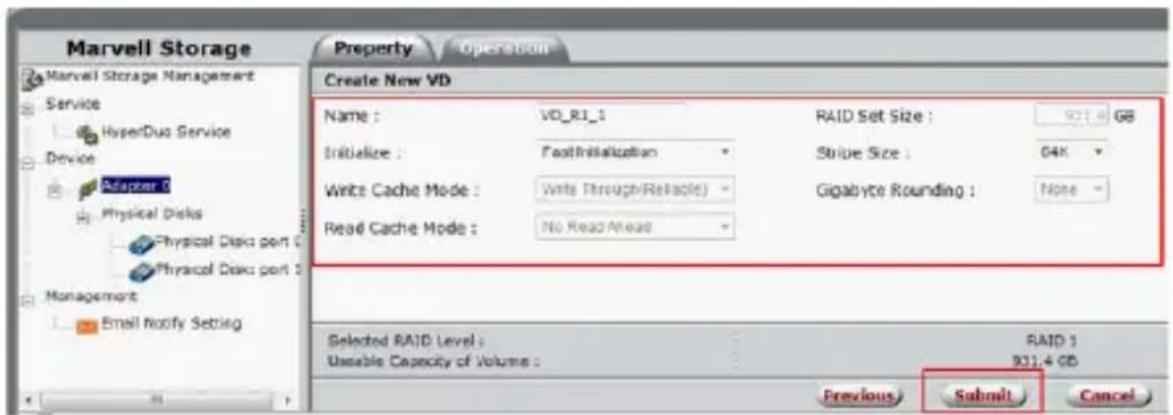
- You will now be presented with configuration options for your RAID set. Choose the appropriate options and select "Submit" to confirm your changes. Your virtual disk will then be visible in the left pane – the same properties can be accessed later by selecting your virtual disk from the left pane.
HyperDuo Configuration
HyperDuo offers the following two modes that you can configure using either of the procedures outlined in the following sections:
- Safe mode creates a virtual disk that is optimized for best fault tolerance – the frequently accessed files copied to the SSD for performance are also stored on the HDD. It is safe to use with hard drives that contain existing data. Virtual disks created in safe mode can also be partially rebuilt if the SSD fails, but not if the HDD fails.
- Capacity mode creates a virtual disk that is optimized for maximum utilization of the SSD – the frequently accessed files are moved to the SSD (not copied). Virtual disks created in capacity mode have better read and write performance than those created in safe mode. However, they cannot be rebuilt.
WARNING! Capacity mode is a data-destructive process. Please back up all data before using capacity mode.
Card BIOS Method
- When prompted on startup, press Ctrl+M to enter the card BIOS utility
Press
- Using the arrow keys to navigate, move to "HBA0: Marvell 0" and press Enter to select
- Press Enter again to open the Configuration Wizard
![Marvell BIOS Setup (c) 2009 Marvell Technology Group Ltd. Topology——— Information—— HBA O: Marvell D [Configuration Wizard] : 1B4B Virtual Disks : 91xx Free Physical D : B1 SSD O: C300-MTFDDAC25 BIOS Version : 1.0.0.1029 HDD 1: WDC WD1002FAEX Firmware Version : 2.2.0.1108 PCIe Speed Rate : 5.0Gbps Configure SATA as: AHCI Mode Supported Mode : RAIDO RAID1 Safe Capacity](/content/2026/05/960072/images/b05b97e4edd6f066b465d048792eff337ff41da43967fd7847301846a008597c.jpg)
- Use the arrow keys to scroll through the list of free physical disks to select the drives that will be part of the HyperDuo set. Press Space to select/de-select a disk.
NOTE: When a disk is selected, an asterisk (*) appears to the left of the disk label.
- After selecting the required disks, press Enter to continue.
- The "Create Virtual Disk" configuration options appear in the "Information" pane (right-side), here you are able to select HyperDuo or RAID options
NOTE: The default HyperDuo mode is Safe mode.
- Highlight "Keep original data" and press Enter to select. Select Yes or No and press Enter.
WARNING! Selecting "No" will destroy all data on the disks included in the virtual disk set. Make sure to back up all data before continuing. The "Keep original data" option is disabled when you choose Capacity mode, as it is inherently data-destructive.
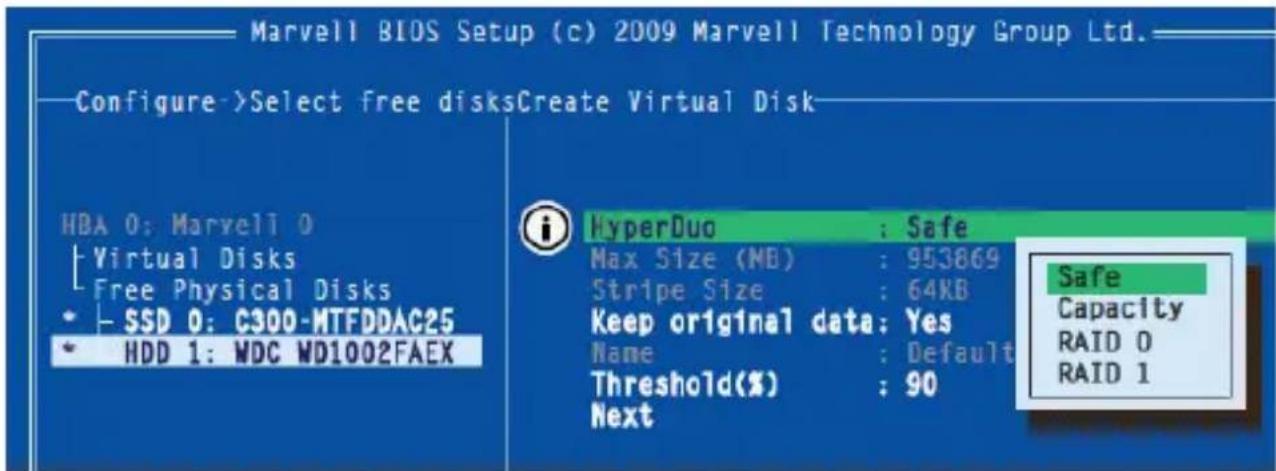
- After configuring the virtual disk, highlight "Next" and press Enter. Press Y to confirm the creation of the virtual disk. It will now be listed in the Topology Pane (left).
Administration Console Method
-
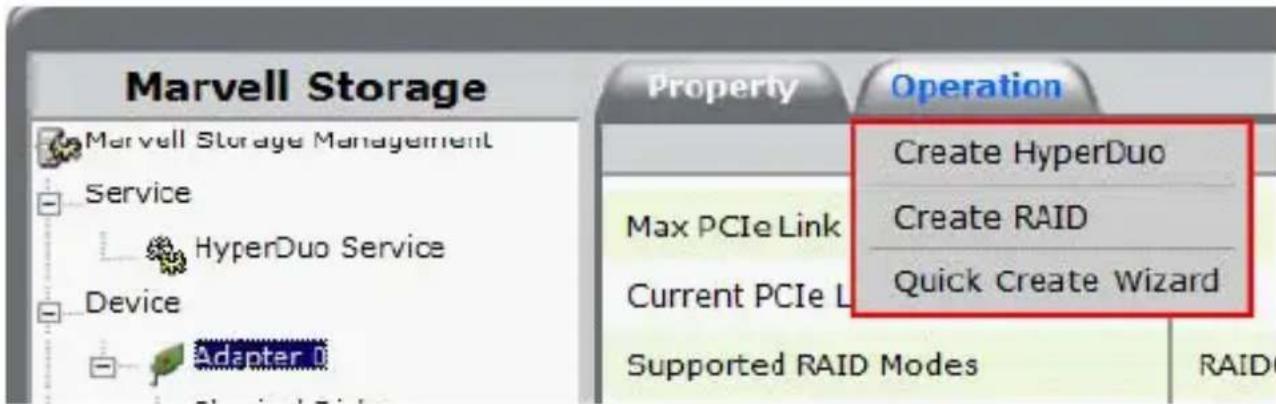
From the left pane of main screen of the Marvell Storage Utility (MSU), select the adapter and hover the mouse over the "Operation" tab.
-
Select "Create HyperDuo"
- Select either Safe mode or Capacity mode from the drop-down in the right pane. Click the "Submit" button once you have selected the appropriate options for your operation.
NOTE: If Safe mode is selected, you will have the option to select the checkbox marked "Keep Original Data" – this option is NOT available in Capacity mode, as it is inherently data-destructive.
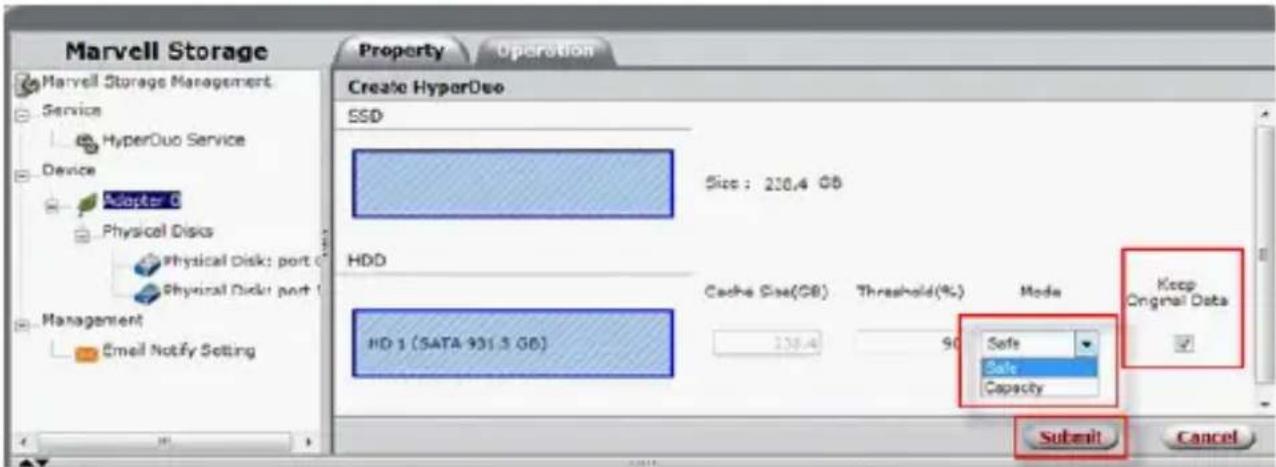
The newly created HyperDuo drive will then appear in the left pane and begin initializing. This can take up to 30 minutes to complete, and system performance may be slow during this period.
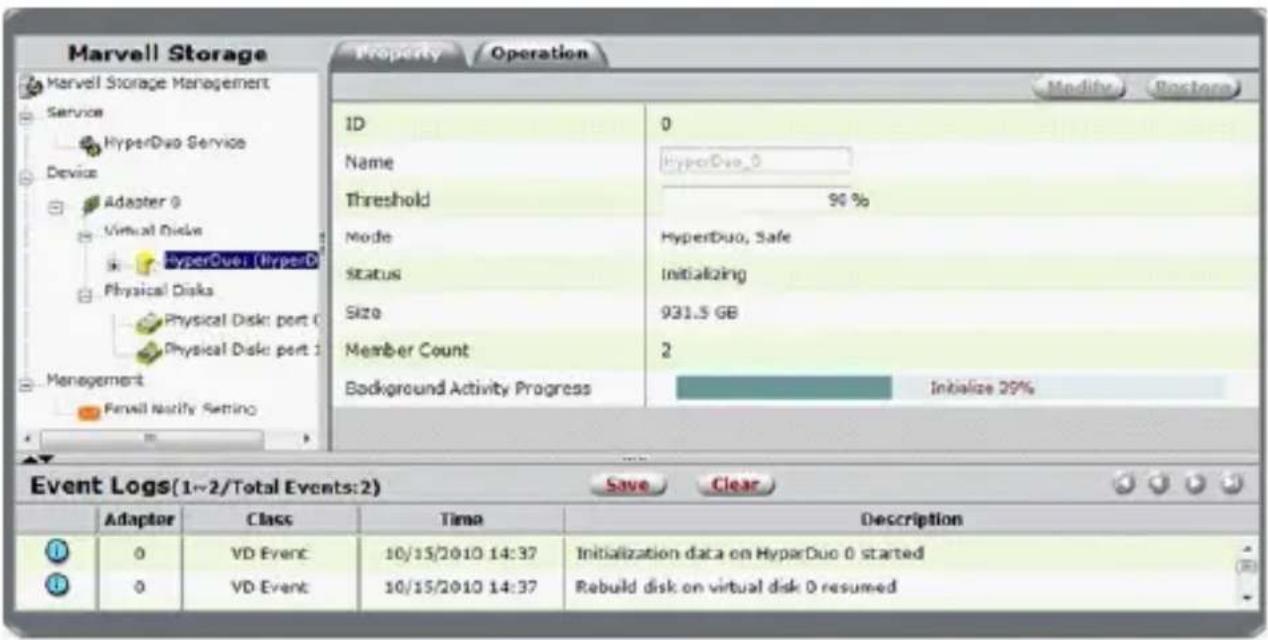
HyperDuo Management (Windows only)
- From the left pane of the MSU, select "HyperDuo Service"
- The right pane will then display available programs and folder that you can customize to one of the following optimization modes:
a. Check Auto to have the MSU manage the optimization of a folder or program automatically.
b. Check Cache to manually select a folder or program for optimization.
c. Check neither to specify that a folder or program should never be optimized.
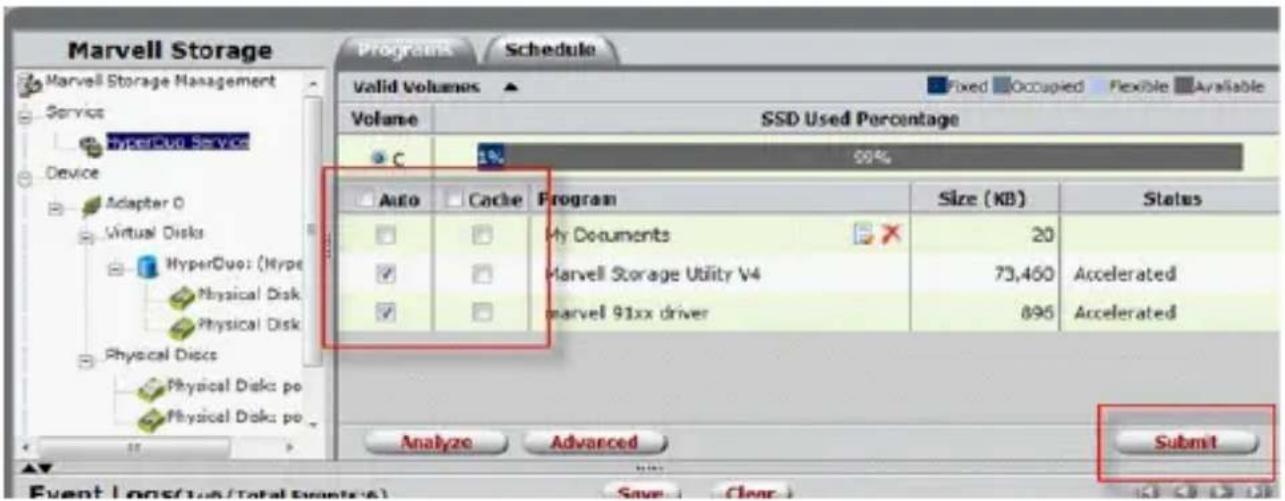
- Select Submit to apply your changes, then select "OK" on the pop-up that follows.
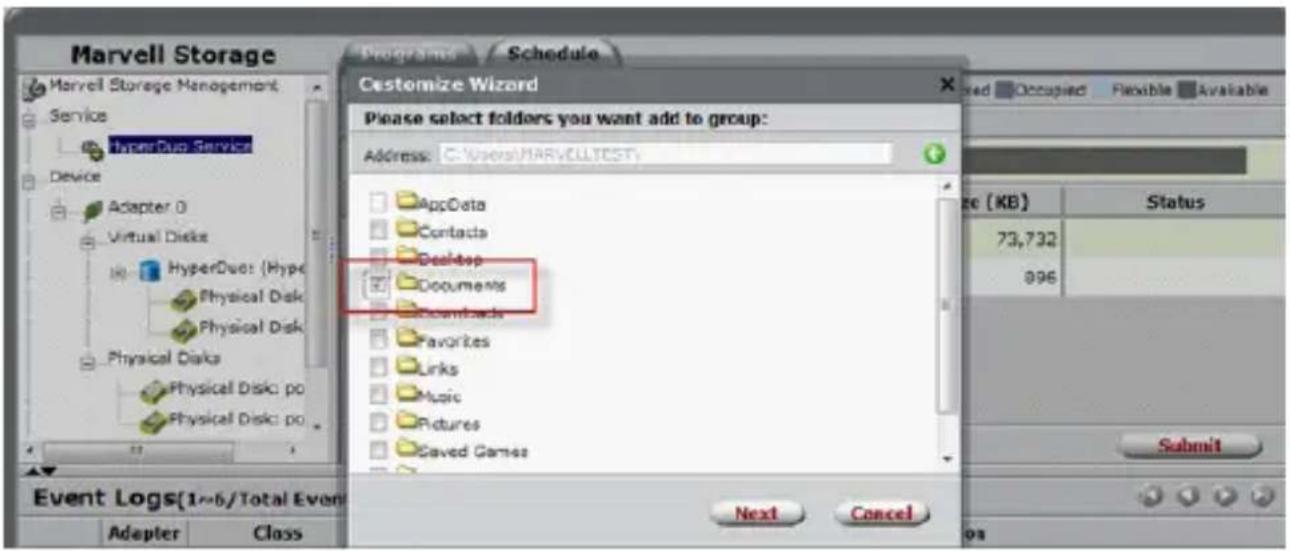
- If the folder you would like to optimize is not available, select "Advanced" from the "HyperDuo Service" pane.
- The "Customize Wizard" will pop-up and allow you to select the desired folders.
Specifications
Host Interface
PCI Express 2.0
SATA Revision 3.0
Form Factor Full/Low Profile
Chipset ID Marvell 9230
Internal Connectors 1x Mini-SAS (SFF-8087) receptacle*
Maximum Transfer Rate SATA: 6Gbps
RAID Support RAID 0, 1, 1+0
Port Multiplier Yes**
Operating Temperature 5°C \~ 50°C (41°F \~ 122°F)
Storage Temperature -25°C \~ 70°C (-13°F \~ 158°F)
Humidity 20% \~ 80% RH
Dimensions (LxWxH) 80mm x 120mm x 20mm
Weight 40g
Compatible Operating Systems
Windows XP(32/64-bit)/ Server
2003(32/64-bit)/ Vista(32/64-bit)/
7(32/64-bit)/ Server 2008 R2/ 8(32/64-
bit), Mac OS 10.6/ 10.7/ 10.8, Linux
*Not compatible with SAS drives, only SATA drives are supported.
**Port Multiplier is not supported in Mac OS
Technical Support
StarTech.com's lifetime technical support is an integral part of our commitment to provide industry-leading solutions. If you ever need help with your product, visit www.startech.com/support and access our comprehensive selection of online tools, documentation, and downloads.
For the latest drivers/software, please visit www.startech.com/downloads
Warranty Information
This product is backed by a two year warranty.
In addition, StarTech.com warrants its products against defects in materials and workmanship for the periods noted, following the initial date of purchase. During this period, the products may be returned for repair, or replacement with equivalent products at our discretion. The warranty covers parts and labor costs only. StarTech.com does not warrant its products from defects or damages arising from misuse, abuse, alteration, or normal wear and tear.
Limitation of Liability
In no event shall the liability of StarTech.com Ltd. and StarTech.com USA LLP (or their officers, directors, employees or agents) for any damages (whether direct or indirect, special, punitive, incidental, consequential, or otherwise), loss of profits, loss of business, or any pecuniary loss, arising out of or related to the use of the product exceed the actual price paid for the product. Some states do not allow the exclusion or limitation of incidental or consequential damages. If such laws apply, the limitations or exclusions contained in this statement may not apply to you.
Hard-to-find made easy. At StarTech.com, that isn't a slogan. It's a promise.
StarTech.com is your one-stop source for every connectivity part you need. From the latest technology to legacy products — and all the parts that bridge the old and new — we can help you find the parts that connect your solutions.
We make it easy to locate the parts, and we quickly deliver them wherever they need to go. Just talk to one of our tech advisors or visit our website. You'll be connected to the products you need in no time.
Visit www.startech.com for complete information on all StarTech.com products and to access exclusive resources and time-saving tools.
StarTech.com is an ISO 9001 Registered manufacturer of connectivity and technology parts. StarTech.com was founded in 1985 and has operations in the United States, Canada, the United Kingdom and Taiwan servicing a worldwide market.
- Port PCIe 2.0 SATA III 6Gbps RAID Controller
- FCC Compliance Statement
- Use of Trademarks, Registered Trademarks, and other Protected Names and Symbols
- Table of Contents
- Introduction ....1
- Installation ....3
- Operation 8
- Specifications ....15
- Technical Support 16
- Warranty Information 16
- Introduction
- Packaging Contents
- System Requirements
- Installation
- Hardware Installation
- Driver Installation
- Windows XP
- Management Utility Installation (Optional - Windows only)
- b. Firefox
- Windows Vista/ 7/ 8
- Verifying Installation
- Windows
- Operation
- RAID Configuration
- Card BIOS Method
- Administration Console Method
- HyperDuo Configuration
- HyperDuo Management (Windows only)
- Specifications
- Technical Support
- Warranty Information
- Limitation of Liability
Brand : StarTech.com
Model : PEXSAT34SFF
Category : Controller