G700 - Office THERMALTAKE - Free user manual and instructions
Find the device manual for free G700 THERMALTAKE in PDF.


| Product Type | Office Chair |
| Brand | Thermaltake |
| Model | G700 |
| Overall Dimensions (W x D x H) | 28.3 x 27.6 x 47.2 inches (720 x 700 x 1200 mm) |
| Seat Dimensions (W x D) | 20.5 x 19.3 inches (520 x 490 mm) |
| Backrest Height | 27.6 inches (700 mm) |
| Weight Capacity | 330 lbs (150 kg) |
| Net Weight | 44.1 lbs (20 kg) |
| Material | PU leather upholstery, foam padding, nylon base |
| Armrests | 2D adjustable (height and angle) |
| Seat Height Adjustment | Gas lift, range 18.9 - 23.6 inches (480 - 600 mm) |
| Tilt Mechanism | Rocking with tilt lock and tension control |
| Headrest | Adjustable height and angle |
| Lumbar Support | Built-in adjustable lumbar cushion |
| Caster Wheels | 5 x 2.8 inches (71 mm) smooth-rolling nylon |
| Cleaning Instructions | Wipe with a damp cloth; avoid harsh chemicals |
| Safety Standards | Meets ANSI/BIFMA requirements |
| Spare Parts Availability | Replacement casters, gas lift, and armrests available from manufacturer |
| Repairability | Modular design allows replacement of major components |
| Warranty | 2 years limited warranty |
Frequently Asked Questions - G700 THERMALTAKE
User questions about G700 THERMALTAKE
0 question about this device. Answer the ones you know or ask your own.
Ask a new question about this device
Download the instructions for your Office in PDF format for free! Find your manual G700 - THERMALTAKE and take your electronic device back in hand. On this page are published all the documents necessary for the use of your device. G700 by THERMALTAKE.
USER MANUAL G700 THERMALTAKE
©2024 Thermaltake Technology Co., Ltd. All Rights Reserved.

thermaltake
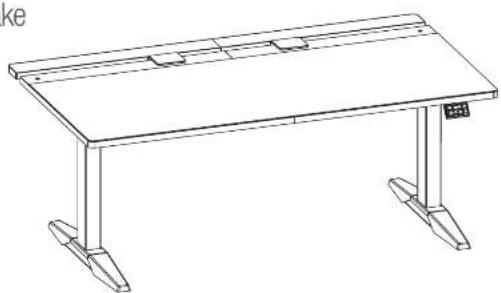
natural_image
Line drawing of a simple wooden table with legs and supports (no text or symbols)G700
RGB GAMING DESK
Assembly & User Manual
組裝 & 使用手冊
组装 & 使用说明

WARNING
COMPLY WITH OS DELIVER ALL ASSEMBLY SMART AND OPERATION INSTRUCTIONS AND ALLOWING SHOULD BE THE USE OF THIS PROJECT MAY INSERT IN BUSINESS HISTORY ISSUE
IMPORTANT INFORMATION
• The document contains all relevant safety regulations. Any non-claiming use may result in personal use or mechanical damage.
Please read this operation manual carefully before use. The manual provides a key of important information about the safety use, assembly and subsequent maintenance of the lifting tool.
- If this desk is sold, please provide his manual to the buyer.
Do not all or stand on the desk. Do not crawl or lie under the desk.
Failure to comply with or ignore any safety requirements, assembly instructions, new operations and mechanical warnings may result in serious personal injury or mechanical damage. Please operate
* Ensure that you have received all parts according to the component checklist prior to hesitation. If any parts are missing or faulty, telephone your local distributor for a replacement.
If the supply cord is damaged, it must be replaced by the manufacturer and its service agent in order to avoid a hazard.
- This product is not intended for use by young children without supervision.
• This product contains small items that could be a choosing hazard if swallowed. Keep these items away from children.
• This product is intended for indoor use only, using this product guidance could lead to product failure and personal injury.
• This product can be used by children from 8 years old [supervised] to Adult. Use with disabilities or act of experience and operating knowledge should be supervised and given careful
Do not over tighten screws during installation.
CAUTION
• The man plans the product away from consumption gas, wine and daily environment.
+Alteration or modeling of any factory components outlined in the checklist will automatically void your warranty.
USE & LIABILITY
• This product is intended for indoor use only. Using this product outdoor could lead to product failure and potential injury
• The height adjustable dose is designed for indoor use and dry work areas only. The dose height is adjustable so that it can be positioned at the most suitable height. Any other use is of the surfaces
The following described text in the above section is clearly written in accordance with the applicable instructions and rules of the authoring of the author.

| Motor | |
| Voltage | Input 110V/Input 240V |
| Speed | 35mm/s |
| Motor | Two motor with two-stage lifting system |
| Duty cycle | 10%. Max 2 mins on/ 18 mins off. |
Safety certifications
| Controller | |
| Controller | Standard 2-Button: descend buttons, Ascend buttons |
| Memory | 2 Memory Settings |
| RGB | Lighting Control |
Function
| Frame | |
| Size | 160cm(L) x 88,7cm(W) | 62,99"(L) x 34,92"(W) |
| Height range | 61cm ~ 125cm | 24° ~ 49.2° |
| Max Load | 130 kg / 286 lb |
| Material | Steel-constructed frame for max stability |
| Cable management | Yes |
| Desktop | |
| Size | 160cm(L) x 88.7cm(W) | 62.99"(L) x 34.92"(W) |
| Desktop thickness | 2.5 cm / 0.98" |
| Material | MDF desktop - premium material with anti-scratch / high-pressure Laminate P2 |
| Scratch coating | Yes |
| RGB LED Lighting Strip | 16.8 million colors |
| Others | |
| Function | Black |
| Frame color | Black |
| Warranty | 2 year warranty(desktop, motor, frame, controller), |
Check if the rubber pads on the Crossbar HA and Side Brackets I-E have fallen off. If any, find the pads in the package and assemble them back.
1 Step 1/步骤1/步骤1
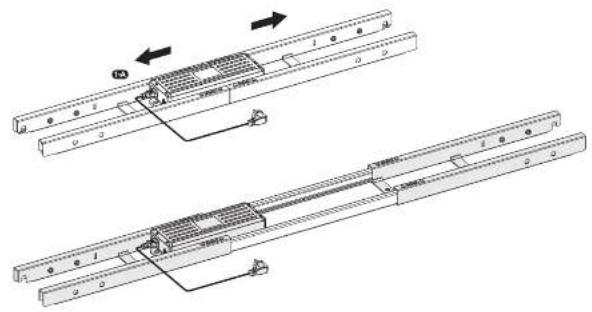
2 Step 2/步骤2/步骤2
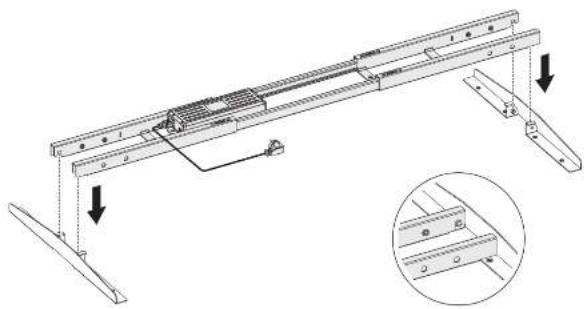
natural_image
Technical line drawing of a mechanical support frame with mounting brackets and a magnified inset showing internal components (no text or symbols)3 Step 3/步骤3/步骤3
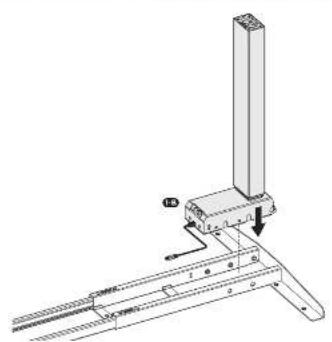
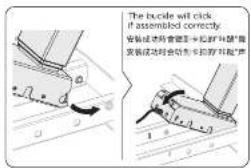
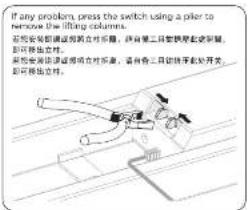
Step 5/步骤5/步骤5
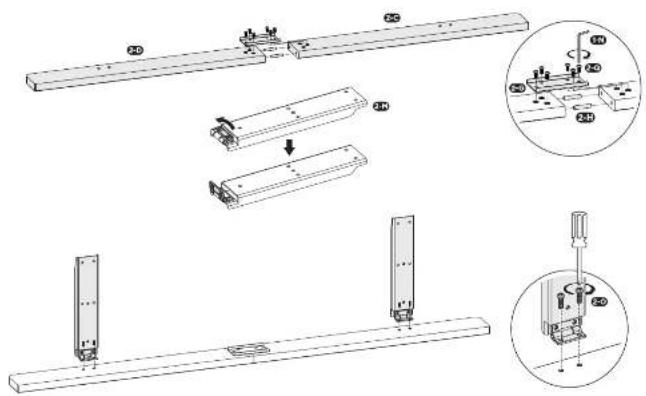
6 Step 6/步骤6/步骤6
Please prepare a spacious area for installation, and put a shipping blanket on the area to prevent scratches. 為防止刮花桌板,请先用防滑垫/塑料膜等铺在地面上,再将桌板底面朝上放置。为防止刮花桌板,请先用防滑垫/塑料膜等铺在地面上,再将桌板底面朝上放置。
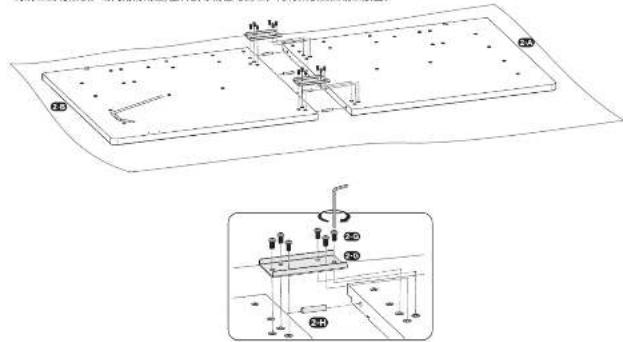
7 Step 7/步骤7/步骤7
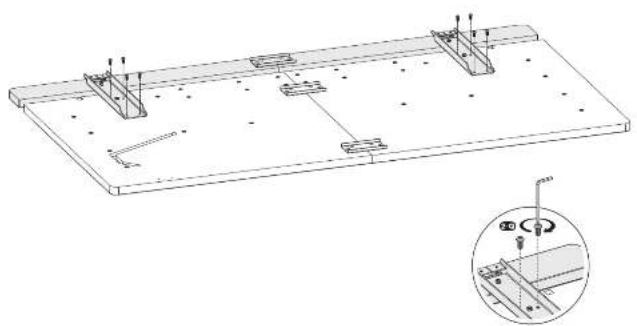
natural_image
Technical line drawing of a mechanical assembly with mounting brackets and a magnified inset showing internal components (no text or symbols)8 Step 8/步骤8/步骤8
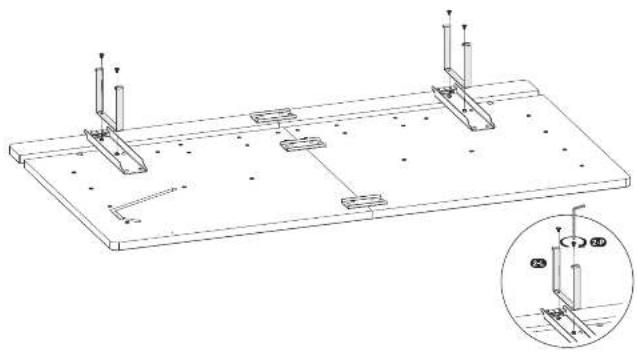
natural_image
Technical line drawing of a structural support frame with mounting points and a magnified inset showing internal components (no text or symbols)9 Step 9/步骤9/步骤9
Route the cable into the slot on the desktop.
Route the cable of the controller out from the lifting column after locating the frame.
natural_image
Technical line drawing of a mechanical assembly with two vertical supports and internal components, shown with an inset detail (no text or symbols)Step 11/步骤11/步骤11
natural_image
Technical line drawing of a mechanical assembly with two vertical supports and three stacked books below (no text or symbols)natural_image
Technical line drawing of a mechanical assembly with no visible text or symbols15 Step 15/步骤15/步骤15
Route the light strip from the side hole of the desktop, and connect it to the adapter. 将熔丝绕桌子连接的孔穿通,若接枪至熔丝连接器上。 将灯带从桌子边墙的孔穿过,并连接至灯带适配器上。
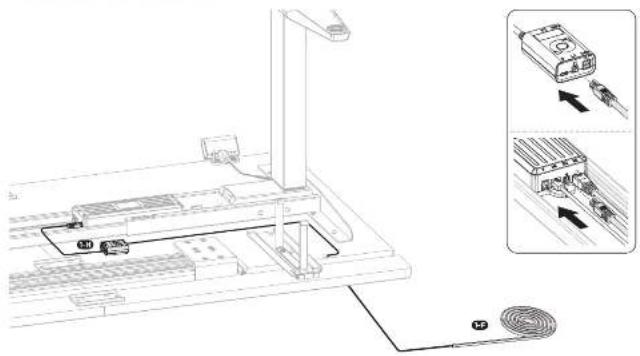
16 Step 16/步骤16/步骤16
17 Step 17/步骤17/步骤17
Ensure the translucent side of light strip facing outside, and put on decorative plates.
18 Step 18/步骤18/步骤18
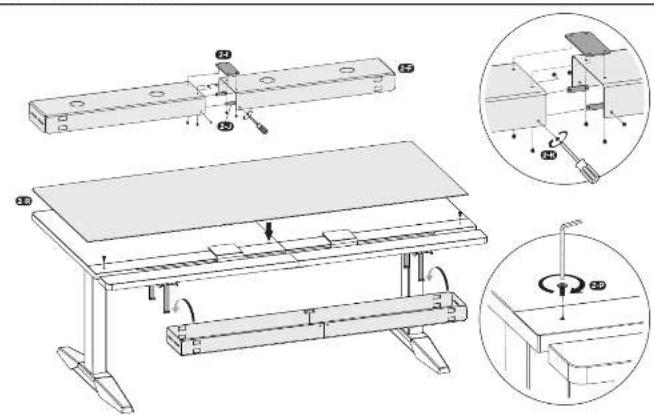
natural_image
Simple line drawing of a computer mouse connected to a device on a surface (no text or symbols)Controller Instruction
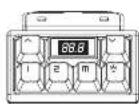
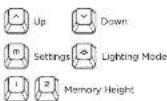
-Memory Settings
Adjust the desk to the cleaned height, press (0) and the display will show 5. Press 1 or 2 to save the current height as 5.1 or 5.3. Press 1 or 2 to adjust the desk to the position automatically.
•Lighting Mode
Press ☑ to switch the lighting effects, and press ☑ to set the desired one.
•Highest and Lowest Limit Settings
Adjust the desk to the desired height, press in and the display will show S. Press or and then press and hold for 3 seconds. When the display shows PSS if indicates the current height is the maximum height limit, while PSS indicates the minimum height limit. Press and hold again for 3 seconds, and the display will show S5 indicating removing all limit settings.
•Lock and Unlock
Press and hold ④ for 8 seconds until the display shows the controller. Repeat the secretion to unlock
Lyt
- Reset the System (Adjust the desk to the lowest position first.)
Press and hold ☑ for 5 seconds until the display shows IFS to reset the system. Repeat the operation to exit reset mode
-Adjust the Actual Minimum Height Number
in reset mode, press and hold for 5 seconds, and the display will flash Press on to adjust the display height to the actual minimum height. After 5 seconds, it will back to RSF, indicating the setting is completed (only modify the display value).
•Switch the One-Touch/Constant-Touch Memory Program
In 85% reset mode, press and hold for 5 seconds to switch the memory program. Indicates "one-touch memory program"—only press or once to reach memory height. Indicates "constant-touch memory program"—keep pressing or until it reaches memory height.
- CM/INCH Conversion
In 85T reset mode, press and hold for 5 seconds to switch CM/INCH display units indicates "CM" and 14 indicates "INCH".
-Adjust Collision Sensitivity
In RST rise mode, press and hold for 5 seconds to adjust the sensitivity. 10.5 indicates high sensitivity. 20.6 indicates middle sensitivity and 31.7 indicates low sensitivity.
升降控制器使用說明
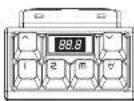


·设置記憶高度

- IMPORTANT INFORMATION
- Do not over tighten screws during installation.
- CAUTION
- USE & LIABILITY
- Step 9/步骤9/步骤9
- Step 11/步骤11/步骤11
- Step 15/步骤15/步骤15
- Step 16/步骤16/步骤16
- Step 17/步骤17/步骤17
- Step 18/步骤18/步骤18
- Controller Instruction
- -Memory Settings
- •Lighting Mode
- •Highest and Lowest Limit Settings
- •Lock and Unlock
- - Reset the System (Adjust the desk to the lowest position first.)
- -Adjust the Actual Minimum Height Number
- •Switch the One-Touch/Constant-Touch Memory Program
- - CM/INCH Conversion
- -Adjust Collision Sensitivity
- 升降控制器使用說明
- ·设置記憶高度
Brand : THERMALTAKE
Model : G700
Category : Office