
D20 - Saw Draper - Free user manual and instructions
Find the device manual for free D20 Draper in PDF.


| Product Type | Circular Saw |
| Brand | Draper |
| Model | D20 |
| Power Source | AC Mains (230V) |
| Power Consumption | 1200 W |
| No-Load Speed | 5000 rpm |
| Blade Diameter | 190 mm |
| Cutting Depth at 90° | 65 mm |
| Cutting Depth at 45° | 45 mm |
| Bevel Capacity | 0° - 45° |
| Weight | 4.2 kg |
| Dimensions (L x W x H) | 310 x 240 x 260 mm |
| Safety Features | Blade guard, spindle lock, double insulation |
| Maintenance | Clean vents, check carbon brushes regularly, lubricate bearings |
| Spare Parts Availability | Blades, carbon brushes, power cord |
| Repairability | User-serviceable carbon brushes; professional service for other repairs |
| Included Accessories | Circular saw blade, rip fence, blade wrench, dust extraction adapter |
Frequently Asked Questions - D20 Draper
User questions about D20 Draper
0 question about this device. Answer the ones you know or ask your own.
Ask a new question about this device
Download the instructions for your Saw in PDF format for free! Find your manual D20 - Draper and take your electronic device back in hand. On this page are published all the documents necessary for the use of your device. D20 by Draper.
USER MANUAL D20 Draper
natural_image
Exterior view of a black and white ORECON Double Guard 90 chain clamp (no text or symbols on the device itself)CE
These instructions accompanying the product are the original instructions. This document is part of the product, keep it for the life of the product passing it on to any subsequent holder of the product. Read all these instructions before assembling, operating or maintaining this product.
This manual has been compiled by Draper Tools describing the purpose for which the product has been designed, and contains all the necessary information to ensure its correct and safe use. By following all the general safety instructions contained in this manual, it will ensure both product and operator safety, together with longer life of the product itself.
All photographs and drawings in this manual are supplied by Draper Tools to help illustrate the operation of the product.
Whilst every effort has been made to ensure the accuracy of information contained in this manual, the Draper Tools policy of continuous improvement determines the right to make modifications without prior warning.
1. TITLE PAGE
1.1 INTRODUCTION:
USER MANUAL FOR: 40V Chainsaw
Stock No: 92423
Part No: D20G/CS40
1.2 REVISIONS:
Date first published July 2019.
As our user manuals are continually updated, users should make sure that they use the very latest version.
Downloads are available from: http://drapertools.com/manuals
Draper Tools Limited
Hursley Road
Chandler's Ford
Eastleigh
Hampshire
SO53 1YF
UK
Website: drapertools.com
Product help line: +44 (0) 23 8049 4344
General Fax: +44 (0) 23 8026 0784
1.3 UNDERSTANDING THIS MANUALS SAFETY CONTENT:
WARNING! – Information that draws attention to the risk of injury or death.
CAUTION! – Information that draws attention to the risk of damage to the product or surroundings.
1.4 COPYRIGHT © NOTICE:
Copyright © Draper Tools Limited.
Permission is granted to reproduce this publication for personal and educational use only. Commercial copying, redistribution, hiring or lending is prohibited.
No part of this publication may be stored in a retrieval system or transmitted in any other form or means without written permission from Draper Tools Limited.
In all cases this copyright notice must remain intact.
2. CONTENTS
1. TITLE PAGE
1.1 INTRODUCTION....2
1.2 REVISION HISTORY 2
1.3 UNDERSTANDING THIS MANUAL 2
1.4 COPYRIGHT NOTICE 2
2. CONTENTS
2.1 CONTENTS....3
3. WARRANTY
3.1 WARRANTY....4
4. INTRODUCTION
4.1 SCOPE 5
4.2 SPECIFICATION 5
4.3 HANDLING & STORAGE 5
5. HEALTH AND SAFETY INFORMATION
5.1 GENERAL POWER TOOL SAFETY WARNINGS....6-7
5.2 GENERAL CHAINSAW SAFETY INFORMATION 7-8
5.3 CHAINSAW OPERATIONAL SAFETY INFORMATION 8-10
5.4 RESIDUAL RISK 10
5.5 SAFETY INSTRUCTIONS FOR MAINS POWERED CHARGERS & BATTERY PACKS 11-12
5.6 CONNECTION TO THE POWER SUPPLY (CHARGER SOLD SEPARATELY)......12
6. TECHNICAL DESCRIPTION
6.1 IDENTIFICATION 13
7. UNPACKING AND CHECKING
7.1 PACKAGING 14
7.2 D20 MULTI-TOOL INTERCHANGEABLE BATTERY SYSTEM 14
7.3 WHAT'S IN THE BOX....14
8. PREPARING THE CHAINSAW
8.1 BATTERY PACK CHARGING 15-16
8.2 BATTERY PACK PROTECTION FEATURES 16
8.3 BATTERY PACK CHARGE STATUS....16
8.4 BATTERY LIFE EFFICIENCY AND CHARGING ADVICE 16
8.5 ATTACHING/ADJUSTING GUIDE BAR AND CHAIN 17
8.6 TENSIONING THE SAW CHAIN 17-18
8.7 LUBRICATION 18
9. BASIC CHAINSAW OPERATIONS
9.1 CHAIN BRAKE 19
9.2 RUNDOWN BRAKE 19
9.3 PERSONAL PROTECTIVE EQUIPMENT (PPE) 20
9.4 HOLDING THE CHAINSAW....20
9.5 KICKBACK 21-22
9.6 DELIMBING 23
9.7 CROSS CUTTING/BUCKING 23
9.8 SAW CHAIN 24
9.9 SHARPENING 24
9.10 BAR MAINTENANCE 24
10. MAINTENANCE AND TROUBLESHOOTING
10.1 MAINTENANCE 25
10.2 TROUBLESHOOTING 25
11. DISPOSAL
11.1 DISPOSAL 26
12. EXPLANATION OF SYMBOLS
12.1 EXPLANATION OF SYMBOLS 27
DECLARATION OF CONFORMITY ....ENCLOSED
3. WARRANTY
3.1 WARRANTY
Draper tools have been carefully tested and inspected before shipment and are guaranteed to be free from defective materials and workmanship.
Should the tool develop a fault, please return the complete tool to your nearest distributor or contact
Draper Tools Limited, Chandler's Ford, Eastleigh, Hampshire, SO53 1YF. England.
Telephone Sales Desk: (023) 8049 4333 or Product Help Line (023) 8049 4344.
A proof of purchase must be provided with the tool.
If upon inspection it is found that the fault occurring is due to defective materials or workmanship, repairs will be carried out free of charge. This warranty period covering labour is 12 months from the date of purchase except where tools are hired out when the warranty period is 90 days from the date of purchase. The warranty is extended to 24 months for parts only. This warranty does not apply to any consumable parts, any type of battery or normal wear and tear, nor does it cover any damage caused by misuse, careless or unsafe handling, alterations, accidents, or repairs attempted or made by any personnel other than the authorised Draper warranty repair agent.
Note: If the tool is found not to be within the terms of warranty, repairs and carriage charges will be quoted and made accordingly.
This warranty applies in lieu of any other warranty expressed or implied and variations of its terms are not authorised.
Your Draper warranty is not effective unless you can produce upon request a dated receipt or invoice to verify your proof of purchase within the warranty period.
Please note that this warranty is an additional benefit and does not affect your statutory rights.
Draper Tools Limited.
4. INTRODUCTION
4.1 SCOPE
Battery chainsaw designed for general lopping, limbing and felling of trees and branches.
As part of our core range, this product is suitable for enthusiasts and tradespeople alike. Any application other than that it was intended for, is considered misuse.
4.2 SPECIFICATION
Stock No. 92423
Part No. D20G/CS40
Rated voltage 40V (2x 20V)
Guide bar length: 420mm
356mm
Guide bar specification:.... Oregon Double Guard 50
Saw chain:
Specified pitch: 9.5mm(3/8")
Specified gauge
(thickness of drive links): 1.3mm(0.050")
Type of saw chain....Oregon 91PJ052X
Drive sprocket:
Specified no. of teeth: 6
Specified pitch: 9.5mm(3/8")
Chain speed: 8.5m/sec
Revolutions per minute (no load): 0-4,500r/min
Sound pressure level (LpA)*: 85.65dB(A)
Sound power level (LWA)**: 98.1dB(A)
Uncertainty (K): 3dB(A)
Vibration level Main handle†: 4.663m/s², K=1.5m/s²
Weight (machine only): 4.7kg
* Continuous A-Weighted Sound Pressure Level at the workstation in accordance to and declared according to EN60745.
** The typical A-weighted noise level determined according to EN60745.
4.3 HANDLING & STORAGE
— Care must be taken when handling this product.
- Dropping this power tool could have an effect on its accuracy and could also result in personal injury. This product is not a toy and must be respected.
- Environmental conditions can have a detrimental effect on this product if neglected.
- Exposure to damp air can gradually corrode components.
- If the product is unprotected from dust and debris, components will become clogged.
- If not cleaned and maintained correctly or regularly, the machine will not perform at its best.
5. HEALTH AND SAFETY INFORMATION
5.1 GENERAL POWER TOOL SAFETY WARNINGS
WARNING Read all safety warnings, instructions, illustrations and specifications provided with this power tool. Failure to follow all instructions listed below may result in electric shock, fire and/or serious injury.
Save all warnings and instructions for future reference.
The term "power tool" in the warnings refers to your mains-operated (corded) power tool or battery-operated (cordless) power tool.
Work area safety
Keep work area clean and well lit. Cluttered or dark areas invite accidents.
Do not operate power tools in explosive atmospheres, such as in the presence of flammable liquids, gases or dust. Power tools create sparks which may ignite the dust or fumes.
Keep children and bystanders away while operating a power tool. Distractions can cause you to lose control.
Electrical safety
Power tool plugs must match the outlet. Never modify the plug in any way. Do not use any adapter plugs with earthed (grounded) power tools. Unmodified plugs and matching outlets will reduce risk of electric shock.
Avoid body contact with earthed or grounded surfaces, such as pipes, radiators, ranges and refrigerators. There is an increased risk of electric shock if your body is earthed or grounded.
Do not expose power tools to rain or wet conditions. Water entering a power tool will increase the risk of electric shock.
Do not abuse the cord. Never use the cord for carrying, pulling or unplugging the power tool. Keep cord away from heat, oil, sharp edges or moving parts. Damaged or entangled cords increase the risk of electric shock.
When operating a power tool outdoors, use an extension cord suitable for outdoor use. Use of a cord suitable for outdoor use reduces the risk of electric shock.
If operating a power tool in a damp location is unavoidable, use a residual current device (RCD) protected supply. Use of an RCD reduces the risk of electric shock.
Personal safety
Stay alert, watch what you are doing and use common sense when operating a power tool. Do not use a power tool while you are tired or under the influence of drugs, alcohol or medication. A moment of inattention while operating power tools may result in serious personal injury.
Use personal protective equipment. Always wear eye protection. Protective equipment such as a dust mask, non-skid safety shoes, hard hat or hearing protection used for appropriate conditions will reduce personal injuries.
Prevent unintentional starting. Ensure the switch is in the off-position before connecting to power source and/or battery pack, picking up or carrying the tool. Carrying power tools with your finger on the switch or energising power tools that have the switch on invites accidents.
Remove any adjusting key or wrench before turning the power tool on. A wrench or a key left attached to a rotating part of the power tool may result in personal injury.
Do not overreach. Keep proper footing and balance at all times. This enables better control of the power tool in unexpected situations.
Dress properly. Do not wear loose clothing or jewellery. Keep your hair and clothing away from moving parts. Loose clothes, jewellery or long hair can be caught in moving parts.
If devices are provided for the connection of dust extraction and collection facilities, ensure these are connected and properly used. Use of dust collection can reduce dust-related hazards.
Do not let familiarity gained from frequent use of tools allow you to become complacent and ignore tool safety principles. A careless action can cause severe injury within a fraction of a second.
5. HEALTH AND SAFETY INFORMATION
Power tool use and care
Do not force the power tool. Use the correct power tool for your application. The correct power tool will do the job better and safer at the rate for which it was designed.
Do not use the power tool if the switch does not turn it on and off. Any power tool that cannot be controlled with the switch is dangerous and must be repaired.
Disconnect the plug from the power source and/or remove the battery pack, if detachable, from the power tool before making any adjustments, changing accessories, or storing power tools. Such preventive safety measures reduce the risk of starting the power tool accidentally.
Store idle power tools out of the reach of children and do not allow persons unfamiliar with the power tool or these instructions to operate the power tool. Power tools are dangerous in the hands of untrained users.
Maintain power tools and accessories. Check for misalignment or binding of moving parts, breakage of parts and any other condition that may affect the power tool's operation. If damaged, have the power tool repaired before use. Many accidents are caused by poorly maintained power tools.
Keep cutting tools sharp and clean. Properly maintained cutting tools with sharp cutting edges are less likely to bind and are easier to control.
Use the power tool, accessories and tool bits etc. in accordance with these instructions, taking into account the working conditions and the work to be performed. Use of the power tool for operations different from those intended could result in a hazardous situation.
Keep handles and grasping surfaces dry, clean and free from oil and grease. Slippery handles and grasping surfaces do not allow for safe handling and control of the tool in unexpected situations.
Service
Have your power tool serviced by a qualified repair person using only identical replacement parts. This will ensure that the safety of the power tool is maintained.
5.2 GENERAL CHAINSAW SAFETY INFORMATION
Chainsaws pose a very significant health and safety risk, even to careful and informed operators, for example, the use of a chainsaw in the workplace requires extensive training and certification. The dangers of using and applying a chainsaw should not be taken lightly. Seek guidance, training or employ a professional to carry out the task if uncertain or nervous of the potential risks and dangers involved.
Personal Protective Equipment (PPE)
- Due to the nature of a chainsaw, no PPE equipment can provide 100% protection against chainsaw cuts.
– Equipment specifically designed for use with a chainsaw shall be worn, consisting of;
• Safety helmet (EN 397).
• Mesh visor (EN 1731).
• Hearing protection (EN 352)
• Gloves (EN 381-7) with protective guard on back of left hand.
• Leg protection (EN 381-5).
• Non-slip boots (EN 345-2).
• High visibility jacket.
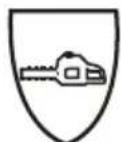
Leg protection is achieved with a chain clogging material designed to stop the saw chain before it penetrates fully through and into flesh. The gloves, boots and leg protection should be marked with the symbol below and indicate the chain speed to which they have been tested.
5. HEALTH AND SAFETY INFORMATION
Preparation
Before use inspect the guide bar grooves for distortion, the guide bar rail for cracks, the nose sprocket teeth condition, saw chain tension and condition, drive sprocket condition and operation and operation of the chain brake.
- Never operate the chainsaw alone in case of emergency. Have an assistant in visual/communicative range.
- Ensure the site is assessed for risk potential and a safe working distance is marked to prevent bystanders entering.
- In case of accident, ensure means of contact with emergency services are possible and adequate information is available to facilitate an urgent recovery.
— Always carry a basic first aid kit containing large wound dressings.
- Identify all services (e.g. gas, water, electric, phone etc.), particularly overhead before felling commences.
– Ensure a distance of at least twice the tree height is observed from all obstacles and dangers.
- Keep bystanders a minimum of 10M away and all access points into the work area marked accordingly.
- Tree felling must only be carried out by a single individual and only after the danger zones and escape routes have been identified and cleared.
— Do not fell when wind conditions may influence/control the direction.
- Close observation and inspection for dead or diseased wood and insecure limbs or branches must be carried out prior to any cutting. Dead wood can cause unexpected reactions during a routine felling.
- Remove any scrub or other obstructions from the area to enable a quick escape route and ensure visibility of the chain is not impeded during cutting.
- Plan work to reduce manual lifting, i.e. lightest off cuts move furthest.
- If work is a result of wind blow, ensure no unstable trees or limbs pose any further danger.
— Never stand on anything other than the ground.
- When preparing to work on the ground, e.g. cross cutting or limbing, ensure no obstacles are hidden or obscured from view. Contact with such an object can result in loss of footing or kickback from the chain saw.
5.3 CHAINSAW OPERATIONAL SAFETY INFORMATION
- Do not operate the chainsaw without being completely familiar on all safety aspects, functions and most importantly how to stop the chainsaw in an emergency.
— Do not operate the chainsaw above shoulder height. - Regularly clear cut material as build up will create a hazard under foot.
- Never use the chainsaw if the (stopping) switch is FAULTY or not functional.
- Prior to each use inspect the chainsaw for damage. Ensure all safety features and mechanisms function correctly and that the cutting means is of the type and design as specified by the manufacturer.
- Adopt a secure and balanced stance, bend knees instead of back. Hold the saw close into your body for balance.
- Maintain a good grip with both hands on the saw. The chainsaw is solely designed for operation of the rear handle by the right hand and the left handle on the front handle. Grip the front handle with left thumb underneath to allow resistance in case of kickback.
- Stop the chainsaw before setting it aside.
- Only begin cutting with saw chain speed at maximum.
5. HEALTH AND SAFETY INFORMATION
- Kickback occurs when the saw saw chain is stopped suddenly resulting in the tip or the guide bar being violently thrown up towards the operator's head/face. Correct stance and knowledge of the operating procedure can greatly reduce that risk.
- Operate the chain brake before moving with the saw. If moving more than a short distance, stop the saw and refit the bar guard.
- Do not attempt to use the chainsaw if tired, ill or under the influence of alcohol or other drugs.
Felling
- Remove lower branches/limbs from the tree up to shoulder height.
- When removing the lower branches ensure the operator is protected from kickback by using the tree stem for protection and keeping the guide bar out of line with the body (off set).
– Ensure the felling cut is completed in one cut for safety. - Never leave a partially felled tree.
- When the tree begins to fall move back and away at 45^ as quickly as possible. Branches on the underside of the tree can cause the stem to move sideways or backwards dangerously.
- In the event of a tree becoming hung in another tree or obstacle seek assistance from a professional. A hung tree poses many dangers and creates more potential risks than felling a normal tree. Do not abandon a hung tree, walk under or attempt to climb one.
- Always perform a notch cut followed by a felling cut to create a felling hinge. Felling wedges or levers may be necessary to prevent the chainsaw from becoming pinched in the felling cut.
Limbing
- Ensure the tree is stable before any limbering commences.
- The ideal working height for performing limbing is between waist and knee height.
- Stand on the left side of the stem, working from the root upwards, then return down the other side.
- Use the top (pushing chain) and bottom (pulling chain) to make the cuts, constantly taking note of the bar tip in conjunction with limbs further round the stem which may be less visible or obscured.
- Ensure the tip of the bar does not come into contact with the ground.
- If the felled tree is on a slope always remain above the tree in case the removal of a limb were to cause potentially dangerous movement.
– Rest the weight of the saw on the tree where possible. - Take care of limbs and undergrowth under tension as there is a danger of spring back once the cut has been performed.
- At regular intervals, stop the chainsaw and clear the cut debris to maintain a firm footing.
Cross cutting
- The timber must be raised off the ground with supports to perform a safe cut.
- When working on slopes, always work above the timber in case of movement.
- Always adopt a good firm footing.
– Observe the timber to assess the surfaces for tension. - Tension and compression in supported timber can result in the timber splitting or pinching the guide bar if incorrectly cut.
- Alleviate tension in the timber by making an initial cut (1/3) into the compressed surface before finishing the cut (2/3) into the tension surface.
- Stand off to the side of the saw in case of kickback.
5. HEALTH AND SAFETY INFORMATION
- If the chainsaw becomes trapped, switch off (and disconnect from the mains supply if applicable) immediately before attempting to free the guide bar. Use the correct tools when attempting to free a trapped saw.
— Be ready to step back quickly in case of the timber rolling.
– Ensure no debris is present in the work area.
Maintenance
- Never modify the chainsaw in anyway.
- Always maintain the chainsaw in good working order regularly serviced by an authorised service agent.
– Ensure the handles remain clean and free from oil & moisture. - Only use replacement parts supplied by the manufacturer.
- All safety devices must remain fitted, functioning and where possible serviced, especially the chain brake.
- Regularly inspect the saw chain lubricant level, regularly topping up. When the chainsaw is running at high speed the saw chain oil will dispel quicker and require checking/adjusting more frequently.
— Never operate the chainsaw without saw chain oil.
— Never operate the chainsaw with a mal adjusted or blunt chain as this is highly dangerous. - When the saw chain has warmed up, stop the chain & disconnect the main supply before checking/adjusting the tension.
- Prior to use check for chain oil distribution on a piece of paper or cut timber. Observe spatter before continuing.
— After each use clean the chainsaw thoroughly. - Regularly check external nuts and fixings to ensure vibration caused by normal use has not begun to loosen them.
– Periodically remove all shavings and sawdust from the visible parts of the chain brake mechanisms.
Storage
— Thoroughly clean/service the chainsaw and refit the bar guard.
- Locate the machine out the reach of children, in a dry locked unit.
5.4 RESIDUAL RISK
Important note: Although the safety instructions and operating manuals for our tools contain extensive instructions of safe working with power tools, every power tool involves a certain residual risk which can not be completely excluded by safety mechanisms. Power tools must therefore always be operated with caution!
5.5 SAFETY INSTRUCTIONS FOR MAINS POWERED CHARGERS & BATTERY PACKS
Chargers
— The charger is for indoor use only.
- Prior to plugging the charger in to the supply, check that the plug and the cable are in good repair. If either are damaged, have the defective item replaced immediately by a suitably qualified person. If the casing of the battery charger is damaged, it is good policy to have the charger checked over by a suitably qualified person.
- Only use a correctly rated mains outlet to provide power, do not plug into site generators, attach to engine generators or D.C. sources. Do not use a mains socket outlet that is not switched.
5. HEALTH AND SAFETY INFORMATION
- Use the correct Draper charger in conjunction with it's corresponding battery pack (consult the Draper website for more information or to find your local Draper stockist).
- Do not charge any other batteries with Draper chargers. Any other application is considered misuse.
- Do not attempt to charge battery packs that are too hot (over 30°C) or too cold (under 5°C), if these conditions apply set the battery pack aside to "normalise" before proceeding with the charging operation.
- Set up the charger and cable in a safe place where it won't be knocked, tripped over, stepped on, etc. and where it is well ventilated. Make sure the ventilation slots in the charger case are not obstructed, plug the charger into the socket outlet.
- Inspect the battery pack for damage, if it is undamaged, plug it into the charger, ensuring the correct orientation. (Most chargers and batteries have 'keys' etc, to make sure the battery pack is not inserted incorrectly, if you are having to 'force' the battery pack into the charger, the chances are you have it the wrong way round, check and try again.)
- Switch the charger on and check that the correct indicators illuminate, allow the battery pack to charge (see the specific instructions for your charger). Once charging is complete, switch the charger off, remove the battery pack and store, repeat the procedure if you have more than one battery pack to charge.
Caution: When the battery charger has been continuously used, the battery charger will be hot. Once the charging has been completed, give 15 minutes rest until the next charge.
- After charging is complete, unplug the charger from the socket outlet by pulling on the plug. Do not pull on the cable. Store the charger in a dry secure place.
- If, when the charger was switched on, the correct indications did not occur, leave for two or three minutes to allow the charger to stabilise, if the correct indications occur, allow the charging cycle to proceed as normal. If no indication appears at all, switch off, remove the battery pack, unplug the charger, check that the charger contacts and the battery contacts are clean and repeat the process. If there is still no indication, switch off, remove the battery pack, unplug the charger and check the fuse. If the fuse is blown, replace and repeat the process. If the fuse blows again, or if the fuse was intact, attempt no further action. Refer the charger to a suitably qualified person for repair.
Battery packs
— Before charging, read the instructions.
— For indoor use. Do not expose to rain.
— Only use Draper D20 battery packs with this product. Consult your Draper stockist for details.
- Do not charge any other manufacturer's battery packs using Draper chargers. Any other application is considered misuse.
— The batteries must be removed from the appliance before it is recycled.
— This product requires the use of two D20 20V batteries at any given time.
— The charger must be disconnected from the supply mains when removing the battery.
— The batteries are to be disposed of in-line with local authority procedures.
— Do not use any other than the designated Draper batteries/chargers with this product.
— Do not crush, open or burn the battery. Exposure to potentially harmful materials may occur.
— In case of fire use CO2 or dry chemical extinguisher.
— Do not expose to high temperatures >50^ C. The battery may degrade at high temperatures.
- Charge battery in conditions between 5°C to 30°C with the specified charger designed for this battery.
- Do not use battery if it has been stored at 5°C or less. Allow it to "normalise" at room temperature before usage/charging.
5. HEALTH AND SAFETY INFORMATION
Warning!
• Leaking battery packs
— The electrolyte in battery packs is corrosive. Avoid contact with the skin.
- If contact is made, flush the area with running water, pat dry and seek medical attention and advice at the earliest opportunity.
— Inform medical personnel that the contaminant is a "high alkaline, corrosive liquid".
- If electrolyte comes into contact with the eyes, flush with copious amounts of water only. Seek medical attention immediately, relaying the information above.
5.6 CONNECTION TO THE POWER SUPPLY (CHARGER SOLD SEPARATELY)
Caution: Risk of electric shock. Do not open.
This appliance is supplied with a moulded 3 pin mains plug for your safety. The value of the fuse fitted is marked on the pin face of the plug. Should the fuse need replacing, ensure the substitute is of the correct rating, approved to BS1362 and ASTA or BSI Kite marked.
ASTA ASTA BSI
The fuse cover is removable with a small plain slot screwdriver. Ensure the fuse cover is replaced before attempting to connect the plug to an electrical outlet. If the cover is missing, a replacement must be obtained or the plug replaced with a suitable type.
If a replacement plug is to be fitted this must be carried out by a qualified electrician.
The damaged or incomplete plug, when cut from the cable should be disabled to prevent connection to a live electrical outlet.
This appliance is Class II ^† and is designed for connection to a power supply matching that detailed on the rating label and compatible with the plug fitted.
If an extension lead is required, use an approved and compatible lead rated for this appliance. Follow all the instructions supplied with the extension lead.
^ Double insulated ☐: This product requires no earth connection as supplementary insulation is applied to the basic insulation to protect against electric shock in the event of failure of the basic insulation.
IMPORTANT
If using an extension lead, follow the instructions that came with your lead regarding maximum load while cable is wound. If in doubt, ensure that the entire cable is unwound. Using a coiled extension lead will generate heat which could melt the lead and cause a fire.
6. TECHNICAL DESCRIPTION
6.1 IDENTIFICATION
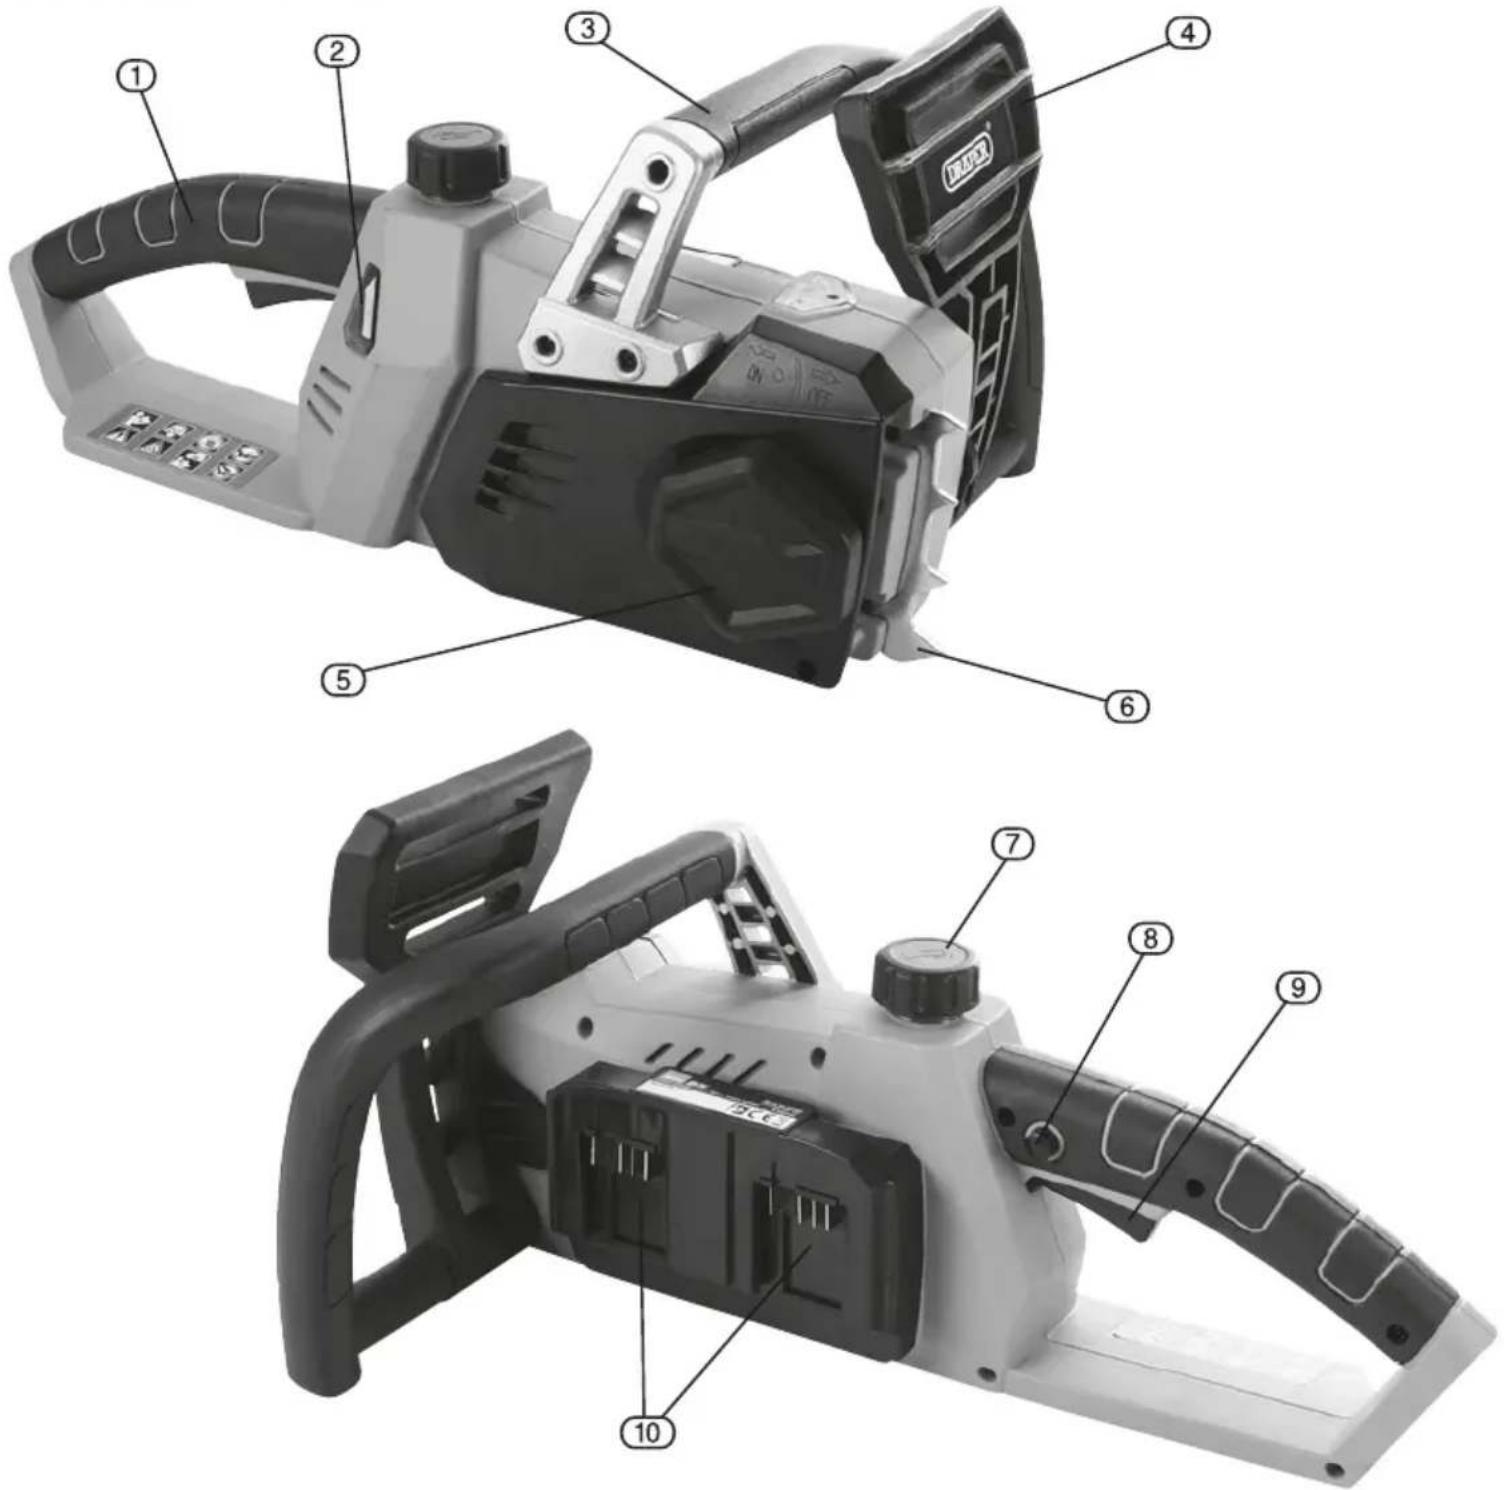
① Rear handle.
② Oil inspection window.
③ Front handle.
④ Brake lever (guard).
⑤ Knurling wheel for quick saw chain tension adjustment.
⑥ Spike bumper.
⑦ Chain lubrication filler cap.
⑧ Locking button.
⑨ Operating switch
⑩ Battery slots.
7. UNPACKING AND CHECKING
7.1 PACKAGING
Carefully remove the product from the packaging and examine it for any sign of damage that may have happened during shipping. Lay the contents out and check them against the parts shown below. If any part is damaged or missing, please contact the Draper Help Line (the telephone number appears on the Title page) and do not attempt to use the product.
The packaging material should be retained at least during the warranty period, in case the machine needs to be returned for repair.
Warning!
- Some of the packaging materials used may be harmful to children. Do not leave any of these materials in the reach of children.
- If any of the packaging is to be thrown away, make sure they are disposed of correctly, according to local regulations.
7.2 D20 MULTI-TOOL INTERCHANGEABLE BATTERY SYSTEM
The D20 range of tools are a range of tools suitable for enthusiasts and tradespersons alike, featuring a wide array of machines all running from the same range of batteries. Many different capacity batteries are available making sure you can balance tool weight with longevity and find a battery that

MULTI-TOOL BATTERY SYSTEM
meets your needs. To find out the latest range of accessories including batteries and chargers please consult the Draper website for more information or to find your local Draper stockist.
7.3 WHAT'S IN THE BOX
As well as the main product, there are also several other parts not fitted or attached to it:
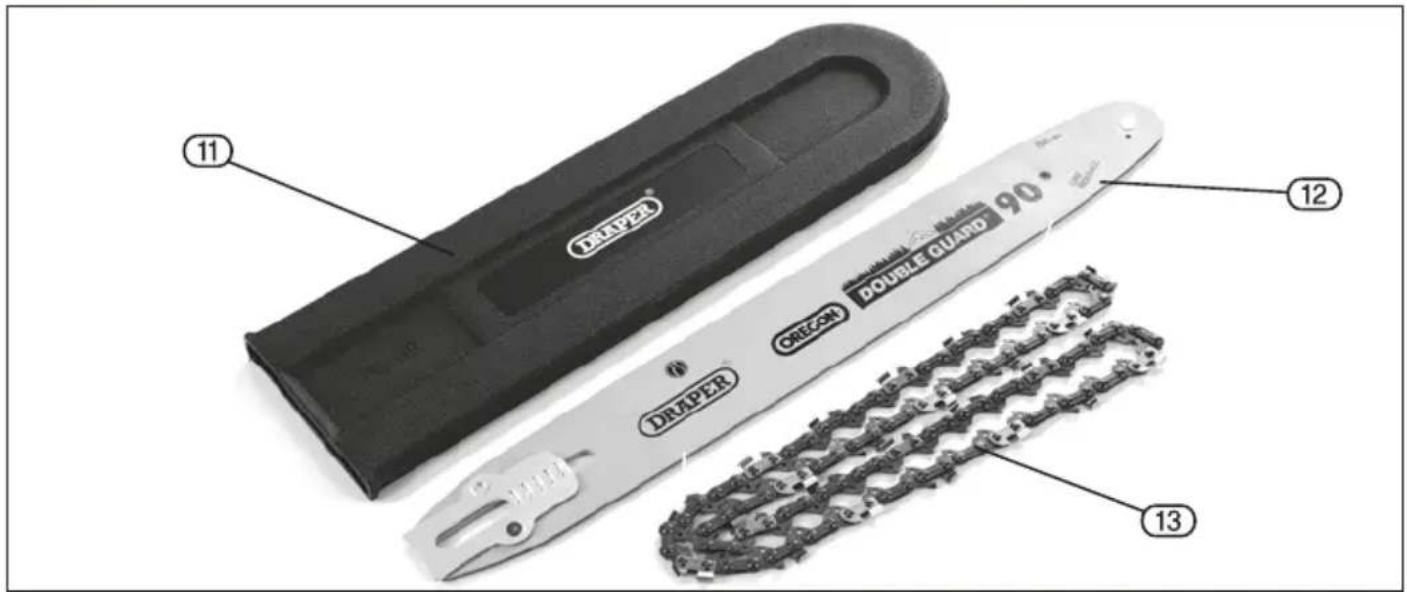
⑪ Guide bar sheath.
12 Guide bar.
13 Saw chain.
8. PREPARING THE CHAINSAW
8.1 BATTERY PACK CHARGING – FIGS. 1 – 2
This power product is supplied "bare", without battery pack or charger. Compatible batteries, chargers and accessories are available through Draper Tools stockists.
Important: Only Draper D20 designated battery packs and chargers can be used in conjunction with this product. Use of any other third party battery packs/chargers with this product is considered misuse and will invalidate the product's warranty.
Once connected to the mains supply, recharging of the battery can be left generally unsupervised, requiring minimal attention. Complex circuit construction monitors the battery condition, adjusting the recharge current to suit. When the recharge cycle is complete, to maintain the full capacity, a low output current will continue as required.
Warning! Check the condition of the charger and battery prior to each charge. If there is any sign of damage then do not commence charging, seek advice from Draper Tools.
The battery pack is supplied un-charged and must be charged before initial use.
To charge the battery pack (14) , it must first be removed from the tool.
To release the battery pack:
- Press the battery release button (14.1) and gently slide the battery pack off (Fig.1).
- Plug the battery charger 15 unit into a 230V/AC 13amp three pin supply socket.
- The red LED (15.1) will illuminate to show the charger has power.
– Slide the battery into the charger (the battery is shaped to fit into the charger one way only. - After a few seconds delay, the red LED (15.1) will flash to show that charging has begun, then illuminate solid red.
- Whilst the battery is charging, the green LED 15.2 will flash, (the red LED will go from flashing to constant red.
- When the battery is fully charged the green LED stops flashing and remains a constant green. The red LED will extinguish.
Caution: Do not pull the plug out of the power supply by pulling on the cord. Make sure to grasp the plug when removing from power supply to avoid damaging the cord.
To remove the battery from the battery charger:
– Supporting the battery charger with hand, pull out the battery from the battery charger.
Caution: If the battery charger has been in continuous use it will be hot. Once the charging has been completed, leave the charger 15 minutes to cool until next use.
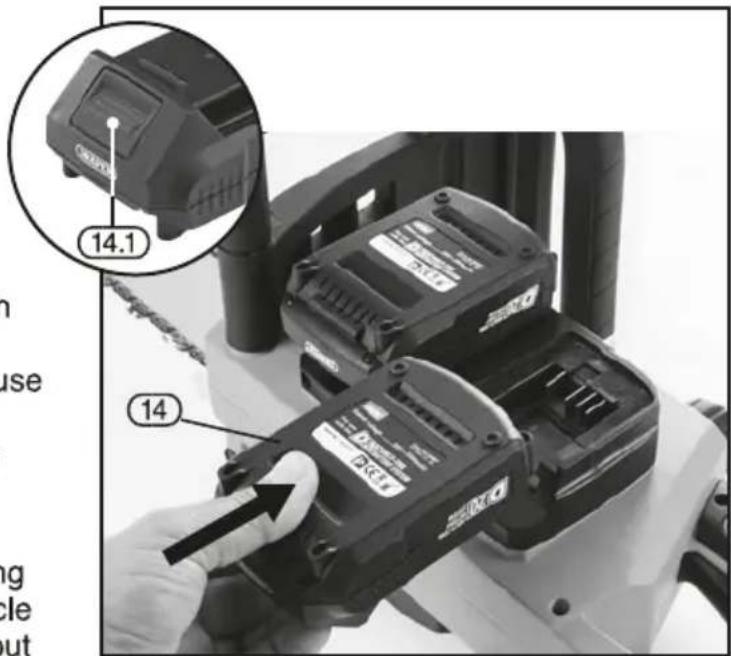
FIG.1
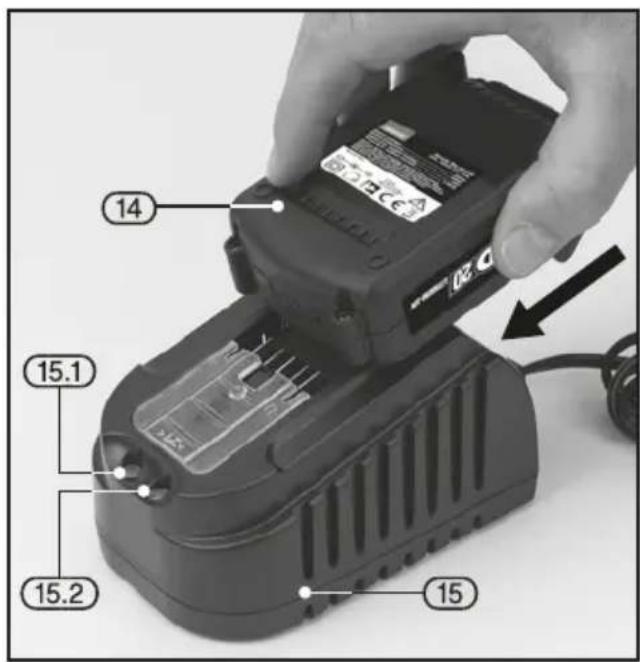
FIG.2
8. PREPARING THE CHAINSAW
If the battery is charged when it is warm due to battery use or exposure to sunlight, the battery will not be recharged. In such a case, let the battery cool before charging.
If the red indicator flickers rapidly at 0.2 second intervals, check or and remove any foreign objects in the charger's battery slot. If there are no foreign objects, it is probable that the battery or charger is malfunctioning. Allow battery/charger to normalise and try again. If a fault remains after trying this then contact Draper Tools.
8.2 BATTERY PACK PROTECTION FEATURES
Overcharging protection: This feature that ensures that the battery pack can never be overcharged. When the battery pack reaches full charge capacity, the transformer/charger will automatically shut off, protecting the internal components from being damaged.
Over-discharging protection: This feature will stop the battery pack from discharging beyond the recommended lowest safety voltage.
Overheating protection: The battery pack contains an internal thermistor cut-off sensor which shuts off the battery pack should it become too hot during operation. This can happen if the tool is overloaded or being used for extended periods. Up to 30 minutes cooling time may be required, depending on ambient temperature.
Current protection: Should the battery be overloaded and the maximum current draw be exceeded, the battery will shut off to protect the internal components. The battery pack will resume working once excessive current draw has returned to normal, safe level.
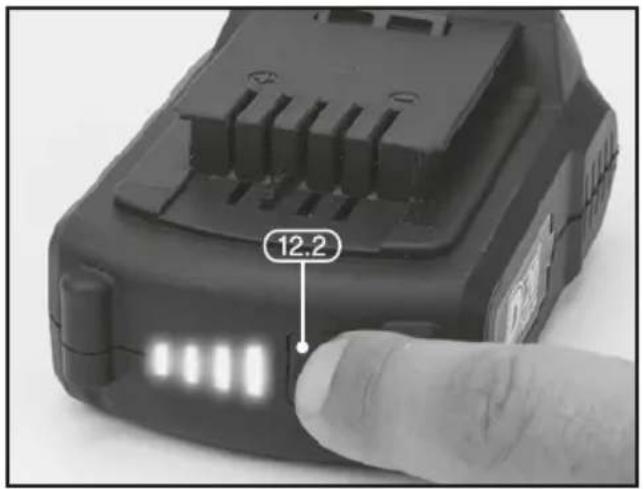
| Charge level indicator | Amount of charge remaining |
| 0 – 10% | |
| 10 – 25% | |
| 25 – 50% | |
| 50 – 75% | |
| 75 – 100% |
FIG.3
Short circuit protection: If, for any reason, the battery pack was to short circuit, the short circuit protection would immediately stop the battery pack from operating.
8.3 BATTERY PACK CHARGE STATUS - FIG. 3
To display the amount of charge left in the battery pack, press the charge level indicator button (12.2) .
8.4 BATTERY LIFE EFFICIENCY AND CHARGING ADVICE
- Avoid recharging at high temperatures. A rechargeable battery will be hot immediately after use. If such a battery is recharged immediately after use, its internal chemical substance will deteriorate, and the battery life will be shortened. Leave the battery and recharge it after it has cooled for a while.
— The battery should only be used and/or charged when battery temperature is between 5°C and 30°C.
- The battery needs to be warmed-up or cooled down in order to prevent damage to the batteries internal components,
Note: If battery is too hot or too cold, allow it to 'normalise' before use or charging.
Note: Failure to warm up or cool down a battery could result in serious damage to the battery, charger and user.
8. PREPARING THE CHAINSAW
Warning: Do not start the chainsaw before mounting and correctly adjusting the guide bar and saw chain.
Attention: Saw chain is extremely sharp - wear gloves when handling saw chain.
8.5 ATTACHING/ADJUSTING GUIDE BAR AND CHAIN (FIGS.4 - 6):
Put the chainsaw on a stable rest.
- Loosen the knurling wheel ⑤ turning it anti-clockwise.
- Remove the gear cover 5.2.
- Put the saw chain 13 on the bar 12 considering the running direction of the saw chain. The cutting teeth on the upper side of the bar must point in forward direction (see Fig.3.).
- Put the free end of the saw chain over the chain driving wheel 5.1.
- Place the bar such as that the long hole in the bar is placed exactly on the guiding element in the bar seat.
- Take care that the saw chain tensioning bolt ⑤.1 is seated exactly in the small opening in the bar (Fig 2). It must be visible through the opening. If necessary, adjust the knurling wheel of the saw chain tensioning device ⑤ in both directions until the saw chain tensioning bolt is seated in the opening in the bar.
- Check whether all chain links are seated exactly in the bar's groove and the chain is lead around the saw chain driving wheel correctly.
- Put the gear cover ⑤.2 back on and push it in place.
- Moderately tighten the knurling wheel ⑤ by turning it clock-wise.
8.6 TENSIONING THE SAW CHAIN
With a correctly tensioned chain you get good cutting performance and a longer life.
Warning: Incorrectly tensioned chain can break or fall off the bar and cause injury. Test the chain tension before every start of the electric chainsaw and after one hour of work.
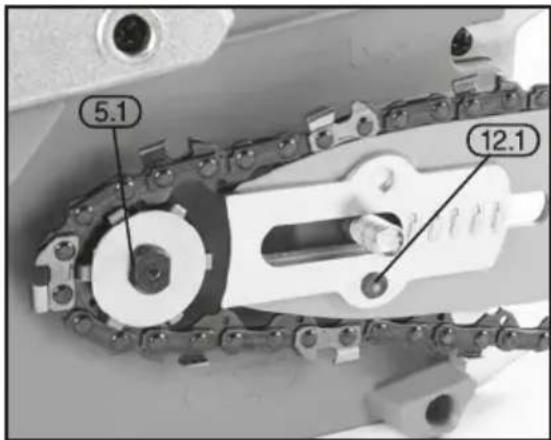
FIG.4
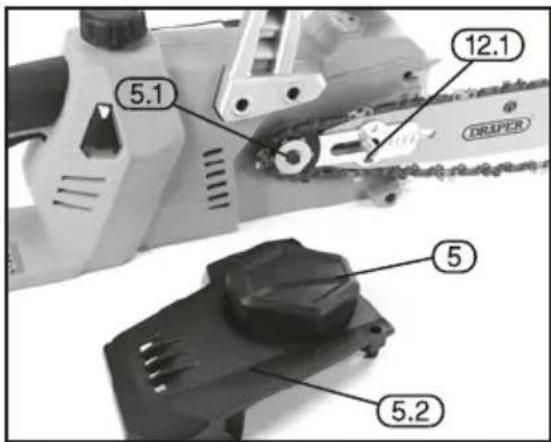
FIG.5
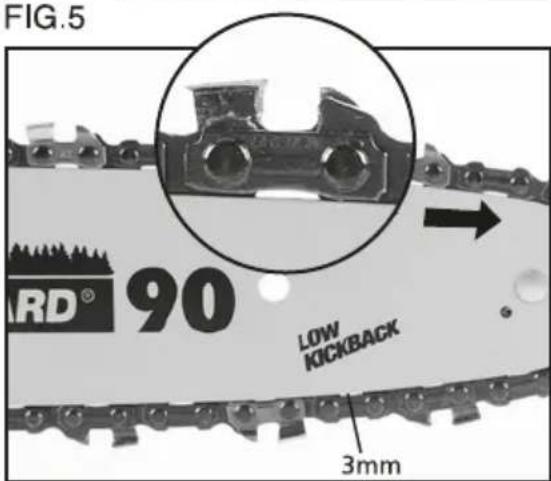
FIG.6
Note: Chains lengthen slightly as the link pins set into place. They set into place from the load applied to the chain, this process continues through-out the life of all chains as they gradually wear from use.
The chain is correctly tensioned if it does not sag at the rail underside and can be rotated completely around with the gloved hand. When the saw chain is tensioned with 9N (approx. 1kg), the gap between the saw chain and the guide rail may not be more than 3mm (fig. 8).
- Remove the battery!
- When the battery is removed, deactivate the brake lever by pulling the front guard (chain brake lever) firmly backwards until an audible click is heard.
8. PREPARING THE CHAINSAW
- Loosen the quick-release nut anti-clockwise by a few threads (pic. 5). Don't remove it completely!
- Then rotate the quick-release nut in the opposite direction
- Gently turn the clamp nut to tighten the chain until the quick-release nut starts to click. (At the moment the nut clicks, the chain is properly tightened. Torque lock is in the nut, and after tightening the chain, you just tighten the rail.)
- Then tighten the rail firmly with the quick-release nut
- With a new saw chain, you must re-adjust the chain tension after at least 5 cutting operations.
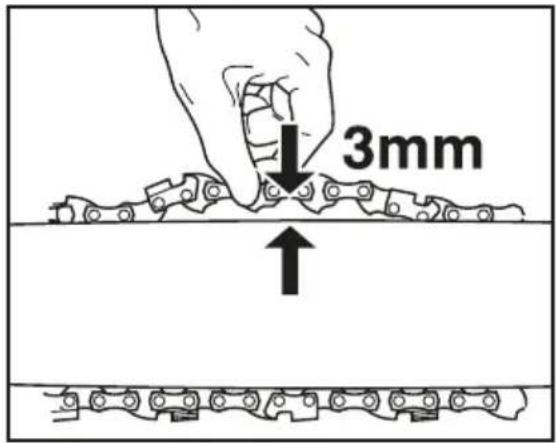
FIG.7
Warning: A loose saw chain is dangerous and may result in a serious accident.
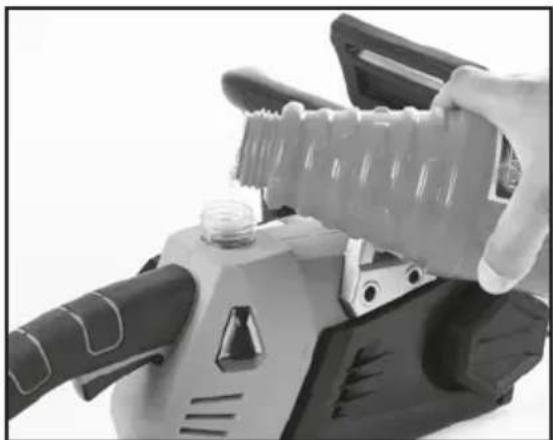
8.7 LUBRICATION (FIG.8)
Filling the oil tank
The chainsaw must never be operated without sufficient oil on the saw chain as this could cause damage to the saw chain, guide bar or motor. No claims for guarantee can be accepted if damage occurs when the device is being operated without saw chain oil.
Please use only biologically-based chainsaw oil, i.e. oil which is 100% biologically decomposable.
Biological chainsaw oil should be available at your local specialist dealer.
Do not use old oil. This will damage the chainsaw and will also lead to loss of the guarantee.
Before filling the oil tank, ensure batteries are not connected.
Open the filler cap (7) fill approx. 90ml oil into the tank using a funnel and screw on the tank cap tightly once more.
The oil level can be seen in the inspection window. If you plan not to use the machine for a longer period, you should remove the saw chain oil from the oil tank.
The oil tank should also be emptied before the chainsaw is transported or dispatched.
Check correct functioning of the chainsaw before commencing work. Switch on the saw with cutting fittings assembled and hold over a bright background at a safe
distance (be careful not to come in contact with the ground!). A track of oil will show you that the saw chain is sufficiently lubricated.
natural_image
Close-up of a robotic device with a hand adjusting its grip, showing mechanical components and no visible text or symbols.FIG.8
9. BASIC CHAINSAW OPERATIONS
WARNING: DO NOT START THE CHAINSAW UNTIL IT IS FULLY ASSEMBLED, CORRECTLY ADJUSTED AND ALL FUNCTIONS AND CONTROLS ARE FAMILIAR.
Note: For first time users of this type of equipment, it is essential that introductory training is undertaken from an experienced and authorised person. Initial cuts should be on logs secured on a saw horse or cradle.
9.1 CHAIN BRAKE (FIG.9):
This chainsaw is equipped with a mechanical brake for the saw chain. In the case of uncontrolled movements, when the tip of the saw blade gets in contact with the wood or a solid object, the drive of the saw chain is immediately stopped by activation of the chain brake ④, the motor will not be stopped. This brake function is initiated by the back of your hand on the front handle ③ pushing the brake. The proper function of the saw chain brake shall be checked before each use of the saw.
Caution: No buttons should be pressed when the chain brake is released (hand protection pulled back in the direction of the handle and locked).
Always ensure before starting the chainsaw that the chain brake ⑤ is locked in the operating position. To do this, pull back the chain brake towards the handle and release.
9.2 RUNDOWN BRAKE:
In accordance with the latest regulations, this chainsaw is equipped with a mechanical rundown brake. This brake is connected to the chain brake and stops the running chain after the chainsaw has been switched off. It is activated by releasing the ON/OFF switch. The rundown brake avoids injuries through the coasting of the chain.
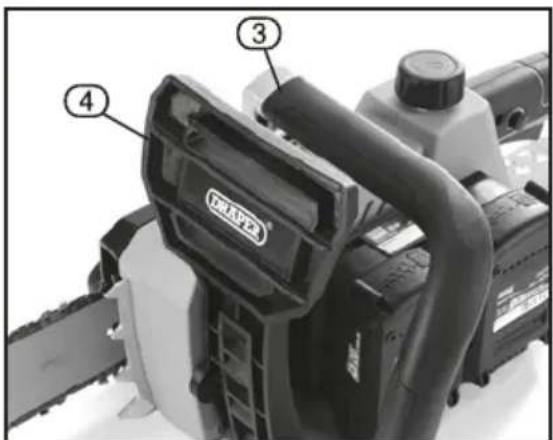
FIG.9
9. BASIC CHAINSAW OPERATIONS
WARNING: CHAINSAWS POSE A SIGNIFICANT HEALTH AND SAFETY RISK EVEN TO CAREFUL AND TRAINED OPERATORS.
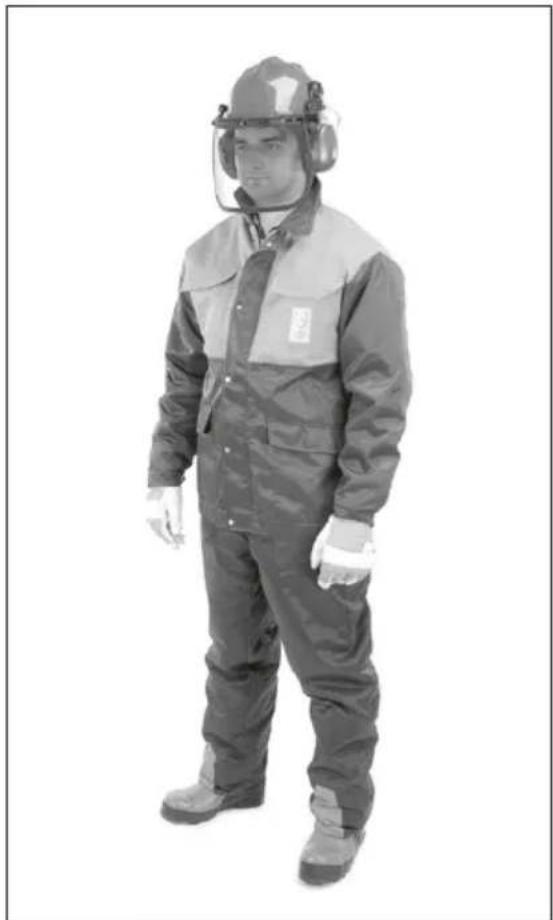
9.3 PERSONAL PROTECTIVE EQUIPMENT (PPE) (FIG.10)
Due to the nature of chainsaw, no PPE equipment can provide 100% protection against chainsaw cuts.
Equipment specifically designed for use with a chainsaw shall be worn, consisting of;
— A safety helmet with mesh visor and ear defender to protect against falling/thrown debris and the high levels of noise generated.
— Gloves with additional protective guard material on the back of the left hand to defend against chain whip in the event of breakage.
— Trousers or chaps with leg protection incorporated into the front/side. In case of contact with a moving saw chain the clogging material is designed to stop the saw chain before it penetrates fully through and into flesh.
— Safety boots with a good non-slip tread incorporating protection to toes and shins.
— High visibility jacket. Some jackets incorporate the clogging material like the trouser, but in any event, should be close fitting.
All this equipment should be tested to relevant international and European standards, and marked accordingly. The gloves, boots and trousers should be additionally marked with symbol, also indicating the chain speed to which they have been tested.
Attention!: Fully read and understand the general safety instruction section of this manual before proceeding.
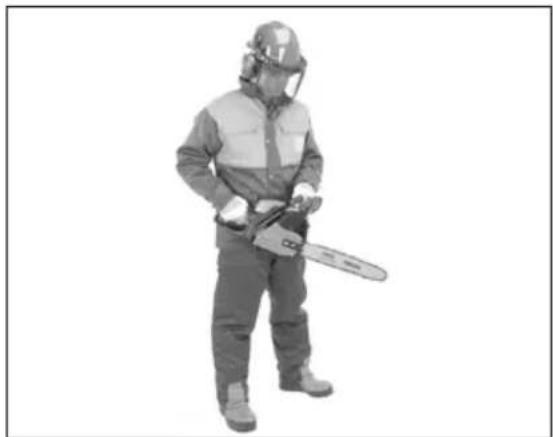
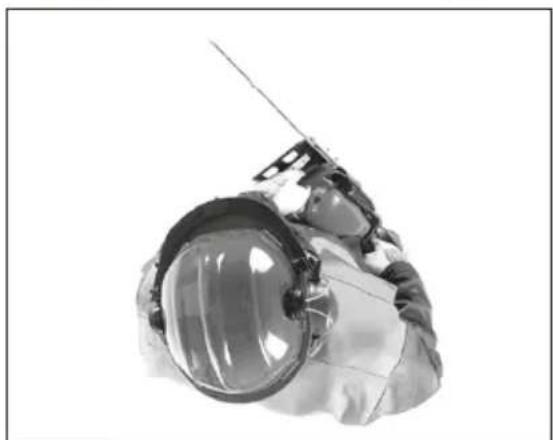
9.4 HOLDING THE CHAINSAW (FIGS.11 - 12)
Do not be afraid to hold the chainsaw power head close in to the body. In this position the weight of the saw will be easy to bear and in the event of a kickback will be more controllable. Firmly grip the rear handle with the right hand pulling it tight in to the hip/thigh.
With the left hand grip the front handle with thumb on the under side. In this position with the body turned slightly toward the saw, should a kickback occur. The left arm will be stronger to brace against the force of the kickback or if unable to withstand, the saw chain should avoid the face/head.
Try to work at hip height, or if unable to do so, bend the knees instead of the back. This will be more comfortable and a safer stance to adopt.
natural_image
Person wearing full protective gear and helmet, standing in a plain (no text or symbols visible)FIG.10
natural_image
Person wearing protective gear and holding a chainsaw (no text or symbols visible)FIG.11
natural_image
Close-up of a person wearing a helmet with a transparent visor and a long antenna (no visible text or symbols)FIG.12
9. BASIC CHAINSAW OPERATIONS
9.5 KICKBACK (FIG.13)
Definition: Kickback –
Rapid upward and/or backward motion of the chainsaw which can occur when the moving saw chain near the tip of the guide bar contacts an object such as a log or branch.
Kickback is the most common hazard associated with chainsaws and can result in serious injuries even fatality. This chainsaw features an Inertia activated chain brake and a manually triggered chain brake. In the event of a particularly strong kickback, the brake lever will trigger the chain brake. If the kickback is less the chain brake lever will activate on the operator's left hand (hence the necessity to always operate the saw two handed). There are different types of kickback and a couple of other associated risks.
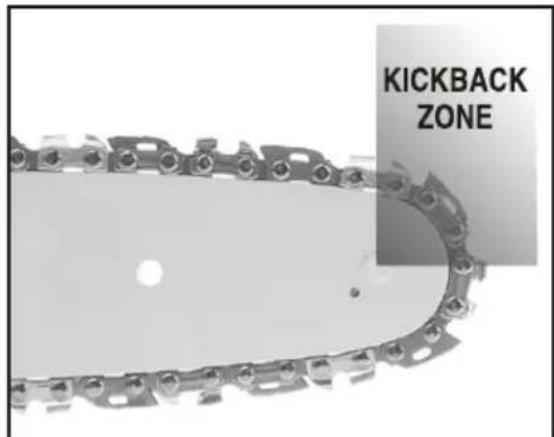
FIG.13
Because the chainsaw is driven along the top of the guide bar away from the power head contact with the kickback zone cam translate the saw chain movement in the opposing direction on the guide bar. This is particularly the case if the saw chain becomes pinched or snags in the kickback zone of the guide bar.
Another kickback danger can result in the chainsaw being forced horizontally back toward the user. Kick back of this nature is the result of the saw chain along the top of the guide bar being pinched, translating the force backward through the guide bar.
- The opposite to kickback is having the chainsaw pulled away. Pull-in can be a result of the saw chain pinching along the bottom of the guide bar. As the saw chain along the bottom of the guide bar is returning to the power head, the transiting force pulls the chainsaw from the operators hands.
- In addition to these risks are skatting and bouncing which can lead to a loss of control of the chainsaw.
- If the saw chain fails to make an initial incision it can move sideways along the timber 'skatting' and 'bouncing'. This sideways movement can result in off balancing or overstretch and further loss of control or contact with the guide bar tip on another limb causing a 'kickback'.
- To avoid kickback occurring, do not use the tip of the guide bar. Take note of foreign objects and other branches/limbs close to the area being cut. Note: They may not be in your line of sight. Always make the initial cut on the tension surface of the timber and use non-metal spreading wedges to avoid the timber pinching the saw chain. Always begin cutting at full speed and ensure the body of the saw, in particular, the spiked bumper is against the timber. Cut only one piece of timber at any time and observe the timber while making the cut to ensure the tension was assessed correctly. Hold the chainsaw firmly as described. Maintain a good firm stance and do not over reach.
— Do not cut over head height.
- The use of low kickback saw chain is also advised. These are designed specifically to help reduce the factors leading to kickback.
- Do not solely rely on the chain brake to stop an accident occurring or chainsaw PPE to avoid injury.
9. BASIC CHAINSAW OPERATIONS
- If unable to safely and satisfactorily resolve these issues, have a certified trained professional carry out the tree felling.
- The direction can be changed from that intended by factors such as wind, sloping terrain, tree growth (leaning, heavy limb structure one side and decay) etc. Failure to observe these factors or account for them can result in severe injury or fatality.
- Plan an escape route and ensure all scrub, debris and undergrowth is cleared so an unimpeded escape can quickly be made to safety if the felling direction unexpectedly changes.
- Delimb the tree up to shoulder height of all branches. If the tree has large buttress roots (15) also remove these to enable the direction notch to be cut as close to the ground as possible.
- The direction notch ⑯ should be started at 45° down into approximately one third the trees diameter. Cut the bottom of the notch at 90° and remove the wedge. On the opposite side of the tree and 5cm higher than the bottom of the notch, the felling cut ⑰ should be made at 90°. This cut must be made in one go and stop 5cm from the back of the notch. This creates the hinge which is very important as it helps control the felling. The hinge ⑱ must be parallel. Use the spiked bumper to obtain a firm grip and leverage while performing these cuts.
- The use of wedges should be employed to prevent the saw becoming pinched and to complete the fell safely.
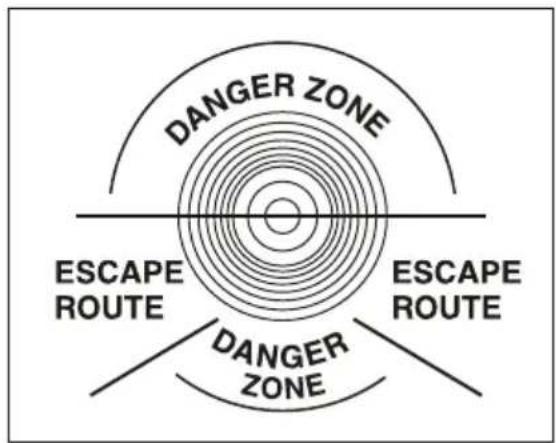
FIG.14
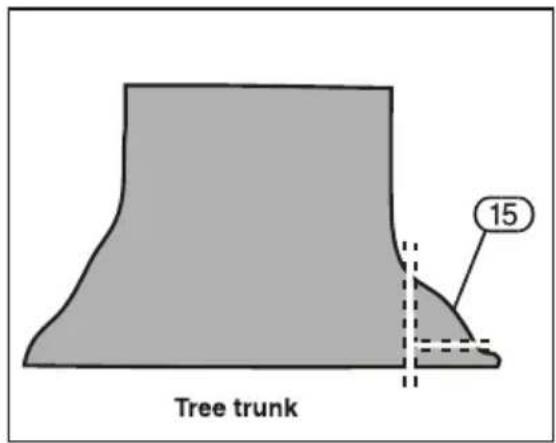
FIG.15
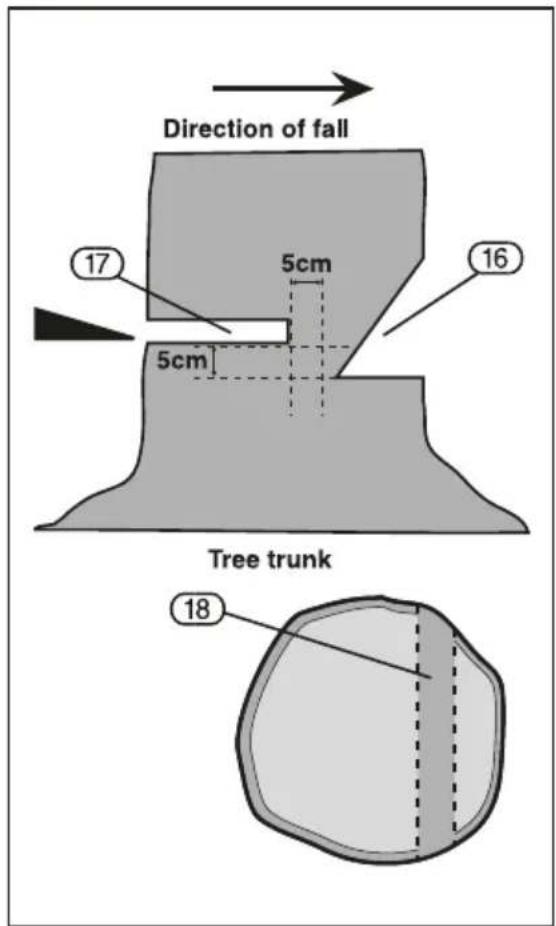
FIG.16
9. BASIC CHAINSAW OPERATIONS
9.6 DELIMBING (FIG.17)
Refer to general safety instructions for preparatory and specific warnings.
- When removing smaller branches with a single cut, keep the tree between you and saw chain.
- For larger limbs make three cuts. The initial cut 19 in the tensioned underside of the limb one third of the way through. Use a pushing chain (the top of the guide bar) for this.
- The second cut (20) will be made all the way through with the underside of the guide bar.
- The third cut ②1 is only necessary if the tree is not being felled, to leave a neat collar.
- On a felled tree always work from butt to tip with the tree on your right side. Always work with the trunk between you and the guide bar.
9.7 CROSS CUTTING/BUCKING (FIGS.18-20)
Refer to general safety instructions for preparatory and specific warnings.
- Regardless of the supporting method, when cross cutting the compression face of the timber must be initially cut followed by a secondary cut from the other side to meet completing the cut. The initial cut should be one third the diameter and the secondary cut two thirds.
- Incorrectly assessing the tension can result in the saw chain pinching or the timber splintering.
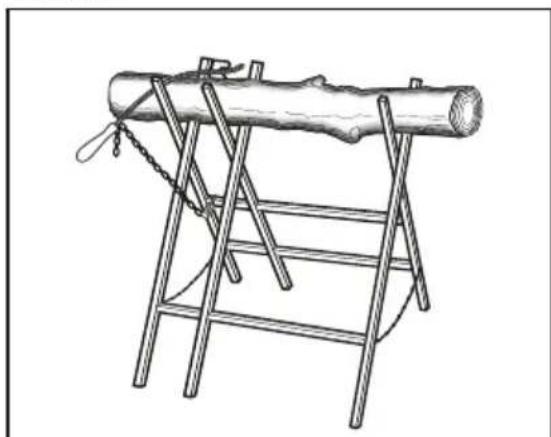
- For smaller logs always employ the use of a log saw stand/horse. Smaller logs must be secured before cutting commences as the saw chain speed can cause the log to move and possible kick up.
- Use the spiked bumper to obtain a firm grip and leverage while performing all cuts.
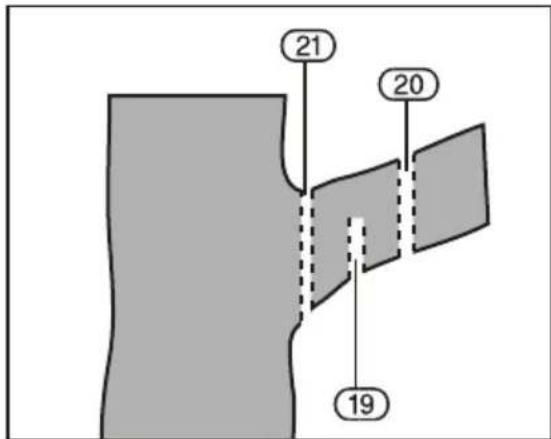
FIG.17
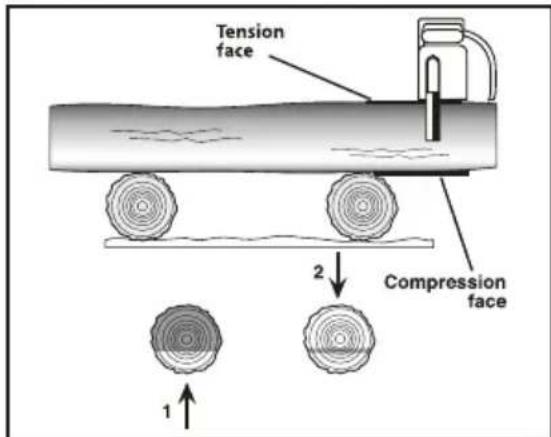
FIG.18
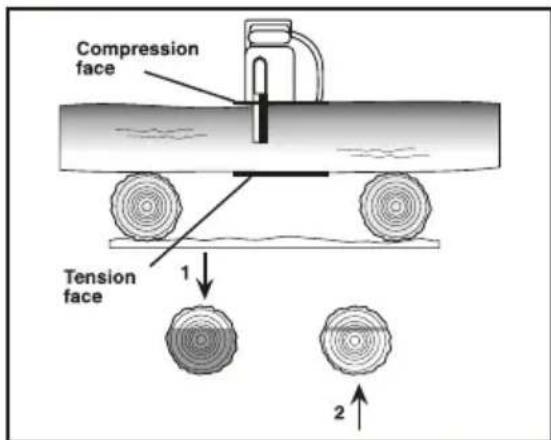
FIG.19
natural_image
Line drawing of a wooden log being handled on a metal ladder (no text or symbols)FIG.20
9.8 SAW CHAIN
- The chainsaw is designed for cutting timber only. Do not allow the saw chain to come into contact with the ground as dirt and soil will dull the saw chain almost immediately. Hard wood will also rapidly dull the saw chain.
- When the saw chain is properly sharpened, work will not be tiring, the cutting yield is high, and there is no abnormal wear on the mechanical parts or the bar.
9.9 SHARPENING (FIG.21)
- Sawdust instead of chips is an indication that the saw chain needs sharpening or replacing.
- Before sharpening, the saw chain must be made taught by means of the saw chain tensioner.
- After sharpening, slacken and adjust the saw chain as per the mounting instructions.
– During sharpening, lock the chain using the brake. - Use a round file specific for the chain fitted. Observe the sharpening angle (Fig.21 parts 2, 3, 5, 7, 8).
- Sharpen by filing from the inside outwards (Fig.21 part 9) all the teeth on one side and then all the teeth on the other.
- Position the file to project 20% of its diameter above the cutter (Fig.21 part 6).
- Make sure every cutter is filed to the same length and angle, and that all depth gauge links are the same height (Fig.21 part 1).
- Inconsistent angles can result in a poor cut or endanger the user. Seek advice from a professional if unsure.
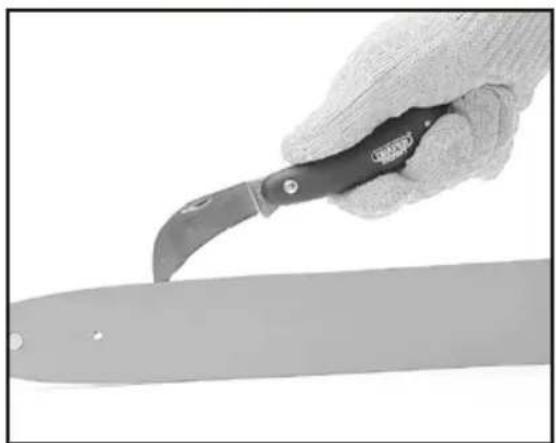
9.10 BAR MAINTENANCE (FIG.22)
– Periodically clean the chain run groove and oil passages.
– Lubricate the sprocket wheel with bearing grease.
– Reverse the guide bar on a regular basis to ensure uniform bar wear.
- Burring of the guide bar rails is normal. Remove these burrs as appropriate with a flat file.
- The guide bar should be replaced when the saw chain run groove is worn, the bar is damaged
or if excessive burring or heating occurs.
Note: Do not carry out repairs on the machine if you are not qualified to do so with the exemption of the items listed in this maintenance section.
Danger: In order to maintain the original safety features, do not make any changes to the machine. In case of repairs, use only genuine spare parts.
- Before each use check that there are no loose or damaged parts, cracks and signs of wear.
– Have damaged parts replaced by an authorised service agent before using the machine.
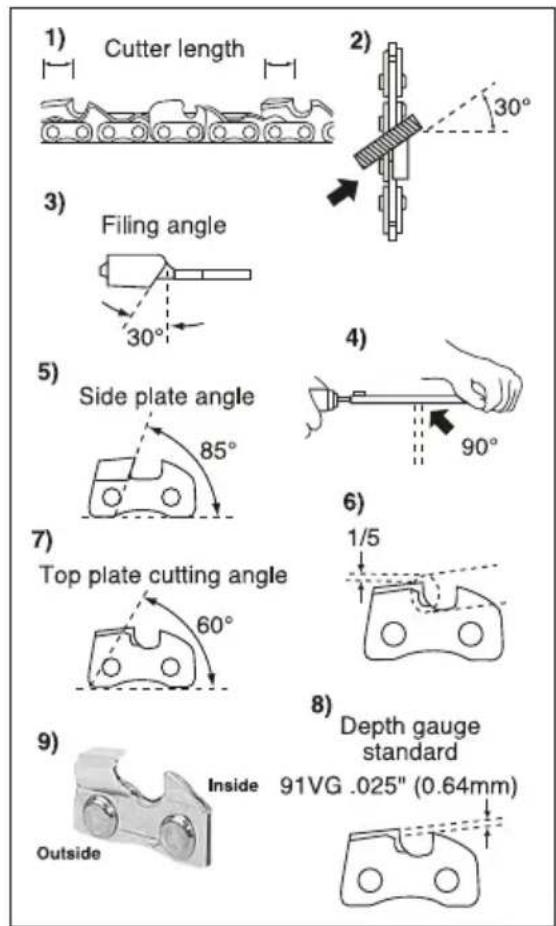
FIG.21
natural_image
Close-up of a hand holding a flat tool with a curved blade, next to a flat blade (no text or symbols visible)FIG.22
10. MAINTENANCE AND TROUBLESHOOTING
10.1 MAINTENANCE
Regular inspection and cleaning reduces the necessity for maintenance operations and will keep your tool in good working condition.
The motor must be correctly ventilated during tool operation. Avoid blocking the air inlets and vacuum the ventilation slots regularly.
10.2 TROUBLESHOOTING
| Problem | Probable Cause | Remedy Suggested |
| Chainsaw fails to start. | 1. Batteries not in situ or need charging.2. Chain brake engaged. | 1. Check batteries are in correct position and are charged.2. Disengage chain brake. |
| Saw chain does not move or is tight. | 1. Chain brake engaged.2. Saw chain tension excessive.3. Insufficient saw chain lubrication. | 1. Disengage chain brake.2. Correctly adjust saw chain tension.3. Fill oil tank to capacity and regularly monitor level. |
| Cut time increase and saw dust produced. | 1. Saw chain dull. | 1. Sharpen or replace saw chain. |
Important: Please note, all repairs/service should be carried out by a qualified person.
11. DISPOSAL
11.1 DISPOSAL
- At the end of the machine's working life, or when it can no longer be repaired, ensure that it is disposed of according to national regulations.
- Contact your local authority for details of collection schemes in your area.
In all circumstances:
- Do not dispose of power tools with domestic waste.
- Do not incinerate.
- Do not dispose of WEEE* as unsorted municipal waste.
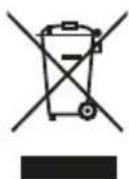
* Waste Electrical & Electronic Equipment.
12. EXPLANATION OF SYMBOLS
12.1 EXPLANATION OF SYMBOLS

Read the instruction manual.

Wear face mask, ear defenders and safety glasses.

Warning!
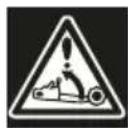
Attention! Kickback!

Do not use this product in the rain or leave outdoors while it is raining
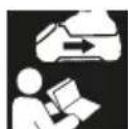
Read instructions for charging battery

Do not use chainsaw when only holding with one hand

Use both hands when operating the chainsaw
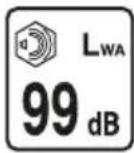
Single value noise marking. (Maximum declared A-Weighted sound power level in decibels).

Class II construction (Double insulated).
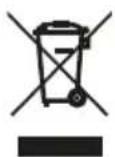
WEEE – Waste Electrical & Electronic Equipment. Do not dispose of Waste Electrical & Electronic Equipment in with domestic rubbish.
CONTACTS
Draper Tools Limited, Hursley Road, Chandler's Ford, Eastleigh, Hampshire. SO53 1YF. U.K.
Help line: (023) 8049 4344
Sales Desk: (023) 8049 4333
Internet: drapertools.com
E-mail: sales@drapertools.com
General Enquiries: (023) 8026 6355
Service/Warranty Repair Agent: For aftersales servicing or warranty repairs, please contact the Draper Tools Help line for details of an agent in your local area.
YOUR DRAPER STOCKIST
TAKC0719
- TITLE PAGE
- INTRODUCTION:
- REVISIONS:
- UNDERSTANDING THIS MANUALS SAFETY CONTENT:
- COPYRIGHT © NOTICE:
- CONTENTS
- WARRANTY
- INTRODUCTION
- HEALTH AND SAFETY INFORMATION
- TECHNICAL DESCRIPTION
- UNPACKING AND CHECKING
- PREPARING THE CHAINSAW
- BASIC CHAINSAW OPERATIONS
- MAINTENANCE AND TROUBLESHOOTING
- DISPOSAL
- EXPLANATION OF SYMBOLS
- DECLARATION OF CONFORMITY ....ENCLOSED
- WARRANTY
- SCOPE
- SPECIFICATION
- HANDLING & STORAGE
- GENERAL POWER TOOL SAFETY WARNINGS
- Work area safety
- Electrical safety
- Personal safety
- Power tool use and care
- Service
- GENERAL CHAINSAW SAFETY INFORMATION
- Personal Protective Equipment (PPE)
- Preparation
- CHAINSAW OPERATIONAL SAFETY INFORMATION
- Felling
- Limbing
- Cross cutting
- Maintenance
- Storage
- RESIDUAL RISK
- SAFETY INSTRUCTIONS FOR MAINS POWERED CHARGERS & BATTERY PACKS
- Chargers
- Battery packs
- Warning!
- CONNECTION TO THE POWER SUPPLY (CHARGER SOLD SEPARATELY)
- IMPORTANT
- IDENTIFICATION
- PACKAGING
- D20 MULTI-TOOL INTERCHANGEABLE BATTERY SYSTEM
- WHAT'S IN THE BOX
- BATTERY PACK CHARGING – FIGS. 1 – 2
- BATTERY PACK PROTECTION FEATURES
- BATTERY PACK CHARGE STATUS - FIG. 3
- BATTERY LIFE EFFICIENCY AND CHARGING ADVICE
- ATTACHING/ADJUSTING GUIDE BAR AND CHAIN (FIGS.4 - 6):
- TENSIONING THE SAW CHAIN
- LUBRICATION (FIG.8)
- Filling the oil tank
- Please use only biologically-based chainsaw oil, i.e. oil which is 100% biologically decomposable.
- CHAIN BRAKE (FIG.9):
- RUNDOWN BRAKE:
- PERSONAL PROTECTIVE EQUIPMENT (PPE) (FIG.10)
- HOLDING THE CHAINSAW (FIGS.11 - 12)
- KICKBACK (FIG.13)
- DELIMBING (FIG.17)
- CROSS CUTTING/BUCKING (FIGS.18-20)
- SAW CHAIN
- SHARPENING (FIG.21)
- BAR MAINTENANCE (FIG.22)
- MAINTENANCE
- TROUBLESHOOTING
- DISPOSAL
- EXPLANATION OF SYMBOLS
- CONTACTS
Brand : Draper
Model : D20
Category : Saw