WP-211T - Router Kramer - Free user manual and instructions
Find the device manual for free WP-211T Kramer in PDF.


| Product Type | AV Router (HDMI Switcher) |
| Model | WP-211T |
| Brand | Kramer |
| Dimensions (W x D x H) | 14.6 cm x 8.3 cm x 4.4 cm |
| Weight | 0.3 kg |
| Power Supply | 5V DC, 1A (power adapter included) |
| Power Consumption | 5 W max |
| Input Ports | 2 x HDMI (female) |
| Output Ports | 1 x HDMI (female) |
| Max Resolution | 4K@60Hz (4:4:4) |
| HDMI Standard | HDMI 2.0 |
| HDCP Version | 2.2 |
| Switching Method | Manual button or auto-switching |
| Additional Ports | 1 x USB (for firmware update) |
| Compliance | CE, FCC |
| Operating Temperature | 0°C to 40°C |
| Storage Temperature | -20°C to 60°C |
| Humidity | 10% to 90% RH (non-condensing) |
| Maintenance | Wipe with a dry cloth; do not use liquids or solvents. |
| Safety | Use in dry environment; avoid exposure to rain or moisture. |
| Spare Parts & Repairability | Contact Kramer support for spare parts or repairs. |
Frequently Asked Questions - WP-211T Kramer
User questions about WP-211T Kramer
0 question about this device. Answer the ones you know or ask your own.
Ask a new question about this device
Download the instructions for your Router in PDF format for free! Find your manual WP-211T - Kramer and take your electronic device back in hand. On this page are published all the documents necessary for the use of your device. WP-211T by Kramer.
USER MANUAL WP-211T Kramer

Scan for full manual
WP-211T Quick Start Guide
This guide helps you install and use your WP-211T for the first time.
Go to www.kramerav.com/downloads/WP-211T to download the latest user manual and check if firmware upgrades are available.
Step 1: Check what's in the box
WP-211T 1 Gang Ethernet and K-NET Control Keypad
√ 1 Frame (or frame set) and faceplate
√ 1 Power adapter and cord √ 1 Quick start guide
Installation accessories
Step 2: Get to know your WP-211T
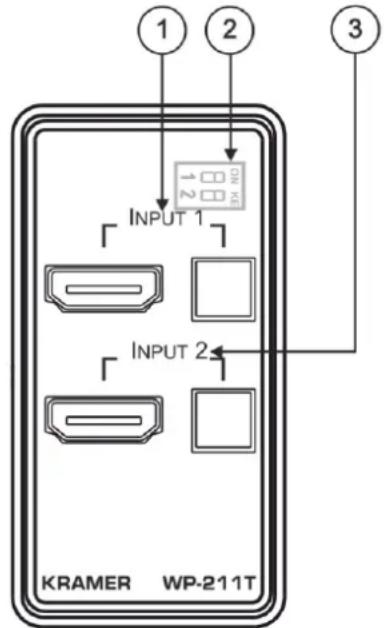
EU/UK Version
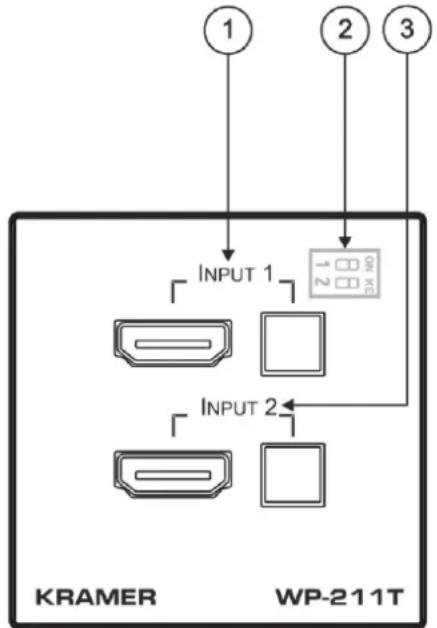
US-D Version
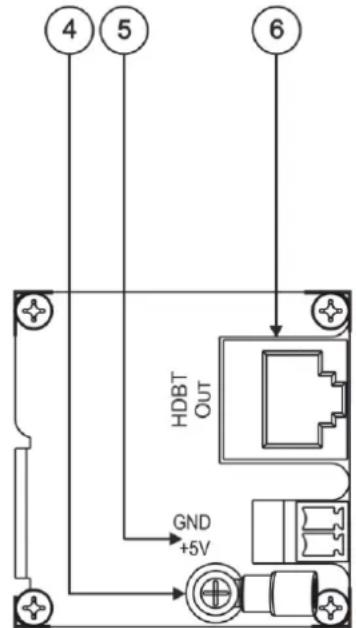
Rear View
| # | Feature | Function | ||
| 1 | INPUT 1 | HDMI Connector | Connect to an HDMI source to route to HDBT OUT. | |
| Button | Press momentarily to manually select HDMI 1 (button lights orange). | |||
| 2 | Operation Mode DIP-switches | By-default the DIP-switches are both set to OFF (left).Controlling via the INPUT buttons overrides all DIP-switch settings and automatic switching until the manually selected source disconnects, becomes inactive or WP-211T is powered off. | ||
| DIP-switch 1 | OFF (left) - Last connected mode.ON (right) - Priority mode according to DIP-switch 2 settings. | |||
| DIP-Switch 2 | OFF (left) - INPUT 1 is the default priority.ON (right) INPUT 2 is the default priority. | |||

WP-211T DIP-switches are located behind the faceplate and should be set during installation, before placing the faceplate. Pressing an input button manually selects that input, independent of the DIP-switch settings.
| 3 | INPUT 2 | HDMI ^TM Connector | Connect to an HDMI Source to route to HDBT OUT. |
| Button | Press momentarily to manually select HDMI 2 (button lights orange). | ||
| 4 | Grounding Screw | Connect to the common ground (optional) to prevent static electricity from impacting the performance of the unit. | |
| # | Feature | Function | |
| 5 | GND 5V DC 2-pin Terminal Block Connector | Connect to the supplied power adapter. Not needed on the WP-211T if there is a PoE provider over HDBaseT. | |
| 6 | HDBT OUT RJ-45 Connector | Connect to an HDBaseT receiver (for example, TP-580R). | |
Step 3: Connect the inputs and outputs
Always switch OFF the power on each device before connecting it to your WP-211T. For best results, we recommend that you always use Kramer high-performance cables to connect AV equipment to the WP-211T.
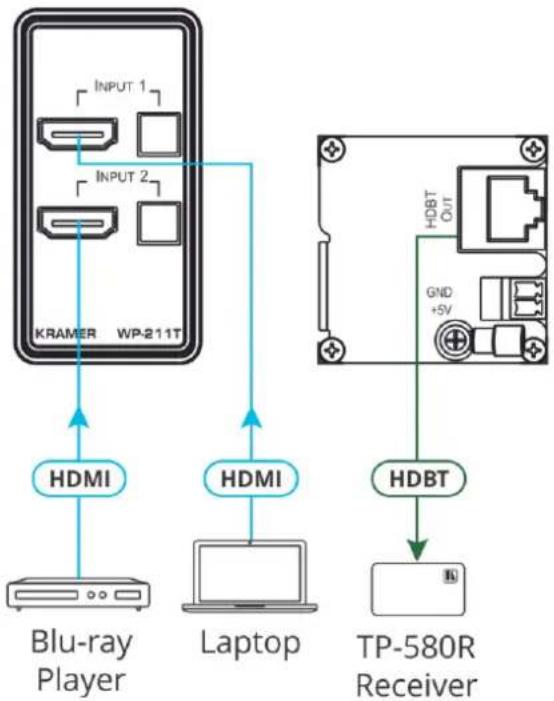
flowchart
graph TD
    A["KRAMER WP-211T"] -->|HDMI| B["Blu-ray Player"]
    A -->|HDMI| C["Laptop"]
    A -->|HDBT| D["TP-580R Receiver"]
    style A fill:#f9f,stroke:#333
    style B fill:#ccf,stroke:#333
    style C fill:#cfc,stroke:#333
    style D fill:#fcc,stroke:#333
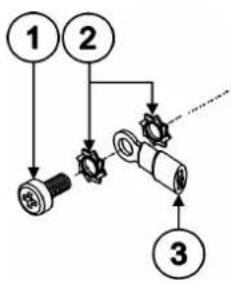
Grounding the WP-211T
flowchart
graph TD
    A["1"] --> B["2"]
    B --> C["3"]
    C --> D["4"]
    D --> E["5"]
    E --> F["6"]
    F --> G["7"]
    G --> H["8"]
    H --> I["9"]
    I --> J["10"]
| # | Component Description |
| 1 | M3X6 screw |
| 2 | 1/8" Toothed Lock Washer |
| 3 | M3 Ring Tongue Terminal |
To ground the WP-211T:
- Connect the ring tongue terminal to the building grounding point wire (it is recommended to use a green-yellow AWG#18 (0.82mm) wire, crimped with a proper hand-tool).
- Insert the M3x6 screw through the toothed lock washers and the tongue terminal in the order shown above.
- Insert the M3x6 screw (with the two toothed lock washers and ring tongue terminal) into the grounding screw hole and tighten the screw.
Step 4: Install WP-211T
After connecting the ports, insert the device into the in-wall box and connect the parts as shown in the illustrations below:
EU/UK Version
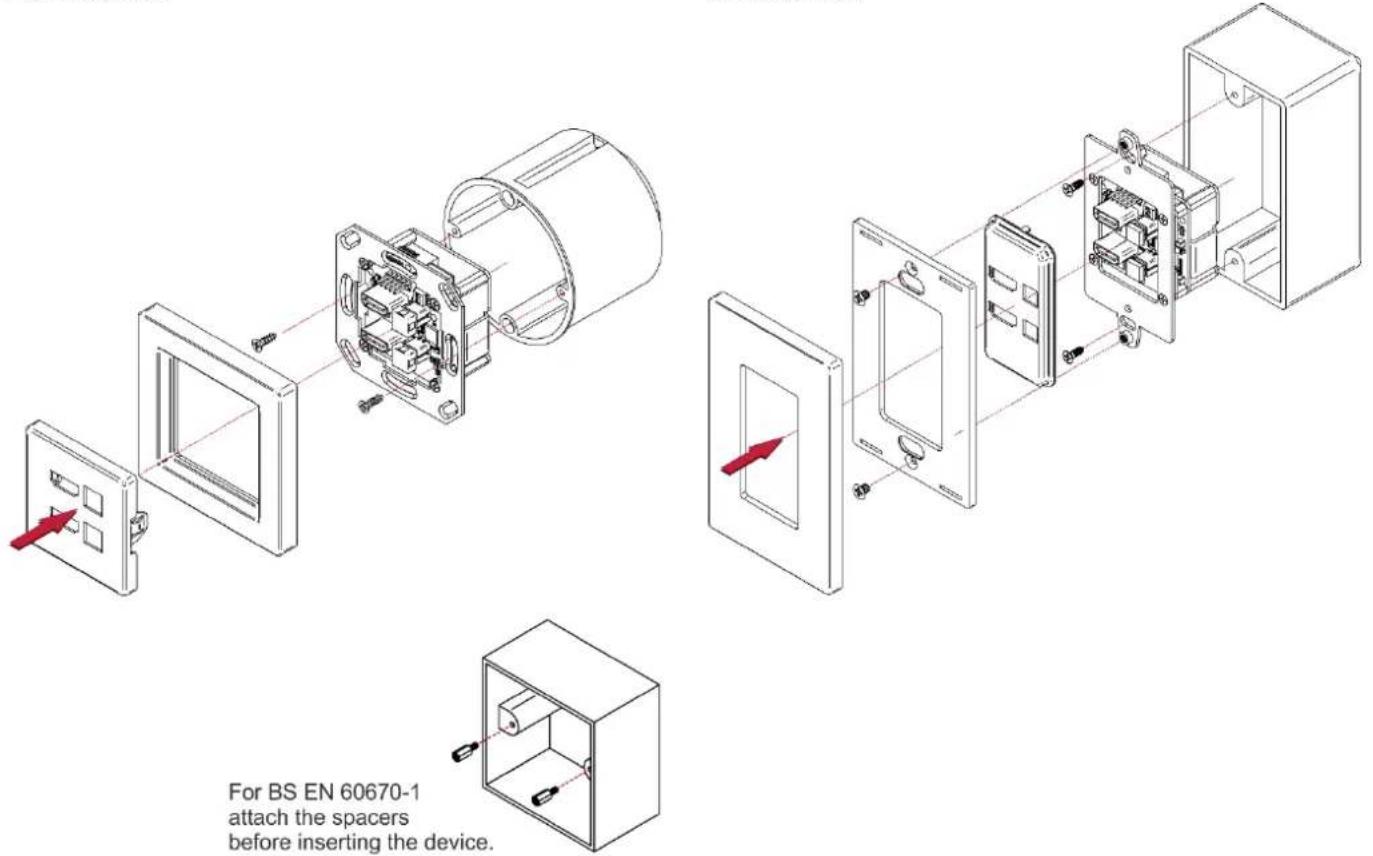

DECORA® design frames are included in US-D models.
We recommend that you use any of the following standard 1 Gang in-wall junction boxes (or their equivalent):
• US-D: 1 Gang US electrical junction boxes.
- EU: 1 Gang in-wall junction box, with a cut-hole diameter of 68mm and depth that can fit in both the device and the connected cables (DIN 49073).
- UK: 1 Gang in-wall junction box, 75x75mm (W, H), and depth that can fit in both the device and the connected cables (BS 4662).
Step 5: Connect the power
If the device is not powered via HDBT PoE, connect the 5V DC power adapter to the WP-211T and plug the adapter into the mains.
Safety Instructions

Caution: There are no operator serviceable parts inside the unit.
Warning: Use only the Kramer Electronics power supply that is provided with the unit.
Warning: Disconnect the power and unplug the unit from the wall before installing.
See www.KramerAV.com for updated safety information.
Technical Specifications
| Inputs | 2 HDMI | On female HDMI connectors |
| Outputs | 1 HDBT | On a female RJ-45 connector |
| Video | Max. Data Rate | 8.91Gbps (2.97Gbps per graphic channel) |
| Max. Resolution | 4K@60Hz (4:2:0) | |
| Standard Compliance | HDCP 2.2 (does not support conversion to HDCP 1.4), HDMI 1.4 | |
| Controls | DIP-Switches | Last connected/priority DIP-switches |
| Front Panel | Input select buttons | |
| Power | Consumption | 5V DC, 780mA |
| Source | 5V DC, 4A with open DC head | |
| Environmental Conditions | Operating Temperature | 0° to +40°C (32° to 104°F) |
| Storage Temperature | -40° to +70°C (-40° to 158°F) | |
| Humidity | 10% to 90%, RHL non-condensing | |
| Regulatory Compliance | Safety | CE, UL |
| Environmental | RoHs, WEEE | |
| Enclosure | Size | 1 Gang wall plate |
| Cooling | Passive heat sink (metal sheet) | |
| General | Net Dimensions (W, D, H) | US-D: 7cm x 3.7cm x 11.4cm (2.8" x 1.5" x 4.5)EU: 8cm x 3.8cm x 8cm (3.1" x 1.5" x 3.1)UK: 8.6cm x 3.8cm x 8.6cm (3.4" x 1.5" x 3.4") |
| Shipping Dimensions (W, D, H) | 23.2cm x 13.6cm x 10cm (9.1" x 5.4" x 3.9") | |
| Net Weight | 0.2kg (0.4lbs) approx.. | |
| Shipping Weight | 0.6kg (1.2lbs) approx. | |
| Accessories | Included | 1 Power adapter, 1 power cord, installation accessoriesUS-D version: 2 US Frame sets and faceplates (1 in black and 1 in white)European version: 1 EU white frame, 1 UK white frame, 1 EU/UK white faceplate |
| Specifications are subject to change without notice at www.kramerav.com | ||
DECORA® is a registered trademark of Leviton Manufacturing Co., Inc.
The terms HDMI, HDMI High-Definition Multimedia Interface, and the HDMI Logo are trademarks or registered trademarks of HDMI Licensing Administrator, Inc.
Brand : Kramer
Model : WP-211T
Category : Router