
MCPK-43DVR - Dash cam Scosche - Free user manual and instructions
Find the device manual for free MCPK-43DVR Scosche in PDF.


| Product Type | Mirror Dash Cam with Reverse Camera |
| Model | MCPK-43DVR |
| Brand | Scosche (Parkmate) |
| Display | 4.3-inch color screen |
| Front Camera Resolution | Full HD 1080p (1920x1080) at 30 fps |
| Lens Angle | 120° wide angle |
| Memory Card Support | Micro SD, Class 6 or higher, up to 32GB (not included) |
| Reverse Camera | Included with grid lines; activates when reversing |
| Power Supply | 12V DC via included cigarette lighter adapter |
| Internal Battery | Built-in rechargeable battery (for parking mode and short operation) |
| Video Recording Modes | Loop recording (1/2/3/5/10 min), locked recording, parking mode |
| G-Sensor | Built-in gravity sensor for automatic event recording |
| Audio Recording | Built-in microphone, can be muted |
| Features | Motion detection, WDR, date stamp, number plate stamp, screen saver |
| Installation | Clip-on over existing rearview mirror; reverse camera mounts near license plate |
| Dimensions (approx.) | 30 x 10 x 5 cm (mirror unit) |
| Weight (approx.) | 300 g (mirror unit only) |
| Warranty | 12 months from date of purchase |
Frequently Asked Questions - MCPK-43DVR Scosche
User questions about MCPK-43DVR Scosche
0 question about this device. Answer the ones you know or ask your own.
Ask a new question about this device
Download the instructions for your Dash cam in PDF format for free! Find your manual MCPK-43DVR - Scosche and take your electronic device back in hand. On this page are published all the documents necessary for the use of your device. MCPK-43DVR by Scosche.
USER MANUAL MCPK-43DVR Scosche
CAUTION
- Ensure you are using your MCPK-43DVR within your countries' road laws. Please make sure you are familiar with your local road legislation before use.
- Avoid leaving your MCPK-43DVR in direct sunlight for extended periods of time in an unventilated space.
- Please set time and date before you use this device to record.
- The reverse camera is only to be used for reference. Please drive to the actual conditions of the road.
- The system is to be used only for non-commercial use, within the limits permitted by the relevant laws.
- Avoid using the Car Dash Cam in the vicinity of any devices that emit radio interference (eg. Microwave Ovens).
- It is considered normal operation for the MCPK-43DVR Dash Cam to get warm during use.
BATTERY WARNING
- Always charge the Car Dash Cam using the provided charger. Improper charging of the MCPK-43DVR may result in failure of the internal battery.
- Never dismantle the Car Dash Cam or expose the internal battery.
- Do not dispose of the MCPK-43DVR in fire.
- Dispose of the MCPK-43DVR observing local regulations being mindful of the internal battery.
- Do not attempt to replace or expose the internal battery.
NOTES ON INSTALLATION
- It is advised that the Mirror Dash Cam is installed on the front face of your vehicle's rear view mirror, with the camera lens clearing the side of your vehicle's rear view mirror.
- Make sure that the mirror's camera lens is within the range of the windscreen wiper to ensure a clear view in wet or dusty conditions.
- Do not touch the lens with your fingers. Finger prints left on the lens will result in unclear videos or photos. If photos or videos are blurred, please clean the lens gently with a microfiber cloth.
- Only use the included charging cable to power the MCPK-43DVR.
- The Reverse camera is to be installed near your vehicle's rear number plate on the exterior of your vehicle
DISCLAIMER
Parkmate's MCPK-43DVR Mirror Dash Cam and & Reverse Camera Pack is designed as a driver assistance device. Although this is a visual aid and will allow you to view what is behind the vehicle, it does not remove the responsibility of driving the vehicle from the driver. The legal responsibility and safe driving practise remains with the driver at all times. You have purchased this product with the understanding that its use is as an aid only. We highly recommend that you have this product professionally installed to ensure that it will provide the functions it is set out to perform.
1 Introduction ......6
1.1 Features 6
1.2 Package Contents....6
1.3 Product Overview 6
2 Getting Started 7-12
2.1 Inserting the Memory Card 7
2.2 Installing the Clip on Mirror DVR....7
2.2.1 Connect to Power 7
2.2.2 Adjust the field of view....7
2.3 Connecting the Reverse Camera....8
2.3.1 Installation Guide 8
2.3.2 Reverse Camera Wiring Diagram....8
2.4 Powering the Mirror DVR On / Off....9
2.4.1 Auto Power On / Off 9
2.4.2 Manual Power On / Off and Reset 9
2.5 LED Indicator....9
2.6 Playing back Video on PC 9
2.7 Initial Settings 10
2.7.1 Formatting Inserted Micro SD Card....10
2.7.2 Set the Date / Time 10
2.8 Using the MCPK-43DVR 11
2.8.1 Recording Video 11
2.8.2 Locked Recording 11
2.9 Reverse Camera....11
2.10 Recording Screen....12
3 Video mode 13-21
3.1 Video Menu....13
3.1.1 Park Mode....13
3.1.2 Resolution 14
3.1.3 Loop Recording....14
3.1.4 MDR....14
3.1.5 Exposure 14
3.1.6 Motion Detection....15
3.1.7 Microphone 15
3.1.8 Date Stamp 15
3.1.9 G Sensor 16
3.2.0 Delay Power On....16
3.2.1 Number Plate 16
4 Photo Mode 17
4.1 Photo Menu....17
4.1.1 Capture Mode 17
4.1.2 Resolution 17
4.1.3 Sequence....18
4.1.4 Quality 18
4.1.5 Sharpness....18
4.1.6 White Balance 19
4.1.7 Colour 19
4.1.8 ISO....19
4.1.9 Exposure....20
4.2.0 Anti Shaking 20
4.2.1 Quick Review....20
4.2.2 Date Stamp 21
5 Setting Menu 21-25
5.1 Setting Date / Time....21
5.2 Key Beeps....22
5.3 Language 22
5.4 TV Mode....23
5.5 Screen Saver....23
5.6 Frequency 24
5.7 Format....24
5.8 Default Settings....25
6 Menu Tables 25-26
6.1 Deleting Photos & Videos 25
6.2 Locking and Unlocking Photos and Videos....26
7 Menu Tables 27-29
Warranty....31
1. INTRODUCTION
Thank you for purchasing a Parkmate Mirror DVR with Integrated 1080P Dash Cam DVR & Reverse Camera. We are certain that our product will give you trouble free operation while providing you with a safety feature that enhances your driving experience. Our products, like most after-market safety enhanced devices, are designed to assist and aid the driver, not to replace the manual function of the person operating the vehicle. Please read through these instructions before attempting to install this product. For the latest manual updates, please see
www.parkmate.com.au or www.parkmatehd.co.nz.
1.1 FEATURES
- Recording full high definition 1080p footage at 30 frames per second.
• 4.3" colour screen - 120^ wide angle lens
• Emergency recording saves your footage when an impact is detected
• Supports Micro SD cards, class 6 and above up to 32GB (Micro SD Card not included) - Reverse Camera with Grid Lines
1.2 PACKAGE CONTENTS
Mirror DVR 12v Adapter Rubber Fasteners
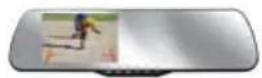
Reverse Camera
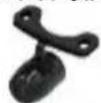
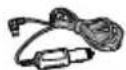
6M Reverse Camera Cable
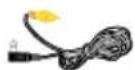
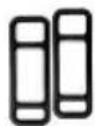
Mini USB Cable
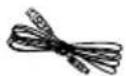
1.3 PRODUCT OVERVIEW
- Reset Button 6. 4.3" display 11. Rec/OK Button
- Mini USB Power Port
- Micro SD Card Slot
- AV In
- Fastening clips
- Power Button
- Menu Button
- Mode Button
-
Up Button
-
Down Button
-
Camera Lens
-
Speaker

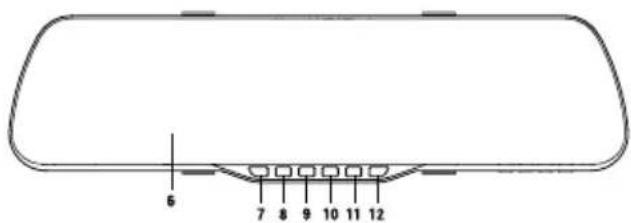
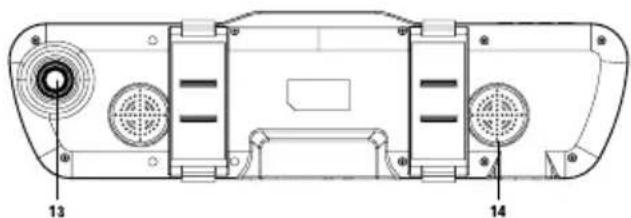
2. GETTING STARTED
2.1 INSERTING/REMOVING A MICRO SD CARD
With the Mirror DVR turned off and the screen facing towards you insert the memory card with the text on the Micro SD card facing away from you. Push the memory card in until a click is heard.
To remove the memory card, ensure that the Mirror DVR is powered off, then push the memory card until a click is heard and then release the card to eject.
Note: 1. Do not remove or insert the memory card while the Mirror DVR is turned on as this may damage the memory card or corrupt the memory cards stored data.
2. Please use a Class 6 or higher rated micro SD card with a maximum capacity of 32GB.
3. Please format the Micro SD card before the initial use.
4. When removing the memory card, be careful as the card may eject quickly.
5. Micro SD Card is not included
2.2 INSTALLING THE MCPK-43DVR
-
Loop the rubber fasteners over the top fastener clips.
-
Put the Mirror DVR in position on the front face of your existing rear view mirror ensuring that the camera lens clears the edge of your rear view mirror.
-
Loop the bottom rubber fasteners over the bottom fastener clips.
2.2.1 CONNECTING TO POWER
Only use the included charger to power and charge the Mirror DVR.
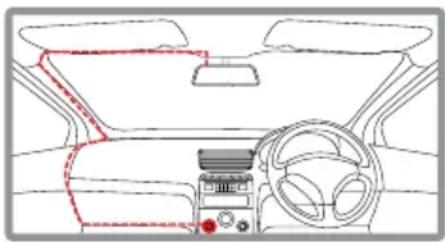
- Once the Mirror DVR is securely installed onto your vehicles rear view mirror, plug the 12V DC charger into your vehicles cigarette lighter adapter or power source.
- Run the cable along your vehicles console and windscreen and plug it into the Mirror DVR port marked with the USB icon.
natural_image
Interior view of a car dashboard and steering wheel (no text or symbols visible)2.2.2 ADJUST THE FIELD OF VIEW
- Use the camera lens on the rear of the Mirror DVR to move the camera field of view to the desired position.
Note: 1. Make sure that the cameras view is not obstructed by any window tint or any other objects.
2. If your vehicle has side curtain airbags please be very careful when running any cables along your vehicles windows. Ensure you are not running cables past any of the airbags as this can prevent the airbags from deploying.
2.3 CONNECTING THE REVERSE CAMERA
2.3.1 INSTALLATION GUIDE
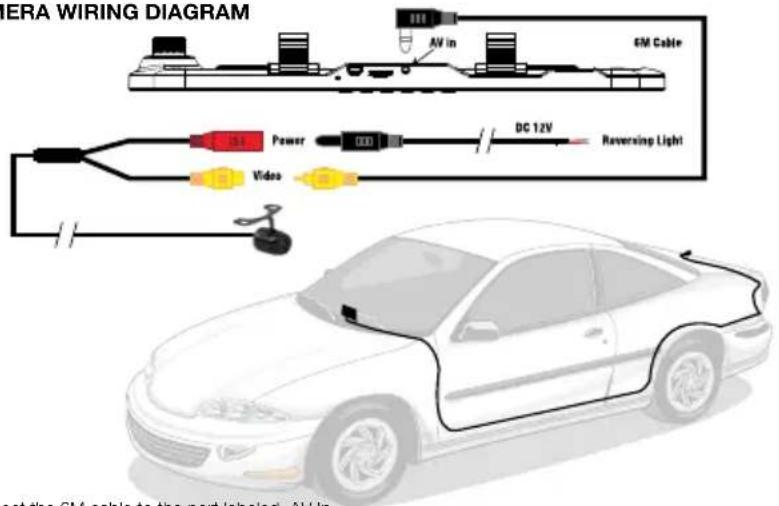
- Select a flat and centred location near the number plate lamp at the rear of the vehicle to mount camera.
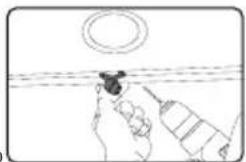
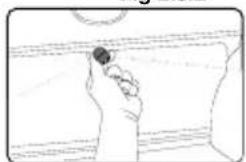
- Attach tape to the bracket of the camera to hold the camera in position while installing, and drill two small holes, one for the first screw, the second to run the reverse camera cable through. (Refer to fig 2.3.1)
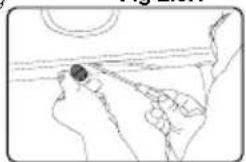
- Use a screw driver to fix the first screw, leaving the screw loose enough to adjust the camera. (Refer to fig 2.3.2)
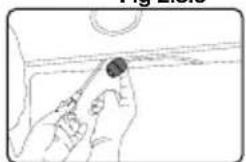
- Insert the camera wire through the intended drilled hole checking the installation position. (Refer to fig 2.3.3)
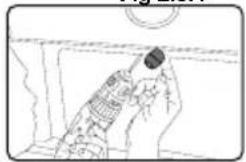
- Mark the position suitable for the second screw and drill a small hole for it. (Refer to fig 2.3.4)
- Fix the second screw and securely tighten both screws. (Refer to fig 2.3.5)
2.3.2 REVERSE CAMERA WIRING DIAGRAM
natural_image
Simple line drawing of a hand holding a tool near a circular object above a horizontal line (no text or symbols)Fig 2.3.1
natural_image
Line drawing of hands holding a small object near a horizontal line (no text or symbols)Fig 2.3.2
natural_image
Simple line drawing of a hand holding a small object, with no text or symbols present.Fig 2.3.3
natural_image
Line drawing of hands holding a small object near a ceiling fixture (no text or symbols)Fig 2.3.4
natural_image
Illustration of a hand holding a syringe above a window (no text or symbols visible)Fig 2.3.5
2.4 POWERING THE MIRROR DVR ON/OFF
2.4.1 AUTO POWER ON/OFF
When the MCPK-43DVR is correctly installed and connected to your vehicles' 12V DC power supply, the Mirror DVR will automatically power on and start recording when the car's accessories are activated. The Mirror DVR will automatically stop recording and shutdown when your vehicle is powered off.
2.4.2 MANUAL POWER ON/OFF
MANUAL POWER ON
Press and hold the Power button on the front of the Mirror DVR until the Parkmate start up screen appears.
MANUALLY POWER OFF
If the Mirror DVR is currently recording, please manually stop the recording by pressing the Rec/OK button. Press and hold the Power button on the front of the MCPK-43DVR. After powering off the device please wait for 10 seconds before powering the Mirror DVR on again.
RESETTING THE DEVICE
If the Mirror DVR does not function normally, try restarting the Mirror DVR. To restart the Mirror DVR with a flattened paper clip, press the small button on the top of the Mirror DVR next to the Mini USB port.
2.5 LED INDICATOR
| STATUS EXPLANATION LED INDICATOR COLOUR | |
| Battery Charging Solid RED Light | |
| Power on, Battery Fully Charged Solid BLUE Light | |
| Power on, Recording Flashing BLUE light | |
2.6 PLAYING BACK RECORDED VIDEO ON A PC
To playback video files on your PC it is recommended to connect the Micro SD card (not included) directly to your PC using either a USB Micro SD card reader (not included) or if your PC has a SD card slot, a Micro SD/SD Card converter (not included). Once the Micro SD card is connected it should appear as a removable storage device. It is recommended that you transfer video files that you want to playback to a folder on your computer before attempting to playback. This will reduce any delay in playback.
2.7 INITIAL SETTINGS
Before using the MCPK-43DVR we recommend Formatting the Inserted Micro SD Card and Setting the Time and Date.
2.7.1 FORMATTING THE INSERTED MICRO SD CARD
Formatting the Micro SD card will delete all information on the inserted Micro SD Card and prepare the card for use with the Mirror DVR.
- Press the REC Button to stop the Mirror DVR from recording.
-
Press the MENU Button to enter the Video Menu.
-
Press theButton again to enter the Settings Menu.
-
About the Buttons to navigate the Settings Menu and highlight the Format setting and press REC to select.
-
Select OK to confirm and press the REC Button.
Note: 1. Menus cannot be accessed while the camera is recording. Please stop the recording before attempting to access the menu.
- Formatting your Micro SD Card will delete all file from the card. Once these files have been deleted you will not be able to recover them.
2.7.2 SET DATE / TIME
Setting the Time and Date allows you to stamp your footage with the time as a reference.
- Press the REC Button to stop the Mirror DVR from recording.
- Press the MENU Button to enter the Video Menu.
- Press the MENU Button again to enter the Settings Menu.
- Use the A and V Buttons to navigate the Settings Menu and highlight the Date/Time setting and press REC to select.
-
Use the A and V buttons to edit the selected digit and the REC button to confirm and progress to the next digit. The final field sets the format that the date will be presented in.
-
To save the date and time, press the MENU Button.
Note: 1. Menus cannot be accessed while the camera is recording. Please stop the recording before attempting to access the menu.
- Once the time and date is set it can be stamped onto your footage using the Date Stamp setting. Please see section Date Stamp for more details.
2.8 USING THE MCPK-43DVR
When the Mirror DVR is connected to your vehicles 12v power supply, the Mirror DVR will automatically power up and begin recording when you start your vehicle. During the start up the buttons will be unresponsive and the camera will take a moment to begin recording. The Mirror DVR will automatically stop recording and shutdown when your vehicle is powered off.
Note: 1. Because of how some vehicles are wired, the recording may continue when the engine is switched off. If this happens, please manually turn off the Mirror DVR or remove the car adapter from the cigarette lighter when not in use.
2. The recording loop length can be configured to save a video file for every 2,3,5 or 10 minutes of recording. For information on how to adjust this setting please refer to the Loop Recording section of this manual.
3. The device saves the recorded footage and Photos on to the inserted Micro SD Card. If the memory card capacity is full, the oldest file in the memory card will be overwritten.
4. The reverse camera is designed to assist with reversing and is not designed to record. Recording will only be captured using the front facing camera.
Locked Recording saves the current video file and protects it from being overwritten. To manually start a Locked Recording follow the instructions below.
-
During recording mode button.
-
To stop recording press the REC button again.
Note: 1. If the G Sensor function is enabled and a collision is detected, the device will automatically trigger the Locked Recording and protect the current video file. Please refer to the section titled G Sensor for information on adjusting this setting.
- The emergency recording file is created as a new file, which will be protected to avoid being overwritten by normal loop recording. If the inserted Micro SD Card fills up with Locked Recording files the message "SD Card Full" will appear on the screen, and the oldest Locked Recording file will be automatically deleted when a new Locked Recording file is created.
2.9 REVERSE CAMERA
The Reverse Camera is designed to assist with reversing by showing your rear view from your bumper reducing blind spots. When installed correctly, the Reverse camera will activate when your vehicles reverse gear is selected, and the reverse cameras feed will be displayed on screen. When your vehicles reverse gear is disengaged the Reverse Camera will power down and the MCPK-43DVRs screen will revert back to displaying the front facing camera feed.
Note: 1. The Reverse Camera is designed to assist with reversing your vehicle, and will not record.
- The Reverse Camera this is a visual aid and will allow you to view what is behind the vehicle, it does not remove the responsibility of driving the vehicle from the driver.
- To ensure correct operation, it is highly recommended that the Reverse Camera is professionally installed.
| 1 |  | Video Mode Icon represents the currently selected mode | |
| 2 |  | Loop Recording Shows the duration of the loop clips | |
| 3 | [BY4D] | Motion Detection The Motion Detection Icon will appear when Motion detection is activated | |
| 4 |  | Recording Indicator The Record Indicator will flash when the Mirror DVR is Recording | |
| 5 |  | Wide Dynamic Range The WDR icon will appear when the Wide Dynamic Range setting is active | |
| 6 | [22SY] | Locked Recording | Shows when the current recording has been lock either by a G Sensor trigger, or Manually. |
| 7 |  | Recording Duration Shows the current recording duration | |
| 8 |  | Resolution Shows the current set resolution | |
| 9 | [DBK7] | Memory card The Memory Card icon shows when a Micro SD Card is installed | |
| 10 |  | Current Date Shows the current date | |
| 11 |  | Current Time | Shows the current time |
| 12 |  | Power | Shows the power connection |
3. VIDEO MODE
When the Mirror DVR is powered up the video screen will start by default. In this screen recording will automatically start and can be stopped by pressing the REC Button. To access the Video Menu, ensure that the Mirror DVR is not recording then press the MENU.
To manually trigger a Locked Recording, while recording press the MODE Button. The Locked Recording icon will appear at the top of the screen indicating that the current recording has been Locked from being recorded over by the regular Loop Recording.
To easily capture a snapshot while you are recording, press the MENU Button while recording is in progress.
3.1 VIDEO MENU
3.1.1 PARK MODE
Park Mode detects any activity from the built in G Sensor once you have parked your vehicle. If an impact is detected, the Mirror DVR will power up and record a clip. To activate Park Mode please follow the instructions below.
- REC Button to stop the Mirror DVR from recording.
-
With the Mirror DVR in video screen, MENU eButton for 2 seconds.
-
Park Mode will activate and a 'P' icon will be displayed onscreen.
Note: 1. Park Mode operates off of the internal battery, this will allow for 2-3 clips to be saved before the battery will deplete depending on if the battery is fully charged.
3.1.2 RESOLUTION
Resolution sets the video quality. Higher resolution video will capture more detail and will also produce larger files. To change the recording resolution, please follow the instructions below.
-
Press the REC Button to stop the Mirror DVR from recording.
-
P MENU Button to enter the Video Menu.
- A set the V Buttons to navigate the Video Menu and highlight the Resolution setting and press REC to select.
- ⚠️ set the V Buttons to highlight your required resolution, then press the REC button to confirm your selection.
Note: 1. Menus cannot be accessed while the camera is recording. Please stop the recording before attempting to access the menu.
- Higher resolution clips will create larger files which will fill the Micro SD Card faster.
3.1.3 LOOP RECORDING
Loop recording allows you to set the duration that the camera will record before creating a new clip. To set the clip length please follow the instructions below.
-
Press the REC Button to stop the Mirror DVR from recording.
-
Prox-Menu Button to enter the Video Menu.
-
United Buttons and highlight the Loop Recording setting and press REC elect.
-
▲ and ▼ Button to highlight your required clip length, then press the REC button to confirm your selection.
Note: 1. Menus cannot be accessed while the camera is recording. Please stop the recording before attempting to access the menu.
-
Selecting the OFF option will create the longest possible clip, in most cases depending on the set resolution and other factors this will be limited to 10MB.
-
To avoid filling the card quickly it is advised to use the 2 or 3 minute options.
3.1.4 WDR
Wide Dynamic Range (WDR) controls the image lighting and balancing on your recorded footage, capturing detail in situations with unbalanced lighting. To activate WDR please follow the steps below.
-
Press the REC Button to stop the Mirror DVR from recording.
-
Press the Button to enter the Video Menu.
-
Betted Buttons and highlight the WDR setting and press to select.
-
▲ and ▼ But does the highlight either OFF or ON, then press the REC to confirm your selection.
Note: 1. Menus cannot be accessed while the camera is recording. Please stop the recording before attempting to access the menu.
3.1.5 EXPOSURE
Exposure is used to manually control the light sensitivity settings. To change the Exposure setting follow the instructions below.
-
Press the REC Button to stop the Mirror DVR from recording.
-
Preview Button to enter the Video Menu.
-
United Buttons and highlight the Exposure setting and press REC.
-
A and V Button to highlight your required Exposure setting, then press the REC button to confirm your selection.
Note: 1. Menus cannot be accessed while the camera is recording. Please stop the recording before attempting to access the menu.
3.1.6 MOTION DETECTION
Motion Detection is used to pause recording when no motion is detected in front of the camera, and to start recording when motion is detected again. To activate the Motion Detection setting follow the instructions below.
-
Press the REC Button to stop the Mirror DVR from recording.
-
Press menu Button to enter the Video Menu.
-
A lined V Buttons to navigate the Video Menu and highlight the Motion Detection setting and press REC to select.
-
A and V Button should highlight either OFF or ON, then press the REC to confirm your selection.
Note: 1. Menus cannot be accessed while the camera is recording. Please stop the recording before attempting to access the menu.
- Motion detection does not work when your vehicle is powered off.
3.1.7 MICROPHONE
The Microphone setting allows you to mute the microphone during recording. To set your recording preferences, please follow the instructions below.
-
Press the REC Button to stop the Mirror DVR from recording.
-
Press the Button to enter the Video Menu.
-
U^{etted} V Buttons to navigate the Video Menu and highlight the Microphone setting and press REC to select.
-
▲ and ▼ But does to highlight either OFF or ON, then press the REC to confirm your selection.
Note: 1. Menus cannot be accessed while the camera is recording. Please stop the recording before attempting to access the menu.
3.1.8 DATE STAMP
Date stamp will stamp the current date onto the footage for future reference. To set the date stamp please follow the instructions below.
-
Press the REC Button to stop the Mirror DVR from recording.
-
Please Button to enter the Video Menu.
-
U^{etrel} V Buttons to navigate the Video Menu and highlight the Date Stamp setting and press REC to select.
-
▲ and ▼ But use the highlight either OFF or ON, then press the REC to confirm your selection.
Note: 1. Menus cannot be accessed while the camera is recording. Please stop the recording before attempting to access the menu.
- For date stamp to be correct the time and date must be set first. To set the time and date please see section Date/Time.
3.1.9 G SENSOR
The G Sensor defines the required force needed to trigger a Locked Recording. Once a Locked Recording is triggered in the case of an incident or impact the current recording will be automatically protected from being saved over by the normal loop recording. To set the required sensitivity please follow the instructions below.
-
Press the REC Button to stop the Mirror DVR from recording.
-
Prosthe Button to enter the Video Menu.
-
Used v Buttons to navigate the Video Menu and highlight the G Sensor setting and press REC to select.
-
▲ and ▼ Button to highlight your required sensitivity, then press the REC button to confirm your selection.
Note: 1. Menus cannot be accessed while the camera is recording. Please stop the recording before attempting to access the menu.
- If your memory card is filling up quickly you may need to lower the sensitivity of the G Sensor (Gravity Sensor) to decrease the number of triggers caused by normal driving.
Delay Power On sets a delay on recording after the Car DVR receives power and when the front facing camera starts recording. To set a delay, please follow the steps below.
-
Press the REC Button to stop the Mirror DVR from recording.
-
Press the Button to enter the Video Menu.
-
U-ethred V Buttons to navigate the Video Menu and highlight the Delay Power setting and press REC to select.
-
A and V Button to highlight your required delay, then press the REC button to confirm your selection.
Note: 1. Menus cannot be accessed while the camera is recording. Please stop the recording before attempting to access the menu.
3.2.1 NUMBER PLATE
Number Plate will stamp your vehicles number plate onto the footage for reference. To set the Number Plate setting please follow the instructions below.
-
Press the REC Button to stop the Mirror DVR from recording.
-
Please Button to enter the Video Menu.
-
Aethrel V Buttons to navigate the Video Menu and highlight the Number Plate setting and press REC to select.
-
MODE button is the switch between letters and numbers and the A and V buttons to select cycle through the selected output. The REC button is used to select the required character.
-
When you have finished inputting your vehicles number plate, use the MODE button to select "OK" and press the REC button.
Note: 1. Menus cannot be accessed while the camera is recording. Please stop the recording before attempting to access the menu.
4. PHOTO MODE
This screen is used to capture still images using your Clip on Mirror DVR. To access the Photo screen ensure that the camera is not recording and press the MODE button. Photo mode also has a menu which is used to edit the photo settings. This menu can be accessed by pressing the MENU in the Photo Screen.
4.1 PHOTO MENU
4.1.1 CAPTURE MODE
The Capture mode setting is used to set a delayed timer. To set a timer delay follow the instructions below.
-
Enter the Photo screen.
-
Press the
MENU Button to enter the Photo Menu.
-
Betrel Buttons to navigate the Photo Menu and highlight the Capture Mode setting and press REC to select.
-
Use the A and V Buttons to highlight your required timer delay, then press the REC n to confirm your selection.
Note: 1. Menus cannot be accessed while the camera is recording. Please stop the recording before attempting to access the menu.
- This setting can only be accessed through the Photo Menu, please make sure that you are in the Photo screen when you access the menu.
4.1.2 RESOLUTION
Resolution sets the still image quality. Higher resolution image will capture more detail and will also produce larger files. To change the photo resolution, please follow the instructions below.
-
Enter the Photo screen.
-
Press the MENU Button to enter the Photo Menu.
-
Used via Buttons to navigate the Photo Menu and highlight the Resolution setting and press REC to select.
-
Use the △ and √ Buttons to highlight your required resolution, then press the REO button to confirm your selection.
Note: 1. Menus cannot be accessed while the camera is recording. Please stop the recording before attempting to access the menu.
- This setting can only be accessed through the Photo Menu, please make sure that you are in the Photo screen when you access the menu.
4.1.3 SEQUENCE
When Sequence is activated, a sequence of 3 photos is taken when a photo is triggered. To activate or deactivate Sequence mode, follow the instructions below.
-
Enter the Photo screen.
-
Press the MENU Button to enter the Photo Menu.
-
Abouted Buttons to navigate the Photo Menu and highlight the Sequence setting and press REC to select.
-
▲ and ▼ Butse the highlight either OFF or ON, then press the REC to confirm your selection.
Note: 1. Menus cannot be accessed while the camera is recording. Please stop the recording before attempting to access the menu.
- This setting can only be accessed through the Photo Menu, please make sure that you are in the Photo screen when you access the menu.
4.1.4 QUALITY
Quality sets the still image detail. Higher quality images will capture more detail and will also produce larger files. To change the recording resolution, please follow the instructions below.
-
Enter the Photo screen.
-
Press the MENU Button to enter the Photo Menu.
-
← Required ↕ Buttons to navigate the Photo Menu and highlight the Quality setting and press REC to select.
-
A and B should highlight your required quality, then press the REC in to confirm your selection.
Note: 1. Menus cannot be accessed while the camera is recording. Please stop the recording before attempting to access the menu.
- This setting can only be accessed through the Photo Menu, please make sure that you are in the Photo screen when you access the menu.
4.1.5 SHARPNESS
Sharpness sets the boldness of the still image. Images with a stronger sharpness will create bolder images with stronger outlines. To change the photo Sharpness, please follow the instructions below.
-
Enter the Photo screen.
-
Press the MENU Button to enter the Photo Menu.
-
Betred Buttons to navigate the Photo Menu and highlight the Sharpness setting and press REC to select.
-
A and B butse she highlight your required sharpness, then press the REC to confirm your selection.
Note: 1. Menus cannot be accessed while the camera is recording. Please stop the recording before attempting to access the menu.
- This setting can only be accessed through the Photo Menu, please make sure that you are in the Photo screen when you access the menu.
4.1.6 WHITE BALANCE
The White Balance setting is used to manually adjust the settings used to counteract different light conditions. This setting is set to Auto by default. To change the White Balance setting follow the instructions below.
-
Enter the Photo screen.
-
Press the MENU Button to enter the Photo Menu.
3.Used ▼ Buttons to navigate the Photo Menu and highlight the White Balance setting and press REC to select.
- ▲ and ▼ Button set to highlight your required setting, then press the REC button to confirm your selection.
Note: 1. Menus cannot be accessed while the camera is recording. Please stop the recording before attempting to access the menu.
- This setting can only be accessed through the Photo Menu, please make sure that you are in the Photo screen when you access the menu.
4.1.7 COLOUR
The Colour setting is used to set the colour palette. To change the Colour setting follow the instructions below.
-
Enter the Photo screen.
-
Press the MENU Button to enter the Photo Menu.
-
Uzbek Buttons to navigate the Photo Menu and highlight the Colour setting and press REC to select.
-
▲ and ▼ Button to highlight your required Colour setting, then press the REC button to confirm your selection
Note: 1. Menus cannot be accessed while the camera is recording. Please stop the recording before attempting to access the menu.
- This setting can only be accessed through the Photo Menu, please make sure that you are in the Photo screen when you access the menu.
4.1.8 ISO
ISO is used to manage how much light is let into the image sensor. Setting a higher ISO will let in more light and blurred movement and lower ISO will capture less movement and less light. To change the ISO setting follow the instructions below.
-
Enter the Photo screen.
-
Press the MENU Button to enter the Photo Menu.
-
Uethrel V Buttons to navigate the Photo Menu and highlight the ISO setting and press REC to select.
-
▲ and ▼ Buto the to highlight your required ISO setting, then press the REC button to confirm your selection.
Note: 1. Menus cannot be accessed while the camera is recording. Please stop the recording before attempting to access the menu.
- This setting can only be accessed through the Photo Menu, please make sure that you are in the Photo screen when you access the menu.
4.1.9 EXPOSURE
Exposure is used to manually control the light settings. To change the Exposure setting follow the instructions below.
-
Enter the Photo screen.
-
Press the MENU Button to enter the Photo Menu.
-
Used via Buttons to navigate the Photo Menu and highlight the Exposure setting and press REC to select.
-
△set the ▼ Buttons to highlight your required Exposure setting, then press the REC button to confirm your selection.
Note: 1. Menus cannot be accessed while the camera is recording. Please stop the recording before attempting to access the menu.
- This setting can only be accessed through the Photo Menu, please make sure that you are in the Photo screen when you access the menu.
4.2.0 ANTI SHAKING
The Anti Shaking setting uses the on board chipset to correct some of the blur caused by handheld photography. To enable Anti Shaking follow the instructions below.
-
Enter the Photo screen.
-
Press the MENU Button to enter the Photo Menu.
-
Attached Buttons to navigate the Photo Menu and highlight the Anti Shaking setting and press REC to select.
-
A set of Buttons to highlight either OFF or ON, then press the button to confirm your selection.
Note: 1. Menus cannot be accessed while the camera is recording. Please stop the recording before attempting to access the menu.
- This setting can only be accessed through the Photo Menu, please make sure that you are in the Photo screen when you access the menu.
4.2.1 QUICK REVIEW
Quick review displays the photo on screen for the set amount of time after the photo has been taken. To change the Quick Review setting follow the instructions below.
-
Enter the Photo screen.
-
Press the MENU Button to enter the Photo Menu.
-
Used via Buttons to navigate the Photo Menu and highlight the Quick Review setting and press REC to select.
-
Use the V Buttons to highlight your required image display time setting, then press the REC button to confirm your selection.
Note: 1. Menus cannot be accessed while the camera is recording. Please stop the recording before attempting to access the menu.
- This setting can only be accessed through the Photo Menu, please make sure that you are in the Photo screen when you access the menu.
4.2.2 DATE STAMP
Date stamp is used to stamp your photos with the time and date that they are taken. To select your preferred time and date format follow the instructions below.
- Enter the Photo screen.
-
Press the MENU Button to enter the Photo Menu.
-
A set of Buttons to navigate the Photo Menu and highlight the Date Stamp setting and press REC to select.
- ▲ and ▼ Button to highlight either Date, Date/Time or On, then press the REC button to confirm your selection.
Note: 1. Menus cannot be accessed while the camera is recording. Please stop the recording before attempting to access the menu.
- This setting can only be accessed through the Photo Menu, please make sure that you are in the Photo screen when you access the menu.
- The Date Stamp setting is not used to set the cameras internal clock. To set the time follow the instructions Date/Time in the settings section.
5. SETTING MENU
This menu is used to edit the cameras operational settings. This menu can be accessed through either the Video or Photo menu by pressing the MENU whilst in either of these menus. While in this menu the And Vittons are used to navigate and the butREG to select the highlighted setting.
5.1 SETTING THE DATE/TIME
Setting the Time and Date allows you to stamp your footage with the time as a reference.
- Press the REC Button to stop the Mirror DVR from recording.
- Pressthe MENU Button to enter the Video Menu.
- Pressthe MENU Button again to enter the Settings Menu.
-
Usethe ▲ and ▼ Buttons to navigate the Settings Menu and highlight the Set Date/Time setting and press REC to select.
-
Use the △ and √ buttons to edit the selected digit and the REC button to confirm and progress to the next digit. The final field sets the format that the date will be presented in.
-
To save and exit the time and date, press the MENU button.
Note: 1. Menus cannot be accessed while the camera is recording. Please stop the recording before attempting to access the menu.
2. Once the time and date is set it can be stamped onto your footage using the Date Stamp setting. Please see section Date Stamp (3.1.8) for more details.
5.2 KEY BEEPS
The Key Beeps setting is used to mute the beep notification when a button is pressed. To change the Key Beep setting please follow the instructions below.
-
Press the REC Button to stop the Mirror DVR from recording.
-
Prox-ntu Button to enter the Video Menu.
- Used via Buttons to navigate the Video Menu and highlight the Key Beeps setting and press REC to select.
- ▲ and ▼ Butte to highlight either OFF or ON, then press the REC to confirm your selection.
Note: 1. Menus cannot be accessed while the camera is recording. Please stop the recording before attempting to access the menu.
- This setting can only be accessed through the Settings Menu which can be accessed via the Video & Photo Menus.
5.3 LANGUAGE
The Language setting is used to select your preferred Language in the menus. To set the systems Language follow the instructions below.
-
Press the REC Button to stop the Mirror DVR from recording.
-
ProSession Button to enter the Video or Menu.
- Preview Button again to enter the Settings Menu.
4.^(A) - (B) Buttons to navigate the Settings Menu and highlight the Language setting and press REC to select. - A and B Button should highlight your preferred language, then press the REC in to confirm your selection.
Note: 1. Menus cannot be accessed while the camera is recording. Please stop the recording before attempting to access the menu.
- This setting can only be accessed through the Settings Menu which can be accessed via the Video & Photo Menus.
5.4 TV MODE
The TV Mode setting is used to change the video output between NTSC and PAL. To change the TV Mode setting please follow the instructions below.
- Press the REC Button to stop the Mirror DVR from recording.
- Pressthe MENU Button to enter the Video or Menu.
- Pressthe MENU Button again to enter the Settings Menu.
- Use the △ and ▼ Buttons to navigate the Settings Menu and highlight the TV Mode setting and press REC to select.
- Use the ▲ and ▼ Buttons to highlight either OFF or ON, then press the REC to confirm your selection.
Note: 1. Menus cannot be accessed while the camera is recording. Please stop the recording before attempting to access the menu.
2. This setting can only be accessed through the Settings Menu which can be accessed via the Video & Photo Menus.
5.5 SCREEN SAVER
The Screen Saver setting is used to set the duration of inactivity of the camera before the screen goes into sleep mode. To set the Screen Saver follow the instructions below.
-
Press the REC Button to stop the Mirror DVR from recording.
-
Pressthe MENU Button to enter the Video or Menu.
-
Pressthe MENU Button again to enter the Settings Menu.
-
Usethe ▲ and ▼ Buttons to navigate the Settings Menu and highlight the Screen Saver setting and press REC to select.
-
Use the A and V Buttons to highlight your preferred duration of activity, then press the REC in to confirm your selection.
Note: 1. Menus cannot be accessed while the camera is recording. Please stop the recording before attempting to access the menu.
-
This setting can only be accessed through the Settings Menu which can be accessed via the Video & Photo Menus.
-
Even when the screensaver is activated and the screen goes into sleep mode, the camera will continue recording.
-
This setting can only be accessed through the Settings Menu which can be accessed via the Video & Photo Menus.
- Even when the screensaver is activated and the screen goes into sleep mode, the camera will continue recording.
5.6 FREQUENCY
The Frequency setting is used to set the cameras frequency. To adjust the frequency, follow the instructions below.
- Press the REC Button to stop the Mirror DVR from recording.
- Pressthe MENU Button to enter the Video or Menu.
- Pressthe MENU Button again to enter the Settings Menu.
-
Use the ▲ and ▼ Buttons to navigate the Settings Menu and highlight the Frequency setting and press REC to select.
-
Use the ∧ and ∨ Buttons to highlight your preferred Frequency, then press the REC button to confirm your selection.
Note: 1. Menus cannot be accessed while the camera is recording. Please stop the recording before attempting to access the menu.
- This setting can only be accessed through the Settings Menu which can be accessed via the Video & Photo Menus.
5.7 FORMAT
Formatting the Micro SD card will delete all information on the inserted Micro SD Card and prepare the card for use with the Mirror DVR.
-
Ensure the Mirror DVR is not recording.
-
Pressthe MENU Button to enter the Video or Menu.
-
Pressthe MENU Button again to enter the Settings Menu.
-
Usethe ▲ and ▼ Buttons to navigate the Settings Menu and highlight the Format setting and press REC to select.
-
Press the REC on.
-
Use the △ and ▼ Buttons to highlight your preferred image rotation, then press the REC button to confirm your selection.
Note:
- Menus cannot be accessed while the camera is recording. Please stop the recording before attempting to access the menu.
- Formatting your Micro SD Card will delete all files from the card. Once these files have been deleted you will not be able to recover them.
5.8 DEFAULT SETTINGS
Default Settings is used to revert the Mirror DVRs settings to their default settings. To reset the camera to restore the default settings, please follow the instructions below.
-
Ensure the Mirror DVR is not recording.
-
Pressthe MENU Button to enter the Video or Menu.
- Pressthe MENU Button again to enter the Settings Menu.
- Use the ▲ and ▼ Buttons to navigate the Settings Menu and highlight the Default Settings setting and press REC to select.
- Use the A and V Buttons to highlight your preferred image rotation, then press the REC n to confirm your selection.
Note: 1. Menus cannot be accessed while the camera is recording. Please stop the recording before attempting to access the menu.
- This setting can only be accessed through the Settings Menu which can be accessed via the Video & Photo Menus.
6. PLAYBACK SCREEN
This screen is used to playback photos and videos. To access the Playback screen ensure that the camera is not recording and press the MODE button. This will send the camera to the photo screen. While in the Photo and press the MODE button again which will bring you to the Playback Screen. In this screen the A and V buttons are used to cycle through the recorded videos and photos and the REC in is used to play and pause videos. In the Playback Screen photos and videos can also be locked and deleted via the Playback Menu. This menu can be accessed by pressing the MENU button in the Photo Screen.
6.1 DELETING PHOTOS AND VIDEOS
To delete an unlocked photo or video follow the instructions below.
- Navigate to the playback screen using the instructions in the section labelled Playback Screen.
-
In the Playback Screen use the A and V buttons to select the photo or video that you want to delete (if you want to delete all unlocked photos and videos select any unlocked Photo or Video).
-
Pressthe MENU button to enter the Playback Menu and use the A and V buttons to select the Delete setting and press the button.

- Use the A and V buttons to select either Delete All, which will delete all unlocked photos and videos, or Delete Current which will delete the selected photo or video.
- Press the REC button to confirm the deletion.
Note: 1. Menus cannot be accessed while the camera is recording. Please stop the recording before attempting to access the menu.
- You will only be able to delete videos that have not been protected by a G Sensor.
- To unlock protected files please follow the directions given in the section marked in the section marked Protect Photos and Videos (6.2).
- To easily delete all files on the inserted Micro SD Card, please follow the instructions given in the section marked Format (2.7.1).
6.2 LOCKING AND UNLOCKING PHOTOS AND VIDEOS
To Lock or Unlock photos or videos from being deleted, please follow the instructions below.
-
Navigate to the playback screen using the instructions in the section labelled Playback Screen
-
In the Playback Screen use the A and V buttons to select the photo or video that you want to lock or unlock (if you want to lock or unlock all photos and videos select any Photo or Video).
- Pressthe MENU button to enter the Playback Menu and use the A and V buttons to select the Protect setting and press the REC button.
- Use the A and V buttons to select either Unlock All, which will unlock all photos and videos, Unlock One to unlock the currently selected photo or video, Lock All to lock all videos and photos to protect them from deletion, or Lock One to lock the currently selected file to protect the currently selected photo or video from deletion.
- Select OK and press the REC button to confirm your selection.
Note: 1. Menus cannot be accessed while the camera is recording. Please stop the recording before attempting to access the menu.
- To easily delete all files on the inserted Micro SD Card, please follow the instructions given in the section marked Format (2.7.1).
7. MENU TABLES
| Video | Resolution | 1080FHD 1920x1080720P 1280x720WVGA 848x480VGA 640x480 | |
| Loop recording | Off 3 Minutes | ||
| 1 Minute 5 Minutes | |||
| 2 Minutes | 10 Minutes | ||
| WDR | Off On | ||
| Exposure | +2.0 -1/3 | ||
| +5/3 -2/3 | |||
| +4/3 -1.0 | |||
| +1.0 -4/3 | |||
| +2/3 -5/3 | |||
| +1/3 -2.0 | |||
| +0.0 | |||
| Motion Detection | Off On | ||
| Micropohone | Off On | ||
| Date Stamp | Off On | ||
| G Sensor | High Low | ||
| Medium Off | |||
| Delay Power On | Off 20 Sec | ||
| 10 Sec 30 Sec | |||
| Number Plate | Enter Number Plate | ||
| Park Mode | Low Medium | ||
| High | |||
| Still | Capture Mode | Single 55 Timer | |
| 2S Timer 10S Timer | |||
| Resolution | 12M 4032x3024 3M 2048x153610M 3648x2736 2MHD 1920x10808M 3264x2448 VGA 640x4805M 2592x1944 1.3 1280x960 | ||
| Sequence | Off On | ||
| Quality | Fine Normal | ||
| Economy | |||
| Sharpness | Strong Normal | ||
| Soft | |||
| White Balance | Auto Tungsten | ||
| Daylight Fluorescent | |||
| Cloudy | |||
| Colour | Color Sepia | ||
| Black & White | |||
| ISO | Auto 200 | ||
| 100 400 | |||
| Exposure | +2.0 -1/3 | ||
| +5/3 -2/3 | |||
| +4/3 -1.0 | |||
| +1.0 -4/3 | |||
| +2/3 -5/3 | |||
| +1/3 -2.0 | |||
| +0.0 | |||
| Anti Shaking | Off On | ||
| Still | Anti-Shaking | Off On | |
| Quick Review | Off 2 Seconds | ||
| 5 Seconds | |||
| Date | Off Date | ||
| Date/Time | |||
| Setup | Date / Time | Set Time & Date | |
| Key Beeps | Off On | ||
| Language | English Chinese S | ||
| French Chinese T | |||
| Spanish Russian | |||
| Portuguese Japanese | |||
| Dutch Korean | |||
| Italian | |||
| TV Mode | NTSC PAL | ||
| Screen Saver | 1 Minute 5 Minutes | ||
| 3 Minutes Off | |||
| Frequency | 50 Hz 60Hz | ||
| Format | Cancel OK | ||
| Default Setting | Cancel OK | ||
| Version | Display Version Number | ||
WARRANTY TERMS & CONDITIONS
Our goods come with guarantees that cannot be excluded under the Australian & New Zealand Consumer Law. You are entitled to a replacement or refund for a major failure and for compensation for any other reasonably foreseeable loss or damage. You are also entitled to have the goods repaired or replaced if the goods fail to be of acceptable quality and the failure does not amount to a major failure.
This warranty is provided in addition to your rights under the Australian & New Zealand Consumer Law.
Directed warrants that this product is free from defects in material and workmanship for a period of 12 months from the date of purchase or for the period stated on the packaging. This warranty is only valid where you have used the product in accordance with any recommendations or instructions provided by Directed.
This warranty excludes defects resulting from alterations of the product, accident, misuse, abuse or neglect.
In order to claim the warranty, you must return the product to the retailer from which it was purchased or if that retailer is part of a National network, a store within that chain, along with satisfactory proof of purchase. The retailer will then return the goods to Directed. Directed will repair, replace or refurbish the product at its discretion. The retailer will contact you when the product is ready for collection. All costs involved in claiming this warranty, including the cost of the retailer sending the product to Directed, will be borne by you.
Directed Electronics: 44 Translink Drive, Keilor Park Victoria Australia 3042
Ph: +61 03 8331 4800
Email: service@parkmate.com.au
parkmate YOUR SAFETY COMES FIRST ^TM
www.parkmate.com.au
www.parkmatehd.co.nz
© Parkmate 2016
- CAUTION
- BATTERY WARNING
- NOTES ON INSTALLATION
- DISCLAIMER
- Introduction ......6
- Getting Started 7-12
- Video mode 13-21
- Photo Mode 17
- Photo Menu....17
- Setting Menu 21-25
- Menu Tables 25-26
- Menu Tables 27-29
- INTRODUCTION
- FEATURES
- PACKAGE CONTENTS
- PRODUCT OVERVIEW
- GETTING STARTED
- INSERTING/REMOVING A MICRO SD CARD
- INSTALLING THE MCPK-43DVR
- CONNECTING TO POWER
- ADJUST THE FIELD OF VIEW
- CONNECTING THE REVERSE CAMERA
- INSTALLATION GUIDE
- REVERSE CAMERA WIRING DIAGRAM
- POWERING THE MIRROR DVR ON/OFF
- AUTO POWER ON/OFF
- MANUAL POWER ON/OFF
- MANUAL POWER ON
- MANUALLY POWER OFF
- RESETTING THE DEVICE
- LED INDICATOR
- PLAYING BACK RECORDED VIDEO ON A PC
- INITIAL SETTINGS
- FORMATTING THE INSERTED MICRO SD CARD
- SET DATE / TIME
- USING THE MCPK-43DVR
- REVERSE CAMERA
- VIDEO MODE
- VIDEO MENU
- PARK MODE
- RESOLUTION
- LOOP RECORDING
- WDR
- EXPOSURE
- MOTION DETECTION
- MICROPHONE
- DATE STAMP
- G SENSOR
- NUMBER PLATE
- PHOTO MODE
- PHOTO MENU
- CAPTURE MODE
- RESOLUTION
- SEQUENCE
- QUALITY
- SHARPNESS
- WHITE BALANCE
- COLOUR
- ISO
- EXPOSURE
- ANTI SHAKING
- QUICK REVIEW
- DATE STAMP
- SETTING MENU
- SETTING THE DATE/TIME
- KEY BEEPS
- LANGUAGE
- TV MODE
- SCREEN SAVER
- FREQUENCY
- FORMAT
- Note:
- DEFAULT SETTINGS
- PLAYBACK SCREEN
- DELETING PHOTOS AND VIDEOS
- LOCKING AND UNLOCKING PHOTOS AND VIDEOS
- MENU TABLES
- WARRANTY TERMS & CONDITIONS
Brand : Scosche
Model : MCPK-43DVR
Category : Dash cam