
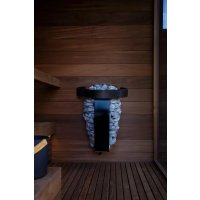
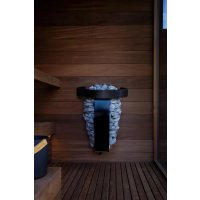
Cilindro Pro HPCE2642 - Heating HARVIA - Free user manual and instructions
Find the device manual for free Cilindro Pro HPCE2642 HARVIA in PDF.


| Product Type | Electric Sauna Heater |
| Brand | Harvia |
| Model | Cilindro Pro HPCE2642 |
| Dimensions (H x W x D) | 1320 x 450 x 450 mm (±20 mm) |
| Weight (net) | 35 kg |
| Stone Capacity | 160 kg (Ø 10-15 cm) + 60 kg (Ø 5-10 cm) / max 220 kg |
| Power Supply | 200 V, 3-Phase, 50/60 Hz |
| Heating Power | 26.4 kW (two circuits: 13.2 kW each) |
| Connection Cable Type | H07RN-F or equivalent |
| Sauna Room Volume | 25-50 m³ |
| Minimum Ceiling Height | 2300 mm |
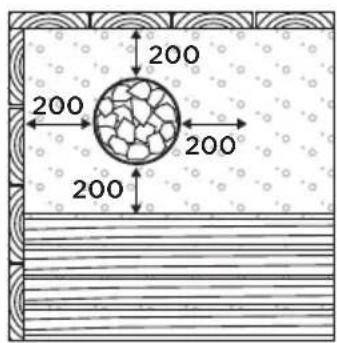
| Safety Distances | See Image 1 in manual (minimum mm) |
| Recommended Stones Type | Angular split-face stones (peridotite, olivine-dolerite, olivine) |
| Separate Control Unit Required | Yes |
| Overheat Protection | Automatic reset via control unit (125°C sensor) |
| Cleaning | Wipe with damp cloth and mild detergent; remove lime stains with 10% citric acid |
| Stone Maintenance | Rearrange yearly, replace broken stones |
| Spare Parts | Heating element 2200 W/200 V (WXZSC-022I), Temperature sensor/overheat protector 125°C (WX248) |
| Guarantee | 2 years (family use), 1 year (building residents), 3 months (institutional) |
| Certifications | IEC/EN 60335-2-53 compliant |
Frequently Asked Questions - Cilindro Pro HPCE2642 HARVIA
User questions about Cilindro Pro HPCE2642 HARVIA
0 question about this device. Answer the ones you know or ask your own.
Ask a new question about this device
Download the instructions for your Heating in PDF format for free! Find your manual Cilindro Pro HPCE2642 - HARVIA and take your electronic device back in hand. On this page are published all the documents necessary for the use of your device. Cilindro Pro HPCE2642 by HARVIA.
USER MANUAL Cilindro Pro HPCE2642 HARVIA
Instructions for installation and use of Electric Sauna Heater

natural_image
Large cylindrical metal trash bin filled with coal, no visible text or symbols on the material itself.PC264E
EN
CONTENTS
These instructions for installation and use are intended for the owner or the person in charge of the sauna, as well as for the electrician in charge of the electrical installation of the heater. After completing the installation, the person in charge of the installation should give these instructions to the owner of the sauna or to the person in charge of its operation. Please read the instructions for use carefully before using the heater.
INSTALLATION IMAGES.... 3
WARNINGS AND NOTES......6
INSTRUCTIONS FOR INSTALLATION...... 8
Technical data....8
Before installation....8
Safety distances....8
Safety Railing....8
Electrical connections....9
Electric Heater Insulation Resistance.... 9
Installation of the Control Unit and Sensor.... 9
Installing the Heater....9
Resetting the Overheat Protector.... 9
SAUNAROOM....10
Sauna room structure.... 10
Heater Output....10
Blackening of the Sauna Walls.... 10
Sauna room ventilation.... 10
Sauna Room Hygiene.... 11
OPERATING INSTRUCTIONS......12
Placing of sauna stones.... 12
Heating of the Sauna.... 13
Using the Heater.... 13
Throwing Water on Heated Stones.... 13
Water quality requirements.... 13
Instructions for Bathing.... 13
Troubleshooting....14
SPAREPARTS......15
GUARANTEE....15
1. Safety distances

(min. mm)
2. Electrical Connections
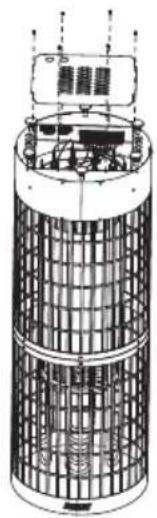
natural_image
Cross-sectional diagram of a cylindrical device with internal grid structure and mounting points (no text or symbols)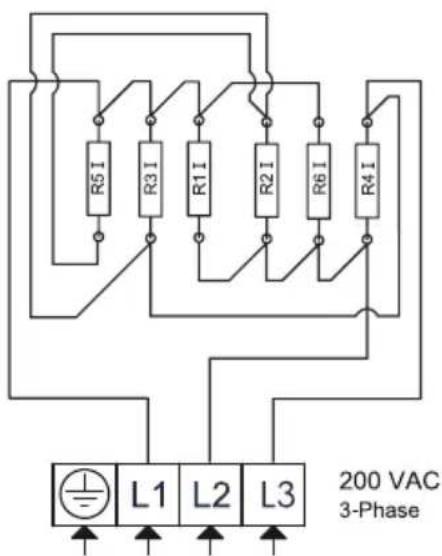
Group I
Y05-1170
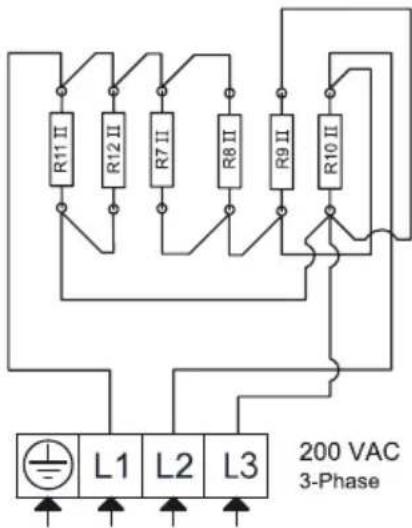
Group II
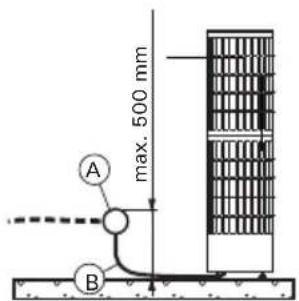
3. Installing the heater

natural_image
Technical diagram of an electrical component with wiring and a top-mounted device (no visible text or symbols)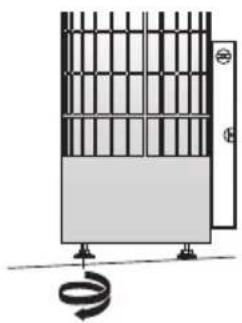
natural_image
Simple line drawing of a vertical panel with a coiled cable at the base (no text or symbols)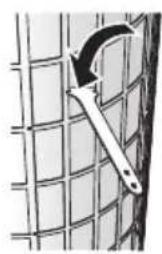
natural_image
Diagram of a hand holding a tool against a grid-patterned wall (no text or symbols)
natural_image
Close-up of a grid-patterned surface with a single tool or bracket (no text or symbols visible)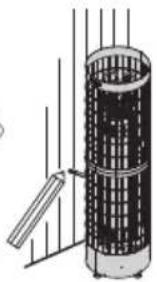
natural_image
Diagram of a cylindrical device with internal grid structure and a handle, no visible text or symbols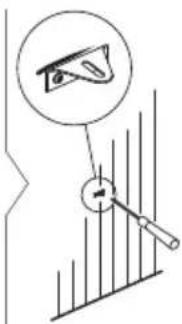


natural_image
Diagram of a cylindrical industrial or filtration unit with vertical supports and directional arrows indicating flow or movement (no text or symbols)
natural_image
Diagram of a cylindrical structure mounted on a base plate with directional arrows indicating force or movement (no text or symbols)4. Installing the sensor (all dimensions in millimeters)
A= Overheat protector
(Delivered with the heater)
(Blue and white wire)
B = Thermostat
(Delivered with the control unit)
(Red and yellow wire)


- Sauna room structure

- Sauna room ventilation
- Piling of the sauna stones


READ THE WARNINGS AND MANUAL CAREFULLY BEFORE USING THE PRODUCT!

Installation and maintenance
- The sauna heater is designed for the heating of a sauna room to bathing temperature. It is not to be used for any other purpose! The control unit is meant for controlling the functions of a sauna and a sauna heater. It is not to be used for any other purpose!
- The heater may only be connected to the electrical network in accordance with the current regulations by an authorised, professional electrician. After completing the installation, the person in charge of the installation should give these instructions to the owner of the sauna or to the person in charge of its operation.
- All maintenance that requires special skills must be performed by a trained professional.
• Always disconnect the device from the electricity network before carrying out any maintenance work!
- Check the device for visible damage before installing and using the device. Do not use a damaged device.
- This device is allowed to use by 8 years old or older children and persons with reduced physical, sensory or mental capabilities, or persons with lack of experience and knowledge, if they are supervised or they have been instructed to use the device safely and if they are aware of the dangers involved.
- Children should not play with the device. Children should not clean or do operations to the device without supervision.
- It is absolutely necessary to install the heater according to values stated in the instructions of installation and use. Neglecting them causes a risk of fire.
- Only one electrical heater may be installed in the sauna room, unless otherwise stated in the instructions.
- The device must be installed in such a way that the warning texts are easy to read after installation.
- The heater or device must not be installed in a wall recess, unless otherwise stated in the instructions.
- If a guardrail is made around the heater, the safety distances specified in the instructions of installation and use manual must be observed.
- If suitable accessories are installed in the device, follow the accessory-specific operating and installation instructions!
- Ensure adequate ventilation in the sauna room (Air should change six times per hour).
- Do not place the supply air vent so that the air flow cools the temperature sensor (see temperature sensor installation instructions!)
- If the supply cord is damaged, it must be replaced by the manufacturers' service person or a similarly qualified person in order to avoid a hazard.
- Use of a PVC-insulated cable as a connection cable for the heater is prohibited due to its thermal fragility.
- Always check condition of the junction box connectors when installing the heater. We recommend screw connectors. Avoid spring-loaded connectors!
- Do not connect power supply to electric heater via a residual current device.
- If device is used in public saunas without a timer, the indicator light, which tells if the device is on, must be placed in the room where the device is controlled.
- Use protective gloves when piling the stones.
- A bare heating element can endanger combustible materials even outside the safety distances. Check that no heating elements can be seen behind the stones.
- No such objects or devices should be placed inside the heater stone space or near the heater that could change the amount or direction of the air flowing through the heater.
- Wipe the heater from time to time with a damp cloth to remove dust and dirt. If necessary, use mild detergents. Do not use running water for cleaning.
- Before cleaning, make sure that the device has cooled down completely.
- Pile the stones or replace the broken stones with new ones at least every year.

Instructions for use and bathing
- Beware of hot heater. The stones and metal parts of the heater may burn the skin.
• Always check that there is no objects on the heater or near the heater before switching it on. - During the first heating sessions, the heater may produce an odour, ensure adequate ventilation of the sauna room
- Do not throw or pour too much water on the heater at once, boiling water may splash on bathers.
- Never throw water on the stones when there are people near the heater.
- The maximum volume of the ladle is 0.2 litres.
- Do not throw any other water on the heater than that specified in the instructions manual of the heater.
- Only special aromas designed for sauna water may be used according to their instructions.
- Staying in the hot sauna for long periods of time makes the body temperature rise, which may be dangerous.
- Keep children away from the heater.
- Do not let young, handicapped or ill people bathe in the sauna on their own.
- Consult your doctor about any health-related limitations to bathing.
- Be very careful when moving in the sauna, as the platform and floors may be slippery.
- Never go to a hot sauna if you have taken alcohol, strong medicines or narcotics.
- Never sleep in a hot sauna.
- Sea air and a humid climate may corrode the metal surfaces of the heater.
- Do not hang clothes to dry in the sauna, as this may cause a risk of fire. Excessive moisture content may also cause damage to the electrical equipment.
- Do not press the overheating protection button before the cause of the fault has been found. Only persons authorised to carry out electrical installations can reset the overheat protector, unless otherwise stated in the instructions manual.
• Always check that the heater has switched off and stopped heating after the on-time period has elapsed. - Particles disintegrating from the sauna stones may damage sensitive floor coverings and cause fire hazard.
- In public saunas, where the heater is used without a timer or continuously for longer than the timer of the heater or the control unit allows with the factory settings, the device must be constantly supervised.
- The sauna room and surroundings of the heater must always be checked before the heater is switched on again or it is switched on with the remote control system.
- The sauna room and surroundings of the heater must always be checked before the device is brought into standby mode required by remote control or pre-timed operation.
- According to the product standard IEC/EN 60335 -2-53 regulating electrical sauna heaters, the control unit can be used to remotely control the heater once the heater or sauna room door is equipped with a secure switch (safety or door switch).

Do not cover!
Be careful of hot steam when using the appliance!

See WARNINGS AND NOTES! See INSTALLATION IMAGES!
Technical data
| HPCE2642 | ||||
| Installation details Max. | power | 26.4 kW | Circuit 1. = 13.2 kW Circuit 2. = 13.2 kW | |
| Input 200 V, 3-Phase | 50 / 60 Hz | |||
| Connection cable type H07RN-F or equivalent | ||||
| Weight 35 kg | ||||
| Stones 160 kg / ∅ 10-15 cm | 60 kg / ∅ 5-10 cm, on top | 220 kg max. | ||
| Storage temperature 0-50 °C | ||||
| Dimensions Height 1320 | ± 20 mm | |||
| Width 450 mm | ||||
| Depth 450 mm | ||||
| Sauna room Volume m3 | 25-50 m3 | |||
| Sauna room height min. 2300 mm | ||||
Before installation > Image 1
Before installing the heater, study the instructions for installation. Check the following points:
- Is the output and type of the heater suitable for the sauna room? The cubic volumes must be followed > Technical data.
• Is the supply voltage suitable for the heater? - The location of the heater fulfils the minimum requirements concerning safety distances > Technical data, > Image 1. Safety distances.

Note! Only one electrical heater may be installed in the sauna room. The heater should be installed so that the warning texts can be read without difficulty after the installation.
Safety distances > Image 1
The minimum safety distances are shown in image 1.

It is absolutely necessary to install the heater according to these values. Neglecting them causes a risk of fire.

Hot pieces of stone can damage floor coverings and cause a risk of fire. The floor coverings of the installation place should be heat-resistant.
Safety Railing
If a safety railing is built around the heater, the minimum distances given in image 1 or in the railing's instructions for installation must be observed.
Electrical connections > Image 2

The heater may only be connected to the electrical network in accordance with the current regulations by an authorised, professional electrician.
• See installation image 2
- The heater is semi-stationarily connected to the junction box on the sauna wall. The junction box must be splash-proof, and its maximum height from the floor must not exceed 500 mm.
- The connecting cable must be of rubber cable type H07RN-F or its equivalent. NOTE! Due to thermal embrittlement, the use of PVC-insulated wire as the connecting cable of the heater is forbidden.
- If the connecting and installation cables are higher than 1000 mm from the floor in the sauna or inside the sauna room walls, they must be able to endure a minimum temperature of 170 °C when loaded (for example, SSJ). Electrical equipment installed higher than 1000 mm from the sauna floor must be approved for use in a temperature of 125 °C (marking T125).
Electric Heater Insulation Resistance
When performing the final inspection of the electrical installations, a “leakage” may be detected when measuring the heater's insulation resistance. The reason for this is that the insulating material of the heating elements has absorbed moisture from the air (storage, transport). After operating the heater for a few times, the moisture will be removed from the heating elements.

Do not connect the power feed for the heater through an RCD (residual current device)!
Installation of the Control Unit and Sensor > Image 4, > Image 6
The control unit includes detailed instructions for fastening the unit on the wall. Install the sensor as shown in image 4.

Do not place the supply air vent so that the air flow cools the temperature sensor. Image 6.
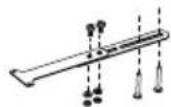
Installing the Heater > Image 3
See image 3
Resetting the Overheat Protector
See the instructions for use of the selected control unit model.

The reason for overheating must be resolved before resetting the overheat protector!

See WARNINGS AND NOTES! See TECHNICAL DATA!
Sauna room structure > Image 5
See image 5.
A. Insulation wool, thickness 50–100 mm. The sauna room must be insulated carefully so that the heater output can be kept moderately low.
B. Moisture protection, e.g. aluminium paper. Place the glossy side of the paper towards the sauna. Tape the seams with aluminium tape.
C. Vent gap of about 10 mm between the moisture protection and panel (recommendation).
D. Low mass 12–16 mm thick panel board. Before starting the panelling, check the electric wiring and the reinforcements in the walls required by the heater and benches.
E. Vent gap of about 3 mm between the wall and ceiling panel.
F. The height of the sauna is usually 2100–2300 mm. The minimum height depends on the heater (>Technical data). The space between the upper bench and ceiling should not exceed 1200 mm.
G. Use floor coverings made of ceramic materials and dark joint grouts. Particles disintegrating from the sauna stones and impurities in the sauna water may stain and/or damage sensitive floor coverings.

NOTE! Check from the fire authorities which parts of the firewall can be insulated.
Flues which are in use must not be insulated.
NOTE! Light protective covers which are installed directly to the wall or ceiling may be a fire risk.
NOTE! Make sure that the water dripping onto the sauna floor enters the floor drain.
Heater Output
When the walls and ceiling are covered with panels and insulation behind the panels is adequate, the heater output is defined according to the volume of the sauna. Non-insulated walls (brick, glass block, glass, concrete, tile, etc.) increase the need for heater output. Add 1,2 m ^3 to the volume of the sauna for each non-insulated wall square meter. For example, a 10 m ^3 sauna room with a glass door equals the output requirement of about a 12 m ^3 sauna room. If the sauna room has log walls, multiply the sauna's volume by 1,5. Choose the correct heater output > Technical data
Blackening of the Sauna Walls
It is perfectly normal for the wooden surfaces of the sauna room to blacken in time. The blackening may be accelerated by:
- sunlight
- heat from the heater
- protective agents on the walls (protective agents have a poor heat resistance level)
- fine particles disintegrating from the sauna stones which rise with the air flow.
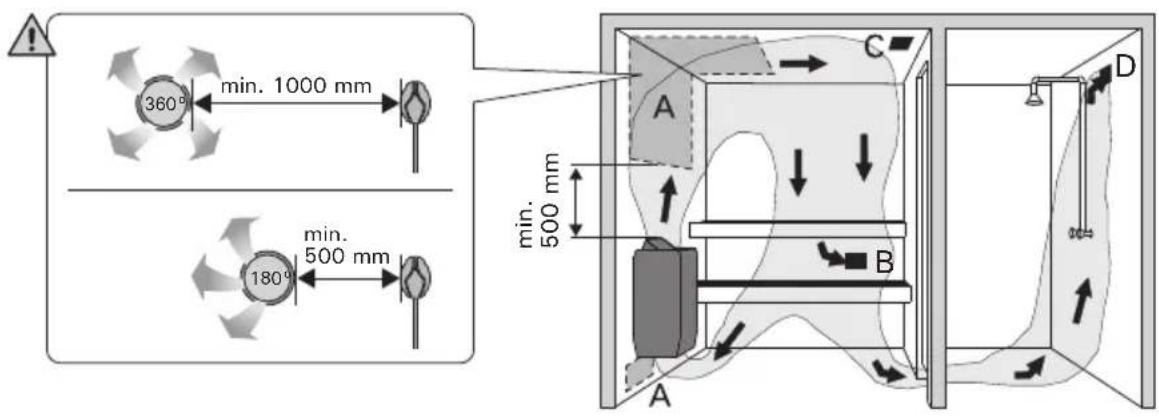
Sauna room ventilation > Image 6
The air in the sauna room should change six times per hour. Image 6 illustrates different sauna room ventilation options.

Note! Do not place the supply air vent so that the air flow cools the temperature sensor
A. Placement area for air supply vent ( 50 – 100 mm). If mechanical ventilation is used, air supply vent should be placed above the heater. If natural ventilation is used, air supply vent should be placed under or next to the heater. The diameter of the supply air pipe must be 50–100 mm.
B. Exhaust air vent ( 100 – 200 mm). Place the exhaust air vent near the floor, as far away from the heater as possible. The diameter of the exhaust air pipe should be twice the diameter of the supply air pipe.
C. Optional vent for drying (closed during heating and bathing). The sauna can also be dried by leaving the door open after bathing.
D. If the exhaust air vent is in the washroom ( 100 – 200 mm), the gap underneath the sauna door must be at least 100 mm. Mechanical exhaust ventilation is mandatory.
Sauna Room Hygiene
- Bench towels should be used during bathing to prevent sweat from getting onto the benches.
- The benches, walls and floor of the sauna should be washed thoroughly at least every six months. Use a scrubbing brush and sauna detergent.
- Wipe dust and dirt from the heater with a damp cloth. Remove lime stains from the heater using a 10% citric acid solution and rinse.
EN
OPERATING INSTRUCTIONS

See WARNINGS AND NOTES!
See TECHNICAL DATA!
See INSTALLATION IMAGES!
Placing of sauna stones > Image 7

The piling of the sauna stones has a great effect on both the safety and the heating capability of the heater.
Important information about sauna stones:
- The stones should be:
∅ 10-15 cm in diameter \~ 160 kg
∅ 5-10 cm in diameter (On top of the heater) \~ 60 kg
- Use solely angular split-face sauna stones that are intended for use in a heater. Peridotite, olivine-dolerite and olivine are suitable stone types
- Neither light, porous ceramic "stones" nor soft soapstones should be used in the heater. They do not absorb enough heat when warmed up. This can result in damage in heating elements.
- Wash off dust from the stones before piling them into the heater.
How placing the stones, observe the following:
• See image 7
- The aim is to pile a dense layer of stones against the steel grid and pile the rest of the stones loosely. The dense layer prevents the direct heat radiation from overheating materials around the heater. Be especially careful with the corners where the heating elements are near the grid. The loose piling of stones in the middle lets the air flow through the heater, resulting in good heating of sauna and sauna stones.
- Do not drop stones into the heater.
- Support the heating elements with stones so that the elements stay vertically straight.
- Do not form a high pile of stones on top of the heater.
- No such objects or devices should be placed inside the heater stone space or near the heater that could change the amount or direction of the air flowing through the heater.

Do not place any items or devices in the stone space or its vicinity that can change the amount or direction of air flowing through the heater.

If a heating element is not surrounded by stones, it can heat materials dangerously hot, even beyond the heater's safety distances. Make sure that the heating elements are not visible beyond the stones. As the user, you are responsible for ensuring that the stone space is properly maintained throughout the heater's life cycle.
Maintenance:
Due to large variation in temperature, the sauna stones disintegrate in use. Rearrange the stones at least once a year or even more often if the sauna is in frequent use. At the same time, remove any pieces of stones from the bottom of the heater and replace any disintegrated stones with new ones. By doing this, the heating capability of the heater stays optimal and the risk of overheating is avoided.

Check occasionally whether the stone level has become lower. Make sure that the heating elements do not become visible over time. The stone level is likely to become lower in about two months after the stones have been placed.
Heating of the Sauna
- When operating the heater for the first time, both the heater and the stones emit smell. To remove the smell, the sauna room needs to be efficiently ventilated.
- If the heater output is suitable for the sauna room, it will take about an hour for a properly insulated sauna to reach the required bathing temperature. The sauna stones normally reach the bathing temperature at the same time as the sauna room. A suitable temperature for the sauna room is about 65–75 °C.
Using the Heater
Heaters are controlled using a separate control unit. See the instructions for use of the selected control unit model.

Before switching the heater on always check that no objects have been placed on top of the heater or inside the given safety distance.
Throwing Water on Heated Stones
The air in the sauna room becomes dry when warmed up. Therefore, it is necessary to throw water on the heated stones to reach a suitable level of humidity in the sauna. The effect of heat and steam on people varies – by experimenting, you can find the levels of temperature and humidity that suit you best. Aim water only on the stones.

The maximum volume of the ladle is 0.2 litres. If an excessive amount of water is poured on the stones, only part of it will evaporate and the rest may splash as boiling hot water on the bathers. Never throw water on the stones when there are people near the heater, because hot steam may burn their skin.
Water quality requirements
The water to be thrown on the heated stones should meet the requirements of clean household water. Only special aromas designed for sauna water may be used. Follow the instructions given on the package.
| Water properties Effect Recommendation | ||
| Humus concentration Colour, taste, precipitates <12 mg/l | ||
| Iron concentration Colour, odour, taste, precipitates <0,2 mg/l | ||
| Manganese (Mn) concentration Colour, odour, taste, precipitates <0,10 mg/l | ||
| Hardness: most important substances are magnesium (Mg) and lime, i.e. calcium (Ca) | Precipitates Ca: <100 mg/ | |
| Chloride-containing water Corrosion Cl: <100 mg/l | ||
| Chlorinated water Health risk | Forbidden to use | |
| Seawater | Rapid corrosion | Forbidden to use |
| Arsenic and radon concentration | Health risk | Forbidden to use |
Instructions for Bathing

See WARNINGS AND NOTES!
- Begin by washing yourself.
- Stay in the sauna for as long as you feel comfortable.
- Forget all your troubles and relax.
- According to established sauna conventions, you must not disturb other bathers by speaking in a loud voice.
-
Do not force other bathers from the sauna by throwing excessive amounts of water on the stones.
-
Cool your skin down as necessary. If you are in good health, you can have a swim if a swimming place or pool is available.
- Wash yourself after bathing.
- Rest for a while and let your pulse go back to normal. Have a drink of fresh water or a soft drink to bring your fluid balance back to normal
Troubleshooting

All service operations must be done by professional maintenance personnel
The heater does not heat up.
- Check that the fuses of the heater are in good condition.
- Check that the connection cable is connected.
- Check that the overheat protector has not gone off. (See the instructions for use of the control unit)
The sauna room heats slowly. Water thrown on the sauna stones cools down the stones quickly
- Check that the fuses to the heater are in good condition.
- Check that all heating elements glow when the heater is on.
- Turn the temperature to a higher setting (See the instructions for use of the control unit)
- Check that the heater output is sufficient
- Check the sauna stones. Too tightly piled stones, the settling of stones with time or wrong stone type can hinder the air flow through the heater, which results in reduced heating efficiency.
- Check that the sauna room ventilation has been arranged correctly.
The sauna room heats quickly, but the temperature of the stones remain insufficient. Water thrown on the stones runs through.
- Check that the heater output is not too high
- Check that the sauna room ventilation has been arranged correctly
Panel or other material near the heater blackens quickly.
- Check that the requirements for safety distances are fulfilled.
- Check that no heating elements can be seen behind the stones. If heating elements can be seen, rearrange the stones so that the heating elements are covered completely.
- Also see section > Blackening of the Sauna Walls
The heater emits smell.
• See section > Heating of the Sauna
- A hot heater may emphasize odours mixed in the air that are not, however, caused by the sauna or the heater. Examples: paint, glue, oil, seasoning.
The heater makes noise.
- Occasional bangs are most likely caused by stones cracking due to heat.
- The thermal expansion of heater parts can cause noise when the heater warms up.
SPARE PARTS

natural_image
Simple line drawing of two vertical tubes with downward connectors, no text or symbols present
| 1 Heating element 2200 W/200 V WXZSC-022I 12 | |||
| 2 | Temperature sensor /Overheat protector 125°C | WX248 1 | |
GUARANTEE
- The guarantee period for heaters and control equipment used in saunas by families is two (2) years.
- The guarantee period for heaters and control equipment used in saunas by building residents is one (1) year.
- The guarantee period for heaters and control equipment used in saunas by institutions is three (3) months.
- The guarantee does not cover any faults resulting from the use of stones not recommended by the heater manufacturer.
- We recommend to use only the manufacturer's spare parts.
- The warranty is void if the quality requirements stated in the instructions are not met, the appliance is not serviced or maintained as described in the instructions and/or if the appliance is not installed as described in the instructions.
HARVIA
P.O.Box 12
Teollisuustie 1-7
40951 Muurame
FINLAND
+358 207 464 000
harvia@harvia.fi

- EN
- CONTENTS
- INSTALLATION IMAGES.... 3
- WARNINGS AND NOTES......6
- INSTRUCTIONS FOR INSTALLATION...... 8
- SAUNAROOM....10
- OPERATING INSTRUCTIONS......12
- SPAREPARTS......15
- GUARANTEE....15
- Safety distances
- Electrical Connections
- Installing the heater
- Installing the sensor (all dimensions in millimeters)
- READ THE WARNINGS AND MANUAL CAREFULLY BEFORE USING THE PRODUCT!
- Installation and maintenance
- Instructions for use and bathing
- Before installation > Image 1
- Safety distances > Image 1
- Safety Railing
- Electrical connections > Image 2
- Electric Heater Insulation Resistance
- See WARNINGS AND NOTES! See TECHNICAL DATA!
- Sauna room structure > Image 5
- See image 5.
- Heater Output
- Blackening of the Sauna Walls
- Sauna room ventilation > Image 6
- Note! Do not place the supply air vent so that the air flow cools the temperature sensor
- Sauna Room Hygiene
- OPERATING INSTRUCTIONS
- Placing of sauna stones > Image 7
- Important information about sauna stones:
- How placing the stones, observe the following:
- Maintenance:
- Heating of the Sauna
- Using the Heater
- Throwing Water on Heated Stones
- Water quality requirements
- Instructions for Bathing
- See WARNINGS AND NOTES!
- Troubleshooting
- All service operations must be done by professional maintenance personnel
- The heater does not heat up.
- The sauna room heats slowly. Water thrown on the sauna stones cools down the stones quickly
- The sauna room heats quickly, but the temperature of the stones remain insufficient. Water thrown on the stones runs through.
- Panel or other material near the heater blackens quickly.
- The heater emits smell.
- The heater makes noise.
- SPARE PARTS
- GUARANTEE
Brand : HARVIA
Model : Cilindro Pro HPCE2642
Category : Heating