
The Xtreme Plus - Guitar amplifier ART - Free user manual and instructions
Find the device manual for free The Xtreme Plus ART in PDF.


| Product Type | Programmable Guitar Preamp and Processor |
| Brand | ART (Applied Research and Technology) |
| Model | The Xtreme Plus |
| Dimensions (D x W x H) | 9.0" x 8.25" x 2.0" |
| Weight | 3.0 lb |
| Power Supply | 9 VAC @ 400mA (external adapter) |
| Input Impedance | 1 MΩ |
| Output Impedance | 750 Ω (1/4"); 47 Ω (headphone) |
| Maximum Input Level | +2 dBV |
| Maximum Output Level | +1 dBV (1/4"); +15 dBV (headphone) |
| Residual Output Noise | < -81 dB @ +5 dBu |
| Dynamic Range | 85 dB (C-weighted) |
| Preamp Types | 4 analog: XTREME, Roar, Stack, Crystal |
| Digital Effects Algorithms | 10 (Delay, Reverb, Chorus, Flange, Pitch Shift, Tremolo, Pan, etc.) |
| Presets | 100 factory/user-definable |
| EQ | 3-band with sweepable mid (300 Hz - 5 kHz), ±15 dB |
| Gain | Over 100 dB |
| Connections | 1/4" unbalanced input; stereo 1/4" unbalanced outputs; stereo TRS headphone output; 9 VAC power input |
| Construction | All steel enclosure |
| Warranty | One year parts and labor |
| Country of Manufacture | United States of America |
| Included Accessories | AC adapter |
Frequently Asked Questions - The Xtreme Plus ART
User questions about The Xtreme Plus ART
0 question about this device. Answer the ones you know or ask your own.
Ask a new question about this device
Download the instructions for your Guitar amplifier in PDF format for free! Find your manual The Xtreme Plus - ART and take your electronic device back in hand. On this page are published all the documents necessary for the use of your device. The Xtreme Plus by ART.
USER MANUAL The Xtreme Plus ART
APPLIED RESEARCH AND TECHNOLOGY
APPLIED RESEARCH AND TECHNOLOGY, INC.
215 TREMONT STREET
ROCHESTER, NEW YORK 14608 USA
716-436-2720 voice
716-436-3942 fax
Internet
artroch@aol.com
artroch@cis.compuserve.com
World Wide Web: http://www.artroch.com

APPLIED RESEARCH AND TECHNOLOGY


Programmable Guitar Preamp and Processor
USER'S GUIDE
Xtreme Plus
Programmable Guitar Preamp and Processor
124-5004-101
CONTENTS
Introduction 3
Features 3
Quick Start Instructions 4
Quick Setup 4
Using your Xtreme Plus 5
Powering the Xtreme Plus 5
Preamp Types 6
XTREME 6
Roar 6
Stack 6
Crystal 7
Distortion Select Switch 7
Knobs And Switches 7
Drive 7
Output 8
Low 8
Mid and Freq. 8
High 9
Blend 9
Digital Effects Controls 9
Effect/Value Control 10
Inlay Information Area 1
Distortion LEDs 1
Display 1
View LED 1
Clip LED 12
Changed LED 12
View/Save Switch 12
Saving Presets 12
Foot Pads 1
Bypassing the Xtreme Plus 1
Lead Foot Warning 13
Digital Effects list 14

APPLIED RESEARCH AND TECHNOLOGY
| Setup Instructions | 18 |
| Using the Xtreme Plus with an Amp | 18 |
| Using the Xtreme Plus With a Power Amp & Cabinets | 18 |
| Factory Reset | 18 |
| Warranty Information | 19 |
| Service | 19 |
| Xtreme Plus Specifications | 21 |
| Notes Page | 22 |
The Xtreme Plus is an exciting and creative guitar processor. The Xtreme Plus offers four finely tuned analog preamplifier circuits that interface perfectly with the proprietary programmable digital effect section. Stereo outputs, speaker simulated headphone output, and three band Equalizer with a sweepable mid band round out the ultimate in stomp boxes – The Xtreme Plus! Do not let the list of features scare you. The Xtreme Plus is incredibly easy to use. A R T's guitar playing engineers have designed a combination of powerful processing and ease of use into the Xtreme Plus. We suggest that you read and refer to this manual while getting used to your cool new toy!
And another thing! Take the time to fill out the User Registration Card included with this manual. This is the only way we will know you're an Xtremist! We do periodic mailings about new products and updates that you don't want to miss (and every once in a while there's some great give-aways and contests with prizes and gear worth tons-o'-money to registered users). It only takes a minute and only a few cents for the postage, and in return we'll be your friend for life and send you stuff!
Fill in the following information for your reference: DATE OF PURCHASE ____ PURCHASED FROM ____ SERIAL NUMBER ____
124-5004-101
2

Introduction
Congratulations on purchasing Applied Research and Technology's Xtreme Plus! You now own the coolest, hickest, and most versatile guitar preamp/processors ever developed. The Xtreme Plus offers all of the features you, as a guitarist, need for creating, practicing and performing your music. The Xtreme Plus offers all of the features you need to bring out the best sound your guitar has to offer. Grab your axe and get ready to rock like you've never rocked before!
Features
* The most versatile guitar stomp box on the planet!
* Four, all analog guitar preamps: XTREME, Roar, Stack and Crystal
* Over 100 dB of gain!
* Three band EQ with sweepable Mid frequency - the ultimate in tone shaping!
* 100 factory/ user definable presets!
* Programmable - Store any combination of distortion and digital effect!
* 10 digital effect algorithms with adjustable parameters!
* Over 400 different effect options!
* User definable preset ordering!
* Foot activated preset selection!
* Speaker simulated Headphone Output!
^1 Mono and Stereo Outputs!
* Reverb, Delay, Doubling, Flanger, Chorus, combination effects
^2 Tremolo, Panning and Pitch Shifting effects
^29 AC powered – no tongue-tingling testing of batteries required.
* All steel construction – the way it ought to be! – Won't crack on melt!!!
* Looks as cool as it sounds!
* You would need \$1500 worth of stomp boxes for all these sounds!
* Full One year parts and labor warranty!
* Designed and manufactured in the United States of America!

QUICK START INSTRUCTIONS
By now you've unpacked your Xtreme Plus and you're itchin' to get jamming. You would probably rather play than read this manual. Fair enough. Check out the basics outlined here just to get your Xtreme Plus hooked up right. It should take only a couple of minutes for you to read through, and then you will be ready to fire up your Xtreme Plus. Refer to this section if you have any difficulty. Later, when you want to get into more into the details of your Xtreme Plus, check out the rest of the manual.
Quick Setup
Turn the Output knob to its full counterclockwise position. Turn this knob up only after completing all the other steps.
Insert the supplied AC adapter's plug into the input labeled 9 VAC Input on the Xtreme Plus' back panel.
Straight into an Amp: If you're running the Xtreme Plus into a guitar (or other instrument) amplifier, use one cable between the instrument and the Xtreme Plus' Input. Run a second cable from the Guitar Output to the amp's input (where you would usually plug in your guitar). If the amp has stereo input capabilities (or if you are using two amps), connect another cable between the Xtreme Plus' Right Stereo and the amp's second-channel input (or the second amp's input).
With headphones: Plug your guitar into the Guitar Input of the Xtreme Plus. Plug your headphones into the Headphones jack. Do not plug anything into the Guitar Output jack when using headphones.
Turn up the Input control on the Xtreme Plus. Make sure your guitar volume control is up and signal is being sent to the Xtreme Plus. Now turn up the Xtreme Plus' Output level. Adjust the input level on your amp. You should be hearing the Xtreme Plus! If not, check your connections and your amp (you did remember to turn it on, didn't you?).
Select different preamp types with the Distortion Select switch to the left of the illuminated inlay. Scroll up and down through the presets with the Up and Down foot pads. Change effects and parameters with the Effect/Value knob. For a complete list of the effect settings see pages 14 & 17.
Wail away! Check out the presets and preamp types. Then, when you are ready, check out the rest of this manual for all the details on how to get the most out of your Xtreme Plus.

The Xtreme Plus, while primarily designed to be used straight into a guitar amp, is capable of driving a power amplifier and speakers. Self-contained in an all-steel enclosure, the Xtreme Plus will provide continuous, professional use and can withstand the rigors of the road and stage.
Powering The Xtreme Plus
An external AC adapter powers the Xtreme Plus. Always make sure the power jack is securely plugged into the rear of the Xtreme Plus and that the adapter is held firmly in an electrical outlet. For best results, make sure you are using the AC adapter that came with your Xtreme Plus (output = 9 VAC). Never operate the Xtreme Plus or AC adapter in the rain or in wet locations. If the AC adapter
cord is ever cut or damaged, discontinue using it and replace the adapter with a new one. To prolong its life, unplug the adapter when the Xtreme Plus is not in use. Refer to the label on the adapter for proper operating voltages.
PREAMP TYPES
The Xtreme Plus provides you with four preamp types: Xtreme, Roar, Stack, and Crystal. Each preamp type has its own personality. With over 100dB of gut-wrenching gain, and complete tonal control, virtually any clean, overdrive or distortion sound—no matter how subtle or explosive—is available! Here are descriptions of the preamp types:

XTREME
This is the ultimate distortion — hands down. If your playing style demands a tone beyond the distortion formerly—known—as-shred, then this is your setting. Don't try to clean up this sound; it won't happen. Nail down your speaker cabinet and blast!
Roar
The Roar preamp provides a unique distortion that blends the clean signal from your guitar with a tasty dose of high-gain distortion. The resulting sound is smooth and intelligible yet demands attention, especially in a live situation. The Drive control lets you clean up the sound at lower settings and produce great sustain when it's turned up. The Roar distortion is primo when you want to be heard and not absorbed.
Stack
The Stack preamp's distortion offers enough versatility to produce a wide range of textures, from fat, overdriven vintage (can you say "800 series"?) stacks to down-and-dirty Texas Blues distortions. The Drive control allows you to clean up to the faintest of tube rattle to the roar of an overworked white Bassman. If
you play with your guitar's volume pot for expression, this is the distortion for you.
Crystal
The Crystal preamp is a clean preamp with complete control over EQ. This preamp is ideal for clean guitar patches, "floating" guitar pads and "Edge-like" clean delay lines. Note: The Drive and Output controls are inactive (to maintain a clean character) when you select the Crystal preamp.
Distortion Select Switch
Pressing the Distortion Select button scrolls through the different distortions. The cycle is as follows: XTREME, Roar, Stack, Crystal, bypass (no LEDs), XTREME, etc. etc. You'll notice that no LEDs light after Crystal. This is the distortion bypass setting. Storing a preset with the distortion bypassed is possible so you can use only the digital effects section. Pressing the switch again cycles back to XTREME.
When you change distortion types you'll notice the "Changed" LED lights. This indicates that the current selection is different from what is in memory at the current preset location. See the Saving Presets section for more information on this.
KNOBS AND SWITCHES
The upper half of the Xtreme Plus' top panel includes: the controls for the pre-amp circuitry, blend control (blend of distortion to digital effect), and the Effect/Value knob. We've listed the effect combinations below these controls for easy identification.
Drive
The Drive control adjusts the amount of gain into the preamp circuit. The range is from 0 (none) to 10 (Lots). Adjust the Drive control for a healthy level. If you experience a low output signal, this control may be set too low. Alternatively, if the Clip LED lights with the Output control set very low, the Drive level could be set too high. You'll want to experiment with different settings with different


preamp types. You'll get the hang of setting this properly very quickly.
Note: The Drive control is inactive when the Crystal preamp is selected. An automatic level is set when you're using the Crystal preamp to ensure a clean signal.

Output
The Output control is used to compensate for the gain of the Drive control and also to set the output level of the Xtreme Plus. The Output control is located before the digital effects section (it drives the digital circuitry). Turn up the Output control until you reach a good level to your amplification device. If you see the Clip LED on constantly (this won't hurt the Xtreme Plus), turn down the Output control - you're overdriving the digital section! (keep the level up if you're into that digital nastiness!).
Low
The Low control adjusts the amount of low end in your guitar's sound, letting you add thump to the bottom, or thin it out for a sharper type of cutting ability. The range is from a cut of 15dB to a boost of 15dB. When set at 12 o'clock, the Low EQ band is "flat"-no boost or cut. If you feel the need to crank up the Low control, make sure your amp is seated firmly on a stable surface. (If you're using a stack, you may want to duct tape your head to the cabinet, to keep it from falling off! - consider this fair warning).
Mid & Mid Freq.
The Mid control adjusts the amount of boost or cut to the "body" of your sound. The Freq. control sets the frequency range you want to boost or cut. Its range is from 300 Hz to 5kHz. To obtain proper "suck" or "scoop" for maximum shred, set the Freq. control somewhere between 12 and 3 o'clock and cut the midrange by setting the Mid control to between 7 and 9 o'clock. You can also select a frequency to boost, making it easy to sustain - or even to feed back - when you play in certain ranges.

High
The High control adjusts the amount of high end in your guitar sound. Its range is from a cut of 15dB to a boost of 15dB. When set at 12 o'clock, the High EQ band is "flat"-no boost or cut. To splinter glass, boost the High control. To get rid of the edge, cut the High control.
Note: If you have excessive noise at the Xtreme Plus' output, it may be because the High EQ is boosted excessively. Try turning down the High EQ control if there is excessive hiss.
Blend Control
The Blend control adjusts how much of the digital effects are added to your guitar sound. The Blend control ranges from Dry (all guitar and distortion) to Wet (guitar distortion with tons o' effects). For most applications you'll probably keep this control between 10 and 2 o'clock.
O.K... Now that you're groovin' with your brand new toy (we guitarists need our toys - genetics or something), don't forget the Xtreme Plus offers a whole other section full of digital wizz-bang goodies that we haven't even covered yet. Feel free to put down the manual and really get into the fact that you do sound great. Later - after your hands cramp up or your roommate/parents/significant-other tells you (politely or otherwise) to mellow out - pick the manual back up and read on.
DIGITAL EFFECTS CONTROLS
The Xtreme Plus offers you essential effects - the stuff you need. Time proven guitar effects! The Xtreme Plus' high quality digital effects were developed to be impressively musical, useful, and specifically tailored to compliment today's guitarist. We didn't want to waste your time or hard earned money on stuff that looks cool in the store but is basically useless when you jam with your band (you know you've got a box or two like that lying around!!!). Note: you can use the Xtreme Plus with or without digital effects.

Effect/Value Control
The Effect/Value control is a variable knob used to select effects. When you turn this knob you'll notice three things: 1) The display shows you a number which changes as you turn the knob. 2) the View LED turns on. 3) The Changed LED turns on. WHAT DOES THIS MEAN?
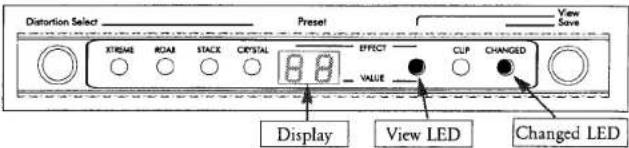
It's all very simple. Let's start with what the numbers in the display mean... The first digit in the display digit is the effect combination screened on the panel (0x - 9x), and the second digit is the parameter setting for that effect (x0 - x9). The numbers range from 00 to 99. The "bP" option (found after 99) is effects bypass. You can store the "bP" option so you can use the distortions without any digital effects. See pages 14 - 17 for a complete list of effects parameters.
The View LED tells you the display is showing the Effect/Value information. You'll notice the line printed next to "EFFECT" in the display area extends to the View LED and the first digit of the display. This is a reminder that when the View LED is lit, the first digit is the effect group. Likewise, "VALUE" is screened next to the second digit of the display and has a line extending to the View LED. This is a reminder that when the View LED is lit, the second digit is the parameter value selected. Three seconds after you stop turning the Effect/Value control, the View LED turns off and the display changes back to showing you the preset number. And that Changed LED is still lit.....
The Changed LED prompts you to save your current settings. The Changed LED lights if any preamp or digital setting is different from what is currently stored at the current preset. If you press the View/Save switch you initiate a save (more on that in a moment). You can choose to ignore the Changed prompt by simply pressing the Up or Down foot pads.

Inlay Information Area
The Inlay Information Area shows you the status of the Xtreme Plus' parameters. We've provided a collection of LEDs and a two-digit display for easy identification of distortion type, preset number, and effect and parameter values.

Distortion LEDs
Each distortion type has an LED associated with it. When you select a distortion, it's LED lights. Pressing the Distortion Select button scrolls through the different distortions. The cycle is as follows: XTREME, Roar, Stack, Crystal, bypass (no LEDs), XTREME, etc. etc. You'll notice that no LEDs light after Crystal. This is the distortion bypass setting. Storing a preset with the distortion bypassed is possible so you can use only the digital effects section. Pressing the switch again cycles back to XTREME.
Display
The two-digit display normally shows you the current preset number - from 00 to 99 (100 total presets). When you turn the Effect/Value control, the display will show you a two-digit number representing the effect and value information (wow! - pretty obvious huh?). The "View" LED will light when the display is showing you the Effect/Value information. The first digit is the effect combination (0x - 9x), and the second digit is the parameter selected within that effect (x0 - x9). This information "times out" (crazy software term) after three seconds. This means that after three seconds the display will switch back to showing the preset number and the View LED turns off.
To sum up: The Display shows you the preset number unless the View LED is lit, then it shows you the Effect/Value information.
View LED
The View LED lights to remind you that the number you're seeing is the Effect/Value number and not the preset number. When you turn the Effect/Value control, the display changes to show you the Effect/Value number.

This LED turns off ("times out") after three seconds and the display returns to showing you the preset number. The Changed LED will remain lit if the Effect Value number is different from what is currently stored in the current preset.
Clip LED
The Clip LED monitors the output of the analog preamp. The Clip LED will light if the digital effects section clips. If this happens, turn down the Output Level control. If the Output Level control is not turned way up, the clipping may be a result of radically boosted EQ. Try turning down the boosted EQ bands and raising the Output Level control until the Clip LED flickers occasionally.
Changed LED
The Changed LED lights whenever a distortion type or digital setting is different from what is currently stored in the preset. The Changed LED prompts you to save your current settings. If you press the View/Save switch you initiate a save (more on that in a moment). You can choose to ignore the Changed prompt by simply pressing the Up or Down foot pads.
View/Save Switch
The View/Save button has two purposes: Pressing it when the Changed LED is not lit allows you to view what digital effect and parameter is currently chosen. Use this feature when you ask yourself, "I wonder what effect I'm using". When the "Changed" LED is lit, it initiates the Save routine. (See: Saving Presets)
Saving Presets
The "Changed" LED must be lit in order to save (if it is not, there is nothing different about the preset than what is currently in memory). When you save a preset, the Xtreme Plus stores the distortion type and the Effect and Value that is currently active. Pressing the View/Save button while the Changed LED is lit causes the display to blink while showing the current preset number. The Xtreme Plus is now asking where you want to save. Pressing the View/Save button again saves your settings to the current location. Using the Up and Down pads allows you to save the settings at any of the 100 preset locations. Once
you've scrolled to where you want to save, press the View/Save button and the save is executed. The display will say "YA" to tell you the save is complete. To "bail out" from the save routine, press either the Distortion Select switch or turn the Effect/Value control.
Foot Pads
Two durable rubber foot pads are used to select presets. The one labeled Down scrolls downward through the presets. The one labeled Up (you guessed it!) scrolls upwards through the presets. Preset numbers range from 00 to 99 (100 total). Pressing and holding down on one pad allows you to quickly scroll through presets. The foot pads "wrap" (another lovely software term) when one end of the range is reached. In human terms this means that if you're on preset 01 and want to go to 99, you can press on the Down foot pad and get there without having to go up through all the other presets. Pressing and holding one foot pad then the other completely bypasses the Xtreme Plus (distortion and digital effects). Press either pad to take the Xtreme Plus out of bypass.
Bypassing the Xtreme Plus
For those who didn't read it directly above... (hey, we needed to list it in the table of contents) you can completely bypass the distortions and digital effects in the Xtreme Plus with the foot pads. Press and hold one pad and quickly press the other. This routine is intentional so you don't inadvertently bypass the Xtreme Plus when you hit both pads by accident while trying to change presets. The display will read “- -”. This means the unit is bypassed. Press either pad to take the Xtreme Plus out of bypass.
LEAD FOOT WARNING!
Even though the Xtreme Plus is built like a tank and the rubber foot pads are designed to be pressed with your feet... The Distortion Select and View/Save switches were designed to be pressed with a finger. Because of their location, you'll be tempted to do some fancy footwork and press these switches with your feet. We strongly recommend being light-footed. You don't have to tell us how hip army boots and smoke-throwing platform shoes are... we know! However, practice this maneuver with caution. A tap is all it takes!
DIGITAL EFFECTS
Here are definitions of the abbreviations used to describe the effects found in the Xtreme Plus:
| doubling | Short delay that gives the illusion of two instruments playing in unison. |
| ms | Short for “milliseconds”, or thousandths of a second. |
| regen | Short for “regeneration”. This means sending part of the output signal back through an effect. Regenerating a delayed signal produces echoes. In flanging and chorusing, regeneration of certain frequencies (highs, for instance) can create a thicker, more dramatic effect. |
| sec | Short for “second” (equal to 1,000 milliseconds). |
| pitch | Short for pitch transposer, which creates a harmony. |

Effects List
The following list describes the 10 effect algorithms and the selectable parameter values available in the Xtreme Plus.
0x Short Delay
00 - 50ms slap delay
01 - 100ms slap delay
02 - 150ms delay with 10% regen
03 - 200ms delay with 15% regen
04 - 250ms delay with 15% regen
05 - 275ms delay with 20% regen
06 - 300ms delay with 20% regen
07 - 325ms delay with 25% regen
08 - 350ms delay with 25% regen
09 - 375ms delay with 30% regen

1x Long Delays
10 - 380ms delay with 30% regen
11 - 390ms delay with 30% regen
12 - 400ms delay with 30% regen
13 - 410ms delay with 35% regen
14 - 420ms delay with 35% regen
15 - 430ms delay with 35% regen
16 - 440ms delay with 40% regen
17 - 450ms delay with 40% regen
18 - 475ms delay with 40% regen
19 - 500ms delay with 45% regen
2x Reverb
20 - 0.5s Bright Plate
21 - 0.7s Warm Room
22 - 0.9s Bright Plate
23 - 1.1s Warm Room
24 - 1.3s Bright Plate
25 - 1.5s Warm Room
26 - 1.7s Bright Chamber
27 - 2.0s Warm Hall
28 - 2.2s Bright Chamber
29 - 2.5s Warm Hall
3x Chorus - or- Flange + Delay
30 - 200ms delay with 5% regen + Slow Chorus
31 - 250ms delay with 10% regen + Medium Chorus
32 - 350ms delay with 10% regen + Fast Chorus
33 - 380ms delay with 15% regen + Slow Chorus
34 - 400ms delay with 15% regen + Medium Chorus
35 - 420ms delay with 20% regen + Fast Chorus
36 - 275ms delay with 10% regen + Slow Flange low regen
37 - 375ms delay with 10% regen + Medium inverted Flange, low regen
38 - 410ms delay with 15% regen + Medium Flange, medium regen
39 - 450ms delay with 20% regen + Slow inverted Flange, medium regen

4x Delay + Reverb
40 - 40ms slap delay + 0.6s Bright Room
41 - 50ms slap delay + 0.8s Warm Room
42 - 60ms slap delay + 1.0s Bright Room
43 - 80ms slap delay + 1.2s Warm Room
44 - 100ms delay with 10% regen + 1.4s Bright Room
45 - 120ms delay with 10% regen + 1.6s Warm Room
46 - 140ms delay with 10% regen + 1.8s Bright Hall
47 - 160ms delay with 15% regen + 2.0s Warm Hall
48 - 180ms delay with 15% regen + 2.2s Dark Hall
49 - 200ms delay with 20 % regen + 2.4s Warm Hall
5x Chorus - or - Flange + Reverb
50 - Slow Chorus + 0.8s Bright Room
51 - Medium Chorus + 1.2s Warm Room
52 - Fast Chorus + 1.8s Bright Hall
53 - Slow Chorus + 2.2s Warm Hall
54 - Slow Flange, low regen + 1.0s Bright Room
55 - Slow Flange, medium regen + 1.3s Warm Room
56 - Medium Flange, low regen + 1.5s Bright Room
57 - Medium inverted Flange, medium regen + 1.8s Warm Hall
58 - Slow Flange, low regen + 2.0s Bright Hall
59 - Slow inverted Flange, low regen + 2.4s Warm Hall
6x Reverb + Tremolo - or - Panner
60 - 1.0s Bright Room + Slow Tremolo
61 - 2.2s Warm Hall + Slow Tremolo
62 - 0.8s Bright Room + Medium Tremolo
63 - 1.8s Warm Hall + Medium Tremolo
63 - 1.2s Bright Room + Fast Tremolo
65 - 1.5s Warm Room + Slow Panner*
66 - 0.8s Bright Room + Medium Panner ^2
67 - 2.0s Warm Hall + Medium Panner*
68 - 0.9s Bright Room + 100ms slap delay + Medium Panner*
69 - 2.5s Warm Hall + 170ms slap delay + Slow Panner*
*Note: A panner will sound like a tremolo when only the Guitar Output (mono) is used! - When used in mono, the Extreme Plus' panner "morphs" into a tremolo - cool huh?

7x Chorus - or - Flange
70 - Slow Chorus
71 - Medium slow Chorus
72 - Medium Chorus
73 - Fast Chorus
74 - Slow Flange, low regen
75 - Medium Flange, medium regen
76 - Fast Flange, low regen
77 - Slow inverted Flange, medium regen
78 - Medium Flange, high regen
79 - Fast inverted Flange, medium regen
8x Chorus - or - Flange + Delay + Reverb
80 - 40ms slap delay + Slow Chorus + 0.5s Bright Room
81 - 70ms slap delay + Medium Chorus + 0.7s Warm Room
82 - 100ms slap delay + Fast Chorus + 1.0s Bright Room
83 - 120ms delay with 10% regen + Slow Chorus + 1.3s Warm Room
84 - 150ms delay with 10% regen + Medium Chorus + 1.8s Bright Hall
85 - 170ms delay with 15% regen + Fast Chorus + 2.0s Warm Hall
86 - 80ms slap delay + Slow Flange, low regen + 0.6s Bright Room
87 - 110ms slap delay + Slow inverted flange, medium regen + 0.8s Warm Room
88 - 140ms 10% regen + Medium Flange, low regen + 1.5s Bright Hall
89 - 160ms 15% regen + Medium inverted Flange, med. regen + 1.7s Warm Hall
9x Pitch - or - Tremolo - or - Panner
90 - Octave Down Pitch Shift
91 - 5th Down Pitch Shift
92 - Detune
93 - 5th Up Pitch Shift
94 - Octave Up Pitch Shift
95 - Slow Tremolo
96 - Medium Tremolo
97 - Fast Tremolo
98 - Medium Slow Panner*
99 - Medium Fast Panner*

SETUP INSTRUCTIONS
Using the Xtreme Plus with an Amp
Plug your guitar into the Guitar Input jack of the Xtreme Plus. Connect the Guitar Output jack into your amplifiers' instrument input (use the Right Stereo output as well if your amp has stereo inputs or if you are using two amps). When plugging a guitar into the Xtreme Plus, make sure that there is sufficient signal level coming from the instrument (make sure you've turned up the guitar's volume control). Turn up the Xtreme Plus' Drive and Output controls before turning up the amplifier's volume control.
Using the Xtreme Plus With a Power Amp & Cabinets
Plug your guitar into the Guitar Input jack of the Xtreme Plus. Connect the Left and Right Stereo output jacks into the Left and Right input jacks on the power amp. Connect the speaker outputs of the amp to two cabinets (or a stereo cabinet). Be sure to power on the Xtreme Plus before turning on the power amp.
Factory Reset (recalling all the original factory settings)
The factory reset routine is intentionally awkward.. We've protected you from your big footed, dancing maniac of a bass player (- or worse yet, your DRUM-MER! -) stepping on your Xtreme Plus and wasting all your presets. (you're welcome). A factory reset erases all your presets and recalls all the original settings that were created at the factory. WARNING! WARNING! If you've created sounds you like... write them down before you perform a factory reset because THEY'LL BE GONE!!! To reset the Xtreme Plus do the following: 1) Unplug the unit. 2) Plug it back in 3) While the display reads "88" press all four switches simultaneously (Distortion Select, View/Save, Up and Down). You'll see the display count from 00 to 99 then return to 01. This sequence only works on power up, so if you missed your four second opportunity, try it again. A R T is proud that the Xtreme Plus can help you improve your hand/eye coordination.

WARRANTY & SERVICE INFORMATION
Warranty and Service for this unit will be provided by Applied Research and Technology, Inc. in accordance with the following warranty statement.
Applied Research and Technology, Inc. (ART) warrants to the original purchaser that this product and the components thereof will be free from defects in workmanship and materials for a period of One year from the original date of purchase. Applied Research and Technology, Inc. will, without charge, repair or replace, at its option, defective product or component parts upon prepaid delivery to the factory service department or authorized service center, accompanied by proof of purchase date in the form of a valid sales receipt. EXCLUSIONS: This warranty does not apply in the event of misuse or abuse of the product or as a result of unauthorized alterations or repairs. This warranty is void if the serial number is altered, defaced, or removed.
ART reserves the right to make changes in design or make additions to or improvements upon this product without any obligation to install the same on products previously manufactured.
ART shall not be liable for any consequential damages, including without limitation damages resulting from loss of use. Some states do not allow limitations of incidental or consequential damages, so the above limitation or exclusion may not apply to you. This warranty gives you specific rights and you may also have other rights which vary from state to state.
For units purchased outside of the United States, service will be provided by an authorized distributor of Applied Research and Technology, Inc.
Service
The following information is provided in the unlikely event that your unit requires service.
1) Be sure that the unit is the cause of the problem. Check to make sure the unit has power supplied, all cables are connected correctly, and the cables them-

selves are in working condition.
2) If you find the unit to be at fault, write down a complete description of the problem, including how and when the problem occurs. Please write down a description of your complete setup and your serial number before calling Customer Service.
3) Call our Customer Service department for a Return Authorization (RA) number or questions regarding technical assistance. Customer Service hours are 9:00am to 6:00pm Eastern Time, Monday through Friday.
4) Pack the unit in its original carton or a reasonable substitute. The packing box is not recommended for a shipping carton. Put the packaged unit in another box for shipping. Print the RA number clearly on the outside of the shipping box. Print your return shipping address on the outside of the box.
5) Include with your unit: The power supply, a return shipping address (we cannot ship to a PO Box), a copy of your purchase receipt, a daytime phone number, and a description of the problem. Keep your manual! (see know how it works!)
6) Ship only your unit and its power supply (keep your manual!) to:
APPLIED RESEARCH AND TECHNOLOGY, INC.
215 TREMONT STREET
ROCHESTER, NEW YORK 14608
ATTN: REPAIR DEPARTMENT
RA#

XTREME PLUS SPECIFICATIONS
| Dimensions | 9.0" D x 8.25" W x 2.0" H |
| Weight | 3.0 lb. |
| Connections | 1/4" unbalanced input.Stereo 1/4" unbalanced outputsRight Stereo output can be used as a Stereo TRS Headphone output |
| Digital Algorithms | 10 |
| Digital Processor | Proprietary A R T VLSI ASIC |
| Presets | 100 factory/ user definable |
| Input impedance | 1 meg ohm |
| Output impedance | 750ohm (1/4"), 47 ohm (Headphone) |
| Maximum input level | +2dBv |
| Maximum output level | +1dBv (1/4"), +15dBv (XLR) |
| Residual output noise | >-81dB @ +5dBu |
| Dynamic range | 85dB ('c' weighted) |
| Power requirements | 9 VAC @ 400mA |
A R T retains a policy of constant product improvement. A R T reserves the right to make changes in design or make additions to or improvements upon this product without obligation to install the same on products previously manufactured. Therefore, specifications are subject to change without notice.
Designed and manufactured in the United States of America.
Applied Research and Technology, Inc.
215 Tremont St.
Rochester, NY 14608 USA
(716) 436-2720
(716) 436-3942 (fax)
Copyright 1997 Applied Research and Technology, Inc.


- CONTENTS
- Introduction
- Features
- QUICK START INSTRUCTIONS
- Quick Setup
- Powering The Xtreme Plus
- PREAMP TYPES
- XTREME
- Roar
- Stack
- Crystal
- Distortion Select Switch
- KNOBS AND SWITCHES
- Drive
- Output
- Low
- Mid & Mid Freq.
- High
- Blend Control
- DIGITAL EFFECTS CONTROLS
- Effect/Value Control
- Inlay Information Area
- Distortion LEDs
- Display
- View LED
- Clip LED
- Changed LED
- View/Save Switch
- Saving Presets
- Foot Pads
- Bypassing the Xtreme Plus
- LEAD FOOT WARNING!
- DIGITAL EFFECTS
- Effects List
- 0x Short Delay
- 1x Long Delays
- 2x Reverb
- 3x Chorus - or- Flange + Delay
- 4x Delay + Reverb
- 5x Chorus - or - Flange + Reverb
- 6x Reverb + Tremolo - or - Panner
- 7x Chorus - or - Flange
- 8x Chorus - or - Flange + Delay + Reverb
- 9x Pitch - or - Tremolo - or - Panner
- SETUP INSTRUCTIONS
- Using the Xtreme Plus with an Amp
- Using the Xtreme Plus With a Power Amp & Cabinets
- Factory Reset (recalling all the original factory settings)
- WARRANTY & SERVICE INFORMATION
- Service
Brand : ART
Model : The Xtreme Plus
Category : Guitar amplifier