
FMXOP24602 - Saw STANLEY - Free user manual and instructions
Find the device manual for free FMXOP24602 STANLEY in PDF.


| Product Type | Petrol Chainsaw |
| Brand | Stanley |
| Model | FMXOP24602 |
| Engine Type | Air-cooled 2-stroke |
| Displacement | 46 cc (nominal) / 45.1 cc (actual) |
| Maximum Engine Power | 1.8 kW |
| Fuel Mix Ratio | 40:1 (unleaded petrol : 2-stroke oil) |
| Fuel Tank Capacity | 500 cc |
| Oil Tank Capacity | 240 cc |
| Guide Bar Length | 406 mm (16 inch) |
| Cutting Length | 360 mm |
| Chain Pitch | 9.525 mm (3/8 inch) |
| Chain Gauge | 1.27 mm (0.050 inch) |
| Sprocket Teeth | 6 |
| Maximum Engine Speed | 11,000 RPM |
| Idle Speed | 2700 - 3400 RPM |
| Weight | 5.6 kg |
| Noise Level | Up to 113 dB(A) |
| Spark Plug | Torch BM6A / L8RTC or Bosch L8RTF |
| Chain Type | 91PX55X or 3/8, 050x55 (low kickback) |
| Guide Bar Type | 160SDEA095 or SPS-16A-55P (reduced kickback) |
| Chain Brake | Inertia-activated, manual override |
| Warranty | 12 months (Australia/NZ) |
| Included Accessories | Bar, chain, chain guard, screwdriver, spark plug wrench, fuel mixing canister |
Frequently Asked Questions - FMXOP24602 STANLEY
User questions about FMXOP24602 STANLEY
0 question about this device. Answer the ones you know or ask your own.
Ask a new question about this device
Download the instructions for your Saw in PDF format for free! Find your manual FMXOP24602 - STANLEY and take your electronic device back in hand. On this page are published all the documents necessary for the use of your device. FMXOP24602 by STANLEY.
USER MANUAL FMXOP24602 STANLEY
For service, spare parts or product information, please contact Smart Marketing Group Pty. Ltd.

AUST. 1300 660 457 N.Z. 0800 474 876
www.stanleyproducts.com.au
CONTENTS
Section Page
| Technical Information 2 | |
| Introduction 3 | |
| Warranty Statement 4 | |
| General Safety Instructions 5 - 7 | |
| Specific Safety Instructions 8 - 11 | |
| Components and Controls 12 - 13 | |
| Unpacking and Assembly 14 - 18 | |
| Operating Instructions 19 - 27 | |
| Maintenance and Storage 28 - 30 | |
| Trouble Shooting 30 | |
| Service Log 31 | |
| Contact Information 32 |
SUGGESTED APPLICATIONS
These are some suggested articles which could be used by this chain saw:
- Trees
- Branches
- Fire wood
- Clearing fallen branches
- Sculpturing
Please take note of serial number and write here for ease of reference:
Serial Number:
Date of Purchase:
Place of Purchase:
Receipt Number:
TECHNICAL INFORMATION
| Specifications | |
| Air-cooled 2-stroke engine FMXOP24602 | |
| Nominal Displacement | 46cc |
| Actual Displacement | 45.1cc |
| Max. engine power | 1.8 kW |
| Fuel 2 Stroke Ratio 40:1 | |
| Fuel tank capacity | 500 cc |
| Oil tank capacity | 240 cc |
| Cutting length | 360 mm |
| Spark plug | Torch BM6A or L8RTC, or Bosch L8RTF |
| Weight | 5.6 kg |
| Bar Length max. | 406mm (16") |
| Chain pitch | 9,525 mm |
| Template chain | 1.27 mm |
| Sprocket | 6 Teeth X 9.525 mm |
| Max. Speed | 11,000 RPM |
| Engine idle speed | 2700 - 3400 RPM |
| Chain Replacement Type | 91PX55X or 3/8, 050x55 |
| Guide Bar Replacement Type | 160SDEA095 or SPS-16A-55P |
| Noise | May exceed 113db (A) |
INTRODUCTION
Dear Customer,
Thank you for purchasing this chainsaw which has passed through our extensive quality assurance processes. Every care has been taken to ensure that it reaches you in perfect condition. However, in the unlikely event that you should experience a problem, or if you require any assistance please do not hesitate to contact us;

If you have a problem, call customer service do not return this chainsaw to the place of purchase.
CUSTOMER SERVICE
Australia: 1300 660 457
New Zealand: 0800 474 876
Operating times: Monday – Friday
8.00am - 5.00 pm
Australian Eastern Standard Time (AEST)
EXPRESS WARRANTY STATEMENT CHAINSAW
You are not required to do anything to register your chainsaw purchase. Please attach the purchase receipt to this manual and ensure both are kept safe. We hope you enjoy your new chainsaw, and if you have any problems call customer service on the above phone numbers. Do not return to place of purchase.
Smart Marketing Group Pty Ltd (SMG) warrants that this chainsaw will be free from manufacturing faults or defects for 12 months from the date of purchase, providing original purchase receipt is kept and shown when needed and is subject to the terms and conditions below.
If a warranty fault appears within the warranty period, SMG reserves the right to replace or repair the product. In the event that SMG chooses to replace the product, this original warranty will expire at the original date. If the product includes various accessories or components, only the defective accessory or component will be replaced or repaired.
SMG reserves the right to replace defective parts of the product with parts and components of similar quality, grade and composition where an identical part or component is not available.
Products presented for repair may be replaced by refurbished products of the same type rather than being repaired. Refurbished parts may be used to repair the products.
What is covered.
• Manufacturing fault or defect.
How to claim under this warranty.
- Call customer service, phone number below.
- Ensure you have the following: Original purchase receipt, Model of chainsaw, Serial number of chainsaw.
- Discuss the issue.
- Customer service will advise which authorised service agent to take the chainsaw to provide the issue is a warranty one.
• Take chainsaw to authorised service agent for repair.
What is not covered.
- Chainsaw used for hire.
- Damage caused by incorrect fuel or incorrectly mixed 2 stroke fuel.
• Damage or deterioration due to transport. - Damage caused by negligence, misuse, abuse or accident or incorrect voltage and wattage.
• Any corrosion or rusting.
• Damage caused by incorrect set up and start up. - Replacement parts due to general wear and tear.
- Chainsaw with serial number defacement, modification or removal.
- Chainsaw which has been serviced by other than an authorised SMG service agent.
• Chainsaw with no original purchase receipt. - Chainsaw which have been on sold, not original purchaser.
- Damage due to non-servicing of chainsaw as is required by this manual.
- Blockages / damage caused by dust, dirt, spiders webs or insects.
- Damage caused by the incorrect fitting of accessories.
- Damage caused by overloading or overworking the chainsaw.
- Damage to attached equipment or third party accessories.
- Damage caused by attached equipment or third party accessories.
CONTACT DETAILS
Smart Marketing Group Pty Ltd
33-35 Lionel Road, Mt. Waverley
Victoria 3149, Australia.
Tel (+613) 9543 7266
Fax (+613) 9543 9839
service.group@smga.com.au
COMPLETE WARRANTY STATEMENT – CHAINSAW
As soon as you have purchased the chainsaw, we recommend that you check to make sure it is intact and that you read the operating instructions carefully before using it. The purchase receipt for this product is to be retained and must be presented if making a claim under the terms of the Smart Marketing Group (SMG) warranty. Bank account statements are not acceptable for proof of purchase.
This warranty does not cover chainsaw intended for hire. The warranty will under no circumstances extend to reimbursement or payment of damages, whether direct, indirect or consequential. The warranty is void if there is evidence the chainsaw has been modified or tampered with in any way or used with unauthorised accessories without our consent.
SMG declines any responsibility or liability whatsoever arising from misuse or abuse, negligent handling of the chainsaw or if the product has not been installed or failure to comply with the relevant safety, operating, setting and maintenance instructions (see further in this manual).
The warranty does not extend to installation or disconnection costs.
Any item sent freight forward/collect for repair will be refused. Warranty repairs are free of charge, provided the product is delivered to our service department or authorised service agent. The chainsaw will need to be returned, adequately protected in a box. SMG will not be responsible for any in-transit loss or damage. Assistance under the warranty will only be made available if the request is made to our customer service team on the contact numbers listed below and proof of purchase is provided.
This is a repair only warranty you will need to take the chainsaw to the authorised service agent after contacting our customer service centre.
If the product includes various accessories or components, only the defective accessory or component will be replaced or repaired.
SMG reserves the right to replace defective parts of the product with parts and components of similar quality, grade and composition where an identical part or component is not available.
Products presented for repair may be replaced by refurbished products of the same type rather than being repaired. Refurbished parts may be used to repair the products.
Damage caused by third party accessories is not covered under this warranty.
Damage caused to attached equipment or third party accessories will not be covered under this warranty.
Rust and corrosion are not covered under this warranty.
If a warranty fault is found the freight cost will be credited to the owner. If no fault is found the product will be returned and any costs associated with the service will be charged to the owner.
Blockages caused by spider webs, insects, dirt, accumulated dust, incorrect fuel or incorrectly mixed 2-Stroke fuel are not covered by warranty. SMG reserves the right to replace or repair the product within the warranty period. Parts found to be defective due to a manufacturing fault will be replaced free of charge.
In the event of SMG choosing to replace the product, the warranty
will expire at the original date of purchase. If no warranty fault is found the owner will be advised and the product will be returned and any costs associated with the service will be charged to the owner.
Our goods come with guarantees that cannot be excluded under the Australian Consumer Law. You are entitled to a replacement or refund for a major failure and for compensation for any other reasonably foreseeable loss or damage. You are also entitled to have the goods repaired or replaced if the goods fail to be of acceptable quality and the failure does not amount to a major failure. The benefits of this warranty are in addition to any rights and remedies imposed by Australian State and Federal legislation that cannot be excluded.
In New Zealand, this SMG warranty is in addition to the conditions and guarantees which are mandatory as implied by the New Zealand Consumer Guarantee Act 1993. For service, spare parts or product information please contact customer service:
Australia: 1300 660 457
New Zealand: 0800 474 876
CONTACT DETAILS
Smart Marketing Group Pty Ltd
33-35 Lionel Road, Mt. Waverley
Victoria 3149, Australia.
Tel (+613) 9543 7266
Fax (+613) 9543 9839
service.group@smga.com.au
OPERATING ENVIRONMENT
ALWAYS use your chainsaw in an open well ventilated area. Do not expose your chainsaw to rain. Do not expose your chainsaw to direct sunlight. Keep the work area well lit. Do not use your chainsaw in areas where there is a risk of explosion or fire from combustible materials, flammable liquids, paint, varnish, petrol, flammable gases and dust of an explosive nature. As a precaution it is recommended that you consult an expert on selecting and using a suitable fire extinguisher and have it available for use in an emergency when operating the chainsaw.
BEWARE OF CHILDREN & PETS
Children and pets should be kept out of the operating area. Children should not be allowed to touch or operate the chainsaw. Chainsaw should be kept out of reach of children. When NOT in use keep the chainsaw preferably stored or locked in a secure well ventilated cabinet or room with the fuel tank empty.
PERSONAL PLANNING
- Restrict the use of your chainsaw to adult users who understand and can follow safety rules, precautions and operating instructions found in this manual.
- Keep all parts of your body away from the chain when the engine is running.
- Keep children, bystanders, and animals a minimum of 15 metres away from the work area. Do not allow other people or animals to be near the chainsaw when starting or operating the chainsaw. If necessary use warning signs to keep on lookers at a distance.
- Carefully plan your sawing operation in advance. Do not start cutting until you have a clear work area, secure footing and if you are felling trees, a planned retreat path. Do not operate the chainsaw near a naked flame or spilled fuel. After refuelling always wipe off any spilled fuel, move the chainsaw away from the fuelling point before starting the engine.
- Do not operate a chainsaw with one hand. Serious injury to the operator, helpers, bystanders or any combination of these persons may result from one-handed operation. A chainsaw is intended for two-handed use. Always maintain a firm foothold. Ensure you are able to STOP the engine quickly if necessary.
- Do not operate chainsaw from a ladder or in a tree.
- Make sure the chain will not make contact with any object while starting the engine. Never try to start the chainsaw when the guide bar is in a cut.
- Do not put pressure on the chainsaw at the end of the cut. Applying pressure can cause you to lose control when the cut is completed.
- With the engine stopped, hand carry the chainsaw with the muffler away from your body and the guide bar and chain to the rear, preferably with the cover on.
SAFETY
Before attempting to operate this chainsaw the following basic safety precautions should be taken to reduce the risk of fire, electric shock and personal injury. It is important to read the instruction manual and to understand applications, limitations and potential hazards associated with this chainsaw. It is important that you read, understand and follow these instructions very carefully. They are designed for the safety of yourself and others ensuring a long and trouble free service life from your chainsaw. This chainsaw is not intended for use by persons (including children) with reduced physical, sensory or mental capabilities, or lack of experience and knowledge, unless they have been given supervision or instruction concerning the use of the product by a person responsible for their safety.
SELECT A CHAINSAW WITH A SUFFICIENT RATING
Select the right chainsaw for the job. Do not use a chainsaw to do a job for which it was not designed. Do not force a small chainsaw to do the job of a heavy duty chainsaw. Any damage caused by overloading will void the warranty. Do not use chainsaw for purposes not intended.
PROPER USAGE
This chainsaw is designed exclusively for sawing wood, for example tree trunks, branches, planks, etc.
If it is used for any other purpose or if modifications are made to it, the manufacturer cannot accept any liability.
Also refer to the safety instructions, the assembly and operating instructions and also the general accident prevention regulations.
CHAIN BAR OIL
Your chain requires lubrication, always ensure oil reservoir is full.
FUEL
Note: Do not use ethanol blended fuels.
This chainsaw requires pre-mixed 2 Stroke fuel. Ensure unleaded fuel is mixed with 2 Stroke oil before being decanted into the fuel tank.
Fuel used in this chainsaw is poisonous. Always wear approved breathing protection when decanting fuel. If you get any fuel on your skin or clothes wash the affected area immediately with soap and water and change your clothes. If you get fuel in your eyes wash immediately with clean water and seek medical attention. If any fuel is swallowed DO NOT induce vomiting, seek immediate medical attention.
MAINTAIN YOUR CHAINSAW WITH CARE
Follow the instructions for lubricating and changing accessories. Keep handles clean, dry and free from oil and grease. Ensure that ventilation slots are kept clean and free from dust at all times. Blocked ventilation slots can cause overheating and damage to the motor. Ensure that the air and fuel filters are kept clean at all times.
MAINTAIN THE CHAINSAW IN GOOD WORKING ORDER
Have all chainsaw service performed by an authorised service agent with the exception of the items listed in the maintenance section of this manual. For example: if improper tools are used to remove or hold the flywheel when servicing the clutch, structural damage to the flywheel can occur and cause the flywheel to burst.
Make certain the chain stops moving when the throttle trigger is released. If it does not, do not use until serviced by an authorised service agent.
- Never modify your chainsaw in any way.
- Keep the handles dry, clean and free of oil or fuel mixture.
- Keep fuel and oil caps, screws and fasteners securely tightened.
- Use only qualified accessories and replacement parts as recommended
REMOVE ADJUSTING KEYS & WRENCHES
Form the habit of always checking to see that any adjusting keys or wrenches have been removed from the chainsaw before operating.
FIRE PRECAUTIONS
Always contact your fire authority before using the chainsaw on fire restricted days. It is not recommended to use your chainsaw when a total fire ban is in force. Never refuel your chainsaw while it is still running. As a precaution it is recommended that an expert is consulted on obtaining and using a suitable fire extinguisher.
CLEANING YOUR CHAINSAW
Always stop your chainsaw before you commence cleaning. Always ensure that your chainsaw has cooled, about one (1) hour, before cleaning and storing. When cleaning your chainsaw use only a damp soft cloth. NEVER use liquid or solvents of any type.

WARNING
Do not attempt to modify the chainsaw in any way; this will VOID your warranty.
The use of any attachment or accessory other than those recommended in this instruction manual could result in damage to the chainsaw and could cause injuries to the operator.
This petrol chainsaw complies with Australian / New Zealand and International standards and safety requirements. Repairs should only be carried out by qualified persons using original spare parts. Failure to do so may result in considerable danger to the operator.
CHECK DAMAGED PARTS
Before using the chainsaw it should be carefully checked to determine that it will operate properly and perform its intended function.
Check for broken or missing parts and have them replaced or repaired at an authorised service facility. Check any other condition that may affect the operation of the chainsaw. A guard or any other part of the chainsaw that is damaged should be properly repaired or replaced by an authorised service agent unless otherwise indicated in this instruction manual.
Any switch that does not operate correctly must be replaced by an authorised service agent.
DO NOT use the chainsaw if the 'ON / OFF' motor switch does not turn the chainsaw 'ON' and 'OFF'.
DO NOT use the chainsaw if the chain brake does not operate correctly.
Do not operate a chainsaw that is damaged, improperly adjusted, or not completely and securely assembled. Always replace bar, chain, hand guard or chain brake immediately if it becomes damaged, broken or is otherwise removed.
HOT COMPONENTS
Beware many of the components will get hot during use. Never touch the exhaust or motor as these may burn.
PERSONAL SAFETY
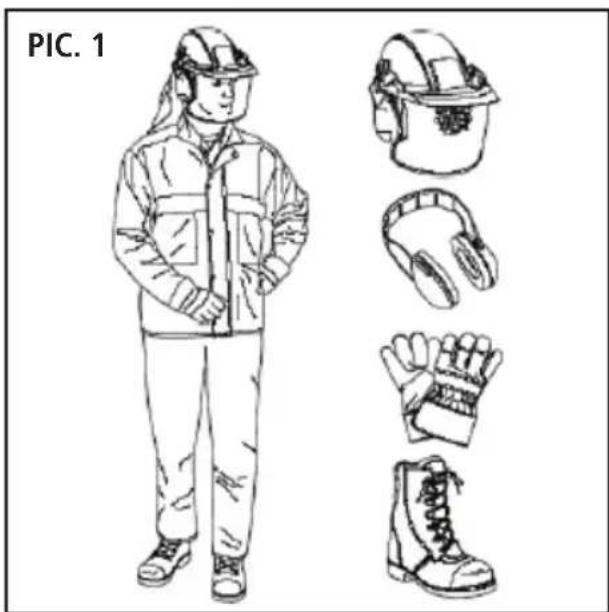
Wear Protective Gear
Wear protective gear. Always use steel capped safety footwear with non-slip soles, snug-fitting clothing, heavy-duty non-slip gloves, eye protection such as non-fogging, vented goggles or face screen, an approved safety hard hat and sound barriers (ear plugs or mufflers) to protect your hearing. Regular users should have hearing checked regularly as chainsaw noise can damage hearing. Secure hair above shoulder length.
Proper Clothing (Pic. 1)
Do not wear loose clothing, jewellery or anything that could get caught in moving machinery.
Clothing must be sturdy and snug-fitting, but allow complete freedom of movement. Avoid loose-fitting jackets, scarfs, neckties, jewellery, flared or cuffed pants or anything that could become entangled with the chainsaw or timber. Wear overalls or jeans with a reinforced cutting resistant insert.
Protect your hands with gloves when handling chainsaw and chain. Heavy-duty non-slip gloves improve your grip and protect your hands.
Good footing is most important in chainsaw work. Wear sturdy boots with non-slip soles. Steel-toed safety boots are recommended.
Proper eye protection is a must. Non-fogging, vented goggles and a face screen is recommended. Their use reduces the risk of eye and facial injury.
Wear an approved safety hard hat to protect your head.
Chainsaw noise may damage your hearing. Always wear noise protection equipment (ear plugs or ear muffs) to protect your hearing.
Continual and regular users should have their hearing checked regularly.
Hair
Long hair should be tied back or contained in a protective covering.
Eye Protection
The use of safety goggles is highly recommended (normal glasses are not sufficient for eye protection) when using or refuelling chainsaw. Prescription glasses do not have safety lenses.
Footwear
Where there is the risk of heavy objects or if there is a risk of slipping on wet or slippery floors, suitable non-slip steel capped safety footwear should be worn. Protect your feet from dropping accidents.
Ear Protection
The use of ear protection is highly recommended when using a chainsaw. The continual noise may damage your ears.
Respiratory Protection
Always wear approved breathing protection when decanting fuel. ALWAYS use this chainsaw in a well ventilated area. Never use indoors.
WARNING: Do not breathe in exhaust fumes. Exhaust fumes are poisonous and may cause drowsiness, unconsciousness and even death.
Do Not Over Reach
Do not over reach. Keep a proper footing and maintain your balance at all times. Avoid using abnormal stances and awkward body positions.
Stay Alert
Watch what you are doing, use common sense, and never operate a chainsaw when you are tired, drinking alcohol, taking drugs or if taking medication that causes drowsiness.
Do not handle or operate a chainsaw when you are fatigued, ill or upset or if you have taken alcohol, drugs or medication. You must be in good physical condition and mentally alert. Chainsaw work is strenuous. If you have any condition that might be aggravated by strenuous work, check with your doctor before operating a chainsaw.
natural_image
Line drawing of a person wearing safety gear and three views of a helmet, gloves, and boots (no text or symbols)KICKBACK SAFETY PRECAUTIONS

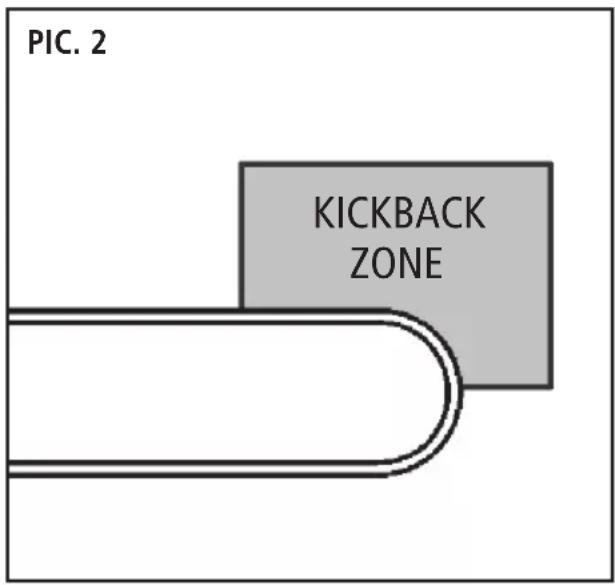
WARNING: Kickback may occur when the moving chain (near the upper quadrant of the bar nose) makes contact with a solid object or the chain is pinched.
The reaction of the cutting force of the chain causes a rotational force on the chainsaw in the direction opposite to the chain movement. This may fling the bar up and back in an uncontrolled arc mainly in the plane of the bar. Under some cutting circumstances the bar moves towards the operator, who may suffer severe or fatal injury.
Kickback (Pic. 2) may occur when the nose of the guide bar is pinched unexpectedly or unintentionally makes contact with a solid material in the wood or is incorrectly used to begin a plunge or boring cut.
It may also occur during limbing. The greater the force of the kickback reaction, the more difficult it becomes for the operator to control the chainsaw. Many factors influence the occurrence and force of the kickback reaction. These include chain speed, the speed at which the bar and chain contact the object, the angle of contact, the condition of the chain and other factors.

WARNING: Use extreme caution when cutting small size brush and saplings which may easily catch the chain and pull you off balance.
PULL-IN
Pull-in occurs when the chain on the bottom of the bar is suddenly stopped when pinched, caught or encounters a foreign object in the wood. The reaction of the chain pulls the chainsaw forward and may cause the operator to lose control of the chainsaw.
Pull-in frequently occurs when the bumper spike of the chainsaw is not held securely against the tree or limb and when the chain is not rotating at full speed before it contacts the wood.
To Avoid Pull-In (Pic. 3)
- Always start a cut with the chain rotating at full speed and the bumper spike in contact with the wood.
- Pull-in may also be prevented by using wedges to open the kerf or cut.
PUSHBACK
Pushback occurs when the chain on the top of the bar is suddenly stopped when pinched, caught or encounters a foreign object in the wood. The reaction of the chain drives the chainsaw straight back toward the operator and may cause the operator to lose control of the chainsaw. Pushback frequently occurs when the top of the bar is used for cutting.
To Avoid Pushback (Pic. 4)
- Be alert to forces or situations that may cause material to pinch the top of the chain, e.g., knots in the tree log.
- Do not cut more than one log at a time.
- Do not twist the chainsaw when withdrawing the bar from a plunge cut or underbuck cut because the chain could pinch.


flowchart
graph TD
    A["Gear Icon"] --> B["Arrow Right"]
    B --> C["Arrow Down"]
    C --> D["Arrow Left"]
    D --> E["Arrow Up"]
    E --> F["Arrow Down"]
    F --> G["Arrow Up"]
    G --> H["Arrow Down"]
    H --> I["Arrow Left"]
    I --> J["Arrow Up"]
    J --> K["Arrow Down"]
    K --> L["Arrow Left"]
    L --> M["Arrow Up"]
    M --> N["Arrow Down"]
    N --> O["Arrow Left"]
    O --> P["Arrow Up"]
    P --> Q["Arrow Down"]
    Q --> R["Arrow Left"]
    R --> S["Arrow Up"]
    S --> T["Arrow Down"]
    T --> U["Arrow Left"]
    U --> V["Arrow Up"]
    V --> W["Arrow Down"]
    W --> X["Arrow Left"]
    X --> Y["Arrow Up"]
    Y --> Z["Arrow Down"]
DEVICES FOR REDUCING THE RISK OF KICKBACK INJURY
Quickstop Chain Brake

WARNING: To reduce the risk of injury, stop using the chainsaw immediately if the chain brake does not function properly. Take the chainsaw to an authorised service agent! Do not use the chainsaw until the problem has been rectified.
Chain brake is designed to stop the chain in the event of kickback. When the chain brake/hand guard is pushed towards the bar, the chain should stop immediately. A chain brake does not prevent kickback. The chain brake should be cleaned and tested daily.
Low Kickback Chain
"Low-Kickback Chain" is a chain which has met the kickback performance requirements. Low-Kickback Chain, is designed with a contoured depth gauge and guard link which deflects kickback forces and allows wood to gradually ride into the cutter. This chainsaw is fitted with a Low-Kickback Chain.
Reduced Kickback Guide Bar
Reduced-Kickback Guide Bar, is designed with a small radius tip which reduces the size of the kickback danger zone on the bar tip. A Reduced-Kickback Guide Bar has been demonstrated to significantly reduce the number and seriousness of kickbacks. This chainsaw is fitted with a low kickback guide bar.
To Avoid Kickback
The best protection from personal injury that may result from kickback is to avoid kickback situations.
- Hold the chainsaw firmly with both hands and maintain a secure grip. Wear gloves for a firmer grip.
- Be aware of the location of the guide bar nose at all times.
- Never let the nose of the guide bar contact any object. Do not cut limbs with the nose of the guide bar. Be especially careful when cutting small, tough limbs, small size brush and saplings which may easily catch the chain.
- Don't overreach.
- Don't cut above shoulder height.
- Begin cutting at full throttle and continue cutting at full throttle.
- Cut only one item, e.g., log, at a time.
- Use extreme caution when re-entering a previous cut.
- Do not attempt to plunge cut if you are not experienced with these cutting techniques.
- Be alert for shifting of the log or other forces that may cause the cut to pinch the chain.
- Maintain chainsaw chain properly. Cut with a correctly sharpened and properly tensioned chain at all times.
- Stand to the side of the cutting path of the chainsaw.
SYMBOLS

Warning. See instruction handbook.

Appropriate ear, eye and head protection must be worn.

Gloves with chainsaw protection.

Boots with chainsaw protection, steel toe-cap and non-slip sole.

Kickback: Never cut with the tip of the chainsaw.

Hot surfaces will burn fingers or palms.

Keep safety distance between other persons and machinery

Engage: push to forward position

Disengage: pull back to locking position

Wear good quality, hard-wearing work wear.

The emissions are toxic and may cause asphyxia.

WARNING: Do not use the chainsaw in the rain or damp conditions. Protect it from moisture.

IMPORTANT. Fire risk. Petrol and petrol fumes are highly inflammable.

Always grip the chainsaw with two hands


No open fire. No smoking.
SPECIFIC SAFETY INSTRUCTIONS

WARNING: Do not use the chainsaw in areas where there is a risk of explosion or fire from combustible materials. The sparks possibly caused when using this chainsaw may ignite combustible materials as well as flammable liquids, paint, varnish, petrol, flammable gases and dust of an explosive nature. As a precaution it is recommended that you consult an expert on a suitable fire extinguisher and its use. Ensure that the work area is kept clear of combustible materials.

WARNING: Do not use the chainsaw indoors or in confined spaces where exhaust gases, smoke or fumes could reach dangerous concentrations.
• Always use the chainsaw in an open well ventilated area.
- Ensure chainsaw is fully assembled before use.
- Unit will become hot during use. Please keep chainsaw at least fifteen metre's (15m) away from buildings, other equipment, pedestrian areas or flammable materials.
- Never pull the re-coil starter once the chainsaw engine has started. Any damage caused will not be covered by warranty.
- Ensure the chainsaw has stopped before servicing, or lubricating etc.
- Do not attempt to modify the chainsaw, guards or the supplied accessories in any way.
- Do not touch the exhaust. This can become very hot during operation and can cause serious burns.
- Always check the chainsaw for damaged parts or fuel leaks, ensure these are fixed before using it.
- Never refuel while smoking or in the vicinity of an open flame.
- Always wear safety eye wear, ear and breathing protection when operating or refuelling the chainsaw.
- To avoid a fire if you spill fuel while refuelling, clean up before starting the chainsaw.
- Your chainsaw is factory set, NEVER attempt to speed it up as this could endanger the user and damage the chainsaw.
- If the chainsaw makes an unfamiliar sound or vibrates excessively, switch the chainsaw 'OFF' immediately. Investigate the possible cause or consult your authorised service agent.
- If chain brake does not operate do not use the chainsaw and have it serviced by your authorised service agent.
- Never use coolant in the chainsaw as damage may occur.
- Never transport the chainsaw with fuel in the tank. ALWAYS empty the fuel tank.
- Do not tamper or alter any parts as this may cause personal injury or damage the chainsaw.
- Never point chainsaw at people or animals.
- Never spray the chainsaw.
- Never operate the chainsaw without chain bar oil, any damage caused will not be covered by warranty.
- Bystanders or people watching must be at least 15 metres away from an operating chainsaw.
- Do not start or use the chainsaw near other people or animals.
- Do not use the chainsaw if you are tired or distracted or your reactions are impaired due to the consumption of alcohol or medication. Inattention can result in serious injuries.
- Do not wear loose-fitting clothing or jewellery. Wear long trousers to protect your legs.
- Wear suitable, close-fitting work clothing.
- Keep your body parts and clothing away from the chainsaw when you start the engine and whilst it is running.
- Ensure that you are standing on a firm, safe surface whilst working. Do not walk backwards carrying the chainsaw. Do not adopt unnatural postures.
- If you use the chainsaw for lengthy periods of time, you may suffer circulation problems caused by vibrations (white finger disease). It is not possible to provide precise details on the duration of use in each case since it may differ from person to person. The following factors may affect this phenomenon: Circulation problems in the hands of the user, low outdoor temperatures and lengthy periods of use. We therefore recommend that you wear warm work gloves and take regular breaks.
- The emissions from engines are toxic and may cause asphyxia. Do not start the chainsaw in enclosed or poorly ventilated areas.
- Ensure that the handles are clean, dry and free of the petrol mixture.
- Do not use the chainsaw without the exhaust. You may suffer burns as a result.
- Switch off the chainsaw before you put it down. Only work in daylight or in good artificial light. Conduct a visual inspection of the chainsaw before use.
- Check the chainsaw and its components and safety equipment every time before use for signs of damage and wear and have any repair work carried out without delay. Never render protective and safety equipment non-functional. Do not use the chainsaw if you discover signs of damage or wear.
- Keep the chainsaw out of the reach of children. Check the chainsaw for signs of damage after any collisions or other types of damage.
- Use only the accessories recommended by the manufacturer.
- Only have the chainsaw repaired by an authorised service agent and using only genuine spare parts.
- Do not use the chainsaw near flammable liquids or gases or in a wet or damp environment. If you ignore this, there is a risk of fire or explosion.
- Never leave the chainsaw running unattended.
- Only work in suitable light conditions.
- Always wear Personal Protective Equipment (PPE) including good quality non-slip shoes with safety toe tips.
- Never use chainsaw in thongs or barefoot.
- Do not use any ethanol fuel in this chainsaw.

MIXING 2-STROKE FUEL
- Use only unleaded petrol (ULP) and 2 Stroke oil. Ratio 40:1. 25ml 2 Stroke oil to 1 litre unleaded fuel.
- Ensure you use clean fresh unleaded petrol (ULP) + 2 Stroke oil.
- Always wear approved breathing protection when mixing fuel. Always mix fuel in a well ventilated area, never indoors.
- Use a clean approved container to mix and store your 2 Stroke petrol before decanting into the fuel tank.
- Ensure fuel / oil is mixed well.
Important
Experience indicates that alcohol-blended fuels (called gasohol or using ethanol or methanol) can attract moisture which leads to separation and formation of acids during storage.
Acidic gas can damage the fuel system of an engine while in storage. To avoid engine problems, the fuel system should be emptied before storage for 30 days or longer. Drain the gas tank, start the engine and let it run until the fuel lines and carburettor are empty. Use fresh fuel next season. See STORAGE section for additional information. Always use fresh clean new unleaded petrol and new clean 2 Stroke oil. To prevent possible restarting problems avoid running the fuel tank dry. This will help to extend engine life.

natural_image
Illustration of a fuel injection into a gas cylinder with a bottle and pump symbol (no text or labels)IMPORTANT: 2-STROKE FUEL

FUEL - ONLY USE UNLEADED PETROL (ULP)
Fuel tank capacity - 500ml
Use of incorrect fuel and/or oil may damage the chainsaw and will not be covered under warranty.
Do not use E10 or any type of ethanol fuel as this will damage the chainsaw and will not be covered under warranty.
Do not use high octane fuels (greater than 91%) as this will damage the chainsaw and will not be covered under warranty.
- Ensure you use clean fresh unleaded petrol (ULP).
- Use a clean approved container to store and mix your unleaded petrol (ULP) 2 Stroke fuel mix in before decanting into the fuel tank.
- If contaminated (dirty) or old (stale) fuel is used any damage caused will not be covered under warranty.

To operate, this chainsaw requires 2 Stroke oil to be mixed with the unleaded fuel, not supplied. If the chainsaw does not have the correct amount of oil mixed into the fuel the motor will be damaged and will not be covered under warranty.
Oil type: 2 Stroke motor oil
Oil to fuel mix: 40:1
25ml 2 Stroke oil : 1000ml (1 Litre) Unleaded Fuel
• Always use fresh clean 2 Stroke oil.
- If contaminated (dirty) or old (stale) 2 Stroke oil is used any damage caused will not be covered under warranty.
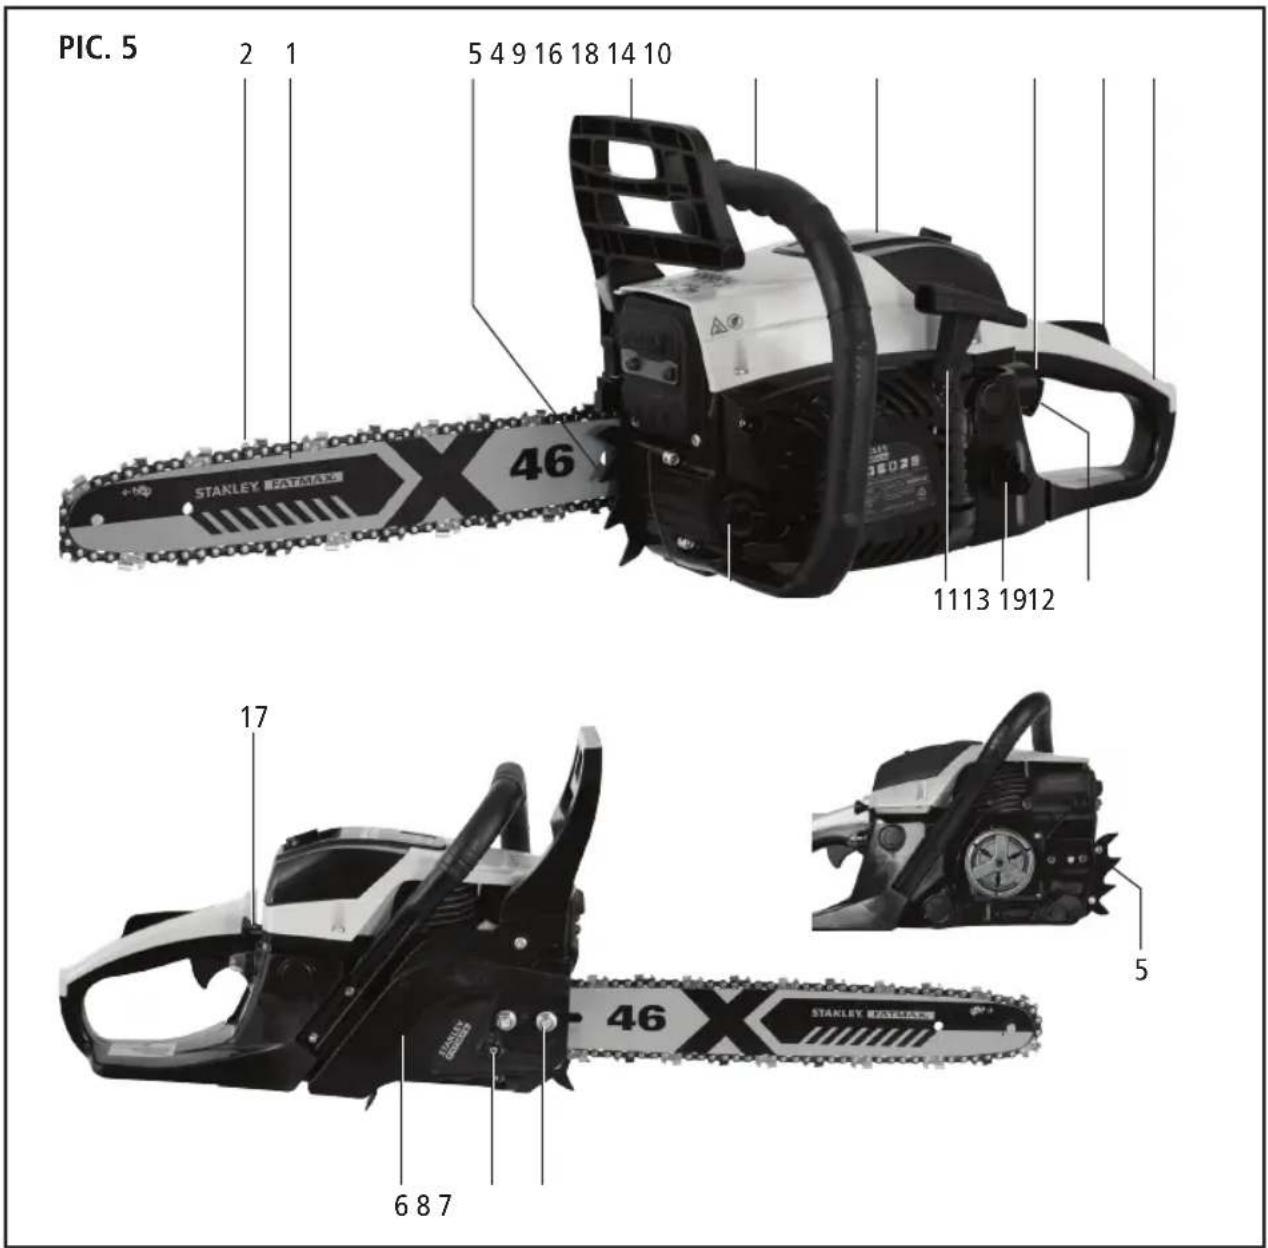
COMPONENTS AND CONTROLS (PIC. 5)
- Guide bar
- Chain
- Chain guard cover (Not shown)
- Chain brake / Hand guard
- Claw stop
- Sprocket wheel cover
- Guide bar bolts/screws
- Chain adjustment screw
- Front handle
- Rear handle
- Recoil starter
- Petrol tank screw cover
- Chain bar oil tank screw cover
- Safety trip lever (Throttle lock)
- Spark plug wrench (Not shown)
- Air filter cover
- Choke lever
- Control switch
- Throttle lever
- Fuel mixing canister (Not shown)
- Screwdriver (Not shown)
ASSEMBLY
Unpacking
Note: Carefully unpack your chainsaw. Dispose of all packing material in an environmentally responsible manner.
Remove from plastic bag.
Note: Plastic bags can be a danger to young children, dispose of immediately.
Your chainsaw requires the blade to be fitted, once fitted you will need to understand these parts. It is suggested to wear gloves during assembly:
ON/OFF Switch
The ON/OFF SWITCH is used to stop the engine.
Throttle Trigger
The THROTTLE TRIGGER controls engine speed.
Safety Trip Lever
The SAFETY TRIP LEVER must be pressed before you can squeeze the throttle trigger. This feature prevents you from accidentally squeezing the trigger.
Choke Lever
The choke and fast idle are set by pulling the CHOKE LEVER out to the full extent for cold starting or after refuelling. The choke provides additional fuel to the engine during cold starting.
Primer Bulb
The PRIMER BULB circulates fuel to the carburettor to provide quicker starting.
Chain Brake
The chain brake is a device designed to stop the chain if kickback occurs. The chain brake activates automatically in the event of kickback. The chain brake activates manually if the front hand guard is pushed forward. The chain brake is disengaged by pulling the front hand guard back toward the front handle as far as possible.
Chain Tension
It is normal for a new chain to stretch during the first 5 minutes of operation.
Ensure the engine is always SWITCHED OFF before fitting or adjusting the chain. You should check your chain tension frequently. See CHAIN TENSION on page 16.

WARNING
Muffler is very hot during and after use. Do not touch the muffler or allow combustible material such as dry grass or fuel to do so.
Claw Stop Assembly (PIC. 6)

Assemble the claw stop using the 2 supplied screws.
Bar and Chain Assembly (PIC. 7 to 11)

natural_image
Close-up of a hand adjusting a black mechanical component, labeled 'PIC. 7' (no other text or symbols visible)Remove the sprocket wheel cover by undoing the two guide bar nuts.

Place the guide bar with the notched end on the two guide bar bolts
Fit the saw chain
- Lay out the chain in a loop. Ensure that the cutting claws point in a clockwise direction.

- Push the chain over the coupling on to the sprocket wheel on the chainsaw. Ensure that the chain links are positioned precisely between the teeth of the sprocket wheel. Pic 9

- Now place the chain over the tip of the bar. Ensure that the chain links are positioned in the guide bar groove. The chain will sag downwards on the bottom of the guide bar. Pic 10

natural_image
Black-and-white photo of a chain-linking tool with visible teeth and a number 46, labeled 'PIC. 11' (no other text or symbols)- Now fit the sprocket wheel cover again. Ensure that the chain adjustment tang engages in the hole on the guide bar. Only then will it be possible to fit the sprocket wheel cover correctly. Pic 11
IMPORTANT! The chain must not slip off the guide bar. The chain links must be positioned precisely between the teeth of the sprocket wheel. The chain adjustment tang on the sprocket wheel must insert into the hole on the guide bar.
- Now fit the two guide bar nuts again. Only tighten them by hand at this stage. Follow the details in chain tensioning to finish the assembly.
CHAIN TENSION

WARNING: Wear protective gloves when handling the chain. The chain is sharp and can cut you even when it is not moving.
Note: When adjusting chain tension, make sure the chain bar nuts are finger tight only. Attempting to tension the chain when the chain bar nuts are tight can cause damage.
Checking the Tension Pic 12 to Pic 14
Use the screwdriver end of the chain adjustment tool (bar tool) to move chain around guide bar. If the chain does not rotate, it is too tight. If the chain is too loose, it will sag below the bar.
Ensure that the guide bar screws for adjusting the chain are only hand tight. Undo them if necessary.
- To increase the tension of the chain, turn the chain adjustment screw clockwise using a suitable screwdriver.
- To reduce the tension of the chain, turn the chain adjustment screw anti-clockwise using a suitable screwdriver.
- The chain tension is correct if it can be raised a maximum of 2 - 3mm in the centre of the guide bar.
- Tighten the guide bar screws properly after you have adjusted the chain tension.
NOTES
- Allow a new chain to run for approx. 5 minutes before actually sawing with it. Check the chain tension again after this time and adjust it if necessary.
- When it is warm, the chain will expand and may sag. This gives rise to the risk that the chain will jump off the guide bar. Therefore you must adjust the tension of the chain after it has carried out its first sawing work.
- A chain that has been tensioned when warm will contract as it cools and this would result in excessive chain tension, the chain tension must be reduced after you have finished the sawing work.
IMPORTANT – the tension of the chain must be checked several times over the course of a working day. Always wear gloves for this work.
- Since the guide bar is subject to particularly high stress at the return point and at the interface, we recommend that the guide bar be turned each time you sharpen the chain so as to avoid it wearing on one side.


natural_image
Close-up of hands operating a mechanical tool, no visible text or symbols
CHAIN BAR OIL & LUBRICATION
Oil tank capacity - 240ml
Either use a quality proprietary chain bar oil or 10-30W motor oil.
NOTE: Only use clean fresh oil, dirty oil will damage the chain and bar.
The service life of the chain bar depends on good lubrication. We recommend using a good quality chain bar oil, otherwise it will result in damage to the bar, the chain and oil pump. The bar and chain require continuous lubrication. Lubrication is provided by the automatic oilier system when the oil tank is kept filled. Lack of oil will quickly ruin the chain bar and chain. Too little oil will cause overheating shown by smoke coming from the chain and/or discolouration of the chain bar. Chain bar oil must be free flowing for the oil system to pump enough oil for adequate lubrication. Never use waste oil for chain bar lubrication. Always stop the engine before removing the oil cap. Refill the chain bar oil tank each time the chainsaw is refuelled. To prevent possible restarting problems avoid running the fuel tank dry. This will help to extend engine life.
The chainsaw is supplied without oil.
Unscrew the oil tank cover. Fill the oil tank with biologically degradable chain bar oil. Pic 15
Never use recycled, used or waste oil.
Ensure that no dirt gets into the oil tank.
The chainsaw must never be operated without chain bar oil.
If the chainsaw is operated without chain bar oil, the entire chainsaw will suffer damage within a very short period of time.
Always check the oil level and the chain lubrication system before starting work. Check the automatic function of the chain lubrication system by holding the chainsaw with the tip of the bar against a sheet of paper on the ground and running the chain a few times. Pic 16. Keep a safe distance! If an increasing oil mark can be seen on the paper, the automatic lubrication system is working correctly when the chainsaw is running. Always ensure that the oil discharge duct is free of dirt at all times. If necessary clean it with a thin object (such as a toothpick or matchstick with the chainsaw turned off).
Caution: Do not try to adjust the oil flow of the oil pump as it has already been adjusted in the optimal position before it left the factory.
Note: Due to the chain and bar being lubricated by a pressured spray, it's very common for this oil to drip and leak from the bottom of the chainsaw. This is normal and not a fault. Always check oil level before using chainsaw.

natural_image
Close-up of a white plastic bottle being inserted into a mechanical component, no visible text or symbols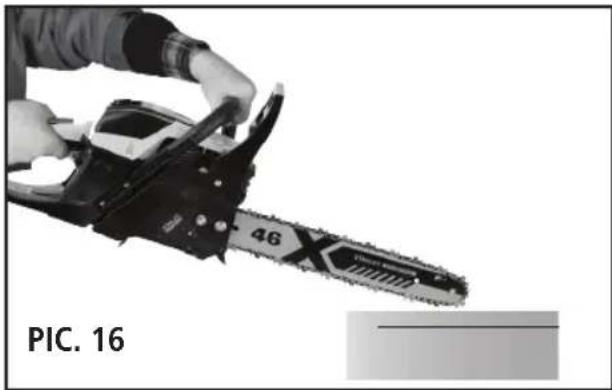
natural_image
Close-up of a hand using a chainsaw to cut a metal strip, labeled 'PIC. 16' (no other text or symbols visible)Adjusting the Tension (Pic. 17, 18 and 19)
Chain tension is very important. The chain will stretch during use. This is especially true during the first few times you use your chainsaw. Always check chain tension each time you use and refuel your chainsaw.
- Loosen chain bar nuts until they are finger tight against the clutch cover.
- Turn adjusting screw clockwise until chain solidly contacts bottom of guide bar rail.
- Using chain bar tool, roll chain around guide bar to ensure all links are in bar groove.
- Lift up tip of guide bar to check for sag. Release tip of guide bar, then turn adjusting screw 1/4 turn clockwise. Repeat until sag does not exist.
- While lifting tip of guide bar, tighten chain bar nuts securely with the chain bar tool.
- Use the screwdriver end of the chain bar tool to move chain around guide bar.
- If chain does not rotate, it is too tight. Slightly loosen chain bar nuts and loosen chain by turning the adjusting screw 1/4 turn counterclockwise. Retighten clutch cover locking nuts.
- If chain is too loose, it will sag below the guide bar. DO NOT operate the chainsaw if the chain is loose.
PIC. 17
Adjusting Screw - 1/4 Turn

flowchart
graph TD
    A["Process Step"] --> B["Output Symbol"]


PIC. 20

OPERATING INSTRUCTIONS
Pre - Operation Preparation
Note: If unit has previously been used, the motor, muffler and exhaust may still be hot enough to burn. Always exercise caution when checking the chainsaw.
- Check that the engine switch is OFF.
- Check that the spark plug lead is firmly attached to the top of the spark plug.
- Holding on to the handles gently rock the chainsaw and listen for any noise which may indicate loose items. If anything appears to be loose either tighten or consult an authorised service agent.
Filling
Always use clean fresh fuel as specified on page 11. Stale fuel can cause the chainsaw to run rough and damage the motor; this will not be covered by warranty.
- Ensure the engine is OFF.
- Use fresh 2 stroke fuel as detailed on page 11.
- Lay chainsaw on its side and remove fuel tank cap.
- Fill fuel tank with about 1/2 litre of pre-mixed 2 Stroke fuel.
- Fit and tighten fuel tank cap.
- Reposition chainsaw to an upright position.
Check the following before starting the engine
• Is the chain tension correct?
- Is the oil tank full?
• Is the chain brake engaged?
- Start the chainsaw.
TO START THE ENGINE
Make sure the chain brake is engaged and place the chainsaw on firm level ground or other solid surface in an open area. Maintain good balance and secure footing.
Grip the front handlebar of the chainsaw firmly with your left hand and press down. Put the toe of your right foot into the rear handle and press down. With your right hand pull out the starter pull cord slowly until you feel a definite resistance and then give it a brisk pull until the engine starts. See Picture 20 for starting process guide.
To prevent possible restarting problems avoid running the fuel tank dry. This will help to extend engine life.
GENERAL POSITIONING AND OPERATION
You are responsible for safety in the area in which you are working.
- Wear suitable work clothing such as gloves, safety helmet, goggles or safety visors and long trousers made of strong material.
- Ensure that you are standing on a firm, safe surface and wear good quality non-slip work shoes. Never use the chainsaw when wearing sandals or barefoot.
- Ensure that you are standing on a firm, safe surface whilst working. Do not walk backwards carrying the chainsaw. Do not adopt unnatural postures.
- Whilst working always keep the chainsaw an adequate distance from your body.
- Always switch off the chainsaw during breaks and when changing location. Wait until the chainsaw stops and switch off the engine.
- Never leave the chainsaw unattended at the workplace. Store the chainsaw in a safe place during breaks.
• Always switch off the chainsaw when changing location.
- Personnel using the chainsaw must not be distracted. This may cause them to lose control of the chainsaw.
- Never use the chainsaw in rain, in wet or damp environments and do not store it outdoors.
^a If the chainsaw becomes wet, wait until it is fully dry before using it again.
- Protect the chainsaw from rain and moisture. Always hold the chainsaw with two hands when the engine is running.
- Use the claw to position the chainsaw for every cut and always start every cut with the chain moving.
- Complete the cut in such a way that the chainsaw does not become trapped or pinched in the wood.
- Pay special attention to branches that are under tension.
- Only pull the chainsaw out of the wood whilst the chain is still moving.
- Never saw using one hand over shoulder height. Always stand perpendicular to the slope when using the chainsaw on a gradient.
- Always stand to the side of falling trees. Watch the falling direction of the sawn parts.
- Never start a cut using the tip of the bar and never saw using the tip of the bar – danger of kickback!
- There is always a risk of kickback if the tip of the bar touches wood or other objects. This makes the chainsaw impossible to control and may lead to it being catapulted with great force towards the operator.
- Always saw through one branch at a time. Watch neighbouring branches when lopping branches off a tree.
- Never use the chainsaw as a lever for moving objects.
• Always use the chain guard for transporting the chainsaw.
The carburettor has been set at the factory to provide the best possible performance. If you wish to improve the setting, contact an authorised service agent.
RESIDUAL RISKS
Even when used properly there is always some residual risk that can not be excluded. From the nature and design of the tool, the following potential hazards can be derived :
- Contact with the unprotected chain (cuts);
- Reaching into the running chainsaw (cut injury);
• Unexpected, sudden movement of the guide rail (cuts);
• Ejection of parts of the chain; - Ejection of parts of the material to be cut;
- Impairment of hearing, if no prescribed hearing protection is worn;
• Inhalation of material to be cut; - Risk of kickback
• This device produces an electromagnetic field during use
IMPORTANT POINTS TO REMEMBER
When pulling the starter rope, do not use the full extent of the rope as this can cause the rope to break. Do not let starter rope snap back. Hold the handle and let the rope rewind slowly.
For cold weather starting, start the unit at FULL CHOKE, allow the engine to warm up before squeezing the throttle trigger.
Note: Do not attempt to cut material with the choke/fast idle lever in the FULL CHOKE position.
To Stop The Engine (Pic. 21)
Move the ON/OFF switch to the OFF position.
Warning: DO NOT put the chainsaw on the ground when the chain is still moving.
Always engage the chain brake when not in use.
Starting a Cold Engine (Or Warm Engine After Running Out Of Fuel)
Note: In the following steps, when the choke lever is pulled out to the full extent, the correct throttle setting for starting is set automatically.
- Move the ON/OFF switch (Pic. 21).
ON - I depressed
OFF - 0 depressed - Pull choke lever out to the full extent (to the FULL CHOKE position) (Pic. 22)
- Slowly press primer bulb 7 times. If bulb is already full, you may only need to press once. (Pic. 22)
- Pull the starter rope sharply 5 times with your right hand. Then proceed to the next step.
Note: If the engine sounds as if it is trying to start before the 5th pull, stop pulling and immediately proceed to the next step.
-
Push the choke lever in to the HALF CHOKE position.
-
Pull the starter rope sharply with your right hand until the engine starts.
-
Allow the engine to run for approximately 5 seconds. Push choke lever back to off position.


Starting a Warm Engine
- Move ON/OFF switch to the ON position.
- Then push the lever in to the HALF CHOKE position.
- Pull the starter rope sharply with your right hand until the engine starts.
- Push the choke lever back to off position.
Difficult Starting (Or Starting a Flooded Engine)
The engine may be flooded with too much fuel if it has not started after 10 pulls. Flooded engines can be cleared of excess fuel by pushing the choke lever in completely (to the OFF CHOKE position) and then following the warm engine starting procedure listed above. Ensure the ON/OFF switch is in the ON position. Starting could require pulling the starter rope handle many times depending on how badly the unit is flooded. If engine fails to start, refer to the TROUBLESHOOTING TABLE or seek help from an authorised service agent.
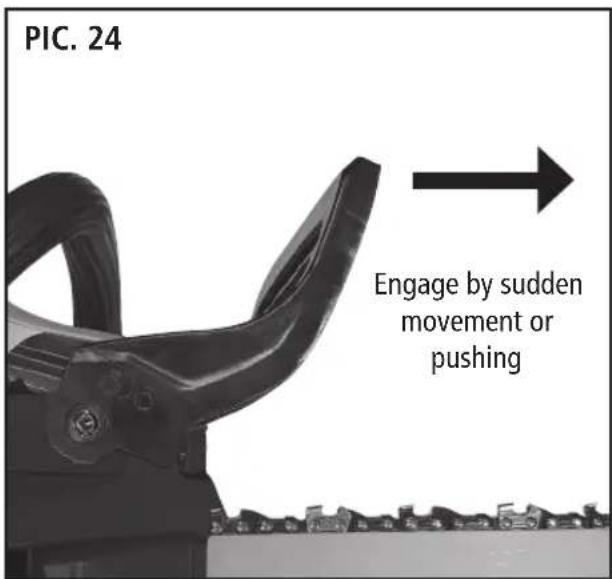
CHAIN BRAKE (PIC. 23 & 24)
Place the chainsaw on firm ground. Grip the rear handle with your right hand and the front handle with your left hand. Apply full throttle by fully depressing the throttle trigger. Activate the chain brake by turning your left wrist against the hand guard without releasing your grip around the front handle. The chain should stop immediately.

WARNING: If the brake band is worn too thin, it may break when the chain brake is triggered. DO NOT USE IT. It must be replaced by the manufacturer or an authorised service agent to avoid a hazard.
Chain Brake
Ensure chain brake is disengaged by pulling the front hand guard back toward the front handle as far as possible. The chain brake must be disengaged before cutting with the chainsaw.

WARNING: The chain must not move when the engine runs at idle speed. If the chain moves at idle speed refer to CARBURETTOR ADJUSTMENT on page 29. Avoid contact with the muffler. A hot muffler can cause serious burns.
- This chainsaw is equipped with a chain brake. The brake is designed to stop the chain if kickback occurs.
- The inertia-activated chain brake is activated if the front hand guard is pushed forward, either manually (by hand) or automatically (by sudden movement) (Pic. 24).
- If the brake is already activated, it is disengaged by pulling the front hand guard back toward the front handle as far as possible (Pic. 23).
- When cutting with the chainsaw, the chain brake must be disengaged.
The chain brake should be replaced by an authorized service agent if any part is worn to less than 0.5mm (0.020") thick.
Caution: The chain brake must be checked several times daily. The engine must be running when performing this procedure. This is the only instance when the chainsaw should be placed on the ground with the engine running.

OPERATING TIPS
You are responsible for safety in the area in which you are working.
Wear suitable work clothing such as gloves, safety helmet, goggles or safety visors and long trousers made of strong material.
Ensure that you are standing on a firm, safe surface and wear good quality non-slip work shoes. Never use the chainsaw when wearing sandals or barefoot.
- Check chain tension before first use and after 1 minute of operation. See CHAIN TENSION on page 16 - 18.
- Cut wood only. Do not cut metal, plastics, masonry, non-wood building materials, etc.
- Stop the chainsaw if the chain strikes a foreign object. Inspect the chainsaw and repair or replace parts as necessary.
- Keep the chainsaw out of dirt and sand prior to use. Even a small amount of dirt will quickly dull a chain and thus increase the possibility of kickback.
- Practice cutting a few small logs using the following techniques to get the "feel" of using your chainsaw before you begin a major sawing operation.
- Squeeze the throttle trigger and allow the engine to reach full speed before cutting.
- Begin cutting with the chainsaw frame against the log.
- Keep the engine at full speed the entire time you are cutting.
- Allow the chain to cut for you. Exert only light downward pressure. If you force the cut, damage to the bar, chain or engine can result.
- Release the throttle trigger as soon as the cut is completed, allowing the engine to idle. If you run the chainsaw at full throttle without a cutting load, unnecessary wear can occur to the chain, bar and engine. It is recommended that the engine not be operated for longer than 30 seconds at full throttle.
- To avoid losing control when cut is complete, do not put pressure on chainsaw at end of cut.
- Stop the engine before setting the chainsaw down after cutting.
SUGGESTED TREE FELLING TECHNIQUES (PIC. 25)
Note: If unsure about chainsaw operation we suggest doing a chainsaw course.
- Carefully plan your sawing operation in advance.
- Clear the work area. You need a clear area all around the tree so you can have secure footing.
- The chainsaw operator should keep on the uphill side of the terrain as the tree is likely to roll or slide downhill after it is felled.
- Study the natural conditions that can cause the tree to fall in a particular direction. Natural conditions that can cause a tree to fall in a particular direction include.
A The wind direction and speed.
B The lean of the tree. The lean of a tree might not be apparent due to uneven or sloping terrain. Use a plumb or level to determine the direction of tree lean.
C Weight and branches on one side.
D Surrounding trees and obstacles.
Look for decay and rot. If the trunk is rotted, it can snap and fall toward the operator. Check for broken or dead branches which can fall on you while cutting. Make sure there is enough room for the tree to fall. Maintain a distance of 2-1/2 tree lengths from the nearest person or other objects. Engine noise can drown out a warning call. Remove dirt, stones, loose bark, nails, staples and wire from the tree where cuts are to be made. Plan a clear retreat path to the rear and diagonal to the line of fall.
Check Chainsaw Lubrication
- Start the chainsaw.
- Hold the running chainsaw approximately 15cm above a trunk or the ground (use appropriate base).
- If the lubrication is sufficient, you will see a light oil trace because oil will be flung off the chain.
- If no oil trace is seen, check chain bar oil reservoir and clean the chainsaw from debris/dirt.

WARNING
Check for broken or dead branches which can fall while cutting causing serious injury. Do not cut near buildings or electrical wires if you do not know the direction of tree fall, nor cut at night since you will not be able to see well, nor during bad weather such as rain, snow, or strong winds, etc. If the tree makes contact with any utility line, the utility company should be notified immediately.
Felling Large Trees (15cm / 6 inches) in diameter or larger)
The notch method is used to fell large trees. A notch is cut on the side of the tree in the desired direction of fall. After a felling cut is made on the opposite side of tree, the tree will tend to fall into the notch.
Note: If the tree has large buttress roots, remove them before making the notch. If using chainsaw to remove buttress roots, keep chainsaw from contacting ground to prevent dulling of the chain.
Notch Cut & Felling the Tree (PIC. 26 & 27)
- Make notch cut by cutting the top of the notch first. Cut through 1/3 of the diameter of the tree. Next complete the notch by cutting the bottom of the notch. See illustration. Once the notch is cut remove the notch of wood from the tree.
- After removing the wood from the notch, make the felling cut on the opposite side of the notch. This is done by making a cut about two inches (5cm) higher than the centre of the notch. This will leave enough uncut wood between the felling cut and the notch to form a hinge. This hinge will help prevent the tree from falling in the wrong direction.
Note: Before felling cut is complete, use wedges to open the cut if necessary to control the direction of fall. To avoid kickback and chain damage, use wood or plastic wedges, but never steel or iron wedges.
- Be alert to signs that the tree is ready to fall, cracking sounds, widening of the felling cut or movement in the upper branches.
- As tree starts to fall, stop chainsaw, put it down and get away quickly on your planned retreat path.
- DO NOT cut down a partially fallen tree with your chainsaw. Be extremely cautious with partially fallen trees that may be poorly supported. When a tree doesn't fall completely, set the chainsaw aside and pull down the tree with a cable winch, block and tackle, or tractor.
PIC. 25

PIC. 26

PIC. 27
Hinge holds tree on stump and helps control fall

CUTTING A FALLEN TREE (BUCKING) PIC. 28
Bucking is the term used for cutting a fallen tree to the desired log size.
Important Points
- Cut only one log at a time.
- Cut shattered wood very carefully, sharp pieces of wood could be flung toward operator.
- Use a sawhorse to cut small logs. Never allow another person to hold the log while cutting and never hold the log with your leg or foot.
- Do not cut in an area where logs, limbs and roots are tangled such as in a blown down area. Drag the logs into a clear area before cutting by pulling out exposed and cleared logs first.
- If your chainsaw gets stuck "pinched" by the timber turn your chainsaw off and use a plastic or wooden wedge to "open" the cut up enough to remove the chainsaw. Never keep sawing as you may damage the chainsaw or injury yourself.
TYPES OF CUTTING USED FOR BUCKING
Overcutting (Pic. 29 and 30)
Overcutting begins on the top side of the log with the bottom of the chainsaw against the log. When overcutting use light downward pressure.
Undercutting (Pic. 29 and 30)
Undercutting involves cutting on the underside of the log with top of chainsaw against the log. When undercutting use light upward
PIC. 28
Use a wedge to remove pinched chainsaw chain

natural_image
Simple line drawing of a pipe with a handle and a small object above it (no text or symbols)Turn chainsaw OFF and use a plastic or wooden wedge to force the cut open
PIC. 29
OVERCUTTING

natural_image
Illustration of a wooden log being cut with a saw (no text or symbols)
natural_image
Illustration of a wooden log being cut with a saw, showing grain and texture (no text or symbols)UNDERCUTTING
PIC. 30
1ST OVERCUTTING
First over cut (1/3 diameter) to avoid splintering
1ST


WARNING
Do not stand on the log being cut. Any portion can roll causing loss of footing and control. Do not stand downhill of the log being cut.
pressure. Hold chainsaw firmly and maintain control. The chainsaw will tend to push back toward you.
Bucking Without a Support (Pic. 31)
• Overcut through 1/3 of the diameter of the log.
- Roll the log over and finish with a second overcut.
- Watch for logs with a compression side to prevent the chainsaw from pinching. See illustrations for cutting logs with a compression side.
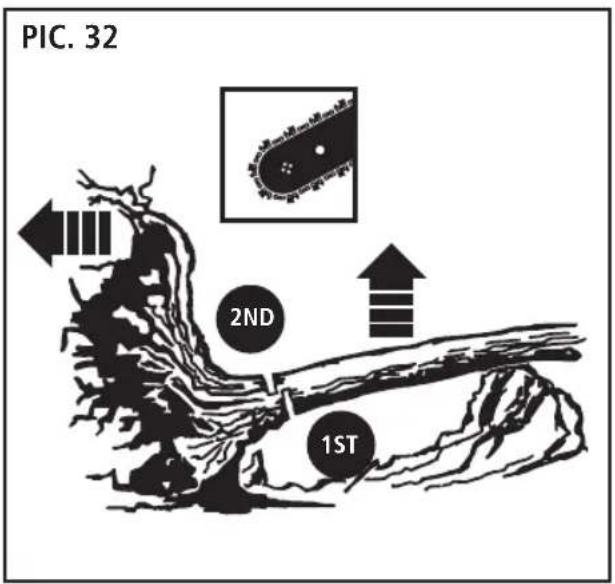
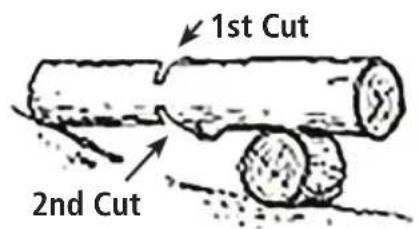
Bucking Using a Log or Support Stand (Pic. 31, 32 & 33)
- Remember your first cut is always on the compression side of the log (See illustrations for your first and second cut).
- Your first cut should extend 1/3 of the diameter of the log.
- Finish with your second cut.

WARNING
If chainsaw becomes pinched or hung in a log, don't try to force it out. You can lose control of the chainsaw resulting in injury and/or damage to the chainsaw. Stop the chainsaw, drive a wedge of plastic or wood into the cut until the chainsaw can be removed easily. Restart the chainsaw and carefully reenter the cut. To avoid kickback and chain damage, do not use a metal wedge. Do not attempt to restart your chainsaw when it is pinched or hung in a log.
Never turn chainsaw upside down to undercut. The chainsaw cannot be controlled in this position.
Always make your first cut on the compression side of the log. The compression side of the log is where the pressure of the log's weight is concentrated.
PIC. 31
1st Cut, then roll log for 2nd Cut

natural_image
Simple line drawing of a pipe or channel with a downward arrow indicating flow or direction (no text or symbols)PIC. 33



2nd Cut
LIMBING AND PRUNING
Important Points
• Work slowly, keeping both hands firmly gripped on the chainsaw. Maintain secure footing and balance.
- Watch out for spring poles. Spring poles are small size limbs which can catch the chainsaw chain and whip toward you or pull you off balance. Use extreme caution when cutting small size limbs or slender material.
- Be alert for spring back. Watch out for branches that are bent or under pressure. Avoid being struck by the branch or the chainsaw when the tension in the wood fibres is released.
- Keep a clear work area. Frequently clear branches out of the way to avoid tripping over them.
Limbing
• Always limb a tree after it is cut down. Only then can limbing be done safely and properly.
- Leave the larger limbs underneath the felled tree to support the tree as you work.
- Start at the base of the felled tree and work toward the top, cutting branches and limbs. Remove small limbs with one cut.
- Keep the tree between you and the chainsaw. Cut from the side of the tree opposite the branch you are cutting.
- Remove larger, supporting branches with the cutting techniques described in BUCKING WITHOUT A SUPPORT.
- Always use an overcut to cut small and freely hanging limbs. Undercutting could cause limbs to fall and pinch the chainsaw.
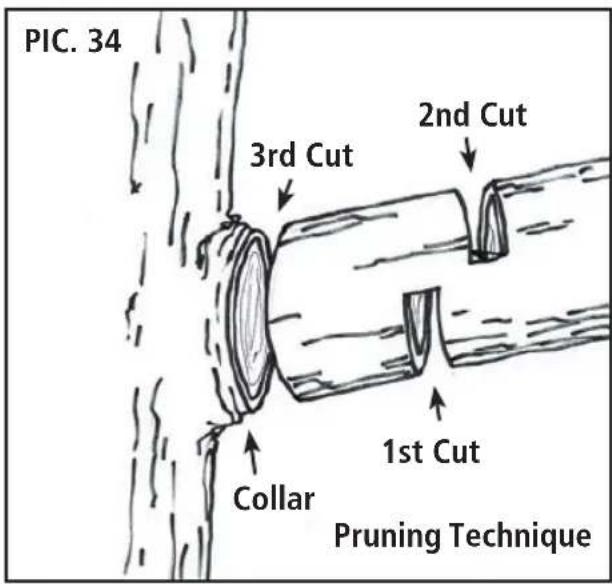
Pruning (Pic. 34)
Make your first cut 1/3 of the way through the bottom of the limb. Next make a 2nd cut all the way through the limb. Then cut a third overcut leaving a 1 to 2 inch (2.5 to 5cm) collar from the trunk of the tree.

WARNING
Be alert for and guard against kickback. Do not allow the moving chain to contact any other branches or objects at the nose of the guide bar when limbing or pruning. Allowing such contact can result in serious injury.
Never climb into a tree to limb or prune. Do not stand on ladders, platforms, a log, or in any position which can cause you to lose your balance or control of the chainsaw.
Limit pruning to limbs shoulder height or below. Do not cut if branches are higher than your shoulder. Get a professional to do the job.
MAINTENANCE
Warning: Disconnect the spark plug before performing maintenance except for carburettor adjustments.
We recommend all service and adjustments not listed in this manual be performed by an authorised service agent.
1. Check For Damaged or Worn Parts
Contact an authorised service agent for replacement of damaged or worn parts.
Note: It is normal for a small amount of oil to appear under the chainsaw after the engine stops. Do not confuse this with a leaking oil tank.
- ON/OFF Switch - Ensure ON/OFF switch functions properly by moving the switch to the OFF position. Make sure engine stops, then restart engine and continue.
- Fuel Tank - Do not use chainsaw if fuel tank shows signs of damage or leaks.
- Oil Tank - Do not use chainsaw if oil tank shows signs of damage or leaks.
2. Check For Loose Fasteners & Parts
- Chain Bar Nuts
- Chain
- Muffler
- Cylinder Shield
- Air Filter
- Handle Screws
- Vibration Mounts
- Starter Housing
- Front Hand Guard
3. Check Chain Sharpness
A sharp chain makes wood chips. A dull chain makes a sawdust powder and cuts slowly.
Chain sharpening is a complicated task and requires special tools. We recommend that you refer chain sharpening to a professional chain sharpener.
4. Check Guide Bar (Pic. 35 & 36)
Conditions which require guide bar maintenance:
- Chainsaw cuts to one side or at an angle.
• Chainsaw has to be forced through the cut. - Inadequate supply of oil to bar and chain.
Check the condition of guide bar each time chain is sharpened. A worn guide bar will damage the chain and make cutting difficult. After each use, ensure ON/OFF switch is in the OFF position, then clean all sawdust from the guide bar and sprocket hole.
To maintain guide bar:
- ON/OFF switch to OFF.
- Loosen and remove chain bar nuts and clutch cover. Remove bar and chain from chainsaw.
- Clean the oil holes and bar groove after every 2 hours of operation.
Replace guide bar when the groove is worn, the guide bar is bent or cracked, or when excess heating or burring of the rails occurs. If replacement is necessary, use only the guide bar specified for your chainsaw.
5. Clean Unit
• After each use, allow chainsaw to cool about 1 hour. Clean the unit and decals using a damp cloth with a mild detergent.
- Wipe off unit with a clean dry cloth.
- NEVER allow water or a mild dish washing solution to enter or drip onto the chainsaw.
- NEVER use solvents, e.g. Petrol, Toluene, Methylated Spirits etc, to clean the chainsaw, as these will damage the surface finish and may cause a fire when chainsaw is next used.
6. Check Chain Brake
See CHAIN BRAKE on page 22.
PIC. 35
Remove Sawdust from Guide Bar Groove

natural_image
Illustration of three different tools or devices, showing different blade shapes and mounting points (no text or symbols present)Remove Sawdust from Guide Bar Holes
PIC. 36

7. Clean Air Filter
Caution: Do not clean filter in gasoline or other flammable solvent to avoid creating a fire hazard or producing harmful evaporative emissions.
Cleaning the air filter:
A dirty air filter decreases the life and performance of the engine and increases fuel consumption and harmful emissions. Always clean your air filter after 10 tanks of fuel or 2 hours of operation, whichever comes first. Clean more frequently in dusty conditions. A used air filter can never be completely cleaned. It is advisable to replace your air filter with a new one after every 12 hours of operation, or annually, whichever comes first
Clean air filter in mild soap and warm water.
Do not use petrol or solvents.
Dry thoroughly before using.
8. Replace Spark Plug
This engine uses a Torch L7RTC or NGR BPMR7A with 0.6-0.7mm electrode gaps.
The spark plug should be replaced each year to ensure the engine starts easier and runs better.
- Loosen black thumb screw on cylinder cover. (Pic. 37)
- Remove the cylinder cover.
- Pull off the spark plug boot (Pic. 37).
- Remove spark plug from cylinder and discard.
- Replace with a new spark plug and tighten securely with a 3/4 inch socket wrench. Spark plug gap should be 0.025 inch (0.6mm).
- Reinstall the spark plug boot.
- Reinstall the cylinder cover and secure with black thumb screw.
9. Replace Fuel Filter
To replace fuel filter, drain your unit by running it dry of fuel. Remove fuel cap and its connected retainer from tank. Pull filter from tank and remove from line. Replace and reassemble.
10. Chain Adjustment
See CHAIN TENSION on page 16.
11. Carburettor Adjustment (Pic. 38)

WARNING: The chain will be moving during most of this procedure. Wear your protective equipment and observe all safety precautions. The chain must not move at idle speed.
The carburettor is factory set and should not require adjusting. The carburettor will permit only limited adjustment of the needle. Any adjustment should be done by an authorised service agent.


STORAGE
Warning: Perform the following steps after each use:
- Allow the engine to cool and secure the unit before storing or transporting.
- Store chainsaw and fuel in a well ventilated area where fuel vapours cannot reach sparks or open flames from water heaters, electric motors or switches, furnaces, etc.
- Store chainsaw with all guards in place and position chainsaw so that any sharp object cannot accidentally cause injury.
- Store chainsaw well out of the reach of children.
Seasonal Storage
Prepare your unit for storage at the end of the season or if it will not be used for 30 days or more.
Perform the following seasonal storage after the above storage steps if your chainsaw is to be stored for a period of time:
- Clean chainsaw thoroughly before storage.
- Store in a clean dry area.
• Lightly oil external metal surfaces and guide bar,
• Oil the chain and wrap it in heavy paper or cloth. - Drain all fuel from the tank and seal
TROUBLE SHOOTING TABLE

Warning: Always stop unit and disconnect spark plug before performing all of the recommended remedies below except remedies that require operation of the unit.
| Trouble Cause Remedy | ||
| Engine will not start or will run only a few seconds after starting. | 1. Ignition switch off. 1. Move ignition switch to ON. | |
| 2. Engine flooded. 2. See “Difficult Starting” on page 22 | ||
| 3. Fuel tank empty. 3. Fill tank with correct fuel mixture. | ||
| 4. Spark plug not firing. 4. Install new spark plug. | ||
| 5. Fuel not reaching carburettor. 5. Check for dirty fuel | filter; replace. Check for kinked or split fuel line; repair or replace. | |
| Engine will not idle properly | 1. Idle speed requires adjustment. 1. See “Carburettor | Adjustment” on page 29. |
| 2. Carburettor requires adjustment. 2. Contact an authorized service agent. | ||
| Engine will not accelerate, lacks power, or dies under a load. | 1. Air filter dirty. 1. Clean or replace air filter. | |
| 2. Spark plug fouled. 2. Clean or replace plug and re-gap. | ||
| 3. Chain brake engaged. 3. Disengage chain brake. | ||
| 4. Carburettor requires adjustment. 4. Contact an authorized service agent. | ||
| Engine smokes excessively. | 1. Too much oil mixed with gasoline. 1. Empty fuel tank and refill with correct fuel mixture. |
SERVICE LOG
Purchase Date Place of Purchase
This Service is to be complete within 12 hours or 3 months of purchase, which ever comes first.
Replace Check & Adjust
Air filter Spark plug
Chain bar oil Chain tension
Authorised Service Agent (Name or Company Stamp)
Technician
Date
This Service is to be complete within 36 hours or 9 months of purchase, which ever comes first.
Replace Check & Adjust
Air filter Spark plug
Chain bar oil Chain tension
Authorised Service Agent (Name or Company Stamp)
Technician
Date
This Service is to be complete within 24 hours or 6 months of purchase, which ever comes first.
Replace Check and adjust
Fuel Tank filter Chain tension
Air Filter
Spark Plug
Chain bar oil
Authorised Service Agent (Name or Company Stamp)
Technician
Date
This Service is to be complete within 48 hours or 12 months of purchase, which ever comes first.
Replace Check and adjust
Fuel Tank filter Chain tension
Air Filter
Spark Plug
Chain bar oil
Authorised Service Agent (Name or Company Stamp)
Technician
Date
STANLEY®
FATMAX®
For any queries or assistance call

Customer Service
AUST. 1300 660 457
NZ 0800 474 876
www.stanleyproducts.com.au
Hours of operation:
Monday to Friday 8.00am - 5.00pm AEST
Do not return to place of purchase.
Keep your purchase receipt, this will be required to
make any claims under the 1 year warranty.
Register online for your extended warranty
(terms and conditions apply)
at www.stanleytools.com.au/warranty



- CONTENTS
- SUGGESTED APPLICATIONS
- TECHNICAL INFORMATION
- INTRODUCTION
- CUSTOMER SERVICE
- EXPRESS WARRANTY STATEMENT CHAINSAW
- What is covered.
- How to claim under this warranty.
- What is not covered.
- CONTACT DETAILS
- COMPLETE WARRANTY STATEMENT – CHAINSAW
- OPERATING ENVIRONMENT
- BEWARE OF CHILDREN & PETS
- PERSONAL PLANNING
- SAFETY
- SELECT A CHAINSAW WITH A SUFFICIENT RATING
- PROPER USAGE
- CHAIN BAR OIL
- FUEL
- MAINTAIN YOUR CHAINSAW WITH CARE
- MAINTAIN THE CHAINSAW IN GOOD WORKING ORDER
- REMOVE ADJUSTING KEYS & WRENCHES
- FIRE PRECAUTIONS
- CLEANING YOUR CHAINSAW
- WARNING
- CHECK DAMAGED PARTS
- HOT COMPONENTS
- PERSONAL SAFETY
- Wear Protective Gear
- Proper Clothing (Pic. 1)
- Hair
- Eye Protection
- Footwear
- Ear Protection
- Respiratory Protection
- Do Not Over Reach
- Stay Alert
- KICKBACK SAFETY PRECAUTIONS
- PULL-IN
- To Avoid Pull-In (Pic. 3)
- PUSHBACK
- To Avoid Pushback (Pic. 4)
- DEVICES FOR REDUCING THE RISK OF KICKBACK INJURY
- Quickstop Chain Brake
- Low Kickback Chain
- Reduced Kickback Guide Bar
- To Avoid Kickback
- SPECIFIC SAFETY INSTRUCTIONS
- MIXING 2-STROKE FUEL
- Important
- IMPORTANT: 2-STROKE FUEL
- FUEL - ONLY USE UNLEADED PETROL (ULP)
- COMPONENTS AND CONTROLS (PIC. 5)
- ASSEMBLY
- Unpacking
- ON/OFF Switch
- Throttle Trigger
- Safety Trip Lever
- Choke Lever
- Primer Bulb
- Chain Brake
- Chain Tension
- Fit the saw chain
- Checking the Tension Pic 12 to Pic 14
- NOTES
- CHAIN BAR OIL & LUBRICATION
- Oil tank capacity - 240ml
- Adjusting the Tension (Pic. 17, 18 and 19)
- OPERATING INSTRUCTIONS
- Pre - Operation Preparation
- Filling
- Check the following before starting the engine
- TO START THE ENGINE
- GENERAL POSITIONING AND OPERATION
- RESIDUAL RISKS
- IMPORTANT POINTS TO REMEMBER
- To Stop The Engine (Pic. 21)
- Starting a Cold Engine (Or Warm Engine After Running Out Of Fuel)
- Starting a Warm Engine
- Difficult Starting (Or Starting a Flooded Engine)
- CHAIN BRAKE (PIC. 23 & 24)
- OPERATING TIPS
- SUGGESTED TREE FELLING TECHNIQUES (PIC. 25)
- Check Chainsaw Lubrication
- Felling Large Trees (15cm / 6 inches) in diameter or larger)
- Notch Cut & Felling the Tree (PIC. 26 & 27)
- CUTTING A FALLEN TREE (BUCKING) PIC. 28
- Important Points
- TYPES OF CUTTING USED FOR BUCKING
- Overcutting (Pic. 29 and 30)
- Undercutting (Pic. 29 and 30)
- Bucking Without a Support (Pic. 31)
- Bucking Using a Log or Support Stand (Pic. 31, 32 & 33)
- LIMBING AND PRUNING
- Limbing
- Pruning (Pic. 34)
- MAINTENANCE
- Check For Damaged or Worn Parts
- Check For Loose Fasteners & Parts
- Check Chain Sharpness
- Check Guide Bar (Pic. 35 & 36)
- Clean Unit
- Check Chain Brake
- Clean Air Filter
- Cleaning the air filter:
- Replace Spark Plug
- Replace Fuel Filter
- Chain Adjustment
- Carburettor Adjustment (Pic. 38)
- STORAGE
- Seasonal Storage
- TROUBLE SHOOTING TABLE
- SERVICE LOG
- STANLEY®
- FATMAX®
Brand : STANLEY
Model : FMXOP24602
Category : Saw