
CAGH1 - Cooker Artusi - Free user manual and instructions
Find the device manual for free CAGH1 Artusi in PDF.


| Product Type | Gas Cooktop |
| Model | CAGH1 |
| Overall Dimensions (W x D x H) | 500 x 580 x 90 mm |
| Cutout Dimensions (W x D) | 477 x 557 mm |
| Weight | Approx. 10 kg |
| Power Supply | AC 220-240 V, 50-60 Hz |
| Gas Type | Natural Gas (1.0 kPa) or ULPG (2.75 kPa) |
| Number of Burners | 4 |
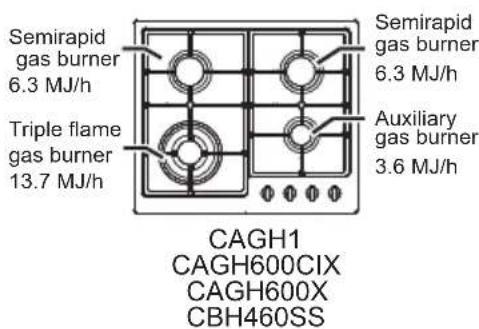
| Burner Types & Outputs | Triple Flame: 13.7 MJ/h, Rapid: 10.8 MJ/h, Semi-rapid: 6.3 MJ/h, Auxiliary: 3.6 MJ/h |
| Burner Material | Stainless Steel |
| Flame Failure Device | Yes (thermocouple) |
| Ignition | Automatic electric ignition (spark) |
| Control Knobs | Plastic, front-mounted |
| Pan Supports | Enamelled steel, dishwasher safe |
| Cleaning | Daily with hot soapy water; avoid abrasive cleaners. Stainless steel parts require special care. |
| Safety Features | Automatic gas shut-off if flame extinguished; child safety warnings |
| Installation | Built-in, requires 40-50 mm worktop thickness, ventilation per AS/NZS 5601 |
| Gas Connection | G 1/2" threaded pipe, rigid pipe recommended |
| Electrical Connection | 3A fused spur, double pole switch |
| Warranty | Not specified; refer to retailer |
Frequently Asked Questions - CAGH1 Artusi
User questions about CAGH1 Artusi
0 question about this device. Answer the ones you know or ask your own.
Ask a new question about this device
Download the instructions for your Cooker in PDF format for free! Find your manual CAGH1 - Artusi and take your electronic device back in hand. On this page are published all the documents necessary for the use of your device. CAGH1 by Artusi.
USER MANUAL CAGH1 Artusi
INSTALLATION AND USER INSTRUCTIONS
CAGH1
CAGH95X
CAGH75X
CAGH600CIX
CAGH600X
CBH460SS
CAGH31B
CAGH90ETX
Reference to AS/NZS 5601
Note: Do not use the hob until you have read the instruction manual.
- INTRODUCTION
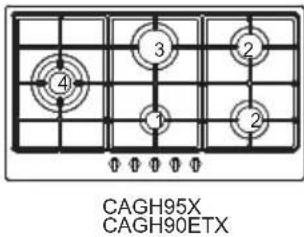
Triple flame gas burner 13.7 MJ/h
Even if you have used a gas hob before, it is important that you read these instructions thoroughly before using the appliance, paying particular attention to the installation and safety instructions. If you have any problems installing, operating or cooking with your hob, please check through these instructions to ensure all of them have been adhered to.
WARNING! For your own safety, make sure that these instructions on installation, use and maintenance are followed.
Please keep these instructions in a safe place for future reference.
Should the appliance be sold or transferred, please pass on these instructions to the new owner.
2. YOUR HOB
Applicable for Gas
| Type | Triple flame gas burner | Rapid gas burner | Semi-rapid gas burner | Auxiliary gas burner | Material | Flame failure device | Power Supply | Size (mm) | Built-in (mm) |
| CAGH1 CAGH600CIX CAGH600X CBH460SS | 13.7 MJ/h 6.8 | MJ/h/3.6 MJ/h | 477x557 | Stainless steel | Yes | AC 220-240 V 50-60Hz | 500x580x90 | ||
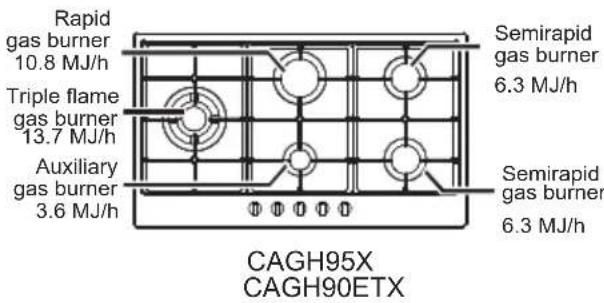
| CAGH95X CAGH90ETX | 13.7 MJ/h 10 | .8 MJ/h 6.3 MJ/h | 3.6 MJ/h | Stainless steel | Yes | 500x860x90 | 477x832 | ||
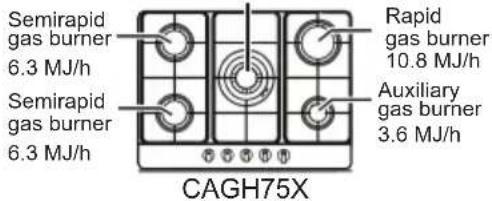
| CAGH75X | 13.7 MJ/h | 10.8 MJ/h 6 | .3 MJ/h 3.6 MJ/h | Stainless steel | Yes | 500x680x90 | 477x557 | ||
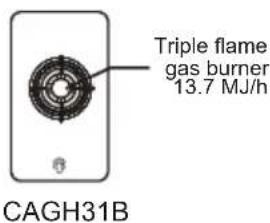
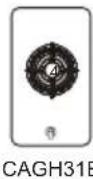
| CAGH31B | 13.7 MJ/h | /// | Glass | Yes | 303x520x100 2 | 83x498 |
3. CLEANING AND MAINTENANCE
IMPORTANT!
Before any cleaning or maintenance always:
·Turn all burners off.
- Switch the power to the cooktop off at the wall.
·Make sure that the cooktop and its parts are a safe temperature to touch.
General advice
·Clean the cooktop regularly—do not let stains become burnt on, as they may become very difficult to remove.
- Do not use abrasive cleaners, cloths or pads to clean any part of your cooktop. Some nylon scourers may also scratch. Check the label.
- Clean up spillages as soon as possible. If left to dry on, food residue may clog the flame ports, causing an uneven flame pattern.
- Make sure that no cleaner residue is left on any cooktop part; when heated, these could stain the cooktop.
- Ensure the flame ports are clear and ignitors are clean. You can use a toothbrush carefully for cleaning.
· Do not clean cooktop parts in a self-cleaning oven.
· Do not use a steam cleaner.
The surface of the hob need to be cleaned after each time they used.
Dayly cleaning
VITREOUS ENAMEL
Hotplate、burner caps、pan supports、enamelled burner caps » (C) and burner heads(T) See right figure.
Cloth wrung out in hot soapy water. Stubborn stains.can be removed with a cream paste.
approved by the Vitreous Enamel Development Council, liquid cleaner or by rubbing with fine steel wool soap pads.
NOTE: The pan supports can also be cleaned in the dishwasher.
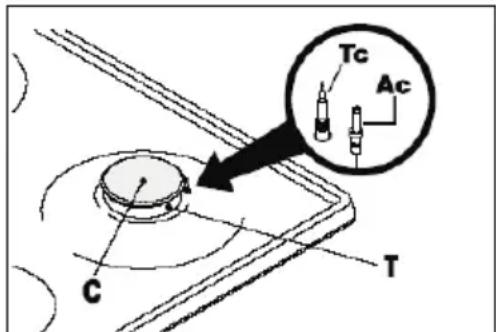
ALUMINIUM
Hotplate burner bodies.
Similar to paint cleaning above. Use a nylon brush to remove any cleaning materials, water or dirt from the hotplate burner bodies. After cleaning, wipe dry and refit to the hob ensuring they are correctly seated.
Check parts are reassembled correctly by lighting the burners and allowing to dry out.
PLASTIC
Control knobs.
Wipe with a cloth wrung out in hot soapy water.
STAINLESS STEEL
Cloth wrung out in hot soapy water
Never clean when the top and components are still warm. Do not use metal or abrasive pads, abrasive powders or corrosive spray products. Never leave vinegar, coffee, milk, salty water, lemon or tomato juice for any length of time on the surfaces.
WARNINGS
Comply with the following instructions, before remounting the parts:
-Check that the heads burners and the relative burner caps, are correctly positioned in their housings.
-Check that burner head slots have not become clogged by foreign bodies.
-If to happened installation or after a few fimes, you find a tap is difficult to open or close do not force it but call for techniacl assistance urgently.
-After use, to keep them in good condition, the plates should be treated with specific products, easily found in the shops, to keep the surfaces clean and shining. This will also prevent rust from forming.
-If any liquid spills over it must always be removed with a sponge.
4. SAFETY INSTRUCTIONS
Make sure that this instruction booklet is read thoroughly and understood before attempting to install or operate this hob.
The instructions are provided in the interest of your safety.
GAS SAFETY REGULATIONS AND USE OF YOUR HOB
-
It is a legal requirement that all gas appliances are installed by qualified personnel only in accordance with current legislation. It is your responsibility to ensure compliance with the law.
-
Repairs or servicing of this product must only be carried out by an authorised service agent using approved parts.
-
No attempt must be made to modify this appliance under any circumstances.
-
Cooking appliances can become very hot in use – please keep children and pets away from them.
-
Do not allow children to operate or play with any part of the appliance.
-
Do not use unstable pans and ensure that the handle is positioned away from the edge of the worktop.
-
In the interest of hygiene and safety, please ensure the hob is kept clean.
-
This appliance is designed for domestic cooking only. Commercial use will invalidate the warranty.
-
Do not cover the hob or place combustible materials on or near the surface even when the hob is not in use.
-
Do not fill deep fat frying containers more than one third full of oil and NEVER leave unattended.
-
Before cleaning the hob, switch off at the mains.
-
When cooking is finished, switch off all controls and allow to cool.
-
These appliances are not intended for use by persons (including children) with reduced physical, sensory or mental capabilities, or lack of experience and knowledge, unless they have been given supervision or instruction concerning use of the appliance by a person responsible for their safety.
-
If the supply cable is damaged, it must be replaced by the authorised service agent or qualified person only.
-
Do not immerse the appliance or the power cable into water or any other liquid.
-
DO NOT SPRAY AEROSOLS IN THE VICINTY OF THIS APPLIANCE WHILE IT IS IN OPERATION.
-
DO NOT USE OR STORE FLAMMABLE MATERIALS ON OR NEAR THIS APPLIANCE.
-
DO NOT PLACE ARTICLES ON OR AGAINST THIS APPLIANCE.
-
DO NOT MODIFY THIS APPLIANCE.
5. INSTALLATION INSTRUCTIONS
TECHNICAL INFORMATION
The installation, adjustments, conversions and maintenance listed in this section must be carried out by qualified personnel only.
The safety and automatic adjustment devices of the appliance may only be modified by an authorised service agent.
The installation of this gas hob must comply with Australia and New Zealand standards.
This appliance must be fitted in compliance with the installation rules given above. Also, particular attention must be given to the following requirements for ventilation.
INSTALLATION LOCATION
The appliance may be located in a kitchen, kitchen/diner or utility room, however, it cannot be in a room containing a bath or shower.
VENTILATION RECOMMENDATION
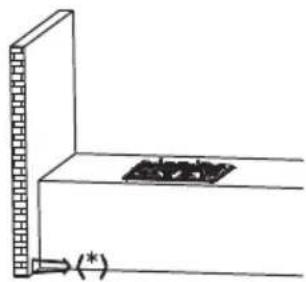
The room must have an opening window or equivalent, some rooms may also require a permanent vent. If the room has a volume between 5 - 10m^3 , it will require an air vent of 50cm^2 effective area, unless it has a door which opens directly to the outside. If the room has a volume of less than 5m^3 , it will require an air vent of 100cm^2 effective area (Fig. 1).
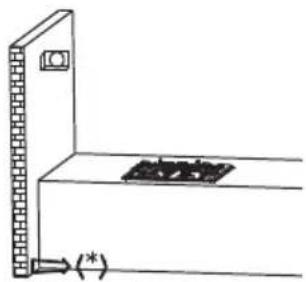
When using more than one hotplate at once, open a window if a mechanical extractor is not present or working (Fig. 3).
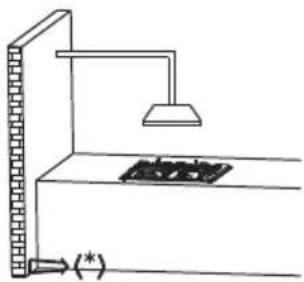
(*) Air inlet minimum section: 100cm ^2
natural_image
Simple line drawing of a cabinet or shelf with a wall-mounted stove and a door, no text or symbols present.Fig. 1
natural_image
Simple line drawing of a kitchen sink with a lamp and a stove (no text or symbols)Fig. 2
natural_image
Simple line drawing of a cabinet or shelf with a wall-mounted stove and a door, no text or symbols present.Fig. 3
UNPACKING THE APPLIANCE
Remove all packaging and make sure the appliance is in perfect condition.
If you have any doubts, do not use the appliance and call your supplier..
Some parts on the appliance are protected by a plastic film. This protective film must be removed before the appliance is used.
The packaging materials should be carefully discarded and not left within easy reach of children as they are a potential hazard.
INSTALLING AND FIXING THE HOB (QUALIFIED PERSONNEL ONLY)
The appliance can be fitted to any worktop with a thickness of 40mm or 50mm.
No overhanging surface or cooker hood should be 600-750mm.
Fix the appliance in position (Fig. 4). The sides of the adjacent cabinets above may be lower than 750mm down to 350mm, provided they are heat and steam resistant.
These hobs are supplied with a special seal which prevents liquids from seeping underneath the appliance. Follow these instructions in order to correctly fit this seal:
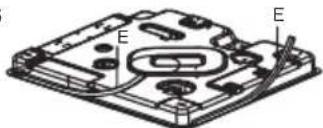
Detach the seals from their backing ensuring that the transparent protection still adheres to the seal. Turn the hob over and correctly position seal *E* (Fig. 5) under the edge of the hob so that the outer part of the seal perfectly matches the outer edge of the hob.
The ends of the strips must fit together without overlapping. Fix the seal to the hob evenly and securely, pressing it firmly in place.
natural_image
Technical line drawing of a mechanical device with labeled components (E), no readable text or symbols present.Fig. 5
Unit: mm
CAGH1 CAGH75X CAGH600CIX CAGH600X CBH460SS
Rear wall should be a flame retardant material
C is the rear clearance from rear edge of the cutout to nearest non-combustible surface (i.e., splash-back)
C* is the rear clearance from rear edge of the cutout to nearest combustible surface (i.e., splash-back)
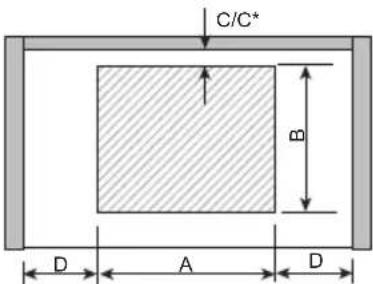
Front edge of worktop
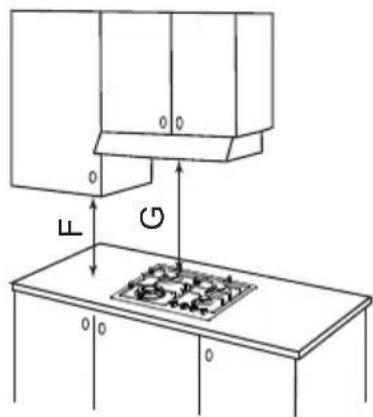
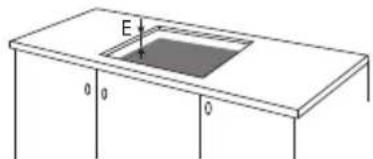
Fig. 4
INSTALLATION OPTIONS
When fitting a gas hob above a drawer or a standard housing unit, suitable precautions must be taken to prevent contact with the hotplate surface as it can become very hot during operation. The recommended method is to fix a wooden panel within the cabinet at a distance of 15mm below the underside of the hob (Fig. 6).
This panel must have adequate ventilation to the rear.
Ventilation slot ≥ 30mm.

Fig. 6
The panel underneath the hob must be easily removable to allow for any servicing requirements. INSERTING AND FIXING THE HOB
Before inserting the hob into the work surface, place the adhesive seal (a) (Fig. 7) around the underside edge of the hob. It is important to fix this seal evenly without gaps or overlap to prevent liquids from seeping underneath the hob. Please follow the below instructions:
1) Remove the pan stands and burner caps before turning the hob upside down, taking care
not to damage the ignition plugs and thermocouples.
2) Place the seal around the bottom edge of the hob as shown in the illustration below.
3) Place the hob in the installation opening and push it down so that the hob is resting firmly on the worktop.
4) Secure the hob in position using the fixing brackets supplied.
Screw one end of the bracket into the pre-drilled holes in the underside of the hob.
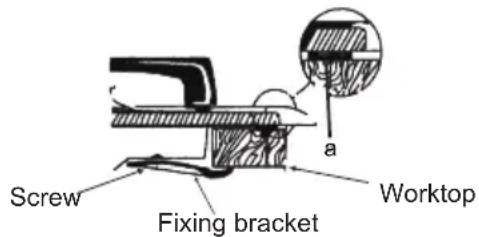
Fig. 7
The other end of the bracket should be located underneath the worktop to secure the hob in position.
GAS CONNECTION (QUALIFIED PERSONNEL ONLY)
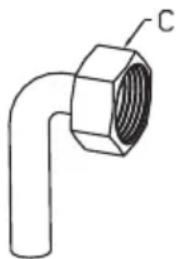
The appliance has an G 1/2" threaded pipe connector to connect it to the gas system. Please ensure that the connection is made using a rigid pipe. When making the gas connection, it is important to place the gasket (A) in between the inlet pipe (C) and the elbow (B) to ensure a tight gas seal (Fig. 8).
natural_image
Simple line drawing of a bent pipe fitting with a hexagonal nut (no text or symbols)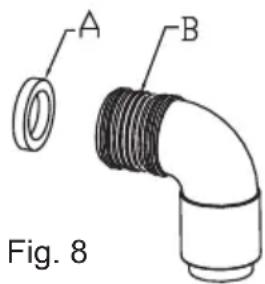
Gas connection
- Accessibility: Make sure that it is possible to run gas lines to the gas connection point of the appliance. The gas connection point must be accessible without having to remove the cooktop. If a flexible hose is used, the connection point must also be accessible without having to remove the cooktop.
- Natural gas connection: Using the supplied gas regulator, remove the dust seals on the inlet and outlet ports and position the "OUT" port of the regulator towards the gas inlet pipe of the cooktop. Using a suitable thread sealant, screw the regulator on and ensure that it is orientated with easy access to the test point. Connect the appropriate Natural Gas supply to the "IN" port of the gas regulator.
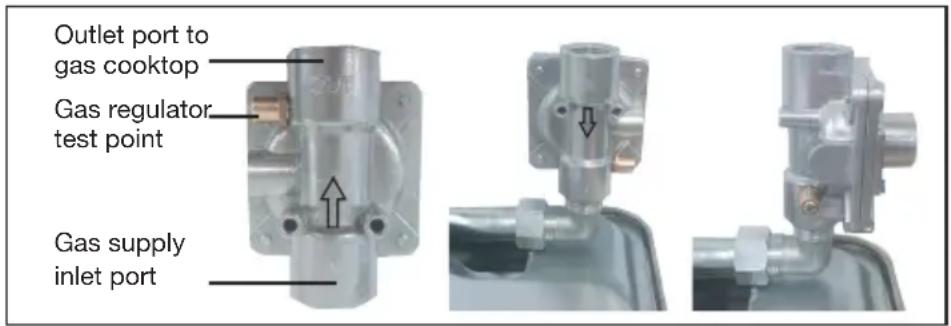
- ULPG connection: Using the supplied gas test point, remove the dust seals on the inlet and outlet ports and position the outlet port of the test point towards the gas inlet pipe of the cooktop. Using a suitable thread sealant, screw the test point on and ensure that it is orientated with easy access to the test point. Connect the appropriate ULPG supply to the inlet port of the gas test point.
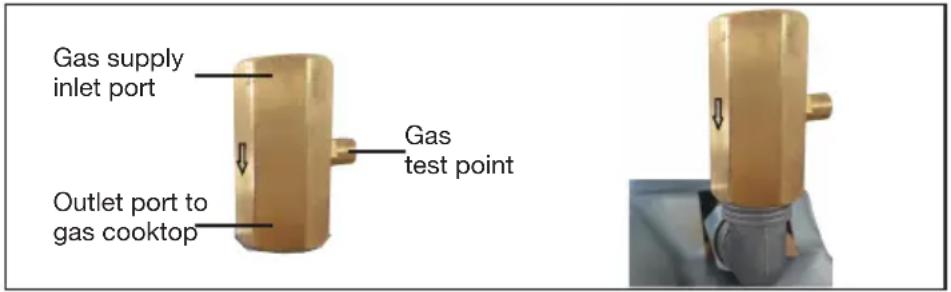
Test the operation of the appliance after installation.
Leak-Testing the Cooktop
- Ensure all dials are set to OFF before connecting cooktop to gas supply.
·After final gas connection is made, turn gas supply on and test all connections in gas supply piping for gas leaks with a soapy water solution.
IMPORTANT!
·In order to avoid property damage or serious personal injury, never use a match or open flame. If a leak is present, tighten joint or unscrew, apply more joint compound, tighten again and retest connection for leak.
Electrical connection, Attach pan supports, Test burners
1) Connect the cooktop to the power supply and attach the duplicate data label to an accessible location.
2) Securely locate all pan supports ensuring they are the installed in the correct orientation and do not rock.
3) TEST BURNERS
- To check that the ignition system operates correctly, light each burner by itself, then all burners in combination.
- Check for a well-defined blue flame without any yellow tipping.
- If any abnormality is evident, check that the components of the burner assembly are located properly.
- Incorrect installation may produce a potentially dangerous flame and result in poor burner performance.
- If proper operation cannot be obtained, contact Customer Care or nearest authorized Service Centre.
- The cooktop must not be used until proper operation has been achieved.
ELECTRICAL CONNECTION
The appliance must be connected to the mains supply by a qualified gas engineer using fixed wiring via a double pole switched fused spur outlet protected by a 3A fuse and with a contact separation of at least 3mm in all poles.
We recommend that the appliance is connected by a qualified electrician.
The wires in the mains lead are coloured in accordance with the following code:
Green & Yellow = Earth, Blue = Neutral, Brown = Live.
| CONNECTION DIAGRAMCaution! Voltage of heating elements 220-240V Caution! In the event of any connection the safety wire must be connected to the ⊕ PE terminal. | CAGH1 CAGH600CIX CAGH31B CAGH600X CAGH75X CBH460SS | Recommended type of connection lead |
Before Leaving
Check all connections for gas leaks with soap and water. DO NOT use a naked flame for detecting leaks. Ignite all burners both individually and concurrently to ensure correct operation of gas valves, burners and ignition. Turn gas taps to low flame position and observe stability of the flame for each burner individually and concurrently. When satisfied with the hotplate, please instruct the user on the correct method of operation. In case the appliance fails to operate correctly after all checks have been carried out, refer to the authorised service provider in your area.
NATURAL GAS TO LPG CONVERSION
This conversion must only be carried out by a competent person (i.e. a Gas Safe registered fitter).
Instructions to fit replacement injectors:
- Disconnect the appliance from the gas and electrical supplies.
- Remove burner components "B" and pan supports (Fig. 9).
- Remove the injectors "A" (Fig. 9) with a socket spanner and replace with the corresponding injectors.
Setting up minimum flow rates:
- Remove the control knobs "M" (Fig. 10).
- Turn on the LP gas supply, light the burners and turn the controls to the minimum position as indicated by the small flame.
- Insert a small screwdriver "D" (Fig. 10) into the hole at the top of the tap "C" and turn the adjustment screw left or right until the flame of the burner is conveniently regulated to the low position.
- Make sure when turning quickly from full position to reduced rate position that the flame does not extinguish.
- Replace the knobs.
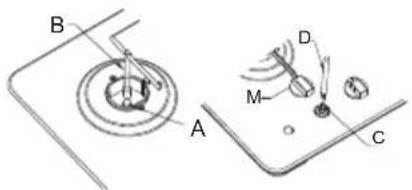
Fig. 9
Fig. 10
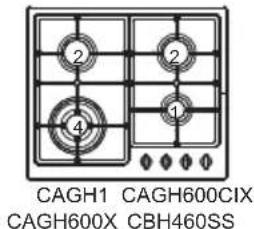
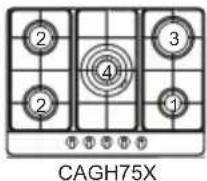
INJECTOR REPLACEMENT TABLE
| BURNERS | GAS | NORMAL RATE | INJECTOR DIAMETER | |
| DESCRIPTION | MJ/h | mm | ||
| 1 | AUXILIARY | 2.75 Kpa Universal - LPG1.0 Kpa natural gas | 3.63.6 | 0.520.87 |
| 2 | SEMIRAPID | 2.75 Kpa Universal - LPG1.0 Kpa natural gas | 6.36.3 | 0.681.11 |
| 3 | RAPID | 2.75 Kpa Universal - LPG1.0 Kpa natural gas | 10.810.8 | 0.91.45 |
| 4 | TRIPLE FLAME | 2.75 Kpa Universal - LPG1.0 Kpa natural gas | 13.713.7 | 1.031.62 |
6. USER INSTRUCTIONS
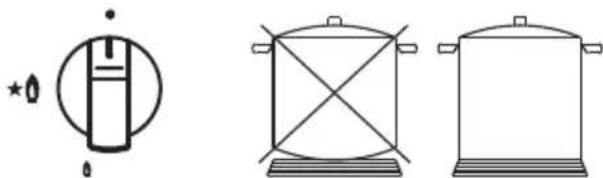
- To light the hob, push down the appropriate knob and turn anti-clockwise to the large flame symbol (Fig.11).
- Keep the knob depressed until the burner lights.
- Turn the knob to the required setting.
- In the event of the burner flames being accidentally extinguished, turn off the burner immediately and do not attempt to reignite for at least 1 minute.
NOTE: Matches can be used to light the burners in the event of a power failure.
Keep the control knob pressed in for 15 seconds ensuring the burner stays lit when released. If the burner fails to stay lit wait for 1 minute before relighting.
- Closed position
★ Full position - Reduced rate position
natural_image
Three simple line drawings of containers: a cylindrical container with a star symbol, a cross-shaped lid, and a flat pot (no text or labels)Fig.11 Fig.12
SELECT THE RIGHT BURNER
Use an appropriately sized pan with a flat bottom for each burner (see the table below and Fig.12). When the contents of the pan start to boil, turn the knob down to reduced rate position. Always put a lid on the pan.
NOTTTEE: Please do not use pots or pans that overlap the boundaries of the hob.
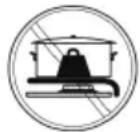
WARNING: It is forbidden to use a pot with a bottom diameter more than 26cm on the triple flame gas burner, otherwise the glass may be broken.
| Burners | Triple Flame13.7 MJ/h 3.6 | RapidMJ/8.6/3 MJ/h | Semirapid Auxiliary | |
| pans in cm | 24-26 | 20-22 | 16-18 | 10-14 |
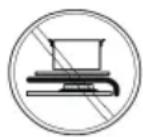
- Do not place anything (e.g. a flame tamer or an asbestos mat) between the pan and pan support, as serious damage to the appliance may result.
- Do not remove the pan support and enclose the burner with a wok stand .as this will concentrate and deflect the heat onto the hotplate.
- Do not use large pots or heavy weights that can bend the pan support or deflect flame onto the hotplate.
- Locate the pan centrally over the burner so that it is stable and does not overhang the appliance.
- Use only a wok support supplied or recommended by the manufacture of the appliance.
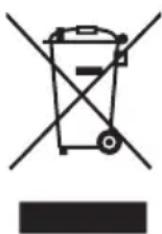
Correct Disposal of This Product:
This marking indicates that this product should not be disposed of together with other household waste. To prevent possible harm to the environment or human health from uncontrolled waste disposal, recycle it responsibly to promote sustainable re-use of material resources. To return your unwanted product, please use local return and collect systems or contact the retailer where the product was purchased. They should be able to take the appliance for environmentally-safe recycling.

7. TROUBLESHOOTING
If you need to repair or replace parts, please contact your local after-sales service department.
Check the guide below if there is a problem with the hob. UNEVEN OR YELLOW FLAME RATHER THAN BLUE.
Switch off and check the following points:
-
Are the burners fitted correctly?
-
Are the holes in the burner clear?
-
Check that no dust has fallen into the flame turning it yellow.
BURNER FAILING TO IGNITE?
Check that the power is turned on or that the fuse has not blown.
Make sure that the ignitor is not coated with food spillage.
SPARK BUT NO GAS?
Make sure the gas is turned on.
Check that the burner holes are not blocked.
SMELL GAS?
Check to see if any gas taps have been left on.
If they are off, switch the gas off at the mains and call a service agent.
WARNING! DO NOT check with a naked flame, strike any matches or press ignitor.
STILL NOT WORKING?
Call a service agent.
ATTENTION!
This appliance must be installed in compliance with the current regulations and only installed in rooms equipped with adequate ventilation.
Consult the instruction manual before proceeding with installation or use of the appliance.
- INSTALLATION AND USER INSTRUCTIONS
- CAGH1
- CAGH95X
- CAGH75X
- CAGH600CIX
- CAGH600X
- CBH460SS
- CAGH31B
- CAGH90ETX
- YOUR HOB
- CLEANING AND MAINTENANCE
- IMPORTANT!
- Dayly cleaning
- VITREOUS ENAMEL
- ALUMINIUM
- PLASTIC
- STAINLESS STEEL
- WARNINGS
- SAFETY INSTRUCTIONS
- GAS SAFETY REGULATIONS AND USE OF YOUR HOB
- INSTALLATION INSTRUCTIONS
- TECHNICAL INFORMATION
- INSTALLATION LOCATION
- VENTILATION RECOMMENDATION
- UNPACKING THE APPLIANCE
- INSTALLING AND FIXING THE HOB (QUALIFIED PERSONNEL ONLY)
- Unit: mm
- INSTALLATION OPTIONS
- GAS CONNECTION (QUALIFIED PERSONNEL ONLY)
- Gas connection
- 3) TEST BURNERS
- ELECTRICAL CONNECTION
- Before Leaving
- NATURAL GAS TO LPG CONVERSION
- USER INSTRUCTIONS
- SELECT THE RIGHT BURNER
- Correct Disposal of This Product:
- TROUBLESHOOTING
- ATTENTION!
Brand : Artusi
Model : CAGH1
Category : Cooker