
Masha PM1324 - Kitchen appliance Salton - Free user manual and instructions
Find the device manual for free Masha PM1324 Salton in PDF.


| Type of Product | Kitchen appliance (multi-function food processor/mixer) |
| Brand | Salton |
| Model | Masha PM1324 |
| Dimensions (approx.) | 30 x 20 x 25 cm |
| Weight | 3.2 kg |
| Power Supply | 220-240 V, 50-60 Hz |
| Power Consumption | 800 W |
| Capacity | 2 L working bowl |
| Main Functions | Mixing, blending, chopping, kneading, emulsifying |
| Speed Settings | 5 variable speeds + pulse |
| Material | Stainless steel blades, BPA-free plastic bowl |
| Dishwasher Safe Parts | Bowl, lid, and accessories are top-rack dishwasher safe |
| Maintenance & Cleaning | Wipe motor base with damp cloth; wash removable parts with warm soapy water or dishwasher |
| Safety Features | Overheat protection, non-slip feet, locking lid with safety interlock |
| Spare Parts Available | Yes, replaceable blades, bowls, and seals |
| Repairability | Moderate; user-replaceable parts, professional repair for motor issues |
| Cord Length | 1.2 m |
| Warranty | 2 years limited manufacturer's warranty |
| User Manual Language | English (13 pages PDF) |
Frequently Asked Questions - Masha PM1324 Salton
User questions about Masha PM1324 Salton
0 question about this device. Answer the ones you know or ask your own.
Ask a new question about this device
Download the instructions for your Kitchen appliance in PDF format for free! Find your manual Masha PM1324 - Salton and take your electronic device back in hand. On this page are published all the documents necessary for the use of your device. Masha PM1324 by Salton.
USER MANUAL Masha PM1324 Salton
electric vegetable masher

natural_image
Black and white photo of a cleaning brush with a black handle, surrounded by potatoes on a reflective surface (no text or symbols visible)Instruction Booklet
Model: PM1324
IMPORTANT SAFEGUARDS
When using electrical appliances, basic safety precautions should always be followed including the following:
- Read all instructions.
- To protect against electrical hazards, do not immerse cord, plugs, or the appliance in water or other liquid.
- Close supervision is necessary when the appliance is used near children. Children should be supervised so they do not play with the appliance.
- This appliance is not intended for use by persons (including children) with reduced physical, sensory or mental capabilities or lack of experience and knowledge, unless they have been given supervision or instruction concerning the use of the appliance by a person responsible for their safety.
- Unplug from outlet while not in use, before putting on or taking off parts and before cleaning.
- DO NOT operate any appliance with a damaged cord or plug or after the appliance malfunctions, or is dropped or damaged in any manner. Return appliance to the manufacturer for examination, repair or electrical or mechanical adjustment. All servicing, other than cleaning, should be performed by an authorized service representative. See Warranty section.
-
The use of accessories or attachments not recommended by the manufacturer may cause hazards.
-
DO NOT use outdoors
-
DO NOT let the cord hang over the edge of the table or counter or touch hot surfaces, including the stove.
-
DO NOT place on or near a hot gas or electric burner or in a heated oven.
-
Always attach plug to appliance first, then plug cord into the wall outlet. To disconnect, turn any control to 'OFF', then remove plug from wall outlet.
-
NEVER use the appliance if your hands are wet.
-
AVOID contacting moving parts .Keep hands, hair, clothing, as well as spatulas and other utensils away from the Rotor-Cone Blade during operation to reduce risk of injury to persons and/ or damage to the appliance.
-
REMOVE the Masha Cone from appliance before washing.
-
NEVER pull the power cord to remove the plug from the wall outlet. Always hold the plug and remove from the wall outlet.
-
DO NOT use the appliance for other than intended use. Do not use this appliance to stir paints (lacquers, polyesters, etc.) This could result in an explosion!
- Repairs to the appliance may only be carried out by trained personnel. As a result of incorrect repairs considerable dangers for the user may result. Please contact an authorized service center in the event of repairs being necessary.
- Ensure fingers are kept away from Rotor-Cone Blade. This could result in injury.
- DO NOT immerse the motor assembly in water or any other liquid.
- NEVER clean the appliance under running water or submerge it. Remove the Masha Cone attachment from the motor assembly before washing. NEVER immerse the Motor Assembly in water or any other liquid.
- The manufacturer is not liable for any damages, which are caused by using the appliance for any other purpose than that intended or incorrect use.
- DO NOT use your appliance with an extension cord unless this cord has been checked and tested by a qualified technician or service person.
- Do not use appliance for other than intended use.
- Do not leave unit unattended while in use.
SAVE THESE INSTRUCTIONS
HOUSEHOLD USE ONLY
POLARIZED PLUG
This appliance has a polarized plug (one blade is wider than the other). To reduce the risk of electric shock, this plug will fit in a polarized outlet only one way. If the plug does not fit fully in the outlet, reverse the plug. If it still does not fit, contact a qualified electrician. Do not modify the plug in any way.
DESCRIPTION OF PARTS
- On/Off Button
- Motor Assembly
- Masha Cone Release Buttons
- Masha Cone
- Indicator Light
- Rotor-Cone Blade

BEFORE FIRST USE
Before using for the first time wash the Rotor-Cone Blade and Masha Cone. Remove the Rotor-Cone Blade by turning counter-clockwise. You will hear a 'click' when it has disengaged from the unit. The Masha Cone can be removed by pressing the two Masha Cone Release Buttons on either side of the Motor Assembly. Wash the Rotor-Cone Blade and Masha Cone in warm soapy water, dry and reassemble (see the Care and Cleaning section).
HOW TO USE
- Plug the power cord into a 120V AC outlet. The power indicator light on top of the masher will come on to indicate power is connected to appliance, and that it is ready for use.
- Squeeze and hold the On/Off button.
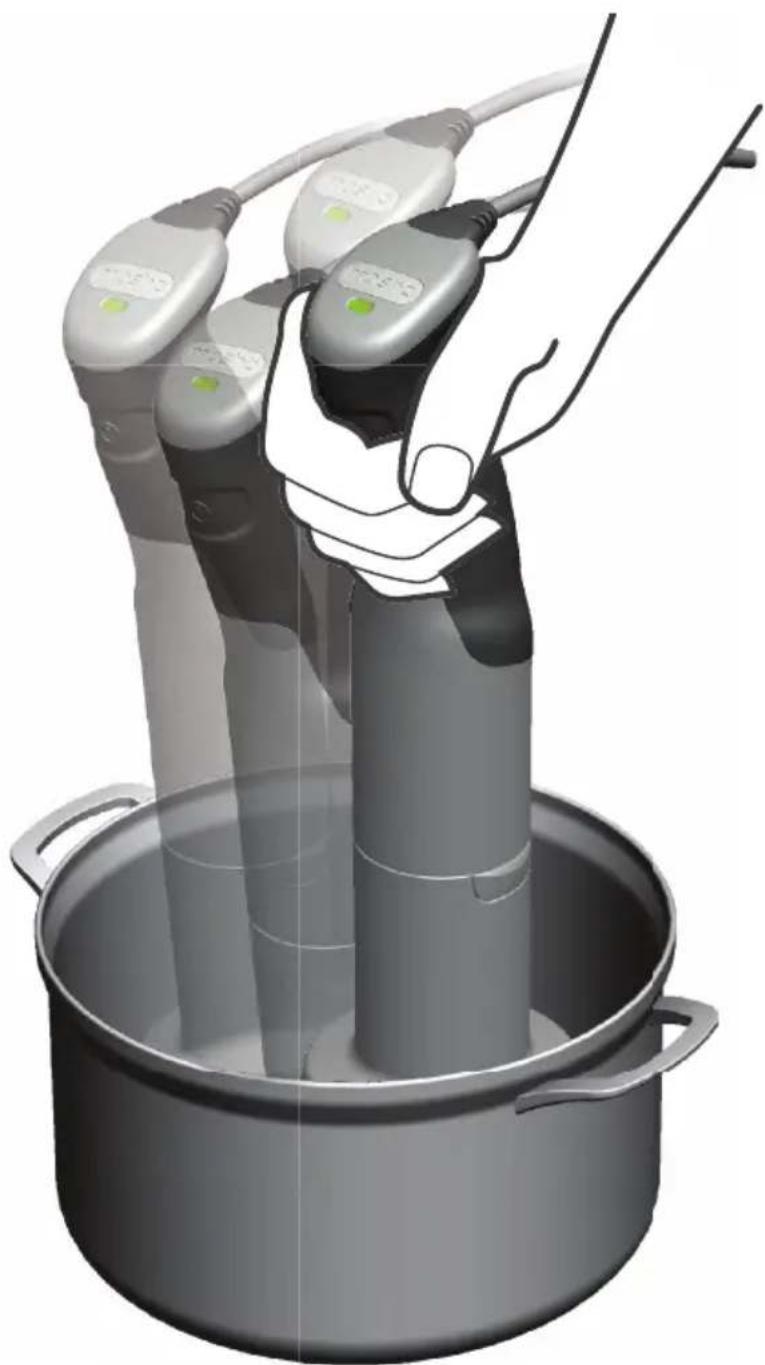
- Move the masher up and down through the ingredients until they have all been processed. This should only take a few seconds.
- Keep the Masha running as you lift it from the ingredients to clear any excess food from under the Masha cone.
natural_image
Illustration of a hand holding three connected medical electrodes in a pot (no text or symbols)CARE AND CLEANING
-
Unplug the Masha from the wall outlet.
-
Remove the Masher Cone by pressing the Masha Cone Release Buttons on either side of the Motor Assembly (Step 1). Wipe excess food from the Masha Cone by rotating the outside of masha head against the edge of the pot or bowl.
-
Rinse the Masha Cone in the sink (Step 2).
-
Remove the Rotor-Cone Blade by turning it clockwise. You will hear a 'click' when the Rotor-Cone Blade is released from the Motor Assembly (Step 3).
-
Wash the Masha Cone and the Rotor-Cone Blade in warm soapy water. Dry. They can also be placed on the top rack of the dishwasher. (Ensure that both pieces are dry before reassembling.)
-
NEVER IMMERSE THE MOTOR ASSEMBLY AND POWER CORD IN WATER OR ANOTHER OTHER LIQUID.
-
After washing replace the Rotor-Cone Blade in the Masha Cone by turning the Rotor-Cone Blade clockwise over the center post until you hear it 'click' into position.
-
Replace the Masha Cone so that the grooves in the Masha Cone fit under the Masha Cone Release Buttons and push the Masha Cone up until it is locked in position.
-
All servicing, other than cleaning, should be performed by an authorized service representative. See Warranty section.

flowchart
graph TD
    A["Step 1"] --> B["Step 2"]
    B --> C["Step 3"]
    C --> D["Step 3"]
    style A fill:#f9f,stroke:#333
    style B fill:#f9f,stroke:#333
    style C fill:#f9f,stroke:#333
    style D fill:#f9f,stroke:#333
RECIPES
Classic Mashed Potatoes
2 lbs. (900g) russet or Yukon gold potatoes, peeled and diced
1/2 - 1 stick butter
1 cup (250 ml) milk, heated
Salt and pepper, to taste
- Cover potatoes with cold salted water.
- Bring to a boil then reduce heat and simmer until potatoes are tender.
- Drain.
- Add the milk, salt and pepper.
- Follow the directions in the 'How to Use' section.
Bacon Mashed Potatoes
Classic Mashed Potato recipe
12 lb. (225g) bacon, chopped – reserve drippings
- Cook chopped bacon until crisp.
- Make Classic Mashed Potatoes and replace half of the butter with 2 to 4 tablespoons (30 – 60 ml) bacon drippings.
- Once the potatoes are mashed, fold in approximately half of the bacon. Sprinkle the rest on top.
Mediterranean Mashed Potatoes
Classic Mashed Potato recipe
12 cup (125 ml) cooking liquid
1/4 cup (60 ml) olive oil
2 tsp. (10 ml) basil, chopped
2 tsp. (10 ml) tarragon, chopped
2 tsp. (10 ml) parsley
-
Make the Classic Mashed Potatoes recipe replacing the butter and milk with cooking liquid and olive oil.
-
Once potatoes are mashed, fold in the chopped basil, tarragon and parsley.
Apple Sauce
1 12 quart/litre water
12 c (125) ml sugar
5-6 apples
1 oz (28 g) butter
Pinch cinnamon
Pinch nutmeg
Sugar or honey to taste
-
Bring water and sugar to a boil.
-
Peel and core apples, cut in quarters.
-
Reduce temperature of the water to simmer and poach apples until done.
-
Drain.
-
Cool apples then add butter, cinnamon and nutmeg. Process using the Masha and leaving the apples a bit coarse.
-
Add sugar or honey, if desired.
NOTE: The apples can be replaced with pears.
Guacamole
2 avocados, ripe
1/4 cup (60 ml) red onion, finely chopped
1/4 cup (60 ml) seeded and diced tomato (preferably Roma tomatoes)
2 limes
1 jalapeno pepper, seeded and minced (optional)
3 tbsp (45ml) finely chopped cilantro (optional)
salt and pepper to taste
- Mash the avocados with the Masha.
- Zest 1 lime and add to the avocado. Cut both limes in half and squeeze juice into the bowl. Stir in the onion, tomato, jalapeno pepper and cilantro. Mix everything together well.
- Serve with tortilla chips, on tacos, with warm pita bread or even veggies.
- Store leftover guacamole with plastic film touching the top to keep it from going brown. Consume within 24 hours.
- Makes about 1-1/2 cups (375 ml)
Leek and Potato Soup
1 oz (28g) butter
1 leek, white part only - diced small
1 quart/litre chicken or vegetable stock
12 medium size onion – diced small
2 lb (900 g) potatoes, peeled and diced
14 - 12 c (60 - 125ml) light cream or milk (optional)
Salt & pepper – to taste
- Melt butter then add the diced onions and leeks, cook for a few minutes. Use low heat and do not brown.
- Add stock and the potatoes.
- Simmer for 30 minutes.
- Add salt and pepper.
- Puree the soup with the Masha.
- Thin the soup with cream or milk, if desired.
Mashed Parsnips
2 lbs. (900 g) parsnips
3 chicken bouillon cubes
3 tbsp. (45 ml) butter
12 cup (125 ml) heavy cream
salt and pepper, to taste
- Peel and cut the parsnips into a uniform size.
- Place the parsnips in a saucepan and cover with water.
- Add the chicken bouillon cubes.
- Simmer for approximately 20 minutes or until very tender.
- Drain.
- Add the butter and cream.
- Mash the parsnips by following the directions in the 'How to Use' section.
- Season with salt and pepper.
- Serve immediately.
Pancakes
1-1/2 cups (375 ml) flour
3 tbsp. (45 ml) sugar
3 tsp. (15ml) baking powder
12 tsp. (3 ml) salt
1 large egg
1-3/4 cup (430 ml) milk
2 tbsp. (30 ml) vegetable oil
- Sift dry ingredients together in a medium size bowl.
- Combine egg, milk and vegetable oil.
- Add wet ingredients to the dry ingredients and process with the Masha.
Makes approximately 8 to 10 - 4" (10 cm) pancakes.
Scones
2 cups (500 ml) self-rising flour
1-1/2 tbsp. (23 ml) castor sugar
12 tsp (3 ml) salt
4 oz. (114g) cold butter (diced to 34 " (2 cm) cubes
1 egg
1/2 cup (125 ml) milk
- Combine the dry ingredients with the cold butter. Use the Masha to cut the butter into the flour mixture.
- Mix the egg and milk together and add to dry ingredients by cutting in with a knife - making a rather wet dough mix.
- Dust the counter with flour. Empty mixture and knead very lightly to combine.
- Spread dough to approximately 1" (2.5cm) thick. Use a cookie cutter or glass to cut circles.
- Place on a baking tray so circles are touching.
- Place in a preheated 450^ F ( 240^ C) oven, then turn to 350^ F ( 180^ C) and cook for 10-15 minutes or until golden.
- Serve with your favourite jam and cream.
SHORTBREAD COOKIES
12 cup (125 ml) icing sugar
2 cups (500 ml) flour
14 tsp. (1.5 ml) salt
1 tsp (5 ml) baking powder
1 cup (250 ml) butter, room temperature
- Preheat oven to 375^ F ( 190^ C).
-
Combine all dry ingredients and mix together in a medium size bowl. Add butter and process with the Masha until mixed. Check the mixture by hand. It should be moist enough to stay together.
-
Form into a ball and roll out to 14 " (5mm). Cut into shapes with a knife or cookie cutters.
-
Place on middle oven rack and bake for 10 minutes until the bottom is golden brown.
Shortcrust Pastry
This basic pastry is used in many popular recipes, from mince pies to quiches; it's also one of the easiest pastries to start with. The uncooked dough can be frozen or kept in the fridge for a couple of days.
1-1/3c (335 ml) plain flour, sifted
Pinch salt
12 c (125 ml) chilled butter, cubed
1 medium egg, beaten
- Place the flour, salt and butter in a mixing bowl. Use your Masha to rub the mixture together until it is evenly mixed. It should look like coarse breadcrumbs.
- Add half the beaten egg and use the Masha to combine.
- Check the mixture by hand. It should be just moist enough to stay together. If it is still too dry to combine, add the rest of the egg and knead gently until it forms a ball.
- Flatten out the ball of dough until it is about 34 " (2cm) thick. Wrap in plastic wrap or place in a plastic bag and leave in the fridge for at least 30 minutes or in the freezer for 10–15 minutes.
- Roll, place in a pie shell and cook in a preheated 400^ F ( 205^ C) oven.
- Makes 400g (14oz).
Extension cords may be used if care is exercised in their use. If an extension cord is used, the marked electrical rating of the detachable power-supply cord or extension cord should be at least as great as the electrical rating of the appliance. If the appliance is of the grounded type, the extension cord should be a grounded 3-wire cord. The extension cord should be arranged so that it will not drape over the counter top or table top, where it can be pulled on by children or tripped over.
LIMITED WARRANTY
Salton Canada warrants that this appliance shall be free from defects in material and workmanship for a period of one year from the date of purchase. During this 'in-warranty' period, defective products will be repaired or replaced at the discretion of the retailer and/or Salton Canada. This warranty covers normal domestic usage and does not cover damage which occurs in shipment or failure which results from alteration, accident, misuse, abuse, glass breakage, neglect, commercial use or improper maintenance.
A defective product should be returned to the original place of purchase within the retailer's stipulated return/exchange period*. If you are unable to have a defective product replaced under warranty by the retailer, please check our website at "www.salton.com" for the service centre nearest you. You may also contact us for assistance by mail, e-mail, fax or telephone as listed below.
To ensure prompt 'in-warranty' service securely package and return the product to us prepaid. Be sure to include the original proof of purchase and a description of the defect along with your address and postal code.
For repairs not covered by the warranty, please contact us for assistance.
SALTON CANADA
Customer Service Department
81A Brunswick,
Dollard-des-Ormeaux,
Quebec, Canada H9B 2J5
website: www.salton.com
E-mail: service@salton.com
Fax: 514-685-8300
Tel: 514-685-3660 Ext. 226
* Return/exchange policies at each retailer vary and may differ from the SALTON Canada 1 year limited warranty period.
- electric vegetable masher
- IMPORTANT SAFEGUARDS
- SAVE THESE INSTRUCTIONS
- HOUSEHOLD USE ONLY
- POLARIZED PLUG
- DESCRIPTION OF PARTS
- BEFORE FIRST USE
- HOW TO USE
- CARE AND CLEANING
- RECIPES
- Classic Mashed Potatoes
- Bacon Mashed Potatoes
- Mediterranean Mashed Potatoes
- Apple Sauce
- Guacamole
- Leek and Potato Soup
- Mashed Parsnips
- Pancakes
- Scones
- SHORTBREAD COOKIES
- Shortcrust Pastry
- LIMITED WARRANTY
- SALTON CANADA
Brand : Salton
Model : Masha PM1324
Category : Kitchen appliance