
DS1457 - Kitchen appliance Salton - Free user manual and instructions
Find the device manual for free DS1457 Salton in PDF.


| Product Type | Toaster |
| Model | DS1457 |
| Brand | Salton |
| Color | Stainless Steel |
| Dimensions (L x W x H) | 30 cm x 20 cm x 15 cm |
| Weight | 1.5 kg |
| Power Supply | 220-240V ~ 50/60Hz |
| Power Consumption | 900 W |
| Number of Slots | 2 |
| Browning Levels | 7 levels |
| Functions | Toast, Reheat, Defrost, Cancel |
| Control Type | Dial and push buttons |
| Removable Crumb Tray | Yes |
| Auto Shut-off | Yes |
| Self-Centering Racks | Yes |
| Material | Stainless steel housing |
| Cleaning and Care | Unplug before cleaning; wipe exterior with damp cloth; wash crumb tray in warm soapy water |
| Safety Features | Automatic shut-off, non-slip feet, cool-touch exterior |
| Spare Parts Availability | Crumb tray, heating elements available from manufacturer |
| Warranty | 1 year limited warranty |
Frequently Asked Questions - DS1457 Salton
User questions about DS1457 Salton
0 question about this device. Answer the ones you know or ask your own.
Ask a new question about this device
Download the instructions for your Kitchen appliance in PDF format for free! Find your manual DS1457 - Salton and take your electronic device back in hand. On this page are published all the documents necessary for the use of your device. DS1457 by Salton.
USER MANUAL DS1457 Salton
natural_image
Abstract grayscale graphic with curved white shapes on a dark gray background (no text or symbols)salton®
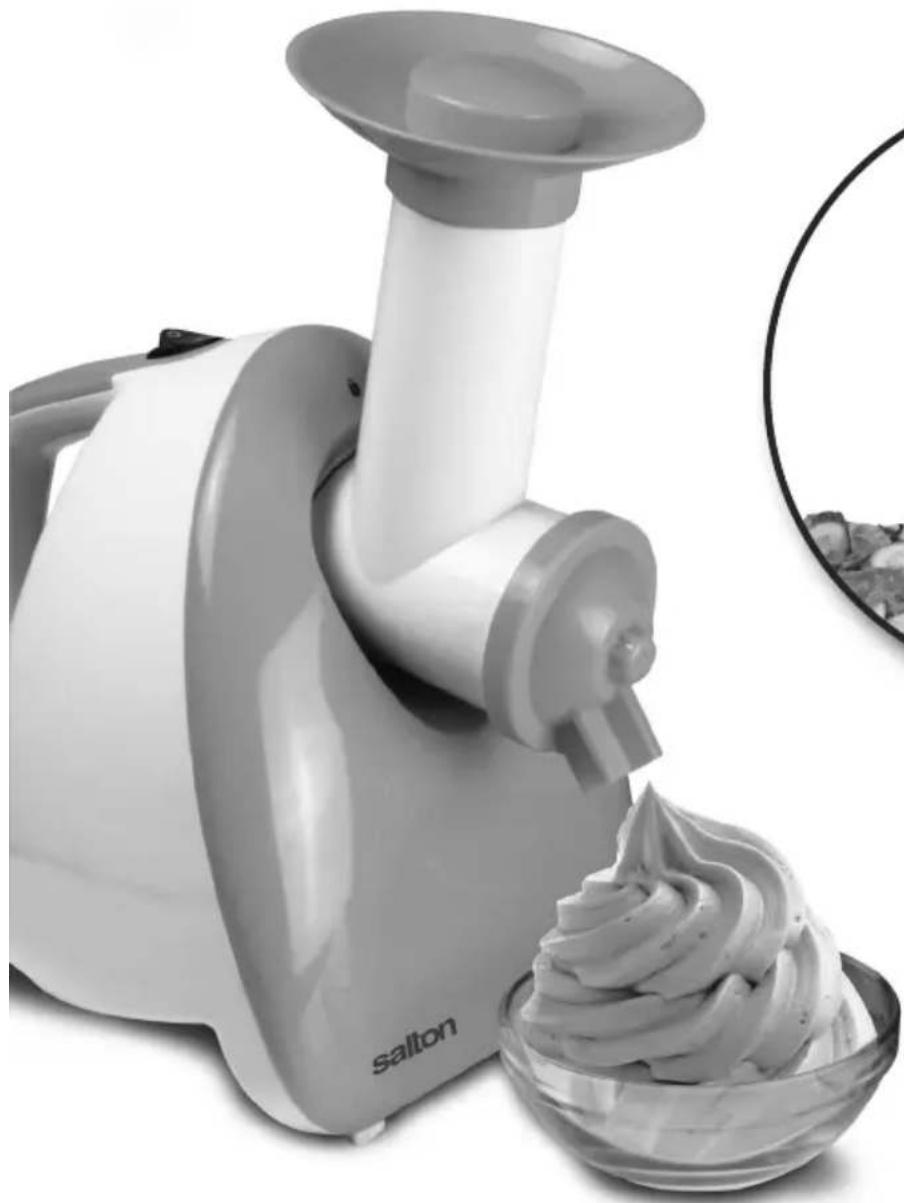
3-in-1
frozen dessert maker/ slicer/grater
natural_image
Close-up of a salton electric shaver with whipped cream in a glass bowl (no text or symbols visible)
natural_image
Close-up of a kitchen electrician feeding sliced vegetables, enclosed in a circular frame (no text or symbols visible)Instruction Booklet
Model DS1457
IMPORTANT SAFEGUARDS
When using electrical appliances, basic safety precautions should always be followed including the following:
- Read all instructions.
- Always use this appliance on a dry, level surfaces.
- To protect against electrical hazards, do not immerse cord, plugs, or the appliance in water or other liquid. Do not place on a wet surface.
- Close supervision is necessary when any appliance is used by or near children. Children should be supervised to ensure that they do not play with the appliance.
- This appliance is not intended for use by persons (including children) with reduced physical, sensory or mental capabilities or lack of experience and knowledge, unless they have been given supervision or instruction concerning the use of the appliance by a person responsible for their safety.
- Unplug from outlet when not in use, before putting on or taking off parts and before cleaning.
- Do not operate any appliance with a damaged cord or plug or after the appliance malfunctions, or is dropped or damaged in any manner. Return appliance to Salton for examination, repair or electrical or mechanical adjustment. See Warranty.
- The use of accessories or attachments not recommended or sold by Salton may cause fire, electric shock or injury.
- Do not use outdoors.
- Do not let cord hang over edge of table or counter, or touch hot surfaces.
- Extreme caution must be used when moving an appliance containing hot liquids.
- This appliance is for Household Use Only.
- Do not use appliance for other than intended use.
- Do not leave unit unattended while in use.
-
Always turn the appliance off and unplug from the outlet when left unattended or finished using.
-
Check to be sure that the switch is in the OFF position after each use. Ensure that the motor is stopped before disassembling
- Avoid contacting moving parts. Make sure that the motor stops completely before disassembling.
- Always make sure the unit is fully assembled and the Chute or Feed Tube/Cone Holder is locked securely in position before the motor is turned on. Do not attempt to remove parts when it is in operation.
- Do not either operate or plug and unplug the unit with wet hands.
- Do not use the appliance continuously for more than 2 minutes.
- Do not turn the appliance on for more than 2 minutes without adding food. This may damage the auger.
- Do not use this appliance if any of the parts are damaged.
- Do not put your fingers or other objects into the Chute or Feed Tube/Cone Holder while it is operating. Always use the food pusher provided.
- During operation feed the food slowly to avoid clogging. If the unit gets clogged turn the appliance off immediately. Unplug the appliance, disassemble and remove the stuck food.
- Do not place on or near a hot gas or electric burner, or in a heated oven.
- Always attach plug to appliance first, then plug cord into the wall outlet. To disconnect, turn control to 'OFF', then remove plug from wall outlet.
- Do not attempt to override the safety features
SAVE THESE INSTRUCTIONS
HOUSEHOLD USE ONLY
POLARIZED PLUG
This appliance has a polarized plug (one blade is wider than the other). To reduce the risk of electric shock, this plug will fit in a polarized outlet only one way. If the plug does not fit fully in the outlet, reverse the plug. If it still does not fit, contact a qualified electrician. Do not modify the plug in any way.
INTRODUCTION
Your 3-in-1 Frozen Dessert Maker/Slicer/Grater is a compact, easy to use Multi-Function appliance. The Frozen Dessert Makers turns frozen fruit into healthy soft serve in seconds. The Slicer/Grater function slices, shreds, grates and grinds vegetables, cheese, fruit, nuts, chocolate & bread for salads, soups, tacos, pizzas, pastas, desserts and more. You can also make snow cones and ice slushies. Control your intake of fats, salts and/or additives for a healthier diet.
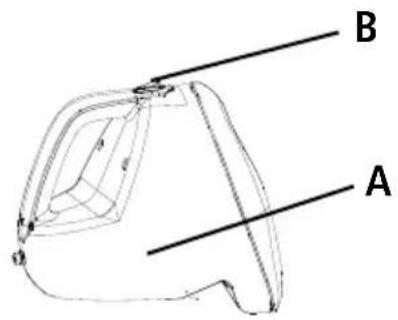
DESCRIPTION OF PARTS
A. Motor Base
B. ON/OFF Switch
FROZEN DESSERT MAKER PARTS
C. Food Pusher
D. Tray
E. Chute
F. Auger
G. Dispensers
G.1 Star Shaped
G.2 Swirl Shaped

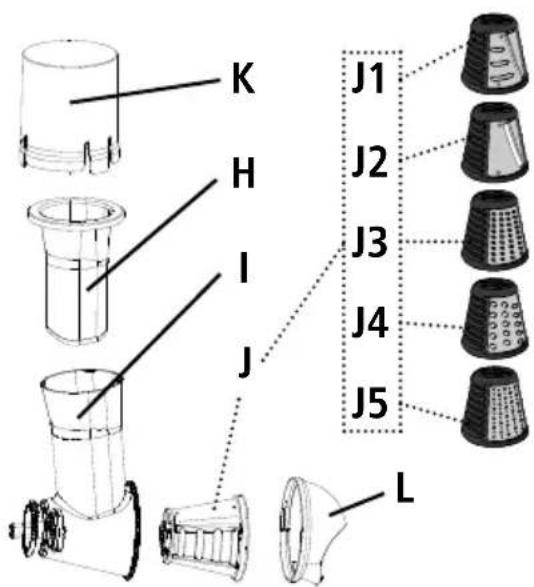
SLICER/GRATER PARTS
H. Food Pusher
I. Feed Tube/Cone Holder
J. Cones
J.1 Thick Slicer (Dark Green)
J.2 Thin Slicer (Light Green)
J.3 Fine Grater (Yellow)
J.4 Coarse Grater (Red)
J.5 Extra Fine Grater (Orange)
K. Storage Accessory for Cones
L. Splash Guard
- Unpack and remove all parts and packaging materials from the carton.
- DO NOT plug the power cord into any outlet before reading the instructions.
- Wash all Frozen Dessert Maker parts (Food Pusher, Tray, Chute, Auger and Dispensers) and all Slicer/Grater parts (Food Pusher, Feed Tube/Cone Holder, Cones, Storage Accessory for Cones and Splash Guard) in warm soapy water. Rinse well and dry.
- Wipe the Motor Base with a damp cloth.
NEVER IMMERSE THE MOTOR BASE IN WATER OR ANY OTHER LIQUID.
DO NOT use harsh detergents or abrasive cleaners on any part of the appliance.
IMPORTANT: Use extreme caution when handling the Cones.
The Cone blades are extremely sharp. Always hold the plastic parts.
HOW TO USE
ASSEMBLY - FROZEN DESSERT MAKER
- Place Auger (F) in bottom of Chute (E).
- Make sure the gasket is properly seated inside the Dispenser (G). Place Dispenser (Star or Swirl Shape) on bottom of Chute aligning tabs. Rotate counter-clockwise a quarter turn to the left until dispenser is facing downward.
- Place Chute (E) in Motor Base (A) aligning tabs. Rotate counterclockwise a quarter turn to the left until it is straight and into the locked position.
- Place Tray (D) on top of Chute (E).
- Place Food Pusher (C) in Chute (E).
- Plug in the appliance.
NOTE: Do not operate unit for more than 2 minutes continuously at any one time.
HOW TO USE - FROZEN DESSERT MAKER
- Freeze your desired fruit for 24 hours. Remove from freezer and allow to thaw slightly (approximately 7-10 minutes depending on the type of fruit).
- Place a small bowl or serving dish directly below the Dispenser.
- Remove the Food Pusher from the Chute and turn the unit ON.
- Insert frozen fruit into the top of the Chute. DO NOT overfill the Chute.
- DO NOT place fruit with pits, honey or ice into the Frozen Dessert Maker.
- Apply steady pressure on the Food Pusher to slowly press the contents down through the Chute. DO NOT apply too much force.
- The creamy frozen fruit mixture will dispense into your bowl. If using more than one type of fruit per serving, add the different fruits alternately to allow them to mix properly.
- Repeat the process until you have created the amount of frozen fruit desired. If using spices, sugar or sugar substitute, you may add with the fruit directly in the Food Pusher.
- If the soft-serve fruit mixture stops dispensing, the Chute may be clogged. Turn unit off IMMEDIATELY and unplug from electrical outlet. Remove the Dispenser by turning clockwise and take out the Auger. Wipe clean and reassemble the Frozen Dessert Maker.
- NEVER try to force ingredients through the Chute if ingredients are not dispensing.
- Unplug unit from outlet when finished.
- Follow the directions in the Cleaning & Maintenance section to clean the machine.
ASSEMBLY - SLICER/GRATER
- Place Feed Tube/Cone Holder (I) in Motor Base (A) aligning tabs. Rotate counter-clockwise a quarter turn to the left until Feed Tube/Cone Holder (I) is straight and into the locked position.
- Install desired Cone (J) inside Cone Holder (I) and gently turn clockwise until it stops turning.
- Place Splash Guard (L) over end of Cone Holder (I) and rotate counter-clockwise a quarter turn to the left until it is straight with the lip facing downward.
- Plug in the Motor Base.
NOTE: Do not operate unit for more than 2 minutes continuously at any one time.
WARNING: Your appliance has an On/OFF Button. Before running the appliance, always make sure that the cone is locked in position. To ensure the cone is properly installed, Press the ON/OFF Switch (B) to the ON position once or twice for 2 seconds and then press to OFF position.
HOW TO USE - SLICER/GRATER
- Place food in the Feed Tube and push down using the Food Pusher as needed.
- Place a bowl or serving dish directly below the Splash Guard.
- Do not operate the appliance empty or with any of the cones stored.
- Do not chop, grate or slice raw or cooked meat.
- Do not use your hands, always use the Food Pusher.
- Do not remove the cones until the motor has completely stopped.
- To change Cones, unplug the Motor Base, remove the Splash Guard and turn the Cone counter-clockwise until it releases from the tabs and gently pull out.
IMPORTANT: Use firm ingredients to avoid accumulation in the Cone Holder. It may be necessary to cut certain foods into smaller pieces to fit through the Feed Tube.
SELECTING THE DESIRED CONE
- Wipe the Motor Base with a damp cloth. NEVER IMMERSE THE MOTOR BASE OR PLUG IN WATER OR ANY OTHER LIQUID.
- All parts except the Motor Base should be washed in warm soapy water. Do not use abrasive cloths or cleansers. You may also use a dishwasher (top rack only) low heat setting.
IMPORTANT: Use extreme caution when handling the Cones. The Cone blades are extremely sharp. Always hold the plastic parts. - For best results cleaning the 3-in-1 Frozen Dessert Maker/Slicer/Grater immediately after each use will reduce stains but carrots or other strong colours in food may still stain the parts. We suggest using one of the following cleaning procedures:
a) Soak in mild soapy water
b) Equal parts warm water to cider vinegar
c) Soak in 12 box of baking soda and warm water
d) 12 cup bleach in a sink full of warm water - Dry all parts thoroughly before assembling.
The cones can be stored in the Food Pusher (H) and covered with the Storage Accessory for Cones (K). NOTE: Only 4 cones can be stored in the Food Pusher, the last cone is stored in the Feed Tube/Cone Holder (I) - Any other servicing should be performed by an authorized service representative.
TROUBLESHOOTING
| PROBLEM SOLUTION | |
| Appliance does not operate • Check the Assembly section to ensure that all parts have been assembled correctly.• Check power cord and power source. | |
| Appliance jams/clogs or stops operating • Check for a blockage in the food chute.• Turn the appliance Off. Disassemble the upper section and clear the remaining food. NOTE: do not remove the upper section until the appliance has been unplugged from the wall outlet. | |
| Squeaking during operation • This is normal. | NOTE: The unit should not be run without food. |
| Leaking from underneath the Frozen Chute Dispenser | • Ensure that the silicone gasket is in place after cleaning. |
| Motor, Dispenser or Cone Damage Contact our service department. | |
| Chute, Dispenser, Feed Tube or Cone is stuck. | • This is caused by excess food during operation. Turn unit off IMMEDIATELY and unplug from electrical outlet. Remove the Dispenser, Chute, Cone and Feed Tube by turning clockwise. Dismantle the Dispenser on the Frozen Dessert Maker by turning the Dispenser clockwise and take out the Auger. Wipe clean and reassemble the Frozen Dessert Maker. Wash all parts (except Motor Base) in warm, soapy water to clean residue. |
Party Antipasto Spread
2 7 oz (30 ml) tins of tuna, drained and mashed
24 oz (710 ml) jar sweet pickles, drained
12 oz (355 ml) jar stuffed olives, drained
12 oz (355 ml) jar pickled onions, drained
10 oz (295 ml) can mushrooms, drained
1 onion
2 carrots
10 oz (295 ml) bottle chili sauce
Small bottle ketchup
1 Tbsp. (15 ml) Worcestershire sauce
2 Tbsp. (30 ml) lemon juice
Slice sweet pickles, onion, mushrooms and olives with the Thin Slicer (J.2). Grate onion and carrots with the Coarse Grater (J.3). Combine all ingredients in the mixing bowl and mix well. Store in tightly closed jars in refrigerator. Mixture will keep up to 6 weeks.
Gazpacho
1 large cucumber, peeled
1 green pepper, seeded
1 onion
6 tomatoes, peeled
4 cloves garlic, peeled
Juice of 12 lemon
14 cup (60 ml) olive oil
12 tsp. (2.5 ml) each chili powder and basil
1 Tbsp. (15 ml) salt
19 oz can tomato juice
Grate cucumber, green pepper, onion and tomatoes with the Fine Grater (J.4). Grate the garlic with the Extra Fine Grater (J.5). Add lemon juice, oil, chili powder, basil, salt and the tomato juice. Adjust seasoning to taste. Chill for several hours. This keeps well in the refrigerator in a tightly closed jar. Serve with croutons and additional chopped vegetables if desired. Contains 6 servings.
Salmon Patties
1 onion
1 carrot
2 3/4 oz (22 ml) tins salmon, well mashed
12 cup (120 ml) corn flake crumbs
4 eggs
Dash salt and pepper
Oil for frying
Grate onion and carrots with the Fine Grater (J.4). Mix with salmon, corn flakes, eggs and seasonings. Heat oil in pan, drop salmon mixture from a large spoon into the hot oil. Flatten slightly with the back of the spoon. Brown over medium heat on both sides until golden. Drain on paper towelling. Freezes well. 4-6 servings.
Zucchini Quiche
3 medium zucchini peeled
1 tsp. (5 ml) salt
1/2 lb (227 g) Swiss, Mozzerella or Cheddar cheese (2 cups grated)
1 / 2 onion
3 eggs
Dash pepper
12 tsp. (2.5 ml) oregano
12 tsp. (2.5 ml) basil
3 Tbsp. (45 ml) Parmesan cheese
Grate zucchini with the Coarse Grater (J.3). Transfer to a strainer and sprinkle with salt. Let stand 10 minutes. Press out all liquid. Grate cheese and onion with the Fine Grater (J.4). Combine all ingredients except Parmesan cheese and mix until just blended. Place in a greased 9" (230 mm) pie plate or ceramic quiche dish. Sprinkle with grated Parmesan cheese (grate with Fine Grater (J.4)). Bake at 350°F (177°C) for 35 to 40 minutes, until set and golden brown. Serves 8.
Sweet Potato Pudding
4 medium sweet potatoes (about 2 lb. (908 g)
1 onion
6 eggs
1 tsp. (5 ml) salt
2 tsp. (10 ml) cinnamon
14 tsp. (1.3 ml) nutmeg
14 tsp. (1.3 ml) cloves
^3/_4 cup (177 ml) brown sugar, packed
12 cup (120 ml) flour
12 tsp. (2.5 ml) baking powder
3 Tbsp. (45 ml) oil
Peel sweet potatoes and grate with the Coarse Grater (J.3). Empty into a large mixing bowl. Grate onion using the Extra Fine Grater (J.5). Add to sweet potatoes. Add eggs, spices and brown sugar, Mix together well. Add flour and baking powder and mix well. Heat oil at 400°F (205°C) in a 7 x 11" (178 x 280 mm) glass (Pyrex) baking dish. When hot, pour in sweet potato mixture and sprinkle a few drops of oil on top. Bake at 400°F (205°C) about 1 hour until nicely browned. Yields about 8-10 servings.
Ratatouille
3 cloves garlic
1 large onion
1 green pepper
1 cup (237 ml) mushrooms
3 unpeeled zucchini
1 eggplant, peeled
12 tsp. (2.5 ml) basil
1 tsp. (5 ml) oregano
Salt and pepper to taste
19 oz (562 ml) tin tomatoes
5½ oz (163 ml) tin tomato paste
Grate garlic with Fine Grater (J.4). Grate onion and green pepper with Coarse Grater (J.3). Slice the mushrooms with the Thin Slicer (J.2).
Sauté garlic, onion, green pepper and mushrooms in oil on medium heat until golden about 7 - 8 minutes. Cut zucchini and eggplant with the Thick Slicer (J.1). Add to frypan and sauté 10 minutes longer, stirring occasionally. Add the remaining ingredients, cover and simmer for 30 minutes. Serve hot or cold. 6-8 servings.
Delicious Coleslaw
1 head cabbage
3 medium carrots, peeled
2 cloves garlic, peeled
3 green onions
1 green pepper
Marinade:
1 cup (237 ml) white vinegar
12 cup (120 ml) sugar
^3/_4 cup (178 ml) oil
1 tsp. (5 ml) salt
14 tsp. (1.3 ml) pepper
Slice the cabbage using the Thick Slicer (J.1). Empty into a large bowl. Grate the carrots using the Coarse Grater (J.3). Add to cabbage. Slice the shallots and green pepper with the Thin Slicer (J.2). Grate the garlic using the Fine Grater (J.4). Combine the ingredients for the marinade in a saucepan and bring to a boil. Pour hot marinade over coleslaw mixture and toss well. Transfer to a large jar, cover tightly and refrigerate. Makes about 12-16 servings. Do not freeze.
Carrot and Raisin Salad
1 lb (454 g) carrots scraped and trimmed
2 cups (473 ml) Sultana raisins
1 apple, peeled
1 tsp. (5 ml) lemon juice
Honey to taste
Grate the carrots with the Fine Grater (J.4). Grate the apple with the same grater and mix with lemon juice. Transfer to a mixing bowl and combine with remaining ingredients. Let stand several hours before serving to blend flavours. Yields 6 servings.
Zucchini Bread
3 cups (710 ml) flour
1½ cup (355 ml) sugar
1 tsp. (5 ml) cinnamon
1 tsp. (5 ml) salt
1 tsp. (5 ml) baking powder
^3/_4 tsp. (3.7 ml) baking soda
1½ cup (355 ml) walnuts
1 cup (237 ml) raisins
2 medium zucchini
3 eggs
1 cup (237 ml) oil
Combine flour, sugar, cinnamon, salt, baking powder and baking soda in a large bowl. Grate walnuts with the Coarse Grater (J.3). Set aside 12 cup (120 ml) nuts. Combine remaining nuts with raisins in a small bowl and set aside. Grate unpeeled zucchini with the fine shredder (J.4). Add to flour mixture. In a separate bowl, blend eggs with oil. Add to flour mixture and stir until moistened. Add raisin/nut mixture. Pour into two greased and floured 9" x 5" loaf pans. Sprinkle with reserved nuts. Bake at 350°F (177°C) for 45 minutes until loaves test done. Cool for 15 minutes before removing from pans. Freezes well. (Can substitute 6 oz chocolate chips for raisins).
Scrumptious and Healthy Carrot Cake
3 carrots, scraped and trimmed
1 apple peeled and cored
3 eggs
1¼ cups (296 ml) sugar
1 cup (237 ml) oil
2 cups (474 ml) flour
2 tsp. (10 ml) baking soda
1 tsp. (5 ml) baking powder
2 tsp (10 ml) cinnamon
1 cup (237 ml) raisins
Grate carrots and apple with the fine shredder (J.4). Beat eggs and sugar. Add oil and continue beating. Add carrots and apple and beat just until blended. Add dry ingredients and mix just until flour disappears. Add raisins. Pour batter into a well-greased 12 cup Bundt
pan or 9 x 13" (228 x 330 mm) baking pan. Bake at 350°F (177°C) for 40-50 minutes, until cake tests done. Optional: Ice with cream cheese icing when cool. Freezes well. 12-15 servings.
Optional Cream cheese icing: (Combine 8 oz (237 ml) cream cheese, 2 cups (474 ml) icing sugar, 2 Tbsp. (30 ml) orange juice: Beat until smooth).
FROZEN DESSERT RECIPES
Maple Walnut Apple Delight
2 frozen ripe bananas cut into chunks
1 cup (240 ml) frozen apple slices
14 cup (60 ml) chopped walnuts
1 tsp (15 ml) maple syrup (to taste)
Alternate adding bananas, apple and walnuts in the chute. Apply steady pressure on the Food Pusher to slowly press the contents down through the Chute. Once completed, drizzle with maple syrup.
Strawberry Banana
2 frozen ripe bananas cut into chunks
1 cup (240 ml) frozen strawberries
Alternate adding bananas and strawberries in the chute. Apply steady pressure on the Food Pusher to slowly press the contents down through the dispenser into a serving bowl.
Berry Explosion
2 frozen ripe bananas cut into chunks
12 cup (120 ml) frozen strawberries
14 cup (60 ml) frozen raspberries
14 cup (60 ml) frozen blueberries
Combine all ingredients in a bowl. Add mixture in the chute. Apply steady pressure on the Food Pusher to slowly press the contents down through the dispenser into a serving bowl.
Blackberry Burst
2 frozen ripe bananas cut into chunks
1 cup (240 ml) frozen blackberries
1 Tbsp (15 ml) honey (to taste)
1 Tbsp (15 ml) wheat germ (optional)
First add wheat germ to the chute and turn the machine on for 5 seconds to coat the auger. Alternate adding bananas and blackberries in the chute. Apply steady pressure on the Food Pusher to slowly press the contents down through the dispenser into a serving bowl.
Cherry Blast
2 frozen ripe bananas cut into chunks
1 cup (240 ml) frozen cherries
Alternate adding bananas and cherries in the chute. Apply steady pressure on the Food Pusher to slowly press the contents down through the dispenser into a serving bowl.
Cherry Chocolate Blast
2 frozen ripe bananas cut into chunks
1 cup (240 ml) frozen cherries
1 oz (30 ml) dark chocolate
Combines all ingredients in a bowl. Add mixture in the chute. Apply steady pressure on the Food Pusher to slowly press the contents down through the dispenser into a serving bowl.
Vanilla Peach Supreme
2 frozen ripe bananas cut into chunks
^3/_4 cup (178 ml) frozen sliced peaches
2 frozen vanilla yogurt cubes cut in half
Alternate adding bananas, peaches and yogurt in the chute. Apply steady pressure on the Food Pusher to slowly press the contents down through the dispenser into a serving bowl.
Cookies & Cream
3 frozen ripe bananas cut into chunks
3 chocolate sandwich cookies cut in half
Alternate adding bananas and cookies in the chute. Apply steady pressure on the Food Pusher to slowly press the contents down through the dispenser into a serving bowl.
Coffee Vanilla Delight
3 frozen ripe bananas cut into chunks
2 Tbsp (30 ml) finely ground coffee (espresso grade, regular or decaf)
2 Tbsp (30 ml) raw honey
12 tsp (2.5 ml) vanilla
In a bowl cover frozen bananas with ground coffee. Add vanilla in the chute and turn the machine on for 5 seconds to coat the auger. Add banana mixture in the chute. Apply steady pressure on the Food Pusher to slowly press the contents down through the dispenser into a serving bowl. Drizzle with raw honey.
RECIPES WITHOUT BANANAS
STRAWBERRY MANGO SORBET
1 cup (240 ml) frozen strawberries
1 cup (240 ml) frozen mango chunks
Alternate adding strawberries and mango in the chute. Apply steady pressure on the Food Pusher to slowly press the contents down through the dispenser into a serving bowl.
STRAWBERRY KIWI PEACH SORBET
1 cup (240 ml) frozen strawberries
1/2 cup (120 ml) frozen mango chunks
1/2 cup (120 ml) frozen sliced peaches
Alternate adding strawberries, mango and peaches in the chute. Apply steady pressure on the Food Pusher to slowly press the contents down through the dispenser into a serving bowl.
MELON MANIA
1 cup (240 ml) frozen cantaloupe chinks
1/2 cup (120 ml) frozen honeydew chunks
1/2 cup (120 ml) frozen watermelon (seedless) pieces
Alternate adding cantaloupe, honeydew and watermelon in the chute.
Apply steady pressure on the Food Pusher to slowly press the contents down through the dispenser into a serving bowl.
INTENSE BLUEBERRY
2 cups (480 ml) frozen blueberries
Add blueberries in the chute. Apply steady pressure on the Food Pusher to slowly press the contents down through the dispenser into a serving bowl.
MANGO PEACH SORBET
1 cup (240 ml) frozen mango chunks
1 cup (240 ml) frozen sliced peaches
Alternate adding mango and peaches in the chute. Apply steady pressure on the Food Pusher to slowly press the contents down through the dispenser into a serving bowl.
A short supply cord is provided to reduce the hazards of becoming entangled in or tripping over a long cord. Extension cords may be used if care is exercised in their use. If an extension cord is used, the marked electrical rating of the detachable power-supply cord or extension cord should be at least as great as the electrical rating of the appliance. If the appliance is of the grounded type, the extension cord should be a grounded 3-wire cord. The extension cord should be arranged so that it will not drape over the counter top or table top, where it can be pulled on by children or tripped over.
LIMITED WARRANTY
**The original sales receipt is the only acceptable proof of purchase**
Salton Canada warrants that this appliance shall be free from defects in material and workmanship for a period of two (2) years from the date of original purchase. Salton Canada, at its sole discretion during this warranty period, will repair or replace a defective product or issue a refund. Any refund to the purchaser will be at a pro-rated value based on the remaining period of the warranty. All liability is limited to the amount of the purchase price. This warranty covers normal domestic usage and does not cover damage which occurs in shipment or failure which results from alteration, accident, misuse, abuse, glass breakage, neglect, improper maintenance, use contrary to the operating instructions or commercial use. This warranty is not available to retailers or other commercial purchasers or owners.
This warranty does not include the cost of shipping, which is to be borne by the customer.
TO OBTAIN PROMPT WARRANTY SERVICE:
Contact one of our many Service Centers found on our website www.salton.com/customer-care
or
Securely package and return the appliance to us. Please enclose:
• Original proof of purchase
- The completed form below with a \$12.50 Return Shipping & Handling fee – either a cheque, money order or credit card (A personal cheque will delay return shipping by 2-3 weeks)
For added protection, we suggest that you use an insured delivery service with tracking information when returning your product. Salton Canada will not be held responsible for in-transit damage or for packages that are not received.
This warranty does not include the cost of shipping, which is to be borne by the customer.
Name
Address
City
Daytime
Product defect:
Type of payment
Name on card
Card No.
To contact our Customer Service Department:
SALTON CANADA
Telephone: 514-685-3660 (Ext. 226)
81A Brunswick,
Dollard-des-Ormeaux, Quebec H9B 2J5
Canada
E-mail: service@salton.com
Fax: 514-685-8300
www.salton.com
Postal/Zip
Code

Visa □
MasterCard □
Visa □
MasterCard □
Visa □ MasterCard □
Visa □ MasterCard □
Visa □ MasterCard □
Visa □ MasterCard □
Visa □
MasterCard □
Visa □ MasterCard □
Visa □
MasterCard □
Visa □
Visa □
Visa □
MasterCard □
Visa □
- salton®
- Instruction Booklet
- IMPORTANT SAFEGUARDS
- SAVE THESE INSTRUCTIONS
- HOUSEHOLD USE ONLY
- POLARIZED PLUG
- INTRODUCTION
- DESCRIPTION OF PARTS
- FROZEN DESSERT MAKER PARTS
- SLICER/GRATER PARTS
- HOW TO USE
- ASSEMBLY - FROZEN DESSERT MAKER
- HOW TO USE - FROZEN DESSERT MAKER
- ASSEMBLY - SLICER/GRATER
- HOW TO USE - SLICER/GRATER
- TROUBLESHOOTING
- Party Antipasto Spread
- Gazpacho
- Salmon Patties
- Zucchini Quiche
- Sweet Potato Pudding
- Ratatouille
- Delicious Coleslaw
- Carrot and Raisin Salad
- Zucchini Bread
- Scrumptious and Healthy Carrot Cake
- FROZEN DESSERT RECIPES
- Maple Walnut Apple Delight
- Strawberry Banana
- Berry Explosion
- Blackberry Burst
- Cherry Blast
- Cherry Chocolate Blast
- Vanilla Peach Supreme
- Cookies & Cream
- Coffee Vanilla Delight
- RECIPES WITHOUT BANANAS
- STRAWBERRY MANGO SORBET
- STRAWBERRY KIWI PEACH SORBET
- MELON MANIA
- INTENSE BLUEBERRY
- MANGO PEACH SORBET
- LIMITED WARRANTY
- TO OBTAIN PROMPT WARRANTY SERVICE:
- or
Brand : Salton
Model : DS1457
Category : Kitchen appliance