
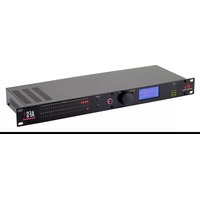
242 - Audio Equalizer DBX - Free user manual and instructions
Find the device manual for free 242 DBX in PDF.


| Product Type | Audio Compressor/Limiter |
| Brand | DBX |
| Model | 242 |
| Weight | Approx. 2.5 kg (5.5 lbs) |
| Dimensions (W x H x D) | 482.6 x 44.5 x 152.4 mm (19 x 1.75 x 6 inches) |
| Power Supply | AC 100-240V, 50/60Hz, 15W |
| Input Connectors | Balanced XLR and 1/4" TRS |
| Output Connectors | Balanced XLR and 1/4" TRS |
| Frequency Response | 20 Hz - 20 kHz (±0.5 dB) |
| Dynamic Range | > 110 dB |
| Controls | Threshold, Ratio, Attack, Release, Gain Makeup, Bypass |
| Indicators | Gain Reduction LED meter, Power LED, Bypass LED |
| Cooling | Passive ventilation |
| Operating Temperature | 0°C to 40°C (32°F to 104°F) |
| Accessories Included | Power cord, user manual |
| User Manual Languages | English (PDF download) |
| Maintenance | Clean with dry cloth; avoid liquids and solvents |
| Safety | Operate in a well-ventilated area; do not expose to rain or moisture |
| Spare Parts & Repairability | Contact DBX certified service centers for replacement parts |
| General Information | Designed for professional audio applications; rackmountable |
Frequently Asked Questions - 242 DBX
User questions about 242 DBX
0 question about this device. Answer the ones you know or ask your own.
Ask a new question about this device
Download the instructions for your Audio Equalizer in PDF format for free! Find your manual 242 - DBX and take your electronic device back in hand. On this page are published all the documents necessary for the use of your device. 242 by DBX.
USER MANUAL 242 DBX
WARNING: TO REDUCE THE RISK OF FIRE OR ELECTRICAL SHOCK, DO NOT EXPOSE THIS APPLIANCE TO RAIN OR MOISTURE.

This symbol, wherever it appears, alerts you to the presence of uninsulated dangerous voltage inside the enclosure — voltage that may be sufficient to constitute a risk of shock.

This symbol, wherever it appears, alerts you to important operating and maintenance instructions in the accompanying literature. Read the manual.
This Manual is part number 18-2085
© Copyright 1996 by dbx Professional Products

dbx Professional Products
8760 South Sandy Parkway, Sandy, UT 84070
Telephone (801) 568-7660 Fax (801) 568-7662
INSPECTION
1. Verify that the 242 package contains the following:
☐ 242 Unit and External Power Supply
☐ Operation Manual (including Registration Card)
INTRODUCTION
Congratulations on choosing the dbx 242 Parametric Equalizer. We recommend you take a moment and read through the manual because it provides information that will assist you in using your unit to its fullest potential. The 242 provides three bands of fully parametric peak/dip equalization and two bands of shelving equalization, all in a compact, one rack-space unit. The 242 is ready to meet all your equalization needs, from putting zip into musical instruments to notching out unwanted whistles or noises.
The 242 can be used in recording studios, live sound reinforcement, and broadcast. Its patented circuitry increases its versatility: not only can you use it as a conventional EQ, but it also offers infinite-depth notching and high- and low-pass filtering.
Features:
☐ Patented Variable Mode Slope Selection™ (VMSS) filters allow high and low shelving bands to "morph" between a typical shelving filter operation and that of a low- or high-pass filter.
☐ Shelving bands (high and low) are switchable 6dB or 12dB/octave.
☐ When shelf is set to infinite cut, dbx's patented circuit acts as a high- or low-pass filter (switchable 6 or 12dB/octave) to remove unwanted noise like hiss or acoustic rumble.
☐ Three fully-parametric symmetrical, reciprocal filter bands offer variable cut/boost, variable frequency and variable bandwidth (Q) for complete tonal shaping capabilities.
☐ The three center bands can each be set to produce a very deep (40dB), very narrow, notch to eliminate unwanted whistles or noises without affecting the program material.
☐ A clip indicator monitors all EQ stages to warn of potential overload anywhere in the equalizer.
☐ A wide-range INPUT GAIN control lets you immediately correct any clipping caused by extreme amounts of EQ, and also lets you use the 242 as an amplifier with up to 16dB of gain. (For example, you could use the 242 to interface between home-type equipment with -10dBV levels and pro equipment with +4dBu levels.)
□ Extremely low noise and distortion make the 242's audio quality comparable to the best pro studio equipment.
☐ The dynamic range is >18-bit digital and is about 20dB - 25dB better than that of the new, low-cost digital multi-track recorders.
□ System BYPASS Button can be used for comparing the processed and unprocessed signal.
☐ Rear panel 14 " TRS jacks include a balanced input and an output capable of driving a 600Ω load.
OPERATING CONTROLS
Front Panel
MASTER Section
CLIP LED: This red LED lights when the output of any of the 242's internal amplifiers is within 1dB of its clipping level. To eliminate clipping, reduce the setting of the INPUT GAIN control or the amount of boost on any or all of the individual bands.
INPUT GAIN Control: This control varies the amount of gain applied to the input audio. Range is - to +16dB.

BYPASS Button and LED: Press this button In to bypass the 242's equalization circuitry. Bypass mode is especially useful for making comparisons between equalized and unequalized signals, and for using the 242 as a utility amplifier with up to 16dB of gain. In Bypass mode, the input is sent directly to the output, bypassing the 242's equalization controls. Because the BYPASS is not hard-wired, the INPUT GAIN control still functions when the unit is bypassed and the unit does not pass signal when AC power is Off.
The red BYPASS LED turns On in Bypass mode.
POWER LED: The red POWER LED lights when AC power is applied to the rear panel power jack.
LOW and HIGH Band Shelving Section
SHELF SLOPE Button and LED: Press this button In to set the shape of the shelving curve to 12dB/OCTAVE. Or leave the button Out to set a gentler 6dB/Octave rate. For example, a 12dB/OCTAVE setting for the LOW SHELF SLOPE allows you to boost very low frequencies to enhance "punch" without making the sound muddy by boosting the mid-bass frequencies excessively. A 12dB/OCTAVE setting for the HIGH SHELF SLOPE can let you create a sense of "air" without stridency caused by too much boosting of upper midrange frequencies.
The green SHELF SLOPE LED lights when the button is In to indicate a 12dB/OCTAVE shelving rate.
CUT/BOOST (dB) Control: This control adjusts the amount of boost or cut of the LOW and HIGH shelving bands. The range is - to +16dB for each band. “- ” is typically better than -40dB . The cut and boost curves are symmetrical from 16dB boost to 16dB cut (e.g., a +2 boost produces a shelving curve that is the mirror image of the shelving curve produced by a -2 cut). When the control is set to - , the band acts like a low-pass or high-pass filter whose slope is determined by the SHELF SLOPE button.
SHELF FREQUENCY Control: Use this control to set the frequency where the band cuts or boosts 3dB. The LOW band range is 20Hz to 630Hz, while the HIGH band range is 1.25kHz to 20kHz. The calibration is accurate with the CUT/BOOST control set at +16dB and -16dB; with this control set for less boost or cut, you will see less than 3dB boost or cut at the frequency where you have set the SHELF FREQUENCY control.
LOW-MID, MID, and MID-HIGH Band EQ Section
CUT/BOOST (dB) Control: This control adjusts the amount of dip or peak in a band by setting the amount of gain or attenuation at the filter's center frequency. The curves are bell-shaped and are symmetrical around the filter's center frequency. The range is - to +16dB for each band. When you set this control fully counterclockwise to maximum cut, the band is said to be in "Infinite" notch mode. ("- ") is typically better than -40dB .) For a given bandwidth, the cut and boost curve shapes are reciprocal (e.g., a +2 boost produces a bell-shaped curve that is the mirror image of the bell-shaped curve produced by a -2 cut). Note that boosts are easier to hear than cuts, especially with narrow BANDWIDTH settings.
FREQUENCY Control: This control determines the center frequency of the bell-shaped curve produced by a band. LOW-MID band range is 31Hz to 800Hz; MID band range is 0.25kHz to 6.3kHz; MID-HIGH band range is 0.63kHz to 16kHz. Changing the FREQUENCY will not change the bandwidth (in octaves); a band's bandwidth is affected only by its BANDWIDTH control.

BANDWIDTH (Oct) Control: The BANDWIDTH control determines the range of frequencies that are affected by the equalizer for a given setting of the FREQUENCY control. Lower settings (towards 0.05) affect only frequencies very close to the center frequency, while higher settings (towards 2) affect frequencies that are further away. Sonically, lower settings produce a sharp, ringy, highly-colored sound when you boost, but affect the overall sound very little when you cut. Therefore, lower settings are very useful when you are trying to remove sound of fixed pitch (like hum) from the input. Higher settings are more gentle and musical when boosting but are more audible than lower settings when you cut.
Rear Panel

INPUT Jack: Use a 14 " TRS phone plug to connect this input to your source. The 242's INPUT jack accepts either balanced or unbalanced signals (the 242's input is balanced). Nominal input level is +0dBu and clipping level is +27dBu. Input impedance is approximately 10kΩ.
OUTPUT Jack: The OUTPUT jack accepts a 14 " TRS phone plug. Nominal output signal level is +4dBu into 600Ω. Clipping level is +19dBm. Output impedance is 47Ω. The output is single-ended (or unbalanced), Tip Hot.
AC Power Jack: Plug the AC Power Supply (shipped with your unit) into this jack and an appropriate AC power source. Note that the 242 does not have a power button. We recommend leaving the 242 "On" at all times. Power consumption is low. If you do not plan to use the 242 for an extended period of time, unplug it.
WARNING: Be sure to verify your actual line voltage is the same as the voltage level printed on the power supply. Connection to an inappropriate power source may result in extensive damage which is not covered by the warranty.

OPERATING NOTES
Getting the Feel Of The 242 Parametric Equalizer
The layout of the 242's controls permit easy, intuitive adjustment. To become more familiar with the 242 parametric equalizer, connect the unit to your system so that audio can pass through it (page 12), then use the following steps as a tutorial to guide you through the 242's front panel controls.
Note: In general, the less EQ you use, the better (unless you are using the EQ as an effect). Do everything possible to get the best sound you can with mic placement, room position, amp setting and instrument tone. EQ works best to fine tune an already good sound and can sometimes perform amazing "surgery" on what would be otherwise unusable tracks. But as good as the 242 is, it is not an excuse to always "fix it in the mix."
Note: The front panel calibrations are approximate.
Three-Band Equalization Controls
- Set the BYPASS button to Out (BYPASS light Off).
- Center all controls for each band (i.e., to their 12 o'clock positions)
- Adjust the INPUT GAIN control as necessary
- Individually, set each band's CUT/BOOST control to +6dB. Listen to each band's distinctive boosting effect.
- Experiment with the FREQUENCY and BANDWIDTH controls to see how they affect the sound. Compare the effect of fuller bandwidths versus narrower bandwidths.
Figure 1 provides a visual representation of a 6dB boost, centered at 1kHz, over both a wide bandwidth and narrow bandwidth; a 6dB cut over the same bandwidths is also shown.

line
| Frequency (Hz) | A. 6dB Boost @ 1 kHz, Broad Bandwidth | B. 6dB Cut @ 1 kHz, Broad Bandwidth | C. 6dB Boost @ 1 kHz, Narrow Bandwidth | D. 6dB Cut @ 1 kHz, Narrow Bandwidth | | -------------- | ------------------------------------- | ----------------------------------- | -------------------------------------- | ------------------------------------ | | 20Hz | 0 | 0 | 0 | 0 | | 100Hz | ~3 | ~-2 | ~-3 | ~-4 | | 1kHz | 6 | ~0 | ~6 | ~-6 | | 10kHz | ~3 | ~-2 | ~-3 | ~-4 | | 20kHz | 0 | 0 | 0 | 0 |Figure: 1: Cut/Boost Curves Over Narrow & Wide Bandwidths
- Set the CUT/BOOST control to - and vary the BANDWIDTH control as before.
Narrowband dips are essentially inaudible — but they can be made sharp enough to act as very effective notch filters, suppressing sounds of fixed frequency, like hum, by more than 45dB (typical). Sounds of fixed frequency that have several harmonics can sometimes be suppressed by using one band for each dominant harmonic if the relevant harmonic falls within a given band's tuning range.
LOW and HIGH Band Shelving Controls
The 242's LOW and HIGH shelving bands' VMSS™ filters incorporate patented circuitry and use different curve slopes than the three center bands. Their circuitry allows them to "morph" between a typical shelving filter operation and that of a low- or high-pass filter. This "shelving" shape affects more frequencies simultaneously than does the bell-shape of the center bands. This means that they produce equalization that is gentle and musical, not sharp and ringy.
When the CUT/BOOST control is set to - , the band produces a shelving curve that never "levels off"; the gain keeps decreasing as the frequency gets further and further away from the setting of the SHELF FREQUENCY control. Thus, at - , the LOW Shelf acts as a high-pass filter: it passes energy whose frequency is above the setting of the SHELF FREQUENCY control while attenuating low-frequency energy more and more as the energy's frequency gets lower. Conversely, when set to - , the HIGH Shelf acts like a low-pass filter: it passes energy whose frequency is below the setting of the SHELF FREQUENCY control while attenuating high-frequency energy more and more as the energy's frequency gets higher.
- Set the LOW band shelf CUT/BOOST to +6.
- Rotate the SHELF FREQUENCY control to hear the effects of sweeping this filter over the bass energy while keeping the maximum boost fixed at +6dB.
- Toggle the SHELF SLOPE button.
With the button In (12dB/OCTAVE) the slope is steeper and the transition between unity gain and +6dB gain is faster: the transition occurs over a smaller frequency range than with the button Out (6dB/Octave setting).
-
Repeat steps 2 and 3 with the band shelf CUT/BOOST set to - (to hear the effect of the 242's high-pass filter).
-
Repeat steps 1 thru 4 for the HIGH band shelf.
Figure 2 shows 12dB and 6dB per octave LOW shelf slopes for both a 16dB cut and an ∞ cut at 100Hz.
The 6dB/Octave setting is good when you want very gentle, uncolored EQ that affects a wide range of frequencies and sounds like a traditional tone control. 12dB/Octave is useful when you need more selectivity: you want to boost or cut one end of the audible frequency range without significantly affecting frequencies close to the range that is boosted or cut. For example, in Rap or Dance music, you might want to boost the range below 100Hz to get punchy bass without excessively affecting the mid-bass range above 100Hz, which can cause a "muddy" or "tubby" sound if boosted excessively.

A. 16dB Cut @ 400Hz; 6dB/Octave Slope
B. 16dB Cut @ 400Hz; 12dB/Octave Slope
C. \~ Cut @ 400Hz; 6dB/Octave Slope
D. ∞ Cut @ 400Hz; 12dB/Octave Slope
Figure 2: LOW Shelving Characteristics
General Equalization Tips
Consider Using CUT Instead Of BOOST To Highlight Frequencies
When attempting to bring a sound to the forefront of a mix or trying to bring more "detail" to a frequency range, do not always use the BOOST control. It may prove more useful to CUT surrounding or overbearing frequencies. Remember, when you boost a band, you add power to the equalizer's output, possibly producing a more cluttered sound (and increasing the risk of overload). Also, cutting will never increase mud or hiss as boosting might. Use BOOST carefully and tastefully.
Equalize Individual Tracks In The Context Of The Entire Mix
Do not fall into the trap of equalizing each track so it sounds good only when soloed in the mix, only to have the final mix sound terrible when all the tracks are combined. Each instrument and voice should have its own frequency band of dominant energy in the mix (especially with Pop/Rock music). Bass guitar and kick drums, each with an 80Hz boost, may sound good individually on your speakers, but together, they will create a muddy undefined bottom end. Try cutting the bass a little where you boost the kick and vice-versa.
Be Careful When Boosting At The Extremes Of The Frequency Spectrum
We do not recommend liberally boosting the 20Hz - 40Hz and 16kHz - 20kHz ranges. Most speaker systems (and analog recorders) cannot handle it, especially if their job is to fill a large space. Also, it is usually not necessary: very little music has power in these ranges, and boosts in these regions make little or no audible difference. Yet you risk overloading (and possibly damaging) your equipment from infra- and ultrasonic garbage (equipment hum and rumble, amp and grounding problems, feedback, MIDI grunge, RFI, stray fields, etc.), and from those rare but potent musical moments containing ultra-low or ultra-high frequencies.
When using the 242 to equalize a reinforcement or playback system, you can achieve a more professional room equalization if you have access to a calibrated microphone and a professional acoustic room analysis system. Otherwise, try to get access to a good quality 1/3 -octave real-time analyzer (which can give a good representation of the spectrum of music whose balance you need to alter). Don't aim for "flat" response at the frequency extremes; a small amount of high-frequency rolloff usually gives the most natural sound. For a large space (like an auditorium) you may want to roll off high frequencies at about 2 - 3dB/octave starting at 2kHz; acoustically, 16kHz will be down about 6 - 9dB if you do this. In a small space, a 1dB/octave rolloff is probably more appropriate; 16kHz will be down about 3dB. Also, use caution when attempting to extend the low frequency response of loudspeakers beyond their natural low-frequency cutoff point; the bass boost that is required will take a great deal of amplifier power and is also likely to overload and damage the speakers. This caveat is particular important if the speakers are horn-loaded.
Reduce The Level Of The 242's INPUT GAIN When The CLIP LED Lights
If you boost a frequency range already containing significant power, this boost can cause the 242 or the system that it is driving to clip and distort. (If the 242 itself is clipping, its CLIP LED will light.) In this case, do not adjust the fader of your mixer, console or tape player. Reduce the level via the 242's INPUT GAIN.
Consider How The Center Bands and Shelving Bands Interact
To achieve the smoothest response when equalizing a broad band of frequencies, use a single band set to a broad bandwidth (BANDWIDTH control set towards 2) instead of using several bands tuned close together and set to narrower bandwidths. If you are trying to boost low or high frequencies, use the low and high shelving bands. Be aware that their boost continues a considerable way into the infrasonic range and ultrasonic range respectively. If you want to boost low or high frequencies while protecting a sound system from infrasonic or ultrasonic overload, use the LOW-MID and HIGH-MID bands respectively, set close to the ends of their frequency ranges with broad bandwidths. You can then use the low and high shelving filters as high-pass and low-pass filters to remove power at infrasonic or ultrasonic frequencies. Set the low shelf frequency to 30Hz, the high shelf frequency to 20kHz, the CUT/BOOST control to , and both SHELF SLOPE buttons to 12dB/Octave.
Try Not To Re-Equalize A Signal
It is usually best not to equalize a signal several times. If you wait until the final mix to equalize the tracks, you can then hear exactly how the tracks interact with one another. Unless you know from experience that you are likely to apply a great deal of high-frequency boost to the track, keep audio tracks equalized flat when first recording them to multi-track tape. (If you are likely to significantly boost high frequencies, you should boost before going to analog tape
because if you boost in the final mix, you can audibly exaggerate tape hiss. You can then do final, slight "touch-up" equalization when mixing.) If you need more highs in a mix, but tape hiss is a problem, use a dbx 296 Spectral Enhancer or dbx 563X Hiss Reducer. To cancel previous equalization, refer to page 10.
Compare Mixes To Professionally-Recorded CDs
A useful technique is to compare your pre-mixes and final mixes to hit CDs within your genre of music, to get the best reference of good equalized material.
Keep A Record Of Your EQ Settings
Blank 242 front panel control settings for you to keep track of your favorite settings are provided in the back of this manual. Before you jot down any settings, though, we recommend you make copies of the page if you think you will need more blank control setups to track your work.
Use the Frequency Spectrum Chart Located In The Back Of This Manual
A frequency spectrum chart detailing typical instrument and voice ranges is also included in the back of the manual. You can use the table as a general guide to get you started or to better understand how the suggested equalization settings in the next section were derived.
For example, if a kick drum sounds too boomy, note in the chart that the kick's lowest frequencies begin around 50Hz. Therefore, use the 242 controls that cover this range: try cutting the kick's lower energy signal by using the LOW-MID equalization controls (ranging from 31Hz - 800Hz) or the LOW SHELF controls (which can cut from 20Hz - 630Hz). (However, note that the best way to get a good drum sound is to tune the drums correctly, use an appropriate microphone, and place the mics properly. If you do all of this, you will need to use far less equalization to get a good sound. Additionally, almost any drum sound will benefit from using gates like the dbx 274 on the individual kick and snare mic channels.)
Equalization of Specific Instruments and Voice
Note: Control settings for each application are suggested as a starting point. Adjust them to your requirements. Every individual instrument is different and has its own character, which is also greatly affected by the mic you use, where you place it, how the performer plays, and how the part fits into the orchestration and the mix. For all of the following, start with controls set flat (centered to 12:00).
Kick Drum
Note: When applicable, reference the kick drum equalization with the bass guitar (or keyboard bass).
Big Boom: Boost at 100Hz (be careful of distortion, or too much "whoosh")
Strong Beat: Boost from 4kHz to 7.5kHz
Snappy Beat: Cut at 100Hz, Boost midrange to accentuate slap of the beater on the drum head
Note: Use the HIGH SHELF as a 12dB/octave low-pass filter to reduce cymbal splash or other leakage. Set its frequency as low as you can without audibly degrading the sound you are trying to get.
Snare Drum
Sharp Attack: Boost between 3kHz and 7.5kHz
Thin Hits: Cut 100Hz or LOW-MID frequencies
Big Snare: Boost from 200Hz to 1kHz
Note: See the comment about the HIGH SHELF under Kick Drum above.
Toms
Fat Toms: Boost entire drum mix from 100Hz to 500Hz
Individual Tom Settings: High-tuned Toms: Sharpen by Cutting LOW-MID frequencies and Boosting @ 7kHz
Mid-tuned Toms: Clean by Cutting LOW-MID and flatten HIGH-MID
Floor Toms: Fatten by Boosting at 100Hz, and sharpen with 5kHz to 7kHz Boost
Note: See the comment about the HIGH SHELF under Kick Drum above.
High Percussives
Ringing Cymbals: Boost at 10kHz, Cut at 100Hz and LOW-MID range
Cymbal Rides: Boost from 5kHz to 7.5kHz
Note: Use the LOW SHELF as a 12dB/octave high-pass filter to reduce leakage from the rest of kit by removing lower frequencies.
Electric and Acoustic Bass
| Electric Bass: | Punchy Bass: Boost at 120Hz, 100Hz, or 80HzFunk Bass: Boost from 100Hz to 5kHzBass with Reduced Hiss: Use LOW SHELF as a 12dB/Oct high-pass filter; set at 5kHz.Bass with Reduced Finger and Pickup Noise: Cut MID-HIGH and HIGH frequency bands, as necessary |
| Acoustic Bass: | Tighter Smoother Bass: Cut at 100HzComplicated or Fast Bass Parts: Boost between 800Hz and 7kHz |
Electric and Acoustic Guitar
| Electric Guitar: | Increased Attack: Boost from 3kHz to 7.5kHzSharper Attack: Cut LOW-MID frequenciesIncrease Warmness: Boost 100Hz to 500Hz frequencies"Fullness" of Overdriven Tube Amp: Boost 400Hz to 500Hz |
| Acoustic Guitar: | Reduce Mud: Cut at 100HzIncrease Treble: Boost from 4kHz to 7.5kHzAdd Shimmer: Boost at 10kHz |
Keyboards
Note: Many electronic keyboards have on-board equalization that can be used to reduce mud or hiss. In general, when using the 242 with keyboards (especially with digital keyboards), do not boost higher frequencies. This will prevent boosting of pre-existing hiss. (You can use the dbx 296 Spectral Enhancer to boost high frequencies from electronic keyboards because the 296 has special hiss reduction circuitry.)
Reduce Mud: Cut at 100Hz
Increase Tone: Cut LOW-MID frequencies.
Acoustic Piano
Reduce Mud: Cut from 100Hz to 500Hz Increase Tone (Piano in Final Band Mix): Cut 100Hz and Boost from 4kHz to 7.5kHz
Note: Correct mic placement is crucial in getting a good acoustic piano sound. Take the time to experiment until the sound is as good as you can get without EQ. Then use the 242 to polish the sound into excellence.
Brass
Note: When equalizing brass (or woodwind and reed instruments), be careful not to unintentionally "detail" breathing and finger movements which occur by boosting LOW and LOW-MID frequencies
Decrease Sharpness: Cut from 1kHz to 7kHz
Increase Tone: Boost from 5kHz to 10kHz
Increase Warmth: Boost from 100Hz to 400Hz
Vocals
| Lead Vocals: | Increase Presence: Boost from 4kHz to 7.5kHzReduce Mud: Cut at 100Hz |
| Backing Vocals: | Set so that these vocals do not interfere with Lead Vocals |
Specific Applications
Recording Studios
The 242 is a powerful single-track equalizer (as discussed immediately above) or can be used to polish a final two-track mix. It can also be used to reduce hum or buzz from electrical instruments. For stereo playback, two units (each set individually), are required.
The 242 is an effective tool to equalize monitor loudspeakers where the frequency response of the playback system must be flat for critical listening. Usually only slight amounts of EQ are necessary; if large amounts are necessary this implies that the loudspeakers are inadequately flat, and/or that the room has serious acoustic problems that should be corrected by acoustic treatment. Once the 242 is set (typically done with acoustical analysis equipment), there should be no need for further adjustment unless the components in the listening chain are altered or changed.
If a track is plagued by hum or other interference of fixed pitch, the 242 can be used to eliminate the interference (with negligible effect upon the program material). Hum occurs at multiples of 60Hz (such as 60Hz, 120Hz, 240Hz, etc.) and similar multiples of 50Hz in countries where the AC alternates at that frequency. For such narrowband notching, set BANDWIDTH and CUT fully counterclockwise, then sweep FREQUENCY until you find it. (An effective trick is to start with the CUT/BOOST control at full boost to let you easily find the interference. Once you have tuned in on it, set the CUT/BOOST control to to remove it.)
Telephone, transistor radio, and "old time" recording effects can be easily generated by setting the HIGH and LOW shelves to CUT/BOOST and 12dB/octave to limit the bandwidth. Telephone audio, for example, is limited to the 300Hz - 3kHz range. To improve the effect, set the Mid Band to 1kHz with 16dB boost and a fairly narrow bandwidth. To simulate the distortion characteristic of such sources, overdrive the input of the 242 beyond the point where the CLIP LED flashes.
Sound Reinforcement
In permanent sound reinforcement installations such as clubs and churches, the 242 can be adjusted to help smooth out inconsistencies in the frequency response caused by loudspeaker anomalies, poor acoustics, reflections, etc., for both the main house speakers and for the on-stage monitor systems. Proper EQ is vital to maximize gain before feedback in stage monitors. Use the 242 to remove, or "notch out" the frequencies that are causing the feedback. You can achieve this in several ways:
(1) During a show, monitor the full bandwidth frequency response with a 13 -octave real-time spectrum analyzer that has a peak hold function. This will enable the person mixing to quickly bring down the volume and to avoid damaging the speakers and compression drivers while still being able to capture the feedback frequency on the spectrum analyzer. The 242 can then be adjusted to attenuate or completely notch it out.
(2) The second method takes more time and requires a general idea of the frequency of the feedback. Set the 242 for a moderate BANDWIDTH, set CUT/BOOST control to -6dB, and adjust the FREQUENCY control until the offending frequency is removed. Once the FREQUENCY control is centered at the offending frequency, slowly decrease the bandwidth (to minimize any sound coloration). You may have to touch up the FREQUENCY control if decreasing the bandwidth causes the system to start feeding back.
(3) If you can tune the system before the audience arrives, put a compressor (like a dbx 266) after the 242. To avoid burning out drivers, set the compressor's threshold, release time and output gain so that the output of the sound system is limited to a very low level. Now increase the sound system gain until the system feeds back. If correctly adjusted, the compressor will prevent any damage. Determine the frequency of the feedback and use one band of the 242 to notch it out. This will cause the gain reduction of the compressor to decrease and the system to feed back at a new frequency. If this frequency is within the range of one of the remaining bands on the 242, notch it out too. A third frequency will appear; eliminate it if you can. You have now removed the three major "ring modes" of the sound system, and, in normal operation, you should be able to get significantly more gain before feedback than you could when the system was unequalized. Be aware, however, that ring modes can change frequency with changes in temperature and acoustics (such as the audience's being present). Be prepared to make slight adjustments just before the show begins. The system will be more stable if you use a wider bandwidth than the minimum 0.05 octave on the 242. However, this will also cause slightly more sonic coloration.
Dance Clubs
Dance clubs often require a large bass boost in the region of 20Hz - 80Hz, along with a smaller treble boost. The 242's LOW and HIGH shelving controls can be used for this purpose, leaving the remaining bands available for house tuning (smoothing out the loudspeakers' mid-bass and midrange acoustic response in the room).
The main limitation to boosting the bass with the 242 is your amplifier power and loudspeaker power-handling capacity. Bi-amping is recommended for maximum capability, because even if the bass amplifier occasionally clips, it won't cause obvious harshness. In this arrangement, an external electronic crossover is necessary.
The settings of the LOW FREQUENCY and BANDWIDTH controls are crucial to obtaining bass that is punchy "tight," and sensual without being boomy (like jukebox bass). Correct settings will vary considerably with loudspeaker type and room acoustics. In particular, satisfactory results cannot be obtained with a horn-loaded bass system that has a cutoff frequency above 40Hz. Excessive bass boost below the cutoff frequency of the horn will cause severe distortion and may also damage the drivers.
Broadcast
In the broadcast studio, the 242 can aid in tailoring the voice of the DJ, enhancing the sonic quality of old recordings before they are recorded onto carts or digital storage media, equalizing incoming phone calls to be aired, correcting poor-quality sound bites, enhancing the intelligibility of traffic reports from aircraft, and equalizing the program line for a "signature sound" prior to final audio processing.
More Equalization Considerations
Phase
In the past, some equalizers were said to ring or not ring in the presence of a transient, to have "phase shift," or to be of minimum-phase topology. Such rhetoric is by and large meaningless today. Virtually all modern analog equalizers can be fully characterized by their frequency response(s), since almost all are minimum-phase.
Canceling Previous Equalization
Because the 242's BANDWIDTH is constant over different frequencies and the CUT/BOOST is symmetrical (refer to Figure 1), equalization provided by the 242 can be quickly and precisely canceled by it. To do this, first set INPUT GAIN and all FREQUENCY and BANDWIDTH controls to the exact positions they were in when equalization was previously added. Then set all CUT/BOOST controls to the inverse of their positions during that equalization (e.g., if set to +2 before, set to -2 now). The net effect will be an equalization curve that is the reciprocal of the one used during equalization. This curve will make the overall frequency response flat and will also cancel all phase shift introduced by the original equalization.
Headroom
The overload-to-noise ratio available from the 242 is typically 115dB (varied somewhat by the control settings). While this ratio is extremely high, audible noise can occur if system gains are chosen very poorly. For best results, set the input sensitivity of the device being driven by the 242 (like a power amplifier) so that it clips when receiving slightly less than +19dBm. Because the 242's noise level is so low, this adjustment does not need to be exact.
In any system using standard professional +4dBu nominal levels, the 242 can be used without any concern that its internal noise will limit the overall noise level of a mix or recording. The 242's dynamic range is >18-bit digital; it is about 20 - 25dB better than the dynamic range of the new, low-cost digital multi-track recorders.
Frequency-Weighted Compression
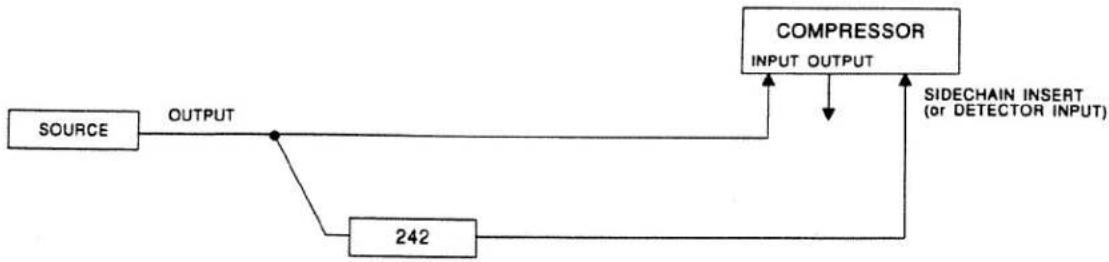
It is possible to enhance certain vocals and instruments in a mix by frequency-weighted compression using the 242 with a compressor that has a Sidechain Insert or Detector Input (such as dbx's 266 and 166A). With the 242 in line ahead of the Insert (but not in the audio path), the equalization settings do not shift the timbre or frequency response of the audio signal. Instead they change the threshold of the compressor so that frequencies that have been boosted by the equalizer cause more gain reduction than frequencies that have been cut. This mechanism means that the program is not subject to the phase shift normally caused by program equalization.
flowchart
graph LR
    A["SOURCE"] --> B["OUTPUT"]
    B --> C["242"]
    C --> D["COMPRESSOR INPUT OUTPUT"]
    D --> E["SIDECHAIN INSERT (or DETECTOR INPUT)"]
Figure 3: Frequency-Weighted Compression
With this arrangement, boosting certain frequencies with the 242 causes the compressor to suppress them dynamically if their power dominates at the 242's output. When compression occurs it affects the level of the entire program, so the effect is greatest when you use fast release times that allow the compressor to briskly adapt to changing spectral balances by quickly changing its gain. A relatively high compressor threshold setting can allow normal sounds to be unaffected while only louder sounds are compressed. Depending on the threshold setting, lower level fundamentals or harmonics will not cause compression.
To help prevent tape saturation (e.g., when recording cymbals and tom-toms to slow-speed analog tape — particularly cassette), you can use a compressor with the 242 in the sidechain path. For drum kit miking, adjust the 242 for boost with a peak of about 5kHz, causing the cymbal to be compressed on a very loud crash, stopping tape saturation at high frequencies, where there is less headroom. However, gentle tapping of a drumstick or brushing of the cymbal will not be affected. Assuming the tom-tom is a lower frequency instrument and can be better tolerated by the tape, it has less need for compression. Equalization in the sidechain circuit means that the compressor is not triggered as readily by a loud tom-tom beat as by an equally loud cymbal crash. (If you want a compressed tom sound, reset the EQ to boost these drum's dominant frequencies.)
You can also use the converse of the above EQ technique: dipping the 242's bands causes any sound with dominant energy in the affected register to pull the level up because the compressor won't detect a need for as much compression.
To increase the sustain of a musical instrument (e.g., a guitar or bass), boost the 242 in the dominant frequency range of the instrument. Set the compressor with a fairly low threshold and a moderate compression ratio.
To apply de-essing to vocals (i.e., to reduce sibilance), use the 242 in the compressor's level detector circuit and set it for a high frequency boost in the specific frequency range where the vocal "hiss" or lisp occurs (generally in the 5-6kHz region). This pre-emphasizes the already "hissy" vocal input to the detector. Used in conjunction with a moderate to high threshold and compression ratio and very fast attack and release times, this arrangement greatly attenuates the "essing" without affecting the basic sound quality or balance of the voice.
(dbx also offers de-essing in the 263X De-Esser and 286 Mic Processor. As dedicated units, they may provide better results for demanding de-essing duty.)
If a single compressor is to be used with a multi-way speaker system (i.e., before the crossover, after the EQ), the system operator is faced with the problem of keeping levels below the point of damage of the most sensitive part of the system. If, for example, mid-range drivers are frequently damaged, the whole system must be operated at a lower sound-pressure level, or additional mid-range drivers must be added. By inserting the 242 in the detector path of the system's compressor, the compressor can be made more sensitive to frequencies in the range handled by the sensitive drivers. The system can then be run at higher levels and will only be dropped back when damaging signals are present.
Keyed Gating
For triggering a gate (e.g., dbx's 274 and 363X Gates) to open and close in response to certain frequencies, connect the 242's input in parallel with the signal input of the gate (both receiving the same input signal) and connect the 242's output to the gate's key input detector. Adjust the 242 to accentuate the frequencies that will control the gating action.
CONNECTING THE 242 TO YOUR SYSTEM
Basic Connection
The 242 has a balanced input and unbalanced output, and can be used with any line-level device. Some common examples include: mixing consoles, musical instruments, patch bays and other signal processors.

flowchart
graph TD
    A["INSTRUMENT, MIXER, INSERT (Send)"] --> B["INPUT (BALANCED)"]
    C["MIXER, AMPLIFIER, INSERT (Return)"] --> D["OUTPUT (UNBALANCED)"]
    E["TIP + RING - SLEEVE GND"] --> F["Power 18VAC"]
    F --> G["USE ONLY SPECIFIED POWER SUPPLY"]

For all connections, refer to the following steps:
- Turn Off all equipment before making any connections.
- Mount the 242 in a 1U rack space (optional).
The 242 requires one rack space (height) and 1 rack space (width). It can be mounted above or below anything that doesn't generate excessive heat, since it requires no special ventilation. Ambient temperatures should not exceed 113°F (45°C) when equipment is powered.
Note: Avoid over-tightening of rack mounting screws as this could damage the front panel.
Caution: Never remove the cover. There are no user-serviceable parts inside, and you run the risk of an electric shock.
- Make connections via 14 " TRS jacks according to your requirements.
Typical patch points include: a mixer's channel or subgroup inserts when using the 242 on individual instruments or tracks; the mixer's main outputs or bus inserts when mixing; an instrument preamp's effects loop when using the 242 for guitar or bass; main outs of a submixer (e.g., keyboard mixer) as the signal is sent to main mixer; between a DAT's output and an analog cassette input. When using a chain of processors, the 242 may be placed either before or after effects or dynamic processors. However, if you are using the 242 (in a compressor sidechain) for speaker protection, the compressor should be as close to the speaker's power amplifier as possible. We recommend you use common sense and experiment with different setups to see which one provides the best results for your needs.
Note: Never connect the 242's input to the speaker output of an instrument or power amplifier.
- Power On the unit: Connect the external AC power transformer to the unit and to mains power.
Note: Check the line voltage. The unit is shipped for 115V or 230V, 50 or 60Hz operation. Refer to the label on the external power transformer to verify your unit's precise line voltage.
TECHNICAL SUPPORT, FACTORY SERVICE
Technical Support/Factory Service
The 242 is an all-solid-state product with components chosen for high performance and excellent reliability. The unit has no internal adjustments. Each 242 is designed, assembled, tested, burned in and calibrated at the factory in the USA. We recommend that your 242 be returned to the factory only after referring to the manual and consulting with Customer Service.
Our phone number, fax number and address are listed on the inside front cover. When you contact dbx Customer Service, be prepared to accurately describe the problem. Know the serial number of your unit — this is printed on a sticker attached to the rear panel.
Note: Please refer to the terms of your Limited Two-Year Standard Warranty, which extends to the first end-user. After the warranty expires, a reasonable charge will be made for parts, labor, and packing if you choose to use the factory service facility. In all cases, you are responsible for transportation charges to the factory. dbx will pay return shipping if the unit is still under warranty.
Shipping Instructions: Use the original packing material if it is available. Mark the package with the shipper's name, and with the following words in quotes in red: "DELICATE INSTRUMENT, FRAGILE!" Insure the package properly. Ship prepaid, not collect. Do not ship parcel post. (If you do not plan to save the packaging material, please recycle it.)
Registration Card and User Feedback
We appreciate your feedback. After you have an opportunity to use your new 242, please complete the Registration Card (located in back of this manual), detach it from the manual and return it.
SPECIFICATIONS
| InputImpedanceMaximum LevelCMRRInput Gain | Balanced 1/4" TRS Phone Jack; Accepts Balanced or Unbalanced Sources10kΩ+27dBu, Balanced or Unbalanced>45dB (58dB Typical)→to +16dB |
| OutputImpedanceMaximum Level | Unbalanced 1/4" TRS Phone Jack; Drives Balanced or Unbalanced Inputs47Ω+19dBm |
| Performance (CUT/BOOST = 0)Frequency ResponseTotal Harmonic DistortionSMPTE Intermodulation DistortionNoiseClipping Indicator | 20 - 20,000Hz, ±0.5dB, -3dB 200kHz0.005% at +4dBu; 0.03% at Maximum Output Level0.003%20 - 20,000Hz; -94dBuMonitors All EQ Stages,Lights When 242's Internal Amplifiers are Within 1dB of its Clipping Level |
| FREQUENCY RangesLOWLOW-MIDMIDHIGH-MIDHIGHOther Band ControlsLOWLOW-MID, MID, MID-HIGHHIGH | 20 - 680Hz31 - 800Hz0.25 - 6.3kHz0.63 - 16kHz1.25 - 20kHzShelving Filter: Switchable 6dB or 12dB/Octave Slope; +16dB MaximumBoost, >40dB Maximum CutPeak Dip Filter, +16dB Boost, >40dB Cut at Any Bandwidth Setting,Shelving Filter: Switchable 6dB or 12dB/Octave Slope; +16dB MaximumBoost, >40dB Maximum Cut |
| Power CordOperating VoltageOperating Temperature | 18VAC, Provided by External Power SupplyDO: 90 - 130VAC, 50/60Hz; EU: 180 - 260VAC, 50/60Hz0°C to 45°C (32°F to 113°F) |
| Dimensions (H x W x D)Rack SpaceWeight | 1.75" x 19" x 4" (4.45cm x 48.5cm x 10.16cm)1 Rack Unit (1U High)Net Weight: 5 lb. (2.3 kg).Shipping Weight: 7 lb. (3.2 kg). |
Notes: Noise and frequency response specifications are at unity gain.
0dBV = 1.0Vrms; 0dBu = 0.775Vrms.
Specifications are subject to change.

SESSION/SONG TITLE:
INSTRUMENT/VOCAL:
DATE:

SESSION/SONG TITLE:
INSTRUMENT/VOCAL:
DATE:

SESSION/SONG TITLE:
INSTRUMENT/VOCAL:
DATE:
The Ground Truth image displays a single, solid horizontal line. According to Rule 2 (UNDERSCORE & LINE RULES), if the GT contains lines used for stylistic emphasis or as background elements (like ruled paper), the OCR result must ignore them. The provided OCR content is "____", which consists of four underscores. This is incorrect because underscores are not equivalent to a solid line and are not permitted under the “Stylistic/Background Lines (Ignore)” rule. Outputting underscores for a stylistic line violates the rule and constitutes an error. Therefore, the OCR result is inconsistent with the Ground Truth.
| FREQUENCY SPECTRUM | |||||||||
| Frequency (in Hz) 20 | 40 | 60 | 100 | 500 | 1k | 2k | 5k | 10k | 20k |
| Percussion | |||||||||
| Cymbals | 293Hz----Cymbals----12.5kHz | ||||||||
| Snare Drum | 87.3Hz----Snare Drum----14kHz | ||||||||
| Kick Drum | 55Hz----Kick Drum----2.3kHz | ||||||||
| Electric/Electronic | |||||||||
| Bass Guitar | 36Hz----Bass Guitar----587Hz | ||||||||
| Electric Guitar | 82Hz----Electric Guitar----1.3kHz | ||||||||
| Synthesizer | 28Hz----Synthesizer---->4.1kHz | ||||||||
| Organ | 20Hz----Organ----20kHz | ||||||||
| Piano | 24Hz----Piano----8.3kHz | ||||||||
| Strings | |||||||||
| Acoustic Guitar | 82Hz----Acoustic Guitar---->3kHz | ||||||||
| Violin | 196Hz----Violin----8.3kHz | ||||||||
| Cello | 73.4Hz----Cello----9.3kHz | ||||||||
| Bass Viol | 40Hz----Bass Viol----8.37kHz | ||||||||
| Winds/Reeds | |||||||||
| Flute | 293Hz----Flute----10.7kHz | ||||||||
| Oboe | 261Hz----Oboe----16.7kHz | ||||||||
| Clarinet | 146Hz----Clarinet----10.7kHz | ||||||||
| Tenor Saxophone | 100Hz----Tenor Saxophone----700Hz | ||||||||
| Horns | |||||||||
| Trumpet | 164Hz----Trumpet----10.7kHz | ||||||||
| Trombone | 82Hz--Trombone--7.9kHz | ||||||||
| Tuba | 43Hz----Tuba----3.9kHz | ||||||||
| Human Sounds | |||||||||
| Female Speech | 164Hz----Female Speech----10.7kHz | ||||||||
| Male Speech | 97Hz----Male Speech----8.3kHz | ||||||||
| Vocal Sibilance | >4kHz--Vocal Sibilance | ||||||||
| Soprano | 246Hz----Soprano----1.1kHz | ||||||||
| Alto | 174Hz----Alto----698Hz | ||||||||
| Tenor | 130Hz----Tenor----493Hz | ||||||||
| Bass | 87Hz----Bass----392Hz | ||||||||
WARRANTY
United States Warranty
Limited Warranty
This warranty is valid only for the original purchaser and only in the United States. We warrant dbx products against defects in material or workmanship for a period of two years from the date of original purchase for use, and agree to repair or, at our option, replace any defective item, except external power transformers, without charge for either parts or labor.
IMPORTANT: This warranty does not cover damage resulting from accident, misuse or abuse, lack of reasonable care, the affixing of any attachment not provided with the product, loss of parts, or connecting the product to any but the specified receptacles. This warranty is void unless service or repairs are performed by an authorized service center. No responsibility is assumed for any special, incidental or consequential damages. However, the limitation of any right or remedy shall not be effective where such is prohibited or restricted by law.
Simply take or ship your dbx product prepaid to our service department. Be sure to include your sales slip as proof of purchase date. (We will not repair transit damage under the no-charge terms of this warranty.) dbx will pay return shipping.
NOTE: No other warranty, written or oral is authorized for dbx products.
This warranty gives you specific legal rights, and you may also have other rights which vary from state to state. Some states do not allow the exclusion of limitations of incidental or consequential damages or limitations on how long an implied warranty lasts, so the above exclusion and limitations may not apply to you.
International Warranty
Bedingungen
dbx warrants dbx products (except for external power transformers) against evident defects in material and workmanship for a period of two years from the date of original purchase for use. This warranty does not cover damage resulting from misuse or abuse, or lack of reasonable care, and inadequate repairs performed by unauthorized service centers. Performance of repairs or replacements under this warranty is subject to proof of purchase. Shipment of the defective item for repair under this warranty will be at the customer's own risk and expense. This warranty is valid for the original purchaser only.
Conditions de garantie

- INSPECTION
- Verify that the 242 package contains the following:
- INTRODUCTION
- Features:
- OPERATING CONTROLS
- MASTER Section
- LOW and HIGH Band Shelving Section
- LOW-MID, MID, and MID-HIGH Band EQ Section
- OPERATING NOTES
- Getting the Feel Of The 242 Parametric Equalizer
- Three-Band Equalization Controls
- LOW and HIGH Band Shelving Controls
- General Equalization Tips
- Consider Using CUT Instead Of BOOST To Highlight Frequencies
- Equalize Individual Tracks In The Context Of The Entire Mix
- Be Careful When Boosting At The Extremes Of The Frequency Spectrum
- Reduce The Level Of The 242's INPUT GAIN When The CLIP LED Lights
- Consider How The Center Bands and Shelving Bands Interact
- Try Not To Re-Equalize A Signal
- Compare Mixes To Professionally-Recorded CDs
- Keep A Record Of Your EQ Settings
- Use the Frequency Spectrum Chart Located In The Back Of This Manual
- Equalization of Specific Instruments and Voice
- Kick Drum
- Snare Drum
- Toms
- High Percussives
- Electric and Acoustic Bass
- Electric and Acoustic Guitar
- Keyboards
- Acoustic Piano
- Brass
- Vocals
- Specific Applications
- Recording Studios
- Sound Reinforcement
- Dance Clubs
- Broadcast
- More Equalization Considerations
- Phase
- Canceling Previous Equalization
- Headroom
- Frequency-Weighted Compression
- Keyed Gating
- CONNECTING THE 242 TO YOUR SYSTEM
- Basic Connection
- TECHNICAL SUPPORT, FACTORY SERVICE
- Technical Support/Factory Service
- Registration Card and User Feedback
- WARRANTY
- United States Warranty
- Limited Warranty
- International Warranty
- Bedingungen
- Conditions de garantie
Brand : DBX
Model : 242
Category : Audio Equalizer