
SW610A - Sound system AmpliVox - Free user manual and instructions
Find the device manual for free SW610A AmpliVox in PDF.


| Product Type | Portable Public Address System |
| Brand | AmpliVox |
| Model | SW610A |
| Power Output | 50W RMS |
| Speaker Configuration | 1 x 6.5" woofer + 1" tweeter |
| Frequency Response | 50 Hz - 18 kHz |
| Battery Type | Rechargeable lead-acid or lithium-ion (12V) |
| Battery Life | Up to 8 hours at moderate volume |
| Power Supply | AC 100-240V, 50/60Hz with included adapter |
| Wireless Microphone | UHF handheld or headset (included) |
| Audio Inputs | 1/4" microphone input, 3.5mm aux input, Bluetooth |
| Audio Outputs | Line output for external speaker |
| Dimensions (W x H x D) | 12 x 14 x 10 inches (30.5 x 35.6 x 25.4 cm) |
| Weight | 12 lbs (5.4 kg) |
| Construction | Durable ABS plastic with metal grille |
| Mounting Options | Built-in telescopic handle and wheels; tripod socket |
| Care & Cleaning | Wipe with dry cloth; avoid moisture and extreme temperatures |
| Safety | Do not disassemble; keep away from water; use only supplied charger |
| Spare Parts & Repairability | Replacement batteries and microphones available from AmpliVox; service by authorized technicians |
| General Information | Ideal for classrooms, conferences, and outdoor events |
Frequently Asked Questions - SW610A AmpliVox
User questions about SW610A AmpliVox
0 question about this device. Answer the ones you know or ask your own.
Ask a new question about this device
Download the instructions for your Sound system in PDF format for free! Find your manual SW610A - AmpliVox and take your electronic device back in hand. On this page are published all the documents necessary for the use of your device. SW610A by AmpliVox.
USER MANUAL SW610A AmpliVox
AMPLIVox® PORTABLE SOUND SYSTEMS
User Guide
S610A / SW610A / SW615A
Wired / Wireless Half Mile Hailer PA System

natural_image
Exterior view of a black AmpUVox device with attached power supply (no visible text or symbols on main body)
Made in the USA
Thank you for choosing the S610A / SW610A / SW615A Half Mile Hailer PA System from AmpliVox Portable Sound Systems.
We are excited in introducing this truly unique system. Our system combines flexibility with functionality. Please refer to this user guide as you enjoy the unique capabilities of another quality product from AmpliVox Portable Sound Systems.
We encourage you to visit our website www.ampli.com to register your product for its warranty coverage, sign up to receive our newsletter, download our catalog, and learn more about the complete line of AmpliVox audio visual products, including portable PA systems, and lecterns.
IMPORTANT SAFETY INSTRUCTIONS
Before using this product, read the instruction manual for important safety information. Please retain this manual for future reference and warranty information.
Troubleshooting & Servicing
Do not attempt to service or repair the device yourself. Refer all servicing to qualified service personnel. Do not attempt to modify the device in anyway. Doing so could invalidate your warranty.
Cleaning
When cleaning the device, please use a soft, dry cloth. Never use benzene, paint-thinner, or other chemicals on the device.
Location
Place the device in stable location, so it will not fall causing damage to the device or bodily harm.
Intended use
The product may only be used with the original parts intended for it. The intended use includes adherence to the specified installation instructions. The manufacturer accepts no liability for damage arising due to improper use.
WARNING: Changes or modifications to this unit not expressly approved by the party responsible for compliance could void the user's authority to operate the equipment.

The exclamation point within an equilateral triangle is intended to alert the user to the presence of important operating and maintenance instructions in this owner's guide.
IMPORTANT
This device complies with Part 15 of the FCC Rules. Operation is subject to the following two conditions:
(1) This device may not cause harmful interference, and (2) this device must accept any interference received, including interference that may cause undesired operation.
The unit's circuitry may cause interference to nearby radios. To prevent interference, either switch the unit off or move away from the affected radio.
NOTE: This equipment complies within the limits for a class B digital device, pursuant to Part 15 of the FCC Rules.
These limits are designed to provide reasonable protection against harmful interference in a residential installation.
This equipment generates, uses and can radiate radio frequency energy and, if not installed and used in accordance with the instructions, may cause harmful interference to radio communications. However, there is no guarantee that interference will not occur in a particular installation. If this equipment does cause harmful interference to radio or television reception, which can be determined by turning the equipment off and on, the user is encouraged to try to correct the interference by one or more of the following measures:
- Increase the separation between the equipment and receiver.
- Connect the equipment into an outlet on a circuit different from that to which the receiver is connected.
- Consult the dealer or an experienced radio / TV technician for help.
NOTE: Shielded cables may be required to be used with this unit to en-sure compliance with the Class B FCC limits.
PACKAGE CONTENTS
Model S610A
- Tapered Weather Resistant Horn SPL 108 dB
- Portable 50 Watt Stereo Amplifier
- Wired Microphone with 5 foot cord
- Shoulder Carry Strap
Model SW615A
- Tapered Weather Resistant Horn SPL 108 dB
- Portable 50 Watt Stereo Amplifier
- Wireless Handheld 16 CH UHF Microphone
- Shoulder Carry Strap
SPECIFICATIONS
Amplifier System
• Power Output - 50 Watt RMS into 4 ohms
- AC/DC Operation
- Stereo Speaker Output
• 3.5mm Line Output
- 3.5mm Line Input
- Separate Volume and Tone Control for Line Input
• Master Volume Control
Model SW610A
- Tapered Weather Resistant Horn SPL 108 dB
- Portable 50 Watt Stereo Amplifier
• Wireless 16 CH UHF Transmitter
• Headset and Lapel Microphones - Shoulder Carry Strap
Wireless System Models
• Built-in UHF Selectable 16 Channel Receiver with RF Signal LED
• Wireless Range: 300 feet
• Frequency: 584 -608 MHz
INSTALL BATTERIES
Battery Power
- The amp uses 10 "D" size Alkaline batteries (not included); or the optional rechargeable AmpliVox NiCad Battery Pack (S-1465) and (S1460) AC adapter -purchase separately (Fig 3).
- The removable battery door on the back of the amp is designed to stay closed until you need to change the batteries. Slip a finger nail under it and slide it out. (Fig 1)
- Lift the battery holder out. The plastic dividers between the batteries help prevent battery corrosion. (Fig 2)
- Install 10 fresh Alkaline "D" size batteries. Be sure to observe the polarity when putting batteries in the battery compartment. The negative (flat) ends go against the springs. (Fig 2) Carefully replace battery holder. Batteries should look like they are standing up.

DO NOT MIX BATTERY TYPES OR ATTEMPT TO RECHARGE ALKALINE BATTERIES. EQUIPMENT DAMAGE, SAFETY HAZARD OR FIRE COULD RESULT.
Note: The battery holder cable comes from the factory already plugged into the connector. If it comes loose, push it in securely. (Turn the plug over if it doesn't fit; it only fits one way.)
- Slide door back into place.
- If using the S-1465 NiCad Battery Pack (Fig 3), replace battery holder with the battery pack. Insert the battery pack plug into the connector where the battery holder was plugged into. Plug AC Adapter/ Recharger power supply (S1460) into the "DC IN" jack on front panel of the amp. Plug into a working electrical outlet. Charge 24 hours for full charge before using.

natural_image
Exterior view of a black AMPLiVOX device with internal components and a label 'Fig 1' (no readable text or symbols on the device itself)
natural_image
Interior view of an open battery pack with six batteries, one partially open (no visible text or symbols)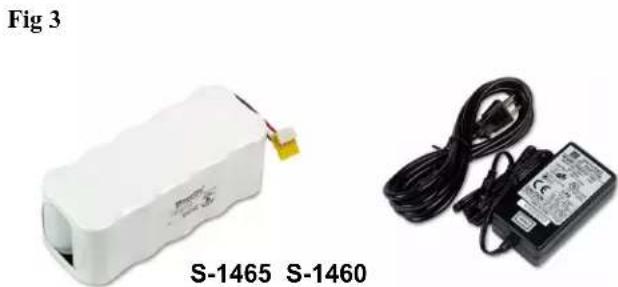
natural_image
Two electronic devices: a white battery labeled S-1465 and a black-and-white power adapter labeled S-1460, shown without any text or symbols on the devices themselves.AMPLIFIER FEATURES
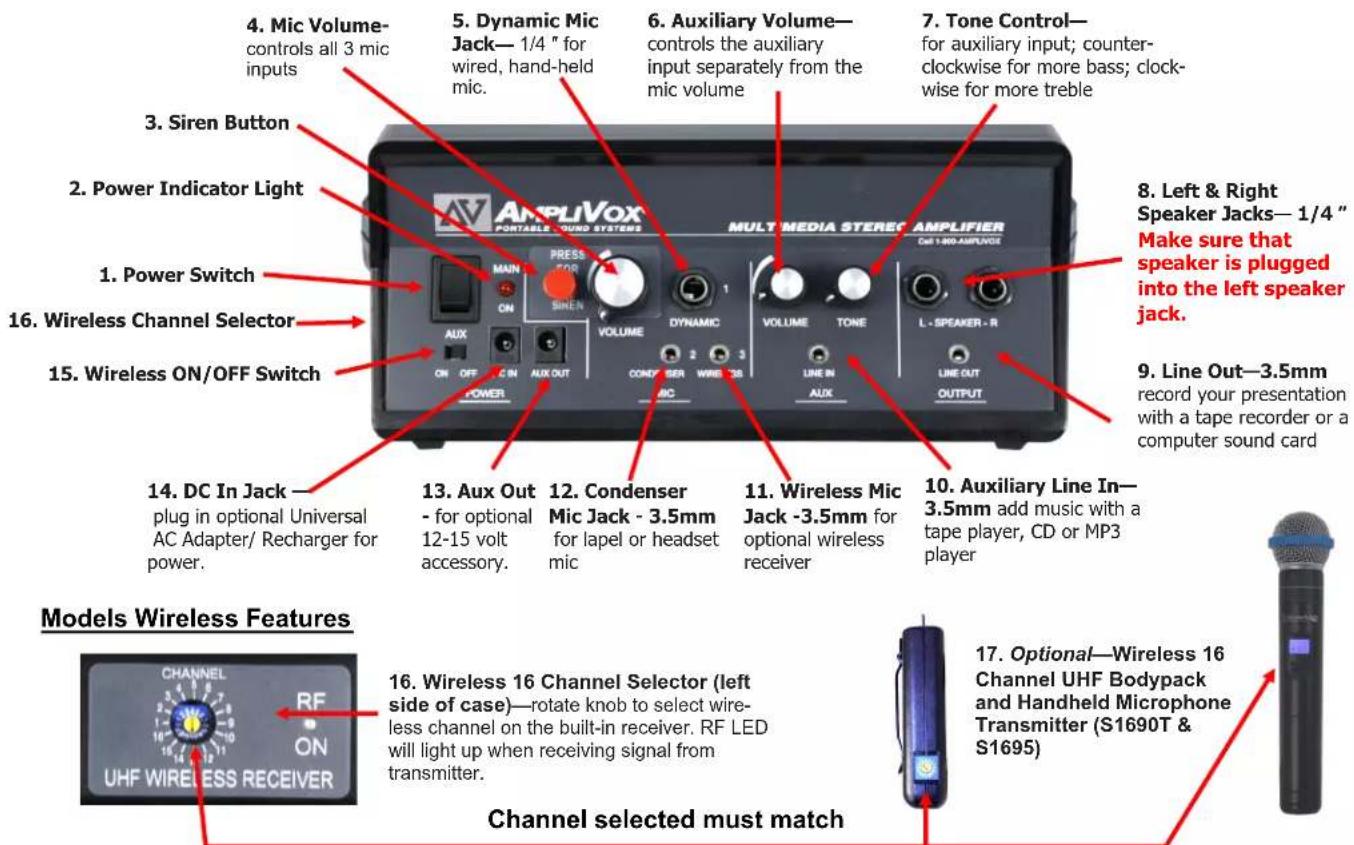
- Power Switch.
- Power Indicator Light. Turns red when power is turned on.
- Siren Button. Single - Variable tone @125 dBL. Push and hold.
- Mic Volume Control. This knob controls output loudness to all 3 microphone inputs and Siren.
- Dynamic Mic Jack. Dynamic is one kind of microphone. AmpliVox's wired, hand-held microphone is this type.
- Auxiliary Volume Control. This volume knob controls the auxiliary volume separately from the microphone volume.
-
Tone Control. This knob controls the tone of the auxiliary input. Turn counterclockwise for more bass or clockwise for more treble. (The mic jacks don't need a tone control because they have been pre-optimized for the human voice.
-
Left & Right Speaker Jacks. Two separately amplified speaker jacks allow you to use one or two speakers for additional sound power or true stereo output.
- Line Out Jack. Can be used with a tape recorder The Line Out Jack outputs all the sound from the 3 microphone inputs and the auxiliary input.
- Auxiliary Line In Jack. To play music, just plug in your CD player, MP3 player or Amplivox's Bluetooth Receiver.
- Wireless Mic Jack. Optional second wireless receiver goes here. Then plug AmpliVox's lapel or headset microphone into the transmitter; that's the one with the belt clip. Now you are hands-free anywhere within a 300-foot radius of the receiver.
-
Condenser Mic Jack—with phantom power. If you don't know what phantom power is, then you don't need to know, but a condenser microphone won't work without it. If you have AmpliVox's lapel or headset microphone, plug it in here.
-
Aux Out. For optional 12-15 volt accessory.
- DC In Jack. Used for the 12V Battery Cable, 12V Power Plug or the optional International AC Adapter/Recharger, plug it in here. Plug the other end into a wall / floor outlet.
- Wireless ON/OFF Switch Switches power on to the built-in 16 channel wireless receiver.
- Wireless 16 Channel Selector Channel that you select here must match with the channel that is selected on the bodypack or handheld microphone transmitter.
- OPTIONAL—Wireless 16 Channel UHF Bodypack Microphone Transmitter (S1690T) or Wireless Handheld Transmitter (S1695).
To Operate:
Make sure that the speaker is plugged into the "LEFT SPEAKER" jack. Plug handheld microphone into the "DYNAMIC" jack. Turn amplifier on. Turn microphone on and talk into microphone. Rotate "VOLUME" control knob to obtain desired loudness level. For Models with the built-in wireless receiver the ON-OFF switch is located just below main power switch of amplifier. Insure both transmitter and receiver is on same frequency channel. Turn on power switch located on wireless transmitter (S1690T or S1695). RF LED on side of amplifier will light meaning that it is receiving signal. If RF LED does not light, check channel numbers.
WIRELESS BODYPACK TRANSMITTER—OPTIONAL—MODEL S1690T
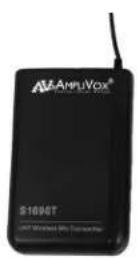
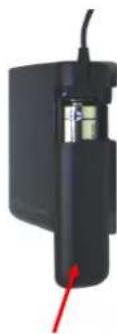
- The transmitter bodypack is operated by 1 - "AA" 1.5 Volt alkaline battery. Slide off battery cover (A) and install battery as shown. Make certain the battery is fully seated in its compartment so the cover slides in place easily. Battery life with alkaline batteries is approximately 8 hours of operating time.
- Select a channel (1-16) on side panel (B) using the supplied screw driver to select channel number. Channel selected should match channel on receiver. When transmitter and receiver are set to correct channel the RF indicator on receiver will glow red when bodypack transmitter is turned on. To check battery, turn on before turning on receiver. If LED (C) changes green to red, or does not light up, replace battery.
- Plug the Lapel / Headset microphone into the Mic Input Jack (D). The microphone can be clipped to a necktie or other clothing, using the supplied clip. The lapel mic should be placed under the chin, as close to the center of the body as possible.
- Slide the power ON / OFF / MUTE / STANDBY switch (E) to the ON position (the LED indicator light will illuminate green). Replace batteries when this LED turns red.
- GAIN SWITCH (F): If you are a soft spoken person then set the switch to the 10 dB position. If you are a loud speaking person then set the switch to the -10 dB position. Adjust to prevent distortion while speaking.
natural_image
Close-up of a black electronic device with a red pointer and metallic connector (no visible text or symbols)A

natural_image
Black cylindrical device with a red arrow and label B pointing to its side (no readable text or symbols on the device itself)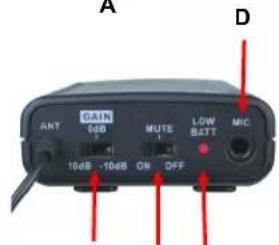
F E C
WIRELESS HANDHELD MICROPHONE—OPTIONAL—MODEL S1695
BATTERIES
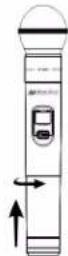
- Hold the body of microphone in hand and twist off bottom section of microphone.
- Insert two "AA" batteries.
- Twist bottom section back on to microphone.
BATTERY STATUS
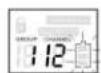
The life expectancy of the two batteries is about 10 hours. When the "BATTERY" symbol on the display screen keeps flashing the batteries should be replaced immediately.

OPEN

CLOSE
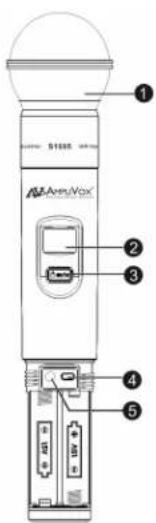
Functions
1) Interchangeable Microphone Head
2) LCD Screen
3) Power / Mute Control Switch
4) Select Button
5) Microphone Input Sensitivity Adjustment—is used to set the gain of microphone. If you are a soft talking speaker you will need to turn the control counter clockwise. Turn clockwise if you are a loud talker. Use plastic screwdriver that is supplied.
BATTERY COVER REMOVED


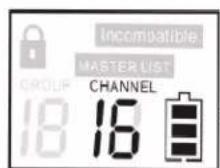


- TURN ON MICROPHONE: Press and hold the "POWER/MUTE" (3) button until LCD screen lights up.
- TO MUTE: Press "POWER/MUTE" button twice to MUTE. Channel number will flash when muted. Press button again twice to remove "MUTE".
- TURN OFF MICROPHONE: Press and hold the "POWER/MUTE" (3) button for 2 seconds to turn microphone "OFF".
- SELECT CHANNEL (Manual): Press and hold the "SELECT" (4) button for 2 seconds until you only see the word Channel and channel number. To change channel, when flashing, press the "SELECT" (4) button until you reach the desired channel. Flashing will stop after 10 seconds and channel is now set.
- LOCK / UNLOCK CHANNEL: Press the "POWER/MUTE" (3) button and "SELECT" button at the same time to lock or unlock channel. When locked, channel cannot be changed. "LOCKED" symbol appears in upper left-hand corner.
PROBLEM SOLVING
HOWLBACK is the howl or screech often heard in sound reinforcement systems. It is caused by sound from the loudspeaker returning to the microphone. AmpliVox systems utilize proven acoustical principles to minimize this; however, there is no way to completely eliminate howl back under conditions of high amplification. If howl back occurs, check the following:
User's hand covering the head of the microphone. [Hold microphone under head slots.] Sound can easily re-enter microphone.
Keep loudspeaker turned toward audience. Note: sound can be reflected from a hard surface back through the microphone. [Turn speaker.]
User holding microphone in a reflecting position. [Turn microphone.]
Volume setting too high. [Reduce microphone channel volume; compensate by speaking louder or closer to the microphone.]
NO SOUND
Make sure amplifier POWER switch is turned on and red LED is lit. If switch is on and LED is not lit, check to see that batteries are properly connected and at full charge. If using optional power adapter, check to see that front panel connector is properly seated, and verify that the power source is live.
WARRANTY
Limited Six (6) -Year Warranty
AmpliVox warrants this product to be free from defects in materials and workmanship (subject to the terms set forth below) for a period of six (6) years from the date of purchase ("Warranty Period").
During the Warranty Period, AmpliVox will repair or replace (at AmpliVox's discretion) this product or any defective parts ("Warranty Service").
Repair or replacement under the terms of this warranty does not give right to any extension or a new beginning of the period of warranty.
CLAIMS UNDER THE WARRANTY
To obtain Warranty Service, contact AmpliVox (800-267-5486) to be assigned a Return Authorization number (RA#). After receiving a RA#, the defective unit is to be returned to AmpliVox in either its original packaging or packaging affording an equal degree of protection. You will bear the cost of shipping the product to AmpliVox. If the product is covered by the warranty, AmpliVox will bear the cost of shipping product back to you after the completion of service under this warranty.
Return shipping will be charged to you for products not covered by the warranty or requiring no warranty repair.
The following information must be presented to obtain Warranty Service: (a) the RA# must be clearly and legibility marked on the outside of shipping carton, (b) proof of purchase, which clearly indicates the name and address of the seller, the date of purchase and the product type, which is evidence that this product is within the Warranty Period. Please further include (c) your return address, (d) daytime telephone number, and (e) reason for return.
LIMITATION OF WARRANTY
This warranty is only valid for the original purchaser and will automatically terminate prior to expiration if this product is sold or otherwise transferred to another party. The warranty provided by AmpliVox in this statement applies only to products purchased for use, and not for resale. It does not apply to open box purchases, which are sold "as is" and without any warranty. Specifically exempt from warranty are limited-life consumable components subject to normal wear and tear, such as microphone windscreens, ear cushions, modular plugs, ear tips, decorative finishes, batteries, and other accessories. This warranty is invalid if the factory-applied serial number, date code label, or product label has been altered or removed from this product. This Warranty does not cover cosmetic damage or damage due to misuse, abuse, negligence, Acts of Nature, accident, disassembling or modification of, or to any part of, the product. This Warranty does not cover damage due to improper operation, maintenance or installation, or attempted repair by anyone other than AmpliVox. Any unauthorized repairs will void this warranty.
REPAIRS OR REPLACEMENTS AS PROVIDED UNDER THIS WARRANTY ARE THE EXCLUSIVE REMEDY OF THE CONSUMER. AMPLIVOX SHALL NOT BE LIABLE FOR ANY INCIDENTAL OR CONSEQUENTIAL DAMAGES FOR BREACH OF ANY EXPRESS OR IMPLIED WARRANTY ON THIS PRODUCT. EXCEPT TO THE EXTENT PROHIBITED BY LAW, THIS WARRANTY IS EXCLUSIVE AND IN LIEU OF ALL OTHER EXPRESS AND IMPLIED WARRANTIES WHAT SOEVER, INCLUDING BUT NOT LIMITED TO THE WARRANTY OF MERCHANTABILITY AND FITNESS FOR A PRACTICAL PURPOSE.
NOTE! This warranty gives you specific legal rights. You may have other rights which vary from location to location. Some jurisdictions do not allow the exclusion or limitation of incidental or consequential damages or implied warranties, so the above exclusions may not apply to you. This warranty does not affect your legal (statutory) rights under your applicable national or local laws.

Dispose of the product according to local standards and regulations
March, 2018
AmpliVox • 650 Anthony Trail Suite D, Northbrook, IL 60062 • Phone: (800)267-5486 • Fax: (800)267-5489 www.ampli.com


- AMPLIVox® PORTABLE SOUND SYSTEMS
- User Guide
- S610A / SW610A / SW615A
- Wired / Wireless Half Mile Hailer PA System
- IMPORTANT SAFETY INSTRUCTIONS
- Troubleshooting & Servicing
- Cleaning
- Location
- Intended use
- IMPORTANT
- PACKAGE CONTENTS
- Model S610A
- Model SW615A
- SPECIFICATIONS
- Amplifier System
- Model SW610A
- Wireless System Models
- INSTALL BATTERIES
- Battery Power
- AMPLIFIER FEATURES
- To Operate:
- WIRELESS BODYPACK TRANSMITTER—OPTIONAL—MODEL S1690T
- WIRELESS HANDHELD MICROPHONE—OPTIONAL—MODEL S1695
- BATTERIES
- BATTERY STATUS
- Functions
- PROBLEM SOLVING
- NO SOUND
- WARRANTY
- CLAIMS UNDER THE WARRANTY
- LIMITATION OF WARRANTY
Brand : AmpliVox
Model : SW610A
Category : Sound system