
i-DDQ9 - 612 Sd - Washing machine Hiberg - Free user manual and instructions
Find the device manual for free i-DDQ9 - 612 Sd Hiberg in PDF.


| Product Type | Washing Machine |
| Brand | Hiberg |
| Model | i-DDQ9 - 612 Sd |
| Rated Capacity | 6 kg |
| Maximum Spin Speed | 1200 rpm |
| Energy Class | A+++ |
| Water Consumption per Cycle | 45 L |
| Dimensions (H x W x D) | 85 x 60 x 60 cm |
| Weight | 65 kg |
| Noise Level (Wash) | 54 dB |
| Noise Level (Spin) | 72 dB |
| Display Type | LED |
| Programs | Cotton, Synthetics, Delicates, Quick 15, Eco, Wool |
| Safety Features | Child Lock, Overflow Protection |
| Installation Type | Freestanding |
| Voltage | 220-240 V |
| Frequency | 50 Hz |
| Power Rating | 2200 W |
| Color | White |
| Manual Pages | 92 |
Frequently Asked Questions - i-DDQ9 - 612 Sd Hiberg
User questions about i-DDQ9 - 612 Sd Hiberg
0 question about this device. Answer the ones you know or ask your own.
Ask a new question about this device
Download the instructions for your Washing machine in PDF format for free! Find your manual i-DDQ9 - 612 Sd - Hiberg and take your electronic device back in hand. On this page are published all the documents necessary for the use of your device. i-DDQ9 - 612 Sd by Hiberg.
USER MANUAL i-DDQ9 - 612 Sd Hiberg
natural_image
Line drawing of two people pushing a large appliance (no text or symbols)√

natural_image
Line drawing of a rectangular box with cutouts and a lid (no text or symbols)×
natural_image
Two workers in hard hats exchanging a large rectangular object (no text or symbols visible)natural_image
Simple line drawing of a washing machine with a black X mark on its side (no text or symbols)natural_image
Simple line drawing of a washing machine with a black X mark symbol (no text or labels)natural_image
Simple line drawing of a washing machine with a black X mark symbol (no text or labels)7

2
natural_image
Close-up of a mechanical component with a wrench and circular head, no visible text or symbolsРис. 1

natural_image
Close-up of a mechanical component with a metallic fitting and a black arrow pointing to a detail (no visible text or symbols)Рис. 2

natural_image
Close-up of a white object with a black circular hole and an arrow pointing to it, partially obscured by a striped pattern (no text or symbols)Рис. 3
Примечание:
natural_image
Close-up of a mechanical component with hexagonal base and threaded shaft (no visible text or symbols)
natural_image
White washing machine with side door and control panel, no visible text or symbols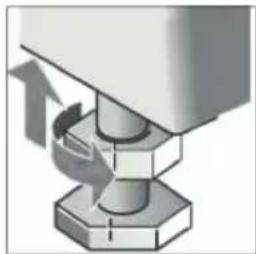
natural_image
Mechanical assembly diagram showing a bolt and nut assembly with directional arrows (no text or symbols)natural_image
Illustration of two plumbing fixtures on a tiled wall, one with a curved pipe and the other with a handle (no text or symbols)
natural_image
Close-up of a kitchen sink pipe with a valve and handle, no text or symbols visible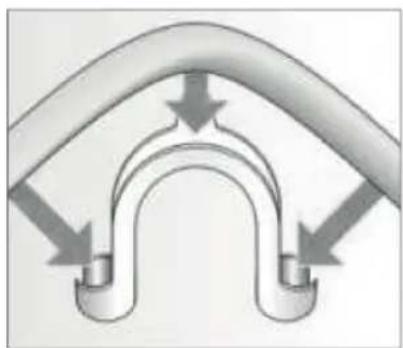
natural_image
Diagram of a U-shaped pipe or arch structure with directional arrows indicating flow or movement (no text or symbols)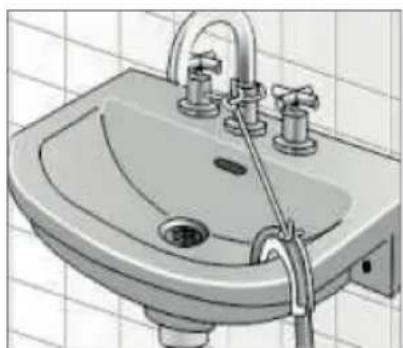
natural_image
Illustration of a standard bathroom sink with faucet and drain, no text or symbols present
ПАНЕЛЬ УПРАВЛЕНИЯ
natural_image
Simple line drawing of a person in pants with abstract objects including a key, coins, and a clock (no text or symbols)
natural_image
Line drawing of two fabric bags with circular designs and ribbon handles (no text or symbols)
natural_image
Illustration of a hand holding a cloth with a magnified view of the fabric (no text or symbols)
natural_image
Simple line drawing of a sweater with patterned sleeves and arms extended (no text or symbols)natural_image
Illustration of clothing items being folded into a box, with arrows indicating movement (no text or symbols)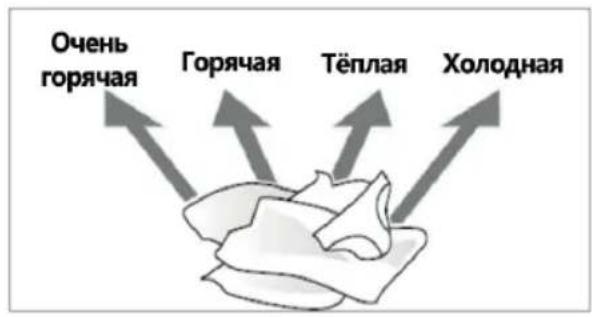
natural_image
Illustration showing two steps of a hand holding a small object, with arrows indicating direction (no text or symbols present)

natural_image
Illustration of a washing machine with a circular component and a handle, mounted on a base (no text or symbols visible)
natural_image
Illustration of a sewing machine needle stitching a circular component, with no visible text or symbolsnatural_image
Diagram of a mechanical device with labeled parts (1, 2, 3) and circular components, no readable text or symbols present.
natural_image
Diagram of a mechanical device with labeled parts (1, 2), showing a rotating component and a curved arrow indicating motion (no text or symbols present)
natural_image
Close-up of a white electronic device with a circular button and an arrow symbol (no text or labels)Address: No. 96 New Energy Avenue, Lishui Economic Development Zone, Lishui District, Nanjing City, Jiangsu Province, China
SAFETY INSTRUCTIONS 51
TECHNICAL DATA 53
MAIN ELEMENTS OF WASHING MACHINES 55
INSTALLATION 56
CONTROL PANEL 65
PREPARING AND SORTING THE LAUNDRY 67
VARIOUS CYCLES AND FUNCTIONS 70
HOW TO USE THE APPLIANCE 76
CARE AND MAINTENANCE 80
BEFORE GOING TO A SERVICE CENTER 84
DISPOSAL 84
TROUBLESHOOTING GUIDE 85
TRANSPORTATION 86
WARRANTY TERMS 86
BRIEF INTRODUCTION
Dear buyer!
Thank you for purchasing the HIBERG device. With the correct usage it will serve you for years. HIBERG products meet the requirements of the highest world quality standards, and also combine sophisticated design, functionality and affordable prices.
HIBERG appliances are devices that will take over part of your household chores and will be useful in everyday life.
Please read this manual carefully. It contains important safety, product use and care instructions. Please take care to keep this Manual and If the device passes to another owner, transfer it along with the device.
Please make sure that all people using this appliance are familiar with the Manual and safety measures.
The manufacturer, as well as the importer, are not liable to by the end user, if for some reason he has not read the manual properly. If for some reason the instruction manual has been lost or damaged, which prevents familiarization with the Guide, you can always contact the help desk, or read / download the manual on the official website www.hiberg.ru.
If you notice that the device is not working properly, once again carefully study the Guide. If there is not enough information in the manual, contact the help desk for warranty and service issues services at the federal number 8-800-700-12-25 (call Russia free) to get help or call an authorized specialist.
WELCOME TO THE WORLD OF HIBERG!
On our website www.hiberg.ru you can:
• find product recommendations and information about maintenance;
• find instruction manuals;
• get information about new products and features of HIBERG equipment.
CUSTOMER SUPPORT AND SERVICE
We strongly recommend using original spare parts. When contacting a service center, have the following information: model, product number, serial number. This information is in the table with technical data.
SAFETY INSTRUCTIONS
⚠️ ATTENTION! Read and understand all safety instructions before using the appliance. Keep them nearby for future reference.
This appliance is intended to be used in household. This appliance is not for professional use.
Do not use the appliance outdoors.
The appliance should not be installed in an outdoor environment, not even where the area is sheltered, because it may be very dangerous to leave it exposed to damp, rain and thunderstorms.
Do not mix chlorine bleach with ammonia or acids (vinegar, rust removers), as this may produce toxic gases.
Do not store flammable liquids near the machine.
Do not place flammable, explosive or volatile substances into the washing machine.
Do not use solvents (e.g. turpentine, benzene), products containing solvents, scouring powders, cleaners for glass or general purpose, and flammable liquids.
Before performing any maintenance or cleaning operations turn off the machine and disconnect it from the mains.
When the machine is not in use, unplug it from the mains, also close the water tap.
Do not allow anyone to climb, lean or hang on any part of the appliance including any protruding components such as the appliance door or a pullout shelf.
Never open the door forcibly or use it as a step.
Please close the loading door correctly, if it is difficult to close it, please check if the laundry is caught in the door.
The manufacturer is not responsible for any damage tissue that occurred due to improper performance instructions for processing linen, indicated on the labels placed on clothing or underwear.
Avoid installation in damp conditions, as well as contact control panel with water.
Do not install the washing machine in a room where the ambient temperature may drop below 0irc C. If necessary, then make sure that all the water is drained from the washing machine.
Do not turn on the washing machine at ambient temperature below 5°C.
Do not load the appliance above the maximum capacity (kg of dry cloth) indicated in the table of wash cycle.
Do not install the appliance near heat sources, avoid contact with other electrical
appliances and heating objects, open sources of fire.
If you smell burning wiring or hear unusual noise when the machine is running, stop it immediately and contact the service center.
Do not use the appliance if it has been flooded.
Oil stains may not completely be washed off, and their chemical interaction with detergents can lead to the fire.
Avoid contact of wet laundry with the control panel.
Do not place heavy items or objects on the washing machine.
Make sure the washing machine is always in a stable position.
The water and power supply must be stopped after end of washing.
If necessary, the power cord can be replaced by a cord the same type that can be purchased at the service center. Power cord replacement must only be carried out by a qualified electrician.
Refurbishment or independent preventive maintenance of device are FORBIDDEN!
Make sure there is no water in the drum before opening the door.
Do not add water manually during the wash cycle.
Do not remove laundry from the washing machine drum until it is fully stops.
The door may become very hot during drying. Never open the door while drying!
Do not dry unwashed items in the tumble dryer.
Remove all objects from packets such as lighters and matches.
Do not allow children to play with the appliance.
When the machine is not in use, make sure that children do not climb in and don't close the door.
Very young children (0-3 years) should be kept away from the appliance.
Young children (3-8 years) should be kept away from the appliance unless continuously supervised.
Children from 8 years old and above and persons with reduced physical, sensory or mental capabilities or lack of experience and knowledge can use this appliance only if they are supervised or have been given instructions on safe use and understand the hazards involved.
Cleaning and user maintenance must not be carried out by children without supervision.
Keep all laundry aids (including detergent, bleach, fabric softener, etc.) out of the reach of children. To reduce the risk of poisoning or chemical burns, keep all cleaning products out of the reach of children.
TECHNICAL DATA
| HIBERG WASHING MACHINES | I-DDQ9 - 612 WI-DDQ9 - 612 SD | I-DDQ9 - 712 WI-DDQ9 - 712 SDI-DDQ9 - 712 G | I-DDQ9 - 812 WI-DDQ9 - 812 G | I-DDQ9 - 10714 WI-DDQ9 - 10714 SD |
| Type | free standing | |||
| Type of loading | front | |||
| Energy class | A+++ | |||
| Max washing capacity, kg | 6 | 7 | 8 | 10.5 |
| Max drying capacity, kg | - | 7 | ||
| Max speed (rpm) | 1200 | 1400 | ||
| Class of washing | A | |||
| Class of spin | A | |||
| Class of drying | - | A | ||
| Energy consumption, kW/year / L/year | 151 / 10560 | 173 / 11440 | 195 / 12100 | 231 / 12980 |
| Water consumption per cycle, L | ~ 48 | ~ 52 | ~ 55 | ~ 59 |
| Energy consumption, kW/cycle | 0,69 | 0,79 | 0,89 | 1,05 |
| Operation | sensor | |||
| Display | LED | |||
| Type of locking / unlocking the door | mechanical | |||
| Type of motor | inverter / direct drive | |||
| Water pressure (MPa) | 0.03-1 | |||
| Voltage / Frequency, V/Hz | 220-240/50 | |||
| Power in washing mode, W | 150 | 150 | 200 | 200 |
| Power in spin mode, W | 320 | 320 | 420 | 500 |
| Heating power, W | 1500 | 1500 | 2000 | 1650 |
| Max power, W | 1650 | 1650 | 2200 | 1850 |
| Power in standby mode, W | 0,49 | |||
| Waterproof class | 0,49 | |||
| Protection class against electric shock | IPX4 | |||
| Mat water temperature (°C) | I | |||
| Noise level for washing, dB | 90 | 96 | ||
| Noise level for spin, dB | 60 | |||
| Tube material / drum material | 75 | |||
| Memory | yes | |||
| Foam control (sensor system) | yes | |||
| Speed control | yes | |||
| Temperature control | yes | |||
| Balance control | yes | |||
| Indication: | remaining time; delay end;child lock; door lock; favorite programm; prewash; error code; type of washing | |||
| Body color | W - white; Sd - dim-grey; G - gold | |||
| Programm | 16 | |||
| Cotton | + | |||
| Shirt | + | |||
| Duvet | + | - | ||
| Eco | + | - | ||
| Quick 15' | + | |||
| Delicate | + | - | ||
| Sports | + | - | ||
| Tub clean | + | |||
| Quick 42' | + | |||
| Underwear | + | |||
| Wool | + | |||
| Rinse+spin | + | - | ||
| Mix | + | |||
| Baby care | + | |||
| Synthetic | + | - | ||
| Spin | + | |||
| 1 HR wash/dry | - | + | ||
| Down Jacket | - | + | ||
| Warm clothes | - | + | ||
| Eliminate mite | - | + | ||
| Air wash | - | + | ||
| Dry | - | + | ||
| ADDITIONAL FUNCTIONS | ||||
| Smart Wash | + | |||
| Child lock | + | |||
| Delay start | + | |||
| Prewash | + | - | ||
| Favorite programm | + | |||
| Extra rinse | + | |||
| Add garment | + | |||
| Dry | - | + | ||
| DIMENTIONS | ||||
| Product dimentions WxDxH (mm) | 595*510*850 | 595*510*850 | 595*600*850 | 595*600*850 |
| Packing dimentions WxDxH (mm) | 657*565*885 | 657*565*885 | 660*670*885 | 660*710*885 |
| Door diameter, cm | 52 | |||
| Max door open angle | 150° | |||
| Inner diameter of the drum, cm | 48,4 | |||
| Drum volume, L | 41 | 58 | 64 | |
| Drain hose length, m | 1,8 | |||
| Inlet hose length, m | 1,5 | |||
| Aquastop | yes | |||
| Net/gross weight (kg) | 58/62 | 66/71 | 73/78 | |
| Adjustable foots, pcs | 4 | |||
| Guarantee | 2 years | |||
| Country of origin | China | |||
The manufacturer and importer reserve the right to change the design, technical characteristics, functions, appearance, product (goods) configuration, etc. without prior notice. All information presented in the manual regarding the configuration, technical characteristics, functions, color combinations, etc. is for informational purposes and under no circumstances is not a public offer.
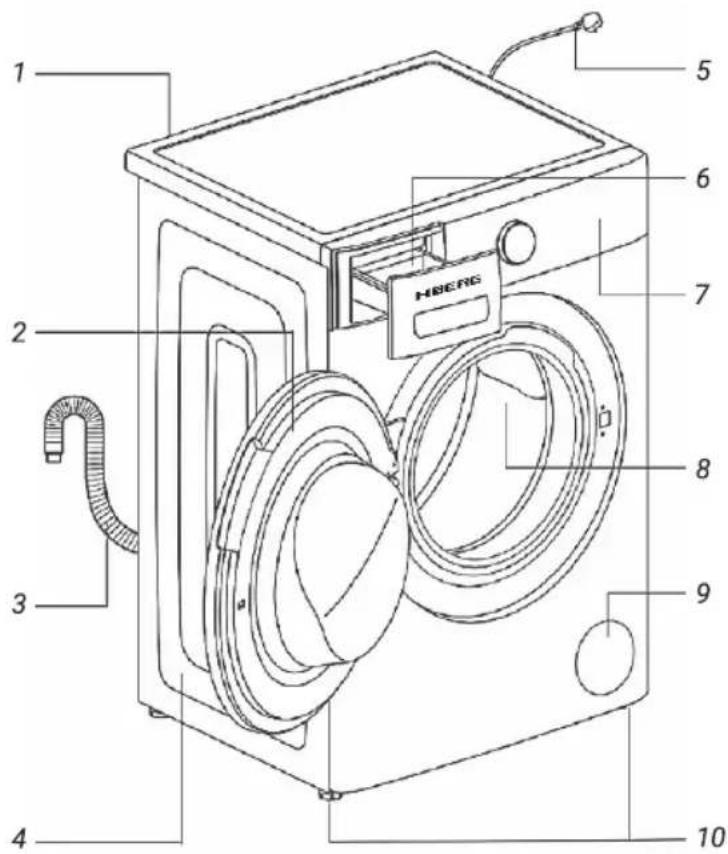
MAIN ELEMENTS OF WASHING MACHINES
-
Water inlet.
-
Detergent drawer.
-
Door.
-
Control panel.
-
Drain hose.
-
Drum.
-
Cabinet.
-
Drain filter cover.
-
Power cord and plug.
-
Adjustable feet.
Accessories
- User manual.
- Water inlet hose.
- Aquastop hose.
- Wrench.
- Transportation bolt caps.
1

2

3

4


5
INSTALLATION
This instruction manual should be kept in a safe place for future reference. If the washer is sold, transferred or moved, make sure that the instruction manual remains with the machine so that the new owner is able to familiarize himself/herself with its operation and features.
Read these instructions carefully, they contain vital information relating to the safe installation and operation of the appliance. Follow these instructions carefully to ensure proper installation of your washer and to prevent accidents when doing laundry.
UNPACKING
- Remove the washer from its packing.
- To remove the cushion bottom of the packing materials, do not tip the washer over on its front side. When you lay the washer down to remove the carton base, protect the side of the washer and lay it down carefully. Never lay your washer on its back or front.
- Make sure that the washer has not been damaged during shipping. Make sure you have received all of the items shown on the next page. If your washer was damaged during shipping, or you do not have all of the items. If it has been damaged, contact the retailer and do not proceed any further with the installation process.


natural_image
Two workers in hard hats exchanging a large box with concentric rings (no text or symbols visible)⚠ WARNING! Packing materials can be dangerous to children. Keep all packing material (plastic bags, polystyrene, etc.) well out of children's reach.
Carrying the washer
Don't do it by yourself alone. Tilt the washer backward. One person stands behind the washer and holds the protruding part of the top plate, while the other person holds the bottom of the washer in front.
To prevent personal injury or strain, wear protective gloves whenever lifting or carrying the unit. When moving the washer, do not allow the front of the washer to contact the trolley frame.
Correct installation of the device
⚠ WARNING! Incorrect installation of the device can lead to cause excessive noise, vibration and water leakage.
Before installing the appliance, make sure that the mains voltage is corresponds to the rated supply voltage of the device indicated on the nameplate on the body.
The washing machine must be installed and operated in room equipped with a sewer drain.
Keep children away from the installation site.
Remove the protective film from the control panel (if applicable on your model).
Place the machine on a firm and level floor surface, preferably in the corner of the room.
Make sure all four feet are firmly on the floor and that the machine is well leveled (use a spirit level).
Do not place the washing machine on carpet or hardwood floors.
Make sure the ventilation holes at the base of your machines (if any on your model) are not carpeted or closed with other similar materials.

natural_image
Simple line drawing of a washing machine with a black X mark on its side (no text or symbols)Inclined surface

natural_image
Simple line drawing of a washing machine with a black X mark symbol (no text or labels)Bracket mounting

natural_image
Simple line drawing of a washing machine with a black X mark symbol (no text or labels)Uneven surface
Removing the transport bolts
CAUTION:
DAMAGE TO THE APPLIANCE OR INJURY POSSIBLE
- The washer is secured for transport with transport bolts. Transport bolts that are not removed can damage the drum during operation of the washing, the washer will vibrate, and it will be much noisier during spin cycles if the transport bolts are not removed before use. Be sure to remove all 4 transport bolts completely before first use. Keep the transport bolts. If a pedestal was purchased with the washer, it must be installed first, prior to removing the transport bolts. Please consult the pedestal installation instructions.
-
In order to prevent transport damage during later transport, be sure to re-install the bolts before transport.
-
Undo the four transport bolts A by the wrench (supplied) and remove them.
- Remove the four spacers B. They will fall to the floor when you tip the machine.
- Insert the four cover caps C which will find in the plastic bag containing the accessories.


natural_image
Close-up of a mechanical component with a wrench and circular head, no visible text or symbols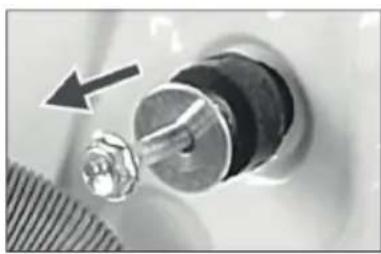
natural_image
Close-up of a mechanical component with a metallic fitting and a black arrow pointing to it (no visible text or symbols)
natural_image
Close-up of a circular object with an arrow pointing to it, partially obscured by a striped pattern (no text or symbols visible)Keep all the parts in safe place: you will need them again if the washer needs to be moved to another location.
NOTE: transport the washer for the prevention of breakage as below:
• the transport bolts are reinstalled;
- the power cord is secured to the back of the washer.
Choosing the right location
Locations the appliance is not to be installed:
- In a damp place or where the washer may be exposed to rain, etc. (As this could cause electric shock or fire);
- Locations that are uneven, or unstable (As this could cause vibration and noise);
• In direct sunlight (As this could cause malfunction or deformation); - Within, or on top of, unstable surfaces, including but not limited to benchtops, timber shelving, or cabinets.
⚠️ CAUTION: do not install where temperatures may reach freezing.
Set-in Installation
Install the washer with easy access to the power plug and socket. Install the washer where there is enough space around it.
(a) 3 cm or more above.
(b) 5 cm or more behind.
(c) 2 cm or more on the left side.
(d) 2 cm or more on the right side.
(e) 64 cm or more.
⚠️ CAUTION: do not let metallic portions of the washer come into contact with metal sinks or other appliances.

Importance of leveling the washer
The washer uses high spin speeds to remove water at the end of the wash cycle. It is important that the washer is level and that the washer feet press with equal pressure against the floor. This will help assure the quietest, most vibration-free use of the washer.
Follow these steps:
- Install the washer on a level and solid surfaces. Preferably in a corner of a room.
- If the floor is uneven (or out of level) adjust the washer feet as required to level the washer. Do not place anything under the washer feet to help level the washer.
- Extend the washer feet no more than is necessary. The more the feet are extended, the more vibration the washer will experience. Start with the washer feet turned all the way in and adjust each foot as necessary.
-
Use a bubble level (no supplied) to check the top of the washer to make sure it is level side to side and front to rear.
-
Press down on each corner of the washer top to make sure the washer doesn't «wobble». There should be no «give» or movement. All the washer feet should press equally against the floor. This is just as important as the washer being level to prevent vibration.
-
When the washer is level and does not wobble, lock the washer feet in place by tightening the locknuts against the washer bottom. Be sure to do this without changing the height of the foot (hold the foot while tightening the locknut).
Procedure for adjusting the appliance feet
-
After determining which the washer feet need to be extended, have someone lift up on the washer slightly to take pressure off the foot to be adjusted.
-
Turn the washer foot to extend it downward as far as necessary to raise the corner of the washer the correct amount to level the washer.
-
When the height of the foot is correct, use the wrench (supplied) to tighten the locknut against the washer bottom. The locknut should be tighten against the bottom of the washer to lock the foot in place.

CONNECTION THE ELECTRICITY AND WATER SUPPLIES
Connecting the water inlet hose
- Connect one end of the water inlet hose to a cold water tap and tighten by hand (see figure). Before performing the connection, allow the water to run freely until it is perfectly clear.
- Connect the other end of the water inlet hose to the water inlet valve on the rear of the appliance and tighten by hand.
- Turn on the tap slowly and make sure there are no leaks.
Do not twist, squash, modify or cut the hose. Tighten the end of the hose firmly by hand.
The supply water pressure must be in the 0.03-1.0 MPa range. If the water pressure exceeds this value, please fit a pressure reducing valve.
If the hose is not long enough, contact a specialized shop or an authorized technician.


Never use second-hand water inlet hose.
Use the new water inlet hose supplied with the washer.
Connecting the drain hose
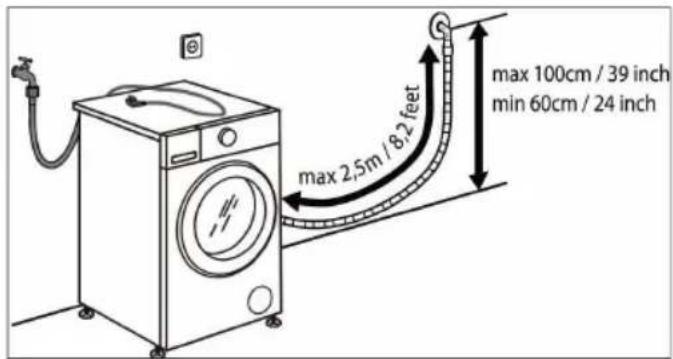
Height of drain point
Height difference between the floor and drainage point: min. 60 cm (24 in.) and max. 100 cm (39 in.).

Types of drainage hookups
Standpipe

Attach the drain hose to the elbow (no supplied, available from our Customer Service Department). Position the elbow on the drain hose 4" (100 mm) from end of the hose as shown. Insert this section of the drain hose into the drain pipe, If the hose is
pushed down too far, this may cause the washer to self-syphonie continuously empty as it is filling. Secure the elbow and hose with a cable tie to keep the hose from coming out of the drain pipe during use.
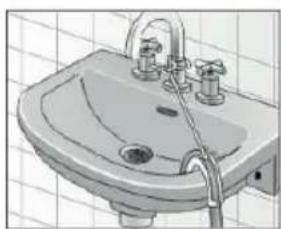
Sink siphon

natural_image
Diagram of a kitchen sink with pipe and valve, no text or symbols presentSecure the drain hose to the sink siphon using a φ 0.9-1.6 in. (20-44 mm) hose clip (available from a hardware store).
Wash Basin
⚠ WARNING: scalding. When washing at high temperatures, there is a risk of scalding if you touch hot suds, e.g. when pumping out hot suds into a wash basin. Do not reach into the hot suds.
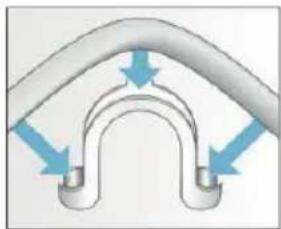
⚠ Notice: appliance damage / damage to textiles. If the end of the drain hose touches the discharged water (water drained from washer), it (the discharged water) can be sucked back into the washer and may damage the appliance or textiles.
natural_image
Diagram of a curved pipe or arch structure with blue directional arrows indicating flow or movement (no text or symbols)Make sure that:
natural_image
Illustration of a bathroom sink with faucet and bathtub (no text or symbols)• there is no stopper in the sink drain;
• the end of the drain hose does touch the discharge water;
• the sink drain is free flowing and not partially clogged;
- attach the drain hose securely to the wash basin.
Do not twist, pull out or bend the drain hose.
Secure the drain hose with the cable tie to the drain pipe, wash basin, etc., so the hose does not pull out from the force of the water.
We advise against the use of drain hose extensions; in case of absolute need, the extension must have the same diameter as the original hose and must not exceed 250 cms in length.
Electric connection
Before plugging the washer into the mains socket, make sure that:
• The socket is earthed and in compliance with the applicable law.
- The socket is able to sustain the appliance's maximum power load indicated on the Technical Date Plate fixed on the machine.
- The supply voltage is included within the values indicated on the Technical Date Plate fixed on the washer.
- When heating, the maximum current of the washer is 10A, so please make sure that the power supply system (voltage, current and the cable) is applicable to the load of the applied appliance.
- The socket is compatible with the washer's plug. If this is not the case, replace the socket or the plug by a qualified electrician.
⚠ WARNING! This appliance must be earthed. The following operations should be carried out by a qualified electrician.
Replace the supply cable:
If the supply cord is damaged, it must be replaced with an identical one by the manufacturer, its service agent or similarly qualified persons in order to avoid a hazard – risk of electric shock.
Disposing of the plug:
Ensure that before disposing of the plug itself, you make the pins unusable so that it cannot be accidentally inserted into a socket.
Disposing of the appliance:
When disposing of the washer please remove the plug by cutting the mains cable as close as possible to the plug body and dispose of the plug as described above.
The appliance is not intended to be operated by means of an external switching device, Such as a timer, or separate remote controlled system.
When the appliance is installed, the mains socket must be within easy reach.
Do not use extension cables, multiple sockets or adapters.
To remove the plug from the socket, grasp the plug firmly and pull it out. Do not pull at the cable.
The electrical components must not be accessible to the user after installation.
Do not connect the machine to electrical outlets while your hands are wet or damp.
Do not operate this appliance when you are wet or barefoot.
Do not operate this appliance if it has a damaged power cable or plug, if it is not working properly, or if it has been damaged or dropped.
⚠ WARNING! The company denies all liability if and when these norms are not respected.
CONTROL PANEL
Models i-DDQ9-612 W/Sd, i-DDQ9-712 W/Sd/G, i-DDQ9-812 W/G:

| No | BUTTON | PURPOSE |
| 1 | Power | Press to turn on/off the power. After the work is completed, the power will turn off automatically. |
| 2 | Programm selection | After turning on the power, select the program using the selection keys. |
| 3 | Start/Pause | Start/pause key for the selected wash program. Click to launch the selected program and get started. Click to stop the machine during operation and click again to continue. |
| 4 | Type of wash | Allows to set the duration of the washing program. After selecting the main program, by pressing the «Type of wash» button, you can select the following modes: Intensive, Standard, Economical, Refresh. |
| 5 | Temperature | Allows to set the desired temperature in accordance with the recommendations of the clothing manufacturer. To do this, press the «Temperature» button several times in succession to select the desired washing temperature after selecting a specific washing program. |
| 6 | Rinse | Used to set the extra rinse after washing. Press the button successively to add +1, +2, +3 extra rinses. |
| 7 | Speed | Allows to set the desired spin speed. To do this, press the «Speed» button several times in succession after selecting a specific washing program. |
| 8 | Delay wash | Allows you to select the desired end time for the wash. After the program, additional functions and washing parameters have been selected, select the delay time using the «Delay» button. |
| 9 | Prewash | Allows to add a prewash cycle. In this case, the prewash powder must be added to the container «I». The corresponding icon will be displayed on the display. |
| 10 | Child lock | Allows to activate the function of blocking the control panel from accidental pressing by children. Press and hold the «Lock» button for 3 seconds, then the function will be activated, and the corresponding icon will be displayed on the display. This function is also available during a wash program. To do this, just pause the cycle, set the lock, and then resume washing using the Start / Pause button. |
| 11 | Favorite | Allows you to program the most frequently used wash cycle. After the program, additional functions, washing parameters are selected, it is necessary to press the Favorites button and hold it for 3 seconds, then turn off the machine. The button will then be programmed to the preset mode. The next time you turn on the machine, just press the «Favorite» button to start this washing program. |
| 12 | Smart Wash | Allows to run an intelligent washing program that allows you to better wash difficult stains. This program detects the weight of the laundry and can combine different washing times and temperatures to realize intelligent washing. Starts with the push of a single Smart Wash button. |
Model HIBERG i-DDQ9-10714 W/Sd:

| No | BUTTON | PURPOSE |
| 1 | Power | Press to turn on/off the power. After the work is completed, the power will turn off automatically. |
| 2 | Programm selection | After turning on the power, select the program using the selection keys. |
| 3 | Start/Pause | Start/pause key for the selected wash program. Click to launch the selected program and get started. Click to stop the machine during operation and click again to continue. |
| 4 | Type of wash | Allows to set the duration of the washing program. After selecting the main program, by pressing the «Type of wash» button, you can select the following modes: Intensive, Standard, Economical, Refresh. |
| 5 | Temperature | Allows to set the desired temperature in accordance with the recommendations of the clothing manufacturer. To do this, press the «Temperature» button several times in succession to select the desired washing temperature after selecting a specific washing program. |
| 6 | Rinse | Used to set the extra rinse after washing. Press the button successively to add +1, +2, +3 extra rinses. |
| 7 | Speed | Allows to set the desired spin speed. To do this, press the «Speed» button several times in succession after selecting a specific washing program. |
| 8 | Dry | Press to set the appropriate type or drying time. The type and time of drying will be shown on the display, and the corresponding icon will light up. Some programs do not allow you to add a drying cycle (see section on programs and functions). |
| 9 | Delay wash | Allows you to select the desired end time for the wash. After the program, additional functions and washing parameters have been selected, select the delay time using the «Delay» button. |
| 10 | Child lock | Allows to activate the function of blocking the control panel from accidental pressing by children. Press and hold the «Lock» button for 3 seconds, then the function will be activated, and the corresponding icon will be displayed on the display. This function is also available during a wash program. To do this, just pause the cycle, set the lock, and then resume washing using the Start / Pause button. |
| 11 | Favorite | Allows you to program the most frequently used wash cycle. After the program, additional functions, washing parameters are selected, it is necessary to press the Favorites button and hold it for 3 seconds, then turn off the machine. The button will then be programmed to the preset mode. The next time you turn on the machine, just press the «Favorite» button to start this washing program. |
| 12 | Smart Wash | Allows to run an intelligent washing program that allows you to better wash difficult stains. This program detects the weight of the laundry and can combine different washing times and temperatures to realize intelligent washing. Starts with the push of a single Smart Wash button. |
PREPARING AND SORTING THE LAUNDRY
Preparing the laundry
⚠ NOTICE: Damage to the appliance/fabric.
Foreign objects (e.g. coins, paper-clips, needles, nails) may damage the laundry or components in the washing machine.
Therefore, note the following tips when preparing your laundry:
Remove any loose items or metal objects, such as safety pins, paper clips, etc. from the laundry.
Brush sand, coins, etc. out of pocket and cuffs.
Close zips and button up cushion covers, duvet covers, etc.
Remove curtain runners, or secure them in a net bag.
Particularly delicate items; such as tights or lace curtains, or smaller items, such as tiny socks or handkerchiefs, should only be washed in a net bag or pillow case.
Some items are best turned inside out. These included knitwear, trousers, T-shirts and sweatshirts.
Make sure that the wire-cup bras are machine washable.
⚠ WARNING! Make sure that wire-cup bras in a pillow case which can be securely closed with a zip or button. If the wire works itself out of the cup it may fall through the holes of the drum and cause extensive damage.
Preparing the laundry for drying
Only tumble-dry textiles which have been washed, rinsed and spun.
Remove as much water as possible from the laundry. Do not touch the button for reducing the spin speed.
In order to ensure uniform drying, sort the items according to fabric type and degree of drying required.
Items which require ironing do not have to be ironed immediately after being tumble-dried. It is a good idea to fold or roll them together for a while, so that any remaining moisture is evenly distributed.

natural_image
Simple line drawing of a pair of pants with a key and coins nearby (no text or symbols)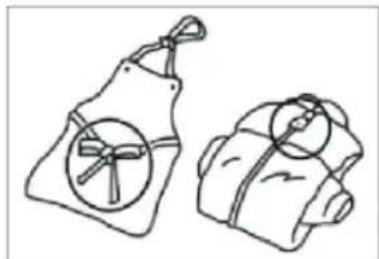
natural_image
Two handbags with circular designs, one wrapped in a bow and the other in a blanket (no text or symbols)
natural_image
Illustration of hands using a tool to clean or fabric a cloth, with an arrow indicating the process (no text or symbols present)
natural_image
Simple line drawing of a sweater with arms extended (no text or symbols)When washing laundry to be tumble-dried, use the correct amount of detergent and textile care products as specified in the manufacturer's instructions. Some detergents and textile care products, starch or softeners may contain chemicals that may become deposited on the moisture sensors negatively affecting their function and the drying result.
The following textiles should not be tumble-dried:
Laundry marked with the care symbol:

Do not tumble-dry!
Wollens or items containing wool. Risk of shrinking!
Delicate fabric (silk, synthetic net curtains). Risk of creasing!
Items containing foam rubber or similar material.
Items which have been treated with inflammable solvents, such as stain removes, petrol, paint thinners. Explosion hazard!
Items still containing hair lacquer or similar substances. Dangerous vapors!
Dripping-wet laundry. Waste of energy!
Sorting the laundry according to colour and degree of soiling
Sort laundry items according to color, degree of soiling and recommended wash temperature range.

natural_image
Illustration of three fabric pieces with arrows indicating flow from a container to a stack of sheets (no text or symbols)
Items of clothing can become discoloured.
Never wash new muti-coloured items together with other items.
Wash white items separately from colored items.
Otherwise, white items may tend to become grey.
Degree of soiling
Light soiling
No visible soiling or stains, but may have absorbed some odor. This could include light weight summer clothes such as T-shirts, shirts, or blouses worn only once. Also to freshen bed linen or guest towels.
Normal soiling
Visible soiling and/or a few light stains. This could include clothing such as T-shirts, shirts, or blouses that have been sweated in or worn several times. Also tea towels, hand towels or bed linen used for up to one week or more. Curtains without stains that have not been washed for up to a half year.
Heavy soiling
Visible soiling and stains. This could include kitchen towels, fabric napkins, baby bibs, children's outer clothing or football jerseys and shirts stained with grass or dirt. It could also include working clothes such as overalls and jeans and other clothing worn for outside work and activities.
Sorting laundry according to their care label specifications
The symbols on labels of your garments will help you in choosing the suitable wash program, the right temperature, wash cycles, and ironing methods.
The labels contain the following instructions:
• type of washing (machine, hand, delicate, etc.);
- washing temperature;
- restrictions on the use of bleaching agents;
• drying program in the tumble dryer. Drying temperature;
• method of drying on a clothes dryer;
• instructions for ironing;
• instructions for dry cleaning.
ATTENTION! Don't forget to give a glance to these useful indications!
VARIOUS CYCLES AND FUNCTIONS
Table of wash cycle (for models HIBERG i-DDQ9-612 W/Sd, i-DDQ9-712 W/Sd/G, i-DDQ9-812 W/G):
| WASHING PROGRAMM | WASHING TEMPERATURE (°C) | SPIN SPEED (RPM) | WASHING TIME (MIN) | MAX WASH LOADING (KG) | FABRIC TYPE |
| Cotton | 40°C cold, 20°C, 60°C, 90°C) | 1000 (0, 400, 800, 1200) | 65 | nominal | White cotton and cotton fabrics. Colored fabrics (shirts, pajamas, bedding, etc.) and lightly soiled white cotton |
| Shirts | cold (20°C, 40°C) | 800 (0, 400) | 28 | ≤3.0 | Do-it-yourself or non-iron shirts or blouses made of cotton, linen, synthetics or blends fabrics |
| Duvet | 40°C cold, 20°C, 60°C) | 800 (0, 400, 1000) | 88 | ≤3.0 | For machine washable products with synthetic filling, such as pillows, blankets, bedspreads; also suitable for products with down filling |
| Eco | 20°C cold, 40°C, 60°C) | 800 (0, 400, 1000, 1200) | 52 | ≤2.0 | White cotton and cotton fabrics. Provides optimal washing performance with less energy consumption |
| Quick 15 | cold (20°C, 40°C) | 800 (0, 400) | 15 | ≤2.0 | Lightly soiled cotton and cotton fabrics |
| Delicate | 20°C cold, 40°C) | 800 (0, 400) | 48 | ≤3.0 | For machine washable silk garments |
| Sport | cold (20°C, 40°C) | 800 (0, 400) | 44 | ≤4.0 | Suits made of fleece and synthetic fabrics. The cycle provides high-quality care for sportswear designed for active sports |
| Tube clean | 60°C | 800 | 75 | - | Special program to remove dirt and bacteria from the drum that may appear in the machine, especially with regular washing at low temperatures |
| Quick 42 | 20°C cold, 40°C) | 800 (0, 400) | 42 | ≤4.0 | For everyday items made of cotton and linen |
| Underwear | cold (20°C, 40°C) | 800 (0, 400) | 26 | ≤3.0 | Linen that is directly in contact with the skin (diapers, bedding, shirts, etc.) |
| Wool | 40°C cold, 20°C) | 800 (0, 400) | 47 | ≤2.0 | Woolen and knitwear, machine washable (use special detergents for washing woolen clothes) |
| Rinse+spin | - | 1000 (0, 400, 800, 1200) | 17 | nominal | Various types of underwear, with the exception of clothes requiring special care |
| Mix | cold (20°C, 40°C) | 800 (0, 400) | 76 | nominal | Various types of laundry, with the exception of clothes requiring special care (silk, wool, delicate fabrics, dark clothes, sportswear, duvets, tulle) |
| Baby care | 60°C (40°C, 90°C) | 800 (0, 400, 1000) | 142 | ≤3.0 | Kids clothes |
| Synthetic | 40°C cold, 20°C, 60°C) | 1000 (0, 400, 800, 1200) | 68 | ≤3.0 | Clothing containing synthetic fabrics |
| Spin | - | 1000 (0, 400, 800, 1200) | 11 | nominal | Various types of underwear, with the exception of clothes requiring special care |
| Smart Wash | 40°C (20°C, 60°C) | 1000 (800) | 71 | nominal | Various types of underwear |
Table of wash cycle (for model HIBERG i-DDQ9-10714 W/Sd):
| WASHING PROGRAMM | WASHING TEMPERATURE (°C) | SPIN SPEED (RPM) | WASHING TIME (MIN) | MAX WASH LOADING (KG) | MAX DRY LOADING (KG) | FABRIC TYPE |
| Cotton | 40°C cold, 30°C, 60°C, 90°C | 800 (0, 400, 1000, 1200, 1400) | 65 | 10,5 | 7 | White cotton and cotton fabrics. Colored fabrics (shirts, pajamas, bedding, etc.) and lightly soiled white cotton |
| Shirts | cold (30°C, 40°C) | 800 (0, 400) | 38 | ≤3.0 | ≤3.0 | Do-it-yourself or non-iron shirts or blouses made of cotton, linen, synthetics or blends fabrics |
| Wool | 40°C cold, 30°C | 800 (0, 400) | 47 | ≤2.0 | - | Woolen and knitwear, machine washable (use special detergents for washing woolen clothes) |
| 1 HR Wash/Dry | 30°C cold, 40°C | 1000 (1200, 1400) | 60 | ≤5.0 | - | Lightly soiled cotton and cotton fabrics that can be machine washed and dried |
| Quick 15 | cold (30°C, 40°C) | 800 (0, 400) | 15 | ≤2.0 | ≤2.0 | Lightly soiled cotton and cotton fabrics |
| Underwear | cold (30°C, 40°C) | 800 (0, 400) | 38 | ≤3.0 | ≤3.0 | Linen that is directly in contact with the skin (diapers, bedding, shirts, etc.) |
| Down jacket | 40°C cold, 30°C | 800 (0, 400) | 87 | ≤3.0 | ≤3.0 | For down jackets that can be machine washed |
| Dry | - | 1000 (0, 1200, 1400) | 233 | - | 7 | Drying any clothes not prohibited for tumble drying |
| Quick 42 | 30°C cold, 40°C | 800 (0, 400) | 42 | ≤4.0 | ≤4.0 | For everyday items made of cotton and linen |
| Baby care | 60°C (40°C, 96°C) | 800 (0, 400, 1000) | 142 | ≤3.0 | ≤3.0 | Kids clothes |
| Tube clean | 60°C (96°C) | 800 | 75 | - | - | Special program to remove dirt and bacteria from the drum that may appear in the machine, especially with regular washing at low temperatures |
| Warm clothes | - | - | 15 | - | ≤1.0 | Drying delicate outerwear |
| Mix | cold (30°C, 40°C) | 800 (0, 400) | 76 | 10,5 | 7 | Various types of laundry, with the exception of clothes requiring special care (silk, wool, delicate fabrics, dark clothes, sportswear, duvets, tulle) |
| Eliminate mite | 60°C | 800 (0, 400, 1000) | 130 | ≤4.0 | ≤4.0 | Special program for bacteria removal, sterilization and tissue disinfection |
| Spin | - | 800 (0, 400, 1000, 1200, 1400) | 10 | 10,5 | - | Various types of underwear, with the exception of clothes requiring special care |
| Air wash | - | - | 50 | 1 | - | For clothes that need refreshing and deodorizing. Washable without water |
| Smart Wash | 40°C (20°C, 60°C) | 800 (400, 1000) | 71 | 10,5 | 7 | Various types of underwear |
Note: washing time may vary depending on the pressure water, wash material, weight, change in water temperature. During the washing process, the time displayed on the display will differ from real time.
Additional Recommendations
Not recommended when using liquid detergent use the delayed wash function.
Fabric softeners or similar products should be use in accordance with the manufacturer's instructions.
Follow the dosage instructions on the package powder or liquid detergent.
Recommended to use:
- washing powder from 20°C to O 80°C;
• detergent for wool from 20°C to 40°C.
Drying program (for model i-DDQ9 - 10714 Sd)
How to set the drying program?
1. To set the program of «Washing + Drying»
Only part of the washing program can add drying function.
First, load the laundry into the drum, close the door, turn the Wash cycle Selector knob to select the desired wash program (except for the Drying program), and press the Dry button to select the two drying modes as follows:
Automatic drying: Press the Drying button continuously to adjust the drying time that is displayed on the panel, and when «Ruto» is displayed, the automatic drying mode is activated, the drying time can be automatically adjusted according to the amount and humidity of clothes.
Timed drying: Press the Dry button to set the drying time. Press the Drying button, the digital display screen will display the timing drying time (30-60-90-120-150-180-210-240), select an appropriate the timing drying time and enter the timing drying mode. Then, press the Start/Pause button, the machine starts running the Washing + Drying program, with the drying program automatically activated at the end of the washing program.
2. To set the Drying Only program
The Drying Only program is suitable for drying clothes of cotton. Do not dry clothes that are prone to deformation or shrinkage. When the Drying Only program is set, before drying, it is recommended to run a single spin cycle for the clothes to be dried.
First, load the laundry in the drum, close the door, turn the Program Selector knob to select the Drying program only, and then press the Drying button continuously, so as to select the mode of Auto drying or Time drying (as described above).
Then, press the Start/Pause button to start the Drying Only program.
3. To set the down jacket drying program
«Washing+Drying» program should be used to dry down jackets. Please select «Down Jacket" program + «Automatic Drying («Auto»)» mode». Please do not
choose Drying only mode for down jacket drying. In order to achieve better drying effect, it is recommended to dry single down jacket once.
Precautions for drying program
- If there is too much moisture in the clothes, the machine will automatically extend the drying time, and it is normal to display «0:20» for too long.
- When the drying program is running, the faucet must be turned on, because the water is required for cooling and dehumidification during drying program.
- The longest drying time is set according to different models.
- In order to prevent the wrinkle of laundry caused by excessive drying, the drying time can be set a little less at first, and then the drying time can be added according to the drying effect.
- Before running the Drying Only program, it is recommended to run a spinning cycle firstly.
- If necessary, please untie the nodules of clothes after spinning, and then put them into the drum for drying.
- For larger or thicker clothes, drying may be uneven in some positions of clothes. Please add drying time according to drying effect after finishing drying cycle.
- Wool fabrics are not suitable for drying.
- Do not dry clothes that are liable to deformation or shrinkage.
- Some programs have no drying function.
Air wash (for model i-DDQ9 - 10714 Sd)
Air wash is to introduce the hot air generated by the drying system into the drum through the drying circulating air duct. The rotation of the drum drives the clothes to fully contact with the hot air, and the warm dry air can carry the moisture in the slightly wet or damp clothes. It can also reduce or remove the peculiar smell on the clothes to a certain extent; Fluffy clothes to improve hand feel.
Special wash cycles
Baby Care: a cycle designed for dirt typical of children's garments in that it effectively removes any traces of residual detergent.
Down Jacket: a cycle to wash single downs (the weight of which should not exceed 2.0kg), cushions or clothes padded with goose down such as puffa jacket, use this special wash cycle. We recommend that down are placed in the drum with their edges folded inwards (see figure) and that no more than 3/4 of the total volume of the drum is used. To achieve the best results, we recommend that a liquid detergent is used and placed inside the detergent dispenser drawer.

natural_image
Illustration of a person examining a human head with an arrow indicating pressure or stress (no text or symbols present)
natural_image
Illustration of a hand holding a small object with an arrow pointing to it, no text or symbols presentWool: a cycle designed for wool fabrics.
- Before washing, please confirm that the clothes have the washing label of «machine washable».
• After the procedure is completed, please take out the clothes quickly, shape and dry them to avoid deformation caused by being placed in the drum for too long.
• To prevent clothes from being damaged, the water temperature should not exceed 40irc C. - For best results and to reduce the damage of clothes, Please use special detergent for wool and do not exceed 1.0 kg of laundry.
Various functions
Delay end
Press DELAY END button to set the program end (Delay end) time in one hour increments to a maximum of 24 h (hours). After selecting the desired washing program but before pressing the START/PAUSE ▶I button, press the DELAY END button until the desired time is displayed, e.g. 8h.
⚠️ Notice: The cycle duration is included in the set Delay End time.
Here is an example of a 1hr: 30 min cycle time and an 8 h Delay end time.
8 h is displayed and count down (approximately 6 h: 30 min) until the washing cycle begins (at 1 hr: 30 min) then the cycle duration 1: 30 is displayed and began. Total time approximately 8 hours.
The way to cancel Delay End function:
Turn the wash cycle selector knob to reset the wash cycle. The DELAY END indicator light ⏻ goes out.
⚠ Notice:
- Delay End function cannot be set in some wash cycle.
- The actual end time of the wash cycle may be different from the set Delay End time depending on the water supply pressure, drainage, clothing type, water temperature and other conditions.
Child lock
- Setting the Child lock function can avoid children's mis-operation and external interference to the washing procedure.
-
During operation, long press the SPEED button for 3 seconds to set or cancel the Child lock function.
-
After the Child lock function is set, the Child lock indicator light 😊 is lit, the door cannot be opened, the control panel is locked and all buttons on control panel do not respond. You can turn off the machine by turning the linear mark on the wash cycle selector knob under the symbol ⏻.
-
After the Child lock function is set, you can turn off the machine by turning the wash cycle selector knob. When the machine is turned on again, the machine directly run the program before turning off the machine.
Downlight (for models i-DDQ9 - 10714 W/Sd)
- Downlight is always on during program or function setting.
- When the program is suspended, the downlight can be lit by opening the machine door.
- When the program is running, the downlight will automatically light up with the change of washing stage.
- Touching any button other than the power button can also illuminate the downlight.
Add clothes during the program is running
When the program is running, long press the START/PAUSE ▶ button to pause the machine, if the DOOR LOCK indicator light ☐ is lit, the door may be opened, you can add or take out laundry.
After the operation is completed, close the door, long press the START/PAUSE ▶ button again, and the machine continues to run from the point at which it was interrupted.
⚠️ Notice: If the water level or water temperature in the drum is too high, the door lock indicator light ☐ is lit, the door cannot be opened and cannot add or take out clothes during the program is running.
Load balancing system
The appliance has an automatic detection system for eccentric load. In the process of spinning, if the clothes are unevenly distributed, the appliance will level and adjust the clothes until the clothes are evenly distributed before spinning. If the clothes cannot be evenly distributed within the specified time, the appliance will not spin to avoid severe vibration of the machine. At this time, you need to check whether the clothes are knotted or entangled, and select the «Spin» program after reorganizing the clothes. When washing less clothes, such as a pair of jeans, a sweater, a bath towel, etc., the machine may not complete the spinning process due to balance protection. Please wash the large and small clothes together as much as possible to make the clothes easier to release evenly and complete the spinning process smoothly.
⚠ Notice: Due to the different types and materials of the laundry, the automatic adjustment and balance system of the appliance may level and adjust the clothes for many times to prolong the spinning time. This is a normal phenomenon, not a machine failure.
HOW TO USE THE APPLIANCE
Before loading your first load of laundry
Your new washing machine was tested before leaving the factory. This process involves running various wash cycles. As a result, a small amount of water may remain in the tub and drainage system.
Run a Drum Clean cycle with no laundry to clean the system before your first load of laundry.
First add 1 to 2 tablespoons of detergent to the chamber I. Then run the Drum Clean cycle.
Wait for the cycle to finish.
Daily use
Preparing the laundry
Empty pockets:
- Coins, paper clips, etc. could damage the load and the washing machine components.
- Tissues will break down during the wash cycle and the fragments will have to be subsequently removed by hand.
Close all zippers, buttons, and hooks. Tie all ribbons or belts:
- Insert the smaller garments (e.g. nylon hosiery, belts, etc.) and garments with hooks (e.g. braziers) into a fabric bag or a pillowcase with zipper. Remove any rings from curtains, or else place the curtains inside a fabric bag together with the rings.
Fabric type/symbol on the wash label:
• Cottons, mixed fibres, easy care/synthetics, wool, hand wash items.
• Color. Separate colored and white items. Wash new colored articles separate.
- Size. Wash items of different sizes in the same wash load, to improve washing efficiency and distribution of the articles in the drum.
• Delicates. Wash delicate items separately; they require gentle treatment.
How to use the washing machine
1. Load laundry
Open the door and load the laundry. Load the articles one at a time loosely into the drum, without overfilling. Observe the load sizes given in the "Table of wash cycle", Overloading the machine will result in unsatisfactory washing results and creased laundry.
2. Close door
Make sure that no laundry gets stuck between door glass and rubber seal. Close the door so that you can hear it click shut.
3. Open water tap
Make sure that the washing machine is connected to the water mains. Open the water tap.
4. Set the desired program
Select the required program with the "Program selector" knob. The duration of the wash cycle is shown on the display. The washing machine automatically displays the default temperature and spin speed settings possible for the selected program. Adjust the temperature and/or spin speed setting if needed with the relative buttons.
• Change temperature, if needed
Press the TEMP. button to progressively lower the temperature setting until cold wash has been set («-» will be shown on the display).
Pressing the button again sets the highest possible setting.
• Change spin speed, if needed
Press the SPEED button to progressively decrease the spin speed until the spin cycle is turned off («-» will be shown on the display). Pressing the button again sets the highest possible setting.
- Select options, if needed
Press the button(s) to select the option; the corresponding option indicator light is on.
Press the button(s) again to cancel the option, the corresponding option indicator light goes out.
⚠ WARNING!
- If the selected option is incompatible with the program set, the incompatibility will be signaled by a buzzer and the corresponding indicator light will flash..
- If the selected option is incompatible with another previously set option, only the most recent selection will remain active.
5. Add detergent
Pull out the detergent dispenser and add detergent (and additives/softener) into the relative compartments as described below.

Observe the dosing recommendations on the detergent pack.
Correct dosing of detergent/additives is important, because:
• It optimizes the cleaning result.
- It avoids irritating residues of surplus detergent in your laundry.
- It saves money by avoiding waste of surplus detergent.
- It protects the washer by avoiding calcification of components.
• It respects the environment by avoiding unnecessary environmental burden.
WARNING!
- Do not use hand washing detergents because these create too much foam.
- Use powder detergent for white cotton garments, for pre-washing, and for washing at temperatures over 60°.
- Follow the instructions given on the detergent packing.
6. Delaying the end of a program
To set a program to end at a later time, see the section «Control panel / DELAY END».
7. Start program
Press the START/PAUSE ▶ button. The relative indicator light is lit, the door locks and the DOOR LOCK indicator light ☐ is lit.
To avoid overflow, do not open the detergent dispenser during a running program anymore.
The remaining program duration can vary. Factors like unbalance in the wash load, or foam formation, can have an effect on the program duration.
8. Change the settings of a running program, if needed
You can still change the settings while a program is running. The changes will be applied, provided the respective program phase has no finished yet.
To change the settings of a running program:
- Press START/PAUSE ▶ button put the running program on pause.
- Change your settings.
- Press START/PAUSE ▶ button again to continue the program.
If you have changed the program, do not add detergent for the new program.
To prevent that a running program is changed by accident (for instance by children), use the Child lock function (see section «Control panel / SPEED»).
Pause a running program and open the door, if needed
Press START/PAUSE ▶ button to pause a running program.
If the water level and/or temperature in the drum are/is not high, the DOOR LOCK indicator light ☐ turns off. You can open the door, for example to add more laundry, or to remove laundry which was loaded by mistake. Press START/PAUSE ▶ button again to proceed with the program.
9. Cancelling a running program, if needed
Turn the wash cycle selector knob to switch the machine off while the light under the symbol ⏻ is lit.
If the water level and/or temperature are/is low enough, the door is unlocked and can be opened.
The door remains locked if there is higher water level in the drum. To unlock the door, firstly turn the wash cycle selector knob to select the Spin program, then turn the spin option off by pressing the SPEED button to set the spin speed to «-» shown on the digital display.
Press START/PAUSE ▶I button to run Spin program. The water is pumped out from the drum during the cycle. The door unlocks at the end of the program.
10. Switch off the appliance after program End
At the end of the cycle, the message «End» is shown on the digital display.
The door can only be opened when the DOOR LOCK indicator light ☐ goes out.
Check that the DOOR LOCK indicator light ☐ is off, then open the door and take out the laundry.
Turn the wash cycle selector knob to switch the machine off while the light under the symbol ⏻ goes out.
Leave the door ajar to let the interior of the appliance to dry.
CARE AND MAINTENANCE
Your appliance is designed to give you years of service. Observe the following instructions to maintain and protect your appliance and keep it in top operating condition.
⚠ WARNING! Risk of electric shock hazard.
- To avoid risk of electric shock always disconnect the appliance from the power outlet prior to cleaning.
- Never clean the appliance with a pressure washer.
Cutting off the water and electricity supplies
Turn off the water tap after every wash cycle. This will limit wear on the hydraulic system inside the appliance and help to prevent leaks.
Unplug the appliance when cleaning it and during all maintenance work.
Cleaning the appliance's exterior
⚠ WARNING! Risk of explosion.
- To avoid risk of explosion never clean the appliance with flammable solvents.
Clean the appliance's exterior surface when required as follows:
• Use hot soapy water or a mild (non-abrasive) cleaning agent.
- Rub the exterior surface of the appliance dry with a soft towel.
- Remove residue immediately.
• Do not use high pressure spray.
Cleaning the drum
Metallic debris left in the drum can product rust spots on the drum. Never use steel wool to try to remove these. Use a chlorine-free cleaning agent and follow the manufacturer's instructions.
Descaling the appliance
Provided that you use correct amounts of detergent with you wash loads, descaling is not necessary. If descaling the appliance drum does become necessary, please follow the descaling product manufacturer's instructions.
Small amounts of descaling agent can be used to remove white spots on the washer drum caused by lime or mineral deposits or small amounts of rust caused by metal objects left in the drum.
⚠ NOTICE: Descaling agents contain acids which may attack parts of the appliance and may discolor the laundry.
Caring for the door and drum of your appliance
Always leave the porthole door ajar in order to prevent unpleasant odours from forming.
Checking the water inlet hose
Check the water inlet hose at least once a year. If there are any cracks, it should be replaced immediately, during the wash cycle, water pressure is very strong and a cracked water inlet hose could easily spilt open.
Never use second-hand water inlet hose.
Cleaning the detergent dispenser
If there is a buildup of residual detergent or additives, or if the softener compartment is not rinsed out well enough, it may be helpful to clean the dispenser.
- Open the detergent dispenser tray fully. Press down on the drawer catch (1) and pull the tray (2) from the appliance housing.
- Remove the liquid detergent cover (3) by grasping it and pulling it upwards from the detergent dispenser tray.
- Clean the liquid detergent cover and the detergent dispenser tray by holding it under runing water. Lightly wipe away any remaining detergent residue.
- Attach the liquid detergent cover and slide the detergent dispenser tray back in place and close the tray securely.
Tip: Do not operate the appliance without the detergent dispenser tray in place. Always keep the tray completely closed.


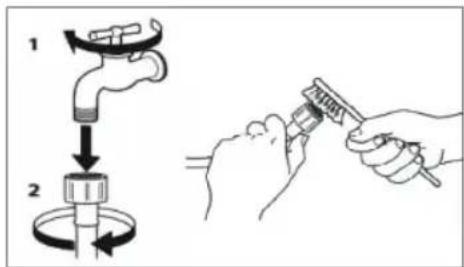


Cleaning the mesh filter in the water inlet hose and the water inlet valve
- Close water tap and unscrew the water inlet hose.
- Clean the mesh filter at the hose's end carefully with a fine brush.
- Now unscrew the water inlet hose on the back of the appliance by hand. Pull out the mesh filter from the water inlet valve on the back of the appliance with pliers and carefully clean it.
- Insert the mesh filter again. Connect the water inlet hose to the water tap and the appliance again. Do not use a tool to connect the inlet hose.
Open the water tap and check that all connections are tight.
Cleaning the drain pump
⚠ WARNING! Risk of scalding. Risk of hot water injury to skin!
You are responsible for ensuring all safety precautions are followed when draining water from the appliance and/or manually opening the appliance door.
It may be necessary to clean the appliance drain pump if the appliance fails to drain (sound of the water being pumped from the appliance cannot be heard when the appliance should be draining and other nearby drains, such as a sink, are draining properly).
The appliance pump can become blocked by loose debris (a good reason to check the drum and remove any visible debris after each load). Fabrics that give off large amounts of fluff may also cause blockage.
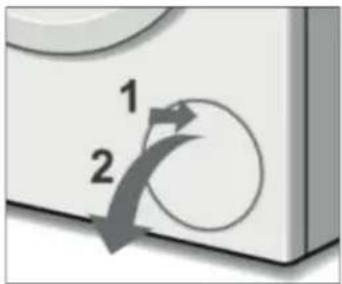
To access the appliance drain pump, the service cover must first be opened (see steps below). With the service cover opened, proceed as follows:
-
If the appliance has not been drained, try to drain it now. Firstly turn the wash cycle selector knob to select the Spin program, press the SPEED button to set the Spin program off («- -» shown on the digital display), then press the START/PAUSE ▶II button. Wait a few moments to let the pump drain the water from the drum. If the pump is totally blocked, the water will be unable to drain and the cycle will end.
-
Shut off the tap so that no more water flows in and has to be drained. Switch the appliance off. Unplug the power plug.
-
Open the drain filter cover.
-
Use the pull-out drain hose located in the pump access opening to drain the remaining water into a suitable container (up to 5.3U.S.gallon/20 liters of water may be drained). Pull the sealing cap from the hose and lay the hose over the side of the container and allow the water to finish draining from the drum. When finished, replace the sealing cap into the end of the hose and restore the hose to its storage location.
-
Turn the pump cover counterclockwise to remove it. A small amount of residual water may flow out when the cover is removed. Clean the interior of the pump hosing, removing any debris or foreign objects. Check to be sure the impeller where at the back of the pump housing can now turn freely. Remove any lint, debris or detergent residue from the threads of the pump cover and the pump cover housing. Reinstall the pump cover by screwing tightly into position. Handle must be vertically.
-
Close the drain filter cover. Wipe up any spilled water.

natural_image
Illustration of a washing machine with a circular component and a lid (no text or symbols)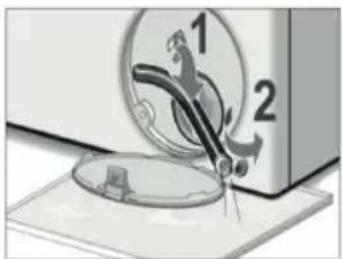
natural_image
Illustration of a sewing machine needle stitching a circular component, with no visible text or symbols
natural_image
Illustration of a washing machine with a hand inserting a coin into the lock, showing two circular components and a magnified view of the lock (no text or symbols present)
natural_image
Diagram of a mechanical device with labeled parts (1, 2), showing components like a knob and shaft assembly (no text or symbols beyond labels)
natural_image
Close-up of a white electronic device with a circular button and an arrow symbol (no text or labels)BEFORE GOING TO A SERVICE CENTER
Please check the information in the Troubleshooting faults". Maybe the tips in it will help you to solve the problems that have arisen. When faults are found during operation, it is necessary to contact a specialized service center.
During the warranty period, defects are eliminated by authorized service center. In cases of interference by others service organizations will void the warranty.
If necessary, repair work, turn off the product from the network, transfer the contents to another location and dial the number of a single help desk: 8-800-700-12-25 (toll-free within Russia), or contact the seller. Be prepared to provide the necessary information on the device you purchased, namely the nature malfunction, model number, serial number and date of purchase.
DISPOSAL

The device at the end of its service life must be disposed of separately from normal household waste. It can be handed over to a special collection point for electronic appliances and electrical appliances for recycling. materials processed according to their classification. Passing device at the end of its service life for recycling, you will do great contribution to environmental protection. List of reception points electronic appliances and electrical appliances for recycling You can obtain from municipal authorities.
⚠ WARNING! Packaging material can be dangerous for kids!
To dispose of the packaging and the device itself, please contact the collection center recyclables. After that, cut the network cable and break the mechanism closing the door. Cardboard packaging is made from recycled materials and must be disposed of at a waste paper collection centre. Following the rules disposal of the product, you will help prevent damage to environment and human health, which is possible due to improper handling of such waste.
For more information on product recycling, please contact the local authorities, the service for the removal and disposal of waste or the store where you purchased the product.
TROUBLESHOOTING GUIDE
| PHENOMENON | CHECK POINTS | SOLUTIONS |
| Washer can't start | Check if press the power button or start pause button?Is the plug pulling out?Is there a power failure?Check if cut the leakage protector? | Press the power button or start/ pause button.Connect the plug.Please wait.Open the leakage protector. |
| Spinning screen shows «UE» | Check if disassemble the carriage bolt?Is the machine placed steadily?Are the clothes too small or light?Are the locknuts on under the feet tightened up? | Disassemble the carriage bolt.Place the machine on a steady ground.Add more clothes.Tighten up the locknuts. |
| Water inflow screen shows «IE» | Check if turn the tap off?Is the water supply cut off or the water pressure too low?Are the water inlet pipes frozen?Are the filters blocked? | Open the stopcock.Please wait.Use hot water to unfreeze the pipes.Take out the filters and clean them. |
| Water outflow screen shows «OE» | Are the outlet pipes placed too highly?Are the outlet pipes frozen?Are the outlet pipes blocked?Are the floor drain blocked? | Please put away the outlet pipes and make sure the height within 1M.Use hot water to unfreeze the pipes.Take out the foreign matter and dredge the pipes.Clean the floor drain. |
| Door trouble screen shows «DE» | Make sure if start the washer without closing the door well. | Make sure the door truly closed. |
| Not heating, screen shows «tE» | Please pull out the plug and call for the after sale service. | |
| Keep water inletting without stop, screen shows «FE» | Due to the abnormal of water inlet valve and water level sensor. | Shut the water tap, pull out the plug and call for the after sale service. |
| The wash drum does not running, screen shows «LE» or «CE» | Please pull out the plug and call for the after sale service. | |
| Too much bubble | If adding the amount of detergent is more than the suggested?If use the low bubble detergent which is especially for front loading washing machine? | Add proper amount of detergent.Use the correct type of detergent. |
| The fault of water level sensor, the screen shows «PE» | If the water level sensor has fallen off or not?If the water level sensor pipe blocked or there is a big pressure? | Tighten the sensor.Open the water pipe excluded congestion or pressure. |
| Power off, the screen shows «PF» | Power off then power on, push the «power» button, the screen display «PF» to indicate that the power has powered off before. The machine can be in normal operation. | To push the button of «Start/Pause» can continue the operations before power off. And the other operations can be processed. |
⚠️ ATTENTION! If the problem persists, do not attempt to repair the device by yourself. contact a specialized service center.
TRANSPORTATION
Keep the original packaging as it may be required for re-transportation. Transport the device in its original packaging in an upright position. Adhere to the directions for signage transportation available on the package. During transport and storage, do not expose the device to mechanical influences that can lead to damage device and violation of the integrity of the packaging. Do not put on something heavy items. It is necessary to protect the packaging of the device from contact with water and other liquids.
WARRANTY TERMS
Dear buyer!
This document does not limit the rights defined by law consumers, but supplements and clarifies the obligations stipulated by law, which presuppose the existence of an agreement between the parties or an agreement.
Please read the warranty card carefully and make sure that it was correctly completed and stamped by the Seller. With absence stamp of the Seller and the date of sale (or a cash receipt with the date of sale) The warranty period of the product is calculated from the date of production of the product.
It is forbidden to make any changes to the Warranty Card, and erase or overwrite any data specified in it.
Carefully check the appearance of the product and its completeness. All complaints about the appearance and completeness of the product Seller when purchasing a product.
The service life of HIBERG products is 10 years from the date of sale through a retail network. During this time, the manufacturer provides the consumer with the opportunity to use the product destination, as well as the production and supply of spare parts to trade and repair companies.
Warranty period - 2 (two) years from the date of sale through retail distribution network, but not more than 3 (three) years from the date of production. Month and year manufacturing are encrypted in the serial number and indicated on the technical label.
WARRANTY REPAIR IS NOT CARRIED OUT IN CASES OF:
- if the product has been used for purposes other than those expressly appointment;
- if the malfunction was the result of negligent operation, improper transportation or storage conditions, as a result of which the product has mechanical damage;
-
if the failure occurred as a result of normal wear and tear accessories;
-
if there is damage caused by ingestion articles of foreign objects, liquids, etc.;
- if evidence of self-opening of the product is found or its repair outside the warranty service center;
- in case of malfunctions resulting from overload, which entailed deformation or failure of internal mechanisms, as well as due to surges or inconsistencies in the mains voltage;
- if there has been natural wear of the outer coating, plastic and metal parts and other materials not involved in the direct mechanical work of the product.
THE COST OF REPAIR IS PAID BY THE BUYER IF:
• the warranty period has ended;
• the warranty does not cover this type of failure;
- an examination is required to determine the type of breakdown, as a result which it is proved that the warranty does not cover this type of malfunctions.
SERVICE CENTERS «HIBERG»
The manufacturer reserves the right to make changes to the list of authorized service centers without prior notice. centers, including changes to addresses and existing phone numbers. If you have any questions about warranty service or you want to purchase spare parts or accessories for HIBERG products, please contact any authorized service center. center or call the single telephone number of the service department:
8-800-700-12-25
(call within Russia is free)
When contacting the service center, please inform:
- The nature of the fault (as accurate as possible).
- Model number.
- Serial number.
- Buyer's name, address, telephone number.
- Date of purchase.
- Convenient date for the visit of a specialist.
Manufacturer: SKYWORTH ELECTRIC CO., LTD.
Address: No. 96 New Energy Avenue, Lishui Economic Development Zone, Lishui District, Nanjing City, Jiangsu Province, China
Importer: LLC «Diorit-Tekhnis»
347800, Russia, Rostov region, Kamensk-Shakhtinsky, Voroshilova str. 152. Tel./fax: +7(863-65) 4-05-05, e-mail: info@hiberg.ru
The month and year of manufacture are encoded in the serial number and indicated on the technical label.
Serial number decoding example:
SWiDDQ9612W0622P03S0001, where
SW-code of the manufacturer
iDDQ9612W - product name
0622 - month and year of manufacture
P03 - batch number
S0001 - individual item number
Made in China
For commercial and cooperation inquiries please call: +7 (863) 203-71-01.

www.hiberg.ru
EAC C E


natural_image
Pure vertical black line on white background (no text or symbols)HIBERG
THE PRIME CHOICE

natural_image
Modern kitchen appliance with white cabinets and wooden shelves in a minimalist interior (no visible text or symbols)Холодильники

natural_image
Modern silver washing machine in a minimalist kitchen setting (no visible text or symbols)■ Стиральные машины

natural_image
White refrigerator with lid placed indoors near a window (no visible text or symbols)Морозильные камеры

natural_image
Exterior view of a modern office building (no signage)natural_image
Black kitchen air conditioner mounted on a wall, no visible text or symbolsВытяжки

natural_image
Modern kitchen oven with digital display and control knobs (no visible text or symbols)CB4

natural_image
Black gas stove burner on a wooden table, no visible text or symbolsnatural_image
Modern kitchen interior with white refrigerator and black double door (no visible text or symbols)Кулеры

natural_image
Interior living room with a large painted mural of autumn foliage on the wall, no visible text or symbolsТелевизоры
natural_image
Modern kitchen electric shaver with metal frame and black control panel, surrounded by fresh tomatoes and a plate of bread (no visible text or symbols)Мясорубки

natural_image
Modern kitchen appliance with a white bowl and beige casing, no visible text or symbolsnatural_image
Kitchen countertop with a hand mixer, blender, and whisk (no visible text or symbols)Блендеры

natural_image
Black appliance with a diagonal stripe on the front panel, placed against a plain wall (no visible text or symbols)Духовые шкафы
natural_image
Interior scene with two ornate spherical objects on a sofa, no visible text or symbolsnatural_image
Modern kitchen appliance with black and pink filter, placed on a table with food items (no visible text or symbols)Мультиварки
- Примечание:
- ПАНЕЛЬ УПРАВЛЕНИЯ
- BRIEF INTRODUCTION
- Dear buyer!
- WELCOME TO THE WORLD OF HIBERG!
- CUSTOMER SUPPORT AND SERVICE
- SAFETY INSTRUCTIONS
- MAIN ELEMENTS OF WASHING MACHINES
- Accessories
- INSTALLATION
- UNPACKING
- Carrying the washer
- Correct installation of the device
- Removing the transport bolts
- CAUTION:
- DAMAGE TO THE APPLIANCE OR INJURY POSSIBLE
- Choosing the right location
- Set-in Installation
- Importance of leveling the washer
- Procedure for adjusting the appliance feet
- CONNECTION THE ELECTRICITY AND WATER SUPPLIES
- Connecting the water inlet hose
- Connecting the drain hose
- Height of drain point
- Types of drainage hookups
- Standpipe
- Sink siphon
- Wash Basin
- Electric connection
- Replace the supply cable:
- Disposing of the plug:
- Disposing of the appliance:
- CONTROL PANEL
- Model HIBERG i-DDQ9-10714 W/Sd:
- PREPARING AND SORTING THE LAUNDRY
- Preparing the laundry
- ⚠ NOTICE: Damage to the appliance/fabric.
- Preparing the laundry for drying
- Sorting the laundry according to colour and degree of soiling
- Degree of soiling
- Light soiling
- Normal soiling
- Heavy soiling
- Sorting laundry according to their care label specifications
- VARIOUS CYCLES AND FUNCTIONS
- Additional Recommendations
- Drying program (for model i-DDQ9 - 10714 Sd)
- To set the program of «Washing + Drying»
- To set the Drying Only program
- To set the down jacket drying program
- Precautions for drying program
- Air wash (for model i-DDQ9 - 10714 Sd)
- Special wash cycles
- Various functions
- Delay end
- ⚠️ Notice: The cycle duration is included in the set Delay End time.
- ⚠ Notice:
- Child lock
- Downlight (for models i-DDQ9 - 10714 W/Sd)
- Add clothes during the program is running
- Load balancing system
- HOW TO USE THE APPLIANCE
- Before loading your first load of laundry
- Daily use
- How to use the washing machine
- Load laundry
- Close door
- Open water tap
- Set the desired program
- • Change temperature, if needed
- • Change spin speed, if needed
- - Select options, if needed
- ⚠ WARNING!
- Add detergent
- WARNING!
- Delaying the end of a program
- Start program
- Change the settings of a running program, if needed
- Cancelling a running program, if needed
- Switch off the appliance after program End
- CARE AND MAINTENANCE
- Cutting off the water and electricity supplies
- Cleaning the appliance's exterior
- Cleaning the drum
- Descaling the appliance
- Caring for the door and drum of your appliance
- Checking the water inlet hose
- Cleaning the detergent dispenser
- Cleaning the mesh filter in the water inlet hose and the water inlet valve
- Cleaning the drain pump
- ⚠ WARNING! Risk of scalding. Risk of hot water injury to skin!
- BEFORE GOING TO A SERVICE CENTER
- DISPOSAL
- ⚠ WARNING! Packaging material can be dangerous for kids!
- TROUBLESHOOTING GUIDE
- TRANSPORTATION
- WARRANTY TERMS
- WARRANTY REPAIR IS NOT CARRIED OUT IN CASES OF:
- THE COST OF REPAIR IS PAID BY THE BUYER IF:
- SERVICE CENTERS «HIBERG»
- 8-800-700-12-25
- When contacting the service center, please inform:
- HIBERG
- THE PRIME CHOICE
Brand : Hiberg
Model : i-DDQ9 - 612 Sd
Category : Washing machine