
VC820BL - Coffee maker CDA - Free user manual and instructions
Find the device manual for free VC820BL CDA in PDF.


| Product Type | Drip Coffee Maker |
| Model | VC820BL |
| Brand | CDA |
| Dimensions (W x D x H) | 30 x 20 x 35 cm |
| Weight | 2.0 kg |
| Power Supply | 220-240 V, 50/60 Hz |
| Power Consumption | 1000 W |
| Water Tank Capacity | 1.2 L |
| Carafe Type | Glass carafe with lid |
| Carafe Capacity | 10 cups (approx. 1.2 L) |
| Filter Type | Paper filter (size #4) or permanent filter |
| Brewing Function | Automatic drip brewing |
| Keep Warm Function | Automatic keep warm for 2 hours |
| Anti-Drip System | Yes, pause & serve |
| Water Level Indicator | Yes, on water tank |
| Cleaning | Descaling recommended every 3 months |
| Safety Features | Auto shut-off after 2 hours; overheating protection |
| Spare Parts Available | Carafe, filter basket, water tank |
| Repairability | Modular design; some parts user-replaceable |
| Warranty | 2 years |
| Certifications | CE, RoHS |
| Color | Black |
Frequently Asked Questions - VC820BL CDA
User questions about VC820BL CDA
0 question about this device. Answer the ones you know or ask your own.
Ask a new question about this device
Download the instructions for your Coffee maker in PDF format for free! Find your manual VC820BL - CDA and take your electronic device back in hand. On this page are published all the documents necessary for the use of your device. VC820BL by CDA.
USER MANUAL VC820BL CDA
Fully automatic coffee machine Use and maintenance
Contents Safety instructions
3 Safety instructions
6 Important information
9 Legend for Fig. 1
10 Control panel
11 First use
13 Use
15 Emptying the waste coffee container
16 Changing the quantity of coffee
17 Adjusting the coffee mill
18 Preparing espresso using ground coffee
19 Preparing hot water
19 Changing the quantity of hot water
20 Making cappuccino
22 Changing the quantity of milk and coffee for cappuccino
23 Tips for coffee making
24 Setting the language
24 Water hardness
25 Setting the coffee temperature
25 Setting the switch-off time
26 Carrying out the descaling programme
28 Rinsing
28 Statistics
29 Resetting the appliance to factory settings
29 Setting the clock
30 Setting auto-start time
30 Auto-start
31 Buzzer
31 Adjusting contrast
32 Cleaning the coffee machine
40 Display messages
42 Faults table
44 Installation
48 Electrical connection
50 Notes
The appliance is not intended for use by persons (including children) with reduced physical, sensory or mental capabilities, or lack of experience and knowledge, unless they have been given supervision or instruction concerning use of the appliance by a person responsible for their safety.
Children should be supervised to ensure that they do not play with the appliance.
Cleaning and user maintenance should not be undertaken by children without supervision.
Never immerse the appliance in water.
This is a household appliance only. It is not intended to be used in:
- Staff kitchen areas in shops, offices and other working environments; - Farmhouses;
- By clients in hotels, motels and other residential type environments;
• Bed and breakfast type environments
If the plug or power cable is damaged, it must be replaced by a qualified engineer only to avoid all risk.
For European Markets Only:
This appliance can be used by children aged from 8 years and above if they have been given supervision or instruction concerning use of the appliance in a safe way and if they understand the hazard involved. Cleaning and user maintenance shall not be undertaken by children unless they are older than 8 and supervised. Keep the appliance and its cord out of the reach of children aged less than 8 years.
Safety instructions
Appliances may be used by persons with reduced physical, sensory or mental capabilities or with no prior knowledge if they have been given supervision or instruction concerning use of the appliance in a safe way and understand the hazards involved.
Children should not play with the appliance.

Surfaces marked with this symbol become hot during use.
Important Notes:
This appliance is designed solely to produce coffee and steam. Other types of use are not permitted and may prove dangerous. The CDA Group Ltd. will not be held liable for any damage caused by incorrect use of the appliance.
- Read the user instructions carefully before using the appliance for the first time
- To protect against fire, electrical shock and injury to persons, do not immerse cord or plugs in water or other liquid
- The use of accessory attachments not recommended by The CDA Group Ltd. may result in fire, electric shock or injury
- Never touch the appliance with damp hands
- Never touch the plug with damp hands
- Make sure the socket used is freely accessible at all times, enabling the appliance to be unplugged when necessary
- Unplug directly from the plug only. Never pull the power cable as you could damage it
Safety instructions
- To disconnect the appliance completely, place the main switch (A) on the side of the appliance in the "0" position (see page 8)
- If the appliance is faulty, do not attempt to repair; turn it off using the main switch (A), unplug from the mains socket and contact CDA Customer Care
- Keep all packaging (plastic bags, polystyrene foam) away from children
- This appliance produces hot water; steam may form while it is in operation. Avoid contact with splashes of hot water or steam. Use knobs and handles
- Do not squeeze or apply pressure to the coffee maker when it is out of the cabinet
- Do not rest vessels containing liquids, inflammable or corrosive materials on top of the appliance. Place accessories required to make coffee safely aside (the measure for coffee may be placed in the special holder)
- Do not rest large objects which could obstruct movement or unstable objects on the appliance
- Do not use the appliance when extracted. Make sure the appliance is inactive before extracting it. The only exception is adjusting the coffee mill which must be done with the machine out (see the section "Adjusting the coffee mill" on page 17)
This coffee machine is not designed for use with caramelised coffee beans: Use of such beans will invalidate the guarantee.
Note: This appliance has a cooling fan. This may switch on when coffee, steam or hot water is delivered. After several minutes the fan switches off automatically. Do not manually switch the coffee machine off or disconnect the power supply while the fan is still running.
Instruction Manual
Important
The CDA Group Ltd. cannot be held responsible for injuries or losses caused by incorrect use or installation of this product. Please note that CDA reserves the right to invalidate the guarantee supplied with this product following incorrect installation or misuse of the appliance.
Under no circumstances should any external covers be removed for servicing or maintenance except by suitably qualified personnel.
Appliance information:
Please enter the details on the appliance rating plate below for reference, to assist CDA Customer Care in the event of a fault with your appliance and to register your appliance for guarantee purposes.
Appliance Model
Serial Number
Declarations of Conformity:
This appliance has been manufactured to comply with all EU & UK statutory requirements and complies with all applicable legislation and the following European Directives:
• The Low Voltage Directive 2014/35/EU
• Electromagnetic Compatibility Directive 2014/30/EU
- Materials suitable for contact with foodstuffs, directive 1935/2004
The product has been marked with the UKCA and CE symbols.
This appliance is marked according to the European directive 2004/104/EC on Waste Electrical and Electronic equipment (WEEE).
6 | Instruction Manual
IMPORTANT INFORMATION FOR CORRECT DISPOSAL OF THE PRODUCT IN ACCORDANCE WITH EC DIRECTIVE 2002/96/EC.
At the end of its working life, the product must not be disposed of as household waste. It must be taken to a special local authority differentiated waste collection centre or to a dealer providing this service.
Disposing of a household appliance separately avoids possible negative consequences for the environment and health deriving from inappropriate disposal and enables the constituent materials to be recovered to obtain significant savings in energy and resources. As a reminder of the need to dispose of household appliances separately, the product is marked with a crossed-out wheeled dustbin.
8 | Instruction Manual
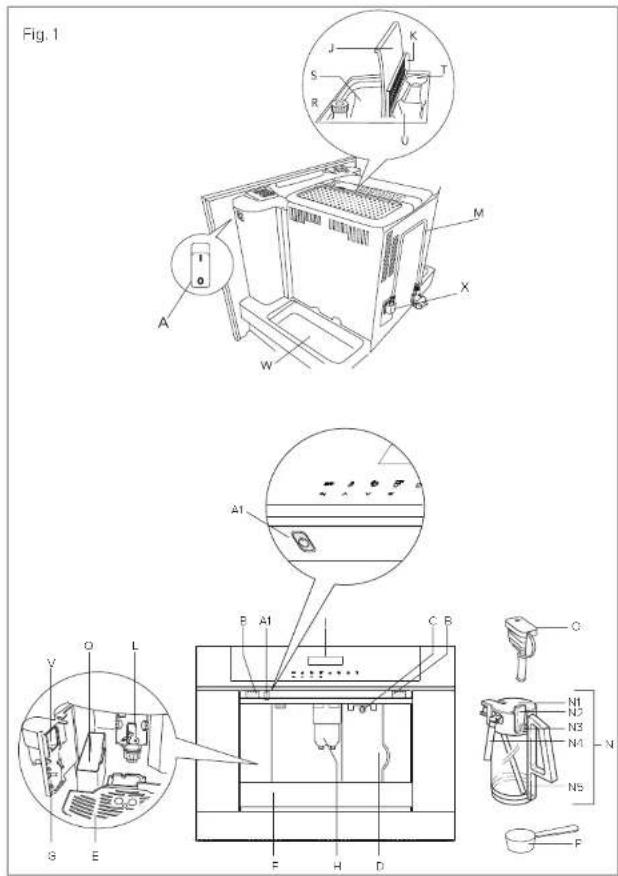
Legend for Fig. 1
Note: Throughout this manual, references in brackets refer to the legend in this section.
A Main switch
A1 On/Stand-by button
B Handles
CNozzle
D Water tank (removable)
E Cup tray
F Drip tray grill (removable)
G Service door
H Height adjustable coffee dispenser
I Control panel
J Coffee bean holder cover
K Ground coffee chute cover
L Brewing unit
M Power cable
N Milk container
N1 Cover (removable)
N2 Slider CAFFELATTE/CAPPUCCINO (removable)
N3 CLEAN button
N4 Milk dispenser pipe (removable)
N5 Suction pipe (removable)
O Hot water nozzle (removable)
P Measuring spoon for pre-ground coffee
Q Waste coffee container (removable)
R Knob for setting ground level
S Coffee bean container
T Measuring spoon holder
U Filling chute for pre-ground coffee
V Coffee guide
W Place for accessories (left and right)
X IEC connector
Control panel
Note: Throughout this manual, references in brackets refer to the legend in this section.

1 Display
2 MENU touch key to activate or deactivate menu
3 Return touch key to exit the selected mode
4 Rinse touch key
5 Scroll touch key to scroll forward through the menu and display
6 Coffee strength key to adjust strength or pre-ground
7 Scroll touch key to scroll backwards through the menu and display
8 Cup touch key
(espresso, small cup, medium cup, large cup, mug)
9 OK touch key to confirm the selected function
10 One cup touch key
11 Two cups touch key
12 Cappuccino touch key
13 Hot water touch key
First use
The first time you switch on the appliance with the main switch (see 'A' on page 8) and every time that it is plugged in, the appliance executes a 'SELF-DIAGNOSIS' action. Then the appliance switches off. To turn it on again press the on/stand by button (see 'A1' on page 8) on the left side underneath the control panel.

Note: Coffee has been used in the factory to test the appliance and is therefore completely normal for there to be traces of coffee in the mill.
- Connect the appliance to the mains supply
- Switch on the appliance with the main switch (see 'A' on page 8)
- Start the appliance with the 'on/stand by button' (see A1 on page 8 or Fig. 3)
- Set the required language by pressing MENU and then OK, scroll through the language options using keys 5 and 7 on the control panel and press OK once the desired language is reached. After 5 seconds, the appliance displays the selected language
- Extract the water tank, rinse and fill with fresh water without exceeding the MAX line, replace and push tank back in (Fig.4)

- Place a cup under the hot water spout (if the hot water spout is not inserted the display will show 'INSERT WATER SPOUT'). The appliance displays 'HOT WATER PRESS OK'. Press the OK key and after a few seconds a little hot water will come out of the spout
- The machine will display 'TURNING OFF...PLEASE WAIT' and will turn off
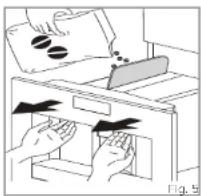
- Extract the appliance by pulling it out using the handles underneath the control panel (Fig. 5) Open the coffee bean cover (J) and fill container with coffee beans. Close the cover and push the appliance back in. It is now ready for normal use
natural_image
Illustration of hands inserting a device into a file cabinet (no text or symbols visible)Only fill the water tank with cold water. Never use other liquids such as mineral water or milk.
To prevent malfunctions, never fill with ground coffee, frozen or caramelised coffee beans or anything else that could damage the appliance.
Use
Preparing coffee (using coffee beans)
This appliance is preset to make coffee with a normal taste. You can also choose coffee with an extra mild, mild, normal, strong or extra-strong taste. There is also a pre-ground coffee option.
To choose the required taste, press the 'Coffee strength' key (6) until the desired strength is displayed.
- Place one cup under the spouts to make one coffee or two cups for two coffees (Fig. 6)
- Lower the spouts as near as possible to the cup for a creamier coffee (Fig. 7)
- Press the 'type/quantity of coffee' key (8) to cycle through the options
- ESPRESSO CUP
-
SMALL CUP
• MEDIUM CUP
• LARGE CUP
• MUG -
Press the 'One cup' key (10) if you want to make one coffee and the 'Two cup' key (11) if you want to make two coffees
The appliance will grind the beans and delivers coffee into the cup. Once the set amount of coffee has been delivered, the machine stops automatically and expels the waste coffee into the waste coffee container. After a few seconds the appliance is ready to use again

natural_image
Diagram of two identical containers with cups, showing internal setup (no text or symbols)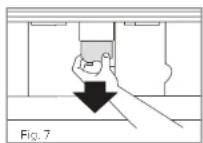
Use
Notes
To turn the appliance off, press the 'On/stand by button' (A1 on page 8 or Fig. 3). Before turning off the appliance performs an automatic rinse cycle. Take care to avoid scalds and place a cup underneath the spout to collect waste water.
If the coffee is being delivered a drop at a time or not at all see the 'Adjusting the coffee mill' section on page 17.
If the coffee is being delivered too fast and the crema is not satisfactory, see the 'Adjusting the coffee mill' section on page 17.
You can stop the coffee from dispensing at any time by pressing the previously selected touch key, which remains lit during operation.
When the display shows 'FILL TANK' you must extract the water tank and fill it; the appliance will not work until this is completed. It is normal for there to be a little water left in the tank when this message is displayed.
Important! Never remove the water tank when the appliance is dispensing coffee. This could cause the machine to malfunction.
Every 14 coffees (or 7 doubles) the appliance displays 'EMPTY WASTE COFFEE CONTAINER'. This means that the waste coffee container is full and must be emptied and cleaned. The appliance counts the number of coffees made, so until the waste coffee container is emptied and cleaned, the message remains on the display and the machine will not make any coffee.
14 | Instruction Manual
Emptying the waste coffee container
Important!
Always completely extract the drip tray to avoid it falling when removing the waste coffee container. Empty the container and clean thoroughly, ensuring all residues deposited on the bottom are removed. Even if it is not completely full the waste coffee container must be emptied; if the container overfills the machine may get blocked.
To clean, open the service door at the front by pulling the coffee spout, remove the drip tray, empty and clean it (Fig. 8 & Fig. 9).

natural_image
Diagram of a mechanical device with a rotating arrow, labeled Fig. 8 (no text or symbols on the diagram itself)
natural_image
Diagram of a mechanical device with an arrow indicating direction, showing internal components and a magnified inset of a component (no text or symbols present)Changing the quantity of coffee
The appliance is preset at the factory to automatically deliver the following quantities of coffee:
- Espresso
- Small cup
- Medium cup
• Large cup
• Mug
To alter these quantities, proceed as follows:
- Press the 'MENU' touch key (2) and the scroll touch keys (5 and 7) until the display shows 'PROGRAM COFFEE'. Confirm the menu option with the touch key 'OK' (9)
- Select the cup size you want to change with the scroll touch keys (5 and 7). When the desired cup is displayed, confirm it with the 'OK' touch key (9)
- A bar appears on the display which can be made bigger or smaller; this represents the cup filling quantity. Using the scroll touch keys (5 and 7) adjusts the quantity filling. A full bar indicates that the maximum of 220ml is selected
- Select the desired quantity and confirm it with the 'OK' touch key (9). If you don't press the touch key within 120 seconds, the appliance will automatically return to its original setting without saving
- To return to making coffee simply press the return touch key (3) twice or wait 120 seconds and the appliance will automatically revert to coffee mode
Adjusting the coffee mill
If the coffee is dispensed too quickly or too slowly (in drips), you can change the grind level.
Only change the grind level during the milling process, otherwise the machine may be damaged.
- Turn anti-clockwise to obtain finer ground coffee, slower delivery and a creamier appearance
- Turn clockwise for coarser ground coffee and faster delivery (not a drop at a time)
Please note the adjustment will only become evident after at least two cups of coffee have been made.
natural_image
Illustration of a hand inserting a spring into a device, with no visible text or symbols
Preparing espresso using ground coffee
- Press the coffee strength touch key (6) and select 'PRE-GROUND'
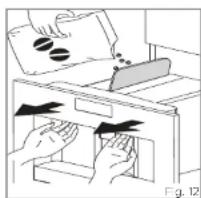
- Extract the machine by pulling it outwards using the handles (Fig. 12)
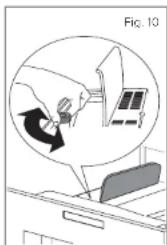
- Lift the central lid, place one measure of pre-ground coffee in the funnel (Fig. 13). Push the appliance back and proceed as described in the 'Preparing coffee using coffee beans section on page 13
- To go back to making coffee using coffee beans, deactivate the pre-ground coffee function by pressing the 'coffee strength' touch key (6)
natural_image
Illustration of hands inserting a device into a filing cabinet (no text or symbols visible)Notes
- Never introduce pre-ground coffee when the machine is switched off or it could spread through the inside of the appliance
- Never add more than 1 measure of pre-ground coffee beans at a time, otherwise the appliance will not make coffee
- Use the measure provided only
- Use only pre-ground coffee for espresso coffee machines in the funnel
- If more than one measure of pre-ground coffee is used and the funnel clogs, push the coffee down with a blunt object then remove and clean the brewing unit and machine as described in the 'Cleaning the brewing Unit' section on page 35

Preparing hot water
Hot water can be used to warm up cups and to make hot drinks such as tea or packet soups.
- Put the hot water nozzle in place (Fig. 14)
- Place a container underneath the hot water nozzle
- Press the 'Hot water' touch key (13). The display shows 'HOT WATER PRESS OK'
- Press the 'OK' touch key (9)
- Hot water is dispensed; the display shows 'HOT WATER'. Once the programmed amount of hot water is dispensed the dispensing stops automatically

natural_image
Diagram of a door with a hanging device and directional arrow, labeled Fig. 14 (no text or symbols on the diagram itself)Changing the quantity of hot water
The appliance is set by default to deliver 150ml of hot water. To change these quantities proceed as follows:
- Place a container underneath the water spout
- Press the 'MENU' touch key (2) to enter the menu
- Press the scroll keys (5 and 7) until 'PROGRAM HOT WATER' is displayed
- Press the 'OK' touch key (9) to confirm
- Select the required quantity of water by pressing the scroll keys (5 and 7). The progress bar displayed shows the quantity of water selected
- Press the 'OK' touch key (9) to confirm or the 'Return' touch key (3) to cancel the operation
- Press the 'Return' touch key (3) to exit the menu
- The appliance is now reprogrammed with the new settings and is ready to use
Making cappuccino
This appliance is set by default to automatically deliver a standard cappuccino.
- Select the taste of coffee you want to for your cappuccino by pressing the 'Coffee strength' touch key (6)
- Remove the lid of the milk container and pour roughly 100ml of milk for each cappuccino to be prepared (Fig. 15). Do not exceed the MAX level (corresponding to about 750ml) marked on the container.
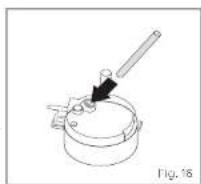
- Make sure the intake tube is correctly inserted in the rubber washer, then replace the milk container lid (Fig. 16)
- Position the frothed milk regulator (N2) between the words CAPPUCCINO and CAFFELATTE printed on the lld
- The quantity of froth can be adjusted by moving the regulator towards the word CAFFELATTE for a denser froth. Moving it towards CAPPUCCINO produces a less dense froth
- Remove the hot water spout and attach the milk container nozzle (Fig. 18 & 19)
- Position the milk spout and then place a sufficiently large enough cup under the coffee and milk spouts
- Press the 'Cappuccino' touch key (12). 'CAPPUCCINO' appears on the display


and after a few seconds, frothed milk flows out of the milk spout into the cup below (delivery stops automatically)
- The appliance then delivers coffee
- The cappuccino is now ready. Sweeten to taste and, if desired, sprinkle the froth with a little cocoa powder

Notes
- While making cappuccino, the flow of frothed milk can be interrupted by pressing the 'Cappuccino' touch key (12)

Changing the quantity of milk and coffee for cappuccino
This appliance is set by default to automatically deliver a standard cappuccino. To change these quantities, proceed as follows:
Changing the quantity of milk
- Fill the container with milk up to the maximum level indicated on the container
- Press the touch key 'MENU' (2) to enter the menu
- Press the 'Scroll' touch keys (5 and 7) until "PROGRAM CAPPUCCINO" is displayed
- Press the touch key 'OK' (9) to confirm. "PROGRAM MILK" is displayed
- Press the touch key 'OK' (9) again
- Select the quantity of milk required by pressing the 'Scroll' touch keys (5 and 7). The progress bar shows the quantity of milk selected
- Press the touch key 'OK' (9) to confirm or the 'Return' touch key (3) to cancel the operation)
- Press the 'Return' touch key (3) twice to exit the menu
Changing the quantity of coffee
- Follow steps 2 & 3 as listed above
- Press the 'Scroll' touch keys (5 and 7) until "COFFEE FOR CAPPUCC" is displayed
- Press the touch key 'OK' (9) again
- Select the quantity of coffee required by pressing the 'Scroll' touch keys (5 and 7). The progress bar shows the quantity of coffee selected
- Press the touch key 'OK' (9) to confirm or the 'Return' touch key (3) to cancel the operation)
- Press the 'Return' touch key (3) twice to exit the menu
22 | Instruction Manual
Tips for coffee making
- 3 minutes after you made your last coffee, you can preheat the brewing unit by using the menu setting "RINSING (see Rinsing). Run off the water into the underlying drip tray or alternatively use this water to fill (and then empty) the cup to be used for the coffee.
- Do not use cups that are too thick, as they will absorb too much heat.
- You can stop the coffee from dispensing by pressing the 'One cup' of coffee deliver' touch key (10) or 'Two cups' of coffee deliver' touch key (11) again, or by selecting "ESPRESSO CUP" with the 'Type/quantity of coffee' touch key (8).
- After the coffee has finished dispensing (the progress bar reaches 100%), you can increase the amount of coffee by pressing and holding the 'One cup of coffee' touch key until the desired amount of coffee is reached.
- When the display shows the message "FILL TANK!". You must fill the tank, otherwise the appliance cannot make any coffee. It is normal that there is some water left in the water tank when the message is displayed.
- Every 14 single coffees (or 7 doubles) the appliance displays "EMPTY WASTE COFFEE CONTAINER". This means that the waste coffee container is full and must be emptied and cleaned.
- The appliance counts the number of coffees made. As long as the waste coffee container is not cleaned, this message remains in place and the coffee machine cannot make any coffee. To clean, open the service door at the front by pulling the coffee spout, remove the drip tray, empty it and clean it.
Instruction Manual 1 23
Setting the language
You can choose between several languages. A different language can be selected as follows:
- Press the touch key 'MENU' and press the scroll touch keys (5 and 7) until the menu option 'CHOOSE LANGUAGE' appears. Confirm the menu option with the touch key 'OK' (9)
- The language set appears on the display. Press the scroll touch keys (5 and 7) until the desired language appears. When the desired language is displayed, confirm with the touch key (9)
Water hardness
A "PLEASE DESCALE!" message is displayed after the appliance has been operated for a factory set period of time, calculated on the basis of the maximum quantity of limescale which may be contained in the water used. If necessary, this period of operation can be extended, making descaling less frequent, by programming the appliance based on the actual lime content in the water used. Proceed as follows:
- Remove the "total hardness" test strip (in front of this manual) and dip it fully in water for a few seconds. Remove it and wait 30 seconds until its colour changes and a number of red dots are formed. For example if there are 3 dots on the test trip you must set the water hardness to level 3
- Press the touch key 'MENU' (2) and press the scroll touch keys (5 and 7) until the menu option 'WATER HARDNESS' is displayed. Confirm the menu option with the touch key 'OK' (9)
- The display shows the current setting. Press the scroll touch keys (5 and 7) until the required hardness level is displayed. Confirm the selection with the touch key 'OK' (9)
24 | Instruction Manual
Setting the coffee temperature
You can choose between three temperature levels. The coffee temperature levels are defined as follows:
• TEMPERATURE LOW
• TEMPERATURE MEDIUM
• TEMPERATURE HIGH
The factory setting is TEMPERATURE HIGH. You can change this as follows:
- Press the touch key 'MENU' (2) and press the scroll touch keys (5 and 7) until the menu option "TEMPERATURE" appears. Confirm the menu option with the touch key 'OK' (9)
- The display shows the current setting. Select another temperature with the scroll touch keys (5 and 7). When the desired temperature is displayed, confirm it with the touch key 'OK' (9)
Setting the switch-off time
The appliance is set by default to go off automatically 30 minutes after the last coffee has been made. To change this interval (max. 120 min), proceed as follows:
• AUTO SHUT OFF TIME 1/2 hour
• AUTO SHUT OFF TIME 1 hour
• AUTO SHUT OFF TIME 2 hour
You can change this as follows:
- Press the touch key 'MENU' (2) and press the scroll touch keys (5 and 7) until the menu option "AUTO SHUT OFF TIME" appears. Confirm the menu option with the touch key 'OK' (9).
-
- Select another switch-off time with the scroll touch keys (5 and 7). When the desired switch-off time is displayed, confirm it with the touch key (9)
Instruction Manual 1 25
Carrying out the descaling programme
When the display shows "PLEASE DESCALE!", the appliance must be descaled.
- Insert the hot water nozzle (Fig. 21)
- Press the touch key 'MENU' (2) and press the scroll touch keys (5 and 7) until the menu option "DESCALE" appears. Confirm the menu option with the touch key 'OK' (9)
- The display shows "PLEASE CONFIRM". Confirm with the touch key 'OK' (9). The descaling programme starts. The top line of the display alternates between "ADD DESCALER" and "PLEASE CONFIRM".
- Empty the water tank, pour the contents of the descaler bottle into the tank respecting the instructions given on the descaler pack, then add water. For subsequent descaling operations, descaling solution can be purchased from authorised technical service centres.
Make sure that any splashes from the descaling product do not come into contact with surfaces that are sensitive to acids such as marble, limestone and ceramic.
- Put a container with a capacity of at least 2 litres underneath the hot water nozzle. (Fig. 22). If this is not possible, make sure you have 2 empty vessels that can be swapped throughout the process. Any excess water will be caught by the drip tray.

natural_image
Line drawing of a coffee maker inside a storage cabinet (no text or symbols)
natural_image
Technical line drawing of a mechanical assembly with a clamping device (no text or symbols)- Press the touch key 'OK' (9). The display shows 'DESCALING'. The descaling liquid runs out of the hot water nozzle. The descaling programme automatically goes through a series of rinses and pauses to remove limescale deposits from the inside of the coffee machine. After about 30 minutes the water tank is empty and the top line of the display alternates between 'DESCALE COMPLETE' and 'PLEASE CONFIRM'
- Press the touch key 'OK' (9). The display shows "RINSING, FILL-TANK". The appliance is now ready for a rinsing process with clean water.
- Empty the container under the hot water nozzle and put it back.
- Take out the water tank and fill it with clean water.
- Put the water tank back in place. The display will show 'PLEASE CONFIRM'
- Press the touch key 'OK' (9). A rinsing process takes place with clean water and the rinsing water runs out of the hot water nozzle. After a few minutes the water tank will be empty and the display will show 'PLEASE CONFIRM'
- Press the touch key 'OK' (9). The display will show 'RINSING COMPLETE CONFIRM'
- Press the touch key 'OK' (9). The display will show 'DESCALE COMPLETE' and then 'FILL TANK!'
- Remove the water tank, fill it with clean water and put it back in place.
The appliance is now ready to use again and will revert to the last coffee mode selected.
Rinsing
If 2/3 minutes have passed, since you last made coffee, you should first rinse the system to preheat the brewing unit. Select the rinsing function from the appropriate menu. Let the water run into the drip tray underneath. You can also use this water to warm up the cup that you are using for the coffee. In this case simply let the hot water run into the cup (and then empty it).
- Press the touch key 'RINSE' (4)
- The appliance performs an automatic rinse cycle (a little hot water runs out of the spouts and is collected by the drip tray beneath)
Statistics
This appliance can give you the following usage data:
• Total number of coffees made with the appliance up to that point
• Number of descaling procedures carried out
• Number of cappuccinos made
• Number of litres of water
2 cups of coffee dispensed at the same time counts as 2 cups
Proceed as follows to look up the values:
- Press the touch key 'MENU' (2) and press the scroll touch keys (5 and 7) until the menu option "STATISTICS" appears. Confirm the menu option with the touch key 'OK' (9).
- The number of cups dispensed so far appears on the display, e.g. "TOT. COFFEES 135".
- Repeatedly press the scroll touch key (7) to show the number of descaling procedures carried out, e.g. "TOT. DESCALES 5", "TOTAL WATER" and then number of cappuccinos, e.g. "TOT. CAPPUCCINO 135".
Resetting the appliance to factory settings
This function resets previously changed values to the factory settings. The following settings or saved data are affected:
- Water hardness
- Coffee temperature
- Switch-off time
- Switch-on time
- Display
• Coffee, water and cappuccino quantity
The factory default values can be reset as follows:
- Press the touch key 'MENU' (2) and press the scroll touch keys (5 and 7) until the menu option 'RESET TO DEFAULT' appears. Confirm the menu option with the touch key 'OK' (9)
- The display shows 'PLEASE CONFIRM'
- Confirm the menu option with the touch key 'OK' (9)
Setting the clock
- Press the touch key 'MENU' (2) to enter the menu and then the scroll touch keys (5 and 7) until "SET CLOCK" is displayed
- Press the touch key 'OK' (9)
- Use the scroll touch keys (5 and 7) to set the hours, then press the 'OK' (9) to confirm
- Use the scroll touch keys (5 and 7) to set the minutes, then press the touch key 'OK' (9) to confirm
- Press the touch key 'RETURN' (3) to exit the menu
Setting auto-start time
This function programmes the time the appliance will switch on automatically.
- Make sure the clock on the appliance has been set
- Press the touch key 'MENU' (2) to enter the menu and then the scroll touch keys (5 and 7) until "START TIME" is displayed
- Press the touch key 'OK' (9)
- Use the scroll touch keys (5 and 7) to set the auto-start time, then press the touch key 'OK' (9) to confirm
- Use the scroll touch keys (5 and 7) to set the minutes, then press the touch key 'OK' (9) to confirm
Auto-start
- Press the scroll touch keys (5 and 7) to activate the auto-start function until "AUTO START" is displayed
- Press the touch key 'OK' (9) to confirm. The 'clock' symbol appears on the display
- Press the touch key 'RETURN' (3) to exit the menu
- To deactivate the automatic start-up function, press the touch key 'MENU' (2), then press the scroll touch keys (5 and 7) until the appliance displays the message "AUTO START". Press the touch key 'OK' (9). "CONFIRM" will appear on the display. Press the touch key 'RETURN' (3) to deactivate and the 'clock' symbol will disappear.
Buzzer
This activates or deactivates the buzzer emitted by the machine each time a key is pressed or an accessory is inserted/removed. The buzzer is active by default.
- Press the touch key 'MENU' (2) to enter the menu and then the scroll touch keys (5 and 7) until "BUZZER" is displayed
- Press the touch key 'OK' (9). "BUZZER PLEASE CONFIRM" is displayed
- Press the touch key 'RETURN' (3) to disable or the touch key 'OK' (9) to enable the buzzer
- Press the touch key 'RETURN' (3) to exit the menu
Adjusting contrast
To increase or reduce the contrast of the display, proceed as follows:
- Press the touch key 'MENU' (2) to enter the menu and then the scroll touch keys (5 and 7) until "CONTRAST" is displayed.
- Press the touch key 'OK' (9).
- Press the scroll touch keys (5 and 7) until the required display contrast is reached. The progressive bar indicates the level of contrast selected.
- Press the touch key 'OK' (9) to confirm.
- Press the touch key 'RETURN' (3) once to exit the function or twice to exit the menu.
Cleaning the coffee machine
Before performing any cleaning operations, the machine must be turned off by pressing the main switch (A) and unplugged from the mains power supply. Never immerse the coffee maker in water.
Do not use solvents or abrasive detergents to clean the coffee maker. A soft damp cloth will suffice. Never wash any of the components of the coffee maker in the dishwasher.
The following parts of the machine must be cleaned regularly:
- Waste coffee container (Q)
- Drip tray (F)
- Water tank (D)
• Coffee spouts (H)
• Pre-ground coffee funnel (U) - Inside of the machine, accessible after opening the service door (G)
- Brewing unit (L)
Cleaning the waste coffee container (Q)
When "EMPTY WASTE COFFEE CONTAINER" is displayed, the waste coffee container must be emptied and cleaned. To clean:
- Open the service door on the front of the appliance, extract the drip tray and clean (Fig. 23 & 24)


32 | Instruction Manual
- Clean the waste coffee container thoroughly.
Important! When extracting the drip tray, the waste coffee container must always be emptied.
Cleaning the drip tray (F)
Important! If the drip tray is not emptied the water might overflow. This could damage the machine. The drip tray is fitted with a level indicator (red) showing the level of water it contains. Before the indicator protrudes from the cup tray, the drip tray must be emptied and cleaned.
To remove the drip tray (F):
- Open the service door
- Remove the drip tray and the waste coffee container
- Clean the drip tray and waste coffee container
- Replace the drip tray and waste coffee container
- Close the service door
Cleaning the water tank (D)
- Clean the water tank regularly (about once a month) with a damp cloth and a little mild washing up liquid
- Remove all traces of washing up liquid
Cleaning the spouts
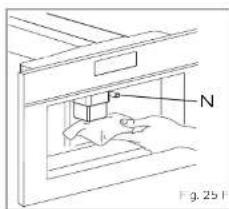
- Clean the nozzles periodically using a sponge (Fig. 25)
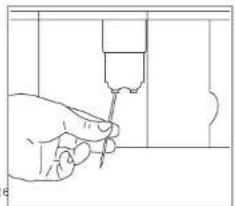
- Check regularly that the holes in the coffee spout are not blocked. If necessary, remove coffee deposits with a toothpick (Fig. 26)
natural_image
Hand using a tool to apply or install a component, no text or symbols visibleMilk residues left on the nozzle (N) and in the container may jeopardise correct operation of the appliance.
Each time you use the coffee maker, they must therefore be removed by cleaning the nozzle with a sponge.
Cleaning the pre-ground coffee funnel
- Check regularly (about once a month) that the pre-ground coffee funnel is not blocked (Fig. 27)

natural_image
Line drawing of a hand using a tool to lift a ladder, with no text or symbols presentCleaning the inside of the coffee maker
- Check regularly (about once a week) that the inside of the appliance is not dirty. If necessary, remove coffee deposits with a sponge
- Remove the residues with a vacuum cleaner
Cleaning the brewing unit
The brewing unit must be cleaned regularly to avoid the build-up of coffee encrustations which could cause malfunction.

The brewing unit can only be taken out when the appliance is switched off by pressing the on/stand by button (A1).
Otherwise, the coffee machine may be seriously damaged.
Proceed as follows:
- Turn the appliance off by pressing the on/stand by button (A1) (do not switch off the main switch or unplug) and wait for the display to go off
- Open the service door
- Remove the drip tray and the waste coffee container
- Press the two red release buttons inwards and at the same time pull the brewing unit outwards (Fig. 28)
Clean the brewing unit under running tap water without using detergent.
Never clean the brewing unit in the dishwasher.

Do not use washing up liquid to clean the brewing unit. It would remove the lubricant applied to the inside of the piston.
- Soak the brewing unit in water for about 5 minutes, then rinse
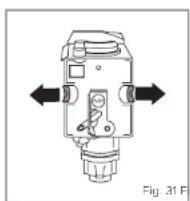
- After cleaning, replace the brewing unit (L) by sliding it onto the internal support (S) and pin (P) at the bottom, then push the 'PUSH' symbol fully in until it clicks into place. (Fig. 31)
Note: If the brewing unit is difficult to insert, you must first adapt it to the right dimensions by pressing it forcefully from the bottom and top (Fig. 30).

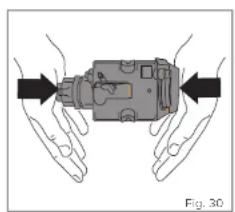
natural_image
Diagram of a mechanical device with hands holding arrows, no visible text or symbols-
Once inserted, make sure the two red buttons have snapped back out, otherwise the service door cannot be closed
-
The two red buttons are correctly snapped out (Fig. 31)
• The two red buttons are not snapped out (Fig. 32) -
Replace the drip tray and waste coffee container
- Close the service door

Notes
- If the brewing unit is not put in place correctly, the service door cannot be closed
- If it is difficult to insert the brewing unit, it must be made into the right height (before inserting) by pressing the brewing unit firmly together from top and bottom
-
If it is still difficult to insert the brewing unit:
-
Leave it out of the appliance, place the drip tray, close the service door, switch the main switch on the back of the appliance to 'off' and then to 'on' again
- Wait for all the lights to go off, then open the door, remove the drip tray and replace the brewing unit
- Replace the drip tray, together with the waste coffee container
- Close the service door
Cleaning the milk container (N)
Always clean the tubes inside the milk container when you prepare milk. If there is still milk in the container, do not leave it out of the refrigerator for longer than strictly necessary. Clean the container each time you prepare milk as described in the section "Making cappuccino". All components can be washed in a dishwasher, placing them in the top basket of the dishwasher.
- Turn the milk container lid clockwise then remove it (Fig. 33)
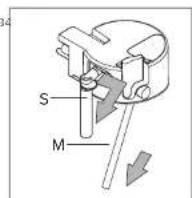
- Remove the milk spout (S) and intake tube (M) (Fig. 34)

-
Remove the frothed milk regulator (F) by pulling it outwards (Fig. 35)
-
Wash all the components thoroughly with hot water and mild washing-up liquid. Make sure there are no milk residues left inside the holes (H) and the groove (G) on the fine end of the frothed milk regulator (F) as shown in Fig. 36


- Check that the intake tube and spout are not clogged with milk residue
- Replace the frothed milk regulator, milk spout and intake tube
- Replace the milk container lid
Cleaning the nozzles
Clean the nozzles on the milk container every time after heating milk or making cappuccino. Otherwise, remains of milk may set hard.

Warning! Risk of scalding from steam and hot water escaping from the milk dispenser pipe.
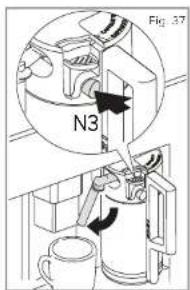
- Place a container under the milk dispenser pipe and press on the CLEAN button (N3) on the milk container for at least 5 seconds. The display shows "CLEANING!"
- Remove the milk container and clean the nozzles on the appliance with a damp cloth (fig.21)
- Put the hot water nozzle back in (fig. 22)

natural_image
Line drawing of a hand inserting a component into a device (no text or symbols)
natural_image
Technical line drawing of a mechanical assembly with a rotating component (no text or symbols)Display messages
| MESSAGE MEANING INSTRUCTION | ||
| FILL TANK! | The water tank is empty or not properly in place. | Fill the water tank and insert it according to the instructions. |
| The water tank is dirty or timescale deposits have built up inside of it. | Rinse out or descale the water tank. | |
| GROUND TOO FINE ADJUST MILL + PRESS 'OK' | Coffee comes out too slowly. | Turn the knob for the grind level setting clockwise by one position (see 'Setting the grind level'). |
| The coffee machine cannot make any coffee. | Place a container underneath the hot water nozzle and press the 'hot water' touch key (13) | |
| EMPTY WASTE COFFEE CONTAINER | The waste coffee container is full. | Empty, clean and replace the waste coffee container. |
| INSERT WASTE COFFEE CONTAINER | The waste coffee container was not replaced after cleaning. | Open the service door and insert the waste coffee container. |
| ADD PRE-GROUND COFFEE | No ground coffee was put into the filling chute after selecting the pre-ground coffee function. | Add ground coffee as described in 'Preparing espresso coffee using ground coffee'. |
| FILL BEAN CONTAINER | There are no more coffee beans in the coffee bean container. | Fill the coffee bean container.. |
| If the mill mechanism starts sounding very loud, this can mean that a small stone from the coffee beans has blocked the mill mechanism. | Consult customer services. | |
| MESSAGE MEANING INSTRUCTION | ||
| PLEASE DESCALE! | Coffee machine is encrusted with timescale. | The descaling program must be carried out as soon as possible (see 'Carrying out the descaling programme'. |
| CLOSE DOOR! | The service door is open. Close the service door. If the service door cannot be closed, make sure that the brewing unit is correctly inserted (see 'Cleaning the brewing unit'. | |
| INSERT BREWING UNIT! | The brewing unit was not replaced after cleaning the coffee machine | Insert the brewing unit (see 'Cleaning the brewing unit'). |
| GENERAL ALARM! | The inside of the machine is dirty | Carefully clean the inside of the machine (see 'Cleaning the coffee machine' if the coffee machine still shows this message once it has been cleaned, please consult customer services. |
Troubleshooting
If the appliance does not work properly, this does not always mean that it is defective. If the coffee machine does not work and a message is displayed, refer to the problem solving information in the 'Messages' section. If no message is displayed, try to find a solution by checking the points mentioned in the table below or contact CDA Customer Care (See the reverse of this manual for details.)
| FAULT CAUSE SOLUTION | ||
| Coffee is not hot | The cups were not preheated | Preheat the cups by rinsing them out with warm water (see 'Tips for coffee making') |
| The brewing unit is too cold | Warm up the brewing unit with the rinsing programme before making coffee (see 'Rinsing') | |
| The coffee doesn't have enough croma | The coffee is too coarsely ground | Turn the knob for the grind level setting anti-clockwise by one position (see 'Setting the grind level') |
| The coffee blend if not suitable | Use a coffee blend suited to fully automated coffee machines | |
| Coffee comes out too slowly | The coffee is ground too fine | Turn the knob for the grind level setting one position clockwise (see 'Setting the grind level') |
| Coffee comes out too quickly | The coffee is too coarsely ground | Turn the knob for the grind level setting anti-clockwise by one position (see 'Setting the grind level') |
| Coffee only comes out of one of the spouts on the coffee dispenser | The holes on the spouts are blocked | Remove the dry coffee residues with a needle (see 'Cleaning the coffee machine') |
| FAULT CAUSE SOLUTION | ||
| The machine does not switch on when the withstand by button is pressed | The main switch on the right side of the appliance is not switched on or the mains plug is not plugged in. | Check that the main switch is in the 'ON' position and that the power lead is plugged in the socket properly. |
| The brewing unit cannot be taken out for cleaning. | The coffee machine is switched on. The brewing unit can only be removed when the machine is switched off | Switch the appliance off and remove the brewing unit (see "Cleaning the brewing unit"). IMPORTANT: The brewing unit can only be taken out when the appliance is switched off, if you try to take out the brewing unit whilst the coffee machine is switched on, this could be seriously damaged. |
| Water comes out of the spouts instead of coffee. | Too much pre-ground coffee was inserted. | Remove the brewing unit and carefully clean the inside of the machine (see "Cleaning the coffee machine" and "Cleaning the brewing unit"). Repeat the process using a maximum of 2 level measuring spools of ground coffee. |
| Ground coffee was used (instead of coffee beans) and the machine will not dispense any coffee. | Pre-ground coffee was inscice whilst the machine was switched off. | Remove the brewing unit and carefully clean the inside of the machine (see "Cleaning the coffee machine" and "Cleaning the brewing unit"). Repeat the process with the machine switched on. |
| Coffee does not come out of the spouts on the coffee dispenser but out of the service door at the side. | The holes on the coffee dispenser are blocked with dried on coffee.The swing drawer on the inside of the service hatch is blocked and will not move. | Remove the dried on coffee with a needle (see "Cleaning the coffee machine"). Carefully clean the swing drawer, particularly in the area around the hinges so that those continue to move. |
| Milk is frothed up too much or too little. | Wrong setting of the slider on the lid of the milk containerIf the milk is not frothy enough, the milk container may not be correctly in place | You can set the amount of from on the milk to any level using the slider on the lid; "CAPPUCCINO" (very frothy milk) or "CAFFELATTE" (not so frothy milk).Put the milk container correctly in place. |
Installation
- After removing the packaging, make sure the product is complete and undamaged. If in doubt, do not use the appliance and contact a qualified professional
• Installation must be carried out by a qualified technician and in compliance with current regulations - Packing elements (plastic bags, polystyrene etc.) must not be left within reach of children as they may represent a hazard
- Never install the appliance in environments where the temperature may reach 0°C or lower (the appliance may be damaged if the water freezes)
• Make sure the mains voltage corresponds to the voltage indicated on the appliance rating plate. Connect the appliance to an efficiently earthed socket with a minimum current rating of 13A only - The manufacturer may not be considered liable for possible incidents caused by the failure to adequately earth the mains
• Make sure the socket used is freely accessible at all times, enabling the appliance to be unplugged when necessary - Never touch the plug with damp hands
- Never pull the power cable as you could damage it
- This appliance can be installed over a built-in oven it the latter is fitted with a cooling fan at the rear (maximum power: 3KW)
- Do not use multiple plug adapters or extension leads
- The power cable on this appliance must not be replaced by the user as this operation requires the use of special tools. If the cable is damaged or requires replacing, contact an authorised service centre only to avoid all risks
- You should personalise water hardness as soon as possible following the instructions.
Installation
Please check the minimum measurements necessary to the correct installation of the appliance. The coffee machine must be installed in a column unit, which must in turn be fixed to the wall.
IMPORTANT! Kitchen furniture in direct contact with the appliance must be heat resistant (65°C min).

Instruction Manual | 45
Installation
Position the rails on the sides of the cabinet as shown in Fig. 40 Fix with the screws, then extend the rails fully.
If the coffee maker is installed over a warming drawer, use the top surface of this as a reference to position the rails. In this case, there will be no lower shelf to rest the rails on.


Position the appliance on the rails as shown in Fig. 41 making sure the pins are correctly inserted in the housings, then fix it with the screws supplied.
If the height of the appliance requires adjusting, use the spacer disks provided.
Fix the power cable with the clip as shown in Fig. 42
The power cable must be long enough to allow the appliance to be extracted from the cabinet to fill the coffee bean container.
If necessary, correct alignment of the appliance by positioning the spacers supplied under or at the sides of the support (Fig. 43)


Electrical connection
If Your Appliance Comes Fitted With a Plug:
The plug will incorporate a 13 Amp fuse. If it does not fit your socket, the plug should be cut off from the mains lead, and an appropriate plug fitted, as below.
WARNING: Very carefully dispose of the cut off plug after removing the fuse, do not insert in a 13 Amp socket elsewhere in the house as this could cause a shock hazard. If the plug is a moulded-on type, the fuse cover must be re-fitted when changing the fuse using a 13 Amp complying with BS 1362. In the event of losing the fuse cover, the plug must NOT be used until a replacement fuse cover can be obtained from your nearest electrical dealer. The colour of the correct replacement fuse cover is that as marked on the base of the plug
If Your Appliance Is Not Fitted With a Plug:
Please follow the instructions provided below:
WARNING - THIS APPLIANCE MUST BE EARTHED
IMPORTANT
The wires in the mains lead are coloured in accordance with the following code:
Green and yellow: Earth
Blue:
Neutral
Brown: Live
As the colours of the wires in the mains lead may not correspond with the coloured markings identifying the terminals in your plug, proceed as follows:
The green and yellow wire must be connected to the terminal in the plug marked with the letter "E" or the earth symbol, or coloured green, or green and yellow.
The blue wire must be connected to the terminal marked with the letter "N" or coloured black.
The brown wire must be connected to the terminal marked with the letter "L" or coloured red.
Notes Notes
The CDA Group
Harby Road
Langar
Nottinghamshire
NG13 9HY
Sales Department
Phone: 01949 862010
Email: sales@cda.eu
CDA Customer Care
Phone: 01949 862012
Email: customer.care@cda.eu


- Contents Safety instructions
- For European Markets Only:
- Safety instructions
- Important Notes:
- This coffee machine is not designed for use with caramelised coffee beans: Use of such beans will invalidate the guarantee.
- Important
- Appliance information:
- Declarations of Conformity:
- IMPORTANT INFORMATION FOR CORRECT DISPOSAL OF THE PRODUCT IN ACCORDANCE WITH EC DIRECTIVE 2002/96/EC.
- Legend for Fig. 1
- Note: Throughout this manual, references in brackets refer to the legend in this section.
- Control panel
- First use
- Use
- Preparing coffee (using coffee beans)
- Notes
- Emptying the waste coffee container
- Important!
- Changing the quantity of coffee
- Adjusting the coffee mill
- Only change the grind level during the milling process, otherwise the machine may be damaged.
- Preparing espresso using ground coffee
- Preparing hot water
- Changing the quantity of hot water
- Making cappuccino
- Changing the quantity of milk and coffee for cappuccino
- Changing the quantity of milk
- Tips for coffee making
- Setting the language
- Water hardness
- Setting the coffee temperature
- Setting the switch-off time
- Carrying out the descaling programme
- Make sure that any splashes from the descaling product do not come into contact with surfaces that are sensitive to acids such as marble, limestone and ceramic.
- Rinsing
- Statistics
- cups of coffee dispensed at the same time counts as 2 cups
- Resetting the appliance to factory settings
- Setting the clock
- Setting auto-start time
- Auto-start
- Buzzer
- Adjusting contrast
- Cleaning the coffee machine
- The following parts of the machine must be cleaned regularly:
- Cleaning the waste coffee container (Q)
- Cleaning the drip tray (F)
- To remove the drip tray (F):
- Cleaning the water tank (D)
- Cleaning the spouts
- Cleaning the pre-ground coffee funnel
- Cleaning the inside of the coffee maker
- Cleaning the brewing unit
- Cleaning the milk container (N)
- Cleaning the nozzles
- Troubleshooting
- Installation
- Electrical connection
- WARNING - THIS APPLIANCE MUST BE EARTHED
Brand : CDA
Model : VC820BL
Category : Coffee maker