
VERI70 - Air conditioner DCG - Free user manual and instructions
Find the device manual for free VERI70 DCG in PDF.


| Product Type | Portable Air Conditioner |
| Model | VERI70 |
| Brand | DCG |
| Dimensions (H x W x D) | 70 cm x 40 cm x 30 cm |
| Weight | 25 kg |
| Power Supply | 220-240 V ~ 50 Hz |
| Cooling Capacity | 7000 BTU/h (approx.) |
| Noise Level | 55 dB (approx.) |
| Refrigerant | R410A |
| Functions | Cooling, Dehumidification, Fan, Timer, Sleep Mode |
| Airflow | 300 m³/h |
| Energy Efficiency | EER 2.5 |
| Filter | Washable dust filter |
| Drainage | Self-evaporative (auto hose drain) |
| Control | Remote control & digital display |
| Installation | Window kit included |
| Maintenance | Clean filter every 2 weeks |
| Safety Features | Auto restart, compressor protection |
| Spare Parts Availability | Filters, remote control, drain hose |
| Page Count of Manual | 18 pages |
Frequently Asked Questions - VERI70 DCG
User questions about VERI70 DCG
0 question about this device. Answer the ones you know or ask your own.
Ask a new question about this device
Download the instructions for your Air conditioner in PDF format for free! Find your manual VERI70 - DCG and take your electronic device back in hand. On this page are published all the documents necessary for the use of your device. VERI70 by DCG.
USER MANUAL VERI70 DCG
natural_image
White DCG air conditioner unit with heat exchanger and control panel (no visible text or symbols)VERI70 RAFFRESCATORE CON IONIZZATORE E TELECOMANDO AIR COOLER
CLIMA dcg16.it
CARATTERISTICHE TECNICHE: 220V\~50Hz 85W
PRIMA DI USARE L'APPARECCHIO, LEGGERE QUESTE ISTRUZIONI PER LA SICUREZZA. CONSERVARLE PER CONSULTAZIONI FUTURE.
ISTRUZIONI IMPORTANTI PER LA SICUREZZA
natural_image
White electronic device with four buttons and icons, no visible text or symbols on the device itself.Telecomando
natural_image
Line drawing of a portable air conditioner unit with control panel and wheels (no text or symbols)Metodo di pulizia:
READ AND SAVE THESE SAFETY INSTRUCTIONS BEFORE USING THIS APPLIANCE
IMPORTANT SAFETY INSTRUCTIONS
WARNING: When using electrical appliance, basic safety precautions should always be followed to reduce the risk of fire, electrical shock and personal injury.
Use this fan only as described in this manual. Other use not recommended may cause fire, electric shock or injury to persons.
This product is intended for household use ONLY and not for commercial, industrial or outdoor use.
To protect against electric shock: do not place fan on windowsills, immerse unit, plug or cord in water or spray with liquids.
To reduce the risk of shock, this plug is intended to fit the outlet. If the plug does not fit fully in the outlet, reverse the plug. If it still does not fit, contact a qualified electrician. DO NOT attempt to defeat this safety feature.
To reduce the risk of fire or electric shock, do not use this fan with any solid-state speed control device.
This appliance is not intended for use by person (including children) with reduced physical, sensory or mental capabilities, or lack of experience and knowledge, unless they have been given supervision or instruction concerning use of the appliance by a person responsible for their safety. Children should be supervised to ensure that they do not play with the appliance.
Turn the fan OFF and unplug the fan from the outlet when not in use, when moving the fan from one location to another and before cleaning. To disconnect the fan, first turn the unit OFF, grip the plug and pull it from the wall outlet. Never pull the plug by the cord. Do not operate the fan in the presence of explosive and/or flammable fumes.
Do not place the fan or any parts near an open flame, cooking or other heating appliance.
Do not operate fan with a damaged cord or plug, or if the product malfunctions, or dropped and damaged in any manner.
Avoid contact with moving fan parts.
MAIN TECHNICAL DATA
TECHNICAL CHARACTERISTICS
Model No.: VERI70
Rated Voltage: 220/240V\~
Rated Frequency: 50Hz
Power Input: 90 W
Protection Class: II
Water Tank Capacity: 6000 ml
PARTS IDENTIFICATION / ASSEMBLY
1) Parts Identification
INDEX PART NAME INDEX PART NAME
[1]: Solf-touch panel [4]: Water curtain
[2]: Wind outlet [5]: Water tank
[3]: Water level window [6]: Wheel(s)
![[1] [2] [3] [4] [5] [6]](/content/2026/05/981736/images/32045deb5bcca4c6228a6c51e399e031562ee8096d7ed2f77df01a22ecb9df37.jpg)
2) Assembly
Position air cooler on a level floor, insert the wheels into the holes positioned on the bottom of the unit.
3) Filling the tank
Place the air cooler on a level ground and follow the steps below:
natural_image
Line drawing of a portable air conditioner unit with wheels and vent slots (no text or symbols)PIC 1.
natural_image
Line drawing of a portable air conditioner unit with control panel and wheels (no text or symbols)Ice box
natural_image
Line drawing of a portable air conditioner unit with control panel and wheels (no text or symbols)PIC 2.
PIC 3.
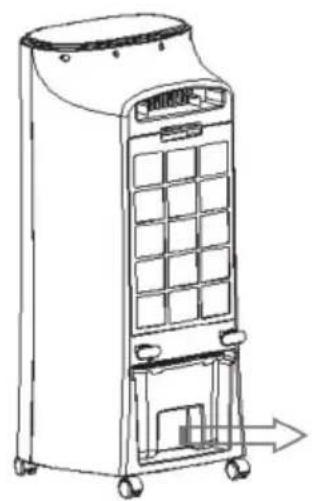
(1) Rotates the door holder to horizontal position, and then put out the water tank; Picture ①
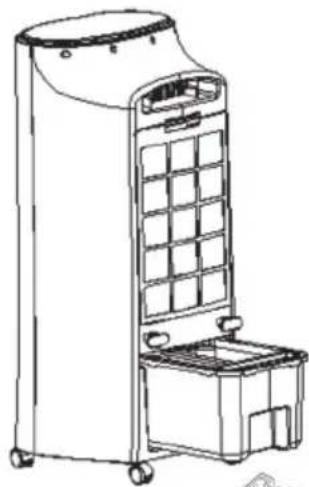
(2) Raise the water pump frame when the tank was pull out around 3/4, and then remove the tank completely; Picture ②.
(3) Take the water tank to fill in water or clean;
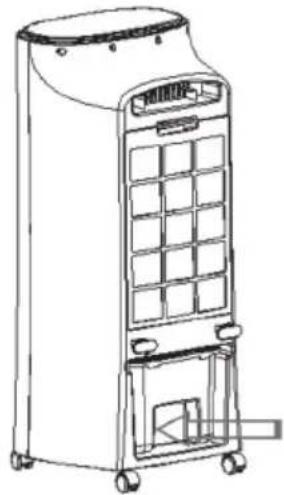
(4) Put the water tank into the product around 1/4, then fix the pump frame and push the tank into the product body completely;
(5) Fix the door holder lastly. Pic. ③
OPERATION
- Please ensure the unit is in the (OFF) position before plugging into the power socket.
- Place the unit on a firm level surface.
- Avoid overloading the circuit by not plugging other high wattage products into the same power socket.
DISPLAY SCREEN & CONTROL PANEL

Display panel

natural_image
White electronic device with four buttons and icons, no visible text or symbols on the device itself.Remote controller
Function Description
ON/OFF:
Press this button to turn on the unit at low speed, and display the room temperature
Press it again to turn off the unit.
SPEED:
Press this button to switch the unit from LOW -MID-HI Speed, in Normal Mode.
JET WIND:
Press this button to turn to the max wind air.
Press it again to turn to original wind setting.
OSC:
Press this button to start Fan Oscillation with left and right direction.
Press it again to stop Oscillation.
OSC:
Press this button to start Fan Oscillation with up and down direction.
Press it again to stop Oscillation.
COOLER:
Before acting this function, be sure to fill enough water into the lower water tank.
Press this button and the water pump starts running. The water circulates from the cooler master to allow warm air to be converted to cool air (warm air combined with water vapor) and cooler down the temperature effectively. If you have used “cooler” function, when you stop the product, the fan will be continue working for 5min to dry the cooler master; Press the “Off” button twice, the product will be forced to stopped.
** For better cooling effect, ice box or ice is recommended to be put at the upper water tank.
Caution: there is water shortage warning system, if the water is not enough, the COOLER function will be automatically stopped, and 3 beep warning sound will be heard, and display of cooler will be blinking.
TIMER:
When the unit is in use, you can set the Timer to turn off the fan after the specified time. Press this button repeatedly to increase the Timer setting in 1 hour increments (up to a maximum of 9 hours) as indicated on the display. After 5 seconds, the Timer starts. Once the Timer has run out, the unit will turn off.
ION:
Press this button to turn the lonizer feature on/off (the fan must be operating for lonizing to work).
When the ioniser is turned on, it will assist in the purification of the room air.
WIND:
Press to select Normal Mode, Natural Breeze Mode or Sleep Mode (as indicated on the Display).
NORMAL Mode: Fan operates at the speed selected with "ON/OFF" button.
NATURAL BREEZE Mode: Fan speed varies automatically to simulate a breeze*.
SLEEP Mode: Fan speed varies automatically for use during sleep*.
CLEANING AND STORAGE
- Unplug the unit before cleaning.
- Please clean the water tank and filter mesh every two weeks.
- Please clean the cooling master when it is visibly dirty or every month (depending on the condition of the surrounding).
- Use a dry cloth to absorb remaining water on the atomizing cup, and dry it using a piece of soft cloth.
- Pack this appliance properly and store it in a cool dry place if it is not used for a long period.

natural_image
Line drawing of a portable air conditioner unit with control panel and wheels (no text or symbols)Cleaning method:
1 Remove the filter first, pic. ④
2 Rotates the door holder to horizontal position, pic. ④, and then take out the water master;
3 Then, you can take the filter and cooler master to clean;
4 Clean the water tank and the flume at the same time.
MAINTAINENCE
Have your product repaired by a qualified person
This electric product is in accordance with the relevant safety requirements. Repairs should only be carried out by qualified persons using original spare parts, otherwise this may result in considerable danger to the user.
Please contact the store which you bought the product for after sale services if any.
natural_image
Symbol of a trash bin crossed with a diagonal line, no text or numbers present- VERI70 RAFFRESCATORE CON IONIZZATORE E TELECOMANDO AIR COOLER
- ISTRUZIONI IMPORTANTI PER LA SICUREZZA
- Metodo di pulizia:
- IMPORTANT SAFETY INSTRUCTIONS
- To reduce the risk of fire or electric shock, do not use this fan with any solid-state speed control device.
- MAIN TECHNICAL DATA
- TECHNICAL CHARACTERISTICS
- PARTS IDENTIFICATION / ASSEMBLY
- 1) Parts Identification
- INDEX PART NAME INDEX PART NAME
- 2) Assembly
- 3) Filling the tank
- OPERATION
- Function Description
- ON/OFF:
- SPEED:
- JET WIND:
- OSC:
- COOLER:
- TIMER:
- ION:
- WIND:
- CLEANING AND STORAGE
- Cleaning method:
- MAINTAINENCE
Brand : DCG
Model : VERI70
Category : Air conditioner