
CT-260 - Hand tool Panduit - Free user manual and instructions
Find the device manual for free CT-260 Panduit in PDF.


| Product Type | Hand Tool |
| Brand | Panduit |
| Model | CT-260 |
| Application | Crimping connectors, cutting and stripping wires |
| Dimensions | 8.5 x 2.5 x 1.2 inches (216 x 64 x 30 mm) |
| Weight | 1.2 lbs (0.54 kg) |
| Material | Carbon steel with ergonomic non-slip handles |
| Crimping Range | 26 AWG to 10 AWG (0.12 mm² to 5.26 mm²) |
| Cutting Capacity | Up to 10 AWG (5.26 mm²) copper wire |
| Stripping Capacity | 26 AWG to 12 AWG (0.12 mm² to 3.31 mm²) |
| Operation | Manual, ratchet mechanism |
| Maintenance | Clean with dry cloth; lubricate pivot points with light oil periodically |
| Safety | Wear eye protection; disconnect power before working on live wires |
| Spare Parts | Replacement die sets, handle grips available from Panduit |
| Certification | UL Listed, RoHS compliant |
| Warranty | 1 year limited |
Frequently Asked Questions - CT-260 Panduit
User questions about CT-260 Panduit
0 question about this device. Answer the ones you know or ask your own.
Ask a new question about this device
Download the instructions for your Hand tool in PDF format for free! Find your manual CT-260 - Panduit and take your electronic device back in hand. On this page are published all the documents necessary for the use of your device. CT-260 by Panduit.
USER MANUAL CT-260 Panduit
Verify power is "OFF" before working on wiring with this tool. The plastic grips are for the user's comfort, and are not intended to insulate against electrical shock while working on live electrical circuits.
See product packaging or contact Customer Service for UL/CSA approved tooling/product combination.
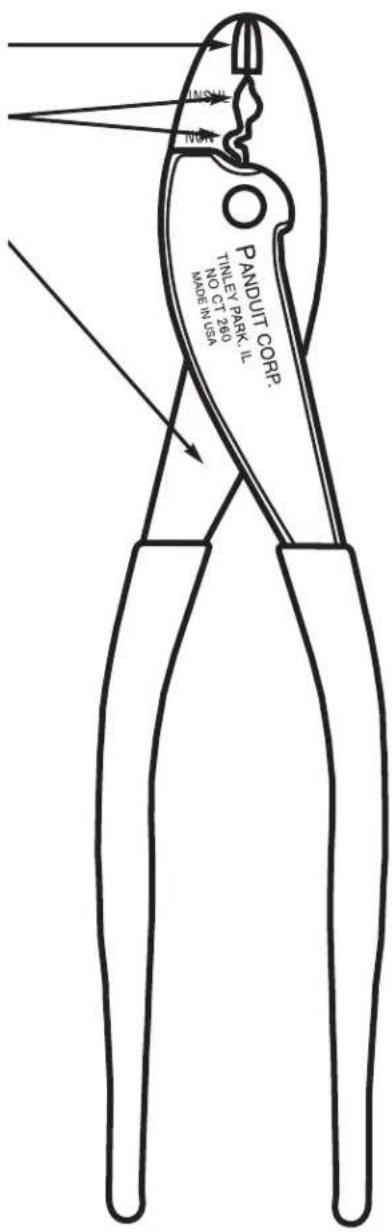
WIRE CUTTER for No. 10 AWG and smaller copper wire.
CRIMP POCKETS for Pan-Term insulated and non-insulated terminals, disconnects, wire joints and splices on No. 22 to 10 AWG solid or stranded wire.
This tool is made of hardened steel and is protected with a light coat of oil.

NON-INSULATED AND INSULATED PARALLEL SPLICE INSTRUCTIONS
- Insert stripped wire into each end of the parallel splice. (See product packaging for proper strip lengths.)
- Locate parallel splice in proper crimp pocket.
- Position crimp pocket on the center of the metal barrel.
- Squeeze handles firmly.

NON-INSULATED BUTT SPLICE INSTRUCTIONS
- Insert stripped wire into end of the butt splice to internal wire stop. (See product packaging for proper strip lengths.)
- Locate butt splice in proper non-insulated crimp pocket.
- Position crimp pocket on the center of the metal barrel half with wire inserted.
- Squeeze handles firmly.
- Repeat for other end of butt splice.

INSULATED BUTT SPLICE INSTRUCTIONS
- Insert stripped wire into end of the butt splice to internal wire stop. (See product packaging for proper strip lengths.)
- Locate butt splice in proper insulated crimp pocket.
- Position crimp pocket on the center of the metal barrel half with wire inserted.
- Squeeze handles firmly.
- Close insulation if desired.
- Repeat for other end of butt splice.
E-mail: techsupport@panduit.com
PANDUIT
www.panduit.com
Technical Support: 1-800-777-3300
NON-INSULATED TERMINAL AND DISCONNECT INSTRUCTIONS
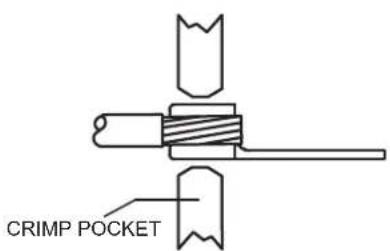
- Insert stripped wire into terminal or disconnect until a minimum of 1/32" of conductor extends beyond barrel. (See product packaging for proper strip lengths.)
- Locate terminal or disconnect in proper non-insulated crimp pocket.
- Position crimp pocket on the center of the metal barrel.
- Squeeze handles firmly.

NON-INSULATED WIRE JOINT INSTRUCTIONS
- Twist ends of stripped wire together, trim and insert into wire joint. (See product packaging for proper strip lengths and trimming instructions.)
- Locate wire joint in proper non-insulated crimp pocket.
- Position crimp pocket on the center of the metal barrel.
- Squeeze handles firmly.
INSULATED TERMINAL AND DISCONNECT INSTRUCTIONS
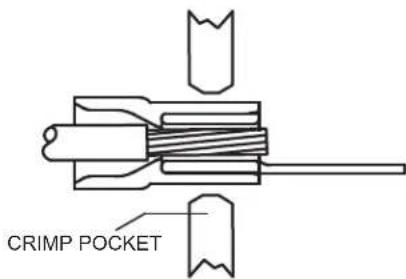
- Insert stripped wire into terminal or disconnect until a minimum of 1/32" of conductor extends beyond barrel. (See product packaging for proper strip lengths.)
- Locate terminal or disconnect in proper insulated crimp pocket.
- Position crimp pocket on the center of the metal barrel.
- Squeeze handles firmly.
- Close insulation if desired.

INSULATED WIRE JOINT INSTRUCTIONS
- Twist ends of stripped wire together, trim and insert into wire joint. (See product packaging for proper strip lengths and trimming instructions.)
- Locate wire joint in proper insulated crimp pocket.
- Position crimp pocket on the center of the metal barrel.
- Squeeze handles firmly.
- Close insulation if desired.
NOTE:
In the interest of higher quality and value, Panduit is constantly improving and updating our products.
Consequently, pictures herein may vary from the actual product.
PANDUIT


- NON-INSULATED AND INSULATED PARALLEL SPLICE INSTRUCTIONS
- NON-INSULATED BUTT SPLICE INSTRUCTIONS
- INSULATED BUTT SPLICE INSTRUCTIONS
- NON-INSULATED TERMINAL AND DISCONNECT INSTRUCTIONS
- NON-INSULATED WIRE JOINT INSTRUCTIONS
- INSULATED TERMINAL AND DISCONNECT INSTRUCTIONS
- INSULATED WIRE JOINT INSTRUCTIONS
- NOTE:
Brand : Panduit
Model : CT-260
Category : Hand tool