CT-1004 - Hand tool Panduit - Free user manual and instructions
Find the device manual for free CT-1004 Panduit in PDF.

| Brand | Panduit |
| Model | CT-1004 |
| Product Type | Hand Tool (Crimping Tool) |
| Application | Crimping connectors and terminals |
| Dimensions (L x W x H) | 8.0 x 2.5 x 1.0 inches (203 x 64 x 25 mm) |
| Weight | 1.2 lbs (0.54 kg) |
| Material | Carbon steel with rubberized grips |
| Handle Type | Ergonomic, non-slip |
| Ratcheting Mechanism | Yes, ensures proper crimp force |
| Interchangeable Dies | No, fixed die set |
| Wire Range | 22-10 AWG |
| Connector Types | Insulated and non-insulated terminals |
| Crimp Force | Adjustable, up to 30 kN |
| Compliance | UL listed, RoHS compliant |
| Maintenance | Clean with dry cloth; lubricate pivot points occasionally |
| Safety | Wear eye protection; keep hands clear of crimping area |
| Repairability | Replaceable handle grips and springs; contact Panduit for service |
| Warranty | 1 year limited |
Frequently Asked Questions - CT-1004 Panduit
User questions about CT-1004 Panduit
0 question about this device. Answer the ones you know or ask your own.
Ask a new question about this device
Download the instructions for your Hand tool in PDF format for free! Find your manual CT-1004 - Panduit and take your electronic device back in hand. On this page are published all the documents necessary for the use of your device. CT-1004 by Panduit.
USER MANUAL CT-1004 Panduit
CRIMP POCKET for Insulated and Non-Insulated Ferrules. Part usage dependent on wire range. Refer to product packaging for proper wire combination.
Controlled cycle mechanism prevents tool from opening before crimp cycle is complete.
Manual release lever, push forward in the event that controlled cycle mechanism must be released.
Cushioned handle grips
CAUTION:
Verify power is "OFF" before working on wiring with these tools.
The plastic grips are for the user's comfort, and are not intended
to insulate against electrical shock
while working on live electrical circuits.
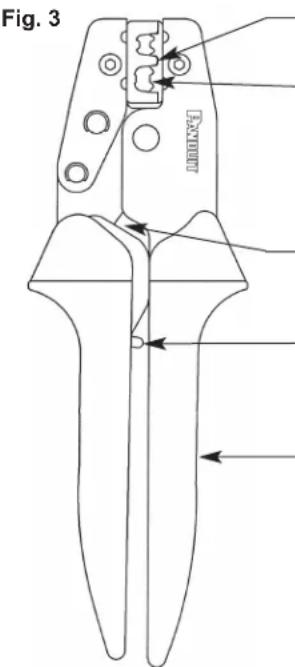
Fig. 3
text_image
Fig. 3 FAK1000Die Closure Alignment (not a crimp pocket)
CRIMP POCKETS for Ferrule terminals. Refer to product packaging for wire range and proper crimp pocket. Crimp pockets are identified with applicable wire range.
Controlled cycle mechanism prevents tool from opening before crimp cycle is completed.
Manual release lever, push forward in the event that controlled cycle mechanism must be released.
Cushioned handle grips
CT-1002, CT-1003 and CT-1004 TOOLS
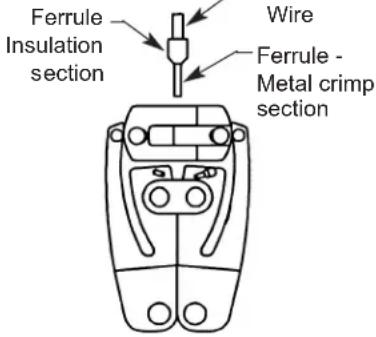
- With the handles in the open position, insert the ferrule into the opening at the top of the tool. Make sure that the ferrule insulation or flared end is up (see Figure 2). Do not allow insulation to be inserted into crimp die. Close handles until dies just slightly crimp ferrule.
Fig. 2
text_image
Ferrule Insulation section Wire Ferrule - Metal crimp section- Insert the stripped wire into the ferrule until the wire stops. Refer to product packaging for wire strip length.
- Crimp the ferrule by closing the handles until the controlled cycle mechanism releases. Upon release, the handles will open automatically and the crimped ferrule can be removed.
CT-1005 and CT-1006 TOOLS
- With the handles in the open position, insert the ferrule into the crimp pocket. Make sure that the ferrule is inserted fully into the crimp die (see Figure 4).
- Insert the stripped wire into the ferrule until the wire stops. Refer to product packaging for wire strip length.
- Crimp the ferrule by closing the handles until the controlled cycle mechanism releases. Upon release, the handles will open automatically and the crimped ferrule can be removed.
NOTE: Crimp entire uninsulated ferrule length. This may require additional crimps.
Fig. 4

text_image
Crimp Die Stripped Wire Ferrule Insulated section Ferrule - Wire crimp sectionINSPECTION / MAINTENANCE
NEW TOOLS - BEFORE PLACING INTO SERVICE:
All Panduit crimping tools are inspected before they are shipped from the factory. All new tools should be inspected before being used.
New tools are shipped, factory lubricated, in protective packaging. After inspection, simply clean any excess oil from the crimping dies and place into service.
When the tool is not in use, keep the handles closed to prevent objects from becoming lodged in the crimping area. Store the tool in a clean, dry area.
IN SERVICE TOOLS - AFTER TOOLS HAVE BEEN IN SERVICE:
It is recommended that each operator of the tool be made aware of - and responsible for following these maintenance steps:
In-service tools should be cleaned and inspected at least ONCE A MONTH. To clean - wipe with a clean cloth.
In-service tools should be lubricated ONCE A WEEK, and after every cleaning. Lubricate all pins, pivots and bearing surfaces with DOW CORNING® Molykote BR2 Plus.
Be sure to clean any excess oil from the crimping dies before using.
® Molykote BR2 Plus is the Registered Trademark of DOW CORNING.
VISUAL INSPECTION
- Visually inspect the tool for missing or loose pins; then close the tool and note the return action of the handles.
- Inspect the crimping dies for worn, chipped or broken edges.
- If parts are missing, defective or damaged; contact Panduit for information on repair or replacement of tools.
- Check for debris in dies. Any debris will need to be removed prior to tool use.