
RD-955AX - Cassette player ROTEL - Free user manual and instructions
Find the device manual for free RD-955AX ROTEL in PDF.


| Product Type | Cassette Tape Deck |
| Brand | Rotel |
| Model | RD-955AX |
| Power Supply | AC 220-240V, 50/60Hz |
| Power Consumption | 15 W |
| Dimensions (W x H x D) | 430 x 120 x 300 mm |
| Weight | 7.5 kg |
| Tape Speed | 4.76 cm/s |
| Wow and Flutter | 0.08% WRMS |
| Frequency Response | 30 Hz - 18 kHz (chrome tape) |
| Signal-to-Noise Ratio | 60 dB (Dolby NR on) |
| Head Type | Permalloy Record/Playback Head |
| Motor Type | DC Servo Motor |
| Auto Reverse | No |
| Output Level | 500 mV (line out) |
| Input Sensitivity | 100 mV (line in) |
| Remote Control | Not included |
| Functions | Play, Record, Pause, Stop, FF, Rew, Eject |
| Maintenance | Clean tape path and heads regularly |
| Cleaning | Use isopropyl alcohol and cotton swabs |
| Safety Precautions | Avoid moisture, heat, and magnetic fields |
| Spare Parts | Belts, pinch rollers, heads available |
| Repair | Service by qualified technician recommended |
Frequently Asked Questions - RD-955AX ROTEL
User questions about RD-955AX ROTEL
0 question about this device. Answer the ones you know or ask your own.
Ask a new question about this device
Download the instructions for your Cassette player in PDF format for free! Find your manual RD-955AX - ROTEL and take your electronic device back in hand. On this page are published all the documents necessary for the use of your device. RD-955AX by ROTEL.
USER MANUAL RD-955AX ROTEL
TO PREVENT FIRE OR SHOCK HAZARD,
DO NOT EXPOSE THIS APPLIANCE TO
RAIN OR MOISTURE.
A WORD FROM ROTEL
Rotel take this opportunity to thank you for choosing our equipment for your home entertainment.
Rotel equipment represents a very high state of the art in sound reproduction, as the result of our everlasting determination to achieve the truly hi-fi performance. Please enjoy the sound Rotel have created for many years to come.
To make sure you get the most of your equipment, please read this owner's manual carefully before you attempt any connections.
BEFORE CONNECTION
1. Place for Installation
Ensure to place the unit in a f, at surface where it is free from humidity, vibration, high temperature and not exposed to direct sunlight. Also, be careful not to place the unit in a highly enclosed area without adequate ventilation around the unit.
2. Electrical Requirements
Your equipment has been designed to be powered by the local AC voltage. Check the setting of your unit by looking at the rear panel name plate. Never try to plug the unit into an outlet of higher voltage, as this causes a serious fire hazard. Consult your dealer if in doubt.
3. Connecting the Power Cord
Always handle the Power cord with care. Ensure to connect the cord to the household wall outlet. When plugging and unplugging make sure the power switch on the unit is turned off.
4. Do not Open the Cabinet
There are no user-serviceable parts inside the cabinet of the unit. Do not attempt to open the cabinet or tamper with the internal components. If water or foreign object falls inside the unit by accidents, disconnect the power cord immediately and consult a qualified electrician of your dealer.
5. Cleaning Your Unit
If your unit becomes dirty, wipe it gently with a soft, dry cloth. Never use solvents of any kind.
CONNECTIONS
1. Connecting to Integrated Amplifiers, Preamplifiers or Receivers
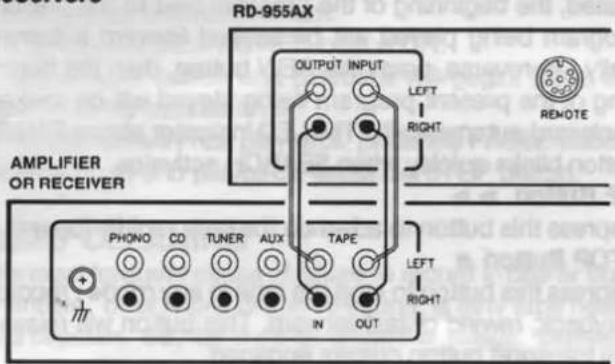
The illustration shows how the input and output terminals should be properly hooked up via the interconnect cords supplied with the unit to the Tape input and output terminals of your amplifier (integrated amplifier, preamplifier or receiver).
Ensure that the Right (red) and the Left (white) channels are correctly matched.
2. Connecting for Remote control
There is the DIN type socket marked REMOTE on the back of the unit. This is for connecting the unit to the Rotel tuner-preamplifiers or receivers which have wireless-remote control systems. When the unit is connected in such way, the control functions of the unit can be operated by remote control.
SPECIAL FACILITIES
1. Automatic Shutoff System
When either end of tape is reached in play, record, fast forward, or rewind mode, the motor and transport mechanism will automatically shut off, disengaging the present mode.
NOTE: It is still necessary to turn off the unit electrically by pressing the Power button to off.
2. Automatic Tape Selection System
The unit is equipped with the automatic tape selection factility which eliminates the need of manual tape selectors. When a tape is inserted, the setting for correct equalization and biasing in accordance to the type of the tape will be automatically done and indicators show what type of tape is inserted.
CASSETTE TAPES
- Use only high quality tapes for best possible result in sound recording. The good or better quality TDK, MAXELL, etc. well known tapes are recommended.
- To prevent possible trouble with the transport mechanism, the use of C-120 or longer hour tapes is not recommended.
- Handle tapes with care. Keep them away from heat, dust, or magnetic field (TV set etc.).
- A loosened tape may cause trouble in playback or recording. Check the tape before loading it into the deck. If it is slack, insert a pencil or the into either of cassette's hubs, and rotate it carefully until the slack is taken up.
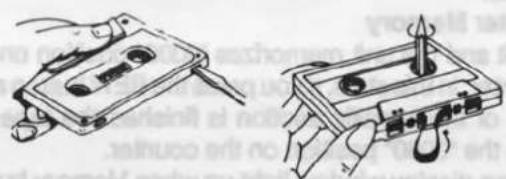
natural_image
Illustration of two hand-cranked cassette tape devices, one with a handle and the other with a spool (no text or symbols)- Each tape has safety tabs on its back edge prevent accidental recording. Each tab is provided for one side (2 tracks) of the tape. Once the tab is removed, recording cannot be done on the side the tab has been taken out.
The tab can be removed with a screwdriver, etc. If you wish, however, to record on the side with no tab, place a piece of adhesive tape, etc. over the opening where the tab has been.
SWITCHES AND CONTROLS
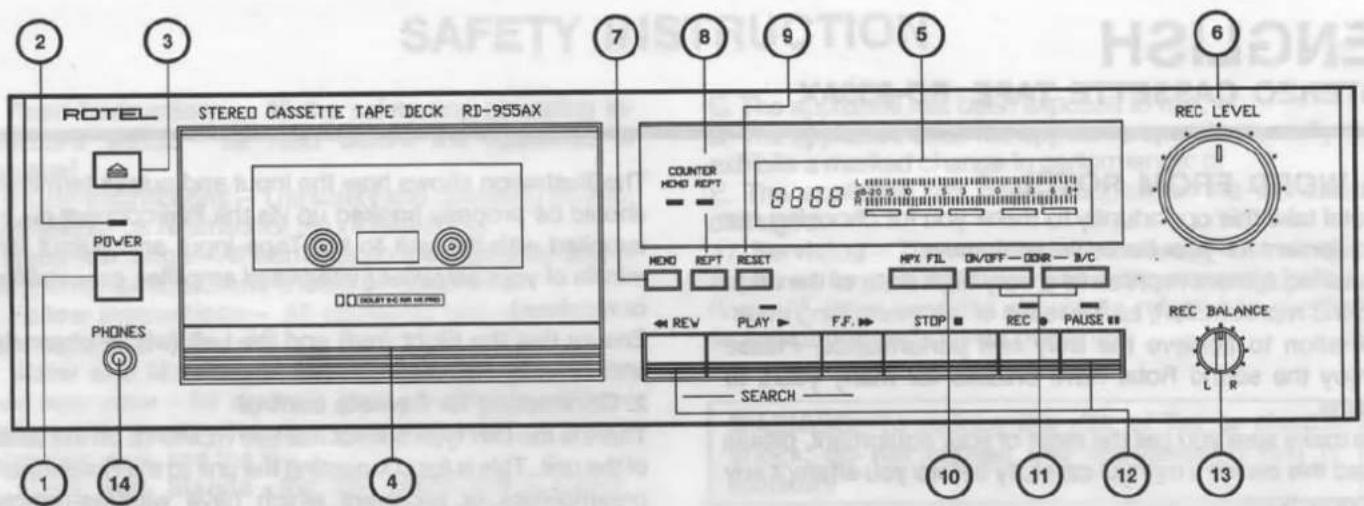
(1) Power Button
Press this button to turn on and off the unit.
(2) Power Indicator
Glows when power is turned on with the POWER button.
(3) Eject Button
Press this button to open the cassette door when loading or unloading the cassette tape.
(4) Cassette Door
Cassette tape is loaded into the cassette holder. Press the EJECT button to open the door. To close the cassette door, push it gently backward.
(5) Multi-function display
1). Tape Counter—The 4 FL digit tape counter indicates the amount of tape travel.
2). Peak Level Indicator—Two bank FL displays show the recording or playback level for both left and right channels.
3). Tape Selection Indicators—When a tape is inserted, an indicators will light up automatically to indicate the type of tape used. NORMAL for normal tape; SPECIAL for Chrome tape, METAL for metal tape.
4). Dolby NR B/C Indicator—Either of these indicators will light up when Dolby NR switch is activated ON and in accordance with whether Dolby type switch is set at Dolby B or Dolby C.
(6) Recording Level Control
Used to adjust the recording level of incoming signals from line source.
(7) Counter Memory
Depress it and the unit memorizes "0000" position on the tape counter, in this state, if you press the REW button after playback of the specific section is finished the tape will rewind to the "0000" position on the counter.
The LED on display window light up when Memory button activated.
(8) Repeat
Depress this button to repeat playback of the selected tape automatically. Please ensure to activate the button before
pushing the PLAY button. When used with the MEMORY button only "0000" position to tape end will be repeated.
The LED on display window light up when REPEAT button activated.
(9) Counter Reset
Depress the button to reset the tape counter to zero. The display will indicate "0000" for the numerical count.
(10) MPX Filter Button
Depress this button when recording stereo FM broadcasts. FM stereo broadcasting system uses a 19 kHz pilot signal which may adversely affect the sound quality in some case. When the MPX filter button is depressed to ON, the MPX filter is activated to eliminate the 19 kHz pilot signal, and clean stereo FM recording is achieved.
(11) Dolby NR Buttons
Depress the Dolby NR button when you wish to record or playback through the built-in Dolby noise reduction circuit. Next to this button is a switch for selecting Dolby B type or C type noise reduction. Select B-type by setting button in released position, and C-type by setting button in depressed position.
NOTE: DOLBY HX PRO circuit is always effected during recording.
(12) Cassette Controls
REW Button ◀◀
For rapid tape rewind, depress this button.
PLAY Button ▶
Depress this button to start the cassette for playback of recorded tape. The LED above the button glows when PLAY activated.
SEARCH
Press the Fast Forward button after the PLAY button activated, the beginning of the program next to the present program being played will be seeked forward automatically. In reverse, press the REW button, then the beginning of the present program being played will be seeked backward automatically. The LED indicator above PAUSE button blinks quickly when SEARCH activates.
F.F Button ▶▶
Depress this button to advance the tape rapidly forward.
STOP Button ■
Depress this button to stop the tape in any mode: record, playback, rewind or fast-forward. This button will release any transport button current engaged.
REC Button ●
To record, depress this and PLAY button. The deck is now in the recording mode, and the tape should be winding. The LED provided on the button glows during recording.
PAUSE Button II
Press this button to stop the tape temporarily during recording or playback without disenganing the mode currently employed, and LED indicator above the button blinks. In this state, pressing the PLAY button restarts the tape in the interrupted mode.
(13) Rec Balance Control
Adjusts the relative recording levels between the left and right channels. Rotate the knob to the left so that the left channel sound is recorded at a louder level than the right. and vice verse, normally set the knob at the mid-position. (14) PHONES
Used to plug headphones jack for the private listening.
WORDS ON OPERATION
Precaution
- Before commencing operation, check to see if all connections are properly made.
- When recording, be sure the safety tabs on the cassette tape edges are not removed.
- When recording from line sources, choose the desired program (tuner, Turntable, CD etc.) on your integrated amplifier, preamplifier, or receivers.
Recording
- Depress the DOLBY NR button ON, and then set the DOLBY B/C button to the desired position when record through DOLBY NR circuit.
- Depress the deck POWER button ON.
- Depress PAUSE button, then simultaneously depress REC button and the unit is put into REC PAUSE state.
- Adjusts recording level controls, if necessary, depress the PLAY button to put the unit into recording mode and start the tape movement.
- Carefully watch the counter indication during recording as well. PAUSE button may be used to temporarily halt recording.
- Press STOP button when recording is finished.
Playback
- Depress the DOLBY NR button ON, when playback a tape recorded with DOLBY NR, and then set the DOLBY B/C button according to whether DOLBY B or DOLBY C is used.
- Turn on the power switch on your amplifier and keeping its volume control to minimum.
- Depress the deck POWER button ON.
- Press PLAY button and playback will gegin. Raise the volume to the desired level.
- To momentarily halt playback, press the PAUSE button. When wish to end playback, press the STOP button.
HEAD CLEANING
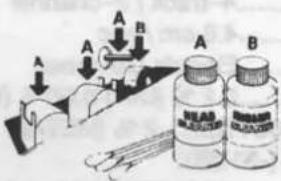
The most frequent cause of failure to record in one or both channels, or of weak, distorted sound, is dirty tape heads and capstan. So, be sure to clean the heads, capstan,
pinch roller and tape guides as often as possible using a "Q" tip dipped in ordinary rubbing alcohol or commercial liquid tape head cleaner. Thoroughly wipe the surface of the heads, capstan, roller and tape guide.
HEAD DEMAGNETIZING
The tape heads, capstan and tape guides gradually become magnetized with use, which will eventually affect the sount quality of your tapes. Demagnetizing should follow cleaning, but need not take place as often as cleaning, once after every 20 to 30 hours of use should suffice.
A demagnetizer may be purchased at a moderate cost from any dealer carrying tape recording accessories. Follow the instruction supplied with the demagnetizer.
Caution: Be sure to turn off the unit before you attempt demagnetizing.
SPECIFICATIONS RD-955AX
Heads: Rec/ Play.....Permalloy core
Erase....Ferrite core
Track....4-track/2-channel
Tape Speed....4.8 cm / sec
Motor.....Electric Governor
Wow and Flutter....0.2 % (DIN) 0.06 % (WRMS)
Distortion (REC/PB, 400 Hz).....2 % (METAL)
Frequency Response (-20 dB):
Normal,LH....30 to 15,000 Hz +/-3 dB
Special....30 to 16,000 Hz +/-3 dB
Metal....30 to 17,000 Hz +/-3 dB
Signal-to-Noise Ratio (WTD. 0 dB = 710 mV, Chromium):
Dolby NR in....64 dB (B Type)
73 dB (C Type)
Dolby NR out....55 dB
Input Sensitivity/ Impedance:
LINE....60 mV/ 33 kohms
Output Level/ Impedance:
LINE....710 mV/ 1.5 kohms
Fast Wind Time (C-60).....80 seconds
Tape Selector BIAS EQUALIZER
Normal, LH....100 % 120 uS
Special....150 % 70 uS
Metal....220 % 70 uS
MISCELLANEOUS
Power Requirement.....120 V/ 60 Hz, 220 V/ 50 Hz,
240 V/ 50 Hz (depending on
destinations)
Power Consumption......30 watts
Dimension (overall)....440 (W) x 121 (H) x 286 (D) mm
17-3/8"×4-13/16"×11-1/4"
Weight (net)....5.6 Kg / 12.32 lbs
- Specifications and design subject to possible modification without notice.
- Dolby noise reduction and HX PRO headroom extension manufactured under license from Dolby Laboratories Licensing Corporation.
HX PRO originated by Bang and Olufsen. "Dolby", the double-D symbol, and "HX PRO" are trademarks of Dolby Laboratories Licensing Corporation.
- A WORD FROM ROTEL
- BEFORE CONNECTION
- Place for Installation
- Electrical Requirements
- Connecting the Power Cord
- Do not Open the Cabinet
- Cleaning Your Unit
- CONNECTIONS
- Connecting to Integrated Amplifiers, Preamplifiers or Receivers
- Connecting for Remote control
- SPECIAL FACILITIES
- Automatic Shutoff System
- Automatic Tape Selection System
- CASSETTE TAPES
- SWITCHES AND CONTROLS
- REC Button ●
- PAUSE Button II
- Rec Balance Control
- WORDS ON OPERATION
- Precaution
- Recording
- Playback
- HEAD CLEANING
- HEAD DEMAGNETIZING
- SPECIFICATIONS RD-955AX
- MISCELLANEOUS
Brand : ROTEL
Model : RD-955AX
Category : Cassette player