
RD-845 - Cassette player ROTEL - Free user manual and instructions
Find the device manual for free RD-845 ROTEL in PDF.


| Product Type | Cassette Tape Deck |
| Brand | Rotel |
| Model | RD-845 |
| Dimensions (W x H x D) | 430 x 120 x 280 mm (approximately) |
| Weight | 5.0 kg (approximately) |
| Power Supply | AC 120V/60Hz (US) or 220-240V/50Hz (EU) |
| Power Consumption | 25 W |
| Functions | Play, Record, Fast Forward, Rewind, Pause, Stop, Eject, Auto-Stop |
| Sound Features | Dolby B Noise Reduction, Bass/Treble Control |
| Connections | RCA Line In/Out, Headphone Jack (6.3mm) |
| Tape Compatibility | Compact Cassette (Type I, II, IV) |
| Motor Type | DC Servo Motor |
| Heads | 2-head (Record/Playback) or 3-head (Monitoring) |
| Maintenance | Clean tape heads and pinch roller regularly; demagnetize heads every 20 hours |
| Safety Precautions | Do not expose to moisture; disconnect power before cleaning; avoid magnetic fields |
| Spare Parts Availability | Belts, idler tires, pinch rollers available from specialist dealers |
| Reparability | Serviceable by qualified technician; user should not open chassis |
| General Information | High-quality stereo cassette deck from Rotel, built in Japan, circa 1980s |
Frequently Asked Questions - RD-845 ROTEL
User questions about RD-845 ROTEL
0 question about this device. Answer the ones you know or ask your own.
Ask a new question about this device
Download the instructions for your Cassette player in PDF format for free! Find your manual RD-845 - ROTEL and take your electronic device back in hand. On this page are published all the documents necessary for the use of your device. RD-845 by ROTEL.
USER MANUAL RD-845 ROTEL
Quality Uncompromised
ROTEL®
RD-845
STEREO CASSETTE TAPE DECK
ENGLISH 1
DEUTSCH....5
FRANCAIS 8
WARNING
TO PREVENT FIRE OR SHOCK HAZARD, DO NOT EXPOSE THIS APPLIANCE TO RAIN OR MOISTURE
Write your SERIAL NUMBER here.
The number is located near the name plate on the rear panel.
SAFETY INSTRUCTIONS
- Read Instructions — All the safety and operating instructions should be read before the appliance is operated.
- Retain Instructions — The safety and operating instructions should be retained for future reference.
- Heed Warnings — All warnings on the appliance and in the operating instructions should be adhered to.
- Follow Instructions — All operating and other instructions should be followed.
- Water and Moisture — The appliance should not be used near water — for example, near a bathtub, wash-bowl, kitchen sink, laundry tub, in a wet basement, or near a swimming pool, etc.
- Carts and Stands — The appliance should be used only with a cart or stand that is recommended by the manufacturer.
- Wall or Ceiling Mounting — The appliance should be mounted to a wall or ceiling only as recommended by the manufacturer.
- Ventilation — The appliance should be situated so that its location or position does not interfere with its proper ventilation. For example, the appliance should not be situated on a bed, sofa, rug, or similar surface that may block the ventilation openings; or placed in a built-in installation, such as a bookcase or cabinet that may impede the flow of air through the ventilation openings.
- Heat — The appliance should be situated away from heat sources such as radiators, stoves, or other appliances that produce heat.
- Power Sources — The appliance should be connected to a power supply only of the type described in the operating instructions or as marked on the appliance.

CAUTION
RISK OF ELECTRIC SHOCK DO NOT OPEN
CAUTION: TO REDUCE THE RISK OF ELECTRIC SHOCK, DO NOT REMOVE COVER (OR BACK)
NO USER-SERVICEABLE PARTS INSIDE
REFER SERVICING TO QUALIFIED SERVICE PERSONNEL

The lighting flash with arrowhead symbol, within an equilateral triangle, is intended to alert the user to the presence of uninsulated "dangerous voltage" within the product's enclosure that may be of sufficient magnitude to constitute a risk of electric shock to persons.

The exclamation point within an equilateral triangle is intended to alert the user to the presence of important operating and maintenance (servicing) instructions in the literature accompanying the appliance.
- Power-Cord Protection — Power-supply cords should be routed so that they are not likely to be walked on or pinched by items placed upon or against them, paying particular attention to cords at plugs, convenience receptacles, and the point where they exit from the appliance.
- Cleaning — The appliance should be cleaned only as recommended by the manufacturer.
- Nonuse Periods — The power cord of the appliance should be unplugged from the outlet when left unused for a long period of time.
- Object and Liquid Entry — Care should be taken so that objects do not fall into and liquids not spilled into the inside of the appliance.
- Damage Requiring Service — The appliance should be serviced by qualified service personnel when:
A. The power-supply cord or the plug has been damaged; or
B. Objects have fallen, or liquid has been spilled into the appliance; or
C. The appliance has been exposed to rain; or
D. The appliance does not appear to operate normally or exhibits a marked change in performance; or
E. The appliance has been dropped, or the cabinet damaged.
- Servicing — The user should not attempt to service the appliance beyond those means described in the operating instructions. All other servicing should be referred to qualified service personnel.
- Grounding or Polarization — The precautions that should be taken so that the grounding or polarization means of an appliance is not defeated.
EXCLUSIVE NOTE FOR U.K.
If your unit comes with a 2-core cable without a plug, make certain live and neutral leads are connected to the proper terminals. Check that the terminals are screwed down firmly and no loose strands of wire are present.
IMPORTANT: The wires in this mains lead are coloured in accordance with the following code:
BLUE : NEUTRAL
BROWN: LIVE
As the colours of the wires in the mains lead of this apparatus may not correspond with the coloured markings identifying the terminals in your plug proceed as follows. The wire which is coloured BLUE must be connected to the terminal which is marked with the letter N or coloured BLUE or BLACK. The wire which is coloured BROWN must be connected to the terminal which is marked with the letter L or colour BROWN or RED.
CAUTION:
To prevent electric shock do not use this (polarized) plug with an extension cord, receptacle or other outlet unless the blades can be fully inserted to prevent blade exposure.
INTRODUCTION
We at Rotel want to thank you for purchasing our audio product.
Rotel audio products are designed to use the latest electronic technology, and they incorporate our long experience as a specialist manufacturer of audio equipment. We are confident that you will find satisfaction in the high quality sound and top performance, and that you will find pleasure in the functional beauty achieved through human-engineering concept. Before starting operation, please read this instruction manual thoroughly and acquaint yourself with the proper mode of using the unit and all its connections.
We hope you will enjoy top-notch performance for many years to come.
INSTALLATION
Be sure to place the unit in a level and flat place where it is free from humidity, vibration, high temperature and not to place the unit in a highly enclosed place such as near a wall or on a bookshelf. A poor ventilation will cause undesirable effects to the unit.
POWER SUPPLY CONNECTION
For power the unit requires the normal house electrical current (AC). You may simply plug the unit into a wall outlet, or into your amplifier's (or receiver's) convenience AC outlet.
CAUTION: Do not apply power without first making sure the proper connections are completed. If you live in U.K. and your unit comes with 2-core cord without a plug, be sure to read the exclusive caution for U.K.
CONNECTION TO INTEGRATED AMPLIFIER OR RECEIVER
Using the two accompanying pairs of RCA pin cords, connect INPUT and OUTPUT terminals on the back of deck with TAPE MONITOR terminals of the amplifier or receiver. Make sure INPUT terminals are connected to OUT terminals, and OUTPUT terminals to IN terminals. Be sure to match L (left) and R (right) terminals of the components. To make correct connections, use cords with white plugs for left channel connections, and cords with red plugs for right channel connections.

AUTOMATIC SHUTOFF SYSTEM
When either end of tape is reached in play, record, fast-forward, or rewind mode, the motor and transport mechanism will automatically shut off, disengaging the present mode. Note, however, that it is still necessary to turn off the entire unit by pressing the power switch to off.
CASSETTE TAPES
• To prevent possible trouble with the transport mechanism, use of large size cassette tapes, such as C-120, is not recommended.
- Handle cassette tapes with care. Keep them away from heat, circulating dust, or a magnetic field (e.g. on the TV set).
• Each cassette tape has safety labs on its back edge to prevent accidental re-recording.
The tabs are provided for both sides of cassette tape. You cannot record on the side whose tab has been removed. The tab can be removed with a screwdriver, etc. If you wish to record on the side with no tab, place a piece of adhesive tape, etc. over the opening where the tab has been, then you can record.
- A loosened tape may cause trouble in playback or recording. Check the tape before loading it into the deck. If it is slack, insert a pencil or the like into either of cassette's hubs, and rotate it carefully until the slack is taken up.

natural_image
Illustration of two hand-cranked cassette tape devices, one with a handle and the other with a flame (no text or symbols)SWITCH AND CONTROLS
(1) Power Button
This button turns on the unit. When it is turned on, the cassette compartment is illuminated. Press the button a second time to turn off the power.
(2) Cassette Door
Cassette tape is loaded into the cassette door. Press the STOP/EJECT button to open the door.
(3) Tape Counter and Reset Button
The three-digit tape counter indicates the amount of tape travel. Push the reset button to set the counter to "000". This counter is convenient in finding the beginning of a specific section of the tape or checking the amount of the remaining tape on the cassette.
(4) Peak Level Indicator
Give instantaneous display of recording or playback level for both left and right channels respectively. Each bank of 7 LEDs directly shows levels from -15dB to +6dB.

(5) Dolby NR B/C Indicator
Either of these indicators will light up when Dolby NR switch is activated on and in accordance with whether Dolby type switch is set at Dolby B or Dolby C.
(6) REC Indicator
Glows when the unit is in recording mode.
(7) Recording Level Control
Used to adjust the recording level of incoming signals from line source.
(8) Cassette Controls
REC Button (●)
To record, press this button. The unit is now in the recording mode, and the tape should be winding.
PLAY Button (▶)
Press this button to start the cassette for playback of recorded tape.
Rewind Button (◀◀)
For rapid tape rewind, press this button.
Fast-Forward Button (▶▶)
Press this button to advance the tape rapidly forward.
STOP/EJECT Button (■/▲)
press this button to stop the tape in any mode; Record, Playback, Rewind or fast-forward and press this button a second time to open the door of cassette compartment.
Just press this button once then open the door of cassette compartment when Tape in Stop mode or compartment is empty.
To close the door, gently push it back.
PAUSE Button (II)
This button is used to stop the tape temporarily during recording or playback. Pressing the button a second time will restart the tape in the interrupted mode.
(9) Tape Selector
Used to select the appropriate recording bias and playback equalization, according to type of cassette tape used. Use the METAL button for metal particle tape, the SPECIAL button for chromium dioxide tape, and the NORMAL button for normal tape.
(10) MPX Filter Button
Depress this button when recording stereo FM broadcasts. FM stereo broadcasting system uses a 19kHz pilot signal which may adversely affect the sound quality in some case. When the MPX filter button is depressed to ON, the MPX filter is activated to eliminate the 19kHz pilot signal, and clean stereo FM recording is achieved.
(11) Dolby NR Button and Dolby B-C Type NR Selector Depress the Dolby NR button when you wish to record or play back through the built-in Dolby noise reduction circuit.
Immediately above this button is a switch for selecting Dolby B-type or C-type noise reduction. Select B-type by setting switch in released position, and C-type by setting switch in depressed position.
(12) Rec Balance Control
Adjusts the relative recording levels between the left and right channels. Rotate the knob to the left so that the left channel sound is recorded at a louder level than the right, and vice versa. Normally set the knob at the mid-position.
OPERATION
- Be certain that power connection and connection with amplifier are properly made.
- When recording, be sure the safety tabs on the cassette tape are not removed.
- When recording from line sources, choose the desired program (tuner, turntable, etc.) on your amplifier.
Recording
- When you wish to record through Dolby B- or C-type NR circuit, depress the Dolby NR button, and then set the B-C type selector button to the desired position.
- Set the Tape Selector according to the type of tape used.
- Turn on the deck Power switch
- Press PAUSE button, then simultaneously press REC and PLAY buttons.
- Adjust the recording level for left and right channels with Recording Level control so that the level indicator readings do not exceed 0 dB position frequently, and when they do, only very briefly.
-
After adjusting recording level, press the PAUSE button again to put the unit into recording mode and to start the tape.
-
Carefully watch the meter indication during recording as well PAUSE button may be used to temporarily halt recording.
- Press STOP/EJECT button when recording is finished. When the end of the tape is reached, the recording mode will automatically disengage and tape stops.
Playback
- Set the Dolby NR button in depressed position when you play back a tape recorded with Dolby NR.
Release the button when you play back a tape not recorded with Dolby NR.
When you play back a tape recorded with Dolby NR, also set the Dolby B-C type selector button according to whether Dolby NR, B or C, is used.
- Set the tape selector to match the type of tape used.
- Turn on the power switch on your amplifier, keeping its volume control set to minimum. When using headphones connected to the deck, the amplifier is not necessary.
- Turn on the Power switch on the deck.
- Press PLAY button and playback will begin. Raise the volume to the desired level.
- To momentarily halt playback, press the PAUSE button. When you wish to end playback, press the STOP/EJECT button. When the tape comes to an end, it stops automatically and playback mode is disengaged.
HEAD CLEANING
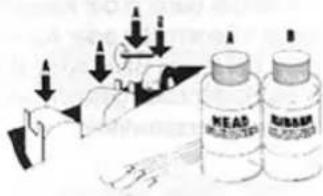
The most frequent cause of failure to record in one or both channels, or of weak, distorted sound, is dirty tape heads and capstan. So, be sure to clean the heads, capstan, pinch roller and tape guides as often as possible using a "Q" tip dipped in ordinary rubbing alcohol or commercial liquid tape head cleaner. Thoroughly wipe the surface of the heads, capstan, roller and tape guide.
HEAD DEMAGNETIZING
The tape heads, capstan and tape guides gradually become magnetized with use, which will eventually affect the sound quality of your tapes. Demagnetizing should follow cleaning, but need not take place as often as cleaning, once after every 20 to 30 hours of use should suffice.
A demagnetizer may be purchased at a moderate cost from any dealer carrying tape recording accessories. Follow the instruction supplied with the demagnetizer.
Caution: Be sure to turn off the unit before you attempt demagnetizing.
VOLTAGE SELECTION
Not available for U.K., Canada and Scandinavia
The unit is a variable voltage equipment that can run on 120V, 220V or 240V power supply. Your unit should already be preset at the proper voltage for use in your area. However, if you move to an area where the power supply voltage is different, consult your dealer.
SPECIFICATIONS
Heads: Rec/Play.... Sendust Guard Erase.... Ferrite core
Track 4-track/2-channel
Tape Speed....4.8cm/sec.
Motor Electronic DC Governor
Wow and Flutter....0.2% (DIN) 0.08% (WRMS)
Distortion (REC/PB, 400 Hz)..... 1.0% (METAL)
Frequency Response (-20 dB).. Normal LH 30 to 15.000Hz ± 3dB SPECIAL 30 to 15.000Hz ± 3dB Metal 30 to 16.000Hz ± 3dB
Signal-to-Noise Ratio (WTD. 0 dB = 580mV, Chromium)..... Dolby NR in. 64 dB (B type) 72 dB(C type) Dolby NR out: 55dB
Input Sensitivity/Impedance.....LINE 58 mV/33 kohms
Output Level/Impedance: LINE 580 mV/1 kohm
Fast Wind Time (C-60)....110 seconds
Tape Selector BIAS EQUALIZER Normal, LH....100% 120 μs Special....160% 70 μs Metal....220% 70 μs
MISCELLANEOUS
Power Requirement.... 120V/60 Hz, 220V/50 Hz, 240V/50 Hz. or 120, 220, 240V/50-60 Hz (depending on destinations)
Power Consumption.... 22 watts
Dimensions (Overall)....444(W) × 115(H) × 282(D) mm 17-15/33" × 4-17/32" × 11-3/32"
Weight (nel) 4.6kg/10.12 lbs
- Specifications and design subject to possible modification without notice.
- Dolby and the double-D symbol are trade marks of Dolby Laboratories Licensing Corporation. Noise reduction system manufactured under license from Dolby Laboratories Licensing Corporation.
- ROTEL®
- RD-845
- SAFETY INSTRUCTIONS
- CAUTION
- EXCLUSIVE NOTE FOR U.K.
- CAUTION:
- INTRODUCTION
- INSTALLATION
- POWER SUPPLY CONNECTION
- CONNECTION TO INTEGRATED AMPLIFIER OR RECEIVER
- AUTOMATIC SHUTOFF SYSTEM
- CASSETTE TAPES
- SWITCH AND CONTROLS
- Power Button
- Cassette Door
- Tape Counter and Reset Button
- Peak Level Indicator
- Dolby NR B/C Indicator
- REC Indicator
- Recording Level Control
- Cassette Controls
- REC Button (●)
- PLAY Button (▶)
- Rewind Button (◀◀)
- Fast-Forward Button (▶▶)
- STOP/EJECT Button (■/▲)
- PAUSE Button (II)
- Tape Selector
- MPX Filter Button
- Dolby NR Button and Dolby B-C Type NR Selector Depress the Dolby NR button when you wish to record or play back through the built-in Dolby noise reduction circuit.
- Rec Balance Control
- OPERATION
- Recording
- Playback
- HEAD CLEANING
- HEAD DEMAGNETIZING
- VOLTAGE SELECTION
- Not available for U.K., Canada and Scandinavia
- SPECIFICATIONS
- MISCELLANEOUS
Brand : ROTEL
Model : RD-845
Category : Cassette player