
LMH2016SW - Kitchen Appliances LG - Free user manual and instructions
Find the device manual for free LMH2016SW LG in PDF.


| Product Type | Over-the-Range Microwave Oven with Ventilation |
| Model | LMH2016SW |
| Color | White |
| Capacity | 1.6 cu. ft. |
| Power Output | 1000 W |
| Convection Cooking | Yes |
| Sensor Cooking | Yes |
| Turntable | Yes, 13.5" diameter |
| Display Type | LED |
| Control Type | Touch |
| Clock Function | Yes |
| Child Lock | Yes |
| Ventilation Fan | 2-speed, 300 CFM |
| Filters | Grease filter (washable), Charcoal filter (replacement required) |
| Interior Light | Yes |
| Overall Dimensions (WxHxD) | 29.9" x 16.2" x 15.9" |
| Weight | 51 lbs |
| Power Supply | 120 V, 60 Hz |
| Warranty | 1 year limited |
Frequently Asked Questions - LMH2016SW LG
User questions about LMH2016SW LG
0 question about this device. Answer the ones you know or ask your own.
Ask a new question about this device
Download the instructions for your Kitchen Appliances in PDF format for free! Find your manual LMH2016SW - LG and take your electronic device back in hand. On this page are published all the documents necessary for the use of your device. LMH2016SW by LG.
USER MANUAL LMH2016SW LG
Thank you for purchasing a LG microwave oven.
Please record the model number and serial number of this unit for future reference. We also suggest you record the details of your contact with LG (LG Electronics U.S.A., Inc.) concerning this unit.
Model No: ____
Serial No: ____
Dealer:
Dealer Phone No: ____
Staple your receipt here for proof of purchase.
Customer Relations LG Electronics U.S.A., Inc.
Service Division Bldg. #3
201 James Record Rd.
Huntsville, AL 35824-0126
PRECAUTIONS TO AVOID POSSIBLE EXPOSURE TO EXCESSIVE MICROWAVE ENERGY...
(a) Do not attempt to operate this oven with the door open since open-door operation can result in harmful exposure to microwave energy. It is important not to defeat or tamper with the safety interlocks.
(b) Do not place any object between the oven front face and the door or allow soil or cleaner residue to accumulate on sealing surfaces.
(c) Do not operate the oven if it is damaged. It is particularly important that the oven door closes properly and that there is no damage to the:
(1) Door (bent), (2) Hinges and latches (broken or loosened), (3) Door seals and sealing surfaces.
(d) The oven should not be adjusted or repaired by anyone except properly qualified service personnel.
TABLE OF CONTENTS
PRECAUTIONS TO AVOID POSSIBLE EXPOSURE TO EXCESSIVE MICROWAVE
ENERGY. 2
TABLE OF CONTENTS......3
SAFETY 4
Important Safety Instructions 4
UNDERSTANDING YOUR MICROWAVE OVEN .....6
Location of Model Number 6
Oven Specifications 6
Electrical Requirements. 6
Grounding Instructions 6
Microwave Oven Features. 7
Control Panel Features 8
Learn About Your Microwave Oven 10
Clock 10
Vent Auto Time Set 10
Vent Fan 10
Light Hi/Low/Off 10
Child Lock 10
Kids Meal 11
EZ-ON 11
+RIGWarm 11
Custom Set 12
More/Less 12
Cooking at High Power Levels 12
Microwave Power Levels 12
Multi Stage Cooking 12
Cooking Guide for Lower Power Levels 13
Turntable On/Off 14
Sensor Operating Instructions 14
Sensor Cooking Guide 14
Sensor Popcorn 14
Sensor Cook 15
Sensor Reheat 15
Sensor Cook Table 16
Sensor Reheat Table 16
Timer 17
Custom Cook 17
Soften 17
Melt 17
Soften Table 18
Melt Table 18
Defrost 19
Quick Defrost 19
Time Defrost 19
Defrost Tips 20
Metal Rack 20
Slide-Out Hood 20
COOKING 21
Getting the Best Cooking Results 21
Fish and Shellfish 21
Fish and Shellfish Cooking Table 21
Appetizers /Sauces /Soups 22
Meat 22
Meat Cooking Table 23
Chicken 24
Chicken Cooking Table 24
Pasta and Rice 25
Pasta Cooking Table 25
Rice Cooking Table 25
MAINTENANCE 26
Care and Cleaning 26
Metal Rack 26
Cleaning the Grease Filters 26
Charcoal Filter Replacement 27
Cooktop/Night Light Replacement 27
Oven Lamp Light Replacement 27
COOKING UTENSILS 28
Microwave Utensil Guide 28
TROUBLESHOOTING 29
Before Calling for Service 29
Questions and Answers 30
LIMITED WARRANTY 31
SAFETY
IMPORTANT SAFETY INSTRUCTIONS
The safety instructions below will tell you how to use your oven and avoid harm to yourself or damage to your oven.
WARNING
■ To reduce the risk of burns,
electric shock, fire, injury to persons, or exposure to excessive microwave energy.
- Read all the instructions before using your oven.
- Do not allow children to use this oven without close supervision.
- Read and follow the specific PRECAUTIONS TO AVOID POSSIBLE EXPOSURE TO EXCESSIVE MICROWAVE ENERGY found on page 2.
- Do not use corrosive chemicals or vapors, such as sulfide and chloride, in this appliance. This type of oven is specifically designed to heat, cook, or dry food. The microwave is made for household use only.
- Do not use or store this appliance outdoors. Do not use this product near water - for example, near a kitchen sink, in a wet basement, or near a swimming pool, or similar location.
- Do not use the cavity for storage purposes. Do not leave paper products, cooking utensils, or food in the cavity when not in use.
- Clean the ventilating hood frequently. Do not allow grease to accumulate on the hood or the filters.
- Use care when cleaning the vent hood filters. Corrosive cleaning agents such as lye-based oven cleaners may damage the filters.
- Do not tamper with the built-in safety switches on the oven door. The oven has several built-in safety switches to make sure the power is off when the door is open.
- If food flames under the hood, turn the fan on.
- Suitable for use above both gas and electric cooking equipment 36 inches wide or less.
- Do not use this oven for commercial purposes. It is made for household use only.
- When cleaning the door and the surfaces that touch the door, use only mild, non-abrasive soaps or detergents and a sponge or soft cloth.
- If your oven is dropped or damaged, have it thoroughly checked by a qualified service technician before using it again. • To avoid a fire hazard:
- Do not severely overcook food. Severely overcooked foods can start a fire in the oven. Watch the oven carefully, especially if you have paper, plastic, or other combustibles in the oven.
- Do not store combustible items (bread, cookies, etc.) in the oven, because if lightning strikes the power lines it may cause the oven to turn on.
- Do not use wire twist-ties in the oven. Be sure to inspect purchased items for wire twist-ties and remove them before placing the item in the oven.
- If a fire should start:
- Keep the oven door closed.
- Turn the oven off.
- Disconnect the power cord or shut off the power at the fuse or circuit breaker panel.
• To avoid electric shock:
- This appliance must be grounded. Connect it only to a properly grounded outlet. See the electrical GROUNDING INSTRUCTIONS on page 6.
- Do not operate this appliance if it has a damaged cord or plug, if it is not working properly or if it has been damaged or dropped.
- Do not immerse the electrical cord or plug in water.
- Keep the cord away from heated surfaces.
Take care when the door is opened.
There is a possibility of being injured.
SAFETY
To avoid improperly cooking some foods.
- Do not heat any types of baby bottles or baby food. Uneven heating may occur and possibly cause personal injury.
- Do not heat small-necked containers, such as syrup bottles.
- Do not deep-fat fry in your microwave oven.
- Do not attempt home canning in your microwave oven.
- Do not heat the following items in the microwave oven: whole eggs in the shell, water with oil or fat, sealed containers, or closed glass jars. These items may explode.
- Do not cover or block any openings in the oven.
- Use your oven only for the operations described in this manual.
- Do not run the microwave empty.
- Secure the cord in the cabinet above the oven.
- Preserve the oven floor:
- Do not heat the oven floor excessively.
- Do not allow the gray film on special microwave-cooking packages to touch the oven floor. Put the package on a microwavable dish.
- Do not cook anything directly on the oven floor or turntable. Use a microwavable dish.
- Keep a browning dish at least 3/16 inch above floor. Carefully read and follow the instructions for the browning dish. If you use a browning dish incorrectly, you could damage the oven floor.
- Install or locate this appliance only in accordance with the provided installation instructions.
- This appliance should be serviced only by qualified service personnel. Contact the nearest authorized service facility for examination, repair, or adjustment.
- Liquids, such as water, coffee, or tea can be overheated beyond the boiling point without appearing to be boiling due to surface tension of the liquid. Visible bubbling or boiling when the container is removed from the microwave oven is not always present. THIS COULD RESULT IN VERY HOT LIQUIDS SUDDENLY BOILING OVER WHEN THE CONTAINER IS DISTURBED OR A SPOON OR OTHER UTENSIL IS INSERTED INTO THE LIQUID.
To reduce the risk of injury to persons;
- Do not overheat the liquid.
- Stir the liquid both before and halfway through heating it.
- Do not use straight-sided containers with narrow necks.
- After heating, allow the container to stand in the microwave oven for a short time before removing the container.
- Use extreme care when inserting a spoon or other utensil into the container.
SAVE THESE INSTRUCTIONS
FEDERAL COMMUNICATIONS COMMISSION RADIO FREQUENCY INTERFERENCE STATEMENT (U.S.A. ONLY)
WARNING:
- Reorient the receiving antenna of the radio or television.
This equipment generates and uses ISM frequency energy and if not installed and used properly, that is, in strict accordance with the manufacturer's instructions, may cause interference to radio and television reception. It has been type tested and found to comply with limits for ISM Equipment pursuant to part 18 of FCC Rules, which are designed to provide reasonable protection against such interference in a residential installation.
- Relocate the Microwave Oven with respect to the receiver.
- Move the microwave oven away from the receiver.
- Plug the microwave oven into a different outlet so that the microwave oven and the receiver are on different branch circuits.
However, there is no guarantee that interference will not occur in a particular installation. If this equipment does cause interference to radio or television reception, which can be determined by turning the equipment off and on, the user is encouraged to try to correct the interference by one or more of the following:
The manufacturer is not responsible for any radio or TV interference caused by unauthorized
Modification to this microwave oven. It is the responsibility of the user to correct such interference.
⚠ WARNING: This product contains chemicals known to the State of California to cause cancer. Wash hands after handling.
Please read this owner's manual. It will tell you how to use all the fine features of this microwave oven.
LOCATION OF MODEL NUMBER
To request service information or replacement parts, the service center will require the complete model number of your microwave oven. The number is on the oven front as shown in the illustration below.
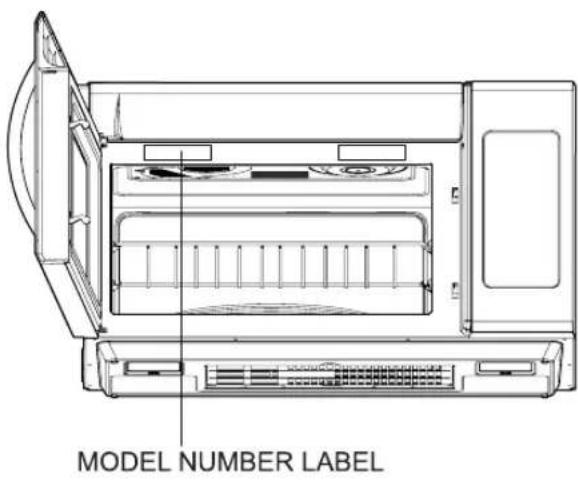
OVEN SPECIFICATIONS
Output Power 1,100W (IEC60705)
Outer Dimensions 29 7/8" x 16 3/4" x 17 5/8"
Cavity Volume 2.0 Cu.ft
Net Weight lbs. 71
ELECTRICAL REQUIREMENTS
The oven is designed to operate on a Standard 120V/60Hz household outlet. Be sure the circuit is at least 15A or 20A and the microwave oven is the only appliance on the circuit. It is not designed for 50Hz or any circuit other than a 120V/60Hz circuit.
GROUNDING INSTRUCTIONS
This appliance must be grounded. If an electrical short circuit occurs, grounding reduces the risk of electric shock by providing an escape wire for the electric current. The appliance is equipped with a cord having a grounded wire with a grounded plug. Put the plug into an outlet that is properly installed and grounded.
⚠ WARNING - If you use the grounding plug improperly, you risk electric shock.
Ask a qualified electrician if you do not understand the grounding instructions or if you wonder whether the appliance is properly grounded.
This appliance has a short power supply cord to reduce the risk of anyone tripping over or becoming entangled in the cord. See the separate Installation Instructions for directions on placing the cord properly. Keep the electrical power cord dry and do not pinch or crush it in any way.
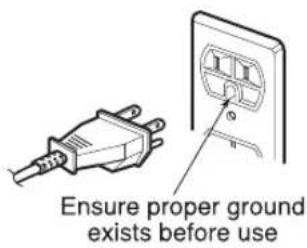
WARNING:
Do not operate the oven when empty or without the glass tray. It is best to leave a glass of water in the oven when not in use. The water will safely absorb all microwave energy, if the oven is accidentally started.
Your microwave oven is designed to make your cooking experience as enjoyable and productive as possible. To get you up and running quickly, the following is a list of the oven's basic features:
- Metal Shielded Window. The shield prevents microwaves from escaping. It is designed as a screen to allow you to view food as it cooks.
- Model and Serial Number Plate & Cooking Guide Label
- Charcoal Filter (behind Vent Grille)
- Vent Grille
- Glass Tray. The glass tray moves food as it cooks for more even cooking. It must be in the oven during operation for best cooking results.
- Cooktop/Countertop Light
- Control Panel. Touch the pads on this panel to perform all functions.
- Metal Rack. Use for extra space when cooking in more than one container at the same time. Remove cooking rack when you are not using it.
- Grease Filter
- Slide-Out Hood.
Push the slide-out hood to move it to the front or rear.
This allows you to remove steam and other vapors more effectively from surface cooking.
Your microwave oven control panel lets you select the desired cooking function quickly and easily. All you have to do is touch the necessary command pad. The following is a list of all the command and number pads located on the control panel. For more information on these features, see the USING YOUR MICROWAVE OVEN section.
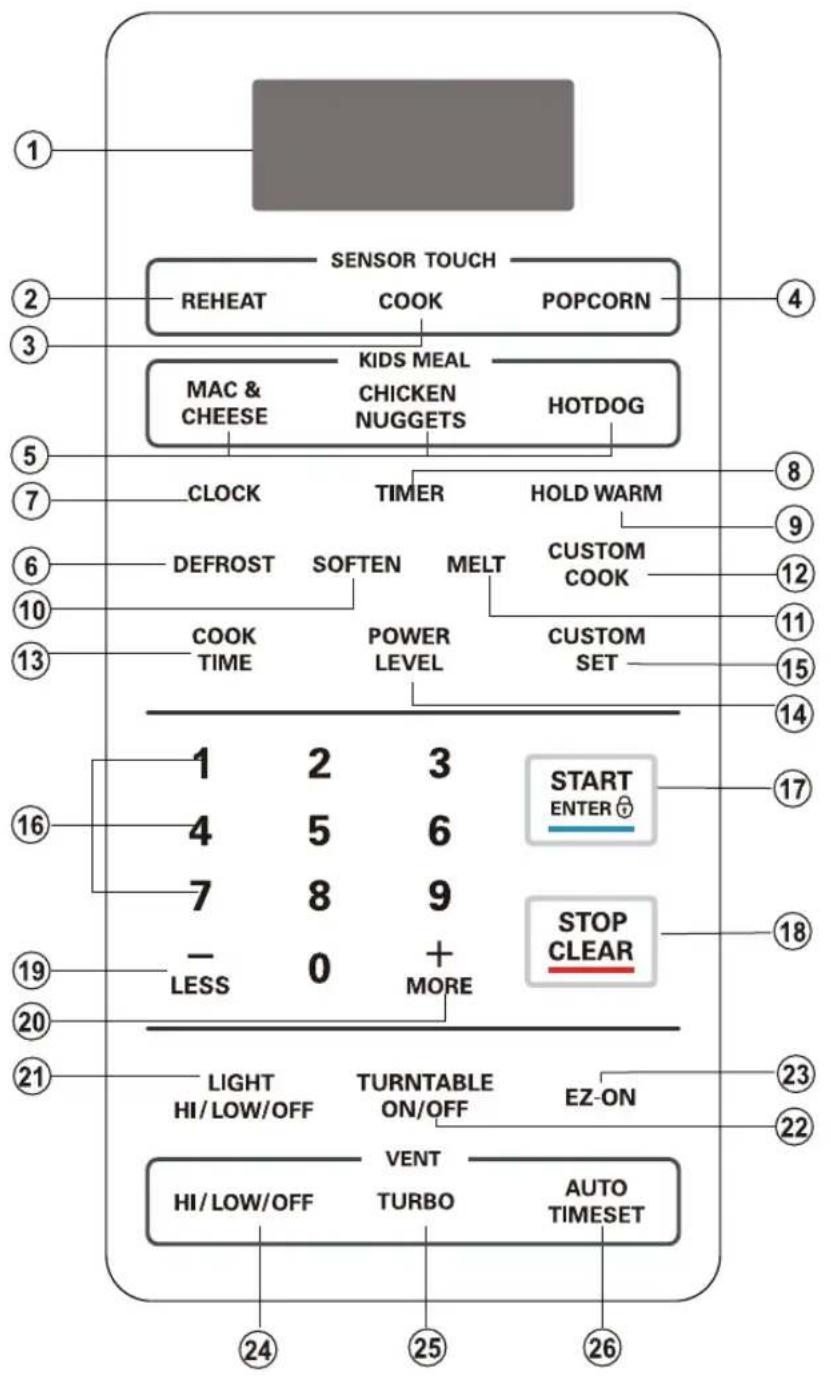
NOTE: Styling and features vary by model.
- DISPLAY: The display includes a clock and indicators to tell you time of day, cooking time setting, and cooking functions selected.
- REHEAT: Touch this pad to reheat Pizza Slice, Dinner Plate, Soup/Sauce, and Casserole. The oven's sensor will tell the oven how long to cook depending on the amount of humidity coming from the food.
- COOK: Touch this pad to cook Baked Potato, Vegetable, Casserole, Rice, and Frozen Entree. The oven's sensor will tell the oven how long to cook depending on the amount of humidity coming from the food.
- POPCORN: Touch this pad when popping popcorn in your microwave oven. The oven's sensor will tell the oven how long to cook depending on the amount of humidity it detects from the popcorn.
- KIDS MEAL: Select type of dish to reheat HOT DOG, MAC & CHEESE or CHICKEN NUGGETS.
- DEFROST: Touch this key to defrost food by entering weight, cook time or Quickly.
- CLOCK: Touch this pad to enter the time of day.
- TIMER: Touch this pad to set the kitchen timer.
- HOLD WARM: Touch this pad to keep hot, cooked foods warm in your microwave oven for up to 90 minutes.
- SOFTEN: Touch this pad to soften Butter, Ice Cream, Cream Cheese, and Frozen Juice.
- MELT: Touch this pad to melt Butter / Margarine, Chocolate, Cheese, and Marshmallows.
- CUSTOM COOK: Touch this pad to recall one cooking instruction previously programmed into memory.
13. COOK TIME: Touch this pad to set a cooking time.
- POWER LEVEL: Touch this pad to select a cooking power level.
15. CUSTOM SET: Touch this pad to change the oven's default settings for sound, clock, display speed, and defrost weight.
- NUMBER: Touch number pads to enter cooking time, power level, quantities, or weights.
- START/ENTER: Touch this pad to start a function. If you open the door after the oven begins to cook, touch START/ENTER again.
- STOP/CLEAR: Touch this pad to stop the oven or to clear all entries.
- LESS: Touch this pad to subtract ten seconds of cooking time each time you press it.
- MORE: Touch this pad to add ten seconds of cooking time each time you press it.
- LIGHT HI/LOW/OFF: Touch this pad to turn the light on high, low, or off.
- TURNTABLE ON/OFF: Touch this pad to turn on/off the turntable. This option is not available in sensor cook, defrost, kids meal, soft and melt modes.
- EZ-ON: Touch this pad to set and start quickly at 100% power level.
- VENT HIGH/LOW/OFF: Touch this pad to turn the fan on high, low, or off.
- VENT TURBO: Touch this pad to choose the most powerful fan speed.
- VENT AUTO TIME SET: Touch this pad when setting ventilation time. (1, 3, 5, 10, and 30 minutes.)
This section discusses the concepts behind microwave cooking and introduces you to the basics you need to know to operate your microwave oven. Please read this information before using your oven.
CAUTION
To avoid risk of personal injury or property damage, do not run the oven empty.
To avoid risk of personal injury or property damage, do not use stoneware, large sheets of aluminum foil, metal utensils, or metal trimmed utensils in the oven. Keep aluminum foil at least 1 inch from the oven wall metal rack and other pieces of foil.
CLOCK
When the oven is first plugged into a power outlet, the "Please Set Time of Day" prompt will flash several times. If a time of day is not set, ":" will show on the display until you touch "CLOCK".
Example: To set the clock for 8:00 am
CLOCK
800
START ENTER
1
START ENTER
- Touch CLOCK.
- Enter the time by using the number keys.
- Touch START/ENTER
- Press 1 for AM, 2 for PM.
- Touch START/ENTER.
VENT AUTO TIME SET
Example: To set 30 minutes for high level.

- Touch HI / LOW / OFF.

- Touch AUTO TIME SET 5 times.
VENT FAN
The fan moves steam and other vapors from the cooking surface. There are three speeds.
HI/LOW/OFF
Touch VENT HI / LOW / OFF once for High fan speed, twice for Low fan speed, or three times to turn the fan off.
TURBO
Touch this pad to choose powerful fan speed.
NOTE: If the temperature from the range or cooktop below the microwave oven gets too hot, the exhaust fan in the microwave oven hood will automatically turn to Level LOW setting to protect the oven.
It may stay on up to an hour to cool the oven. When this occurs, the HI/LOW/OFF will not allow you to turn off the microwave oven fan.
Turbo cannot be used together with microwave cooking.
LIGHT HI/LOW/OFF
LIGHT
HI/LOW/OFF
Touch LIGHT HI/LOW/OFF
once for bright light, twice for night light, or three times to turn the light off.
CHILD LOCK
Use this safety feature to lock the control panel when you are clearing the oven, or so that children cannot use the oven unsupervised.
The Child Lock feature is also useful when cleaning the control panel. Child Lock prevents accidental programming when wiping the control panel.
Example: To set the child lock.

- Touch STOP/CLEAR.

- Touch and hold START/ENTER until "LOCKED" appears (approximately 4 seconds).
Example: To cancel the child lock.

- Touch and hold START/ENTER until "LOCKED" disappears (approximately 4 seconds)
Using KIDS MEAL lets you heat common microwave-prepared foods without needing to program times and cook power. MAC & CHEESE, HOT DOG, CHICKEN NUGGETS.
Example: To heat 4 ea Hot Dogs.
HOT DOG
- Touch STOP/CLEAR.
- Touch HOT DOG.
2
- Touch 2.

NOTE: When the cook time is over, you will hear four beeps and COOK END will display.
KIDS MEAL TABLE
| Category | Touch Pad number | |
| 1 | 2 | |
| MAC & CHEESE 6 ozs. | 12 ozs. | |
| HOT DOG 2 ea 4 ea | ||
| CHICKEN NUGGETS 4 ozs. | 8 ozs. | |
EZ-ON
A time-saving pad, this simplified control lets you quickly set and start microwave cooking without the need to touch the START/ENTER.
Example: To set EZ-ON for 2 minutes.
EZ-ON
- Touch EZ-ON 4 times. The oven begins cooking and display shows time counting down.
HOLD WARM
You can keep cooked food warm in your microwave oven for up to 90 minutes. You can use HOLD WARM by itself or to follow a cooking cycle automatically.
Example: To use HOLD WARM.
HOLD WARM
- Touch HOLD WARM.
START ENTER
- Touch START/ENTER.
NOTES:
• HOLD WARM operates for up to 90 minutes. - Food cooked covered should be covered during HOLD WARM. - Pastry items (pies, turnovers, etc.) should be uncovered during HOLD WARM. - Complete meals kept warm on a dinner plate can be covered during HOLD WARM.
| Food Type | Recommended Quantity |
| Liquid | 1-2 cups |
| Dry | 5-10 ozs. |
To make HOLD WARM automatically follow another cycle:
- While you are programming the cooking instructions, touch HOLD WARM before touching START/ENTER.
- When the last cooking cycle is over, you will hear two beeps and HOLD WARM will appear in the oven display.
- You can set HOLD WARM to follow AUTO DEFROST, or multi-cycle cooking.
You can change the default values for beep sound, clock, display speed, and defrost weight.
See following chart for more information.
| No. | Function No. Result | ||
| 1 | Sound ON/ 1 OFF control | Sound ON2 Sound OFF | |
| 2 | Clock ON/ 1 OFF control | Clock ON2 | Clock OFF |
| 3 | Scroll speedcontrol | 1 Slow speed2 Normal speed3 Fast speed | |
| 4 | Defrost weightmode selected | 1 Lbs.2 Kg. | |
| Example: To change defrost weight mode (from Lbs. to Kg). | |
| CUSTOM SET | 1. Touch CUSTOM SET |
| 4 | 2. Touch 4. |
| 2 | 3. Touch 2. |
MORE/LESS
By using the MORE or LESS keys, the TIMED COOK program can be adjusted to cook food for a longer or shorter time. Pressing MORE will add 10 seconds to the cooking time each time you press it. Pressing LESS will subtract 10 seconds from the cooking time each time you press it.
| To adjust the cooking time for a longer time,or for a shorter time. | |
| 1. Touch STOP/CLEAR. | |
| 100 | 2. Touch 1,0,0.1:00TOUCH START OR POWER LEVELwill shows on the display |
| 3. Touch START / ENTERThe Oven will start. | |
| LESS MORE | 4. Touch MORE or LESS.Remaining time willincrease or decrease by 10seconds. |
COOKING AT HIGH POWER LEVELS
| Example: To cook food for 8 minutes 30 seconds at 100% power. | |
| 8 3 0 | 1. Enter the cook time. |
| START ENTER | 2. Touch START/ENTER. |
| When the cook time is over, four beeps will sound and COOK END will display. | |
Your microwave oven has 10 cook power levels to let you cook or heat a wide variety of foods.
| Example: To cook food for 7 minutes 30 seconds at 70% power. | |
| 7 3 0POWER LEVEL7 | 1. Enter the cook time.2. Touch POWER LEVEL.3. Enter the power level.4. Touch START/ENTER.When the cook time is over, four beeps will sound and COOK END will display. |
| START ENTER6See cooking guide for Lower Power Levels, page 13. | |
MULTI STAGE COOKING
For best results, some recipes call for different cook powers during different stages of a cook cycle. You can program your oven to switch from one power to another for up to 2 stages. 3 stages can be programmed if the first stage is the defrost cycle.
| Example: To cook food for 3 minutes at 100% power and then 70% power for 7 minutes 30 seconds. | |
| 3 0 0 | 1. Enter the first cook time. |
| COOK TIME | 2. Touch COOK TIME. |
| 7 3 0 | 3. Enter the second cook time. |
| POWER LEVEL | 4. Touch POWER LEVEL. |
| 7 | 5. Enter the power level. |
| START ENTER | 6. Touch START/ENTER. |
| When the cook time is over, four beeps will sound and COOK END will display. | |
The 10 power levels in addition to HIGH allow you to choose the best power level for the food you are cooking. Below are listed all the power levels, examples of foods best cooked at each level, and the amount of microwave power you are using.
| POWER LEVEL MICROWAVE OUTPUT USE | ||
| 10 High 100% | ● Boil water● Cook ground beef● Make candy● Cook fresh fruits and vegetables● Cook fish and poultry● Preheat browning dish● Reheat beverages● Bacon slices | |
| 9 | 90% | ● Reheat meat slices quickly● Saute onions, celery, and green pepper |
| 8 | 80% | ● All reheating● Cook scrambled eggs |
| 7 | 70% | ● Cook breads and cereal products● Cook cheese dishes, veal● Cook cakes, muffins, brownies, cupcakes |
| 6 | 60% | ● Cook pasta |
| 5 | 50% | ● Cook meats, whole poultry● Cook custard● Cook whole chicken, turkey, spare ribs, rib roast, sirloin roast |
| 4 | 40% | ● Cook less tender cuts of meat● Reheat frozen convenience foods |
| 3 | 30% | ● Thaw meat, poultry, and seafood● Cook small quantities of food● Finish cooking casserole, stew, and some sauces |
| 2 | 20% | ● Soften butter and cream cheese● Heat small amounts of food |
| 1 | 10% | ● Soften ice cream● Raise yeast dough |
| 0 | 0% | ● Standing time |
For best cooking results, leave the turntable on.
It can be turned off for large dishes. Touch the TURNTABLE ON/OFF pad to turn the turntable on or off.
NOTES:
- This option is not available in sensor cook, defrost, kids meal, soft and melt modes.
- Sometimes the turntable can become hot to the touch. Be careful touching the turntable during and after cooking.
- Do not run the oven empty.
SENSOR OPERATING INSTRUCTIONS
Sensor Cook allows you to cook most of your favorite foods without selecting cooking times and power levels. The display will indicate the sensor category during the initial sensing period. The oven automatically determines the required cooking time for each food item. When the internal sensor detects a certain amount of humidity coming from the food, it will tell the oven how much longer to heat. The display will show the remaining heating time. For best results when cooking by Sensor, follow these recommendations:
- Food cooked with the sensor system should be at normal storage temperature.
- The glass tray and the outside of the container should be dry to assure best cooking results.
- Foods should always be covered loosely with microwavable plastic wrap, waxed paper, or a lid.
- Do not open the door or touch STOP/CLEAR during the sensing time. When sensing time is over, the oven beeps twice and the remaining cooking time will appear in the display window. At this time you can open the door to stir, turn, or rearrange the food.
SENSOR COOKING GUIDE
Appropriate containers and coverings help assure good Sensor cooking results.
- Always use microwavable containers and cover them with lids or vented plastic wrap.
- Never use tight-sealing plastic covers. They can prevent steam from escaping and cause food to overcook.
- Match the amount to the size of the container. Fill containers at least half full for best results.
- Be sure the outside of the cooking container and the inside of the microwave oven are dry before placing food in the oven. Beads of moisture turning into steam can mislead the sensor.
SENSOR POPCORN
SENSOR POPCORN lets you pop 1.75, 3.0 and 3.5 ounce bags of commercially packaged microwave popcorn. Pop only one package at a time. If you are using a microwave popcorn popper, follow manufacturer's instructions.
Example: To pop popcorn.
POPCORN
- Touch POPCORN.
When the cook time is over, four beeps will sound and COOK END will display.
- Recommended amounts: 1.75, 3.0-3.5 ozs.
CAUTION
DO NOT leave microwave oven unattended while popping corn.
When popping commercially packaged popcorn, remove the rack from the oven. Do not place the bag of microwave popcorn on the rack or under the rack.
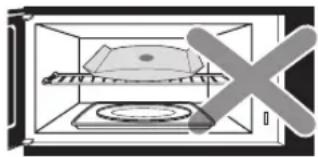
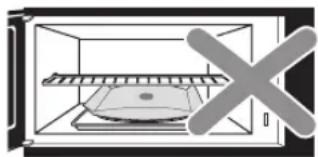
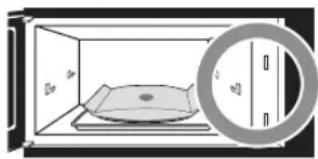
Using SENSOR COOK lets you heat common microwave-prepared foods without the need to program times and Cook Powers. SENSOR COOK has preset Cook Power for 7 food categories.
| Example: To cook rice. | |
| cook | 1. Touch COOK. |
| 6 | 2. Choose food category. |
SENSOR COOK TABLE
| Category | Touch Pad Number | Amount |
| Baked Potato 1 1 - 4 ea | ||
| Fresh Vegetable 2 1 - 4 cups | ||
| Frozen Vegetable 3 1 - 4 cups | ||
| Canned Vegetable 4 1 - 4 cups | ||
| Casserole 5 1 - 4 cups | ||
| Rice 6 | 1/2 - 2 cups | |
| Frozen Entree | 7 | 10 - 21 ozs. |
When the cook time is over, four beeps will sound and COOK END will display.
SENSOR REHEAT
Using SENSOR REHEAT lets you heat common microwave-prepared foods without the need to program times and Power levels.
| Example: To reheat 2 slices of pizza. | |
| REHEAT | 1. Touch REHEAT. |
| 1 | 2. Choose food category. |
SENSOR REHEAT TABLE
| Category | Touch Pad Number | Amount |
| Pizza slice 1 1 - 3 slices | ||
| Dinner plate 2 1 - 2 servings | ||
| Soup/Sauce 3 1 - 4 cups | ||
| Casserole 4 1 - 4 cups |
| NOITCERID YROGETAC AMOUNT | |||
| Baked Potato | Pierce each potato with a fork and place on the oven tray around the edge, at least one inch apart. | 1 - 4 medium approx.8 -10 ozs. each | |
| VEGETABLE | Fresh Vegetable | Prepare as desired, wash and leave residual water on the vegetables. Place in an appropriately sized microwave container. Add water according to the quantity. (1-2cups : 2tablespoons, 3-4cups : 4tablespoons) Cover with plastic wrap and vent. After cooking, stir and allow to stand for 3 minutes. | 1 - 4 cups |
| Frozen Vegetable | Remove from package, rinse off frost under running water. Place in an appropriately sized microwave container. Add water according to the quantity. (1-2cups : 2tablespoons, 3-4cups : 4tablespoons) Cover with plastic wrap and vent. After cooking, stir and allow to stand for 3 minutes. | 1 - 4 cups | |
| Canned Vegetable | Remove from the outer display can. Place in an appropriately sized microwave container, cover with plastic wrap and vent. After cooking, stir and allow to stand for 3 minutes. | 1 - 4 cups | |
| Casserole | Assemble the ingredients per the recipe in a 1-2 quart casserole. Cover with plastic wrap and vent. After cooking, stir and allow to stand for 3 minutes | 1 - 4 cups | |
| Rice | Place rice and twice as much liquid(water,chicken or vegetable stock) in a 2 quart microwave dish. Cover with plastic wrap and vent. After cooking, allow to stand for 5 minutes. Stir for fluffier rice. | 1/2 - 2 cups | |
| Frozen Entree | Remove from outer display package. Slit cover. If not in microwave-safe container, place on plate, cover with plastic wrap and vent. | 10 - 21 ozs. | |
SENSOR REHEAT TABLE
| YROGETAC AMOUNT NOITCERID | ||
| Pizza Slice | This is a reheat function for leftover pizza.Place on paper towel on a microwave safe plate. | 1 - 3 slices(3 - 5 ozs. each) |
| Dinner Plate | Place on a low plate.Cover with vented plastic wrap.Let stand 3 minutes. | 1 - 2 servings |
| Soup/Sauce | Place in shallow microwavable casserole.Cover with vented plastic wrap.After cooking, stir and let stand 3 minutes. | 1 - 4 cups |
| Casserole | Cover dish containing the casserolewith plastic wrap and vent.After cooking, stir and allow to stand for 3 minutes. | 1 - 4 cups |
You can use your microwave oven as a timer. Use the Timer for timing up to 99 minutes, 99 seconds.
Example: To count 3 minutes.
| STOP CLEAR |
TIMER
- Touch STOP/CLEAR.
- Touch TIMER.
3 0 0
- Enter the time by using the number key pad.
START ENTER
- Touch START/ENTER. When the time is over, you will hear seven beeps and END will display.
CUSTOM COOK
CUSTOM COOK lets you to recall one cooking instruction previously placed in memory and begin cooking quickly.
Example: To memorize for 2 minutes.
| STOP CLEAR |
CUSTOM COOK
- Touch STOP/CLEAR.
- Touch CUSTOM COOK.
200
- Enter the cook time.
START ENTER
- Touch START/ENTER.
Example: To recall the memory.
| STOP CLEAR |
CUSTOM COOK
- Touch STOP/CLEAR.
- Touch CUSTOM COOK.
START ENTER
- Touch START/ENTER. When the cook time is over, you will hear four beeps and COOK END will display.
SOFTEN
The oven uses low power to soften foods (butter, ice cream, cream cheese, and frozen juice.) See the following table.
Example: To soften quart of ice cream.
SOFTEN
- Touch SOFTEN.
2
- Choose food category. Touch 2 for ice cream.
2
- Choose food amount. Touch 2 for quart.
START ENTER
- Touch START/ENTER.
SOFTEN TABLE
| Category | Touch Pad Number | Amount |
| Butter 1 1,2,3 sticks | ||
| Ice cream 2 | Pint, Quart, Half gallon | |
| Cream cheese 3 3, 8 ozs. | ||
| Frozen juice 4 6,12,16 ozs. |
MELT
The oven uses low power to melt foods (butter or margarine, chocolate, marshmallows, or processed cheese food.) See the following table.
Example: To melt 8 ozs. chocolate.
MELT
- Touch MELT.
2
- Choose food category. Touch 2 for chocolate.
2
START ENTER
- Choose food amount. Touch 2 for 8 ozs.
- Touch START/ENTER.
MELT TABLE
| Category Amount | Touch Pad Number | |
| Butter / Margarine 1 | 1, 2, 3 sticks | |
| Chocolate 2 | 4, 8 ozs. | |
| Cheese 3 | 8, 16 ozs. | |
| Marshmallows 4 | 5, 10 ozs. |
| NOITCERIDYROGETAC AMOUNT | ||
| Butter | Unwrap and place in a microwave safe dish on the rack over the glass tray. Butter will be at room temperature and ready for use in recipe. | 1, 2, or 3 sticks |
| Ice Cream | Place in a microwave safe dish on the rack over the glass tray. Ice cream will be soft enough to make scooping easier. | Pint, Quart, Half gallon |
| Cream cheese | Unwrap and place in a microwave safe dish on the rack over the glass tray. Cream cheese will be at room temperature and ready for use in recipe. | 3 or 8 ozs. |
| Frozen juice | Remove top. Place in oven. Frozen juice will be soft enough to mix easily with water. | 6, 12, or 16 ozs. |
MELT TABLE
| NOITCERIDYROGETAC AMOUNT | ||
| Butter or Margarine | Unwrap and place in a microwave safe dish on the rack over the glass tray. No need to cover butter. Stir at the end of cooking to complete melting. | 1, 2, or 3 sticks |
| Chocolate | Chocolate chips or squares of baking chocolate may be used. Unwrap squares and place in a microwave safe dish on the rack over the glass tray. Stir at the end of cycle to complete melting. | 4 or 8 ozs. |
| Cheese | Use processed cheese food only. Cut into cubes. Place in a single layer in a microwave safe dish on the rack over the glass tray. Stir at the end of cooking to complete melting. | 8 or 16 ozs. |
| Marshmallows | Large or miniature marshmallows may be used. Place in a microwave safe dish on the rack over the glass tray. Stir at the end of cycle to complete melting. | 5 or 10 ozs. |
Four defrost choices are preset in the oven. The defrost feature provides you with the best defrosting method for frozen foods, because the oven automatically sets the defrosting times for each food item according to the weight you enter. For added convenience, the DEFROST includes a built-in tone mechanism that reminds you to check, turn over, separate, or rearrange the food during the defrost cycle. Four different defrosting options are provided.
- MEAT
- POULTRY
- FISH
- BREAD
After touching DEFROST once, select the food category. Available weight ranges for Meat, Poultry, and Fish are 0.1 to 6.0 lbs. The available weight range for Bread is 0.1 to 1.0 lb.
Example: To defrost 1.2 lbs of meat.
DEFROST
- Touch DEFROST.
1
- Choose food category.
1 2
- Enter the weight.
START ENTER
- Touch START/ENTER.
NOTE: After you touch START/ENTER, the display counts down the defrost time. The oven will beep once during the Defrost cycle. At this time, open the door and turn, separate, or rearrange the food as needed. Remove any portions that have thawed, then return frozen portions to the oven and touch START/ENTER to resume the defrost cycle. The oven will not stop during the BEEP unless the door is opened.
For best results:
- Remove fish, shellfish, meat, and poultry from its original closed paper or plastic package (wrapper). Otherwise, the wrap will hold steam and juice close to the foods, which can cause the outer surface of the foods to cook.
- Form the meat into the shape of a doughnut before freezing. When defrosting, scrape off thawed meat when the beep sounds and continue defrosting.
- Place foods in a shallow glass baking dish or on a microwave roasting rack to catch drippings.
- Foods should still be somewhat icy in the center when removed from the oven.
DEFROST TABLE
| Category Food | |
| MEAT0.1 to 6.0 lbs | BEEFGround beef, Round steak, Cubes for stew,Tenderloin steak, Pot roast, Rib roast,Rump roast, Chuck roast,Hamburger patty.LAMBChops (1-inch thick), Rolled roastPORKChops (1/2-inch thick), Hot dogs, Spareribs,Country-style ribs. Rolled roast, Sausage. |
| POULTRY0.1 to 6.0 lbs | POULTRYWhole (under 4 lbs), Cut up, Breasts(boneless)CORNISH HENSWholeTURKEYBreast (under 6 lbs) |
| FISH0.1 to 6.0 lbs | FISHFillets, Whole SteaksSHELLFISHCrab meat, Lobster tails, Shrimp, Scallops |
| BREAD0.1 to 1.0 lb | MUFFINSROLL CAKE |
QUICK DEFROST
The QUICK DEFROST feature provides a rapid defrost for 1.0 pound frozen food. The oven automatically sets the defrosting time for ground beef.
Example: To defrost 1lb. ground beef.
DEFROST
- Touch DEFROST 2 times.
START ENTER
- Touch START/ENTER.
TIME DEFROST
This feature allows you to choose the time you want to defrost.
Example: To defrost for 2 minutes.
DEFROST
- Touch DEFROST 3 times.
200
- Enter the defrosting time you want.
START ENTER
- Touch START/ENTER. (Defrost starts)
When the defrost time is over, four beeps will sound and COOK END will display.
- When using DEFROST, the weight to be entered is the net weight in pounds and tenths of pounds (the weight of the food minus the container).
- Use DEFROST only for raw food. DEFROST gives best results when food to be thawed is a minimum of 0°F (taken directly from a true freezer). If food has been stored in a refrigerator-freezer that does not maintain a temperature of 5°F or below, always program a lower food weight (for a shorter defrosting time) to prevent cooking the food.
- If the food is stored outside the freezer for up to 20 minutes, enter a lower food weight.
- The shape of the package alters the defrosting time. Shallow rectangular packets defrost more quickly than a deep block.
- Separate pieces as they begin to defrost. Separated pieces defrost more easily.
- You can use small pieces of aluminum foil to shield foods like chicken wings, leg tips, and fish tails, but the foil must not touch the side of the oven. Foil causes arcing, which can damage the oven lining.
- Shield areas of food with small pieces of foil if they start to become warm.
- For better results, a preset standing time is included in the defrosting time.
- For best results, elevate food to be defrosted on a microwave safe roasting rack. This prevents the possibility of warm meat juices cooking food during defrost.
METAL RACK
CAUTION
To avoid risk of property damage:
Do not use rack to pop popcorn.
Rack must be on the four plastic supports when used.
Use the rack only when cooking food on rack position.
Do not cook with rack on floor of the oven.
The metal rack gives you extra space when cooking in more than one container at the same time.
To use rack:
- Place rack securely in the four plastic supports.
- Rack MUST NOT touch metal walls or back of microwave oven.
- Place equal amounts of food both ABOVE AND BELOW rack.
- Amount of food must be approximately the same to balance out cooking energy.
SLIDE-OUT HOOD
CAUTION
- Do not place any objects on the slide-out hood as they could fall and be damaged.
- Do not pull on the slide-out hood or damage may occur.
- Do not spill food or liquid on the slide-out hood. Spillage of liquid or food may result in electric shock or oven malfunction.
- Make sure the slide-out hood has been moved back to the rear before your microwave oven or range cooking starts.
- Strictly install the microwave oven according to the Installation Manual. Install at least 12 inches (30.5 cm) above a cooktop.
- Don't leave the cooktop without cookware when cooking. The high temperature of the flame may cause the slide hood to melt.
- Close the slide hood after finishing cooking on the cooktop.
SLIDE-OUT HOOD PUSH
- Push the Slide-out hood PUSH to move the slide-out hood to the front or back.
- The slide-out hood system will allow you to capture vapor more effectively from range cooking.
COOKING
GETTING THE BEST COOKING RESULTS
To get the best results from your microwave oven, read and follow the guidelines below.
- Storage Temperature: Foods taken from the freezer or refrigerator take longer to cook than the same foods at room temperature. The time for recipes in this book is based on the normal storage temperature of the food.
- Size: Small pieces of food cook faster than large ones, and pieces similar in size and shape cook more evenly. For even cooking, reduce the power when cooking large pieces of food.
- Natural Moisture: Very moist foods cook more evenly because microwave energy is attracted to water molecules.
- Stir foods such as casseroles and vegetables from the outside to the center to distribute the heat evenly and speed cooking. Constant stirring is not necessary.
- Turn over foods like pork chops, baking potatoes, roasts, or whole cauliflower halfway through the cooking time to expose all sides equally to microwave energy.
- Place delicate areas of foods, such as asparagus tips, toward the center of the dish.
- Arrange unevenly shaped foods, such as chicken pieces or salmon steaks, with the thicker, meatier parts toward the outside of the dish.
- Shield, with small pieces of aluminum foil, parts of food that may cook quickly, such as wing tips and leg ends of poultry.
- Let It Stand: After you remove the food from the microwave, cover food with foil or casserole lid and let it stand to finish cooking in the center and avoid overcooking the outer edges. The length of standing time depends on the density and surface area of the food.
- Wrapping in waxed paper or paper towel: Sandwiches and many other foods containing prebaked bread should be wrapped prior to microwaving to prevent drying out.
FISH AND SHELLFISH
Cooking Fish and Shellfish:
General Directions
• Prepare the fish for cooking.
- Completely defrost the fish or shellfish.
- Arrange unevenly shaped pieces with thicker parts toward the outside of the dish. Arrange shellfish in a single layer for even cooking.
- The type of cover you use depends on how you cook. Poached fish needs a microwavable lid or vented plastic wrap.
- Baked fish, coated fish, or fish in sauce needs to be covered lightly with waxed paper to keep the coating crisp and sauce from getting watery.
- Always set the shortest cooking time. Fish is done when it turns opaque and the thickest part begins to flake. Shellfish is done when the shell turns from pink to red and the flesh is opaque and firm.
FISH AND SHELLFISH COOKING TABLE
| FISH POWER LEVEL COOKING TIME DIRECTIONS | |||
| Fish fillets HI 3 | 1/2-41/2 minutes | Arrange fish in a single layer with thickest portion toward outside edge of 11/2 quart microwavable baking dish. Brush with melted butter and season, if desired. Cook covered with vented plastic wrap. Let stand covered 2 minutes. If you are cooking more than 1 lb. of fish, turn the fish halfway through cooking. | |
| Fish steaks HI 4 | 1/2-51/2 minutes | ||
| Whole fish 7 4 | 1/2-6 minutes | ||
| Scallops HI 3 | 1/2-5 minutes | Arrange in a single layer. Prepare as directed above, except stir instead of turning the shellfish. | |
| Shrimp, shelled HI 3 | 1/2-5 minutes | ||
COOKING
APPETIZERS/SAUCES/SOUPS
Cooking Appetizers: Tips and Techniques
- Crisp crackers, such as melba toast, shredded wheat, and crisp rye crackers are best for microwave use. Wait until party time to add the spreads. Place a paper towel under the crackers while they cook in the microwave oven to absorb extra moisture.
- Arrange individual appetizers in a circle for even cooking.
- Stir dips to distribute heat and shorten cooking time.
Cooking Sauces: Tips and Techniques
- Use a microwavable casserole or glass measuring cup that is at least 2 or 3 times the volume of the sauce.
- Sauces made with cornstarch thicken more rapidly than those made with flour.
- Cook sauces made with cornstarch or flour uncovered so you may stir them 2 or 3 times during cooking for a smooth consistency.
- To adapt a conventional sauce or gravy recipe, reduce the amount of liquid slightly.
Cooking Soups: Tips and Techniques
- Cook soups in a microwavable dish which holds double the volume of the recipe ingredients to prevent boil-over, especially if you use cream or milk in the soup.
- Generally, cover microwaved soups with VENTED plastic wrap or a microwavable lid.
- Cover foods to retain moisture. Uncover foods to retain crispness.
- Avoid overcooking by using the minimum suggested time. Add more time, if necessary, only after checking the food.
- Stirring occasionally will help blend flavors, distribute heat evenly, and may even shorten the cooking time.
- When converting a conventional soup recipe to cook in the microwave, reduce the liquid, salt, and strong seasonings.
Not Recommended
- Appetizers with a crisp coating or puff pastry are best done in a conventional oven with dry heat.
- Breaded products can be warmed in the microwave oven but will not come out crisp.
MEAT
Cooking Meat: General Directions
• Prepare the meat for cooking. - Defrost completely. - Trim off excess fat to avoid spattering. - Place the meat, fat side down, on a microwavable rack in a microwavable dish. - Use oven cooking bag for less tender cuts of meat. - Arrange the meat so that thicker portions are toward the outside of the dish. - Cover the meat with waxed paper to prevent spattering.
• Tend the meat as it cooks.
- Drain juices as they accumulate to reduce spattering and keep from overcooking the bottom of the meat.
- Shield thin or bony portions with strips of foil to prevent overcooking.
NOTE: Keep the foil at least 1 inch from the oven walls, and do not cover more than one-third of the meat with foil at any one time.
- Let the meat stand covered with foil 10-15 minutes after you remove it from the oven. The internal temperature of the meat may rise from 5 to 10°F during standing time.
The Meat Cooking Table on the next page provides detailed directions, Power Level, and Cooking Time settings for most cuts of meat.
COOKING
MEAT COOKING TABLE
| MEAT | POWER LEVEL | COOKING TIME | DIRECTIONS |
| BEEFHamburgers, Fresh or defrosted (4 ozs. each)1 patty2 patties4 patties | HI | 1-1 1/2 minutes1 1/2 -2 minutes2 1/2 -3 1/2 minutes | Form patties with depression in center of each.Place on microwavable roasting rack. Brush with browning agent, if desired. Cover with waxed paper.Turn over halfway through cooking.Let stand covered 1 minute. |
| Sirloin tip roast (3-4 lbs.) | 5 | 8-10 minutes per poundRARE (135°F)11-13 minutes per poundMEDIUM (155°F) | Place roast fat side down on microwavable roasting rack.Add desired seasonings and cover with waxed paper.Turn meat over halfway through cooking and shield if necessary. Remove roast from microwave oven when desired temperature is reached. Let stand covered with foil 15 minutes. (Temperature may rise about 10°F). |
| LAMB Lamb roast, rolled boneless (3-4 lbs.) | 5 | 11-12 minutes per poundRARE (135°F)12-13 minutes per poundMEDIUM (145°F)13-14 minutes per poundWELL (155°F) | Place roast fat side down on microwavable roasting rack.Brush lamb with marinade or desired seasonings such as rosemary, thyme or marjoram. Cover with waxed paper.Turn roast over after 15 minutes, and again after 30 minutes.Shield if necessary.Remove roast from microwave when desired temperature is reached. Let stand covered with foil 15 minutes.(Temperature may rise about 10°F). |
| PORK Bacon slices2 slices4 slices6 slices10 slices | HI | 1 1/2 -2 minutes2-3 minutes4-5 minutes7-8 minutes | Place bacon slices on microwavable roasting rack.Cover with paper towels.After cooking, let stand 1 minute. |
| Chops (5-7 ozs. each)2 chops4 chops | 3 | 18-20 minutes per pound15-17 minutes per pound | Place chops in microwavable baking dish.Add desired seasonings and cover with vented plastic wrap.Cook until no longer pink or until internal temperature reaches 170°F. Turn chops over halfway through cooking.Let stand covered 5 minutes.(Temperature may rise about 10°F). |
| Loin Roast, rolled, boneless (3 1/2 -4 1/2 lbs.) | 3 | 25-27 minutes per pound(165°F) | Place roast in cooking bag in microwavable dish.Add seasonings and browning agent if desired. Close bag loosely with microwavable closure or string. After cooking, let stand in bag 15 minutes. (Temperature may rise about 10°F.) Internal temperature of pork should reach 170°F before serving. |
| Sausage links, Fresh or Frozen, defrosted (1-2 ozs. each)2 links4 links6 links10 links | HI | 45-60 seconds1-1 1/2 minutes1 1/2 -2 minutes1 3/4 -2 minutes | Pierce links and place on microwavable roasting rack.Cover with waxed paper or paper towel.Turn over halfway through cooking.After cooking, let stand covered 1 minute. |
COOKING
CHICKEN
Cooking Poultry: General Directions
• Prepare the poultry for cooking. - Defrost completely. - Arrange poultry pieces with thicker pieces at the outside edge of the baking dish. When cooking legs, arrange them like the spokes of a wheel. - Cover the baking dish with waxed paper to reduce spattering. - Use a browning agent or cook with a sauce to give a browned appearance.
- Watch the poultry as it cooks.
- Drain and discard juices as they accumulate.
- Shield thin or bony pieces with small strips of aluminum foil to prevent overcooking. Keep foil at least 1 inch from the oven walls and other pieces of foil.
- Poultry is done when it is no longer pink and the juices run clear. When done, the temperature in the thigh meat should be 180-185°F.
- Let the poultry stand after cooking covered with foil for 10 minutes.
The Poultry Cooking Table below provides detailed directions, Power Level, and Cooking Time settings for most cuts and types of poultry.
CHICKEN COOKING TABLE
| CHICKEN | POWER LEVEL | COOKING TIME | DIRECTIONS |
| Chicken pieces (21/2-3 lbs.) | HI | 41/2-51/2 minutes per pound | Before cooking, wash pieces and shake the water off. Place pieces in a single layer in a microwavable baking dish with thicker pieces to the outside. Brush with butter or browning agent and seasonings if desired. Cover with waxed paper. Cook until no longer pink and juices run clear. Let stand covered 5 minutes. |
| Chicken whole (3-31/2 lbs.) | HI | 12-13 minutes per pound | Before cooking, wash and shake off water. Place breast side down on a microwavable roasting rack. Brush with butter, or browning agent and seasoning if desired. Cover with waxed paper. Cook 1/3 of estimated time. Turn breast side up, brush with butter, or browning agent. Replace waxed paper. Cook 1/3 of estimated time again. Shield if necessary. Cook remaining 1/3 of estimated time or until no longer pink and juices run clear. Let stand covered with foil 10 minutes. (The temperature may rise about 10°F.) The temperature in the thigh should be 180°F-185°F when the poultry is done. |
| Cornish Hens whole (1-11/2 lbs. each) | HI | 6-7 minutes per pound | Before cooking, wash and shake the water off. Tie wings to body of hen and the legs to tail. Place hens breast side down on microwavable rack. Cover with waxed paper. Turn breast side up halfway through cooking. Shield bone ends of drumsticks with foil.Remove and discard drippings. Brush with butter or browning agent and seasonings if desired. Cook until no longer pink and juices run clear. Remove hens from microwave when they reach desired temperature. Let stand covered with foil 5 minutes. (Temperature may rise about 10°F). Temperature in breast should be 170°F before serving. |
COOKING
PASTA AND RICE
Microwave cooking and conventional cooking of pasta, rice, and cereal require about the same amount of time, but the microwave is a more convenient method because you can cook and serve in the same dish. There is no stirring needed and leftover pasta tastes just like fresh cooked when reheated in the microwave oven.
Cooking Pasta and Rice: Tips and Techniques
- If you are planning to use rice or pasta in a casserole, undercook it so it is still firm.
- Allow for standing time with rice, but not for pasta.
- The Pasta and Rice Cooking Tables below provide specific directions, with Power Level and cooking time settings for most common types of pasta and rice.
PASTA COOKING TABLE
| PASTA | POWER LEVEL | COOKING TIME | DIRECTIONS |
| Spaghetti4 cups waterAdd 8 ozs. spaghetti | HI5 | 9-10 minutes 71/2 - 81/2 minutes | Combine hot tap water and salt, if desired.Use a 2-quart microwavable baking dish and cover with vented plastic wrap for spaghetti and lasagna noodles.Use microwavable lid or vented plastic wrap for macaroni and egg noodles.Cook as directed in chart or until water boils.Stir in pasta; cook covered as directed in chart or until tender.Drain in a colander. |
| Macaroni3 cups waterAdd 2 cups macaroni | HI5 | 6-7 minutes 51/2 - 61/2 minutes | |
| Lasagna noodles4 cups waterAdd 8 ozs. lasagna noodles | HI5 | 7-8 minutes 11-121/2 minutes | |
| Egg noodles6 cups waterAdd 4 cups noodles | HI5 | 8-10 minutes 51/2 - 61/2 minutes |
RICE COOKING TABLE
| RICE | POWER LEVEL | COOKING TIME | DIRECTIONS |
| Long grain21⁄4 cups waterAdd 1 cup rice | HI5 | 41⁄2-51⁄2 minutes14 minutes | Combine hot tap water and salt, if desired, in 2 quart microwavable casserole.Cover with microwavable lid or vented plastic wrap.Cook as directed in chart or until water boils.Stir in rice and any seasonings.Cook covered as directed in chart or until water is absorbed and rice is tender.Let stand covered 5 to 10 minutes.Fluff with fork. |
| Brown21⁄2 cups waterAdd 1 cup rice | HI5 | 41⁄2-51⁄2 minutes28 minutes | |
| Long grain and wild rice mix21⁄3 cups waterAdd 6 ozs. package | HI5 | 4-5 minutes24 minutes | |
| Quick cooking1 cup waterAdd 1 cup rice | HI | 2-3 minutes | Cook water until it boils.Stir rice into boiling water and let stand, covered 5 to 10 minutes or until water is absorbed and rice is tender.Fluff with fork. |
MAINTENANCE
CARE AND CLEANING
For best performance and safety, keep the oven clean inside and outside. Take special care to keep the inner door panel and the oven front frame free of food or grease build-up. Never use rough powder or pads. Wipe the microwave oven inside and out, including the hood bottom cover, with a soft cloth and a warm (not hot) mild detergent solution. Then rinse and wipe dry. Use a chrome cleaner and polish on chrome, metal and aluminum surfaces. Wipe spatters immediately with a wet paper towel, especially after cooking chicken or bacon. Clean your oven weekly or more often, if needed.
METAL RACK
Wash the metal rack with a mild soap and a soft or nylon scrub brush. Dry completely. Do not use abrasive scrubbers or cleaners to clean rack.
CLEANING THE GREASE FILTERS
The grease filter should be removed and cleaned often, at least once a month.
- Disconnect power or unplug microwave oven.
- To remove the grease filter, open the Slide-out hood. Remove the screws holding the filter bracket in place. The filter can be removed/replaced by sliding front.
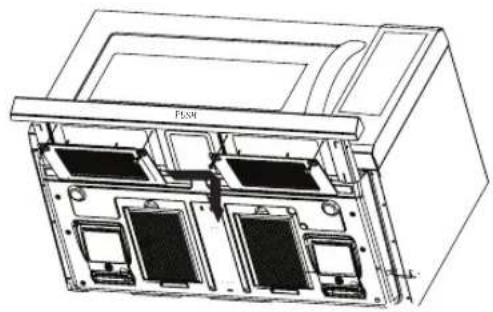
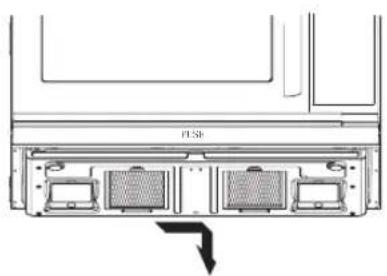
The rear grease filters can be removed by sliding the filter back and pulling downward.
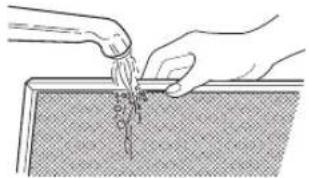
- Soak grease filter or bracket with filter in hot water and a mild detergent. Scrub and swish to remove embedded dirt and grease. Rinse well and shake to dry. Do not clean filter or bracket with filter with ammonia, corrosive cleaning agents such as lye-based oven cleaners, or place them in a dishwasher. The filter will turn black or could be damaged.
- To reinstall the filter, insert the filter to bracket and reinstall the bracket using the two screws. Push the Slide-out hood back to original position.
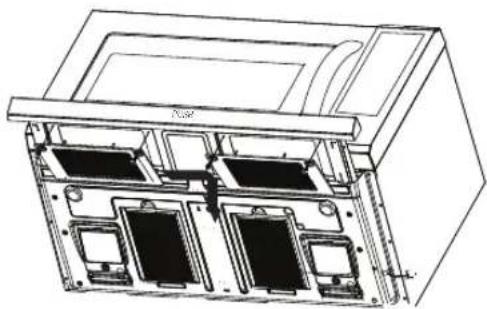
To reinstall the rear grease filter, slide the filter into the slot and push up and pull forward to lock in place.
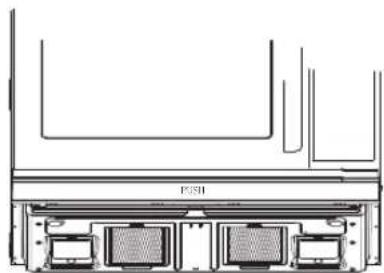
- Reconnect power or plug in microwave oven. NOTE: Do not operate the hood without the filter in place.
MAINTENANCE
CHARCOAL FILTER REPLACEMENT
CAUTION
To avoid risk of personal injury or property damage, do not operate oven hood without filters in place.
If your microwave hood combination is installed to recirculate air, the charcoal filter (5230W1A003C) is available by calling the Parts department at your nearest Authorized Service Center. The charcoal filter cannot be cleaned and should be replaced every 6-12 months.
- Unplug microwave oven or disconnect power.
- Open the door and remove the one vent grille mounting screw. (1 middle screw)
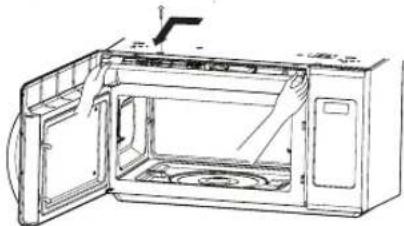
- Slide the grille left and tip forward, then lift out to remove.
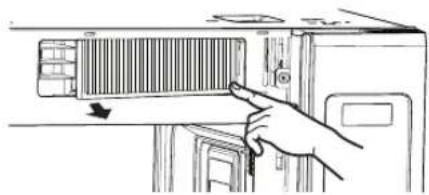
- Remove old filter.
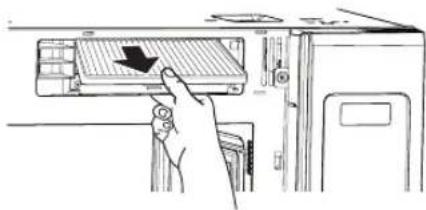
- Slide a new charcoal filter into place. The filter should rest at the angle shown.
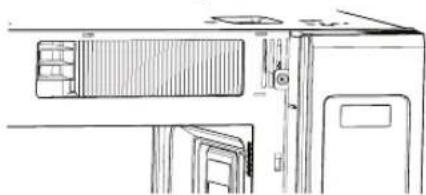
- Slide the bottom of the grille into place. Push the top and slide right until it snaps into place. Replace the mounting screws. Turn the power back on at the main power supply and set the clock.
COOKTOP/NIGHT LIGHT REPLACEMENT
CAUTION
To avoid personal injury or property damage, wear gloves when replacing light bulb.
- Unplug microwave oven or disconnect power.
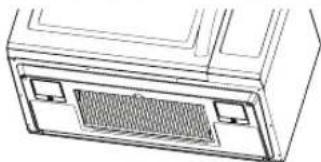
- Remove the lamp cover mounting screws.
- Replace bulb(s) with 20~40 watt appliance bulb(s).
- Replace lamp cover, and mounting screws.
- Plug in microwave oven or reconnect power.
OVEN LAMP LIGHT REPLACEMENT
- Unplug microwave oven or disconnect power.
- Open the door and remove the vent grille mounting screw.
- Slide the grille left and tip the cover forward, then lift out to remove.
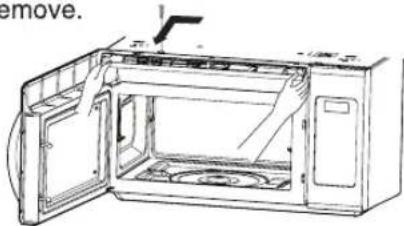
- Remove the bulb holder mounting screw, and lift up the bulb holder which you want to replace.
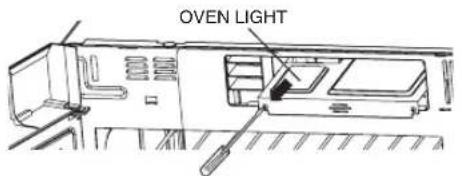
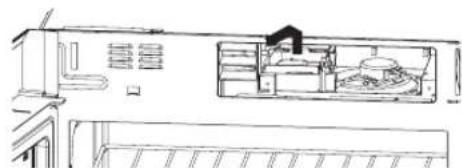
- Replace bulb with a 30 watt appliance bulb.
- Replace the bulb holder, if damaged.
- Slide the bottom of the vent cover into place. Push the top and slide right until it snaps into place. Replace the mounting screws. Plug in microwave oven or reconnect power.
COOKING UTENSILS
MICROWAVE UTENSIL GUIDE
| USE | DO NOT USE |
| OVENPROOF GLASS(treated for high intensity heat):Utility dishes, loaf dishes, pie plates, cake plates, liquid measuring cups, casseroles, and bowls without metallic trim.CHINA:Bowls, cups, serving plates, and platters without metallic trim.PLASTIC:Plastic wrap (as a cover)-- lay the plastic wrap loosely over the dish and press it to the sides.Vent plastic wrap by turning back one edge slightly to allow excess steam to escape. The dish should be deep enough so that the plastic wrap will not touch the food. As the food heats it may melt the plastic wrap wherever the wrap touches the food.Use plastic dishes, cups, semirigid freezer containers, and plastic bags only for short cooking times. Use these with care because the plastic may soften from the heat of the food.PAPER:Paper towels, waxed paper, paper napkins, and paper plates with no metallic trim or design.Look for the manufacturer's label for use in the microwave oven. | METAL UTENSILS:Metal shields the food from microwave energy and produces uneven cooking. Also avoid metal skewers, thermometers, or foil trays. Metal utensils can cause arcing, which can damage your microwave oven.METAL DECORATION:Metal-trimmed or metal-banded dinnerware, casserole dishes, etc.The metal trim interferes with normal cooking and may damage the oven.ALUMINUM FOIL:Avoid large sheets of aluminum foil because they hinder cooking and may cause harmful arcing. Use small pieces of foil to shield poultry legs and wings. Keep ALL aluminum foil at least 1 inch from the side walls and door of the oven.WOOD:Wooden bowls and boards will dry out and may split or crack when you use them in the microwave oven. Baskets react in the same way.TIGHTLY COVERED UTENSILS:Be sure to leave openings for steam to escape from covered utensils.Pierce plastic pouches of vegetables or other food items before cooking.Tightly closed pouches could explode.BROWN PAPER:Avoid using brown paper bags.They absorb too much heat and could burn.FLAWED OR CHIPPED UTENSILS:Any utensil that is cracked, flawed, or chipped may break in the oven.METAL TWIST TIES:Remove metal twist ties from plastic or paper bags.They become hot and could cause a fire. |
Do not use recycled paper products in the microwave oven. They sometimes contain impurities that cause sparks to occur.
TROUBLESHOOTING
BEFORE CALLING FOR SERVICE
Check the following list to be sure a service call is necessary. Reviewing additional information on items to check may prevent an unneeded service call.
| PROBLEM | POSSIBLE CAUSES |
| If nothing on the oven operates | · check for a blown circuit fuse or a tripped main circuit breaker. · check if oven is properly connected to the electric circuit in house. · check that controls are set properly. |
| If the oven interior light does not work | · the light bulb is loose or defective. |
| If oven will not cook | · check that control panel was programmed correctly. · check that door is firmly closed. · check that Start/Enter Pad was touched. · check that timer wasn't started instead of a cook function. |
| If oven takes longer than normal to cook or cooks too rapidly | · be sure the Power Level is programmed properly. |
| If the time of day clock does not always keep correct time | · check that the power cord is fully inserted into the outlet receptacle. · be sure the oven is the only appliance on the electrical circuit. |
| If food cooks unevenly | · be sure food is evenly shaped. · be sure food is completely defrosted before cooking. · check placement of aluminum foil strips used to prevent overcooking. |
| If food is undercooked | · check recipe to be sure all directions (amount, time, and power levels) were correctly followed. · be sure microwave oven is on a separate circuit. · be sure food is completely defrosted before cooking. |
| If food is overcooked | · check recipe to be sure all directions (amount, power level, time, size of dish) were followed. |
| If arcing (sparks) occur | · be sure microwavable dishes were used. · be sure wire twist ties were not used. · be sure oven was not operated when empty. · make sure metal rack (if used) is properly installed on 4 supports. |
| If the display shows a time counting down but the oven is not cooking | · check that door is firmly closed. · check that timer was not started instead of a cooking function. |
| Vent fan starts automatically | · If the temperature gets too hot around the microwave oven, the fan in the vent hood will automatically turn on at the LEVEL 4 setting to cool the oven. It may stay on up to an hour to cool the oven. |
TROUBLESHOOTING
WARNING
To avoid electrical shock which can cause severe personal injury or death, do not remove the outer case at any time. Only an authorized service technician should remove the outer case.
QUESTIONS AND ANSWERS
| QUESTION | ANSWER |
| Can I use a rack in my microwave oven so that I may reheat or cook in two rack positions at a time? | Only use the rack that is supplied with your microwave oven. Use of any other rack can result in poor cooking performance and/or arcing and may damage your oven. |
| Can I use either metal or aluminum pans in my microwave oven? | Usable metal includes aluminum foil for shielding (use small, flat pieces). Never allow metal to touch walls or door. |
| Sometimes the door of my microwave oven appears wavy. Is this normal? | This appearance is normal and does not affect the operation of your oven. |
| What are the humming noises I hear when my microwave oven is operating? | This is the sound of the transformer when the magnetron tube cycles on and off. |
| Why does the dish become hot when I microwave food in it? | As the food becomes hot it will conduct the heat to the dish. Use hot pads to remove food after cooking. Dish may not be microwave safe. |
| What does standing time mean? | Standing time means that food should be taken out of the oven and covered for additional time after cooking. This process allows the cooking to finish, saves energy, and frees the oven for other purposes. |
| Can I pop popcorn in my microwave oven? How do I get the best results? | Yes. Pop packaged microwave popcorn following manufacturer's guidelines or use the preprogrammed Popcorn pad. Do not use regular paper bags. Use the listening test by stopping the oven as soon as the popping slows to a pop every one or two seconds. Do not try to repop unpopped kernels. You can also use special microwave poppers. When using a popper, be sure to follow manufacturer's directions. Do not pop popcorn in glass utensils. |
| Why does steam come out of the air exhaust vent? | Steam is normally produced during cooking. The microwave oven has been designed to vent this steam out the top vent. |
LG MICROWAVE OVEN LIMITED WARRANTY — USA Model: LMH2016SB/LMH2016SW/LMH2016ST
LG Electronics Inc. will repair or replace your product, at LG's option, if it proves to be defective in material or workmanship under normal use, during the warranty period set forth below, effective from the date of original consumer purchase of the product. This warranty is good only to the original purchaser of the product and effective only when used in the United States, including U.S. Territories.
WARRANTY PERIOD:
LABOR: One Year from the Date of Purchase*.
PARTS (except as listed below): One Year from the Date of Purchase*.
MAGNETRON: Ten Years from the Date of Purchase*.
Replacement Units and Repair Parts are warranted for the remaining portion of the original unit's warranty period.
* Retain your Sales Receipt to prove the date of purchase. A copy of your Sales Receipt must be submitted at the time warranty service is provided.
HOW SERVICE IS HANDLED:
Please call 1-800-243-0000 and choose the appropriate option. (Phones are answered 24 hours a day, 365 days per year.) Please have the product type (Microwave) and your ZIP code ready.
Or visit our website at: http://us.lgservice.com
THIS WARRANTY IS IN LIEU OF ANY OTHER WARRANTY, EXPRESS OR IMPLIED, INCLUDING WITHOUT LIMITATION, ANY WARRANTY OF MERCHANTABILITY OR FITNESS FOR A PARTICULAR PURPOSE. TO THE EXTENT ANY IMPLIED WARRANTY IS REQUIRED BY LAW, IT IS LIMITED IN DURATION TO THE EXPRESS WARRANTY PERIOD ABOVE. LG WILL NOT BE LIABLE FOR ANY INCIDENTAL, CONSEQUENTIAL, INDIRECT, SPECIAL, OR PUNITIVE DAMAGES OF ANY NATURE, INCLUDING WITHOUT LIMITATION, LOST REVENUES OR PROFITS, OR ANY OTHER DAMAGE WHETHER BASED IN CONTRACT, TORT, OR OTHERWISE.
Some states do not allow the exclusion or limitation of incidental or consequential damages or limitations on how long an implied warranty lasts, so the above exclusion or limitation may not apply to you.
This warranty gives you specific legal rights and you may also have other rights that vary from state to state.
THIS LIMITED WARRANTY DOES NOT APPLY TO:
- Service trips to your home to deliver, pick up, and/or install the product, instruct, or replace house fuses or correct wiring, or correction of unauthorized repairs.
- Damages or operating problems that result from misuse, abuse, operation outside environmental specifications or contrary to the requirements of precautions in the Operating Guide, accident, vermin, fire, flood, improper installation, acts of God, unauthorized modification or alteration, incorrect electrical current or voltage, or commercial use, or use for other than intended purpose.
The cost of repair or replacement under these excluded circumstances shall be borne by the consumer.
CUSTOMER INTERACTIVE CENTER NUMBERS
| To obtain Customer Assistance, Product Information, or Dealer or Authorized Service Center location: | Call 1-800-243-0000 (24 hours a day, 365 days per year) and select the appropriate option from the menu. Or visit our website at: http://us.lgservice.com |
TO CONTACT LG ELECTRONICS BY MAIL:
LG Customer Interactive Center
P. O. Box 240007
201 James Record Road
Huntsville, Alabama 35824
ATTN: CIC

LG
Life's Good


- THANK YOU FOR PURCHASING A LG MICROWAVE OVEN
- PRECAUTIONS TO AVOID POSSIBLE EXPOSURE TO EXCESSIVE MICROWAVE ENERGY
- TABLE OF CONTENTS
- PRECAUTIONS TO AVOID POSSIBLE EXPOSURE TO EXCESSIVE MICROWAVE
- SAFETY
- IMPORTANT SAFETY INSTRUCTIONS
- WARNING
- SAVE THESE INSTRUCTIONS
- FEDERAL COMMUNICATIONS COMMISSION RADIO FREQUENCY INTERFERENCE STATEMENT (U.S.A. ONLY)
- LOCATION OF MODEL NUMBER
- OVEN SPECIFICATIONS
- ELECTRICAL REQUIREMENTS
- GROUNDING INSTRUCTIONS
- ⚠ WARNING - IF YOU USE THE GROUNDING PLUG IMPROPERLY, YOU RISK ELECTRIC SHOCK
- CAUTION
- CLOCK
- VENT AUTO TIME SET
- VENT FAN
- LIGHT HI/LOW/OFF
- CHILD LOCK
- EZ-ON
- HOLD WARM
- NOTES
- MORE/LESS
- COOKING AT HIGH POWER LEVELS
- MULTI STAGE COOKING
- SENSOR OPERATING INSTRUCTIONS
- SENSOR COOKING GUIDE
- SENSOR POPCORN
- SENSOR REHEAT
- CUSTOM COOK
- SOFTEN
- MELT
- FOR BEST RESULTS
- QUICK DEFROST
- TIME DEFROST
- METAL RACK
- TO USE RACK
- SLIDE-OUT HOOD
- SLIDE-OUT HOOD PUSH
- COOKING
- GETTING THE BEST COOKING RESULTS
- FISH AND SHELLFISH
- COOKING FISH AND SHELLFISH
- GENERAL DIRECTIONS
- APPETIZERS/SAUCES/SOUPS
- COOKING APPETIZERS: TIPS AND TECHNIQUES
- COOKING SAUCES: TIPS AND TECHNIQUES
- COOKING SOUPS: TIPS AND TECHNIQUES
- NOT RECOMMENDED
- MEAT
- COOKING MEAT: GENERAL DIRECTIONS
- CHICKEN
- COOKING POULTRY: GENERAL DIRECTIONS
- PASTA AND RICE
- COOKING PASTA AND RICE: TIPS AND TECHNIQUES
- MAINTENANCE
- CARE AND CLEANING
- CLEANING THE GREASE FILTERS
- CHARCOAL FILTER REPLACEMENT
- COOKTOP/NIGHT LIGHT REPLACEMENT
- OVEN LAMP LIGHT REPLACEMENT
- COOKING UTENSILS
- TROUBLESHOOTING
- BEFORE CALLING FOR SERVICE
- LG MICROWAVE OVEN LIMITED WARRANTY — USA MODEL: LMH2016SB/LMH2016SW/LMH2016ST
- WARRANTY PERIOD
- HOW SERVICE IS HANDLED
- THIS LIMITED WARRANTY DOES NOT APPLY TO
- CUSTOMER INTERACTIVE CENTER NUMBERS
- TO CONTACT LG ELECTRONICS BY MAIL
Brand : LG
Model : LMH2016SW
Category : Kitchen Appliances