
Versarray PRO 215 - Loudspeaker CREST AUDIO - Free user manual and instructions
Find the device manual for free Versarray PRO 215 CREST AUDIO in PDF.


| Product Type | Powered subwoofer speaker system |
| Woofer Complement | Dual 15" Peavey Low Rider, 4 ohm, 4" voice coil |
| Total Peak Power (Amp) | 3000 watts |
| Continuous Sine Wave Power | 1500 watts |
| Frequency Response (-6 dB) | 35 Hz - 125 Hz |
| Maximum SPL (Peak, half space) | 139 dB SPL |
| Transducer Impedance (each woofer) | 4 ohms |
| Enclosure Material | 18 mm 13-ply Baltic Birch plywood |
| Finish | Hammerhead polyurea black finish, black powder-coated steel grille with cloth liner |
| Rigging System | Crest Audio FlyQWIK, compatible with Versarray Mk III Halo and Sub Support Frame |
| Dimensions (H x W x D) | 32.75 in x 25.13 in x 21.25 in (832 mm x 638 mm x 540 mm) |
| Weight (with rigging hardware) | 161 lbs (73.2 kg) |
| AC Power Supply | Universal 100-240 VAC, 50/60 Hz, PowerCON TRUE1 TOP connectors |
| Analog Audio Input | Balanced female XLR, +6 dBu or +12 dBu sensitivity |
| Digital Audio Input | Dante Ethernet (RJ45), 48 kHz or 96 kHz sample rate |
| DSP Section | 48 kHz sampling, 24-bit ADC/DAC, 3.5 ms latency, parametric EQ, compression, limiting, crossover |
| Fan Cooling | Yes, power amp fan cooled for reliability |
| UniVent Air Pumping Technology | Yes, helps cool the woofers and reduce power compression |
| Woofer Protection | Full DSP-based limiting, compression, and peak limiting |
| Cabinet Feet | Rubber feet for floor placement |
| Included Accessories | PowerCON AC cords, jumper cable, quick-release locking pins |
| Cleaning Instructions | Wipe with a dry cloth; do not use solvents or water |
| Safety Warnings | Must be suspended by qualified rigging professional; always use safety chains |
| Repair Service | Contact Crest Audio or authorized service center for repairs |
| Warranty | Register online at www.peaveycommercialaudio.com/warranty |
Frequently Asked Questions - Versarray PRO 215 CREST AUDIO
User questions about Versarray PRO 215 CREST AUDIO
0 question about this device. Answer the ones you know or ask your own.
Ask a new question about this device
Download the instructions for your Loudspeaker in PDF format for free! Find your manual Versarray PRO 215 - CREST AUDIO and take your electronic device back in hand. On this page are published all the documents necessary for the use of your device. Versarray PRO 215 by CREST AUDIO.
USER MANUAL Versarray PRO 215 CREST AUDIO
Versarray™ Pro 215 Powered Enclosure Product Specifications
CREST AUDIO
The Crest Audio* Versarray™ Pro 215 Sub Powered Subwoofer speaker system consists of a pair of Peavey* 15" Low Rider* woofers combined with a super-solid cabinet with a simple, quick, yet flexible rigging system. Designed to provide modular coverage of small to medium venues, and intended for use with the companion Crest Audio* Versarray™ Pro 112 models, the Versarray™ Pro 215 Sub offers excellent versatility with a very high performance capability. The subwoofer system consists of the following woofer components: a pair of Peavey* 15" Low Rider* series woofers with a very long throw 4" voice coil structure. Capable of over 800W of continuous power handling (AES Std 2-1984) each, these woofers can project a lot of low frequency energy.
The Versarray™ Pro 215 Sub incorporates Peavey's UniVent™ air pumping venting technology. The UniVent™ venting system literally pumps air through the enclosure, exchanging the stale hot air inside the cabinet for the cooler outside air. This helps keep the woofer operating temperatures from getting so high, and increases reliability and reduces power compression under heavy continuous drive conditions. The air pumping action is achieved without excessive turbulence or any significant net asymmetry of total vent air flow.
Power for both woofers is supplied by some very efficient power amplifier systems, controlled by a sophisticated and refined DSP operations system with Dante connection capability. Total system power is 3000W total peak power, with 1500W total sine wave power for the woofers. This sheer power is controlled precisely and processed by a high performance DSP system, which provides all the crossover and EQ functions, as well as providing all limiting, compression and driver protection duties with unfailing attention to every detail of the music.
The adjustable rigging system provides for hanging multiple Crest Audio® Versarray™ Pro 112 cabinets below a single Sub, or multiple Subs. Quick-lock pins are supplied with the rigging hardware to couple the Versarray™ Pro 215 Subs together, and to the rigging Halo and Frames. The flexibility of the Versarray™ FlyQWIK™ system allows the use of anywhere from 1 to 7 Versarray™ Pro 215 Subs in conjunction with an appropriate number of Versarray™ Pro 112 cabinets. An optional special Sub Support Frame rigging adaptor mounts to the Versarray™ Pro 215 Sub, and allows Versarray™ Pro 112's to be flown below the Sub, with the Sub being flown from a Crest Audio® Versarray™ Halo. See Crest Audio® Model Versarray™ Mk3 Halo Spec Sheet for details of the allowable mix of Versarray™ Subs to 2-ways.
Features
•Dual Woofer Subwoofer SR System
• 3000 Total Peak watts of system power
- 15" Low Rider® 4" VC Peavey® Woofer
- Peavey's UniVent™ air pumping venting technology
• Power amp is fan cooled for maximum reliability
- Easy FlyQWIK™ hardware rigging system
• Full complement of DSP based limiting and compression to protect the drivers from overdrive conditions
- Inputs are analog XLR in and/or Dante Ethernet audio network in.
- Analog Output Thru connector is a male XLR
- 18 mm 13 ply Baltic Birch enclosure
- Hammerhead™ polyurea black finish and black powder-coated cloth lined grilles
- PowerCON ° TRUE1 TOP Input and Thru AC power connections
- Comes with PowerCON* AC cords, one AC outlet to Sub, and one jumper cord.
- Has rubber feet for floor use when not flown
SPECIFICATIONS
Frequency Response, 1 meter on-axis, swept-sine in anechoic Environment (-6 dB): 35 Hz - 125 Hz
Useable Low Frequency Limit (-10 dB anechoic): 33 Hz
Power Amp Rating, Total Power Output: 3,000 watts* total peak available power Sine wave Power: 1,500 watts* total *Output duration is limiter controlled
Sound Pressure Level, 1 Watt, 1 meter in anechoic environment: 101 dB SPL (Both speakers driven with 1 watt)
Maximum Sound Pressure Level (1 meter): Anechoic environment: 130 dB SPL continuous (flown) 133 dB SPL peak One half space: 136 dB SPL continuous (on floor) 139 dB SPL peak
Transducer Complement: Dual 15" Peavey a Low Rider b 4 ohm woofers, 4" voice coil
Box Tuning Frequency: 36 Hz
Electronic Crossover: DSP based, Crossover Frequency: 125 Hz Low Pass slope: 24 dB/octave Infrasonic Filter Slope: 36 dB/octave, staggered poles
Transducer Impedance (Z): Low Frequency Nominal (X2): 4 ohms each woofer
Signal Input Connections: Analog XLR in and/or Dante Ethernet audio network in.
Enclosure Materials & Finish: 18 mm 13 ply Baltic Birch plywood finished in a tough
Versarray PRO 215
Hammerhead™ polyurea black finish, with a perforated steel grille finished in black powder coat paint and a cloth liner inside. Inner steel frame and backing plates for rigging hardware.
Mounting provisions: Custom array brackets and hardware, and a custom array rigging system are included with each cabinet. 10mm quick release pins are included with each cabinet, conveniently affixed using wire rope lanyards.
Dimensions (H x W x D): 32.75 in. x 25.13 in. x 21.25 in. 832 mm x 638 mm x 540 mm With Rigging hardware and Pins: 32.75 in. x 27.23 in. x 21.25 in. 832 mm x 692 mm x 540 mm
Net Weight: 161 Lbs. (73.2 kg) {includes all cabinet associated rigging hardware for each cabinet, including quick-loc pins, etc}
Companion Speaker Models (sold separately): Crest Audio® Versarray™ 112 Pro Powered Line Array SR System with dual ribbon tweeters, 2-way Crest Audio® Versarray™ 218 Pro Powered Sub with double 18" LowRider® woofers subwoofer.
Additional Power Amp Specifications THD: Typically less than 0.1% AC Power Input: Universal power supply 120–240 VAC, 50 to 60 Hz
DSP Section Specifications: Sampling frequency: 48 kHz Bit Depth: 24 bits for ADC/DAC Latency: 3.5 ms typical
Architectural and Engineering Specifications The loudspeaker system shall have an operating bandwidth of 35 Hz to 125 Hz, measured on axis at 1 meter in a half-space environment, with +3/- 6 dB tolerance. The maximum peak
output level shall be 139 dB when measured at a distance of one meter with full system output. The woofers loaded into the cabinet shall be two Peavey ® Low Rider ® 18" 4 ohm woofers, rated at 800W continuous power per AES Std. 1984-2. The enclosure vents shall incorporate the Univent ™ air pumping system to aid cool air circulation through the cabinet.
The powered speaker amplifiers shall have a total power output of 1500 watts sine wave, and the power amp shall be fan cooled. Signal input shall be provided via XLR analog and Dante Ethernet connections. DSP signal processing shall be incorporated to provide the crossover, protective filtering and EQ for the system, as well as limiting and compression to minimize overdrive distortion. The cabinet shall incorporate rigging hardware to interface with the Crest Audio® Versarray™ FlyQWIK™ rigging system, and the 10 mm locking quick release pins required to interface to the FlyQWIK™ hardware shall be included with the cabinet. The outside dimensions shall be 32.75 inches high by 25.13 inches wide by 21.25 inches deep. The weight shall be 161 pounds. The loudspeaker system shall be a Crest Audio® model Versarray™ Pro 215 Sub.
Frequency Response


Versarray™ Pro 215 Subs Dimensions
Rear Panel Controls and Connections
System Settings Group
Volume Buttons
0 dB to -6 dB in 2 dB increments, controlled by Up and Down buttons.
Status LED's indicate which gain level is currently in effect.
Sensitivity Buttons
Select either +12 dBu or +6 dBu input sensitivity
Status LED's indicate which sensitivity level is currently in effect.
Polarity Button
One button cycles through Normal or Reversed Polarity.
Status LED indicates which polarity is currently in effect.
Analog Audio Group
Female XLR input jack, Male XLR Output/Thru jack
Network Group
Primary Ethernet in
Secondary Ethernet in/out
Both have LED indication of network activity.
Separate SYNC LED's indicate if the unit is syncd with the control interface.
Assign Network I.D. Buttons
Two push buttons to change the network ID of the unit.
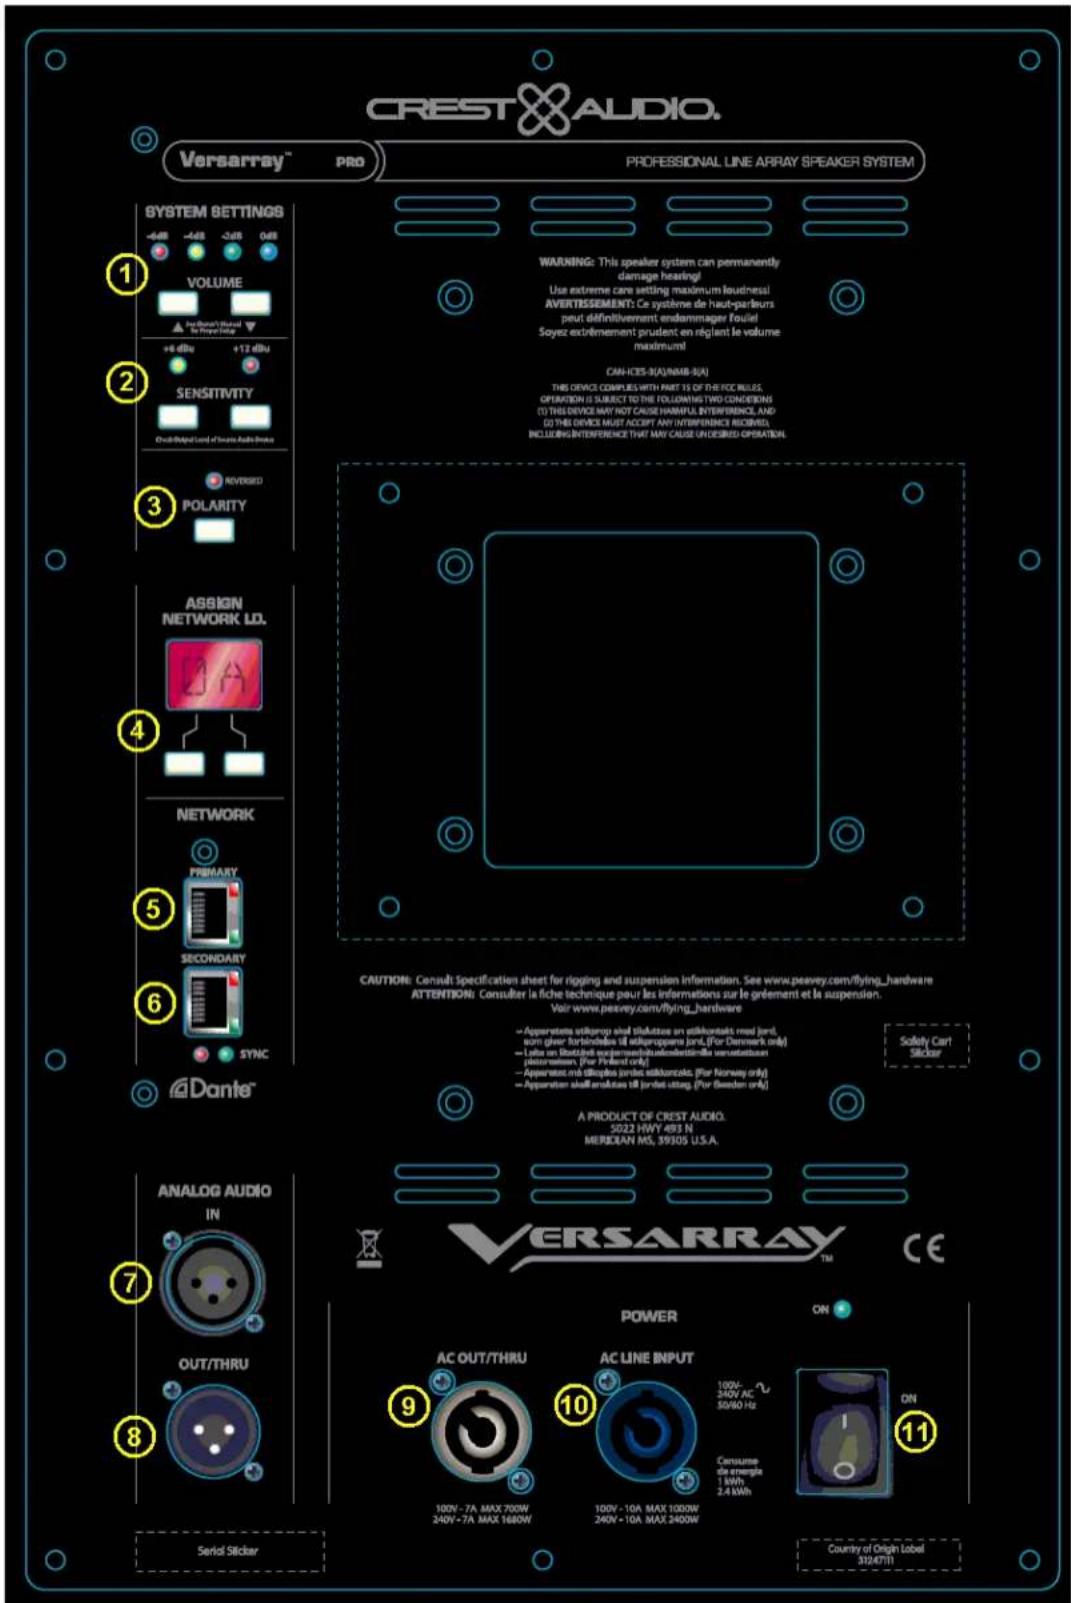
System Settings Group
(1) Volume Buttons
These two buttons are used to change the input signal gain from -6 dB to 0 dB in 2 dB increments, controlled by Up and Down buttons. The status LED's will indicate which gain level is selected.
(2) Sensitivity Buttons
The module input sensitivity can be changed using these two buttons. Either +12 dBu or +6 dBu input sensitivity can be selected, the status LED's will indicate which gain level is currently in effect.
(3) Polarity Switch
Normal Sub Polarity is in the OUT position, with the Red LED unlit.
Reversed Sub Polarity is with the switch in the IN position, and the Red LED is lit. Normal usage of the VRPro215 Sub positioned within the same plane of the VR112 Pro's has this switch in the OUT position, or Normal Polarity. Other locations of the Sub relative to the VR112 Pro line-array may require a Polarity reversal.
(4) Assign Network I.D. Buttons
The module's network ID is displayed on the two digit, 7-segment display. The two push buttons below the display are used to change the network assignment of the module. Pushing the left button increments the left digit 0 - F, while pushing the right button increments the right digit 0 - F. Push the buttons until the desired assignment is displayed. There are up to 255 different ID's (two digit hex number ID) available.
(5) Primary Ethernet IN, RJ45 jack
(6) Secondary Ethernet in/out, RJ45 jack
(7) IN
The audio input consists of a balanced female XLR input jack. The input signal should be a line level signal of sufficient level to drive the speaker system to its maximum levels. The connector is wired as follows; Pin 1 = Ground, Pin 2 = + signal, Pin 3 = - signal
(8) OUT/THRU
The output/thru jack is a balanced male XLR jack wired in parallel with the analog line input jack (6). The con nector is wired as follows; Pin 1 = Ground, Pin 2 = + signal, Pin 3 = - signal
Balanced Inputs: Connect to the plug as shown.

1 = shield (ground)
5 = minus (-)
2 = plus (+)
Unbalanced Inputs: Connect to the plug as shown.

1 = shield (ground)
3 = jumper to pin 1
2 = plus (+)
Making Audio Connections
When using a single box, only the XLR input will be used. As additional boxes are added, the signal can easily be daisy-chained from the first box's output/thru jack to the next boxes input connector. This can be repeated for up to 10 Versarray™ Pro series boxes.

NOTE: The VR Pro 215 Sub has an universal power supply, it will work with AC power voltages ranging from 100V to 240VAC at 50/60Hz. Use the proper power cable for your voltage and location.
(9) AC OUT/THRU
The AC power Out/Thru connector is a Neutrik® powerCON TRUE1 TOP premium quality output connector. Using the supplied 3 foot jumper cable, the power can be daisy-chained to power 1 additional box (100V-120V) and up to 3 additional boxes (220V - 240V). This can be achieved by connecting the male end of the jumper cable to the female AC Out/Thru connector (11) on the back of the first speaker. Once this connection is made, the female end of the jumper cable can be connected to the AC Power Line Input (12) connector on the second box. The AC power Out/Thru connector is not controlled by the On/Off Power Switch (11), if power has been supplied to the AC Power Input (10), then the AC Power Out/Thru connector (9) will have power available.
(10) AC LINE INPUT
The AC power inlet is connected via a Neutrik® powerCON TRUE1 TOP connector. This premium quality AC inlet connector is a locking mains connector for professional equipment. The connection is made by firmly inserting and twisting the mating connector on the AC line cord.
(11) ON/OFF POWER SWITCH with BLUE LED
This rocker switch supplies AC power to the VR 218 Pro when switched to the ON position. The ON position is with the top side of the switch pushed “in” or nearly flush with the rear panel. Once the switch is in the ON position, the blue power LED will illuminate.
Dante Operation
The Dante interface allows digital audio to be used as the input source and can be selected in the VR-Pro Series control application. The transmit and receive routings for all connected Dante devices are set using Dante Con troller software. The VR-Pro system does not transmit and only receives digital audio.
The Dante interface on the VR is 1000 BT Ethernet, requiring standard Category 5e or Cat 6 wiring. It has an internal network switch to allow daisy chaining to another unit. Too many switches in the path will cause latency problems, so it is best to use a multi-port gigabit network switch to feed the units. (For more information on the Dante network speed and switch requirements, go to www.Audinate.com).
Dante Controller is the software program that is essential for configuring your network and is available as a free download at the Audinate web site. Dante Controller is used to route signals between devices on the network and change device settings. These are then stored in the Dante devices. Once configured, the transmitting de vice sends to the receiving device, which in this case is the VR-Pro. The interface supports sample rates of 48 kHz (Default), and 96 kHz.
Below is an example of a Dante network. Digital audio is routed from a Nion to the VR-Pro. The vertical columns are transmitter channels, the horizontal rows are receiver channels. In this example Nion channel 01 is sending to VR-Pro receive IN. Any transmit channel on any device can send to a receive channel on any device as long as it is not to itself. Multiple receivers can be connected to a single transmitter. All devices on the net work must have the same
sample rate settings.

*Tom-n3-dlm is a Media Matrix Nion N3, VR-a011ac is the VR-Pro speaker.
To name a device, go to the Device menu pull down and select Device View (or Ctrl+ D). Here is where you select the Dante device you are interested in editing. This is where information about this device is found. The Device Config tab will give you access to settings that can be changed, including the name and sample rate.

Note: Crest Audio can not provide all the necessary information and data to operate and interface Dante with the Versarray TM Pro 215 system in this Owner's Manual.
Please visit www.Audinate.com for the detailed information needed. Primers, FAQ's and other basic information on the details of the Dante® audio networking system are available.
Hanging Versarray™ Pro 215 Powered Subs Below a Versarray™ Mk III Halo

CAUTIONS
WARNING!
IMPORTANT INFORMATION FOR STRUCTURAL ENGINEER AND RIGGING PERSONNEL.
Before you fly the array, be sure to inspect the rigging and flying hardware to insure that it is mechanically sound and has not been damaged. There should be no significant distortion of the shape of the Halo or Sub Support Frame coupling ears or coupling tongues, cabinet straps, Angle Slider bracket or Rail, Pivot Bar or a fly bar, and the hardware should be checked for tightness.

CAUTIONS: IF ANY OF THE BRACKETS, RAILS, CABINET STRAPS, PIVOT BAR OR THE FLY BAR HAS BEEN DAMAGED OR DISTORTED, DO NOT USE, AND DO NOT FLY THE ARRAY UNTIL THEY CAN BE REPLACED OR REPAIRED!
DO NOT USE THE PIVOT BAR OR ANGLE SLIDER BRACKET AS HANDLES TO TRANSPORT THE CABINETS!
DO NOT TRANSPORT THE CABINETS IN ARRAY CONFIGURATION COUPLED TOGETHER, EXCEPT WITH THE RECOMMENDED TRANSPORT CART AND IN THE STIPULATED MANNER FOR THAT CART. TRANSPORT IN SUCH AN UNAPPROVED MANNER VOIDS THE WARRANTY, AND THE SYSTEM WOULD BE CONSIDERED UNSAFE TO BE FLOWN AFTER SUCH AN UNAPPROVED TRANSPORT EVENT.
The Crest Audio® Versarray™ loudspeaker models should be suspended overhead only in accordance with the procedures and limitations specified in the User's Manual and possible manual update notices. This system should be suspended with certified rigging hardware by a qualified rigging professional and in compliance with local, provincial or national suspension ordinances. ALWAYS USE PROPER GRADE HARDWARE.
CAUTION: Before attempting to suspend this speaker, consult with a certified structural engineer. Speaker can fall from improper suspension, resulting in serious injury and property damage. Use only the correct mating hardware. All associated rigging is the responsibility of others. Maximum enclosure angle 30 degrees.
Failure to follow proper rigging specifications listed in the manual may result in injury or death.
Whenever possible, in addition to the nominal primary mounting method, use a suitable safety chain or wire rope attached to one of the other groups of fly points, and firmly attached to a suitable structural member as indicated by a certified structural engineer. CAUTION: ALWAYS USE SAFETY CHAIN OR WIRE ROPE. It is the responsibility of the user and installer to make sure that any Crest Audio® Versarray™ installation meets any applicable local, state or federal safety regulations.

DO NOT USE THE FLOWN ARRAY AS A LADDER, OR ATTEMPT TO CLIMB UP TO THE RIGGING OR
THE HALO USING THE FLOWN LINE OF VR112 CABINETS! DOING SO IS LIKELY TO DAMAGE THE CABINET HARDWARE AND RIGGING, AS WELL AS POSE A SERIOUS AND DANGEROUS SAFETY HAZARD!
The Versarray™ Pro 215 Powered Subwoofer can be hung below a Versarray™ Mk III Halo, up to 5 Subs per Versarray™ Mk III Halo, or some combination of Subs and Versarray™ 112's, as per the chart listed out in this section. The attachment of the Subs to the Halo is substantially the same basic procedure as hanging
Versarray™112 Mk III Cabinets from a Versarray™ Mk III Halo, in that the Subs have the same sliding strap and pin on the rear sides as the front sides, but no Angle Slider Bracket or Angle Rail, or Pivot Bar connections. Another way of putting it is that there are four sliding hang straps on the Sub that connect to the four ears at the corners of the Halo frame, using the attached quick release lock pins.
See Fig. A

Fig. A
The Versarray™ Pro 215 Powered Subs can only hang at a zero degree angle relative to the Halo, so they must be placed at the top of a mixed model line array, and then the Versarray™ 112 cabinets hung below the last Sub in the array using a Versarray™ Mk III Sub Support Frame.
Connecting the First Sub to the Halo
- Lift the Halo high enough so that the VR Pro 215 Sub cabinet can be placed underneath and properly aligned up with the cabinet. See Fig. 1
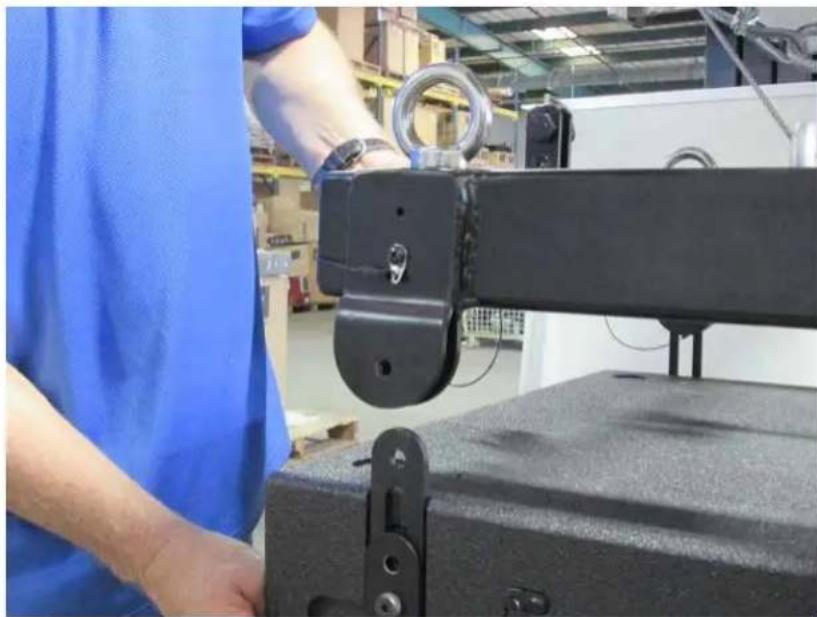
Fig. 1
- Remove the Quick Release Lock Pins from the Sub Coupling Tongues, all four, and push the coupling tongues up and re-insert the pins so that the tongues can slide up all the way using the thumb lever on the side of the tongue. See Fig. 2

Fig. 2
- Using the Quick Release Lock Pins from the Halo, push the tongues all the way up, and pin the tongues to the Halo ears. See Fig. 3
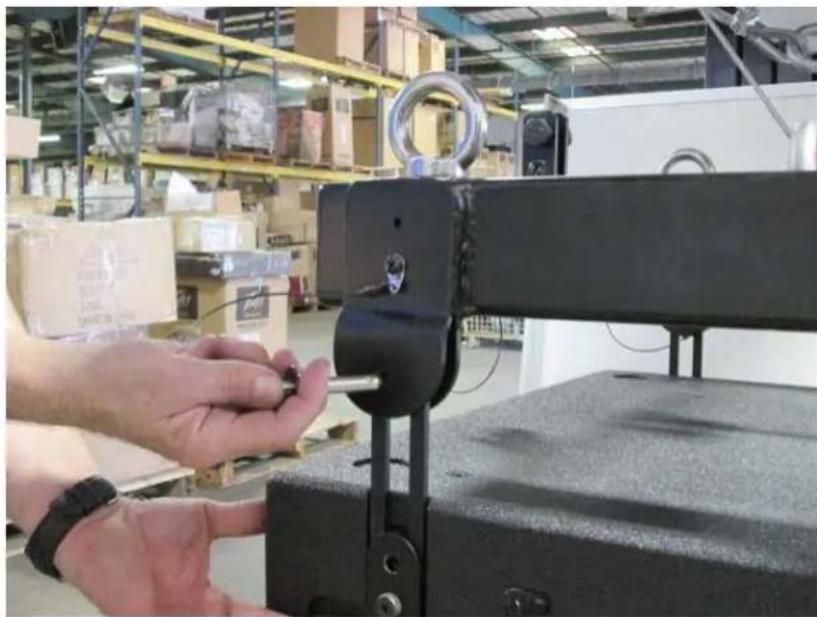
Fig. 3
It may be necessary to adjust the height of the Halo above the Sub, in order to pin all four of the tongues to the Halo.
Once all the pins have been put into place, it should look like Fig. 4

Fig. 4
The next Sub to be hung will connect to the bottom of the first Sub, where the 2nd Sub's top tongues will interface with the 1st Sub's bottom coupling slots (similar to the Halo's hanging ears).
-
Position the 2nd Sub under the 1st Sub, lining the corners up, and placing the Halo and 1st Sub at a height where the Subs can couple effectively.
-
Remove the pins from the 1st Sub's bottom coupling slots.
-
Remove the pins from the 2nd Sub's top tongues, and push the coupling tongues up and re-insert the pins so that the tongues can slide up all the way using the thumb lever on the side of the tongue. It may be helpful to re-align the Halo and 1st Sub above the 2nd Sub again at this point.
-
Using the pins removed from the 1st Sub's bottom coupling slots, pin the 2nd Subs tongues into position on the 1st Sub's bottom coupling slots. The 2nd Sub should now be fully attached to the 1st Sub.
Using Multiple Versarray™ 112 Pro's or Mk3's mounted under a Versarray™ Pro 215 Sub
If less than 5 Versarray™ Pro 215 Powered Subs are hung from a single Halo, then some Versarray™ 112's can be hung below the Subs using the Versarray™ Mk III Sub Support Frame.
Maximum Combined Number of Versarray ™ 112 Mk3 or Pro 2-Ways and Versarray ™ Pro 215 Powered Sub cabinets for Halo and Sub Support Frame.
MIX OF SUBS VERSUS VR Pro 112
MIX OF SUBS VERSUS VR 112 Mk3
| Subs VR Pro 112 | Subs VR 112 Mk3 | ||||||
| EU | N. America | EU | N. America | ||||
| 0 | 12 | 15 | 0 | 14 | 15 | ||
| 1 | 9 | 11 | 1 | 10 | 13 | ||
| 2 | 7 | 9 | 2 | 8 | 10 | ||
| 3 | 5 | 7 | 3 | 5 | 8 | ||
| 4 | 3 | 5 | 4 | 3 | 6 | ||
| 5 | 1 | 3 | 5 | 1 | 4 | ||
| 6 | 0 | 1 | 6 | 0 | 1 | ||
| 7* | X | 7* | X | ||||
*N. America (PLASA) ONLY!
WARNING!
Crest Audio ® is not liable for any injuries or damages that could potentially occur if the specified Working Load Limit is exceeded for any of the Versarray ™ FlyQWIK ™ rigging components or system configurations.
If there is any question about the capacity of a given configuration of rigging hardware and cabinets, you should consult with a certified structural engineer or a qualified rigging professional before installing the system.
Maximum Combined Pull-Back Angle, Two or less Subs in the hang: 30 degrees
Maximum Pull-Back Angle, more than 2 Subs in the hang: 15 degrees
It is the responsibility of the user and installer to make sure that any Crest Audio® Versarray™ installation meets any applicable local, state or federal safety regulations.
See the Versarray ™ Mk III Sub Support Frame Owner's Manual for details on connecting the Sub Support Frame to the VR 215 Sub, and the VR112 cabinets to the Frame.
See the Versarray™ Pro 112 or Versarray™ 112 Mk 3 Owner's manual for details on hanging, connecting and aiming VR 112 cabinets.
Crest Audio® Versarray™ Pro series - User GUI Use Instructions
Installation of the Versarray™ Pro series User GUI Software
The software to connect to the Versarray™ Pro 215 Sub speaker system can be found at a link available on the following URL page:
https://peaveycommercialaudio.com/versarray
Download the VR Pro series User GUI Software following the instructions at the web page referenced. Note that in order for the software to run properly, a copy of the .NET framework 4.0 (also referred to as the dotNET framework 4.0) or higher must be present on your computer. Instructions and URL's for where to download this file will be available at the Versarray™ web page: https://peaveycommercialaudio.com/versarray
Connecting the User GUI Software to the Versarray™ Pro 215 Sub Speaker System for Analog Signal Input Use
- Connect appropriate length Ethernet cables to each Versarray™ Pro 215 Sub cabinet (see REAR PANEL DISPLAY diagram, item #5), and turn on the Power before it is raised into line array position. The cables need to be at least Cat 5e grade or better. Cat 6 grade cables are recommended for best results. The Ethernet cables can be daisy chained from one cabinet to the other if more than one speaker is being connected to or controlled. The longest cable should be run from the bottom of the array to the PC. Be sure to leave enough spare cable length for the long cable run to accommodate all the necessary routing, tucking, taping and positioning needed. The input cable from the PC should be connected to the Primary Ethernet jack, and the cable used to daisy-chain to the next one should come out of the Secondary Ethernet jack.
NOTE: If connecting for Dante®, see the Dante Operation section for details on the correct way to wire up the Versarray™ Pro 215 Sub cabinets. Daisy-chaining as described above can be used with the proper Dante latency settings, but most professionals will want the maximum performance Dante is capable of, and this would involve the use of a multi-port gigabit network switch to feed the units in a star wiring configuration.
-
Connect the other end of the long Ethernet cable to the PC with the Versarray™ Pro series User GUI software installed on it.
-
Turn on and boot the PC with the Versarray™ Pro series User GUI software.
When the Versarray™ Pro 215 Sub speaker system cabinets are all turned on, the PC should show a LAN connection notice, before trying to start the Versarray™ Pro series User GUI software. This can take a minute or so, depending on the exact nature of your PC's LAN and Ethernet connection readiness and load time.
Older operating systems may display an on-screen notification, while more recent operating systems may not show any obvious notification at all. In order to check the status of your network connection, go to a Control Panel section where the LAN information is displayed, check the Network and Internet section or the Network Status window/icon (often located in the lower right hand corner, and visible once you use the Show Hidden Icons arrow).
THE MOST COMMON CAUSE OF A FAILURE TO CONNECT TO THE POWER AMP MODULE VIA THE NETWORK IS NOT ALLOWING ENOUGH TIME FOR THE PC TO MAKE THE NETWORK CONNECTION CORRECTLY BEFORE STARTING THE SOFTWARE!!
Using the Versarray™ Pro 215 Sub User GUI Software
Once the Versarray™ Pro 215 Sub speaker system cabinets are turned on, connected via Ethernet, and connected to the PC with the Versarray™ Pro series User GUI software installed on it, it is time to start the GUI software.
NOTE: Just like most modern electronic devices, the Versarray™ Pro 215 Sub speaker system power amp electronics need to be operated within a certain temperature range.
This range is typically from 0 degrees Centigrade, to +70 degrees Centigrade for electronic components. In order to avoid improper operation, do not turn the Versarray™ Pro 215 Sub speaker system power on until the units temperature has equalized close to that of the room, if it has been stored in a cold environment.
-
Run the Versarray™ Pro series User GUI software by clicking on the Desktop Icon (or from the Start Bar/All Programs).
-
A Start Window will open up, and if it is not already, make it full screen. See Fig.1

Fig.1
- The functions for this Start Window are contained within the block in the upper left hand corner, see close-up below in Fig. 2 with numbered functions, full descriptions to follow later. Note that the Device List Block (DØ) will not have any speaker systems loaded into it's window until you have connected with one or more different VR Pro series speaker systems via the software.
| IP | INTERFACE | NAME | UNIQUE ID | STATUS | NET. ID |
| 169 254 218 84 | LAN | VR215_A5 | 7779308474AD | Off-line | A5 |
| 169 254 12 25 | LAN | VR215_00 | 5D24A9B0359E | Off-line | 00 |
| 169 254 98 160 | LAN | VR112_02 | D0BAA5061A7B | Off-line | 02 |
| 169 254 124 110 | LAN | VR112_00 | 740391FF354E | Off-line | 00 |
| 169 254 146 165 | LAN | VR112_00 | 3907B2178312 | Off-line | 00 |
| 169 254 150 165 | LAN | VR112_00 | 8303B2178411 | Off-line | 00 |
| 169 254 166 153 | LAN | VR112_00 | 1C91039A2085 | Off-line | 00 |
| 169 254 63 32 | LAN | VR112_04 | C02CD8E8A09E | Off-line | 04 |
| 169 254 35 51 | LAN | VR112_00 | 11E6AD9E7153 | Off-line | 00 |
| 169 254 150 135 | LAN | VR112_00 | 3366B1368613 | Off-line | 00 |
| 169 254 23 32 | LAN | VR112_01 | 4A7F075BB1A7 | Off-line | 01 |
| 169 254 230 129 | LAN | VR215_00 | 367DB2338F8A | Off-line | 00 |
Fig. 2
Quick Start Instructions will follow this segment, and details on all other file management will be available at the end of the descriptions of the GUI parameter pages.
Quick Start Instructions
A. Once the Ethernet cable is plugged into the PC with the Versarray™ Pro series User GUI software installed on it and running, and the Power turned on to the Versarray™ Pro series cabinets, and the Network connection established, the User GUI software will detect the presence of the Versarray™ Pro 215 Sub cabinet or cabinets, and other Pro series models cabinets.
A dialog Window will pop-up, as shown below in Fig. 3. The device ID's will be different, but the general format will be the same.

Fig. 3.
When you click "Yes", a Connect Device dialog window comes up, as shown in Fig. 4

Fig. 4
B. Now click "OK" and read the current settings from the VRPro 215 Sub Cabinet to the User GUI software
Each cabinet will come up as you click "Yes", and click "OK" for as many cabinets as have been networked together.
The first time you do this, just click "Yes" and "OK" for one cabinet, so as to look at just one device initially.
The Device List D∅ should now show one of the units (or the only unit) as “On-line”, See Fig.5, where the red arrow points.
| IP | INTERFACE | NAME | UNIQUE ID | STATUS | NET. ID |
| 169.254.218.84 | LAN | VR215_A5 | 7779306474AD | Off-line | A5 |
| 169.254.12.25 | LAN | VR215_00 | 5D24A9B0353E | Off-line | 00 |
| 169.254.98.160 | LAN | VR112_02 | D0BAA5051A7B | Off-line | 02 |
| 169.254.124.110 | LAN | VR112_00 | 740391FF354E | Off-line | 00 |
| 169.254.146.165 | LAN | VR112_00 | 3307B2178312 | Off-line | 00 |
| 169.254.150.165 | LAN | VR112_00 | 3303B2178411 | Off-line | 00 |
| 169.254.166.153 | LAN | VR112_00 | 1C91039A2085 | Off-line | 00 |
| 169.254.63.32 | LAN | VR112_04 | C02CC6E6A09E | Off-line | 04 |
| 169.254.35.51 | LAN | VR112_00 | 11E6AD9E7153 | Off-line | 00 |
| 169.254.150.135 | LAN | VR112_00 | 3356B1368613 | Off-line | 00 |
| 169.254.23.92 | LAN | VR112_01 | 4A7F075BB1A7 | Off-line | 01 |
| 169.254.230.129 | LAN | VR215_00 X | 357DB2338F6A | On-line | 00 |
Fig.5
C. To display the User GUI parameter pages, double-click on the desired unit in the NAME column in that row, shown by the green "X" in Fig. 5
The various parameter pages for the Versarray™ Pro 215 Sub will now come up in a new large window within the Start Window. See Fig. 6
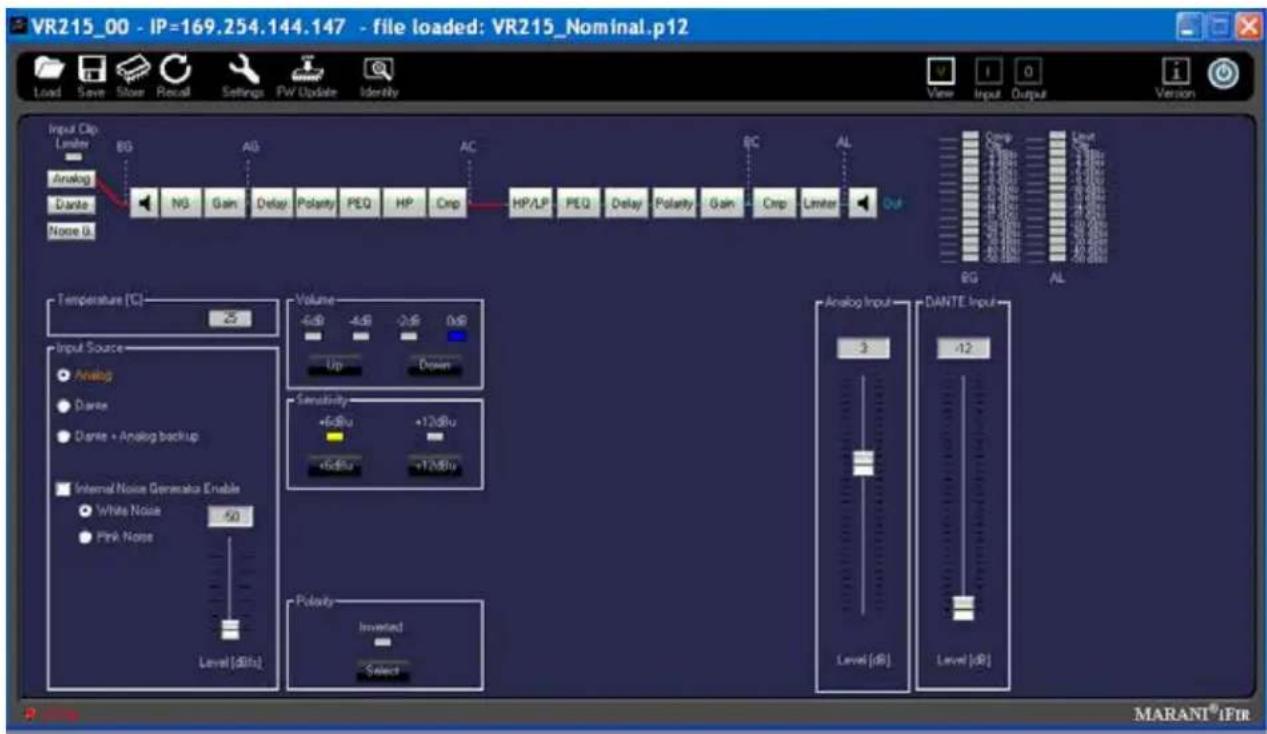
Fig. 6
The default first page is the View page, which will allow you to adjust cabinet overall gain and input Sensitivity and other basic parameters.
CAUTION!
IT IS STRONGLY SUGGESTED THAT BEFORE YOU PROCEED TO ANY OF THE OTHER PARAMETER PAGES, OR CHANGE ANY SETTINGS ON THIS GUI VIEW PAGE, THAT YOU READ AND UNDERSTAND THE DESCRIPTIONS OF EACH PAGE'S FUNCTIONS!
WARNING!
CHANGES TO THE LIMITER SETTINGS, CROSSOVER SETTINGS, OR INDIVIDUAL DRIVER EQ SETTINGS CAN ALL RESULT IN UNRELIABLE OPERATION OR PREMATURE DRIVER FAILURE!
USE OF SETTINGS OTHER THAN THE FACTORY SETTINGS FOR FUNDAMENTAL PARAMETERS WILL VOID THE WARRANTY!!
Quick Start Instructions, CONT'D
The Versarray™ Pro 215 Sub ships with the default programming set for Nominal bass levels and EQ, where the VR Pro 215 Subs will match the levels of normally configured VR 112 Pro's if there are two VR 112 Pro's arrayed for each VR Pro 215 Sub.
These settings provide for a very flat, neutral and natural sound from the system, and use of the MLAS ™ technique Presets for the various VR 112 array configurations adjusts for different vertical coverage configurations very accurately.
However, when using the Versarray™ Pro system for use with playback or live DJ, EDM, or other bass heavy music genres, it may be desirable to use the provided Bass Boost Presets.
These have been carefully configured to boost the low bass and mid-bass for extra punch and
definition in those regions. Use of these Bass Boost Presets will add the bass content to the music that needs it, but without risking damage or premature limiting of the Subs or the system as a whole. Trying to add boost in the bass externally to the system will not be as effective or allow for as much additional headroom in terms of maximum peak SPL.
In order to load Presets for Bass Boost system EQ use, you will need to access the Factory files stored in the Versarray™ Pro series User GUI PC software folders for Presets.
Loading Presets from PC GUI software folders
- Position the View page from Fig. 6 so it does not cover up the row of icons at the top left corner of the Start page, but still has the bottom portions of the View page visible.
In the File Management group A, select "Load", as seen in the upper left-hand corner of Fig. 7 below.
![VR215_B1 - IP=169.254.137.140 program loaded: VDS Load Save Store Recall Settings Pw/ Update Identity Input Clip Limiter BG AG AC BC AL Analog Dante NG Gain Delay Polarity PEQ HP Crop HP/LP PEQ Delay Polarity Gain Crop Limiter Out Noise G Temperature [℃] 25 Volume 4dB -4dB -2dB 0dB Input Source Anal…](/content/2026/05/980983/images/6cd53ce2a71ee287e0deaf04c1bd284b430adfc13ff7fbe4b3b9a0d6b42f6908.jpg)
Fig. 7
- A typical Windows file manager window will come up with the File Folder contents for the Preset files, generally located at:
For Windows 7 and for Windows XP - C:\Program Files (x86)\VR Series v1.2.X\Preset
For Windows 10 - C:\Program Files\VR Series v1.2.X\Preset. No (x86)
where C: is the root drive where the VR112 PC GUI software has been located, and "X" is the version of the VR112 PC GUI software you have loaded onto the PC.
We will chose the VR215_BassBoost Preset file to be loaded into the power amp DSP Preamp.
Highlight and Click "OPEN" on the VR215_BassBoost Preset file.
The bar across the top of the View window should now display the "Program Loaded" as the "VR215_BassBoost" Preset. During normal operation after being fully informed of the rest of the
page parameter functions, you can now proceed to make any recommended adjustments or dial in some mild venue EQ or level adjustment on the VR215 Sub using the other pages as listed out below.
CAUTION!
IT IS STRONGLY SUGGESTED THAT BEFORE YOU PROCEED TO ANY OF THE OTHER PARAMETER PAGES, OR CHANGE ANY SETTINGS ON THIS GUI VIEW PAGE, THAT YOU READ AND UNDERSTAND THE DESCRIPTIONS OF EACH PAGE'S FUNCTIONS!
WARNING!
CHANGES TO THE LIMITER SETTINGS, CROSSOVER SETTINGS, OR INDIVIDUAL DRIVER EQ SETTINGS CAN ALL RESULT IN UNRELIABLE OPERATION OR PREMATURE DRIVER FAILURE!
USE OF SETTINGS OTHER THAN THE FACTORY SETTINGS FOR FUNDAMENTAL PARAMETERS WILL VOID THE WARRANTY!!
The next section deals with the details of the parameter pages: The View, Input, and Output pages.
Full List of Features of the Versarray™ Pro series PC Software GUI Pages for the VR Pro 215 Sub
View Page
This is the first page that comes up after loading a Preset into the Versarray™ Pro 215 Sub, or when connecting with an existing Preset already present in the speaker system. See Fig. 7.
Preset File Management Group A
This includes the icons for Load, Save, Store and Recall.
Load (Preset) instructions have already been covered in the Quick Start Instructions for connecting to the Versarray™ Pro 215 Sub system and for up-loading a Preset to the Versarray™ Pro 215 Sub.
Save (Preset) function is the usual Windows file manager format, and files saved to the PC folders can be very long file names, with the usual Windows restrictions on allowed characters. However, it is good to keep in mind that the DSP memory can only display 16 characters, including spaces, so keep the important or descriptive stuff towards the beginning of the file name.
Store (Preset) function refers to storing the currently loaded Preset DSP file into the DSP system memory of the power amp in the cabinet. See Fig. 8
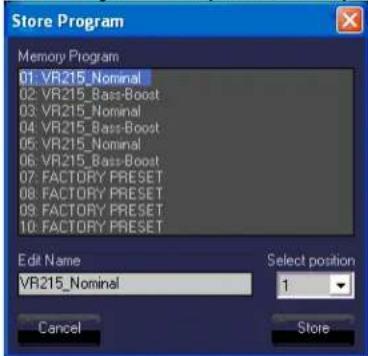
Fig. 8
Sixteen characters are available for the file name, so when saving custom presets to the PC software folder outside the Versarray™ Pro 215 Sub, keep that limitation in mind for the file name, and put the important descriptors first in the file name.
If a Factory Preset has been customized, then type in your desired name and use that to save the file into DSP memory.
Recall (Preset) function loads a DSP file from the on-board memory into the DSP system in the power amp, and makes it the active working Preset settings for the Versarray™ Pro 215 Sub system. See Fig. 9.

Fig. 9
The Recall function only brings in the Preset level of parameters, if there was a different set of Project settings involved with that file, then the appropriate Project file from the PC software Program folder will also need to be loaded into the Versarray™ Pro 215 Sub DSP system as the next step.
All the Crest Factory Presets use the same basic settings, and thus, can be interchanged by merely changing the Presets or Recalling from memory.
If setting the system up for network use from now on, see the sub-section titled Setting a Cabinet Up for Network Use Only, in section 4 below.
Signal Flow Chart Group B
This chart shows the signal flow through the Versarray™ Pro 215 Sub DSP system.
It provides a indicator in the form of an Input Clip Limiter, which shows input stage electrical clipping. Gain within the DSP system has been set so as to avoid the signal from clipping the input significantly before the internal processes reach compression and limiting. Re-adjustment of the internal gain structure will require monitoring this indicator to assure that you are not clipping the input stage instead of engaging the appropriate levels of internal compression and limiting.
Input Source is displayed, and is controlled at the View page section 2, located just below the Signal Flow Chart Group at the left side of the Window.
Two muting points are accessible directly from this flow chart, as shown by the light green "X"s on the loudspeaker symbol block, see Fig. 10
![graph LR A["Input Clip Limiter"] --> B["Analog"] B --> C["Dante"] C --> D["NG Gain Delay Polarity PEQ HP Cmp"] D --> E["AC"] E --> F["HP/LP PEQ Delay Polarity Gain Cmp Limiter"] F --> G["AL"] G --> H["Out"] style A fill:#f9f,stroke:#333 style B fill:#ccf,stroke:#333 style C fill:#cfc,stroke:#333 sty…](/content/2026/05/980983/images/3419d3763ed0caebf978bceadc5b2da79ad7ddbd814954fbc3f72679f6b67c23.jpg)
Fig. 10
When clicked on to mute, the loudspeaker block turns red, and mutes the signal flow at that point. Clicking on the block again un-mutes the signal chain at that point.
There are also mute controls on the Input Page, and on the Output Page, if the mute is triggered at these locations, the indication still will occur at the View page as well, via a red block icon.
For the various level meters provided at the right hand of all the GUI pages, some have a selectable monitor point. The location of this point is shown on the Signal Flow Chart.
BG is Before Gain, AG is After Gain, AC is After Compression, BC is Before Compression, and AL is After Limiting.
Section 1
Temperature
Displays the operating temperature of the power amp output stage in degrees Centigrade. Allows monitoring the temperature of each amp in an array as one switches from Device to Device
Section 2
Input Source
Radio Buttons allow selection of the input from Analog XLR in, to Dante Ethernet network input, to Dante with Analog back-up. Input level gains are controlled in Sections 9 and 10, see appropriate Section.
Section 3
Internal Noise Generator Enable
Checkbox enabled. Provides the choice between White Noise and Pink Noise via Radio Button selection, and a Level control with a range from -50 dBFS to -20 dBFS. Note that even at -50 dBFS, the level is substantial when one is up close to the speaker, and could startle someone if unaware of the initiation of the event. Strongly recommended that the noise be turned on at the lowest level, and then dis-engaged, and to then adjust level slowly up in moderate increments and re-engage to reach the desired output.
Section 4
Settings
This section contains the settings that are associated with the Project parameters that are not changed with the loading of a different Preset.
Clicking on this Icon will bring a menu of the various settings choices available. See Fig. 11.

Fig. 11
The default menu selection is for assigning the LAN addresses in the line array network.
In order for the data to be entered, or any changes to register with the DSP system, you must click on the Apply button, and then the EXIT button. This procedure must be done for each of the Settings choices, or the change or data entered will be lost.
NAME
Allows up to 16 characters to name a given Versarray™ Pro 215 Sub cabinet. Default name is just VR215
AUTO-SLEEP
Checkbox enabled, this allows a Radio Button choice between 3, 5 or 10 minutes before the SLEEP mode is engaged. Auto-Sleep mutes the power amplifiers after the designated time has elapsed, and then detects the presence of an audio signal and un-mutes the amplifiers within approximately a few ms.
AUTO-STANDBY
Checkbox enabled, this allows a Radio Button choice between 15, 30 or 60 minutes before the STAND-BY mode is engaged. Auto-Standby powers the amplifiers down after the designated time has elapsed, and then detects the presence of an audio signal and un-mutes the amplifiers within approximately a few hundred ms.
INP HEADROOM
Input Headroom (+12 dB), Checkbox enabled, is used to provide a safety margin for DSP set-ups that use a lot of gain above the 0 dB line on the Frequency Response Graphic Display (See Sections 11 or 24). The Factory settings do not need this enabled, gain structure has been optimized for the EQ settings and gain used.
If this feature is enabled, it is recommended that the input Sensitivity (Section D) be changed to +12 dBu from the nominal Factory setting of +6 dBu.
NETWORK ID
Allows you to set the network ID from hexadecimal 00 to FF.
There is a set of rear panel buttons that provide for this to be changed as well.
As a reminder, in order for the Settings data to be entered, or any changes to register with the DSP system, you must click on the Apply button, and then the EXIT button. This procedure must be done for each of the Settings choices, or the change or data entered will be lost.
NOTE: The parameters in the Settings menu DO NOT carry over from any Preset files, they do not Save into a Preset, nor do they Load when a Preset is loaded. So each cabinet will have to be adjusted individually. Once this has been done, the Presets will not change these parameters, and there need be no concern about the Settings parameters changing with a load-in of a Preset. The Settings parameters CAN be loaded in using the Project function, but only under special conditions. See the Project section in this Owner's Manual for details.
Section 5
FW Update
This section allows for a firmware update to the DSP operating system, something that will only be done on an infrequent (if ever) basis. Contact Crest Audio/Peavey Electronics for information on whether a firmware update is available or desirable, or check the following URL page:
https://peaveycommercialaudio.com/versarray
Instructions for an update will be provided at that time as needed.
Section 6
Identify
This function is not active on the Versarray ™ Pro 215 Sub.
Section C
Volume
Up and Down buttons provide for changing the Level of the audio signal.
Factory default is 0 dB, with a range down to -6 dB in 2 dB steps.
There are rear panel buttons that provides for the selected Level to be chosen as well.
These Level choices become handy when manually adjusting the level of the Subs for the number of VR112 Pro cabinets in the array.
Section D
Sensitivity
Click to choose buttons allow selection of either +6 dBu or +12 dBu sensitivity of the Analog input (XLR in) of the Versarray™ Pro 215 Sub system. The Factory default is +6 dBu, and the gain structure of the rest of the DSP based preamp system has been based on this sensitivity level. If the +6 dBu is too sensitive for your requirements, then you can select the +12 dBu option instead with no penalty in performance or noise.
With the Input Sensitivity set to +6 dBu, it takes 1.75 VAC RMS to drive the Versarray™ Pro 215 Sub system to full power output on music. That would change to 3.5 VAC with a change of the Sensitivity to +12 dBu.
Note that with the Sensitivity set to +12 dBu, it might be more likely that the input stage could be overdriven and clipped. Checking the Input Clip Indicator in Section B would be advisable if it is felt necessary to engage the +12 dBu sensitivity setting.
Section E
Polarity.
A click to choose button allow selection of either Normal (default and indicator blank or white), and Inverted, where the indicator turns red.
Normal Sound Reinforcement practice is to keep the Subwoofer polarity correct with respect to bass
transients, e.g., a kick drum mic placed in front of the drum should create a positive pressure wave.
Thus the polarity of the Sub should reflect that situation. The polarity button is available for those instances when it is more convenient to take care of a polarity inversion somewhere else in the signal chain, at the speaker system array.
If the location of the Sub is not coincident with the acoustic center of the VR 112 array, one or the other should be delayed using the delay function on the Input page in the Versarray™ Pro series User GUI software. The VR Pro 112 and the VR 215/218 Pro should both be able to be operated in Normal or non-inverted polarity with the proper amount of delay dialed in.
Section F
Page Select Buttons
These are the buttons to select the allotted control page views: View, Input and Output.
Clicking on the button takes you to that page of controls and indicators.
Section H
Power
Button turns the power amplifier Off if it is On, and On if it is Off. Turns Red when the power amp is Off.
Section I
On-line/Off-line Indicator
Indicates whether or not that particular cabinet is connected to the DSP GUI network.
It does not indicate Dante connection or any other network status.
Lights up Red when On-line, Black when Off-line.
Section 7
Level Meter
Monitors signal level at the point marked BG (Before Gain) in the Signal Flow Chart Section B diagram, see Fig.10 for the details.
This is the level of the signal at the input to the DSP Preamp, and shows clipping of the analog input stage (2nd from top indicator bar turns red), as well as compression due to the input stage ADC overdrive prevention circuit (top indicator bar turns yellow).
These red and yellow indicators should never come on, or the input stage is being driven too hard, and the gain needs to be made up later on in the signal flow path.
If the factory settings are in place, the gain structure is such that the DSP system will be compressing and limiting the signal well before these would ever light up.
Section 8
Level Meter for the Output of the First stage
Monitors signal level at the point marked AL (After Limiter) in the Signal Flow Chart Section B diagram, see Fig.10 for the details.
This is the level of the signal at the output of the 1st stage of the DSP Preamp.
Section 9
Analog Input Level
Master Gain control for the analog input. Has a range of +/- 12 dB.
Factory Setting is 0 dB. Realize that turning this gain down will NOT prevent input stage clipping, and that in order to try and avoid input stage clipping, this control should be set at 0 dB or above, so the gain inside the Versarray ™ Pro 215 Sub DSP architecture will allow the input signal drive level to be reduced and avoid the input stage clipping.
Section 10
DANTE Input Level
Local gain control for the DANTE input. Has a range of +/- 12 dB.
Factory Setting is -12 dB, so the level can be adjusted as appropriate after establishing DANTE connection.
Input Page
The Input Page of the Versarray™ Pro 215 Sub DSP GUI provides an overview of controls and parameters of the system, including EQ and compression of the entire signal. See Fig. 12
![VR215_B1 - IP=169.254.137.145 - file loaded: VR215_Nominal.p12 Load Save Store Recall Settings Fw/ Update Identity 11 20Hz 100Hz 1 kHz 10 kHz 20 kHz Curser View All Mag Phase Delay Unit Mule ms noise Delay [ ms ] Adj Fine Analog 3 Crip 24 Level [dB] 100° Gain Reduction 18 0 19 20 22 23 EQ Filters 16…](/content/2026/05/980983/images/a5663f66e7bb133c80b43a59201143c0f72adb4804bfbac1e06d44250d409f46.jpg)
Fig. 12
Section 11
Frequency and Phase Response Graph and related controls
This section provides a graphical display of the frequency response changes dialed in to this Page. Using the Mag and Phase Radio Buttons, you can toggle between the Magnitude (frequency response) and the Phase of the changes.
The Cursor button places small cursor symbols at all the dialed-in EQ spots on the curve, providing a visual locator and flag for their actions.
The View All button starts a new Window that overlays the three pages curves, the Input Page, the Lows Page and the Highs Page, on one graph. They are not summed, just overlaid on one another. See Fig. 13

Fig. 13
Checkboxes and Radio Buttons provide for various display options from the default view, including the Phase response of both sections.
Note that these responses are for the electronics only, and DO NOT represent the actual electro-acoustic output of the system, or of the woofers themselves.
Section 12
Noise Gate
A noise gate is provided as a means to mute low level noises or sounds from the system.
A Bypass checkbox toggles the noise gate active or inactive. Default setting is Bypassed, as the Versarray™ Pro 215 Sub system is very quiet and free from hiss or hum in and of itself.
parameters
Thr (Threshold) dBFS
The threshold of opening the noise gate ranges from -90 dBFS to -60 dBFS
Release
The release time ranges from 1 to 1000 ms
Attack
The attack time ranges from 30 to 1000 ms
NOTE: If the Noise gate threshold is set too high, or the Attack and Release times are set oddly, the music could be affected, with low level notes cutting on and off as the music plays.
Section 13
FIR
A Bypass checkbox toggles the FIR processing active or inactive.
FIR processing provides a means to correct phase and amplitude deviations beyond what a typical parametric EQ can achieve. This is a specialized Factory set of parameters and data, and is not user adjustable. Factory setting is Bypass.
FIR processing and EQ is not as effective for attempting to correct a Subwoofer's response, and the latency and number of taps needed to address low frequencies is prohibitive, and thus FIR coefficients are not included in these Sub models.
NOTE: It is strongly recommended that the User not try to load or change the FIR coefficients, as they could be loaded in with an error in amplitude or bandwidth, and cause excessive drive level to the system or a particular component, causing damage and/or failure of the system or component.
CHANGING THESE SETTINGS FROM THE FACTORY SETTINGS WILL VOID THE WARRANTY!
Section 14
Loudness Filter
An Enable checkbox toggles the loudness function processing active or inactive.
This function provides a bass and treble boost for situations where the sound level is much lower than normal, and will stay that way for a long period of time.
Should not be used for high SPL Sound Reinforcement use.
Factory setting is unchecked.
Section 15
High Pass Filter
This section provides a means to infra-sonic filter the music before it gets to the rest of the signal processing sections, for added protection from non-musical deep bass noises, transients (Pops), and stage borne noises.
Slope/Type is a drop down menu bar, with the following options for filters:
Bypass
6 dB/Oct. Butterworth (BW)
12 dB/Oct. Butterworth
18 dB/Oct. Butterworth
24 dB/Oct. Butterworth
36 dB/Oct. Butterworth
48 dB/Oct. Butterworth
12 dB/Oct. Linkwitz-Riley (LZ)
24 dB/Oct. Linkwitz-Riley
36 dB/Oct. Linkwitz-Riley
48 dB/Oct. Linkwitz-Riley
12 dB/Oct. Bessel (BS)
24 dB/Oct. Bessel
Below the Slope/Type Drop down menu bar, is a Frequency (Hz) box, where you can enter the frequency in directly in Hz. This can range from 20 Hz to 20,000 Hz. Click on the box numerals, and type in the desired frequency in Hz, and hit Enter.
Factory setting is 25 Hz, 12 dB/Oct. Bessel
Altering this setting will undo the optimization of the Versarray™ Pro 215 Sub crossover to the Versarray™ 112 Pro's crossover. The frequency and amount of roll-off is carefully considered for minimal sonic impact, and maximum additional protection from LF garbage signals.
Section 16
EQ Filters Section
Ten Bands of parametric EQ are available for the overall system EQ, and provide a lot of performance enhancement of the system.
Each band has the following capabilities:
Amplitude changes up to + and - 6 dB, in 0.5 dB increments.
Filter Types for each band include:
Bell (parametric), with Q ranging from 0.4 to 20
Hi Shelf, with Q ranging from 0.1 to 3.5
Lo Shelf, with Q ranging from 0.1 to 3.5
Low Pass, with Q ranging from 0.1 to 3.5
High Pass, with Q ranging from 0.1 to 3.5
Notch Filter, with Q ranging from 4 to 72
All-Pass1, a 1st order all-pass filter, no Q adjust (it's 1st order)
All-Pass2, a 2nd order all-pass filter, with Q ranging from 4 to 72
Each band has a Bypass button ( Byp ) at the bottom of the EQ strip, which turns off the EQ band changes to make that band “flat”, then with another click, that EQ band action is turned back on.
There is a Bypass checkbox for overall bypass of the entire EQ section at once, which toggles the EQ on and off. This is located at the top right-hand side of this section.
There is an EQ Flat button for returning all the bands and settings to 0 dB, but this button does NOT toggle, if clicked, the EQ settings are lost, and you start over again.
If you should accidentally click this button, just re-load the most relevant Preset back into the
Versarray™ Pro 215 Sub system from the file folder, or from the on-board DSP memory.
Note: It is strongly recommend that the EQ bands in use for the Factory Presets be left unaltered and NOT be changed by the end user. This is the additional EQ used to generate the Factory Presets for the Versarray™ Pro 215 Sub system, and as such, altering it will defeat to whatever extent the bands are changed, the desired end result of the Preset's use.
This should still leave anywhere from 10 bands of EQ to 5 bands for the Bass Boosted Presets.
Any unused EQ bands should have the Byp (Bypass) button clicked on (turns Orange).
CHANGING THE BANDS WITH FACTORY SETTINGS MAY VOID THE WARRANTY!
Section 17
Mute button, a click turns the Input Page signal output OFF.
The icon turns red, and an "X" appears next to the loudspeaker symbol.
To un-mute the signal, click it again.
This action also shows up on the View Page under the Signal Flow Chart B group, where the same icon in the signal chain shows as red when muted. As noted in that section, clicking on the icon while on the View Page will also toggle the Mute On or Off.
Section 18
Delay, sets the delay time of the Input Page signal for the system.
Delay Units, Radio Buttons select the units, either ms (milliseconds) or meters.
Parameter
Adj delay increments are 1 ms (or 0.34 meters), Fine delay increments are approx. 0.0207 ms (or 0.007 meters), with a maximum total delay of 251 ms (or 85.3 meters).
Factory setting for this section is 0 ms.
Section 19
Gain, sets output level of the Input Page.
Range is +/- 12 dB in 0.1 dB increments.
This is the same control as Section 9 or 10 on the View Page, depending on which input has been selected at Section 2. See that section for some notes on it's operation.
Section 20
Level Meter, monitors signal level at the point selected by the Meter Select drop down menu.
The Meter Select drop down menu allows a choice of BG (Before Gain), AG (After Gain), or AC (After Compression). See the Signal Flow Chart Section B diagram Fig.10 for the details of where these monitor points are in the signal chain.
The signal monitor point selection BG duplicates the meter function on the View Page at Section 7. It is recommended to leave the meter set to either the monitor point of BG or AG, since the next meter shows how much compression is occurring.
The meter shows clipping of the signal (2nd from top indicator bar turns red), as well as compression as dialed in at Section 26 (top indicator bar turns yellow).
Section 21
Cmp Gain Reduction meter, displays the level of compression occurring in Section 23 (top indicator bar turns yellow)..
Section 22
Polarity, provides a checkbox to reverse the polarity of the signal.
The overall polarity would seldom be reversed, except for some special circumstance, normal usage would have the polarity remain normal. See Section E for details. Factory setting is normal (unchecked).
Section 23
RMS Compressor Section
This section provides for adjusting the compression parameters of the overall system, and for the Versarray™ Pro 215 Sub it is used to extend the apparent dynamic range of the system, by compressing the signal when it reaches 3 dB below hard limiting (amplifier clipping). The slope (ratio) of the compression is 2:1, so the input signal can increase 6 dB before hitting the Hard Limit point Parameters
Thr (Threshold), sets the threshold of the limiter action, with a range from 0 dBFS to -30 dBFS. Factory Setting is -5 dBFS.
Ratio, sets the slope of the compression curve, ranges from 2:1 to 32:1. Factory Setting is 2:1.
Knee, sets how sharp the compression curve engages relative to the Threshold point, ranges from 0% to 100%. Factory Setting is 50%.
Release, sets the release time after compression has engaged, till the compression is no longer engaged. Ranges from 100 milliseconds to 15000 ms. Factory Setting is 100 ms.
Attack, sets how quickly the compression engages once the threshold point has been passed. Ranges from 0.10 milliseconds to 2000 ms. Factory Setting is 1 ms.
Make-Up (Make up gain), has a +/- 12 dB range, in 0.1 dB increments. Factory Setting is 0 dB. There is a Bypass checkbox for overall bypass of the entire Compression section at once, which toggles the Compression on and off. This is located at the top right-hand side of this section.
Output Page
The Output Page of the Versarray™ Pro series DSP GUI provides the control of the woofer parameters of the system. See Fig. 14
![VR215_B1 - IP-169.254.137.145 - file loaded: VR215_Nominal_V2.p12 Load Save Store Recall Settings Fx/ Update Identity 20Hz 100Hz 1 kHz 20 kHz +30 +20 -30 +30 +20 -30 24 30 32 33 34 35 Curser View All Mag Phase Delay Unit Mute ms meter Delay [ ms ] Adj Fine Level [dB] Gain Select BC Gain Reduction Ga…](/content/2026/05/980983/images/d10e0857a7cb8dc108e5a31f78766cd72ca27c7f57969d290a88cdaa5188a0d2.jpg)
Fig. 14
Section 24
Frequency and Phase Response Graph and related controls
This section provides a graphical display of the frequency response changes dialed in to this Page. Using the Mag and Phase Radio Buttons, you can toggle between the Magnitude (frequency response) and the Phase of the changes.
The Cursor button places small cursor symbols at all the dialed-in EQ spots on the curve, providing a visual locator and flag for their actions.
The View All button starts a new Window that overlays the two pages curves, the Input Page, and the Output Page, on one graph. They are not summed, just overlaid on one another. See Fig. 13 from Input Page Section
Checkboxes and Radio Buttons provide for various display options from the default view, including the Phase response of both sections.
Note that these responses are for the electronics only, and DO NOT represent the actual electro-acoustic output of the system, or of the woofers.
Section 25
EQ Filters
Eight Bands of parametric EQ are available for the woofer EQ, and provide a lot of performance
enhancement of the system.
Each band has the following capabilities:
Amplitude changes up to + and - 15 dB, in 0.5 dB increments.
Filter Types for each band include:
Bell (parametric), with Q ranging from 0.4 to 128
Hi Shelf, with Q ranging from 0.1 to 5.1
Lo Shelf, with Q ranging from 0.1 to 5.1
Low Pass, with Q ranging from 0.1 to 5.1
High Pass, with Q ranging from 0.1 to 5.1
Notch Filter, with Q ranging from 4 to 104
All-Pass1, a 1st order all-pass filter, no Q adjust (it's 1st order)
All-Pass2, a 2nd order all-pass filter, with Q ranging from 4 to 104
Each band has a Bypass button ( Byp ) at the bottom of the EQ strip, which turns off the EQ band changes to make that band “flat”, then with another click, that EQ band action is turned back on.
There is a Bypass checkbox for overall bypass of the entire EQ section at once, which toggles the EQ on and off. This is located at the top right-hand side of this section.
There is an EQ Flat button for returning all the bands and settings to 0 dB, but this button does NOT toggle, if clicked, the EQ settings are lost, and you start over again.
If you should accidentally click this button, just re-load the most relevant Preset back into the VR 215
Sub system from the file folder, or from the on-board DSP memory.
Note it is strongly recommended that this section NOT be changed or altered by the end user. This is the primary EQ for the woofers in the Versarray™ Pro 215 Sub system, and as such, altering it even a little will not only degrade the crossover function and the acoustic mesh with the VR 112, but render the available EASE Focus 3 and EASE modeling data incorrect.
CHANGING THESE SETTINGS FROM THE FACTORY SETTINGS WILL VOID THE WARRANTY!
Section 26
RMS Compressor
This section provides for adjusting the compression parameters of the woofer, and is used to control the medium and long-term power to the woofer, so it will not be damaged due to thermal overdrive over the long-term. Thus, the settings may seem odd, but they are there to protect the woofer, as the woofer power amp has enough continuous power output capability to exceed the long-term thermal capacity of the woofer.
Parameters
Thr (Threshold), sets the threshold of the limiter action, with a range from 0 dBFS to -30 dBFS. Factory Setting is -5 dBFS.
Ratio, sets the slope of the compression curve, ranges from 2:1 to 32:1.
Factory Setting is 32:1
Knee, sets how sharp the compression curve engages relative to the Threshold point, ranges from 0% to 100%. Factory Setting is 0%.
Release, sets the release time after compression has engaged, till the compression is no longer engaged. Ranges from 100 milliseconds to 15000 ms. Factory Setting is 200 ms.
Attack, sets how quickly the compression engages once the threshold point has been passed.
Ranges from 0.10 milliseconds to 2000 ms. Factory Setting is 100 ms.
Make-Up (Make up gain), has a +/- 12 dB range, in 0.1 dB increments. Factory Setting is 0 dB. There is a Bypass checkbox for overall bypass of the entire Compression section at once, which toggles the Compression on and off. This is located at the top right-hand side of this section.
CHANGING THESE SETTINGS FROM THE FACTORY SETTINGS WILL VOID THE WARRANTY!
Section 27
Peak Limiter
This section provides for adjusting the peak limiting parameters of the woofer, and is used to control the short-term power to the woofer, so it will not be overdriven at high levels. It has an abrupt engagement threshold, no knee, controlled only by the attack and release parameters.
Parameters
Thr (Threshold), sets the threshold of the limiter action, with a range from 0 dBFS to -30 dBFS.
Factory Setting is -2.6 dBFS.
Release, sets the release time after limiting has engaged, till the limiting is no longer engaged.
Ranges from 100 milliseconds to 5,000 ms. Factory Setting is 200 ms.
Attack, sets how quickly the limiting engages once the threshold point has been passed.
Ranges from 1 millisecond to 1,000 ms. Factory Setting is 20 ms.
There is a Bypass checkbox for overall bypass of the entire Peak Limiting section at once, which toggles the peak limiting on and off. This is located at the top right-hand side of this section.
CHANGING THESE SETTINGS FROM THE FACTORY SETTINGS WILL VOID THE WARRANTY!
Section 28
Hard Lim
This is a peak limiter that absolute limits the signal to the level selected, with zero time constants. No attack, no release times.
It's sole purpose it to prevent and avoid PWM amplifier clipping. It has been found that PWM amplifier clipping is much more distressing and audible than a clean clip or limit in the digital domain as implemented in this section.
The proper use of this hard limiter can allow the system to play louder with less apparent distortion than if the PWM amplifier were allowed to clip uncontrolled, effectively extending the apparent loudness of this portion of the system by approximately 3 dB or more.
The previous compression and peak limiting stages take care of the music dynamics with minimal effect on the sound, and this stage minimizes the audible negative impact when the system is driven beyond full peak output power.
Parameter
Threshold, range of 0 dBFS to -9 dBFS. Factory Setting is -2.5
Indicator
Has a Limit indicator icon to show when Hard Limiting is occurring, located at the top of this sections strip.
CHANGING THIS SETTING FROM THE FACTORY SETTING WILL VOID THE WARRANTY!
Section 29
Makeup (Make up gain),
Range is 0 dB to +9 dB.
It is recommended that this control be left at 0 dB, as adding gain at this point will defeat the correct action of the Hard Limiter as Factory set.
If the Compressors and Limiters are re-configured away from Factory settings (which will void the Warranty), then this control may be of some utility.
Section 30
Delay, sets the delay time of the Lows Page signal for the woofer.
Delay Units, Radio Buttons select the units, either ms (milliseconds) or meters.
Parameter
Adj delay increments are 1 ms (or 0.34 meters), Fine delay increments are approx. 0.0207 ms (or 0.007 meters), with a maximum total delay of 41 ms (or 13.6 meters).
Factory setting for this section is 0.0 ms.
This setting should be adjusted to match the Versarray™ Pro 215 Sub to the rest of the systems location. It may be necessary to adjust the Delay on the VR 112 Pro Array instead, depending on which section needs to be delayed to line things up.
NOTE: When using the Crest Audio® Versarray™ Mk3 6 Foot Fly Bar to fly a Halo of Multiple VR 112's, and a separate Halo of multiple VR 215 Subs at the recommended hang locations on the flybar, the typical delay needed for the VR112 hang as a whole is approximately 4 ms to align it with the Subs for the best mesh at the crossover.
Section 31
Mute button, a click turns the Output Page signal output OFF.
The icon turns red, and an "X" appears next to the loudspeaker symbol.
To un-mute the signal, click it again.
This action also shows up on the View Page under the Signal Flow Chart B group, where the same icon in the signal chain shows as red when muted. As noted in that section, clicking on the icon while on the View Page will also toggle the Mute On or Off.
Section 32
Gain, sets output level of the Output Page.
Range is +/- 12 dB in 0.1 dB increments.
The Factory Presets use this point to add gain for the overall gain structure to minimize input stage and internal DSP system clipping or overload.
Factory Default is +6.0 dB.
Section 33
Level Meter, monitors signal level at the point selected by the Meter Select drop down menu.
The Meter Select drop down menu allows a choice of BC (Before Compression), or AL (After
Limiting). See the Signal Flow Chart Section B diagram Fig.10 for the details of where these points are in the signal chain.
It is recommended to leave the meter set to the default monitor point of BC, since the next two meters show how much compression and limiting is occurring.
The meter shows clipping of the signal (2nd from top indicator bar turns red), as well as compression as dialed in at Sections 26 and 27 (top indicator bar turns yellow).
Section 34
Cmp Gain Reduction meter, displays the level of compression occurring in section 26.
Section 35
Lim Gain Reduction meter, displays the level of limiting occurring in section 27.
This meter will tend to display up to approximately 4 to 5 dB of Gain Reduction at maximum reasonable output of the system. Driving the system harder than this will tend to result in increasingly audible distortion and/or compression, and is not recommended for high quality music playback or Sound Reinforcement.
Section 36
High Pass Filter, provides the control of the crossover parameters for the Low Frequency roll-off of
the woofer.
Slope/Type is a drop down menu bar, with the following options for filters:
Bypass
6 dB/Oct. Butterworth (BW)
12 dB/Oct. Butterworth
18 dB/Oct. Butterworth
24 dB/Oct. Butterworth
36 dB/Oct. Butterworth
48 dB/Oct. Butterworth
12 dB/Oct. Linkwitz-Riley (LZ)
24 dB/Oct. Linkwitz-Riley
36 dB/Oct. Linkwitz-Riley
48 dB/Oct. Linkwitz-Riley
12 dB/Oct. Bessel (BS)
24 dB/Oct. Bessel
Below the Slope/Type Drop down menu bar, is a Frequency (Hz) box, where you can enter the frequency in directly in Hz. This can range from 20 Hz to 20,000 Hz. Click on the box numerals, and type in the desired frequency in Hz, and hit Enter.
Factory setting is 23 Hz, 24 dB/Oct. Linkwitz-Riley
Altering this sections Filter type or Frequency from Factory settings will render the available EASE Focus 3 and EASE modeling data incorrect, and WILL void the Warranty.
Section 37
Low Pass Filter, provides the control of the crossover parameters for the High Frequency roll-off of the woofers.
Slope/Type is a drop down menu bar, with the following options for filters:
Bypass
6 dB/Oct. Butterworth (BW)
12 dB/Oct. Butterworth
18 dB/Oct. Butterworth
24 dB/Oct. Butterworth
36 dB/Oct. Butterworth
48 dB/Oct. Butterworth
12 dB/Oct. Linkwitz-Riley (LZ)
24 dB/Oct. Linkwitz-Riley
36 dB/Oct. Linkwitz-Riley
48 dB/Oct. Linkwitz-Riley
12 dB/Oct. Bessel (BS)
24 dB/Oct. Bessel
Below the Slope/Type Drop down menu bar, is a Frequency (Hz) box, where you can enter the frequency in directly in Hz. This can range from 20 Hz to 20,000 Hz. Click on the box numerals, and type in the desired frequency in Hz, and hit Enter.
Factory setting is 120 Hz, 24 dB/Oct. Bessel
Altering this sections Filter type or Frequency from Factory settings will render the available EASE
Focus 3 and EASE modeling data incorrect, and WILL void the Warranty.
Using the Non Network Push-Buttons On the VR Pro 215 Sub Rear Panel
The Versarray™ Pro 215 Sub offers a simple “no PC, no-network connection required” mode of operation using push buttons on the rear panel of the Input Plate to change the speaker systems operating parameters to meet differing line array configuration needs.
See Rear Panel Display diagram with numbered controls.
Fig. 15 shows just the push-button section under review.

Fig. 15
We will go over the push buttons one group at a time to show how to use them to configure a line array without the requirement to use a PC and a LAN network to connect to the Versarray™ Pro 215 Sub.
Section 1
Volume
Up and Down buttons provide for changing the Level of the audio signal.
Factory default is 0 dB, with a range down to -6 dB in 2 dB steps.
These Level choices become handy when there is a need to adjust the level of the Subs in a repeatable manner, when more Subs are used than are needed to balance the number of VR 112 Pro's present. The normal ratio of Subs to VR 112 Pro's is one Sub for every two VR 112 Pro's. This results in Sub levels that are slightly hotter than the VR 112 Pro units, but still sound totally natural with difficult program material such as acoustic guitar, female vocals and other sounds that sound poor with too much bass present.
If a Sub is being used with just one VR 112 Pro, then changing the Volume down to -6dB will balance the bass level back to the correct ratio.
Section 2
Sensitivity
Click to choose buttons allow selection of either +6 dBu or +12 dBu sensitivity of the Analog input (XLR in) of the Versarray™ Pro 215 Sub system. The Factory default is +6 dBu, and the gain structure of the rest of the DSP based preamp system has been based on this sensitivity level. If the +6 dBu is too sensitive for your requirements, then you can select the +12 dBu option instead with no penalty in performance or noise.
With the Input Sensitivity set to +6 dBu, it takes 1.75 VAC RMS to drive the Versarray™ Pro 215 Sub system to full power output on music. That would change to 3.5 VAC with a change of the Sensitivity to +12 dBu.
This button also gives another 6 dB of level adjustment between cabinets in the same line array, although it would be unlikely that additional attenuation beyond the 6 dB that is available in section C would be needed, these buttons will allow for even more range as needed.
Section 3
Polarity
A click to choose button allow selection of either Normal (default and indicator blank or white), and Inverted, where the indicator turns red.
Normal Sound Reinforcement practice is to keep the Subwoofer polarity correct with respect to bass transients, e.g., a kick drum mic placed in front of the drum should create a positive pressure wave. Thus the polarity of the Sub should reflect that situation. The polarity button is available for those instances when it is more convenient to take care of a polarity inversion somewhere else in the signal chain, at the speaker system array.
If the location of the Sub is not coincident with the acoustic center of the VR 112 array, one or the other should be delayed using the delay function in the Versarray™ Pro series User GUI software. The VR Pro 112 and the VR 215/218 Pro should both be able to be operated in Normal or non-inverted polarity with the proper amount of delay dialed in.
Section 4
Assign Network I.D.
These buttons allow you to set the network ID from hexadecimal 00 to FF.
The module's network ID is displayed on the two digit, 7-segment display. The two push buttons below the display are used to change the network assignment of the module. Pushing the left button increments the left digit 0 - F, while pushing the right button increments the right digit 0 - F. Push the buttons until the desired assignment is displayed. There are up to 255 different ID's (two digit hex number ID) available.
While these are normally used for the network ID function, the rear panel display also provides for a means to identify a given subwoofer if any of the Subs have had their parameters adjusted differently than other Subs used in the system.
Using these rear panel buttons wisely and appropriately can make the Versarray™ Pro 215 Sub work well for you even without a PC and LAN network connection.
PROJECT/PRESET FILE MANAGEMENT
We have already gone through some of the basics of loading a Preset file into a Versarray™ Pro 215 Sub, see sections associated with Fig. 1 through 9. Now, we cover the rest of the Versarray™ Pro series PC software GUI file management
Descriptions of Start-Up Page Functions
| IP | INTERFACE | NAME | UNIQUE ID | STATUS | NET. ID |
| 169 254 218 84 | LAN | VR215_A5 | 7779308474AD | Off-line | AS |
| 169 254 12 25 | LAN | VR215_00 | 5024A0B0959E | Off-line | 00 |
| 169 254 98 160 | LAN | VR112_02 | D0BAA5061A7B | Off-line | 02 |
| 169 254 124 110 | LAN | VR112_00 | 7409B1FF354E | Off-line | 00 |
| 169 254 146 165 | LAN | VR112_00 | 3907B2178312 | Off-line | 00 |
| 169 254 150 165 | LAN | VR112_00 | 8303B2178411 | Off-line | 00 |
| 169 254 166 153 | LAN | VR112_00 | 1C91039A2085 | Off-line | 00 |
| 169 254 63 32 | LAN | VR112_04 | C02C08E6A09E | Off-line | 04 |
| 169 254 35 51 | LAN | VR112_00 | 11E6AD9E7153 | Off-line | 00 |
| 169 254 150 135 | LAN | VR112_00 | 3366B1368613 | Off-line | 00 |
| 169 254 23 92 | LAN | VR112_01 | 4A7F075B81A7 | Off-line | 01 |
| 169 254 230 123 | LAN | VR215_00 | 367DB2838F6A | Off-line | 00 |
Fig. 2
Project File Management
F1
New Project
Starts a new project, prepares the GUI by clearing the Device List of all devices, including ones currently connected to the network. See Fig. 16

Fig. 16
If you click "Yes", a dialog Window will pop-up, as shown below in Fig. 3. The device ID's will be different, but the general format will be the same.
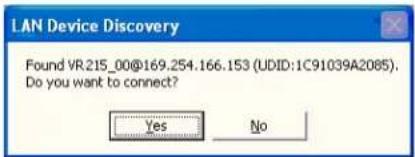
Fig. 3
When you click "Yes", a Connect Device dialog window comes up, as shown in Fig. 4
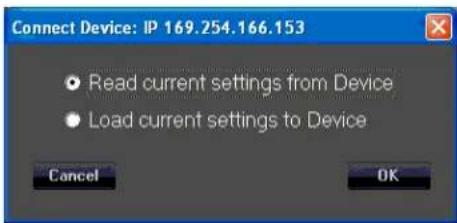
Fig. 4
To initiate a Project set-up, click on "Read current settings from Device" to start, then change any parameters you want to alter.
You can use the Copy Device function (D1) to copy the changed parameters to the other cabinets in the array as appropriate, make any other changes to any of the other cabinets one at a time in the array (amplitude shading, frequency shading, etc.) or load in of one of the MLAS™ Presets. Once all the parameters for all the cabinets in the array have been changed to the desired settings, then Save the project.
F2
Save Project
Save's a Project file to the PC software Project Folder
Click on the Save File icon (F2) to open a standard Windows file dialog window.
The default folder will be the Project folder in the VR Series v1.2.X folder, which is generally located on the root drive of the PC, the exact location which is dependent on your operating system version. During any given session, you can change the folder where the files are saved to, or read from, but the default Save location on start up of a new instance of the GUI software will always be the folder named Project.
F3
Load Project
Load's a Project file from the PC software Project folder
The Project file can only be loaded into a group of cabinets using the same cabinet ID's as were present when the Project was first created. If you attempt to load a Project file into a cabinet that was NOT a part of the original cabinets that were present on the DSP GUI network, then the saved parameters associated with a Project file will not transfer over to that new cabinet, and this may disrupt the proper loading of any other cabinets that were present at the time the original Project file was created.
The Project Files store and load all the parameters in all the Pages for a given device/cabinet, but unlike the Preset files, the Project file also saves the parameters that are found under the Settings icon, #4 on Fig. 7. These parameters are not loaded or changed when a Preset is loaded or saved. For a list of what those parameters are, see View Page, Section 4, Fig 14 and subsequent content. Instructions for loading a Project are just below this section.
Remember, a Project file only works with the exact same cabinets that were present when the Project was created.
Loading Projects from PC GUI software folders
- Position the View page from Fig. 6 so it does not cover up the row of icons at the top left corner of the Start page, but still has the bottom portions of the View page visible.
Click on icon F3, from the Start page (Fig.2), Load Project.
- The "Load Project" dialog window will come up, see Fig. 17

Fig. 17
Click Yes, as the default Preset "VR215_Nominal" is also stored in the File folders for future use, as needed.
- A file manager window will come up with the File Folder contents for the Project files, located at: For Windows 7 and for Windows XP - C:\Program Files (x86)\VR Series v1.2.X\Project For Windows 10 - C:\Program Files\VR Series v1.2.X\Project. No (x86) where C: is the root drive where the Versarray™ Pro series User GUI PC software has been located, and "X" is the version of the software you have loaded onto the PC.
You must pick a previously saved Project file, as there are no supplied Factory Project files, they must be associated with the exact cabinets present on the network at the time of the Project Save. Let's say you named a Project file "Example-Sub"
Highlight and Click "OPEN" on the Example-Sub Project file.
- The "LAN Device Discovery" window will come up. See Fig. 18

Fig. 18
Click on "Yes".
- The Connect Device dialog window comes up, as shown in Fig. 19 .

Fig. 19
Click on "Load Current Settings to Device"
Once the settings have been loaded into the VR 215 speaker system, the Device List should now show one or more of the units as “On-line”, See Fig. 5 in the previous section on Presets, where the arrow points.
- Double-click on the desired unit in the NAME column in that row, shown by the "X" in Fig. 5, and the View page will come up as shown in Fig. 6.
CAUTION: After loading a Project into an array of VR PRO models, look at the View page, and the other pages for that cabinet/device, to make sure that the desired parameters have loaded in, and that crossovers, and EQ are present. This will require paging through the Input page, and the Output page to make sure that the curves shown are not all flat with no crossover action or EQ present. IF THE VR215 IS OPERATED WITHOUT ANY CROSSOVERS ACTIVE, OR WITHOUT ANY LIMITERS ENGAGED, IT IS POSSIBLE THAT THE WOOFERS COULD BE DAMAGED, so it important to check the individual pages of each device/cabinet to make sure all the parameters have loaded in properly.
F4
Add Group
Contact Crest Audio® for details on this function, or check the Crest Audio® website for more information:
https://peaveycommercialaudio.com/versarray
M1
Store Program
Allows multiple cabinets to have a Preset File stored to memory, see Fig. 20

Fig. 20
All the cabinets currently connected online to the Versarray™ Pro series User GUI Software network are shown grayed in, other cabinets that may have been connected at one time are listed with white letters. The IP address for a particular cabinet can be determined by looking at the Device List of Fig. 2, which also lists the assigned Net ID number, as well as the Name of the device and the Unique ID number.
Once the online devices have been check box selected for "Store to device(s)", the network IP addresses turn orange. Choose a Name for the file to be loaded, make a "Select position" choice for
the onboard DSP memory location (one through ten of 10 Preset storage slots), and then click on the "Store" button.
These cabinets must all be of the same type, i.e., all VR 112's or all VR 215's, etc.
M2
Recall Program
Similar to Storing multiple devices, one can Recall from a list of multiple devices, however, you can only retrieve one Preset file at a time. See Fig. 21.
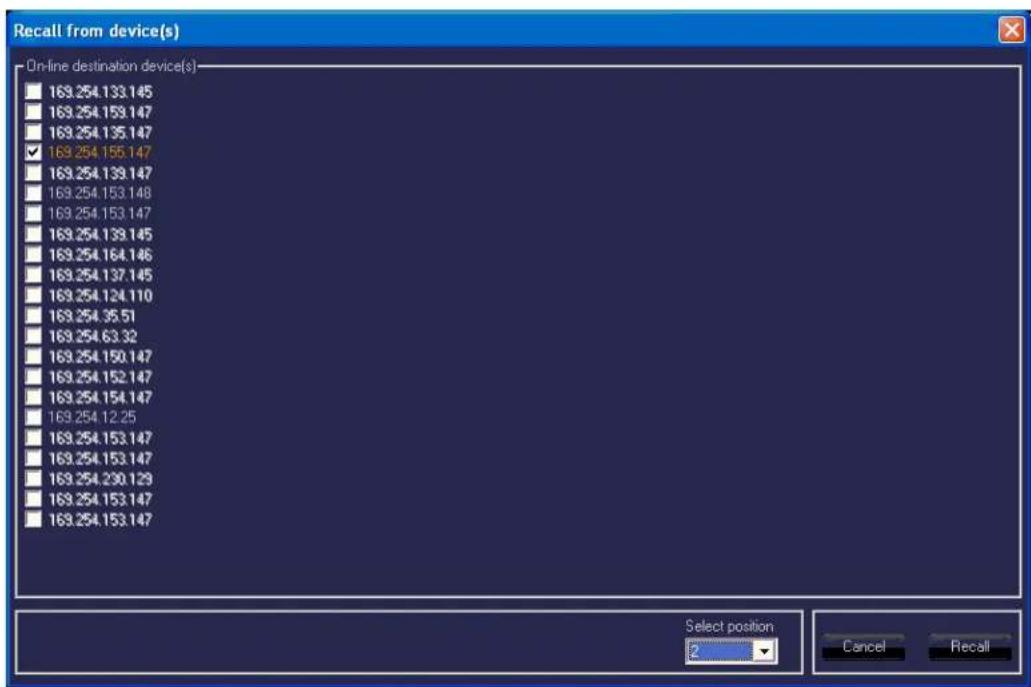
Fig. 21
Select the online device to have the Preset file Recalled, and click the check box for that device. Select the memory position to be Recalled, (one through ten of 10 Preset storage slots), and click the "Recall" button.
The Preset that was previously loaded into memory at that location will now be loaded into the units DSP preamp and change the parameters of the various pages to those Preset settings.
Line Array Device Management
The Device List, D∅, has several columns of information displayed.
The columns labeled IP, NAME, and NET ID are able to be changed and altered using the Settings Icon, Section 4 of the View Page. See that Section for details.
The NET ID can also be changed using the rear panel buttons shown on the Rear Panel Display at (11) Assign Network I.D. Buttons. If using the rear panel buttons to change the Network I.D., do so before establishing network connection, otherwise, once connected, use the GUI to make any changes.
D1
Copy Device
Copies the parameters of a highlighted device in the Device List D∅ to another device or devices in the Device List. See Fig. 22
NOTE: Do not attempt to copy a VR 215 Preset into a VR 112, copy the Presets from a given model into the same model.

Fig. 22
D2
Connect All Devices
Establishes connection with all networked devices sequentially, and displays the connections in the Device List.
D3
Disconnect All Devices
This disconnects all the On-line devices listed in the Device chart, and takes them Off-line from the network.
D4
Add Device
Adds a new device to the Device List, one unit at a time.
D5
Remove Device
As above, only removal of one device from the Device List.
D6
Search Devices
Initiates a search for devices connected to the Versarray™ Pro series User GUI Software network.
Must use the proper search parameter (IP address) in order for the software to detect devices connected to the network.
Preset Files Available for Use
Ten On-board Presets
- VR215 Nominal
- VR215 BassBoost
- VR218 Nominal
- VR218 BassBoost
- VR215 Nominal
- VR215 BassBoost
- VR218_Nominal
- VR218 BassBoost
- VR215 Nominal
- VR215_BassBoost
These first ten Presets are loaded into the power amp DSP memory, and are accessed directly using the Section A Store and Recall functions. File versions are also stored in the PC software DSP GUI Preset folder.
NOTE: The power amp DSP memory locations need to be loaded with an active working Preset file, or the DSP and power amp module would have no parameters loaded at all. This situation of no parameters would entail no crossover, no EQ, no limiters, etc., and thus would not only fail to perform to specification, but could allow the powered speaker system to become damaged at high drive levels. Therefore, with only two Factory Presets per Sub model, we loaded them into the memory locations that holds 10 Presets, in an alternating fashion. Users can overwrite the other 8 repeated or irrelevant Presets with their own custom Presets once they have a particular venue or use defined.
The VR 215 and the VR 218 have very similar settings, but it is best to use the correct model Preset file for the model in use. This provides for maximum performance from the VR 218, and maximum protection for the VR 215.
Preset files included in PC software DSP GUI Preset folder
(The following files are for the VR 112 Pro)
- 2cabs_Straight-line (0 degrees angle between cabs)
- 3cabs Straight-line
- 4cabs_Straight-line
- 6cabs_Straight-line
- 8cabs_Straight-line
- 2Cabs_J-line_section (angles of 12.5 to 15 degrees)
- 3Cabs J-line section
- 4Cabs J-line section
- LT_2Cabs_Mild_Angle (LT is Long Throw)
- LT_3Cabs_Mild_Angle
- LT_4Cabs_Mild_Angle
- LT_6Cabs_Mild_Angle
-
LT_8Cabs_Mild_Angle
-
BB_2Cabs_Mild_Angle (BB is Bass Boost)
- BB_3Cabs_Mild_Angle
- BB_4Cabs_Mild_Angle
- BB_6Cabs_Mild_Angle
- BB_8Cabs_Mild_Angle
- BB 2Cab More Angled
- BB_3Cab_More_Angled
- BB_4Cab_More_Angled
- BB_6Cab_More_Angled
- BB_2cabs_Straight-line
- BB_3cabs_Straight-line
- BB_4cabs_Straight-line
- BB_6cabs_Straight-line
- BB_8cabs_Straight-line
- BB 2Cabs J-line section
- BB_3Cabs_J-line_section
- BB_4Cabs_J-line_section
- Single_Cab_Flat
- 2Cabs_Mild_Angle
- 3Cabs_Mild_Angle
- 4Cabs_Mild_Angle
- 6Cabs_Mild_Angle
- 8Cabs_Mild_Angle
- 2Cab_More_Angled
- 3Cab_More_Angled
- 4Cab_More_Angled
- 6_Cabs_More_Angled
Subwoofer Preset Files
Files normally loaded into power amp memory, also in DSP GUI folder, for when they get overwritten in amp memory.
- VR218_Nominal
- VR215 Nominal
- VR218_BassBoost
- VR215_BassBoost
NOTE: DO NOT ERASE OR DELETE ANY OF THE FACTORY PRESET FILES, OR WRITE OVER THEM IN THE PC SOFTWARE FOLDERS WITH A CUSTOM SETTING WITHOUT FIRST CHANGING THE NAME.
Even if you do not plan to use the Crest Audio® MLAS™ technique at this time, you may find a use for it or it's files later, or want to experiment with the files in the future.
Crest Audio® will provide copies of the Preset files, and any eventual updates of same at the Crest Audio® website at:
https://peaveycommercialaudio.com/versarray
New Folders can be created in the User GUI software location, with your own custom Presets saved into that folder. At start-up, the User GUI software by default will always look for the Folders named "Preset" or "Project", but you could perform some file manipulation and copy all of the stock Factory
MLAS ™ files into a newly created Folder called “Backup”, and then alter the files in the “Preset” folder at will.
About the Bass Boost Presets
When using the Versarray™ Pro system for use with playback or live DJ, EDM, or other bass heavy music genres, it may be desirable to use the provided Bass Boost Presets.
These have been carefully configured to boost the low bass and mid-bass for extra punch and definition in those regions. Use of these Bass Boost Presets will add the bass content to the music that needs it, but without risking damage or premature limiting of the Subs or the system as a whole. Trying to add boost in the bass externally to the system will not be as effective or allow for as much additional headroom in terms of maximum peak SPL.
While the “AUX fed” approach to sub levels can be very effective, and is typically used to increase the level of bass energy in a multi-way system with Subs, in the case of many systems, this can lead to a muddy sounding mid-bass that has a tendency to “boom”.
This is especially the case when the Sub levels are raised more than 6 dB above nominal.
Use of the Bass Boost Presets for the Versarray™ Pro system will eliminate that muddiness, and provide the extra bass punch using the nominally recommended number of Subs to VR112's of one Sub for every two VR 112 Pro's. At this ratio, the levels of the Subs will be up approx. 6 - 8 dB above a nominal "flat" response with the use of the Bass Boost Presets, depending on the exact environment and system configuration.
If further levels of bass energy are desired or needed, then the Bass Boost Presets allow the Sub levels be turned up even more than nominal for the Bass Boost settings, and still avoid the worst of the “AUX Fed” boom. If absolutely necessary, up to 6 dB more Sub level than nominal can be used with the Bass Boost Preset with little adverse effect on the overall quality of the system’s sound. This will be a significant amount of extra bass energy above a flat response, and should only be done with enough VR 215 Subs available to deal with this much extra output demand. Instead of the recommended number of Subs being one Sub for every two VR 112 Pro’s, up to one Sub per one VR112 Pro can be utilized for maximum impact. This will then allow the Subs greatly increased amount of bass output demands to “keep up” with the mids and highs coming from the VR 112 array, without the Subs going into compression or limiting.
If an equal number of Subs is used with a given number of VR112's, and all Subs are using the Bass Boost Presets, then the gain of the Subs and VR112's can remain set at stock gain levels, and the overall level of the bass energy will then be approximately 12 - 14 dB above a nominally flat response. Increasing the Sub drive levels above this range will then require some pull back of the midbass levels at around 160 Hz.
CAUTION!: THESE KINDS OF BASS ENERGY LEVELS COULD CAUSE INTERNAL ORGAN DAMAGE, PERMANENT HEARING LOSS, OR OTHER ILL EFFECTS IF SOMEONE STAYS NEAR THE SUBS AND IS SUBJECTED TO MAXIMUM SPL'S!
USE EXTREME CARE IN SETTING THE MAXIMUM LOUDNESS!
For the latest up to date Owner's Manual's, Preset files, and other information about the Versarray ™ Pro system check out:
https://peaveycommercialaudio.com/versarray
LOSS OF LAN NETWORK CONNECTION
If you experience a loss of the LAN network connection to one or more of the VR speaker systems while operating the Versarray TM Pro system's PC DSP GUI software, an error message will be generated.
See Figure 23 below.

FIG. 23
This can occur due to momentary loss of the LAN connection, a faulty Ethernet RJ45 plug or jack, packet loss, or other common network problems.
While the Versarray ™ Pro system's PC DSP GUI software runs without issues alongside Dante on a LAN, Dante has a very robust recovery capability, and may maintain connectivity despite any intermittent network connections.
If this occurs, then to reconnect the PC with the VR unit, click OK on the error message click button. If the connection has re-established itself without further errors, then a dialog Window will pop-up, as shown below in Fig. 3.
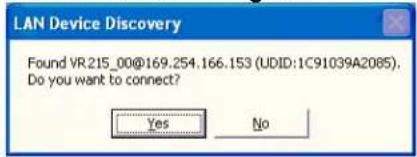
Fig. 3.
You can then click on OK to re-connect as it normally progresses upon initial start-up and connection.
However, if the connection was not re-established due to network conditions, the following error message may pop-up, as shown below in Fig. 24
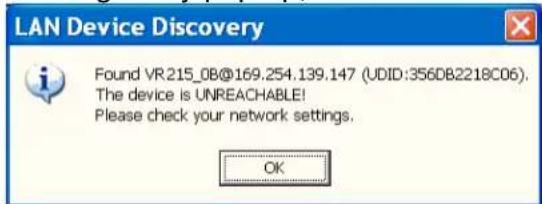
Fig. 24
If this is the case, then close the Versarray TM Pro system's PC DSP GUI software window by clicking on the Close box in the upper right hand corner, and then Yes on the Exit box click button. See Fig. 25 below.

Fig. 25
Then once the software has closed, allow enough time for the network connection to re-establish, this will typically take as long as it normally does when you first connect, however long your particular system takes to do that. This can be up to a minute or more.
Then start the VR PC DSP GUI software again.
If you continue to get error messages or the Unreachable error (Fig. 24), then the network cables, connectors, and such will all need to be checked for correct insertion and continuity.
It may be necessary to re-boot the computer if the problem persists after all the cables and connectors check out OK. This should be done in conjunction with cycling the power to the Versarray ™ Pro speaker system's.
Design and specifications subject to change without notice.
Architectural and Engineering Specifications
The loudspeaker system shall have an operating bandwidth of 35 Hz to 125 Hz, measured on axis at 1 meter in a half-space environment, with +3/- 6 dB tolerance. The maximum peak output level shall be 139 dB when measured at a distance of one meter with full system output. The woofers loaded into the cabinet shall be two Peavey® Low Rider® 15" 4 ohm woofers, rated at 800W continuous power per AES Std. 1984-2. The enclosure vents shall incorporate the Univent™ air pumping system to aid cool air circulation through the cabinet.
The powered speaker amplifiers shall have a total power output of 1500 watts sine wave, and the power amp shall be fan cooled. Signal input shall be provided via XLR analog and Dante® Ethernet connections. DSP signal processing shall be incorporated to provide the crossover, protective filtering and EQ for the system, as well as limiting and compression to minimize overdrive distortion.
The cabinet shall incorporate rigging hardware to interface with the Crest Audio® Versarray™ FlyQWIK™ rigging system, specifically the Crest Audio® Versarray™ Mk III HALO, and the Versarray™ Mk III Sub Support Frame.
The outside dimensions shall be 37.75 inches high by 25.13 inches wide by 21.25 inches deep. The weight shall be 161 pounds. The loudspeaker system shall be a Crest Audio® model Versarray™ Pro 215 Sub.

FCC/ICES Compliancy Statement
This device complies with Part 15 of the FCC. Operation is subject to the following two conditions: (1) this device may not cause harmful interference, and (2) this device must accept any interference received, that may cause undesired operation.
Warning: Changes or modifications to the equipment not approved by Peavey Electronics Corp. can void the user's authority to use the equipment.
Note – This equipment has been tested and found to comply with the limits for a Class A digital device, pursuant to Part 15 of the FCC rules. These limits are designed to provide reasonable protection against harmful interference when the equipment is operated in a commercial environment. This equipment generates, uses and can radiate radio frequency energy and, if not installed and used in accordance with the instruction manual, may cause harmful interference to radio communications. Operation of this equipment in a residential area is likely to cause harmful interference in which case the user will be required to correct the interference at their expense.

www.peaveycommercialaudio.com Warranty registration and information for U.S. customers available online at www.peaveycommerciallaudio.com/warranty or use the QR tag below

Features and specifications subject to change without notice.
Crest Audio 5022 HWY 493 N. Meridian, MS 39305 (601) 483-5365 FAX (601) 486-1278

Logo referenced in Directive 2002/96/EC Annex IV (CUI)67/88,13.02.03 and defined in EN 50418: 2005 The bar is the symbol for marking of new waste and is applied only to equipment manufactures after 13 August 2005
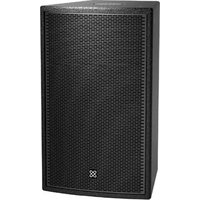

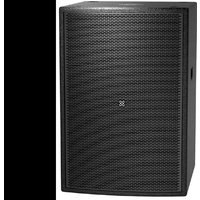
- VERSARRAY™ PRO 215 POWERED ENCLOSURE PRODUCT SPECIFICATIONS
- CREST AUDIO
- FEATURES
- SPECIFICATIONS
- VERSARRAY PRO 215
- REAR PANEL CONTROLS AND CONNECTIONS
- SYSTEM SETTINGS GROUP
- VOLUME BUTTONS
- SENSITIVITY BUTTONS
- POLARITY SWITCH
- ASSIGN NETWORK I.D. BUTTONS
- IN
- OUT/THRU
- MAKING AUDIO CONNECTIONS
- AC OUT/THRU
- AC LINE INPUT
- ON/OFF POWER SWITCH WITH BLUE LED
- DANTE OPERATION
- HANGING VERSARRAY™ PRO 215 POWERED SUBS BELOW A VERSARRAY™ MK III HALO
- CONNECTING THE FIRST SUB TO THE HALO
- USING MULTIPLE VERSARRAY™ 112 PRO'S OR MK3'S MOUNTED UNDER A VERSARRAY™ PRO 215 SUB
- WARNING
- CREST AUDIO® VERSARRAY™ PRO SERIES - USER GUI USE INSTRUCTIONS
- CONNECTING THE USER GUI SOFTWARE TO THE VERSARRAY™ PRO 215 SUB SPEAKER SYSTEM FOR ANALOG SIGNAL INPUT USE
- THE MOST COMMON CAUSE OF A FAILURE TO CONNECT TO THE POWER AMP MODULE VIA THE NETWORK IS NOT ALLOWING ENOUGH TIME FOR THE PC TO MAKE THE NETWORK CONNECTION CORRECTLY BEFORE STARTING THE SOFTWARE
- USING THE VERSARRAY™ PRO 215 SUB USER GUI SOFTWARE
- QUICK START INSTRUCTIONS
- CAUTION
- USE OF SETTINGS OTHER THAN THE FACTORY SETTINGS FOR FUNDAMENTAL PARAMETERS WILL VOID THE WARRANTY
- QUICK START INSTRUCTIONS, CONT'D
- LOADING PRESETS FROM PC GUI SOFTWARE FOLDERS
- FULL LIST OF FEATURES OF THE VERSARRAY™ PRO SERIES PC SOFTWARE GUI PAGES FOR THE VR PRO 215 SUB
- VIEW PAGE
- PRESET FILE MANAGEMENT GROUP A
- SIGNAL FLOW CHART GROUP B
- SECTION 1
- TEMPERATURE
- SECTION 2
- INPUT SOURCE
- SECTION 3
- INTERNAL NOISE GENERATOR ENABLE
- SECTION 4
- SETTINGS
- NAME
- AUTO-SLEEP
- AUTO-STANDBY
- INP HEADROOM
- NETWORK ID
- SECTION 5
- FW UPDATE
- SECTION 6
- IDENTIFY
- SECTION C
- VOLUME
- SECTION D
- SENSITIVITY
- SECTION E
- POLARITY
- SECTION F
- PAGE SELECT BUTTONS
- SECTION H
- SECTION I
- SECTION 7
- SECTION 8
- SECTION 9
- ANALOG INPUT LEVEL
- SECTION 10
- INPUT PAGE
- SECTION 11
- SECTION 12
- RELEASE
- ATTACK
- SECTION 13
- SECTION 14
- SECTION 15
- SECTION 16
- CHANGING THE BANDS WITH FACTORY SETTINGS MAY VOID THE WARRANTY
- SECTION 17
- SECTION 18
- PARAMETER
- SECTION 19
- SECTION 20
- SECTION 21
- SECTION 22
- SECTION 23
- RMS COMPRESSOR SECTION
- OUTPUT PAGE
- SECTION 24
- SECTION 25
- EQ FILTERS
- SECTION 26
- RMS COMPRESSOR
- PARAMETERS
- CHANGING THESE SETTINGS FROM THE FACTORY SETTINGS WILL VOID THE WARRANTY
- SECTION 27
- PEAK LIMITER
- SECTION 28
- HARD LIM
- INDICATOR
- SECTION 29
- SECTION 30
- SECTION 31
- SECTION 32
- SECTION 33
- SECTION 34
- SECTION 35
- SECTION 36
- SECTION 37
- PROJECT/PRESET FILE MANAGEMENT
- DESCRIPTIONS OF START-UP PAGE FUNCTIONS
- PROJECT FILE MANAGEMENT
- F1
- FIG. 4
- F2
- F3
- LOADING PROJECTS FROM PC GUI SOFTWARE FOLDERS
- F4
- M1
- M2
- RECALL PROGRAM
- LINE ARRAY DEVICE MANAGEMENT
- D1
- D2
- D3
- D4
- D5
- D6
- PRESET FILES AVAILABLE FOR USE
- TEN ON-BOARD PRESETS
- PRESET FILES INCLUDED IN PC SOFTWARE DSP GUI PRESET FOLDER
- ABOUT THE BASS BOOST PRESETS
- LOSS OF LAN NETWORK CONNECTION
- ARCHITECTURAL AND ENGINEERING SPECIFICATIONS
Brand : CREST AUDIO
Model : Versarray PRO 215
Category : Loudspeaker