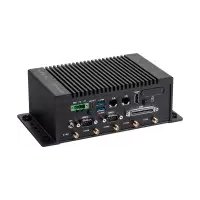
PV100A - Industrial computer ASUS - Free user manual and instructions
Find the device manual for free PV100A ASUS in PDF.


| Product Type | Portable LED Projector |
| Brand | ASUS |
| Model | PV100A |
| Dimensions (W x D x H) | 150 x 110 x 50 mm |
| Weight | 0.5 kg |
| Power Consumption | 30 W (typical) |
| Power Supply | AC 100-240V, 50/60 Hz |
| Light Source | RGB LED |
| Brightness | 150 ANSI lumens |
| Native Resolution | WVGA (854 x 480) |
| Contrast Ratio | 1000:1 |
| Lamp Life | Up to 30,000 hours |
| Input Ports | HDMI, USB-A, Micro USB (power) |
| Output Ports | 3.5 mm audio jack |
| Built-in Speaker | 1W mono |
| Keystone Correction | ±40° vertical |
| Projection Size | 20 - 120 inches |
| Throw Ratio | 1.4:1 |
| Noise Level | <25 dB |
| Operating Temperature | 0°C to 40°C |
| Warranty | 1 year limited |
Frequently Asked Questions - PV100A ASUS
User questions about PV100A ASUS
0 question about this device. Answer the ones you know or ask your own.
Ask a new question about this device
Download the instructions for your Industrial computer in PDF format for free! Find your manual PV100A - ASUS and take your electronic device back in hand. On this page are published all the documents necessary for the use of your device. PV100A by ASUS.
USER MANUAL PV100A ASUS
PV100A Series Embedded Computer
User Manual
E17975
First Edition
September 2021
COPYRIGHT INFORMATION
No part of this manual, including the products and software described in it, may be reproduced, transmitted, transcribed, stored in a retrieval system, or translated into any language in any form or by any means, except documentation kept by the purchaser for backup purposes, without the express written permission of ASUSTeK COMPUTER INC. ("ASUS").
ASUS PROVIDES THIS MANUAL "AS IS" WITHOUT WARRANTY OF ANY KIND, EITHER EXPRESS OR IMPLIED, INCLUDING BUT NOT LIMITED TO THE IMPLIED WARRANTIES OR CONDITIONS OF MERCHANTABILITY OR FITNESS FOR A PARTICULAR PURPOSE. IN NO EVENT SHALL ASUS, ITS DIRECTORS, OFFICERS, EMPLOYEES OR AGENTS BE LIABLE FOR ANY INDIRECT, SPECIAL, INCIDENTAL, OR CONSEQUENTIAL DAMAGES (INCLUDING DAMAGES FOR LOSS OF PROFITS, LOSS OF BUSINESS, LOSS OF USE OR DATA, INTERRUPTION OF BUSINESS AND THE LIKE), EVEN IF ASUS HAS BEEN ADVISED OF THE POSSIBILITY OF SUCH DAMAGES ARISING FROM ANY DEFECT OR ERROR IN THIS MANUAL OR PRODUCT.
Products and corporate names appearing in this manual may or may not be registered trademarks or copyrights of their respective companies, and are used only for identification or explanation and to the owners' benefit, without intent to infringe.
SPECIFICATIONS AND INFORMATION CONTAINED IN THIS MANUAL ARE FURNISHED FOR INFORMATIONAL USE ONLY, AND ARE SUBJECT TO CHANGE AT ANY TIME WITHOUT NOTICE, AND SHOULD NOT BE CONSTRUED AS A COMMITMENT BY ASUS. ASUS ASSUMES NO RESPONSIBILITY OR LIABILITY FOR ANY ERRORS OR INACCURACIES THAT MAY APPEAR IN THIS MANUAL, INCLUDING THE PRODUCTS AND SOFTWARE DESCRIBED IN IT.
Copyright © 2021 ASUSTeK COMPUTER INC. All Rights Reserved.
LIMITATION OF LIABILITY
Circumstances may arise where because of a default on ASUS' part or other liability, you are entitled to recover damages from ASUS. In each such instance, regardless of the basis on which you are entitled to claim damages from ASUS, ASUS is liable for no more than damages for bodily injury (including death) and damage to real property and tangible personal property; or any other actual and direct damages resulted from omission or failure of performing legal duties under this Warranty Statement, up to the listed contract price of each product.
ASUS will only be responsible for or indemnify you for loss, damages or claims based in contract, tort or infringement under this Warranty Statement.
This limit also applies to ASUS' suppliers and its reseller. It is the maximum for which ASUS, its suppliers, and your reseller are collectively responsible.
UNDER NO CIRCUMSTANCES IS ASUS LIABLE FOR ANY OF THE FOLLOWING: (1) THIRD-PARTY CLAIMS AGAINST YOU FOR DAMAGES; (2) LOSS OF, OR DAMAGE TO, YOUR RECORDS OR DATA; OR (3) SPECIAL, INCIDENTAL, OR INDIRECT DAMAGES OR FOR ANY ECONOMIC CONSEQUENTIAL DAMAGES (INCLUDING LOST PROFITS OR SAVINGS), EVEN IF ASUS, ITS SUPPLIERS OR YOUR RESELLER IS INFORMED OF THEIR POSSIBILITY.
SERVICE AND SUPPORT
Visit our multi-language web site at https://www.asus.com/support/
Contents
About this manual....5
Conventions used in this manual....6
Typography....6
Package contents ....7
Chapter 1: Getting to know your Embedded computer
1.1 Features....10
1.1.1 Front view 10
1.1.2 Rear view.... 10
1.1.3 I/O ports and LEDs.... 11
Chapter 2: Using your Embedded computer
2.1 Getting started....18
2.1.1 Connect the adapter cable to your Embedded computer....18
2.1.2 (optional) Connect the AC power adapter to your Embedded computer 19
2.1.3 Connect a display panel to your Embedded computer....21
2.1.4 Connect the USB cable from keyboard or mouse 22
2.1.5 Install the cable tie and mount 23
2.2 Installing your Embedded computer with the wall mount 24
2.3 Configuring the Boot mode 25
2.4 Turning your Embedded computer off....26
Chapter 3: Upgrading your Embedded computer
3.1 Removing the bottom cover....28
3.2 Replacing the bottom cover 29
3.3 Installing a LTE Mini PCIe card 30
3.4 Installing the M.2 GPS module....31
3.5 Installing the Wi-Fi module....32
3.6 Installing a nano SIM card....33
3.6.1 Installing a nano SIM card inside the chassis.... 33
3.6.2 Installing a nano SIM card to the rear of the Embedded computer ..... 34
3.7 Installing an SD card....35
Appendix
Safety information....38
Setting up your system.... 38
Care during use....39
Regulatory notices 41
Service and Support....51
About this manual
This manual provides information about the hardware and software features of your Embedded computer, organized through the following chapters:
Chapter 1: Getting to know your Embedded computer
This chapter details the hardware components of your Embedded computer.
Chapter 2: Using your Embedded computer
This chapter provides you with information on using your Embedded computer.
Chapter 3: Upgrading your Embedded computer
This chapter provides you with information on how to upgrade the memory modules, wireless modules, and hard disk drive / solid state drive of your Embedded computer.
Chapter 4: Booting up your Embedded computer
This chapter tells how to boot up your Embedded computer.
Appendix
This section includes notices and safety statements your Embedded computer.
Conventions used in this manual
To highlight key information in this manual, some text are presented as follows:
IMPORTANT! This message contains vital information that must be followed to complete a task.
NOTE: This message contains additional information and tips that can help complete tasks.
WARNING! This message contains important information that must be followed to keep you safe while performing certain tasks and prevent damage to your Embedded computer's data and components.
Typography
Bold text Indicates a menu or an item to select.
Italic
This indicates sections that you can refer to in this manual.
Package contents
Your Embedded computer package contains the following items:

PV100A Series
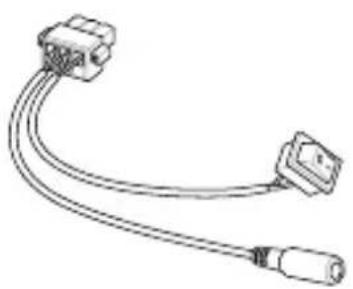
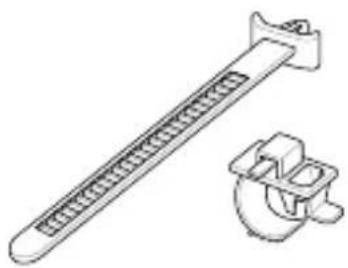
Adapter cable with switch Cable mount and tie


IO port dust covers Additional rubber shock absorbers
Optional items

High Density cable
NOTE:
- Some bundled accessories may vary with different models.
- The device illustration is for reference only. Actual product specifications may vary with models.
- If the device or its components fail or malfunction during normal and proper use within the warranty period, bring the warranty card to the ASUS Service Center for replacement of the defective components.
1
Getting to know your Embedded computer
1.1 Features
1.1.1 Front view
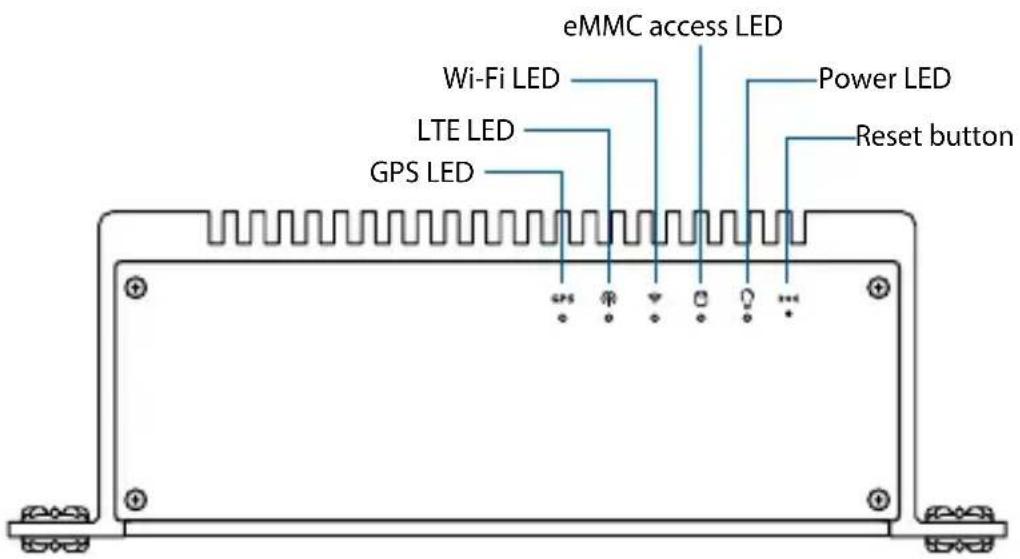
1.1.2 Rear view

1.1.3 I/O ports and LEDs
GPS
GPS LED
This LED is used to indicate GPS activity.
| LED color Status Description | |
| Red User defined User defined | |
| Green Blink Module is transmitting/receiving data | |
| Off Module is not transmitting/receiving data |

LTE LED
This LED is used to indicate LTE activity.
| LED color Status Description | |
| Red User defined User defined | |
| Green Blink Module is transmitting/receiving data | |
| Off Module is not transmitting/receiving data |

Wi-Fi LED
This LED is used to indicate Wi-Fi activity.
| LED color Status Description | |
| Red User defined User defined | |
| Green Blink Module is transmitting/receiving data | |
| Off Module is not transmitting/receiving data |

eMMC access LED
This indicator lights up when your Embedded computer is accessing the internal storage drives.
| LED color Status Description | |
| Green Blink eMMC is reading/writing data |

Power LED
This LED lights up depending on the current power status of your Embedded computer.
| LED color Status Description | ||
| Red On | Embedded computer is connected to a power source | |
| Green On SOC Power on | ||

Reset button
The reset button allows you to reset the Embedded computer.

Nano SIM card / Micro SD card combo slot
This combo slot allows you to insert a Nano SIM card to the top slot or a Micro SD card to the bottom slot.
NOTE:
- This slot is covered with a metal cover. Ensure to remove and replace the metal cover when installing a Nano SIM card and/or Micro SD card. For more information on removing and replacing the metal cover, please refer to Installing a nano SIM card to the rear of the Embedded computer or Installing an SD card.
- The Nano SIM card slot is hot swappable.
HDMI
HDMI™ port
The integrated 19-pin HDMI™ (High Definition Multimedia Interface) port with a receptacle connector can support resolutions up to 3840 x 2160 @ 60 Hz on external display devices.

LAN port
The 8-pin RJ-45 LAN port supports a standard Ethernet cable for connection to a local network.

USB 3.2 Gen 1 port
The USB 3.2 Gen 1 (Universal Serial Bus) port provides a transfer rate up to 5 Gbit/s, and provides a maximum of 5V/0.9A output.

USB 3.2 Gen 1 Type-C® OTG port
This USB Type-C® OTG (Universal Serial Bus) port provides a transfer rate of up to 5 Gbit/s, and provides a maximum of 5V/1.5A output. This port supports OTG mode that can be taken to replace UART debug console.
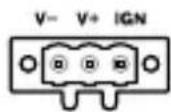
Power input jack
This power input jack allows you to connect the bundled adapter cable. Power supplied through this jack supplies power to the Embedded computer.

HDC
High Density Cable port
The High Density cable port allows you to connect the High Density cable which features an integrated high density connector for various interfaces. This port supports 4 x isolated DI, 4 x isolated DO, 2 x RS-232/422/485, 1 x Mic-in, 1 x Line-out, 2 x CANbus (CAN2.0 A/B, CANOpen, J1939, OBDII).
NOTE: The High Density cable is optional and may not be bundled.
COM1
Serial (COM) connector
The 9-pin RS232/422/485 serial (COM) connector allows you to connect devices that have serial ports such as bar code scanner, modem, or printers. Please refer to the table below for the pin definitions of the different COM connectors.

| Pin RS-232 RS-422 RS485 | ||
| 1 NA TX- D- | ||
| 2 RXD TX+ D | ||
| 3 TXD RX+ NA | ||
| 4 NA RX- NA | ||
| 5 GND GND GND | ||
| 6 NA NA NA | ||
| 7 RTS NA NA | ||
| 8 CTS NA NA | ||
| 9 NA NA NA | ||
COM2
Serial (COM) connector
The 9-pin RS232/422 serial (COM) connector allows you to connect devices that have serial ports such as bar code scanner, modem, or printers. Please refer to the table below for the pin definitions of the different COM connectors.
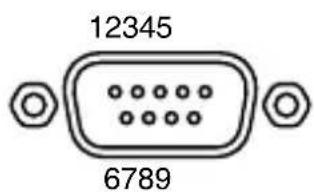
| Pin RS-232 RS-422 | |
| 1 NA TX- | |
| 2 RXD TX+ | |
| 3 TXD RX+ | |
| 4 NA RX- | |
| 5 GND GND | |
| 6 NA NA | |
| 7 NA NA | |
| 8 NA NA | |
| 9 RI NA | |

Functional Earth Ground
The Functional Earth Ground provides you with a grounding point.
ANT.1
GPS Wireless antenna jack
The GPS wireless antenna jack allows you to connect a wireless antenna for GPS signals.
NOTE: The GPS wireless antenna is optional and may not come bundled.
ANT.2
LTE Wireless antenna jack
ANT.3
The LTE wireless antenna jack allows you to connect a wireless antenna for LTE signals.
NOTE: The LTE wireless antenna is optional and may not come bundled.
ANT.4
ANT.5
WLAN Wireless antenna jack
The WLAN wireless antenna jack allows you to connect a wireless antenna for Wi-Fi signals.
NOTE: The WLAN wireless antenna is optional and may not come bundled.
Using your Embedded computer
2
2.1 Getting started
2.1.1 Connect the adapter cable to your Embedded computer
You can connect your own wires to the bundled adapter cable, please refer to the steps below:
A. Remove the three (3) screws securing the wires from your adapter cable, then remove the cable.

B. Insert the wires into the adapter cable and secure them using the screws removed previously.
NOTE: The amount of wires inserted may vary according to preference. This illustration is for reference only.
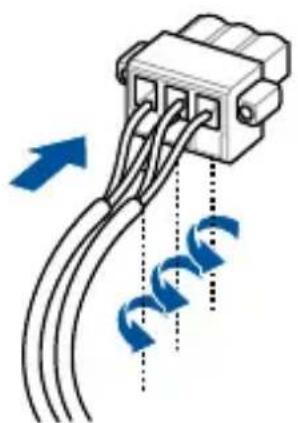
C. Connect the Adapter cable to your Embedded computer's power input jack, then secure it with the two screws on the adapter cable.
NOTE: The Embedded computer should power on once a power source is connected to it.
2.1.2 (optional) Connect the AC power adapter to your Embedded computer
If your Embedded computer package comes bundled with a power adapter, you may follow the steps below to set up your Embedded computer using the power adapter.
NOTE: This section depends on the availability of the power adapter. The power adapter is optional and may not come bundled.
A. Connect the power cord to the AC power adapter.
B. Connect the adapter cable to your Embedded computer's power input jack, then secure it with the two screws on the adapter cable.
C. Connect the power adapter to the adapter cable.
D. Plug the AC power adapter into a 100V\~240V power source.
E. Toggle the power switch on the adapter cable to On.

IMPORTANT!
- We strongly recommend that you use only the AC power adapter and cable that came with your Embedded computer.
- We strongly recommend that you use a grounded wall socket while using your Embedded computer.
- The socket outlet must be easily accessible and near your Embedded computer.
- To disconnect your Embedded computer from its main power supply, unplug your Embedded computer from the power socket.
NOTE:
Please refer to the following for more information on the adapter:
65W Power adapter
- Input voltage: 100-240 Vac
- Input frequency: 50-60 Hz
• Rating output current: 5.417A (65.0 W)
• Rating output voltage: 12.0V
2.1.3 Connect a display panel to your Embedded computer
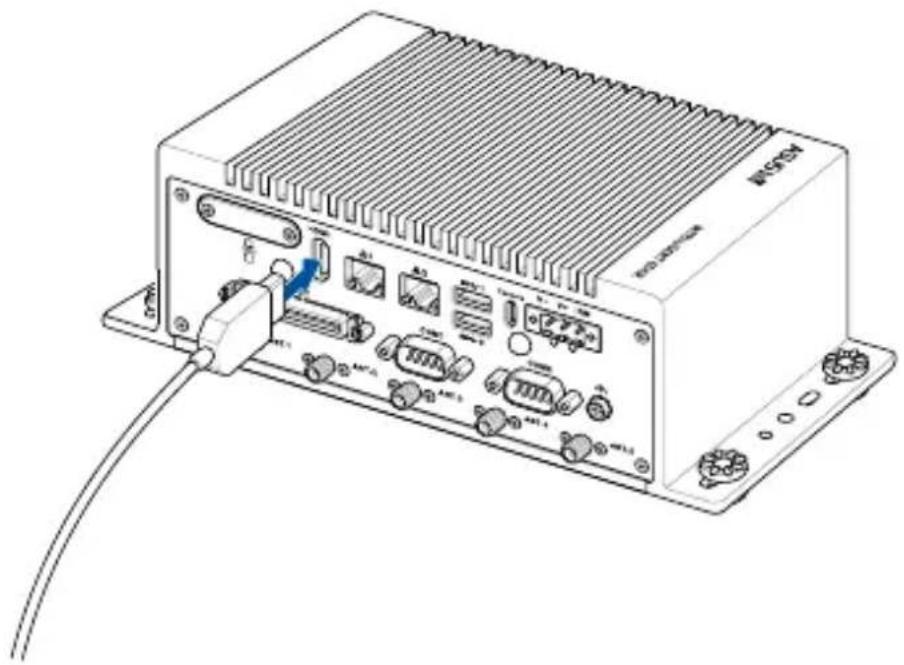
You can connect a display panel or projector to your Embedded computer that has the following connectors:
- HDMI connector
To connect a display panel to your Embedded computer:
Connect one end of an HDMI cable to an external display, and the other end of the cable to your Embedded computer's HDMI port.
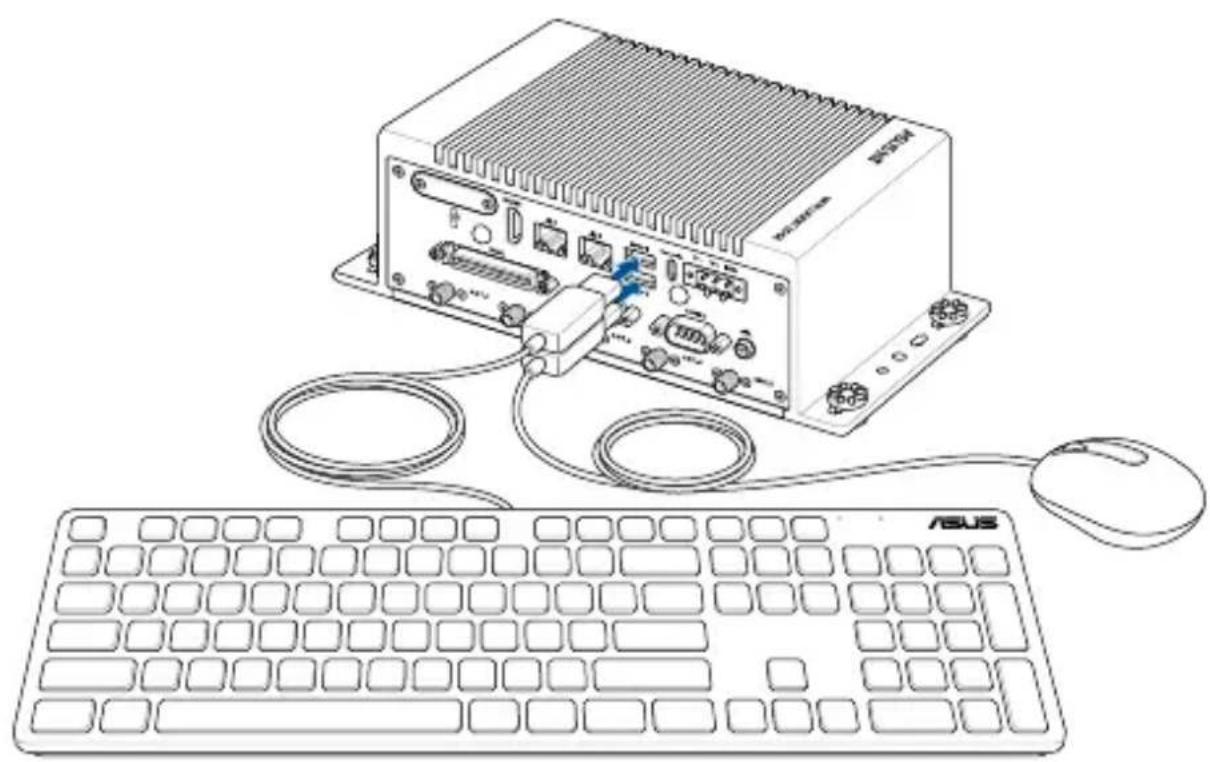
2.1.4 Connect the USB cable from keyboard or mouse
You can connect generally any USB keyboard and mouse to your Embedded computer. You can also connect a USB dongle for a wireless keyboard and mouse set.
To connect a keyboard and mouse to your Embedded computer:
Connect the USB cable from your keyboard and mouse to any of the USB ports of your Embedded computer.
NOTE:
• The keyboard varies with country or region.
• The keyboard and mouse are purchased separately.
2.1.5 Install the cable tie and mount
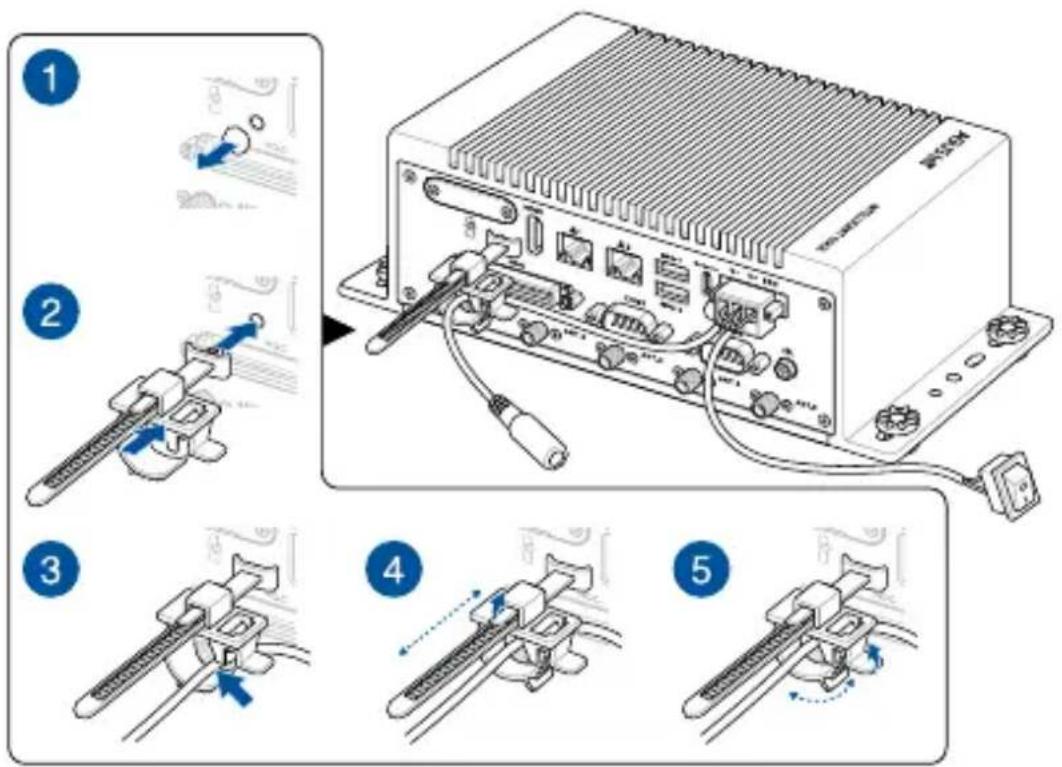
You can install the bundled cable tie and mount which may be used to organize your cables.
To install the cable tie and mount to your Embedded computer:
- Remove the two (2) rubber plugs from the holes reserved for the cable tie and mount from your Embedded computer.
- Insert the cable tie into the cable mount, then install the cable tie and mount to your Embedded computer.
- You can organize the cables using the cable mount.
- You can adjust the position of the cable mount by lifting the tab securing the mount to the tie upwards then sliding the cable mount along the cable tie while the tab is lifted. When you have adjusted the cable mount to a preferred position, let go of the tab.
- You can adjust the tightness of the cable mount cable holder by lifting the tab and tightening or loosening the cable mount cable holder.
2.2 Installing your Embedded computer with the wall mount
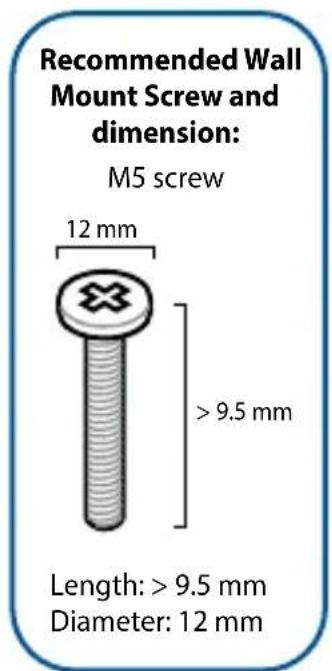
You can install your Embedded computer to a suitable surface using the wall mounts.
Insert four (4) screws into the rubber shock absorbers on the Embedded computer, then securing the Embedded computer onto your selected surface using the four (4) screws.
IMPORTANT! We strongly recommend installing your Embedded computer so that the Embedded computer sits upright with the top of the Embedded computer facing upwards to allow for efficient heat dissipation.

2.3 Configuring the Boot mode
You may configure the boot mode of your Embedded computer using the boot mode switch. The Boot Mode switch allows you to configure between different boot modes and the location to boot from.
To configure the boot mode switch:
- Remove the bottom cover.
NOTE: For more information on removing the cover, please refer to the Removing the bottom cover section in this manual.
- Locate the boot mode switch on the bottom of the Embedded computer, then configure the boot mode switch to a boot mode listed in the table below.
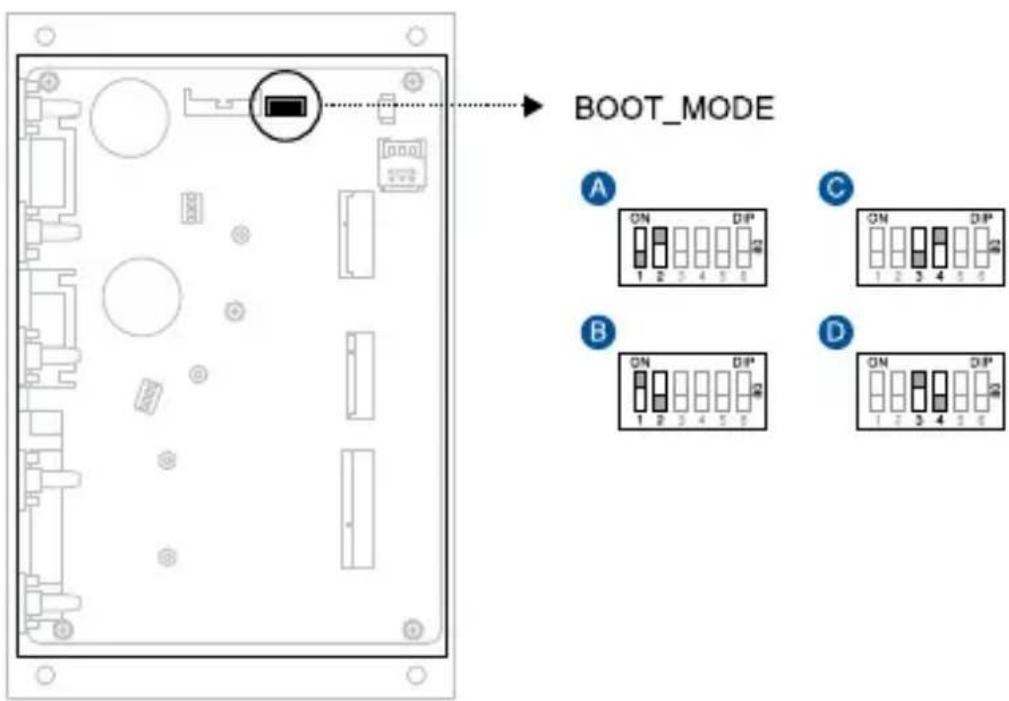
| Boot Mode | Boot type | ||
| 1 | 2 | ||
| A | OFF ON Serial Downloader | ||
| B | ON OFF Internal Boot (default) | ||
| Boot Mode | Boot type | ||
| 3 | 4 | ||
| C | OFF ON eMMC (default) | ||
| D | ON OFF SD | ||
2.4 Turning your Embedded computer off
If your Embedded computer is unresponsive, disconnect the power from the Embedded computer to turn it off.
3
Upgrading your Embedded computer
IMPORTANT!
- Ensure that your hands are dry before proceeding with the rest of the installation process. Before installing any of the features in this guide, use a grounded wrist strap or touch a safely grounded object or metal object to avoid damaging them due to static electricity.
- Turn off the power of your Embedded computer, and allow it to cool for at least 10 minutes before performing any installation/uninstallation process.
NOTE: The illustrations in this section are for reference only. The slots may vary depending on model.
3.1 Removing the bottom cover
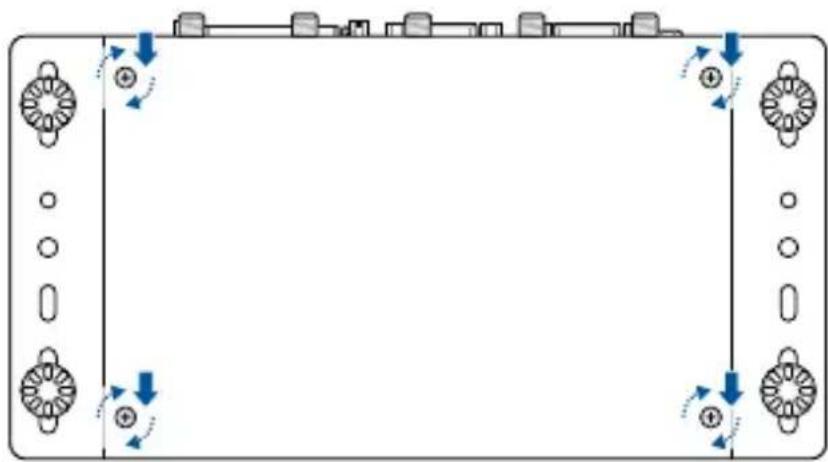
- Turn off your Embedded computer then disconnect all cables and peripherals, then place the Embedded computer on a flat stable surface, with its top side facing down.
- Remove the four (4) screws securing the bottom cover and place it aside.

3.2 Replacing the bottom cover
- Align the bottom cover with the screw holes and two notch holes, then replace the bottom cover onto the Embedded computer.
- Secure the bottom cover using the four (4) screws removed previously.
3.3 Installing a LTE Mini PCIe card
Your Embedded computer comes with a Mini PCIe slot that allow you to install a LTE Mini PCIe card.
-
Align and insert the LTE Mini PCIe card into the slot and press it down and secure it in place using two (2) screws.
-
Connect the antennas to your LTE Mini PCIe card.

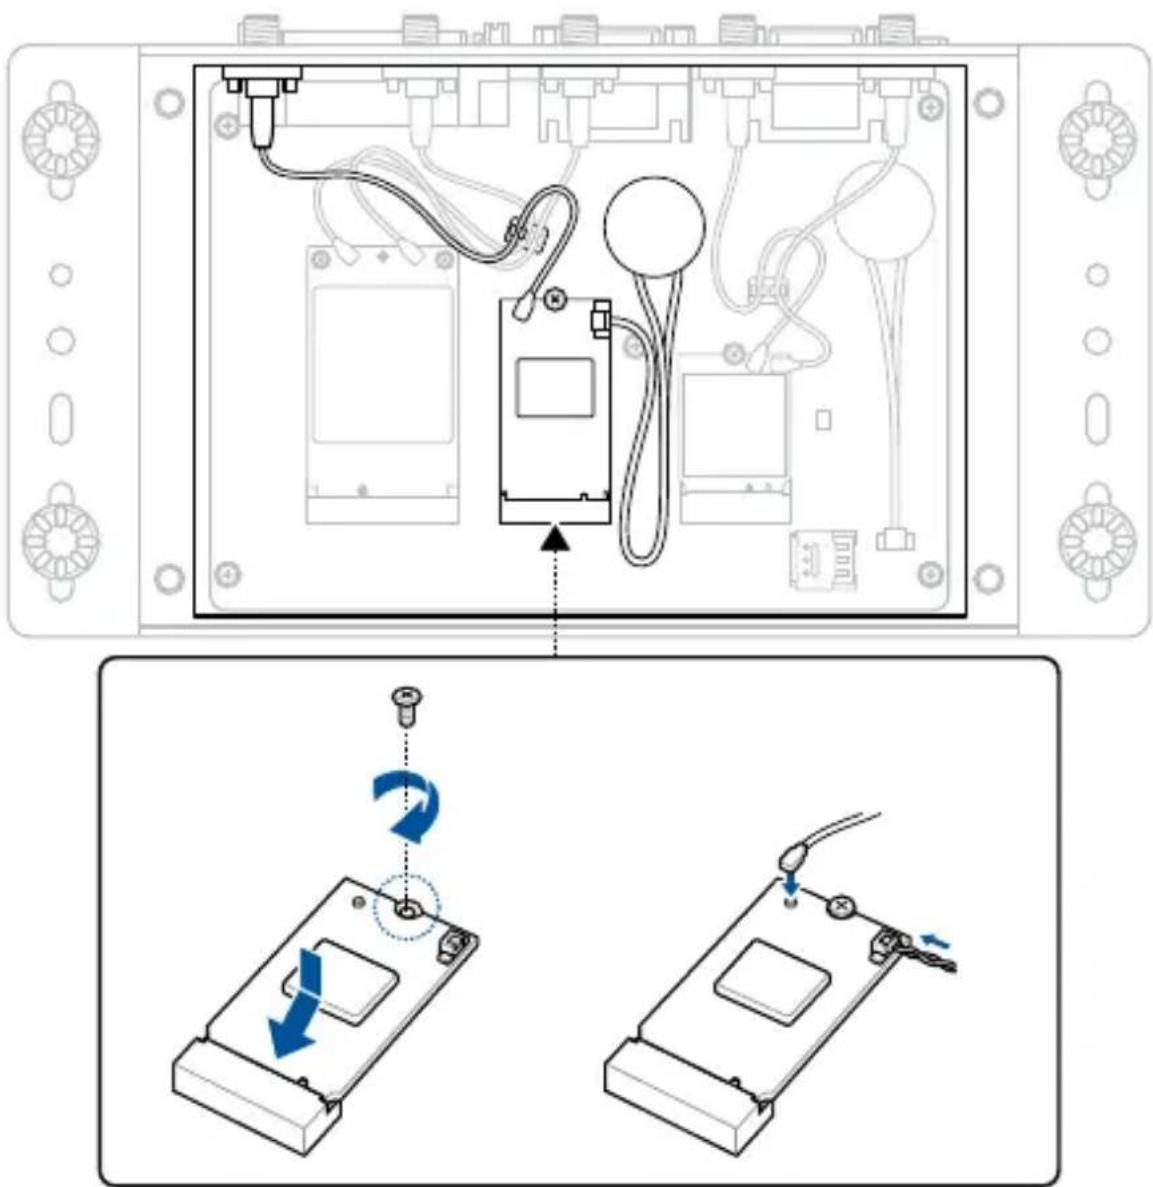
3.4 Installing the M.2 GPS module
Your Embedded computer comes with a M.2 (B-key) slot that allow you to install a M.2 GPS module.
-
Align and insert the M.2 GPS module into the slot and press it down and secure it in place using a screw.
-
Connect the antenna to your M.2 GPS.
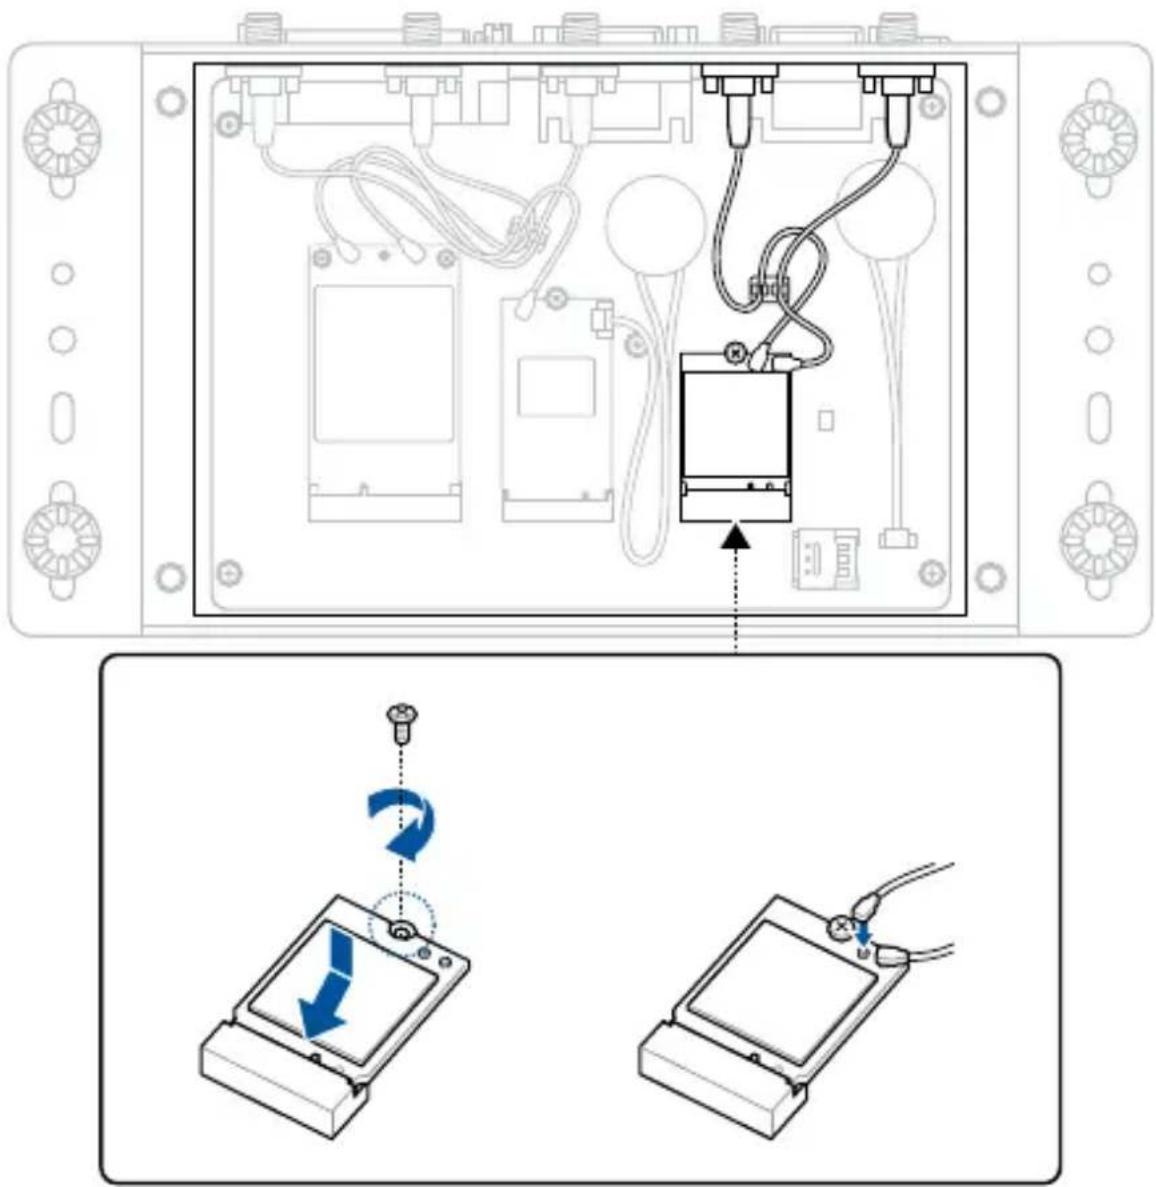
3.5 Installing the Wi-Fi module
Your Embedded computer comes with a M.2 (E-key) slot that allow you to install a M.2 Wi-Fi module.
-
Align and insert the M.2 Wi-Fi module into the slot and press it down and secure it in place using a screw.
-
Connect the antennas to your M.2 Wi-Fi.
3.6 Installing a nano SIM card
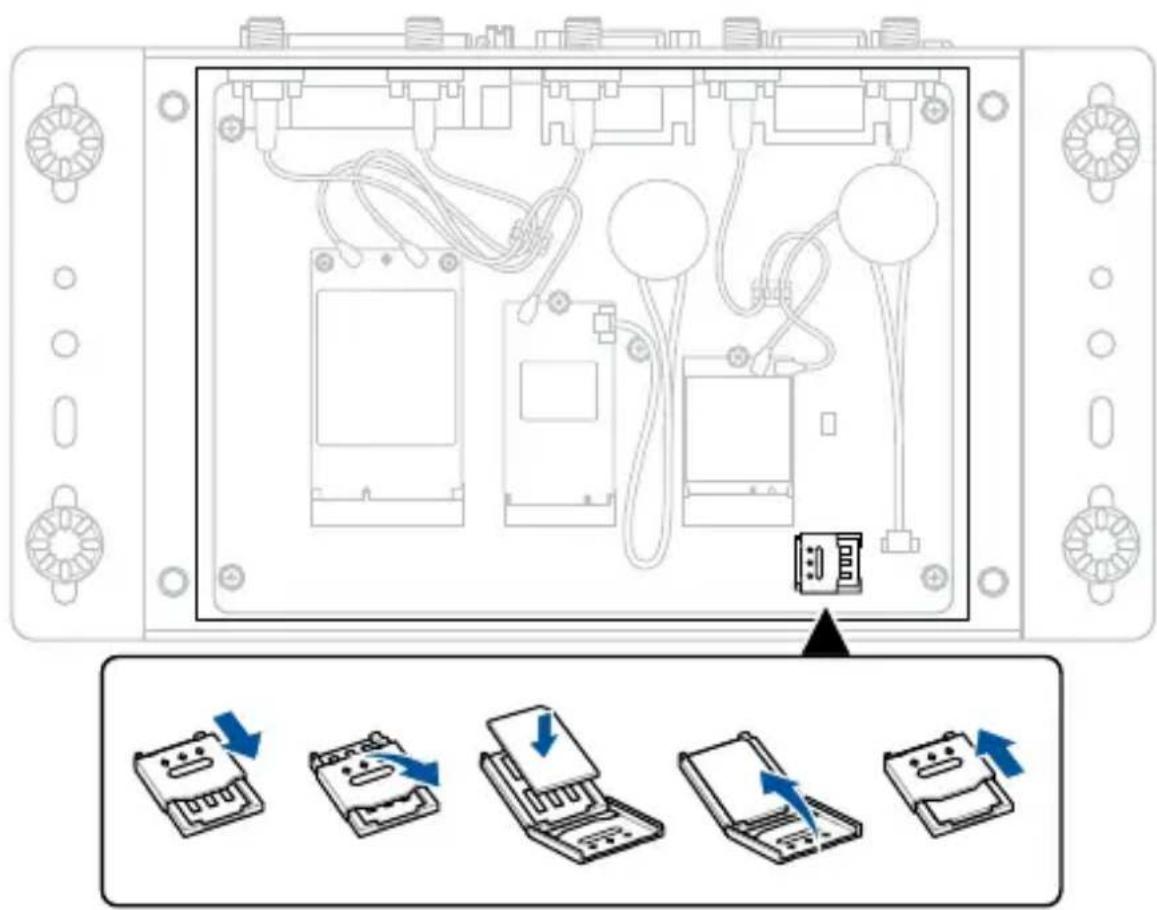
Your Embedded computer comes with two (2) nano SIM card slots, one inside the chassis, and one located in the rear of the Embedded computer.
3.6.1 Installing a nano SIM card inside the chassis
- Place the Embedded computer so that the rear of the Embedded computer faces away from you.
- Push the nano SIM cover towards the right of your Embedded computer.
- Lift the nano SIM cover.
- Place the nano SIM into the nano SIM slot.
- Replace the nano SIM cover.
- Push the nano SIM cover towards the left of your Embedded computer to secure the nano SIM card.
3.6.2 Installing a nano SIM card to the rear of the Embedded computer
NOTE: This Nano SIM card slot is hot swappable.
- Remove the two (2) screws securing the Nano SIM card / Micro SD card combo slot cover, then remove the cover.
- Insert the nano SIM card to the top slot of the Nano SIM card / Micro SD card combo slot.
- Replace the Nano SIM card / Micro SD card combo slot cover and secure it with the screws removed previously.
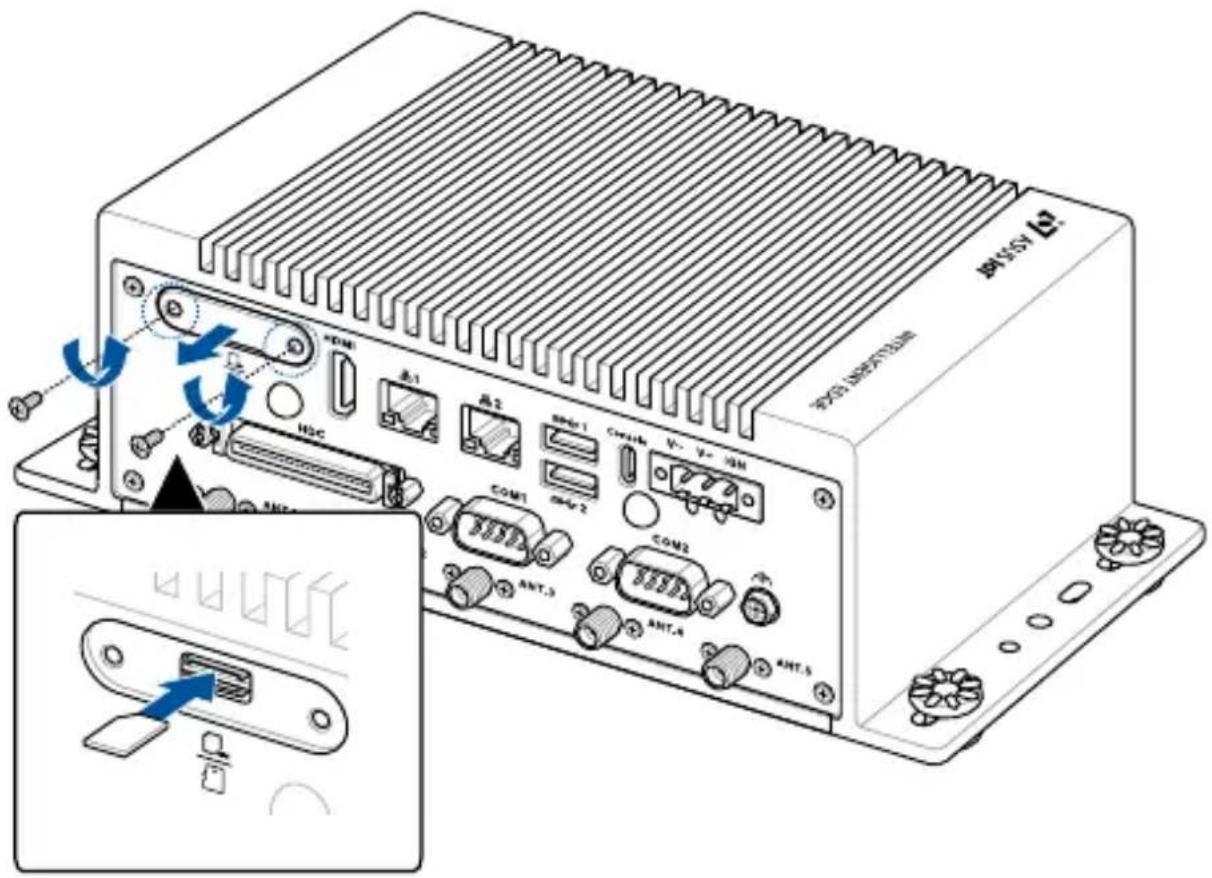
3.7 Installing an SD card
- Remove the two (2) screws securing the Nano SIM card / Micro SD card combo slot cover, then remove the cover.
- Insert the SD card to the bottom slot of the Nano SIM card / Micro SD card combo slot.
- Replace the Nano SIM card / Micro SD card combo slot cover and secure it with the screws removed previously.
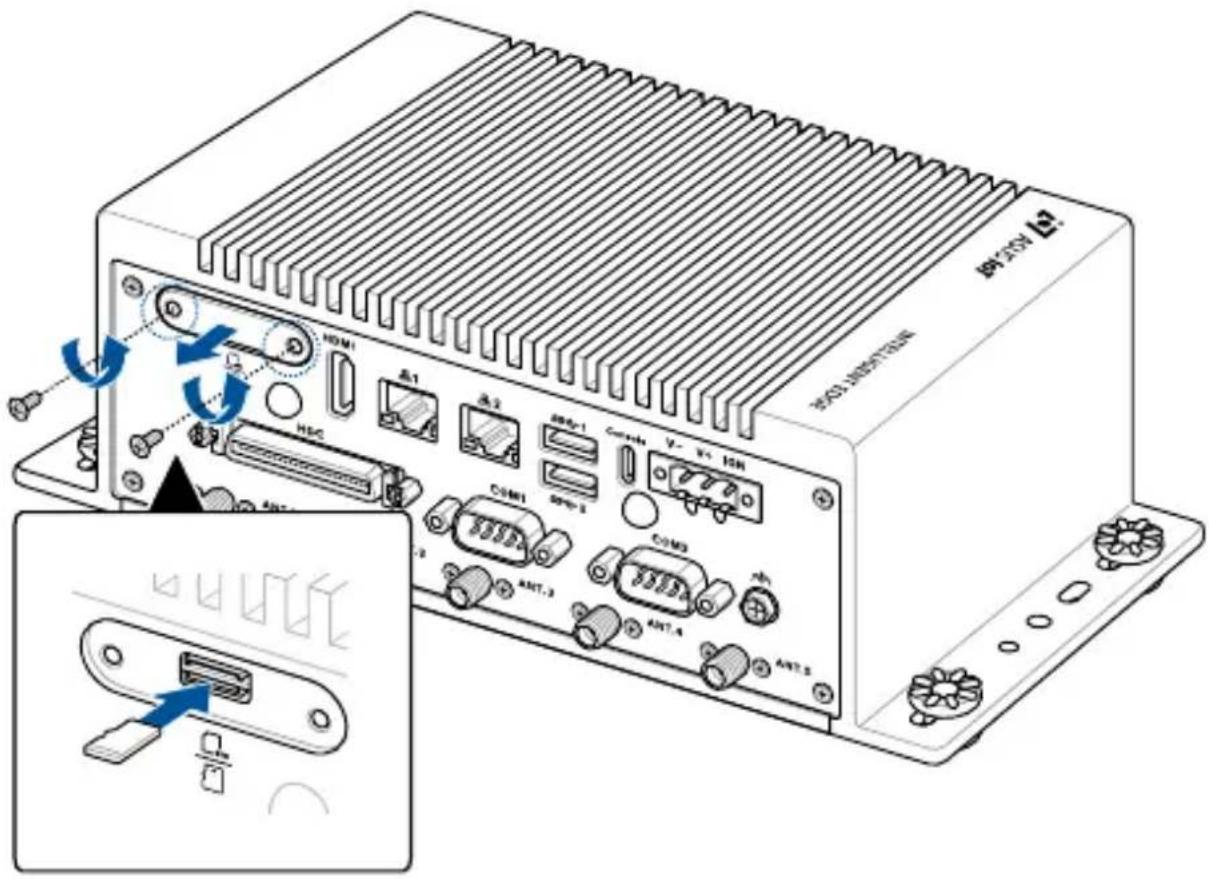
Appendix
Safety information
Your Embedded computer is designed and tested to meet the latest standards of safety for information technology equipment. However, to ensure your safety, it is important that you read the following safety instructions.
Setting up your system
- Read and follow all instructions in the documentation before you operate your system.
- Do not use this product near water or a heated source.
- Set up the system on a stable surface.
- Peripherals with extended temperature tolerance (such as industrial grade DRAM, SSD, etc.) will allow this product to be used in environments with ambient temperatures between -20°C and 60°C.
- The product should be used in environments with an ambient temperature of 35° C when using the 65W adapter, whilst using HDD or SDD only and without the PoE module installed.
- If you use an extension cord, make sure that the total ampere rating of the devices plugged into the extension cord does not exceed its ampere rating.
- This equipment should be installed and operated with a minimum distance of 20cm between the radiator and your body.
- Restricted Access Location:
The equipment should only be installed in a Restricted Access Area where both these conditions apply:
- access can only be gained by USERS who have been instructed about the reasons for the restrictions applied to the location and about any precautions that shall be taken; and
- access is through the use of a TOOL or lock and key, or other means of security, and is controlled by the authority responsible for the location.
- This device shall not be connected to an Ethernet network with outside plant routing.
Care during use
- Do not walk on the power cord or allow anything to rest on it.
- Do not spill water or any other liquids on your system.
- When the system is turned off, a small amount of electrical current still flows. Always unplug the power cord from the power outlets before cleaning the system.
- Please use this product with care when operating this product at full load, as the product may reach temperatures of up to 60°C and the outer casing may reach temperatures of up to 72°C
- If you encounter the following technical problems with the product, unplug the power cord and contact a qualified service technician or your retailer.
- The power cord or plug is damaged.
– Liquid has been spilled into the system. - The system does not function properly even if you follow the operating instructions.
- The system was dropped or the cabinet is damaged.
- The system performance changes.
Lithium-Ion Battery Warning
CAUTION: Danger of explosion if battery is incorrectly replaced. Replace only with the same or equivalent type recommended by the manufacturer. Dispose of used batteries according to the manufacturer's instructions.
NO DISASSEMBLY
The warranty does not apply to the products that have been disassembled by users

DO NOT throw the Embedded computer in municipal waste. This product has been designed to enable proper reuse of parts and recycling. This symbol of the crossed out wheeled bin indicates that the product (electrical, electronic equipment, and mercury-containing button cell battery) should not be placed in municipal waste. Check local technical support services for product recycling.
Regulatory notices
COATING NOTICE
IMPORTANT! To provide electrical insulation and maintain electrical safety, a coating is applied to insulate the device except on the areas where the I/O ports are located.
Federal Communications Commission Statement
This device complies with Part 15 of the FCC Rules. Operation is subject to the following two conditions:
- This device may not cause harmful interference, and
- This device must accept any interference received including interference that may cause undesired operation.
This equipment has been tested and found to comply with the limits for a Class A digital device, pursuant to part 15 of the FCC Rules. These limits are designed to provide reasonable protection against harmful interference when the equipment is operated in a commercial environment.
This equipment generates, uses, and can radiate radio frequency energy and, if not installed and used in accordance with the instruction manual, may cause harmful interference to radio communications. Operation of this equipment in a residential area is likely to cause harmful interference in which case the user will be required to correct the interference at his own expense.
IMPORTANT! Outdoor operations in the 5.15\~5.25 GHz band is prohibited. This device has no Ad-hoc capability for 5250\~5350 and 5470\~5725 MHz.
CAUTION! Any changes or modifications not expressly approved by the grantee of this device could void the user's authority to operate the equipment.
RF exposure warning
This equipment must be installed and operated in accordance with provided instructions and the antenna(s) used for this transmitter must be installed to provide a separation distance of at least 20 cm from all persons and must not be co-located or operating in conjunction with any other antenna or transmitter. End-users and installers must be provide with antenna installation instructions and transmitter operating conditions for satisfying RF exposure compliance.
End Product Labeling
This transmitter module is authorized only for use in device where the antenna may be installed such that 20cm may be maintained between the antenna and users. The final end product must be labeled in a visible area with the following:
Contains FCC ID: TX2-RTL8822CE and Contains IC:6317A-RTL8822CE
ISED Radiation Exposure Statement for Canada
This equipment complies with ISED radiation exposure limits set forth for an uncontrolled environment. To maintain compliance with ISED RF exposure compliance requirements, please avoid direct contact to the transmitting antenna during transmitting. End users must follow the specific operating instructions for satisfying RF exposure compliance.
Operation is subject to the following two conditions:
• This device may not cause interference and
- This device must accept any interference, including interference that may cause undesired operation of the device.
Compliance Statement of Innovation, Science and Economic Development Canada (ISED)
This device complies with Innovation, Science and Economic Development Canada licence exempt RSS standard(s). Operation is subject to the following two conditions: (1) this device may not cause interference, and (2) this device must accept any interference, including interference that may cause undesired operation of the device.
CAN ICES-3(A)/NMB-3(A)
Wireless Operation Channel for Different Domains
N. America 2.412-2.462 GHz Ch01 through CH11
Japan 2.412-2.484 GHz Ch01 through Ch14
Europe ETSI 2.412-2.472 GHz Ch01 through Ch13
KC: Korea Warning Statement
Class A:
사용자 안내문
Japan RF Equipment Statement
屋外での使用について
Declaration of compliance for product environmental regulation
ASUS follows the green design concept to design and manufacture our products, and makes sure that each stage of the product life cycle of ASUS product is in line with global environmental regulations. In addition, ASUS disclose the relevant information based on regulation requirements.
Please refer to http://csr.asus.com/Compliance.htm for information disclosure based on regulation requirements ASUS is complied with:
EU REACH and Article 33
Complying with the REACH (Registration, Evaluation, Authorization, and Restriction of Chemicals) regulatory framework, we publish the chemical substances in our products at ASUS REACH website at http://csr.asus.com/english/REACH.htm
EU RoHS
This product complies with the EU RoHS Directive. For more details, see http://csr.asus.com/english/article.aspx?id=35
Japan JIS-C-0950 Material Declarations
Information on Japan RoHS (JIS-C-0950) chemical disclosures is available on http://csr.asus.com/english/article.aspx?id=19
India RoHS
This product complies with the “India E-Waste (Management) Rules, 2016” and prohibits use of lead, mercury, hexavalent chromium, polybrominated biphenyls (PBBs) and polybrominated diphenyl ethers (PBDEs) in concentrations exceeding 0.1% by weight in homogenous materials and 0.01% by weight in homogenous materials for cadmium, except for the exemptions listed in Schedule II of the Rule.
Vietnam RoHS
ASUS products sold in Vietnam, on or after September 23, 2011, meet the requirements of the Vietnam Circular 30/2011/TT-BCT.
ASUS recycling and takeback programs come from our commitment to the highest standards for protecting our environment. We believe in providing solutions for you to be able to responsibly recycle our products, batteries, other components as well as the packaging materials. Please go to http://csr.asus.com/english/Takeback.htm for detailed recycling information in different regions.
Ecodesign Directive
European Union announced a framework for the setting of ecodesign requirements for energy-related products (2009/125/EC). Specific Implementing Measures are aimed at improving environmental performance of specific products or across multiple product types. ASUS provides product information on the CSR website. The further information could be found at https://csr.asus.com/english/article.aspx?id=1555.
ENERGY STAR complied product

ENERGY STAR
ENERGY STAR is a joint program of the U.S. Environmental Protection Agency and the U.S. Department of Energy helping us all save money and protect the environment through energy efficient products and practices.
All ASUS products with the ENERGY STAR logo comply with the ENERGY STAR standard, and the power management feature is enabled by default. The monitor is automatically set to sleep within 10 minutes of user inactivity; the computer is automatically set to sleep within 30 minutes of user inactivity. To wake your computer, click the mouse, press any key on the keyboard, or press the power button.
Please visit http://www.energystar.gov/powermanagement for detail information on power management and its benefits to the environment. In addition, please visit http://www.energystar.gov for detail information on the ENERGY STAR joint program.
NOTE: Energy Star is NOT supported on FreeDOS and Linux-based products.
UK: The Radio Equipment Regulations 2017 (S.I. 2017/1206)
Simplified UKCA Declaration of Conformity
ASUSTek Computer Inc. hereby declares that this device is in compliance with the essential requirements and other relevant provisions of The Radio Equipment Regulations 2017 (S.I. 2017/1206). Full text of UKCA declaration of conformity is available at https://www.asus.com/support/.
The WiFi operating in the band 5150-5350MHz shall be restricted to indoor use for country listed below:
UK
UKCA RF Output table (The Radio Equipment Regulations 2017)
XXXX (Model: XXXX)
| Function Frequency Maximum Output Power (EIRP) | |
| WiFi | 2400 - 2483.5 MHz XX dBm |
| 5150 - 5350 MHz XX dBm | |
| 5470 - 5725 MHz XX dBm | |
| 5725 - 5850 MHz XX dBm | |
| Bluetooth 2400 - 2483.5 MHz XX dBm | |
EU: Radio Equipment Directive (Directive 2014/53/EU)
Simplified EU Declaration of Conformity
ASUSTek Computer Inc. hereby declares that this device is in compliance with the essential requirements and other relevant provisions of Directive 2014/53/EU. Full text of EU declaration of conformity is available at https://www.asus.com/support/
The WiFi operating in the band 5150-5350MHz shall be restricted to indoor use for countries listed in the table below:
https://www.asus.com/support/
For the standard EN 300 440, if this device operates in 5725-5875 MHz, it will be considered as a receiver category 2.
Service and Support
Visit our multi-language website at https://www.asus.com/support/.

| Manufacturer ASUSTeK Computer Inc. | |
| Authorised representative in Europe | ASUSTeK Computer GmbH |
| Address: Harkortstrasse 21-23, 40880 Ratingen, Germany | |
| Authorized Representative in United Kingdom | ASUSTEK (UK) LIMITED |
| 1st Floor, Sackville House, 143-149 Fenchurch Street, London, EC3M 6BL, England, United Kingdom | |
- PV100A SERIES EMBEDDED COMPUTER
- E17975
- FIRST EDITION
- SEPTEMBER 2021
- COPYRIGHT INFORMATION
- LIMITATION OF LIABILITY
- SERVICE AND SUPPORT
- CONTENTS
- CHAPTER 1: GETTING TO KNOW YOUR EMBEDDED COMPUTER
- CHAPTER 2: USING YOUR EMBEDDED COMPUTER
- CHAPTER 3: UPGRADING YOUR EMBEDDED COMPUTER
- APPENDIX
- ABOUT THIS MANUAL
- CHAPTER 4: BOOTING UP YOUR EMBEDDED COMPUTER
- CONVENTIONS USED IN THIS MANUAL
- TYPOGRAPHY
- PACKAGE CONTENTS
- OPTIONAL ITEMS
- NOTE
- 1
- GETTING TO KNOW YOUR EMBEDDED COMPUTER
- 1.1 FEATURES
- 1.1.1 FRONT VIEW
- 1.1.2 REAR VIEW
- 1.1.3 I/O PORTS AND LEDS
- GPS
- GPS LED
- LTE LED
- WI-FI LED
- EMMC ACCESS LED
- POWER LED
- RESET BUTTON
- NANO SIM CARD / MICRO SD CARD COMBO SLOT
- HDMI
- HDMI™ PORT
- LAN PORT
- USB 3.2 GEN 1 PORT
- USB 3.2 GEN 1 TYPE-C® OTG PORT
- POWER INPUT JACK
- HDC
- HIGH DENSITY CABLE PORT
- COM1
- SERIAL (COM) CONNECTOR
- COM2
- FUNCTIONAL EARTH GROUND
- ANT.1
- GPS WIRELESS ANTENNA JACK
- ANT.2
- LTE WIRELESS ANTENNA JACK
- ANT.3
- ANT.4
- ANT.5
- WLAN WIRELESS ANTENNA JACK
- USING YOUR EMBEDDED COMPUTER
- 2
- 2.1 GETTING STARTED
- 2.1.1 CONNECT THE ADAPTER CABLE TO YOUR EMBEDDED COMPUTER
- 2.1.2 (OPTIONAL) CONNECT THE AC POWER ADAPTER TO YOUR EMBEDDED COMPUTER
- IMPORTANT
- 2.1.3 CONNECT A DISPLAY PANEL TO YOUR EMBEDDED COMPUTER
- TO CONNECT A DISPLAY PANEL TO YOUR EMBEDDED COMPUTER
- 2.1.4 CONNECT THE USB CABLE FROM KEYBOARD OR MOUSE
- TO CONNECT A KEYBOARD AND MOUSE TO YOUR EMBEDDED COMPUTER
- 2.1.5 INSTALL THE CABLE TIE AND MOUNT
- TO INSTALL THE CABLE TIE AND MOUNT TO YOUR EMBEDDED COMPUTER
- 2.2 INSTALLING YOUR EMBEDDED COMPUTER WITH THE WALL MOUNT
- 2.3 CONFIGURING THE BOOT MODE
- TO CONFIGURE THE BOOT MODE SWITCH
- 2.4 TURNING YOUR EMBEDDED COMPUTER OFF
- 3
- UPGRADING YOUR EMBEDDED COMPUTER
- 3.1 REMOVING THE BOTTOM COVER
- 3.2 REPLACING THE BOTTOM COVER
- 3.3 INSTALLING A LTE MINI PCIE CARD
- 3.4 INSTALLING THE M.2 GPS MODULE
- 3.5 INSTALLING THE WI-FI MODULE
- 3.6 INSTALLING A NANO SIM CARD
- 3.6.1 INSTALLING A NANO SIM CARD INSIDE THE CHASSIS
- 3.6.2 INSTALLING A NANO SIM CARD TO THE REAR OF THE EMBEDDED COMPUTER
- 3.7 INSTALLING AN SD CARD
- SAFETY INFORMATION
- SETTING UP YOUR SYSTEM
- CARE DURING USE
- LITHIUM-ION BATTERY WARNING
- NO DISASSEMBLY
- THE WARRANTY DOES NOT APPLY TO THE PRODUCTS THAT HAVE BEEN DISASSEMBLED BY USERS
- REGULATORY NOTICES
- COATING NOTICE
- FEDERAL COMMUNICATIONS COMMISSION STATEMENT
- RF EXPOSURE WARNING
- END PRODUCT LABELING
- ISED RADIATION EXPOSURE STATEMENT FOR CANADA
- COMPLIANCE STATEMENT OF INNOVATION, SCIENCE AND ECONOMIC DEVELOPMENT CANADA (ISED)
- WIRELESS OPERATION CHANNEL FOR DIFFERENT DOMAINS
- KC: KOREA WARNING STATEMENT
- JAPAN RF EQUIPMENT STATEMENT
- 屋外での使用について
- DECLARATION OF COMPLIANCE FOR PRODUCT ENVIRONMENTAL REGULATION
- EU REACH AND ARTICLE 33
- EU ROHS
- JAPAN JIS-C-0950 MATERIAL DECLARATIONS
- INDIA ROHS
- VIETNAM ROHS
- ECODESIGN DIRECTIVE
- ENERGY STAR COMPLIED PRODUCT
- UK: THE RADIO EQUIPMENT REGULATIONS 2017 (S.I. 2017/1206)
- SIMPLIFIED UKCA DECLARATION OF CONFORMITY
- UK
- UKCA RF OUTPUT TABLE (THE RADIO EQUIPMENT REGULATIONS 2017)
- EU: RADIO EQUIPMENT DIRECTIVE (DIRECTIVE 2014/53/EU)
- SIMPLIFIED EU DECLARATION OF CONFORMITY
Brand : ASUS
Model : PV100A
Category : Industrial computer