
6452 - Pizza oven Nemco - Free user manual and instructions
Find the device manual for free 6452 Nemco in PDF.


| Product Type | Pizza Oven |
| Brand | Nemco |
| Model | 6452 |
| Height | 12 inches |
| Width | 24 inches |
| Depth | 24 inches |
| Weight | 65 lbs |
| Power Supply | 208-240V, 60Hz, 2000W |
| Number of Decks | 1 |
| Heating Element | Calrod® sealed heating elements |
| Temperature Range | 200°F to 600°F |
| Thermostat Control | Adjustable thermostat with indicator light |
| Timer | 60-minute mechanical timer with bell |
| Interior Material | Reflective stainless steel |
| Stone Deck | High-density ceramic stone |
| Crumb Tray | Removable, dishwasher safe |
| Door | Double-pane tempered glass with cool-touch handle |
| Safety Features | Automatic shut-off, tip-over protection |
| Cleaning | Wipe interior with damp cloth; remove crumb tray |
| Warranty | 1 year parts and labor |
| Certifications | ETL, NSF |
Frequently Asked Questions - 6452 Nemco
User questions about 6452 Nemco
0 question about this device. Answer the ones you know or ask your own.
Ask a new question about this device
Download the instructions for your Pizza oven in PDF format for free! Find your manual 6452 - Nemco and take your electronic device back in hand. On this page are published all the documents necessary for the use of your device. 6452 by Nemco.
USER MANUAL 6452 Nemco
- Please read instructions before using this appliance.
- When using electrical appliances, always follow basic precautions to reduce the risk of fire, electric shock and injury to persons.
- Clean machine thoroughly before and after all uses using cleaning instructions below.
SAFETY INSTRUCTIONS
- Plug electrical cord into a certified electrical outlet with a corresponding voltage rating as listed on the machine model labels.
- Always unplug the electric cord when appliance is not in use and before cleaning, adjusting or maintaining this machine. Do not operate with a damaged cord or plug or after the machine malfunctions, has been dropped or damaged. Use authorized service for examination, electrical or mechanical adjustment or repair.
- This machine will be HOT during use and for a short time after it is turned off - BE CAREFUL. To avoid burns, do not let bare skin touch hot surfaces. Keep combustible materials away from appliance.
- Use extreme caution when any appliance is used by or near children and whenever the appliance is left operating and unattended.
- This appliance is not intended for use near or around water. Never locate appliance where it may fall into a water container.
- Do not insert or allow foreign objects to enter any ventilation or exhaust opening as this may cause an electrical shock, fire or damage to the appliance. Do not block air intakes or exhaust in any manner. Do not use on soft surfaces where openings may become blocked.
PREPARATION
- Remove all packing pieces and lift unit out of the box.
- Remove any outside packaging.
- Remove any plastic coating that may be affixed to stainless steel surfaces.
- Be sure the round tier rack systems (equipped on models that rotate) are secure at the top and bottom.
-
CAUTION - To reduce the risk of fire, the appliance is to be installed in non-combustible surroundings only, with no combustible material within 18 inches of the sides, front, or rear of the appliance or within 40 inches above the appliance. The appliance is to be mounted on floors of noncombustible construction with non-combustible flooring and surface finish and with no combustible material against the underside, or on noncombustible slabs or arches that have no combustible material against the underside. Such construction shall in all cases extend not less than 12 inches beyond the equipment on all sides.
-
Unit can only be operated with the 4" legs provided. Failure to do so will cause damage to the unit.
- Set unit on a flat surface.
- Position unit near the power outlet. Avoid the use of extension cords. Do not run cord under carpeting or cover with runners or the like. Arrange cord where it will not be tripped over.
- This appliance has hot and live electrical parts. Do not use in areas where gasoline, paint or flammable liquids are used or stored.
- If unit fails to work properly when first operated call NEMCO customer service at 1-800-782-6761.
ELECTRICAL REQUIREMENTS
Refer to the product tag (serial plate) on the back of the unit for voltage and wattage requirements. Be sure to plug unit into grounded outlet with sufficient power.
WARNING: DURING NORMAL OPERATIONS THE EXTERIOR OF THE UNIT IS HOT.
OPERATION
- Fill one or both water reservoirs to provide humidity as required. Do not overfill.
- Plug the unit into the appropriate power supply.
- Turn heat switch to on position.
- Turn temperature switch to high and preheat approximately 15 minutes.
- Turn the temperature control to desired setting. (High, Medium or Low)
- Load food products when pre-heat is complete.
- Turn on the light switch for lights and rotating rack if equipped.
- Pull pin and lift the top coupling to remove rack.
- To disconnect appliance, turn controls to off and remove plug from outlet.
CLEANING
NOTE: Proper maintenance plays an important part in the life span and functioning of the unit.
- Turn the temperature control to the off position.
- Turn the light switch and heat switch off.
- Unplug the unit from the power supply.
- Do not attempt to clean unit while it is turned on; it will be hot during operation.
- The rotary rack is removed by lifting on the drive coupling located at the top of the shelf system and carefully removing the rack from the interior of the case. Stationary racks just lift out. Wash with warm water and a mild detergent. Rinse and dry. Rack can be installed by reversing process.
- Clean daily. Clean excess food debris from the interior of the unit.
- Clean the water reservoirs daily with a scouring pad and mild detergent. Use of distilled water in the reservoirs will reduce mineral deposit build-up.
- Clean interior and exterior of unit with a mild detergent and warm water. Be sure to dry unit.
- Do not immerse in water or other liquid. Avoid splashing water into the motor unit.
SERVICE INSTRUCTIONS
- For warranty or service information, please refer to the attached "Nemco Food Equipment Warranty Service Procedures."
- The light can be replaced easily in the event it burns out. Be sure to replace it with a shatterproof fluorescent light.
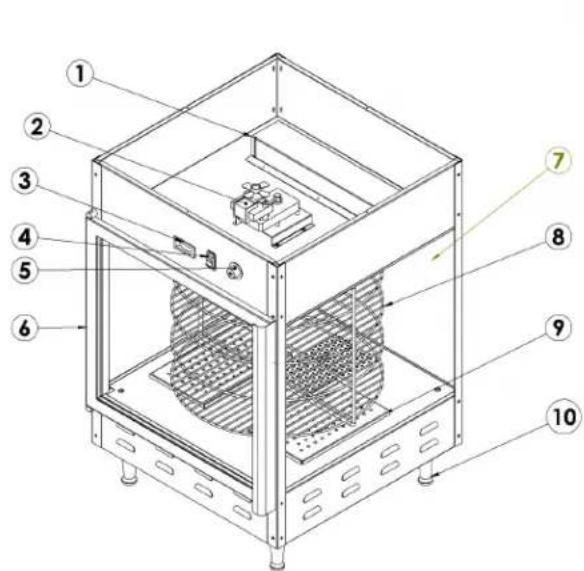
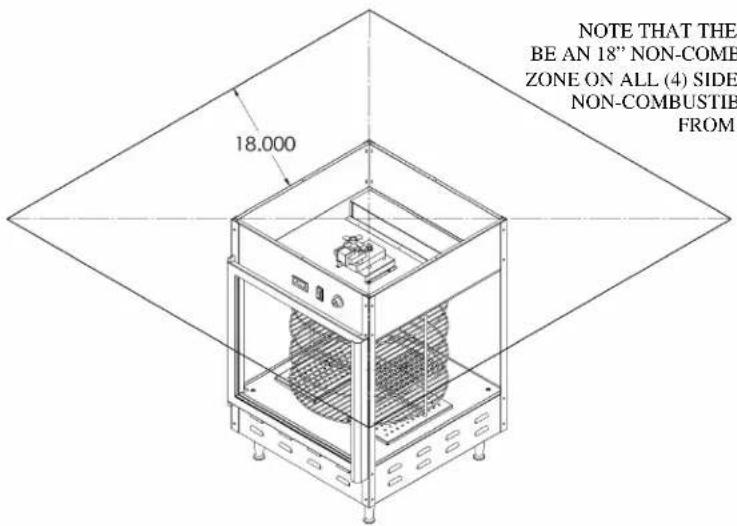
NOTE THAT THERE MUST BE AN 18" NON-COMBUSTIBLE ZONE ON ALL (4) SIDES & A 40" NON-COMBUSTIBLE ZONE FROM THE TOP
| ITEM NUMBER | PART NUMBER DESCRIPTION | |
| 1 | 4747246356 | SOCKETBULB |
| 2 | 67419 MOTOR ASSEMBLY | |
| 3 | 45988 THERMOMETER | |
| 4 | 47420 ROCKER SWITCH | |
| 5 | 4677445740 | THERMOSTATKNOB |
| 6 | 6738367383-L6738147122-B | GLASS DOOR ASSEMBLY 6450 & 6454GLASS DOOR ASSEMBLY 6451, 6452, 6453, & 6455HINGE PINMAGNETIC STRIPPING 8" LENGTH |
| 7 | 4598745992 | GLASS PANEL 6450 & 6454GLASS PANEL 6451, 6452, 6453, & 6455 |
| 8 | 679076709866790-166791-1667926679366794 | RACK, 3-TIER 12" 6450RACK, 4-TIER 12" 6450-4RACK, 3 TIER 18" 6451RACK, 4 TIER 18" 6452RACK, 3 TIER 15" SHELF 6454RACK, 3 TIER 19" SHELF 6455RACK, 3 TIER BRANCH 6453 |
| 9 | 6736546908 | RESERVIOR LID 1/4^TH PAN |
| 10 | 45495 LEG | |
| NOT SHOWN | 45989 DOOR SWITCH | |
| NOT SHOWN | 67368 HEATER | |
Brand : Nemco
Model : 6452
Category : Pizza oven