
6210 - Pizza oven Nemco - Free user manual and instructions
Find the device manual for free 6210 Nemco in PDF.


| Brand | Nemco |
| Model | 6210 / 6210-220 |
| Product Type | Countertop Pizza Oven |
| Power Supply | 120V or 220V AC (see model tag) |
| Heating Elements | Top and bottom tubular heaters, independently controlled |
| Controls | Thermostat, 60-minute timer, toggle switches for top/bottom, indicator lights |
| Temperature Control | Adjustable thermostat |
| Timer Range | 0-60 minutes |
| Construction | Stainless steel |
| Cleaning Method | Remove rack and crumb pan; wash with hot soapy water; wipe exterior with damp sponge |
| Important Cleaning Note | Do not immerse unit in water or other liquids |
| Safety Features | Hot surface warning; requires unplugging before cleaning/service |
| Installation Clearance | At least 12 inches on all sides from combustible materials |
| Surface Requirement | Noncombustible floor or slab with noncombustible finish |
| Rack | Removable wire rack (part #66602) |
| Crumb Pan | Removable crumb pan (part #66605) |
| Service Parts | Available; see manual for part numbers |
| Warranty | Not specified in manual |
Frequently Asked Questions - 6210 Nemco
User questions about 6210 Nemco
0 question about this device. Answer the ones you know or ask your own.
Ask a new question about this device
Download the instructions for your Pizza oven in PDF format for free! Find your manual 6210 - Nemco and take your electronic device back in hand. On this page are published all the documents necessary for the use of your device. 6210 by Nemco.
USER MANUAL 6210 Nemco
Operating and Maintenance Instructions
Model: 6210 & 6210-220 Pizza Oven
INTRODUCTION
- Please read instructions before using this appliance.
- When using electrical appliances, basic precautions should always be followed to reduce the risk of fire, electric shock and injury to persons.
- Clean machine thoroughly before and after all uses using cleaning instructions below.
SAFETY INSTRUCTIONS
- Plug electrical cord into a certified electrical outlet with a corresponding voltage rating as listed on the machine model labels.
- Always unplug the electric cord when appliance is not in use and before cleaning, adjusting or maintaining this machine. Do not operate with a damaged cord or plug or after the machine malfunctions, has been dropped or damaged. Use authorized service for examination, electrical or mechanical adjustment or repair.
- This machine will be HOT during use and for a short time after it is turned off - BE CAREFUL. To avoid burns, do not let bare skin touch hot surfaces. Keep combustible materials away from appliance.
- Extreme caution is necessary when any appliance is used by or near children and whenever the appliance is left operating and unattended.
- This appliance is not intended for use near or around water. Never locate appliance where it may fall into a water container.
- Do not insert or allow foreign objects to enter any ventilation or exhaust opening as this may cause an electrical shock, fire or damage to the appliance. Do not block air intakes or exhaust in any manner. Do not use on soft surfaces where openings may become blocked.
PREPARATION
- Remove all packing pieces and lift unit out of the box.
- Remove any outside packaging.
- Set unit on a flat surface.
- Position the unit near a power outlet. Avoid the use of extension cords. Do not run cord under carpeting or cover with runners or the like. Arrange cord where it will not be tripped over.
- This appliance has hot and live electrical parts inside. Do not use it in areas where gasoline, paint or flammable liquids are used or stored.
Caution: To reduce the risk of fire, the appliance is to be mounted on floors of noncombustible construction with noncombustible flooring and surface finish and with no combustible material against the underside thereof, or on noncombustible slabs or arches having no combustible material against the underside thereof.
Such construction shall in all cases extend not less than 12 inches beyond the equipment on all sides.
- Remove any white plastic coating that may be affixed to stainless steel surfaces.
- If unit fails to work properly when first operated call NEMCO customer service at 1-800-782-6761.
ELECTRICAL REQUIREMENTS
Refer to the product tag (serial plate) on the back of the unit for voltage and wattage requirements. Be sure to plug unit into grounded outlet with sufficient power.
WARNING: DURING NORMAL OPERATIONS THE EXTERIOR OF THE UNIT IS HOT!
OPERATION
- Plug the unit into the power supply.
- Set thermostat according to recipe or food package instructions.
- Bake food products according to their cooking instructions. (Top and bottom of heaters can be operated independently)
- To disconnect appliance, turn controls to off and remove plug from outlet.
CLEANING
NOTE: Proper maintenance plays an important part in the life span and functioning of the unit.
- Turn the temperature control to the OFF position. Unplug the power cord.
- Allow the unit to cool 30 minutes.
- The rack and crumb pan can be removed from the unit and washed in hot, soapy water. Wipe dry.
- Clean exterior of unit with a damp sponge and mild soap. Be sure to dry unit.
- Do not immerse in water or other liquid.
DO NOT IMMERSE UNIT!
SERVICE PARTS
PART # DESCRIPTION
45380 PILOT LIGHT (120 VOLTS)
45756 ON / OFF SWITCH PLATE
45769 TUBULAR HEATER (120 VOLTS)
45769-220 TUBULAR HEATER (220 VOLTS)
45772 THERMOSTAT
45781 PILOT LIGHT (220 VOLTS)
45918 TIMER (60 MIN)
45920 TIMER KNOB
45921 KNOB, CRUMB PAN
45936 TIMER DIAL
46361 CORDSET (220 VOLTS)
46372 CORDGRIP (220 VOLT CORD)
46376 CORDGRIP (120 VOLT CORD)
46377 TOGGLE SWITCH
46751 CORDSET (120 VOLTS)
55077 FOOT
66602 RACK
66605 CRUMB PAN
66631 RACK HANDLE
66756 DOOR ASSEMBLY
CONTROL PANEL LAYOUT
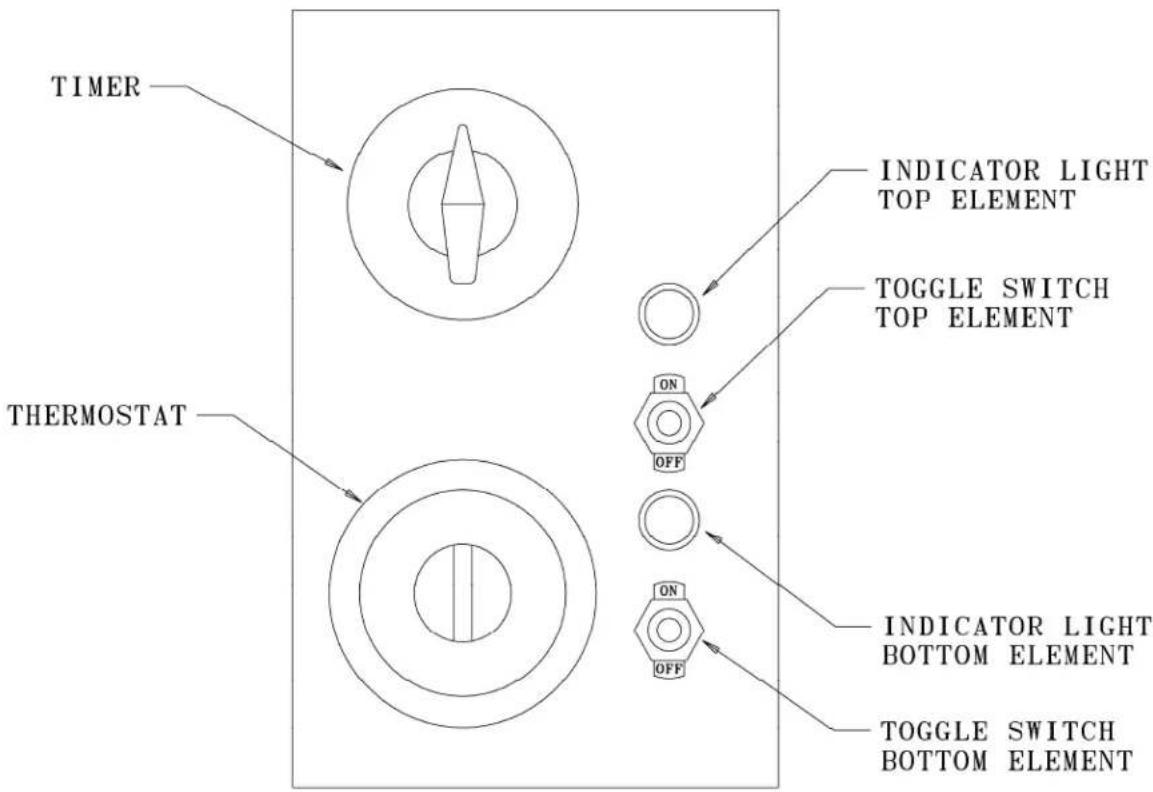

Brand : Nemco
Model : 6210
Category : Pizza oven