
Pure Clean PSTM50 - Steam cleaner Pyle - Free user manual and instructions
Find the device manual for free Pure Clean PSTM50 Pyle in PDF.


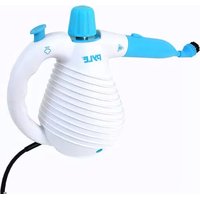
| Product Type | Handheld Steam Cleaner |
| Brand | Pyle |
| Model | Pure Clean PSTM50 |
| Power Source | 120V AC, 60Hz |
| Power Consumption | 1200 Watts |
| Water Tank Capacity | 200 ml |
| Heat-Up Time | Approx. 30 seconds |
| Steam Output | Continuous steam up to 15 min |
| Cord Length | 16 feet |
| Weight | 2.2 lbs |
| Dimensions (L x W x H) | 9.5 x 6.5 x 4.0 inches |
| Material | High-temperature resistant plastic |
| Color | White/Blue |
| Included Accessories | Measuring cup, funnel, brush, nozzle, cleaning cloth |
| Safety Features | Auto shut-off, cool-touch housing, pressure relief valve |
| Maintenance | Descaling every 3 months recommended |
| Repairability | Replaceable heating element and seals |
| Warranty | 1 year limited |
Frequently Asked Questions - Pure Clean PSTM50 Pyle
User questions about Pure Clean PSTM50 Pyle
0 question about this device. Answer the ones you know or ask your own.
Ask a new question about this device
Download the instructions for your Steam cleaner in PDF format for free! Find your manual Pure Clean PSTM50 - Pyle and take your electronic device back in hand. On this page are published all the documents necessary for the use of your device. Pure Clean PSTM50 by Pyle.
USER MANUAL Pure Clean PSTM50 Pyle
natural_image
Blue and white electric vacuum cleaner with a handle, mounted on a base (no visible text or symbols)SAFETYINSTRUCTIONS
SAVETHESEINSTRUCTIONS
Thisproductisforhouseholduseonly.Anycommercialusewillvoidthemmanufacturer'swarranty. Basicprecautionsshouldbeusedwhenusinganelectricalappliance,includingthefollowinglisted warnings.
READALLINSTRUCTIONSBEFOREUSINGYOURPSTM50STEAMMOP&SWEEPER.

Intendeduse
- This device is suitable for cleaning heat-resistant surfaces. It is also suitable for cleaning laminate flooring if you follow the instructions below:
- Thelaminates should be properly laid and havenogaps or cracks in which moisture can penetrate.
- First test the steam mopatanin conspicuous spot and then check the laminate for wavesor penetrated moisture.
- If the surface is unblemished, the device can be used to clean the entire laminate floor.
- The device is not suitable for unsealed wooden flooring, soft plastic, wooden furniture, leather and sensitive fabric covers.
- Onlyeverusethedeviceonthefloorandnot,forexample,onsofas,carseatsetc.
- The devices should not be used on glass at the hot steam can lead to glass breakage.
- Askaspecialistwhetheryourflooringissuitableforbeingcleanedwiththedevice. Alwaysfirsttestthecleaningwithsteamonasmallspot.
- Thedevicesweepsdustandloose, lightdirtinto the collecting container. Larger/heavierobjectsarenotremoved.
- Onnoaccountshouldthedevicebeusedtosweepupthefollowing:
- glowingash, cigaretteends, matches, etc.
2.inflammableorexplosivesubstances
3.toxicsubstances,e.g.bleach - The device is designed for private use and not for commercial use. The device should only be used as described in these instructions. Any other use is deemed to be improper.

Dangerofinjury
- Keepthearticleoutofthereachofchildren!Improperusecanleadtoinjuriesandelectricshock.
- Keepchildrenandpetsawayfromthepackaging.Thereisadangerofsuffocation, aswellasotherhazards!
- This device is not designed to be used by individuals (including children) with limited physical, sensory or mental abilities or those without sufficient experience and/or knowledge, unless they are supervised by someone responsible for their safety or have received instructions from them on how to set the device.
• Children must be supervised in order to ensure that they don't play with the device. - Keepsmallchildrenandpetsawayfromthedevicewhileitisinoperation.
- Keephair, clothing, jewellery, fingers, or other body parts away from the openings or rotating part of the device when it is in operation.
- CAUTIONDANGEROFBURNS!Improperusecanleadtoinjuries,burns,and electricshock.
- Neverdirectthesteam at people, animals, plants or sensitive objects.
- Laythecableinsuchawaythatitdoesnotposeariskoftripping!
- Please take care when cleaning stair that you donot stumble and fall.

Electricity-riskofelectricshocks/riskoffire!
- Neverimmersedehedeviceinwaterorotherliquidstoavoidtheriskofelectricshock. Donotusethedeviceifitfallsinwater.
- Donottouchthedevicewithwethands.
- Donotoperateitoutdoorsorinroomswithhighhumidity.
- Storethedeviceonlyindryindoorrooms.Donotusethedeviceifithasbeen outdoorsforalongperiodoftime.Inthiscase,contactourCustomerService department.
- Intheeventofdamage/interference, disconnect the device from them ains immediately.
- PLEASENOTE: Acutedangertolifefrom electrocution! Nevertrytorepairan electricalarticleyourself; contactyournearestcustomerservicecentre/specialist dealertoensureyouownsafety. Thesameappliestothemainslead. Incaseof damage,contactourCustomerServicedepartment.
- Donotusethedeviceifthecable,plugoranyotherpartofthedeviceisdamaged.
- Nevercarryorpullthedevicewiththemainslead; alwaystreatthemainsleadwith care. Avoidpinchingthecableindoorsorpullingitoversharpedgesorcorners. Keepthecableawayfromhotsurfaces.
- Connect the device only to an plug socket whose main voltage corresponds to the data on the rating plate of the device. Them a socket must still be accessible after the connection has been made.
- Thedevicemustbeswitchedoffwheninsertingorremovingthemainsplug.
-
Removethemainsplugfromthemainssocket,
-
whenthe device is not in use,
- before refilling it with water,
- beforechangingthefloorcloth,
-
whenthereisathunderstorm,
5.beforeyoucleanit. -
Alwayspulltheplug,neverthemainscable,toremovetheplugfromthemains socket.
- Touchthemainsplugonlywithdryhands.
• Useonlytheappropriateplug. - Donotuseanyextensioncables.
- Donotusethedeviceifhighlyflammablegasesarepresentintheair.

Equipment and device damage
- Usethedeviceonlywhenitiscompletelyassembledandthemainscableis completelyunwound. Thewaterreservoirandthefiltermustbeinserted.
- In the interest so of your own safety, inspect the device for damage every time before use.
Intheeventofdefects, thedevicemustnotbeuseduntilithasbeenrepairedby qualifiedpersonnel.
If them ainsleadisdam aged, it must bereplaced in an authorised workshop in orderto avoid danger.
- Always su set the floor cloth and check it for sign so we are each time you use it. Don't use if it shows any sign so wear or if it is damaged! It could damage your flooring!
- Useonlytheaccessoriesincludedinthescopeofsupplyorrecommendedbythe manufacturer.Useonlyoriginalmanufacturer'sspareparts.
- In the case of surface treated with wax, the heat and steam may remove the wax!
- Neverpouranycleaningagentorotheradditivesintothewaterreservoir. Thiscould destroythedeviceandsafeworkingisnolongerguaranteed.
- Onlyfillitwithnormalordistilledwater. Usinganyotherliquidscandamagethe device.
- Neveroperatethedevicewiththesteamfunctionifthewaterreservoirisempty.
- Neverdirectthesteamatonespotfortoolong.
- Donotinsertanythingintotheopenings/nozzlesofthedeviceandtakecarethat thesedonotbecomeclogged.
- Ensure that the device does not rollover them ainscable.
• Alwaysworkwithsufficientlighting. - Donotdropthedeviceorallowittobeknockedviolently.
- Donotexposethedevicetoextremetemperatures,widetemperaturevariations,ordirectsunlight.
Whatissupplied
- 1centralpiece
- 1handleassembly
- 1cleaningfoot
- 1longscrew
- 1shortscrew
- 1watertank
- 1carpetglider
- 2floorcloths
• Theseoperatinginstructions
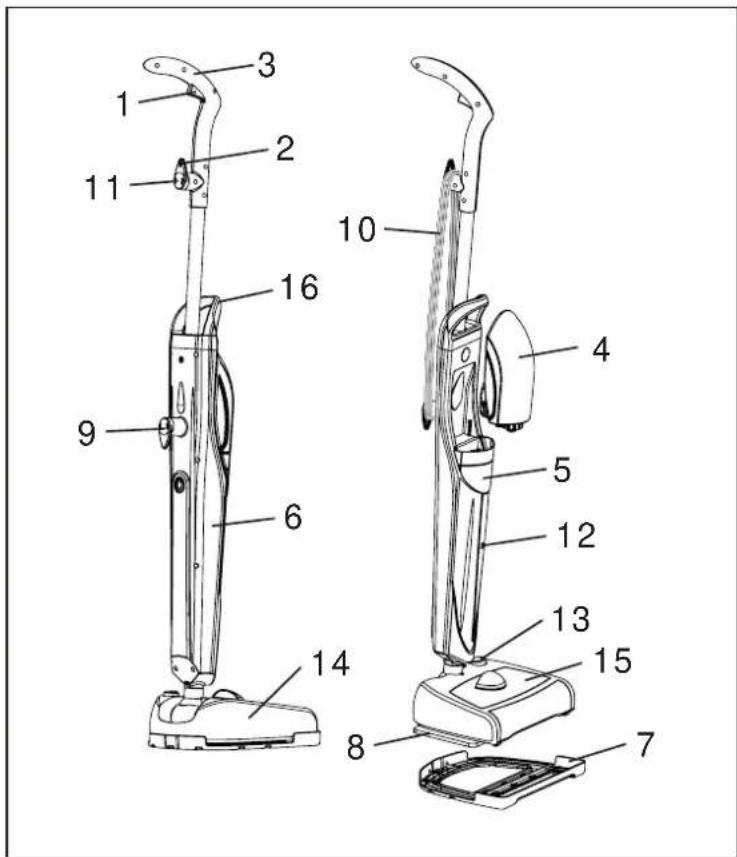
DeviceOverview
- Steam release button
- Cablemount
- Tophandle
4.Watertank - Waterfilter
6.Centralpiece - Carpetglider
- Floorcloth
- Lowerhookforcablereel
10.Mainscable - Upperhookforcablereel
- Controllamp
- On/Offswitchforthe rotatingbrush
- Cleaningfoot
- Collectingcontainer
- Carryinghandle
BeforeInitialUse
Beforeyoucanusethedevice,youmust:
- unpacktheitemssupplied,
• assemblethedevice.
A. Unpacking

PLEASENOTE!
- Keepchildrenandanimalsawayfromthepackagingmaterial.Thereisadangerof suffocation!
Unpackallpartsandcheckthescopeofsupplyforcompleteness(see"Whatis supplied"section); alsocheckfortransportdamage. If you find any dam agetothe components, DO notusethem.
B. Assembly
- Placethecentralpiece(6) onto the cleaning foot(14).
- Screwthetwopartstogetheronthebackusingthescrewwhichisalsosupplied.
- Insertthewatertank(4) into the central piece and press it down until engages audibly.
- Slidehandleassemblydownintocentralpiece(6) untilitwillgonofurther.
- Screw the handle assembly and the central piecetogether by using the supplied long Screw.
- Turn the upper hook of the cable reel (11) so that it points upwards and wrap the Mainscable(10)aroundthetwohooksofthecablereel.

natural_image
Diagram of a mechanical device with a downward arrow indicating motion or force (no text or symbols present)
natural_image
Diagram of a vacuum cleaner's base with a screwdriver inserted, showing no text or symbols
natural_image
Diagram of a mechanical device with a curved component and directional arrow (no text or symbols)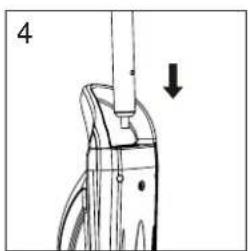
natural_image
Technical line drawing of a mechanical component with an arrow indicating direction (no text or symbols)
natural_image
Mechanical diagram showing a tool inserted into a component with an arrow indicating direction (no text or symbols present)Use
Thisdevicesweepsupdustandloosedirtintothecollectingcontainerandthencleans thefloorwithhotsteamimmediatelyafterthis.However,youcanalsoactivatethe sweepfunctionandsteamfunctionindividually.
Werecommendthatyoufirstsweepaverydirtyfloorwiththedeviceandthencleanit withsteaminasecondstep.
Thewatertankcanbefilledwithtapwater. However, inareaswhichhavehardwater, werecommendthatyouusedistilledwaterinordertopreventcalcification.
A. Preparing the device/ filling watertank

PLEASENOTE!
- Neverpouranycleaningagentorotheradditivesintothewatertank. These maydamagethedevice.
-
Beforeusingthedevice,alwayscheckthefloorclothforsignsofwear.Donot useitifitshowsanysignsofwearorifitisdamaged!Itcoulddamageyour flooring!
-
If not pre-fitted, attach one of the floor cloth supplied (8) to the bottom of the cleaning foot using the Velcrofasteners.
-
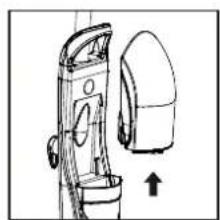
If the watertank(4) is inserted in the device, removethewatertank by pulling it in A vertical direction, up and away from the appliance, as show in the illustrations.
-
Unscrewtheclosureofthewatertank, fillthewatertankpreferablywith distilledwateratroomtemperatureandthencloseitagain. Firmlyturntheclosure shut.
-
Place the water tank into the central piece (6) and press it down until it engages audibly.
-
To quickly unwind the cable (10), turn the upper hook of the cable reel (11) so that itpointsdownwards. Thenpressthemainscableintothecablemount(2)sothat youarebetterabletohandlethedevicewhilecleaningtheflooranddonotstumble overthecable.
-
Now insert the plug into as suitable, easily accessible plug socket (120V, 60Hz). Thered controllamp (12) lights up as soon as the operating voltage is present.
-
To clean carpets, attach the carpet glider (7) with the flat side towards the floor and placethecleaningfootintothecarpetglider.
PLEASENOTE! Only us the carpet glideron carpets and not on hard floors in order. Top prevent damage to the floor!
natural_image
Line drawing of a washing machine with a side panel and an arrow indicating direction (no text or symbols)
natural_image
Simple line drawing of a mechanical component with curved and straight sections (no text or symbols)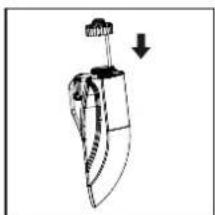
natural_image
Simple line drawing of a mechanical component with an arrow indicating direction (no text or symbols)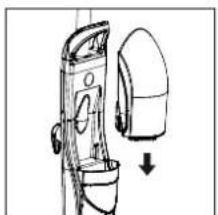
natural_image
Diagram of a hand holding a toilet with a downward arrow indicating motion (no text or symbols)
natural_image
Diagram of a robotic vacuum cleaner with a downward arrow indicating motion (no text or symbols present)B.Cleaningthefloor

CAUTION:
- Keepchildrenandanimalsawayfromthedeviceduringuse.
- Makesureduringusethatdirtparticlesdonotaccumulatebeneaththe cleaningfootastheycoulddamagesensitivesurfaces.
- Neveroperatethedevicewiththesteamfunctionifthewatertankisempty.
-
Duringcleaning, makesurethefloorclothisfirmlyattachedtothecleaning foottopreventdamagetothedeviceorflooring.
• Alwaysfirsttestthecleaningwithsteamonasmallspot. -
Nevercleanthesamespotforlongerthan10seconds.
- Neverdirectthesteamatpeople,animals,oritemscontainingelectrical components(e.g.insideovens,fridges,atswitchesandlights,microwave ovensetc.).
- Nevertouchthebottomofthedeviceduringoperation!
- While the device is in operation, the cleaning foot must not be held at a slanted angle or be inverted as shotspray water may emerge!
- Afterusethefloorclothmaystillbeveryhot.Ifyouwishtoremoveit,wait about5minutesforittocooldown.
NOTE: Waterresiduesinthefilterortankareduetothisdevicehavingbeentested. Whenyoufirstusethedeviceorifyouhavenotuseditforalengthyperiodoftime, youmustholdthesteamreleasebuttondownforapprox.30secondsafterconnecting ittothemainstogetthedevicereadyforoperation.Duringthistime,youwillheara pumpingnoisebecausethecorrespondingpartsofthedeviceneedtofillupwithwater.
- To ensure that the device can be put down easily, the joint in the cleaning foot (14) latches in when the central piece is in the vertical position. Touseth device, grab hold of the top handle and tilt the handle to a position which is comfortable for you, and if necessary place your foot on the cleaning foot as yououdoso.
- Using your foot, press the On/Off switch (13) on the cleaning foot to switch the device.
- Slidethecleaningfootforwardsoverthesurfacewhichistobecleaned. Theloose dirt is taken up by the rotating brush and collected in the collecting container (15) of thedevice.
- Pressthesteam releasebutton(1) to expelsteam and clean the floorm more thoroughly.
- If there are anymorestubbornareas of dirtoryouwanttokillgerms (e.g. in the vicinity of toilets), hold the cleaning footononespot for a number of seconds (but not longer than 10 seconds!).
- If you want to replace or wash the floor cloth, let go of the steam release button, switch off the device and pull them a ins plug out of the plug socket. Wait for 5 minutes that the device can cooldown. Now you can change the floor cloth.
- If steam stops being produced, the watertank is empty. Let goofthesteam release button, switch off the device and pull them mains plug out of the plug socket. refill the tank in them manner described in the "Preparing the device/filling watertank" section.
- Oncethecleaningprocedureiscompleteandthedevicehascompletelycooleddown, pleaseemptythewatertank(seebelow).
Afteruse

PLEASENOTE!
- Removetheplugfromthemainssocketbeforecleaningthedevice.
- Donotimmersethedeviceinwateranddonotrinseitoffunderrunning water.
- Allowthedevicetocooldowncompletelybeforestoringit.
-
Storethedeviceinacool,drylocationwhichisoutofthereachofchildren andanimals.
-
Switchoffthedevice, pullouttheplugandallowthedevicetocooldowncompletely (approx.5minutes).
- Removethewatertankfromthedeviceandemptyit.
- Carefully pull the collecting container out of the cleaning foot and empty the waste into arubbishbin. Then placethe container back into the device.
- Removethefloorclothfromthecleaningfootandwashit. Youcanwashthefloor clothsatamaximumof140Finthewashingmachine. Although they can be tumble-dried, you should allow the floor cloth stodrynaturally in the air so that they last longer.
- Overthecourseoftime, hairs, threadsandotherparticlesaccumulateonthe rotatablecleaningbrush. Werecommendthatfromtimetotimeyouremoveany contaminationfromthebrush.
- Asrequired, wipedownthehousingofthedevicewithasoft,drycloth.
- Turn the upper hook of the cablereel so that it points upwards and wrap them ains cable around the two hook of the cablereel.
- Let all of the part sof the devided ry completely before you put it away.
Technicaldata
Model: PSTM50
Device: PureCleanSteam FloorMop&Sweeper
Voltagesupply:120,60Hz
Output:1500W
Capacityofthewatertank:max.28.15oz.
Protectionclass:2
Troubleshooting
If the devices should stop working properly, first check whether you are able to correct the problem yourself. If you are not, contact the Customer Service (1-888-318-PYLE/718-535-1800).
Donottrytorepairafaultydeviceyourself!
NOTE: If you use normal tap water in the and Pure Clean Steam Floor Mop & Sweeper you have hard water, it may be necessary to replace the filter when it is no longer effective. Mineral deposits can build up in the heating element causing damage and/or diminished performance. Contact Customer Service (1-888-318-PYLE/718-535-1800) for information about replacement parts. If replacement of the filter is determined to be necessary, you can purchase this through Customer Service. Toremovethe filter, first removal watertank then pull the filter up and out of the steamer body. Replace with anew filter. Using distilled water will extend the life of the unit.
| Problem | Possiblecause/ solution |
| Thedevicedoesnot work. Theredcontrol lampdoesnotlightup. | Isthepluginsertedinthemainssocketcorrectly?Isthemainssocketdefective?Tryanothermains socket.Checkthefuseofyourmainsconnection. |
| Thebrushrotatesbutno steamcomesout. | Haveyoupressedthesteamreleasebutton correctly?Thedeviceisnotyetreadytooperate.Holdthe steamreleasebuttondownforapprox.30 secondsuntilyounolongerhearanypumping noises,andthedevicebeginstoemitsteam.Thewatertankisempty.Fillitup(see"Preparing thedevice/fillingwatertank"section). |
| Wateremergesinstead ofsteam. | Thewaterisformingcondensationinthetube.Presstthesteamreleasebuttonuntilsteam emerges.Ifnecessary,placeaclothbeneaththe attachmentaswatercanemerge.Ifwatershould unexpectedlycontinuetoemergeinsteadof steam,letgoofthesteamreleasebutton,pull theplugoutoftheplugsocket,letthedevice cooldownforapprox.5minutesandthentry again. |
| Onlyaverysmallamount ofsteamemerges. | Thenozzleisblocked.Unscrewthecentralpiece fromthecleaningfootandcarefullyrinsethe tubeofthecleaningfootwithadescalersolution.Useafunnel.Pleasefollowtheinstructionsfor usingthedescalier. |

Limited Warranty Policy
All Pyle products are carefully constructed and thoroughly tested before shipment. Products purchased in the USA are warranted to be free of defects in material and workmanship for one (1) year from the date of purchase. This warranty is limited to the original retail purchaser.
Should the product fall due to factory defect in material or workmanship, your unit will be repaired or replaced at the solo discretion of Sound Around Inc. You can contact our customer service department at (718) 535-1800.
To obtain warranty service, the unit must be carefully packed and shipped prepaid to:
Sound Around Service Center
1600
63rd
Street
Brooklyn,
NY
11204
• You must also include the following items:
• A copy of your sales receipt or other proof of purchase.
• A brief letter indicating the problem you are experiencing.
- Include in your letter your return address, daytime phone number
- Must include a money order for \$25.00 for return shipping, handling and insurance or provide your Visa/ MC number with expiration date.
Our Obligation under this warranty is limited to the repair or replacement of the defective unit when it is returned to us prepaid. This warranty will be considered void if the unit was tampered with, improperly serviced or subject to misuse, neglect or accidental damage.
Register Your Product Online www.PyleAudio.com
How would you like to extend the warranty on your product for three months? Simply write and post a review of the product online. Then, register your product online at pyleaudio.com or send an e-mail to warranty@soundaroundusa.com including your name, address, and phone number, as well as a link to the review.

We want you listening for a lifetime
Introducing Pyle Rewards!
• Get points for registering your Pyle product, posting text or video reviews online
- Redeem your points for cool items like Pyle-branded t-shirts, pens, and Pyle products, including mini speakers, sports watches, guitar pedals, iPod clock radios, and more!
- Connect your Pyle Rewards account to your Facebook and Twitter accounts to show off all the cool stuff you earned!
For more information, visit PyleAudio.com/rewards
Check us out on Facebook & Twitter:
www.facebook.com/pyleaudio
Twitter: @pyleaudio


- SAFETYINSTRUCTIONS
- SAVETHESEINSTRUCTIONS
- Intendeduse
- Dangerofinjury
- Electricity-riskofelectricshocks/riskoffire!
- Equipment and device damage
- Whatissupplied
- DeviceOverview
- BeforeInitialUse
- Unpacking
- PLEASENOTE!
- Assembly
- Use
- Preparing the device/ filling watertank
- B.Cleaningthefloor
- CAUTION:
- Afteruse
- Technicaldata
- Troubleshooting
- Limited Warranty Policy
- Register Your Product Online www.PyleAudio.com
- Introducing Pyle Rewards!
Brand : Pyle
Model : Pure Clean PSTM50
Category : Steam cleaner