SR-AX107 - Blender Saramonic - Free user manual and instructions
Find the device manual for free SR-AX107 Saramonic in PDF.


| Product Type | Blender / Mixer |
| Model | SR-AX107 |
| Brand | Saramonic |
| Dimensions (H x W x D) | Approx. 400 x 200 x 200 mm |
| Weight | Approx. 3.5 kg |
| Power Consumption | 800 W |
| Voltage / Frequency | 220-240 V / 50-60 Hz |
| Jar Capacity | 1.5 L |
| Blade Material | Stainless steel |
| Jar Material | Tritan plastic |
| Speed Settings | Variable speed with pulse function |
| Main Functions | Blending, crushing ice, grinding, smoothies |
| Safety Features | Overload protection, non-slip feet, safety lock |
| Cleaning & Care | Hand wash jar and lid; wipe motor base with damp cloth |
| Spare Parts | Replacement jar, blade assembly, lid available |
| Reparability | Repairable by authorized service centers |
| Warranty | 1 year limited warranty |
| Usage | Household only |
Frequently Asked Questions - SR-AX107 Saramonic
User questions about SR-AX107 Saramonic
0 question about this device. Answer the ones you know or ask your own.
Ask a new question about this device
Download the instructions for your Blender in PDF format for free! Find your manual SR-AX107 - Saramonic and take your electronic device back in hand. On this page are published all the documents necessary for the use of your device. SR-AX107 by Saramonic.
USER MANUAL SR-AX107 Saramonic
The SARAMONIC SR-AX107 is a 2-channel XLR audio adapter with preamplifiers and phantom power, ideal for any DSLR cameras with a built-in microphone jack.
COPYRIGHT 2011-2021 SARAMONIC INTERNATIONAL
A brand of DSQN
Web: www.saramonic.com
Email: info@saramonic.com
User Manual
Statement
Please read this manual carefully before using and strictly operate and store in accordance with the instructions. Please save it for your future reference. If the user manual can not help you to solve certain problems, please ask your retailer for help or email us: info@saramonic.com.

Cautions
- Do not use the unit under water, don't expose it to rain. Please store it in a cool, dry place.
- Please use and store it in normal temperature. Do not move it from overheated to supercooled condition frequently as well as keep away from heat sources such as heater and oven.
- When using and storing, please pay attention to dust and moisture.
- Be careful to violent collision.
1 PRODUCT INTRODUCTION
1.1 General Introductions
The SARAMONIC SR-AX107 is a 2-channel XLR audio adapter with preamplifiers and phantom power, ideal for any DSLR cameras with a built-in microphone jack. Wide-variety of audio devices like professional condenser microphones, wireless microphones, external audio mixers, sound boards and more can be connected to the camera via this adapter.
The SR-AX107 makes your recording work much easier. Level Meter allows you to verify the proper input levels in real time, the output signal can be adjusted by the level controls for optimum recording. The phone jack lets you monitor the audio from the adapter during recording, Or from camera during playback. The AGC disable feature reduces noise during quiet moments of recording.
1.2 Product Structure
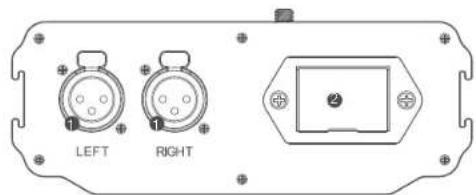
① XLR Inputs
Balanced LEFT and RIGHT XLR inputs
② Battery Compartment
Operates on one 9 volt battery (not included).
You could use an alkaline or lithium type battery for the longest operating type.
The adapter can also operate without a battery for limited functions.

Indicates the sound level in dB for each channel
4 Gain Switches
Selects LOW for unity gain or HIGH for +20dB boost
⑤ PEAK Switches
Turn on / off the LED signal indicators which flash red for overload
⑥ PLAY / REC Switch
Select PLAY for headphone monitoring playback audio from the camera
Select REC for headphone monitoring audio from the microphones during recording
7 AGC ON/OFF
Turn the AGC switch to ON to active camera AGC function
Turn the AGC switch to OFF to disable camera AGC function
Note: The AGC ON/OFF is only applied to cameras with built-in AGC function.

8 M/S Switch
Select mono or stereo output mode
The mono mode is for one mono microphone recording. It can send the mono audio signal to each channel and output stereo audio signal.
The stereo mode is for two channels recording. It provides two separate channels of audio.
9 POWER Switch
Main power switch for adapter
10 PHANTOM 12V/48V Switch
Optional 12 or 48 volt phantom power for condenser microphones that require phantom power to operate.
Many microphones will operate on 12V to save battery power.
11 LINE / MIC/ PH Switches
Select LINE or MIC or Phantom levels
The MIC level is for self powered microphones or wireless system.
The LINE level is for mixers and other audio devices with a line level output, set
the LINE/MIC switch to LINE to attenuates the signal to about 40dB.
The PH level is for microphones that require phantom power.
12 Monitor input jack
For connecting AV cable to the camera
13 Audio Output
One stereo 1/8" (3.5 mm) mini-jack output
14 Left and Right Control Knobs
Adjust the signal of each channel to the optimum recording levels
Volume Control knob
Adjusts the headphone volume level
16 PHONES
Headphone jack to monitor the audio from microphones or camerat

natural_image
Simple line drawing of a rectangular container with three top-mounted sensors and two circular labeled points (17 and 19) inside, no text or symbols present.17 3/8" Female Screw
18 1/4" Female Screw
1.3 Product Structure
| Maximum Input Levels | MIC 0 dB on the Level meter at -44 dBu inputLINE 0 dB on the Level meter at +10 dBu input |
| Output Level | Nominal MIC levels |
| Frequency Response | 20 Hz to 20 kHz (+/- 0.5 dB) |
| THD | Less than 0.01% @ 1kHz, -30dBu input |
| S/N Ratio | 85 dB @ 1 Khz, -30 dBu inp |
| Gain LO gain: 0 dB | HI gain: 20 dB |
| Phantom Power Dual regulated | 12 or 48 volt power suppliesCurrent to 14 mA (direct short) |
| Level meter | -18 to +3 dB in 3 dB increments |
| Battery Type | One 9 volt alkaline or lithium battery |
| Battery Duration 3 hours typical with alkaline battery (no phantom)8 hours typical with lithium battery (no phantom) | |
| Dimensions | (L × W × H) 155 mm x 96 mm x 64 mm |
| Weight | 21.1 oz (0.599 kg) |
2. Operation
2.1 Set up Guide
(1) Install the battery.
Lift up and pull out the drawer from the battery compartment. Insert 9V battery into place aligning + and - polarity as shown. Slide the drawer closed until it clicks into place.
(2) Attach the SR-AX107 to the base of the camera. Spin counter-clockwise to tighten up the adapter with the camera. Mount the adapter to a tripod with the tripod socket on the bottom of the adapter.
(3) Connect the supplied signal transmission line from the output jack (OUT) of adapter to the MIC input of camera. If there is a MIC / Line switch on the camera, select it to MIC.
(4) For monitor audio from the camera during playback, connect the supplied AV cable to the MONITOR jack on the adapter. Attach the other end to the AV output of the camera.
(5) Connect balanced XLR microphones, wireless mics or other audio sources to the LEFT and RIGHT XLR.
(6) Set the GAIN switches.
Set the Gain switches to HIGH for most microphones
Set the Gain switches to LOW for very sensitive condenser microphones or recording very loud sounds
(7) Set the PEAK switches for both channel to ON.
(8) Set the MONITOR switch to PLAY to monitor the audio from the microphones during recording.
(9) Set AGC ON / OFF.
Please read the AGC Operation Guide for your reference.
(10) Set the M/S switch.
When using one channel, switch to M for mono.
When using two channels, switch to S for stereo.
(11) Set the LINE/MIC/PH switch.
When using microphones and wireless systems, set to MIC for microphone.
When using other audio devices, set to LINE for Line.
When using microphones operating on phantom power, set to PH for phantom power.
Note: Please DO NOT select Phantom level when recording with microphones that do not operate on phantom power, wireless receivers, mixing boards or any unbalanced device, because it may cause damage to both the adapter and audio device.
(12) Set the 12V or 48V according to your needs.
(13) Turn the adapter POWER switch to ON.
(14) Plug an earphone into the headphone terminal on the camera to monitor the audio. Please make sure that both channels can be heard and adjust the gain controls if any distortion. Be sure that the VOLUME control is set low to avoid excessively loud audio from damaging your hearing.
(15) We suggest you could do a test recording and playback the audio to see if it is acceptable. When test recording, you could adjust the knobs flexibly to get the the optimum signal levels.
2.2 AGC Operation Guide
Automatic gain control (AGC) provide a controlled signal amplitude at its output, despite variation of the amplitude in the input signal. By disabling AGC function, the hiss can be eliminated when the camera is recording during quite moments.
When recording under stereo mode and set the AGC switch to off, a 20kHz sine wave will be sent from left channel to the camera to turn off the AGC function. The 20kHz sine wave can be easily filtered out, and the left channel can still be used for normal recording.
When recording under mono mode, you could set the M/S switch to S and recording only on the right channel. Leaving the left channel unused, so the 20kHz sine wave will not be recorded into the audio file.
Suggestion:
(a) When turn the volume of each channel to the maximum but the recording sound is still low or not clear, you could turn off the AGC.
(b) When turn the volume of each channel to the minimum but the recording sound is still high, you could turn off the AGC.
(c) When the background noise affects the recording, please turn off the AGC.
(d) If you don't want the 20KHz sine wave to be recorded into the audio file, please turn on the AGC.
Please do a test recording and play back the audio to see if it is acceptable.
3 Warranty
(1) Saramonic International provides one-year warranty under normal use and lifelong paid maintenance from the date you purchase this product.
(2) Saramonic International will repair or replace the product that under the warranty for free during the one-year valid period, but customers should pay for shipping and insurance charges for returning the product to Saramonic International.
(3) This warranty only applies where a defect has arisen, wholly or substantially, as a result of faulty manufacture, parts or workmanship during the warranty period.
(4) This warranty does not cover:
(a) All damages caused by human factors include using the products in abnormal conditions and operate the device without according to the user manual.
(b) The guarantee is invalid if defect is caused by incorrect use, poor maintenance or if persons not authorized by Saramonic International have carried out alterations or repairs.
(c) Damages caused by poor transportation after you purchased this product.
(d) Force majeure such as fire, flood, lighting stroke, earthquake.
(e) Customers who can not show valid invoice.
(5) Wherever you purchased our products, you will be served very well at local retailer.
(6) Saramonic International reserves all the rights for the ultimate interpretation.
4 Compatibility
Professional XLR microphones, wireless systems, other audio devices such as mixing boards. Any DSLR cameras with video making function.
5 Packing List
One SR-AX107 main unit
One signal transmission line
AV cable
User manual
Warranty card
COPYRIGHT 2011-2021 SARAMONIC INTERNATIONAL A brand of DSQN

- Statement
- Cautions
- PRODUCT INTRODUCTION
- General Introductions
- Product Structure
- M/S Switch
- POWER Switch
- PHANTOM 12V/48V Switch
- LINE / MIC/ PH Switches
- Monitor input jack
- Audio Output
- Left and Right Control Knobs
- Volume Control knob
- PHONES
- Operation
- Set up Guide
- AGC Operation Guide
- Suggestion:
- Warranty
- Compatibility
- Packing List
Brand : Saramonic
Model : SR-AX107
Category : Blender