
MEH4045 - Hedge Trimmer McGregor - Free user manual and instructions
Find the device manual for free MEH4045 McGregor in PDF.


| Product Type | Hedge Trimmer |
| Brand | McGregor |
| Model | MEH4045 |
| Blade Length | 45 cm (18 inches) |
| Overall Length | 95 cm |
| Weight | 3.8 kg |
| Power Source | Corded Electric, 1200 W |
| Voltage | 120 V / 60 Hz |
| Cutting Capacity | 22 mm maximum branch thickness |
| Blade Material | High-carbon steel |
| Motor Type | Brushed electric motor |
| Sound Pressure Level | 85 dB(A) |
| Vibration Level | 2.5 m/s² |
| Safety Features | Two-hand operation, blade guard, safety switch |
| Maintenance | Regular blade cleaning and lubrication; no professional servicing required |
| Repairability | Customer-replaceable blades and switches; spare parts available |
| Warranty | 2 years limited warranty |
| Manual Languages | English (24 pages PDF) |
Frequently Asked Questions - MEH4045 McGregor
User questions about MEH4045 McGregor
0 question about this device. Answer the ones you know or ask your own.
Ask a new question about this device
Download the instructions for your Hedge Trimmer in PDF format for free! Find your manual MEH4045 - McGregor and take your electronic device back in hand. On this page are published all the documents necessary for the use of your device. MEH4045 by McGregor.
USER MANUAL MEH4045 McGregor
natural_image
Green hairless hedges with serrated blade and handle (no text or symbols visible)400/500/600W Hedge Trimmer
7543144/7438912/7648166 (Model: MEH4045/MEH5051/MEH6060)
Important - Please read these
instructions fully before starting assembly
These instructions contain important information that will help
you get the best from your hedge trimmer, ensuring it is assembled
correctly and safely. If you need help or have damaged or
missing parts, call the Customer Helpline on 0345 605 2065
AFTER SALES SUPPORT
0345 605 2065
Contents
Safety information ....3
In the box 11
Assemble....12
Prepare....12
Operate....14
Maintenance 16
Technical data....17
Accessories....18
Troubleshooting....19
Environmental protection....19
Getting help....20
Guarantee....20
⚠️ Safety information
Important - Please read these instructions fully before starting assembly
Warning symbols
The following warning symbols appear throughout this assembly manual and indicate the appropriate safety measures you should take when assembling and operating the hedge trimmer.

This symbol indicates there is a danger of serious personal injury or death if you do not observe the warning.
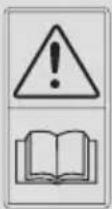
Read operator's manual

Do not expose to rain
General safety

WARNING!
Keep this assembly manual in a safe place following assembly for reference at a later date.
Always ensure anyone intending to operate this hedge trimmer is fully conversant with the contents of this assembly manual prior to assembling, maintaining or operating the hedge trimmer.
Perform assembly operations as described in this manual. Failure to observe this warning may lead to serious injury, death, or damage to the hedge trimmer.
Always take care when removing the packaging to prevent damage to you or to the hedge trimmer.

IMPORTANT! Before assembling the hedge trimmer, check all the parts indicated in the manual are in the box. Inspect all the parts for signs of damage. Do not assemble the hedge trimmer if you observe any damaged components.

Safety information
Important - Please read these instructions fully before starting assembly
Personal safety

WARNING!
Only operate the hedge trimmer if you are wearing the correct Personal Protective Equipment (PPE) as described in the following warnings.
Warning symbols
The following warning symbols appear throughout this assembly manual and indicate the appropriate safety measures you should take when assembling and operating the hedge trimmer.

Read operator's manual

Wear ear protection

Wear eye protection

Wear dust mask

Do not expose to rain

Double insulation
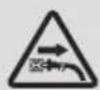
Remove plug from the mains immediately if the cable is damaged or cut
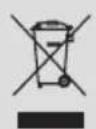
Waste electrical products must not be disposed of with household waste. Please recycle where facilities exist. Check with your local authorities or retailer for recycling advice.

Safety information
Important - Please read these instructions fully before starting assembly
General power tool safety warnings

WARNING!
Read all safety warnings and all instructions. Failure to follow the warnings and instructions may result in electric shock, fire and/or serious injury.
Save all warnings and instructions for future reference.
The term “power tool” in the warnings refers to your mains-operated (corded) power tool or battery-operated (cordless) power tool.
1) Work area safety
a) Keep work area clean and well lit. Cluttered or dark areas invite accidents.
b) Do not operate power tools in explosive atmospheres, such as in the presence of flammable liquids, gases or dust. Power tools create sparks which may ignite the dust or fumes.
c) Keep children and bystanders away while operating a power tool. Distractions can cause you to lose control.
2) Electrical safety
a) Power tool plugs must match the outlet. Never modify the plug in any way. Do not use any adapter plugs with earthed (grounded) power tools. Unmodified plugs and matching outlets will reduce risk of electric shock.
b) Avoid body contact with earthed or grounded surfaces, such as pipes, radiators, ranges and refrigerators. There is an increased risk of electric shock if your body is earthed or grounded.
c) Do not expose power tools to rain or wet conditions. Water entering a power tool will increase the risk of electric shock.
⚠️ Safety information
Important - Please read these instructions fully before starting assembly
General power tool safety warnings
d) Do not abuse the cord. Never use the cord for carrying, pulling or unplugging the power tool. Keep cord away from heat, oil, sharp edges or moving parts. Damaged or entangled cords increase the risk of electric shock.
e) When operating a power tool outdoors, use an extension cord suitable for outdoor use. Use of a cord suitable for outdoor use reduces the risk of electric shock.
f) If operating a power tool in a damp location is unavoidable, use a residual current device (RCD) protected supply. Use of an RCD reduces the risk of electric shock.
3) Personal safety
a) Stay alert, watch what you are doing and use common sense when operating a power tool. Do not use a power tool while you are tired or under the influence of drugs, alcohol or medication. A moment of inattention while operating power tools may result in serious personal injury.
b) Use personal protective equipment. Always wear eye protection. Protective equipment such as dust mask, non-skid safety shoes, gloves, hard hat, or hearing protection used for appropriate conditions will reduce personal injuries.
c) Prevent unintentional starting. Ensure the switch is in the off-position before connecting to power source and/or battery pack, picking up or carrying the tool. Carrying power tools with your finger on the switch or energising power tools that have the switch on invites accidents.
d) Remove any adjusting key or wrench before turning the power tool on. A wrench or a key left attached to a rotating part of the power tool may result in personal injury.
⚠ Safety information
Important - Please read these instructions fully before starting assembly
General power tool safety warnings
e) Do not overreach. Keep proper footing and balance at all times. This enables better control of the power tool in unexpected situations.
f) Dress properly. Do not wear loose clothing or jewellery. Keep your hair, clothing and gloves away from moving parts. Loose clothes, jewellery or long hair can be caught in moving parts.
g) If devices are provided for the connection of dust extraction and collection facilities, ensure these are connected and properly used. Use of dust collection can reduce dust-related hazards.
4) Power tool use and care
a) Do not force the power tool. Use the correct power tool for your application. The correct power tool will do the job better and safer at the rate for which it was designed.
b) Do not use the power tool if the switch does not turn it on and off. Any power tool that cannot be controlled with the switch is dangerous and must be repaired.
c) Disconnect the plug from the power source and/or the battery pack from the power tool before making any adjustments, changing accessories, or storing power tools. Such preventive safety measures reduce the risk of starting the power tool accidentally.
d) Store idle power tools out of the reach of children and do not allow persons unfamiliar with the power tool or these instructions to operate the power tool. Power tools are dangerous in the hands of untrained users.
e) Maintain power tools. Check for misalignment or binding of moving parts, breakage of parts and any other condition that may affect the power tool's operation. If damaged, have the power tool repaired before use. Many accidents are caused by poorly maintained power tools.

Safety information
Important - Please read these instructions fully before starting assembly
General power tool safety warnings
f) Keep cutting tools sharp and clean. Properly maintained cutting tools with sharp cutting edges are less likely to bind and are easier to control.
g) Use the power tool, accessories and tool bits etc. in accordance with these instructions, taking into account the working conditions and the work to be performed. Use of the power tool for operations different from those intended could result in a hazardous situation.
5) Service
a) Have your power tool serviced by a qualified repair person using only identical replacement parts. This will ensure that the safety of the power tool is maintained.
Important - Please read these instructions fully before starting assembly
Hedge trimmer safety warnings
- Keep all parts of the body away from the cutter blade. Do not remove cut material or hold material to be cut when blades are moving. Make sure the switch is off when clearing jammed material. A moment of inattention while operating the hedge trimmer may result in serious personal injury.
- Carry the hedge trimmer by the handle with the cutter blade stopped. When transporting or storing the hedge trimmer always fit the cutting device cover. Proper handling of the hedge trimmer will reduce possible personal injury from the cutter blades.
- Keep cable away from cutting area. During operation the cable may be hidden in shrubs and can be accidentally cut by the blade.
- Hold the power tool by insulated gripping surfaces only, because the cutter blade may contact hidden wiring or its own cord. Cutter blades contacting a "live" wire may make exposed metal parts of the power tool "live" and could give the operator an electric shock.
- Check the hedge for foreign objects, e.g. wire fences.
- Use both hands when operating the hedge trimmer. Using one hand could cause loss of control and result in serious personal injury.
- Recommendation for the use of a residual current device with a tripping current of 30 mA or less.
⚠️ Safety information
Important - Please read these instructions fully before starting assembly
Maintenance and storage
1) Never use water to cleaning the unit.
2) Always clean the hedge trimmer immediately after use. Brush the blade using a stiff nylon brush to remove any debris.
3) Always store the unit in a dry place.
4) Inspect the hedge trimmer before each use.
5) Have the unit professionally repaired if any damage occurs.
6) The blade rail should be cleaned and treated with fine lubricating oil after each use.
7) Use the blade sheath for transportation and storage.
In the box
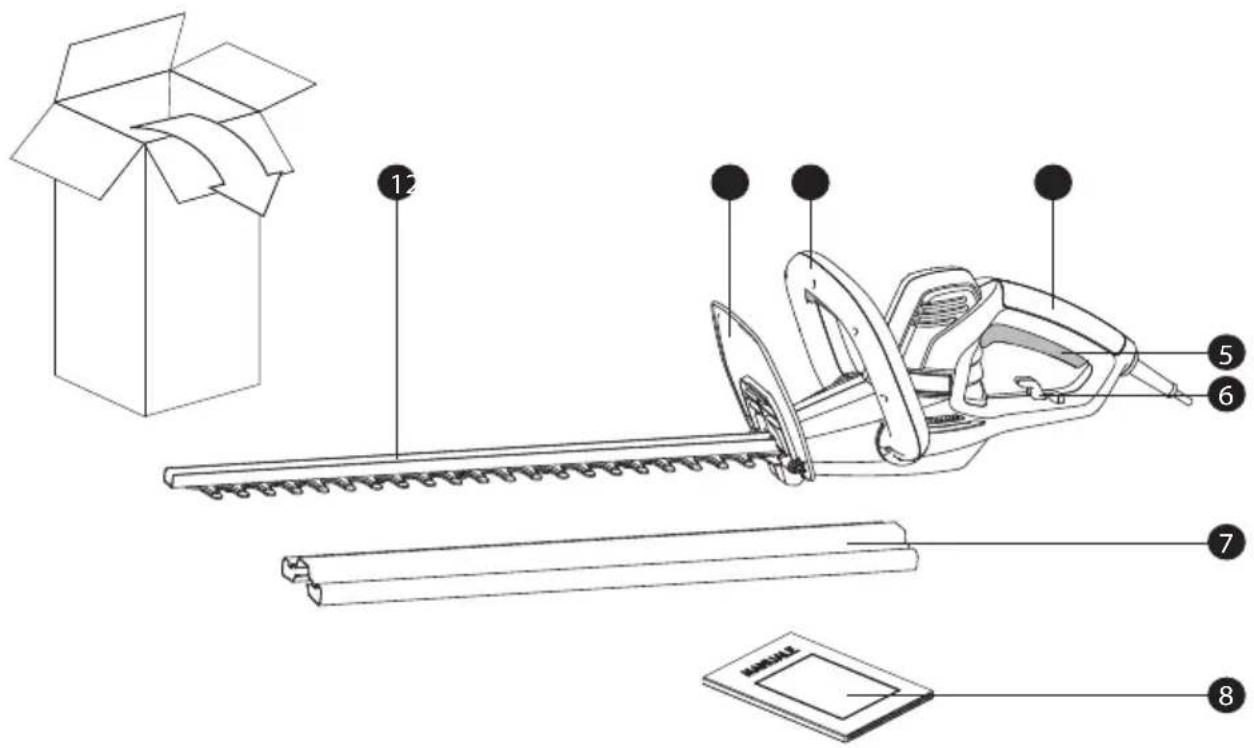
Parts
1 Blade
2 Safety guard
3 Front handle with safety switch
4 Rear handle
5 On/off switch
6 Cable strain relief
7 Blade sheath
8 Instruction manual
Assemble
Assembling instructions
The hedge trimmer has been already assembled, You needn't to assemble.
Prepare
Preparing instructions

Always take care when removing the packaging to prevent damage to you or to the hedge trimmer.

IMPORTANT! Before assembling the hedge trimmer, check all the parts indicated in the manual are in the box. Inspect all the parts for signs of damage. Do not assemble the hedge trimmer if you observe any damaged components.

NOTE: Before using the tool, read the instruction book carefully.
Remove all parts of the hedge trimmer from the box and carefully remove all packaging. Take care not to lose any instructions which may be attached to the tool, these provide important information which will be required while assembling the hedge trimmer.

WARNING! Take great care when doing this as the blade has a very sharp cutting edge.
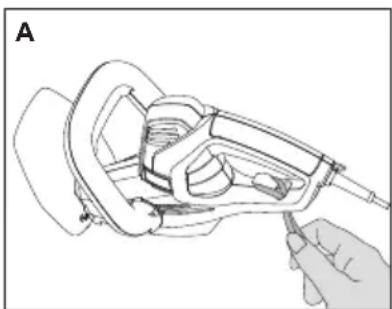
1. CABLE STRAIN RELIEF (See Fig. A)
This product is designed with a cable strain relief that prevents the extension cord from being pulled loose while using.
- Form a loop with the end of the extension cord.
- Insert loop portion of extension cable strain relief opening in the bottom of the rear handle and place over cable strain relief.
- Slowly pull loop against cable strain relief until the slack is removed.
natural_image
Line drawing of a hand holding a tool interacting with a mechanical component (no text or symbols)
WARNING! Before using the tool, read the instruction book carefully.
INTENDED USE
The product is intended for trimming hedges, bushes and shrubs. Observe the technical data for the maximum cutting capacity. Do not cut branches exceeding the stated maximum capacity. This product is intended for private domestic use only, not for any commercial trade use. It must not be used for any purposes other than those described.
Operate
Operating instructions
1. STARTING AND STOPPING
BEFORE STARTING YOUR HEDGE TRIMMER
Remove blade sheath as illustrated in Fig B.

natural_image
Diagram of a mechanical tool with a gear and blade, showing an arrow indicating direction (no text or symbols present)TO START YOUR HEDGE TRIMMER
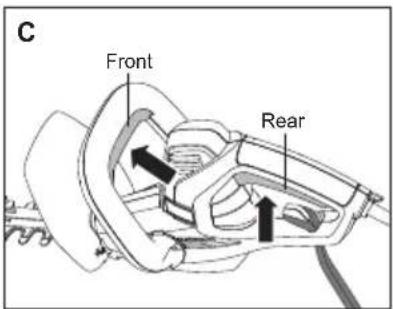
Depress the safety switch on front handle with one hand and the on/off switch on the rear handle with the other hand to turn on the hedge trimmer. The trimmer will be staying on as long as the two switches are depressed. (See Fig C)
TO STOP YOUR HEDGE TRIMMER
Move Hedge trimmer away from cutting area before stopping.
To stop, release either on/off switch or safety switch.

WARNING: If any parts are missing, damaged or broken, do not operate your Hedge
trimmer until all damaged parts have been replaced or repaired. Failure to do so could result in serious personal injury. DO NOT USE WITHOUT HANDLE AND GUARD.
Operate
Operating instructions
2. PAY ATTENTION TO USE YOUR HEDGE TRIMMER
Inspect the area to be cut before each use, remove objects which can be thrown or become entangled in the cutting blades.
Always hold the hedge trimmer with both hands and with the blade away from you before turning it on.
Always keep the power cord behind the Hedge trimmer when in use. Do not place it over the hedge that you are trimming where it may be cut by the blade.
When trimming new growth, use a wide sweeping action so that the stems are fed directly into the blade.
Allow the cutting blades to reach full speed before entering the material to be cut.
Always work in the direction going away from people and solid objects such as walls, large stones, trees, vehicles etc.
If the blade stalls, immediately stop the Hedge trimmer. Disconnect the hedge trimmer from the electrical outlet and clear the jammed debris from the cutting blade.
Wear gloves when trimming thorny or prickly growth.
Move the hedge trimmer to feed the branches directly into the blade cutting edges.
Do not try to cut stems that are too large to feed into the cutting blade.
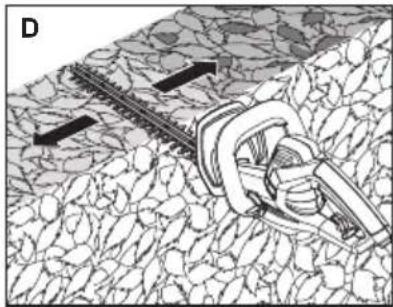
TOP EDGING (See Fig D)
Use a wide sweeping motion. A slight downward tilt of the cutting blades in the direction of motion gives the best cutting results.
natural_image
Microscopic cross-section of a material sample showing layered structure and directional arrows (no text or symbols)SIDE EDGING (See Fig E)
When trimming the sides of the hedge, begin at the bottom and cut upwards, tapering the hedge inward at the top. This shape will expose more of the hedge, resulting in a more uniformed growth.
WARNING! Check extension cords before each use. If damaged replace immediately.
Never use your tool with a damaged cord since touching the damaged area could cause electrical shock resulting in serious injury.
If the supply cord is damaged, it should be replaced by a local approved service centre.

natural_image
Cross-sectional diagram of a layered geological or material structure with an arrow indicating a specific feature (no text or symbols present)WARNING:
If the supply cord is damaged, it must be replaced by the same cord provided by the manufacturer. Also replacement of cord has to be done by the manufacturer, or its service agent or similarly qualified persons in order to avoid a hazard.
CLEANING
Disconnect from electrical outlet. Using a soft brush-remove debris from all air intakes and cutting blade.
Wipe over surface of your Hedge trimmer with a dry cloth.
WARNING! Never use water for cleaning your Hedge trimmer. Do not clean with chemicals, including petrol, or solvents as this can damage your hedge trimmer.
LUBRICATING THE CUTTING BLADE
For easier operation and longer life, lubricate the cutting blades before and after each use. Before lubricating, make sure your Hedge trimmer is disconnected from electrical outlet.
Apply the gear oil so that it runs between the two blades.
AT THE END OF THE CUTTING SEASON
Clean your Hedge trimmer thoroughly.
Check that all nuts and bolts are secure.
Visually inspect the Hedge trimmer for any worn or damaged parts.
TO STORE YOUR HEDGE TRIMMER
Ensure the blade sheath is fitted before storage.
Store in a secure, dry place out of the reach of children, and your trimmer can be protected from damage.
Do not place other objects on top of the machine.
Technical data
Technical data table
| Model MEH40 | 45 MEH5051 MEH6060 | ||
| Rated Voltage 230-240 V ~ 50 Hz | |||
| Rated Power 400W 500W 600W | |||
| Rated no-load speed 1800 /min | |||
| Cutting width 16 mm | |||
| Cutting length 450 mm | 510 mm 600 mm | ||
| Machine Weight 2.2kg | 2.5kg 2.7kg | ||
| Protection degree | ☐/II | ||
Noise and technical date
MEH4045
A weighted sound pressure L

A weighted sound power L
MEH5051
A weighted sound pressure

A weighted sound power L
MEH6060
A weighted sound pressure L

A weighted sound power L
Wear ear protection.
VIBRATION INFORMATION
Vibration total values (triax vector sum) determined according to EN 60745:
MEH4045
Vibration emission value: a_h=2.1m/s^2 Uncertainty K=1.5m/s^2
MEH5051
Vibration emission value: a_h=2.1m/s^2 Uncertainty K = 1.5m/s ^2
MEH6060
Vibration emission value: a_h=2.2m/s^2 Uncertainty K=1.5m/s^2
The declared vibration total value may be used for comparing one tool with another, and may also be used in a preliminary assessment of exposure.

WARNING: The vibration emission value during actual use of the power tool can differ
from the declared value depending on the ways in which the tool is used dependant on the following examples and other variations on how the tool is used:
How the tool is used and the materials being cut or drilled.
The tool being in good condition and well maintained
Technical data
Noise and technical date
Using the correct accessory for the tool and ensuring it is sharp and in good condition.
The tightness of the grip on the handles and if any anti vibration accessories are used.
And the tool is being used as intended by its design and these instructions.
This tool may cause hand-arm vibration syndrome if its use is not adequately managed
WARNING: To be accurate, an estimation of exposure level in the actual conditions of use should also take account of all parts of the operating cycle such as the times when the tool is switched off and when it is running idle but not actually doing the job. This may significantly reduce the exposure level over the total working period.
Helping to minimise your vibration exposure risk.
Maintain this tool in accordance with these instructions and keep well lubricated (where appropriate)
If the tool is to be used regularly then invest in anti vibration accessories.
Plan your work schedule to spread any high vibration tool use across a number of days.
Accessories
| Model MEH4045 | MEH5051 MEH6060 | ||
| Safety guard(Assembled on machine) | 1 1 1 | ||
| Blade sheath(Assembled on machine) | 1 1 1 |
Troubleshooting
General troubleshooting
The following chart lists problem symptoms, possible causes and corrective action, if your electric hedge trimmer does not operate properly. If these do not identify and correct the problem, contact your service agent.
WARNING! Always switch the product off, disconnect it from power supply and let the product cool down before performing inspection, maintenance and cleaning work!
| Problem Possible Cause Solution | ||
| Hedge trimmer does not operate | 1.1 No power1.2 Mains socket faulty1.3 Extension cord damaged1.4 Fuse faulty | 1.1 Check power1.2 Check other socket, replace1.3 Check cord, replace1.4 Replace fuse |
| Hedge trimmer operates intermittently | 2.1 Extension cord damaged2.2 Internal wiring damaged2.3 On/Off switch defective | 2.1 Check cord, replace2.2 Contact Service Agent2.3 Contact Service Agent |
| Motor runs but blades remain stationary | 3. Internal fault 3. Contact Service Agent | |
| Cutting blade hot | 4.1 Cutting blade dull4.2 Cutting blade has dents4.3 Too much friction, due to lack of lubricant | 4.1 Have blade sharpened4.2 Have blade inspected/overhauled4.3 Apply lubricant spray |
Environmental protection

This product has been marked with a symbol relating to removing electric and electronic waste. This means that this product shall not be discarded with household waste but that it shall be returned to a collection system which conforms to the European Directive 2002/96/CE. It will then be recycled
or dismantled in order to reduce the impact on the environment. Electric and electronic equipment can be hazardous for the environment and for human health since they contain hazardous substances.
Guarantee
Dear Customer,
In the unlikely event that your device develops a fault, please contact our Customer service department on the telephone number shown below.
- These guarantee terms cover additional guarantee rights and do not affect your statutory warranty rights. Claims must be accompanied by Proof of Purchase. This must be in the form of a Sales receipt or Bank statement and must show that the product has been purchased within 2 years prior to the claim, from the retailer that it was originally sold to.
- Our guarantee covers problems caused by material or manufacturing defects, and will result in the repair of these defects or replacement of the device with a like for like or similar article. Please note that our devices have not been designed for use in commercial, trade or industrial applications. Consequently, the guarantee is invalidated if the equipment is used in commercial, trade or industrial applications or for other equivalent activities.
- The following are also excluded from our guarantee :
A. Faults due to accidents, customer misuse or unauthorized repairs
B. Consumable Parts such as detergent bottle, patio cleaner, jet lance, fix brush and nozzle pin.
C. Failure due to lack of routine maintenance.
D. Failure as a result of not using the equipment in accordance with the manual and safety instructions
E. The adjustment of cables, drives belts or recoil starters.
-
The guarantee is valid for a period of 2 years starting from the purchase date of the device. Guarantee claims should be submitted before the end of the guarantee period within two weeks of the defect being noticed. No guarantee claims will be accepted after the end of the guarantee period. The original guarantee period remains applicable to the device even if repairs are carried out or parts are replaced. In such cases, the work performed or parts fitted will not result in an extension of the guarantee period, and no new guarantee will become active for the work performed or parts fitted. This also applies when an on-site Service is used.
-
Please keep your sales receipt in a safe place. If is covered by our guarantee your device will either be repaired under the terms of guarantee or we will send you a replacement device. This device may be re-conditioned or like for like replacement.


- 400/500/600W Hedge Trimmer
- Contents
- ⚠️ Safety information
- Warning symbols
- General safety
- WARNING!
- Safety information
- Personal safety
- Save all warnings and instructions for future reference.
- ⚠ Safety information
- General power tool safety warnings
- Important - Please read these instructions fully before starting assembly
- Hedge trimmer safety warnings
- Maintenance and storage
- In the box
- Parts
- Assemble
- Assembling instructions
- Prepare
- Preparing instructions
- CABLE STRAIN RELIEF (See Fig. A)
- INTENDED USE
- Operate
- Operating instructions
- STARTING AND STOPPING
- TO START YOUR HEDGE TRIMMER
- TO STOP YOUR HEDGE TRIMMER
- PAY ATTENTION TO USE YOUR HEDGE TRIMMER
- TOP EDGING (See Fig D)
- SIDE EDGING (See Fig E)
- WARNING:
- CLEANING
- LUBRICATING THE CUTTING BLADE
- AT THE END OF THE CUTTING SEASON
- TO STORE YOUR HEDGE TRIMMER
- Technical data
- Technical data table
- Noise and technical date
- MEH4045
- MEH5051
- MEH6060
- VIBRATION INFORMATION
- Accessories
- Troubleshooting
- General troubleshooting
- Environmental protection
- Guarantee
Brand : McGregor
Model : MEH4045
Category : Hedge Trimmer