
YT4395-01 - Saw McGregor - Free user manual and instructions
Find the device manual for free YT4395-01 McGregor in PDF.


| Product Type | Circular Saw |
| Model | YT4395-01 |
| Brand | McGregor |
| Power Source | Electric Corded (120V, 60Hz) |
| Motor Power | 1500 W |
| Blade Diameter | 7-1/4 inches (184 mm) |
| Arbor Size | 5/8 inch |
| Max Cutting Depth at 90° | 2-1/2 inches (63 mm) |
| Max Cutting Depth at 45° | 1-3/4 inches (44 mm) |
| No-Load Speed | 5500 RPM |
| Dimensions (L x W x H) | 12.6 x 10.2 x 8.7 inches |
| Weight | 9.5 lbs (4.3 kg) |
| Cord Length | 6 ft (1.8 m) |
| Blade Guard | Telescoping lower guard |
| Bevel Adjustment | 0° to 45° with positive stops at 0°, 22.5°, 45° |
| Cutting Capacity (2x lumber) | 2x4 at 90° |
| Safety Features | Electric brake, lock-off button, spindle lock |
| Maintenance | Regularly clean vents, check brush wear, lubricate bearings |
| Replaceable Parts | Blade, carbon brushes, power cord |
| Warranty | 2 years limited |
Frequently Asked Questions - YT4395-01 McGregor
User questions about YT4395-01 McGregor
0 question about this device. Answer the ones you know or ask your own.
Ask a new question about this device
Download the instructions for your Saw in PDF format for free! Find your manual YT4395-01 - McGregor and take your electronic device back in hand. On this page are published all the documents necessary for the use of your device. YT4395-01 by McGregor.
USER MANUAL YT4395-01 McGregor
natural_image
Illustration of a Megregor electric chain saw with visible blade and handle (no text or symbols on the device itself)McGregor 180OW Electric Chainsaw
MECI8352 (Model: YT4395-OI)
Contents
Safety Information....3
Warning symbols....3
General safety....5
Electrical safety 6
Personal safety 7
Operational and maintenance safety 9
Intended use 13
Service 13
In the Box....14
Parts....14
Preparing to assemble the chainsaw....14
Assemble 15
Prepare....16
Step 1 Oil filling ....16
Step 2 Remove the guide bar cover 16
Step 3 Check the chain tension ....17
Step 4 Settle the power cord....17
Step 5 Connect to power supply ....18
Step 6 Locate the chain brake 18
Step 7 Check oil passes 18
Operate....20
Operating the electric chainsaw....20
Operating the electric chainsaw Tips: 23
Maintenance 28
Maintenance....28
Adjusting chain tension 29
Technical Data 32
Technical data table 32
Part list 32
Recycling and disposal 32
Troubleshooting....33
General troubleshooting....33
Getting help....33
Guarantee 34

Safety Information
Important - Please read these instructions fully before starting assembly
Warning symbols
The following warning symbols appear throughout this manual and indicate the appropriate safety measures you should take when operating and maintaining the electric chainsaw.

WARNING! This is a warning symbol. This symbol is used throughout the user guide whenever there is a risk of personal injury. Ensure that these warnings are read and understood at all times.

To reduce the risk of injury, ueser must read instruction manual.


Wear eye protection and ear protection.


Wear protective gloves and boots.

Do not expose and operate the tool in rain.

Remove the plug from the mains immediately if cable is damaged or cut.

Hold the chain saw with both hands.

Correct way of operation.


Caution! kick-back! Be careful of kick-back of the machine during work.

Safety Information
Important - Please read these instructions fully before starting assembly
Warning Safety
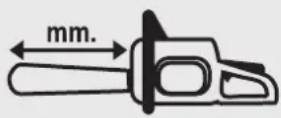
Bar length 356mm.

Brake is engaged and product can not be started or run.

Brake is disengaged and product can be operated.

Guaranteed sound power level.

Double insulation.

Recycle unwanted materials instead of disposing of them as waste. All tools, hoses and packaging should be sorted, taken to the local recycling centre and disposed of in an environmentally safe way.

Safety Information
Important - Please read these instructions fully before starting assembly
General Safety

IMPORTANT!
- The chain is designed exclusively for sawing wood. You may only cut trees if you have received the appropriate training. The manufacturer cannot be held liable for damage caused by improper or incorrect usage.
- Please note that our equipment has not been designed for use in commercial, trade or industrial applications. The warranty will be void if the machine is used in commercial, trade or industrial businesses or for the equivalent purposes.
- Read the instructions carefully. Be familiar with the controls and the proper use of the equipment. Always ensure anyone intending to operate this electric chainsaw is fully conversant with the content of this assembly manual prior to assembling, maintaining or operating the chainsaw.
- Keep this operating and maintenance manual in a safe place for future reference.
- Never allow children or people unfamiliar with these instructions to use the electric chainsaw. Local regulations can restrict the age of the operator.
- This appliance is not intended for use by persons (including children) with reduced physical, sensory or mental capabilities, or lack of experience and knowledge, unless they have been given supervision or instruction concerning use of the appliance by a person responsible for their safety.
- Do not touch the saw chain.

Safety Information
Important - Please read these instructions fully before starting assembly
Electrical Safety
- Power tool plugs must match the outlet. Never modify the plug in any way. Do not use any adapter plugs with earthed (grounded) power tools. Unmodified plugs and matching outlets will reduce risk of electric shock.
- Avoid body contact with earthed or grounded surfaces, such as pipes, radiators and refrigerators. There is an increased risk of electric shock if your body is earthed or grounded.
- Do not expose power tools to rain or wet conditions. Water entering a power tool will increase the risk of electric shock.
- Do not abuse the cord. Never use the cord for carrying, pulling or unplugging the power tool. Keep cord away from heat, oil, sharp edges or moving parts. Damaged or entangled cords increase the risk of electric shock.
- When operating a power tool outdoors, use an extension cord suitable for outdoor use. Use of a cord suitable for outdoor use reduces the risk of electric shock.
- If operating a power tool in a damp location is unavoidable, use a residual current device (RCD with a tripping current of 30mA or less) protected supply. Use of an RCD reduces the risk of electric shock. NOTE! The term residual current device (RCD)"may be replaced by the term "ground fault circuit interrupter (GFCI)" or "earth leakage circuit breaker (ELCB)".

Safety Information
Important - Please read these instructions fully before starting assembly
Personal Safety

IMPORTANT!
- Use appropriate tool. This device is only intended for sawing wood for domestic purposes in residential gardens. You may only cut trees if you’ve received appropriate training. Do not force small tools or attachments to do the job of a heavy duty tool.
- Use personal protective equipment (PPE). Always wear eye protection and ear protection. Protective equipment such as dust mask, chainsaw trousers, nonskid safety shoes, hard hat, or hearing protection used for appropriate conditions will reduce personal injuries.
- Dress appropriately. Use safety footwear, snug-fitting clothing, protective gloves as well as eye, hearing and head protection devices. Wear non-slip footwear when working outdoors and protective hair covering to keep long hair out of the way.
- Stay alert, watch what you are doing and use common sense when operating a power tool. Do not use a power tool while you are tired or under the influence of drugs, alcohol or medication. A momentary lapse of concentration while operating power tools may result in serious personal injury.
- Prevent unintentional starting. Ensure the switch is in the off-position before connecting to power source and/or battery pack, picking up or carrying the tool. Carrying power tools with your finger on the switch or energizing power tools that have the switch on invites accidents.
- Keep all parts of the body away from the cutting saw
Important - Please read these instructions fully before starting assembly
Personal Safety (continued)
chain. Make sure the switch is off when clearing jammed material. A momentary lapse of concentration while operating the chainsaw may result in serious personal injury.
- Do not overreach and do not cut over shoulder height. Keep proper footing and balance at all times. This enables better control of the power tool in unexpected situations.
- Remove any adjusting key or wrench before turning the tool on. A wrench or a key left attached to a rotating part of the tool may result in personal injury.
- Dress properly. Do not wear loose clothing or jewellery. Keep your hair, clothing and gloves away from moving parts. Loose clothes, jewellery or long hair can be caught in moving parts

Safety Information
Important - Please read these instructions fully before starting assembly
Operational and Maintenance Safety
- Keep work areas clean. DO NOT start cutting until you have a clear work area, secure footing, and a planned retreat path from falling trees or branches. Cluttered or dark areas invite accidents.
- Consider work area environment. Do not expose your tool to high humidity or rain.
- Do not use your tool in damp and wet conditions. Keep the work area well lit.
- Keep all bystanders, children, and pets at least 50 feet away. The operator or user is responsible for accidents or hazards occurring to other people or the property.
- Do not operate power tools in explosive atmospheres, such as in the presence of flammable liquids, gases or dust. Power tools create sparks which may ignite the dust or fumes.
- Be certain the parts are fully tightened before operating the tool. Check it periodically for tightness during use to avoid serious injury.
- Risk of cut. Do not touch or try to stop the cutting saw chain when it is moving.
- Disconnect plug from the tool when not in use or when servicing or cleaning.
- Check for damaged parts. Before further use, carefully check the tool for damage.
- Check for alignment of moving parts, binding of moving parts, breakage of parts, mounting and any other condition that may affect its operation.

Safety Information
Important - Please read these instructions fully before starting assembly
Operational and Maintenance Safety (Continued)
- Do not use the tool if any parts are damaged or defective. Have any damaged or defective parts repaired or replaced by an authorized service agent. Never attempt any repairs yourself.
- Grip the tool securely. Always hold the tool securely in both hands while working with it.
- Keep handle dry, clean and free from oil and grease. Slippery handles do not allow for safe handling and control of the tool in unexpected situations.
- Keep the cable away from the cutting area. During operation, the cable may be hidden in shrubs and can be accidentally cut by the saw chains.
- Do not overload the tool. Only work in the performance range stated. Do not use tools that do not have sufficient power for heavy jobs. Do not use the tool for any use other than that intended by the manufacturer.
- Do not operate a chainsaw while climbing in a tree. Operation of a chainsaw while up in a tree may result in personal injury.
• Always keep proper footing and operate the chainsaw only when standing on a fixed, secure and level surface. Slippery or unstable surfaces such as ladders may cause a loss of balance or control of the chainsaw. - When cutting a limb that is under tension, be alert for spring back. When the tension in the wood fibers is released, the spring loaded limb may strike the operator and/or throw the chainsaw out of control.
- Use extreme caution when cutting brush and saplings.
The slender material may catch the saw chain and be whipped toward you or pull you off balance.
- Follow instructions for lubricating, chain tensioning and changing accessories. Incorrectly tensioned or lubricated chain may either break or increase the chance for kickback.
- Cut wood only. Do not use chainsaw for purposes not intended. For example; do not use the chainsaw for cutting plastic, masonry or non-wood building materials. Use of the chainsaw for operations different than intended could result in a hazardous situation.
- Maintain a firm grip with thumbs and fingers encircling the chainsaw handles, with both hands on the saw and position your body and arm to allow you to resist kickback forces. Kickback forces can be controlled by the operator, if proper precautions are taken. Do not let go of the chainsaw.
- Kickback may occur when the nose or tip of the guide bar touches an object or when the wood closes in and pinches the saw chain in the cut. Tip contact, in some cases, may cause a sudden reverse reaction, kicking the guide bar rapidly back to towards the operator.
- Either of these reactions may cause you to lose control of the saw which could result in serious personal injury. Do not rely exclusively upon the safety devices built into your saw. As a chainsaw user, you should take several steps to keep your cutting jobs free from accident or injury.
Important - Please read these instructions fully before starting assembly
Operational and Maintenance Safety (Continued)
- Carry the chainsaw by the front handle with the chainsaw switched off and away from your body. When transporting or storing the chainsaw, always fit the guide bar cover. Proper handling of the chainsaw will reduce the likelihood of accidental contact with the moving saw chain.
- Do not use the power tool if the switch does not turn it on and off. Any power tool that cannot be controlled with the switch is dangerous and must be repaired.
- Disconnect the plug from the power source before making any adjustments, changing accessories, or storing power tools. Such preventive safety measures reduce the risk of starting the power tool accidentally.
- Cut the wood in correct direction.
- The first time user should request an experienced operator in the use of the chainsaw and the protective equipment, and should be have the initial practice cutting logs on a saw horse or cradle. cutting logs on a saw-horse or cradle.
- Before using the chainsaw, be sure to check the chain and bar tension. Do not use the chainsaw if the chain and bar are loose. Also confirm that no abnormalities are present by first test running the tool.

Safety Information
Important - Please read these instructions fully before starting assembly
Intended Use
- The product is designed for domestic purpose sawing in residential gardens only. The saw is not designed for any other types of application (e.g. cutting of brickwork, plastic or food). Observe the technical data for the maximum cutting capacity. Do not work exceeding the stated maximum capacity.
- This product is intended for private use only, not for any commercial applications. It may not be used for any purposes other than those described.
- Attachments must be used according to the respective functions and in accordance with this instruction manual.
Service
Have your tool repaired by an authorized service agent. This tool is manufactured in accordance with the relevant safety regulations. To avoid danger, electrical appliances must only be repaired by qualified technicians. Call our customer helpline at 0333 300 1614 for advice.
In the Box
Parts
① Rear handle
2 On/Off switch
3 Lock off button
4 Oil tank cap
5 Front handle
6 Brake(Hand guard)
7 Guide bar
8 Saw chain
9 Side cover
10 Bar locking knob
11 Chain tension knob
12 Cable clip
13 Power cord
14 Oil bottle
15 Guide bar cover
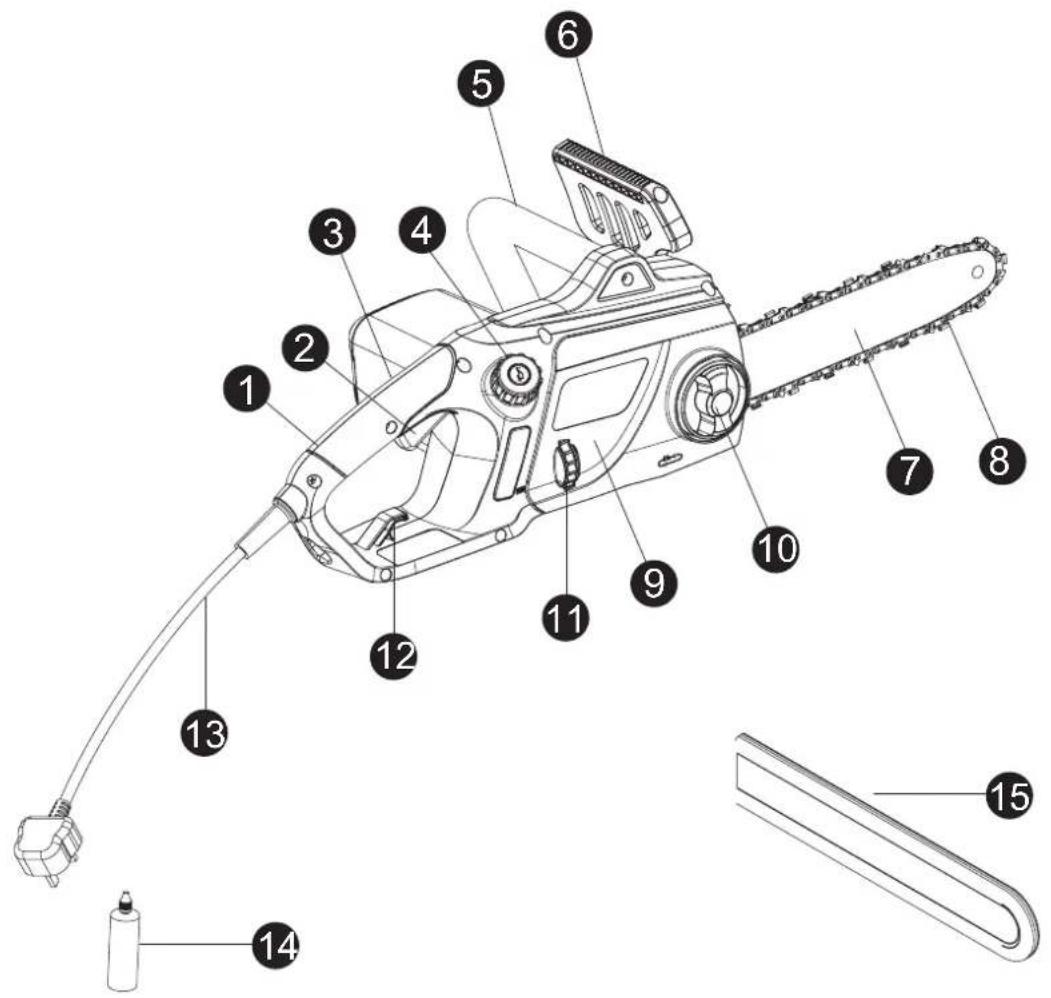
Preparing to Assemble the Chainsaw
- Remove all packaging.
• Take care not to lose any instructions which may be affixed to the parts. These provide important information which will be required while attached the chainsaw.
• Always recycle the packaging in accordance with local recycling schemes. - Keep all packaging until the chainsaw has been operated. If there are any parts missing, please call the customer helpline 0333 300 1614.
Assemble
Assemble

natural_image
Line drawing of a chain-link robotic device with a cable, shown in isometric view (no text or symbols)The chainsaw has been assembled in the standard delivery so no need for extra assembling steps.
Prepare
Step 1 Oil filling
When oil is lower than min.level, open the oil bottle (press the oil tank cap and turn counterclockwise to open it), then fill the oil.
NOTE: Capacity of oil tank is 150 ml.

Step 2 Remove the guide bar cover

natural_image
Technical line drawing of a chain-linking device with a cable and attached bracket (no text or symbols)Prepare
Step 3 Check the chain tension
After the first cuts and regularly during use, approx. every 10 minutes.
The lowest cutters should be underneath the bar solidly and contact the bar. If not, adjust the chain with protection glovers. (Please refer to the detailed info. in later chapter "Adjust the chain tension")

NOTE: Always check the chain tension before use.
Step 4 Settle the power cord
Hook the mains cable through the cable strain-release to reduce the strain on the cable fitting as your work.

natural_image
Line drawing of a hand using a tool to press or install a component, no text or symbols presentPrepare
Step 5 Connect to power supply
Insert the power cord/plug to power supply before starting to work.

natural_image
Line drawing of a plug with a cable inserted, showing the socket connected to a wall socket (no text or symbols present)Step 6 Locate the chain brake
The motor will not start if the chain brake is in the engaged position. Disengage the chain brake level by pulling backward toward the front handle. Keep brake setting is in correct position before using, and ensure chain saw operate normally.
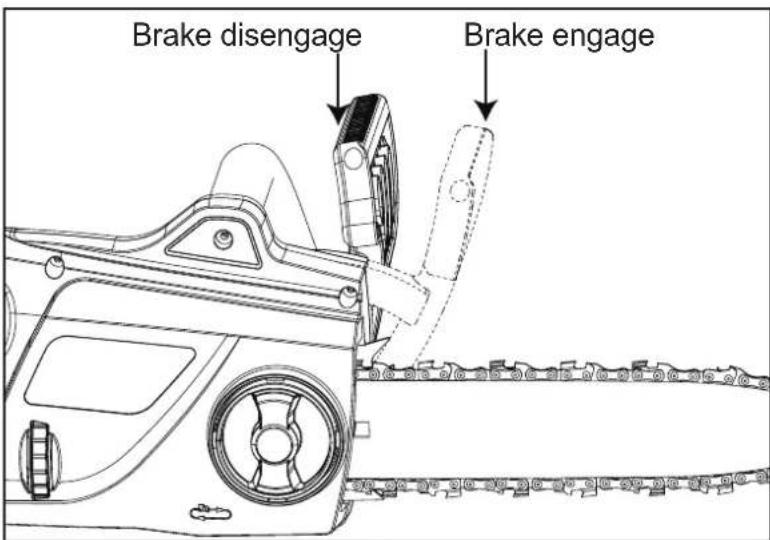
Make sure the chain brake is in the operating position before using. To check brake operation:
- Place the saw on a firm, flat surface.
- Start the saw briefly.
- Keep the left hand on the front handle and roll the left wrist to move the front handle guard forward to manually activate the chain brake.
Prepare
Step 6 Locate the chain brake (Continued)

natural_image
Line drawing of hands operating a mechanical device with a scroll wheel and adjustment knob (no text or symbols)Step 7 Check oil passes

Start the chainsaw and check whether the chain can give off a spray of oil within a few seconds. If an oil trace can be seen, the chainsaw is lubrication.
NOTE: Never saw when a sufficient chain lubrication is not guaranteed. Before starting work check oil level in the tank and oil feeding.
Operate
Operating the Electric Chainsaw
IMPORTANT!
Never attempt to cut with the end of the bar. Ensure the end of the bar does not touch any wood, branches or other solid object while working as this may cause the chainsaw to kick back.
Hold the chainsaw
Always hold chainsaw firmly with both hands. Front grip with left hand and rear grip with right hand. Fully grip both handles at all times during operation. Never operate chainsaw with one hand only.
Ensure power cord is located to the rear, away from chain and wood that it will not be caught on branches during cutting.
Use chainsaw only with secure footing.Hold chainsaw at the right-hand side of your body.
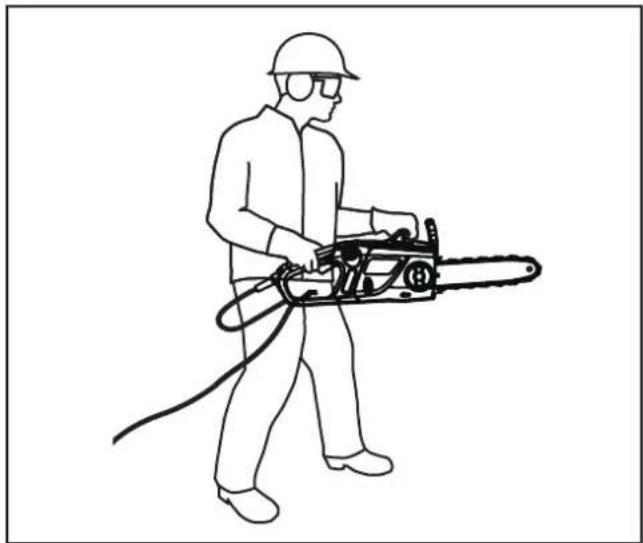
natural_image
Line drawing of a person in protective gear using a chainsaw (no text or symbols)Switch on
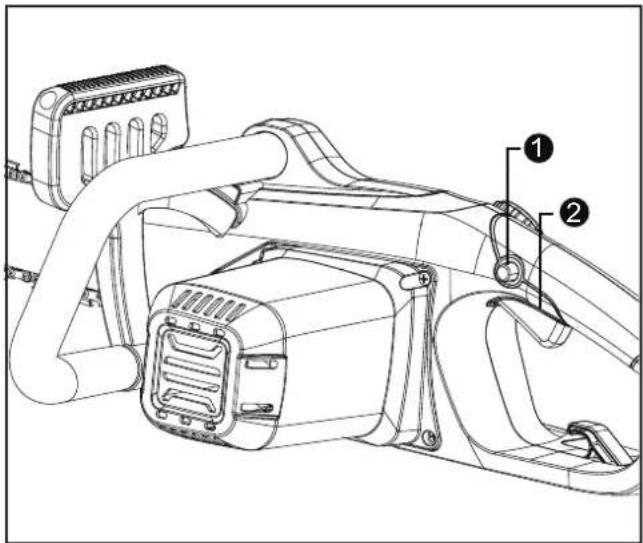
To start the machine, first push the lock-off button (1) for the On/Off switch and then press the On/Off switch (2) and keep it pressed. When the machine is running, the lock-off button (1) can be released again.

Operating the Electric Chainsaw
Start cutting
The chain must be running at full speed before it makes contact with the wood. Use the metal gripping teeth to secure the saw onto the wood before starting to cut. Use the gripping teeth as a leverage point while cutting.

natural_image
Illustration of a worker in hard hat and safety gear using a saw to cut metal bars (no text or symbols)- Reset the gripping teeth at a low point when sawing thicker logs by pulling chainsaw slightly backwards until the gripping teeth release, and reposition at lower level to continue sawing. Do not remove the saw completely from the wood.
- Do not force the chain while cutting, let the chain do the work, using the gripping teeth to apply minimal leverage pressure.
- Do not operate the chainsaw with arms fully extended or attempt to saw areas which are difficult to reach, or on a ladder. Never use the chainsaw above shoulder height.
- Sawing is optimized when the chain speed remains steady during cutting.
- Beware when reaching the end of the cut. The weight of the saw may change unexpectedly as it cuts free from the wood. Accidents can occur to the legs and feet. Always remove the saw from a wood cut while the saw is running.
- Cutting logs. Observe the following safety instructions.
- Support logs so that the face sides at the cut do not close in against each other, which would result in the chain being jammed or pinched.
- Position and set short logs safety prior to sawing. Saw only wood or wooden objects. When sawing, always take care to avoid hitting stones, nails, etc, as these could be thrown up or cause damage to the chain or serious injury to the operator or bystanders.
- Keep a running saw clear or wire fencing or the ground. Use of the saw to thin out branches or bushes is not approved.
- Length cuts must be carried out with care, as leverage with the gripping teeth is not possible. Saw at a flat angle to avoid kickback.
- When working on a slope, operate above or to the side of the trunk or laying tree.
- Be careful not to trip over tree stumps, branches, roots, etc.
Operate
Operating the Electric Chainsaw
Stop the chainsaw
To switch off the machine, release the On/Off switch (2).
Disconnect power supply
Disconnect the plug source for safety. When the machine is cooled down for several minutes, it is advised to put on the blade protection cover for longer storage.

natural_image
Line drawing of a plug with a cable, showing the socket connected to a wall socket (no text or symbols present)Tips:
Log cutting
Start the motor and hold the chain saw in both hands then lower the moving chain firmly onto the log. Allow the retaining spike on the front of the saw to hold the log in place.
Felling a tree
When bucking and felling operations are being performed by two or more persons at the same time, the felling operations should be separated from the bucking operation by a distance of at least twice the height of the tree being felled. Trees should not be felled in a manner that would endanger any person, strike any utility line or cause any property damage. If the tree does make contact with any utility line, the company should be notified immediately.
The chainsaw operator should keep on the uphill side of the terrain as the tree is likely to roll or slide downhill after it is felled.
An escape path should be planned and cleared as necessary before cuts are started. The escape path should extend back and diagonally to the rear of the expected line of fall as illustrated in.
Before felling is started, consider the natural lean of the tree, the location of larger branches and the wind direction to judge which way the tree will fall.
Remove dirt, stones, loose bark, nails, staples and wire from the tree.
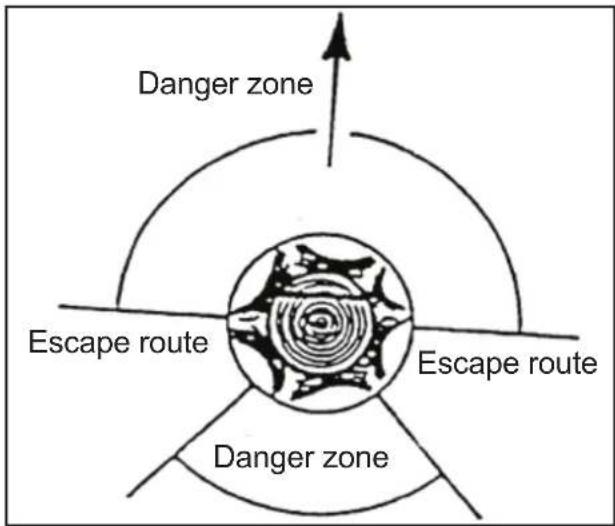
Notching undercut
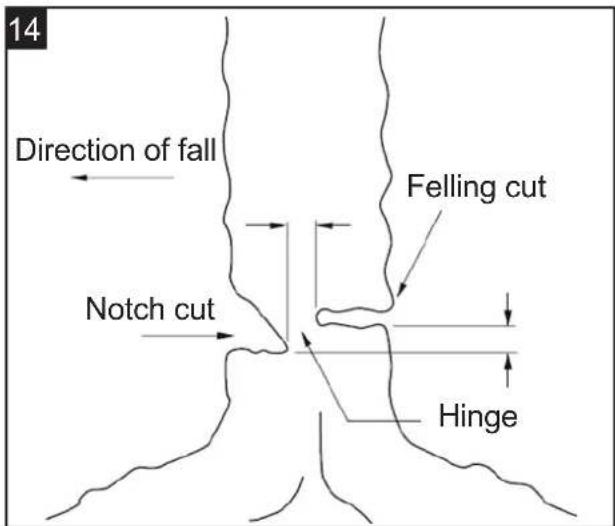
First, make a notch cut 1/3 the diameter of the tree, perpendicular to the direction of fall as illustrated in. Make the lower horizontal notching cut first. This will help to avoid pinching either the saw chain or the guide bar when the second notch is being made.
Felling back cut
Secondly, make a felling back cut on the opposite side of the notch cut and at least 50mm
Operate
Operating the Electric Chainsaw-Tips:(Continued)
higher than the notching cut as illustrated in Fig 14. Keep the felling back cut parallel to the horizontal notching cut. Make the felling back cut so enough wood is left to act as a hinge. The hinge wood keeps the tree from twisting and falling in the wrong direction. Do not cut through the hinge.
As the felling gets close to the hinge, the tree should begin to fall. The position of the notch cut will help to determine the direction of fall. If there is any chance that the tree may not fall in desired direction or it may rock back and bind the saw chain, stop cutting before the felling back cut is complete and use wedges of wood, plastic or aluminum to open the cut and drop the tree along the desired line of fall.
When the tree begins to fall remove the chain saw from the cut, stop the motor, put the chain saw down, and then use the retreat path planned. Be alert for overhead limbs falling and watch your footing.
Felling is the process of cutting down a tree. Make sure your footing is firm, keep feet apart, and divide your weight evenly on both feet. Follow directions below to fell a tree.
Limbing a tree
Limbing is the removal of the branches from a fallen tree. When limbing leave larger lower limbs to support the log off the ground. Remove the small limbs in one cut as illustrated in. Branches under tension should be cut from the bottom up to avoid binding the chain saw.
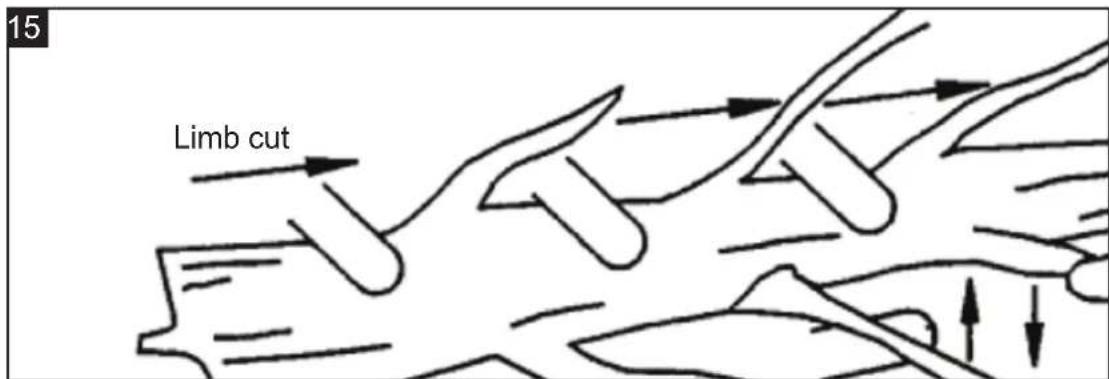
Keep work off ground leave support limbs until log is cut
Bucking a log
Bucking is cutting a log into lengths. It is important to make sure your footing is firm and your weight is evenly distributed on both feet. When possible, the log should be raised and supported by the use of limbs, logs or chocks. Follow the simple directions for easy cutting.
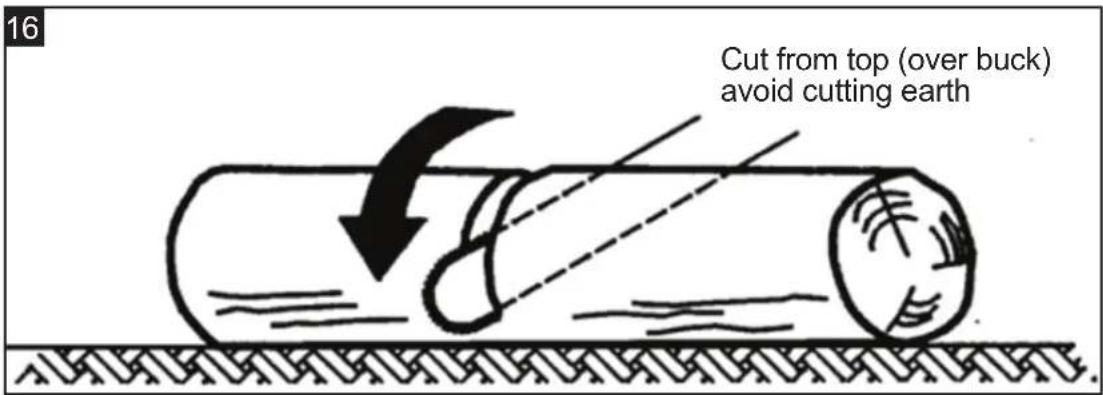
When the log is supported along its entire length as illustrated in (Fig 16), it is cut from the top (overbuck).
When the log is supported on one end, as illustrated in (Fig 17), cut 1/3 the diameter from the underside (underbuck). Then make the finished cut by overbucking to meet the first cut.
When the log is supported on both ends, as illustrated in (Fig 18), cut 1/3 the diameter from the top (overbuck). Then make the finished cut by underbucking the lower 2/3 to meet the first cut.

When bucking on a slope always stand on the uphill side of the log, as illustrated in (Fig 19).
When "cutting through", to maintain complete control release the cutting pressure near the end of the cut without relaxing your grip on the chainsaw handles. Don't let the chain contact the ground. After completing the cut, wait for the saw chain to stop before you move the chainsaw.
Always stop the motor before moving from tree to tree.

Operate
Operating the Electric Chainsaw -Tips:(Continued)


Operate
Operating the Electric Chainsaw -Tips:(Continued)

natural_image
Pure technical line drawing of a mechanical component with no text or symbolsOil level Check
Check the oil level at the window of the oil tank prior to switching on and regularly during operation. Refill oil when the oil level is lower than Min marking.
Maintenance
Maintenance
Cleaning saw body
WARNING: unplug chainsaw from power source before servicing, sever injury or death could occur from electrical shock or body contact with moving chain.
WARNING: cutting edges of chain are sharp, use protective gloves when handling chain.
WARNING: cleaning saw body.
- Do not submerge saw in any liquids.
- Do not use products that contain ammonia, chlorine, or abrasives.
- Do not use chlorinated cleaning solvents, carbon tetrachloride, kerosene, or petrol.
Use a soft, dry brush to keep the body of the chainsaw clean.

Care of guide bar
Uneven bar wear causes most guide bar problems, incorrect sharpening of chain cutter and depth gauge settings often cause this, when bar wears unevenly, it widens guide bar groove, this causes chain clatter and rivet popping. Saw will not cut straight, replaces guide bar if this occurs.
Inspect guide bar before sharpening chain. A worn or damaged guide bar is unsafe. A worn or damaged guide bar will damage chain, it will also make cutting harder.
Maintenance
Maintenance (Continued)
Care of chain

Adjusting chain tension
WARNING: The saw chain has very sharp edges. Use protective gloves for safety. To adjust the chain tension as follows
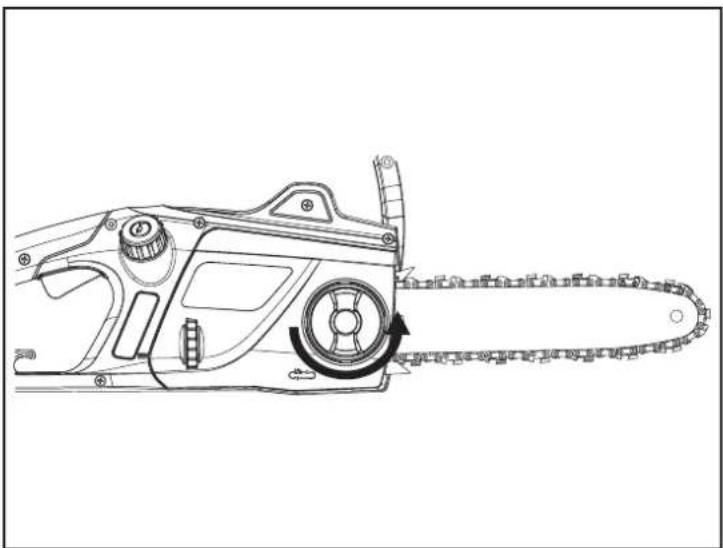
Loosen the locking knob anticlockwise slightly, and remove the side cover.
natural_image
Technical line drawing of a chain-linking device with gear and pulley (no text or symbols)Maintenance
Adjusting chain tension (Continued)
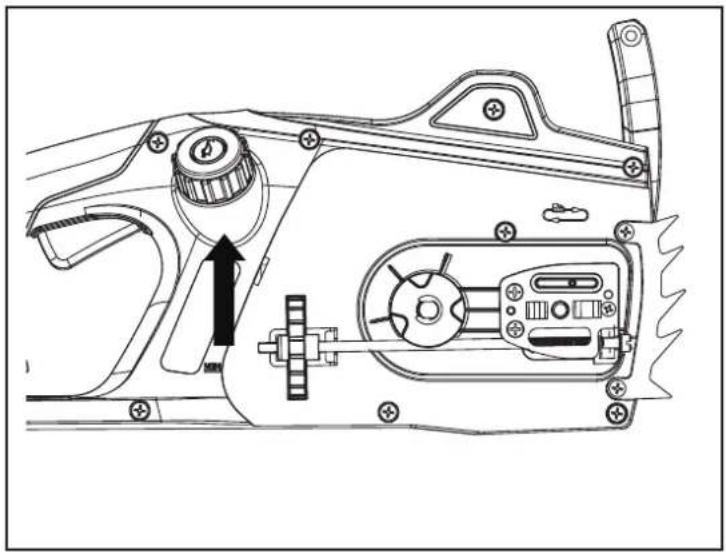
Turn chain tension wheel upwards.
When the saw chain is tensioned with 9N (approx.1kg), the gap between the saw chain and the guide rail should never be more than 2mm. Put side cover on.
natural_image
Technical line drawing of a mechanical assembly with no visible text or symbols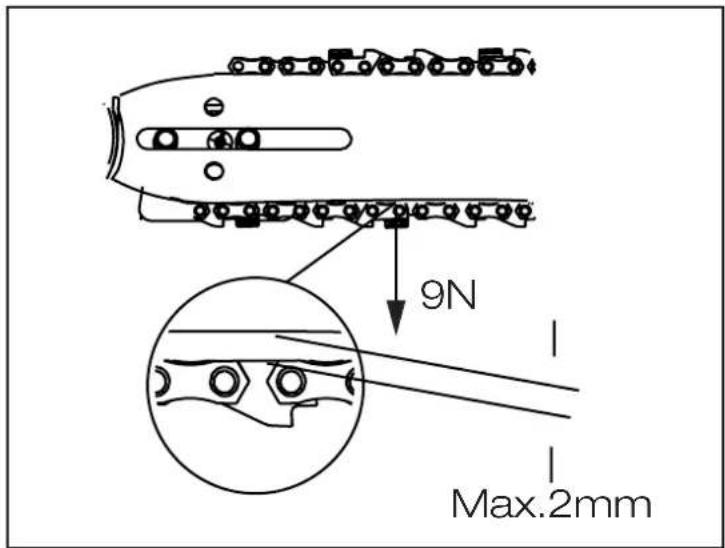
Maintenance
Adjusting chain tension (Continued)
Tighten and lock chain tension.
Turn the bar locking knob in clockwise with one or two cycles, then tighter chain tension wheel again. At last tighter locking knob.

natural_image
Technical line drawing of a chain-linking device with gear and mounting bracket (no text or symbols)WARNING!
Do not over tension the chain as this will lead to excessive wear and will reduce the life of bar and chain. Over tensioning also reduce the amount of cuts you should get.
Technical Data
Technical Data Table
| Model | YT4395-01 |
| Voltage 220-240V~ 50Hz | |
| Power 1800W | |
| Bar length 356mm | |
| Oregon bar and chain | Bar -140SDEA041, Chain - 91PJ052X |
| Weight 5.4 kg | |
| Sound pressure level LpA | 94.5dB(A) K=3dB(A) |
| Sound power level LwA | 105.5dB(A) K=3dB(A) |
| Guaranteed sound power level LWA | 108 dB(A) |
| Rear handle vibration ah 7.0 m/s ^2 | k=1,5 m/s ^2 |
| Front handle vibration ah | 4.3 m/s ^2 k=1.5 m/s ^2 |
| Oil tank volume | 150ml |
| Chain line speed | 13.1m/s |
Part List
| Part number | Accessories |
| 140SDEA041 (already assembled) | Oregon Bar |
| 91PJ052X (already assembled) | Oregon Chain |
| Lubrication oil bottle with capacity 150 ml | |
| Guide bar cover |
Recycling and Disposal

Recycle unwanted materials instead of disposing of them as waste. All tools, hoses and packaging should be sorted, taken to the local recycling centre and disposed of in an environmentally safe way.
Recycle rather than dispose of unwanted material in landfill whenever possible. The machine must be delivered in rigid packaging to avoid damage during transportation. The packaging and the machine itself are manufactured from recyclable materials and should be disposed of accordingly.
Only dispose of electrical/electronic/battery terms in separate collection schemes, which cater for the recovery and recycling of materials contained within. Your cooperation is vital to ensure the success of these schemes and for the protection of the environment.
Recycle packaging where facilities exist.
This symbol is known as the Crossed out Wheelie Bin Symbol. When this symbols is marked on a product or battery, it means that it should not be disposed of with your general household waste. Some chemicals contained within electrical/electronic products or batteries can be harmful to health.
Troubleshooting
General Troubleshooting

WARNING!
Only perform the steps described within these instructions!
All further inspection, maintenance and repair work must be performed by an authorised service center or a similarly qualified specialist if you cannot solve the problem yourself!
Always turn off the machine and remove the plug before making any adjustment.
| Fault Possible Cause Solution | ||
| Tool will not start Lock button not pressed. Press the lock button. | ||
| Chain does not stop within 2 seconds when the tool is switched off | Chain tension is too slack Check chain tension | |
| "Bar/chain appear hot/ smoking" | Oil tank empty Check oil tank level | |
| Oil hole blocked on chain bar | Clean oil hole and clear the groove around the edge of the chainbar . | |
| Chain tension is too tight Check chain tension | ||
| "Guide bar sprocket nose needs greasing" | "Oil the guide bar sprocket nose" | |
| Chainsaw does not cut well | Chain on backwards | "Check/modify chain direction" |
| Sharpen | ||
| Chainsaw not using oil | Debris in tank | Empty oil from tank and replace |
| Oil hole in cap blocked | "Remove debris from hole" | |
| Debris in chain bar | "Remove debris and clean the chain bar" | |
| Debris in oil outlet | Remove debris | |
Getting Help
Customer Helpline 0333 300 1614
Dear Customer,
In the unlikely event that your device develops a fault, please contact our Customer service department on the telephone number shown below.
- These guarantee terms cover additional guarantee rights and do not affect your statutory warranty rights. Claims must be accompanied by Proof of Purchase. This must be in the form of a Sales receipt or Bank statement and must show that the product has been purchased within 2 years prior to the claim, from the retailer that it was originally sold to.
- Our guarantee covers problems caused by material or manufacturing defects, and will result in the repair of these defects or replacement of the device with a like for like or similar article. Please note that our devices have not been designed for use in commercial, trade or industrial applications. Consequently, the guarantee is invalidated if the equipment is used in commercial, trade or industrial applications or for other equivalent activities.
- The following are also excluded from our guarantee:
A. Faults due to accidents, customer misuse or unauthorized repairs.
B. Failure due to lack of routine maintenance.
C. Failure as a result of not using the equipment in accordance with the manual and safety instructions.
-
The guarantee is valid for a period of 2 years starting from the purchase date of the device. Guarantee claims should be submitted before the end of the guarantee period within two weeks of the defect being noticed. No guarantee claims will be accepted after the end of the guarantee period. The original guarantee period remains applicable to the device even if repairs are carried out or parts are replaced. In such cases, the work performed or parts fitted will not result in an extension of the guarantee period, and no new guarantee will become active for the work performed or parts fitted. This also applies when an on-site Service is used.
-
Please keep your sales receipt in a safe place.


- McGregor 180OW Electric Chainsaw
- Contents
- Safety Information....3
- In the Box....14
- Assemble 15
- Prepare....16
- Operate....20
- Maintenance 28
- Technical Data 32
- Troubleshooting....33
- Guarantee 34
- Safety Information
- IMPORTANT!
- Important - Please read these instructions fully before starting assembly
- Electrical Safety
- Personal Safety (continued)
- Operational and Maintenance Safety
- Operational and Maintenance Safety (Continued)
- Intended Use
- Service
- In the Box
- Parts
- Preparing to Assemble the Chainsaw
- Assemble
- Prepare
- Step 1 Oil filling
- Step 2 Remove the guide bar cover
- Step 3 Check the chain tension
- Step 4 Settle the power cord
- Step 5 Connect to power supply
- Step 6 Locate the chain brake
- Step 6 Locate the chain brake (Continued)
- Step 7 Check oil passes
- Operate
- Operating the Electric Chainsaw
- Hold the chainsaw
- Switch on
- Start cutting
- Stop the chainsaw
- Disconnect power supply
- Tips:
- Log cutting
- Felling a tree
- Notching undercut
- Felling back cut
- Operating the Electric Chainsaw-Tips:(Continued)
- Limbing a tree
- Bucking a log
- Operating the Electric Chainsaw -Tips:(Continued)
- Oil level Check
- Maintenance
- Cleaning saw body
- Care of guide bar
- Maintenance (Continued)
- Adjusting chain tension
- Adjusting chain tension (Continued)
- Turn chain tension wheel upwards.
- Tighten and lock chain tension.
- WARNING!
- Technical Data
- Recycling and Disposal
- Troubleshooting
- General Troubleshooting
- Getting Help
Brand : McGregor
Model : YT4395-01
Category : Saw