
CDVD9SW - Portable DVD Player BUSH - Free user manual and instructions
Find the device manual for free CDVD9SW BUSH in PDF.


| Product Type | Portable DVD Player |
| Brand | Bush |
| Model | CDVD9SW |
| Screen Size | 9 inches |
| Dimensions (approx.) | 21 x 16 x 3 cm |
| Weight | 0.9 kg |
| Power Supply | AC adapter (100-240V) and rechargeable battery |
| Battery Life | Up to 3 hours |
| Disc Compatibility | DVD, DVD±R/RW, CD, CD-R/RW, MP3, JPEG |
| Connectivity | USB port, AV output, headphone jack |
| Playback Functions | Repeat, shuffle, zoom, subtitle selection |
| Region Code | Region 2 (or multiregion) |
| Cleaning | Wipe with a soft dry cloth; do not use liquids |
| Safety | Keep away from moisture; do not disassemble |
| Spare Parts | Remote control, AC adapter, battery pack |
| Repairability | Battery replaceable; other repairs by qualified technician |
| General | Portable design with built-in handle; ideal for travel |
Frequently Asked Questions - CDVD9SW BUSH
User questions about CDVD9SW BUSH
0 question about this device. Answer the ones you know or ask your own.
Ask a new question about this device
Download the instructions for your Portable DVD Player in PDF format for free! Find your manual CDVD9SW - BUSH and take your electronic device back in hand. On this page are published all the documents necessary for the use of your device. CDVD9SW by BUSH.
USER MANUAL CDVD9SW BUSH
natural_image
Black and white photo of a BUSH portable TV stand with open screen (no visible text or symbols on device)You'll soon be enjoying your new Portable DVD Player.
It all begins here, with your instructions. Don't worry, there's nothing too technical coming up. Just simple, step-by-step guidance to get you up and running quickly. Sound good? Then let's get started.
Help and Guidance
We're here to help you get the most from your Portable DVD Player. Should you require any guidance, a simple solution can often be found online at:
www.argos-support.co.uk
If you still require further assistance, call one of our experts on 0345 604 0105.
Contents
1 Safety information
Safety information 6
2 Getting to know your Portable DVD Player
Ready? Let's begin 10
Accessories 10
Front & side panel 11
Remote control 13
Installing the remote batteries 14
Battery disposal advice 14
Powering with mains power 14
Powering with the in-car power adaptor 14
Adjusting the swivel display 14
TV connection 15
Connecting an external source 15
3 Using your Portable DVD Player
Charging the internal battery 18
Getting started 18
Volume controls 18
Stopping a DVD/CD 18
Pause DVD/CD 18
Skip chapter (DVD) or track (CD) 18
Search forward or backward 18
Display (DVD/CD) 19
Menu (DVD) 19
Title (DVD) 19
Numeric keypad (DVD/CD) 19
Repeat (DVD/CD) 19
3 Using your Portable DVD Player
Multi-angle (DVD) 19
Mute (DVD, CD) 19
Audio tracks (DVD) 20
Subtitles (DVD) 20
Zoom (DVD, Picture disc) 20
USB/DVD 20
JPG picture viewer 20
Program playback 21
Earphone usage 21
Setup menu
General 22
Audio (speaker setup) 22
Video > Quality 22
Preferences 23
4 Other information
Technical specification 26
Care & maintenance 26
5 Product support
Troubleshooting 28
Help and assistance 29
Disposal 30
Guarantee 31
This page is left intentionally blank
1 Safe

natural_image
Abstract geometric pattern composed of gray triangles and squares on a white background (no text or symbols)
Safety information
Important - Please read these instructions fully before installing or operating
Power source

- This symbol means that this unit is double insulated. An earth connection is not required.
- The appliance must be connected to a 100-240 volt 50/60Hz AC supply by means of a three pin socket.
- Unplug this apparatus during lightning storms or when unused for long periods of time - to prevent damage to this product.
- Opening or removing covers may expose you to dangerous voltages or other hazards.
- To prevent risk of fire or electric shock, avoid overloading wall outlets, extension cords, or integral convenience receptacles.
- Use suitable power sources - Plug the product into a suitable power source, as described in the operating instructions or as marked on the product.
- The supply voltage should be the same as that indicated in the technical specifications and the appliance rating plate.
- If the socket outlets in your home are not suitable for the plug supplied with this unit check with a qualified electrician for replacement.
- In order to disconnect the apparatus from the mains completely, switch off the outlet and remove the mains plug completely.
- Do not bend, stretch or pull the supply cable in order to avoid electric shock.
- When installed, the power socket must be within easy reach.
- Do not install the unit in a confined space. Allow adequate ventilation to prevent heat build-up.
- For indoor use only.
Heat build up
- During use the unit will heat up, this is not a malfunction. If the unit is used continuously at high volume levels, the unit temperature will rise considerably. Do not touch the unit to avoid potential burns..
Moisture and water
- Do not use this apparatus near water or moisture.
- Do not use this product near a bathtub, washbowl, kitchen sink, and laundry tub, in a wet basement, near a swimming pool, or anywhere else that water or moisture is present.
Heat sources and flames

- Batteries shall not be exposed to excessive heat such as sun, fire or the like
- To prevent risk of fire or electric shock, avoid overloading wall outlets, extension cords, or integral convenience receptacles.
Servicing and repairs
• Refer all servicing to qualified service personnel
- Servicing is required when the apparatus has been damaged in any way: such as liquid has been spilled or objects have fallen into the apparatus; the apparatus has been exposed to rain or moisture, does not operate normally, or has been dropped.


Safety information
Important - Please read these instructions fully before installing or operating
Laser warnings

• This product utilizes a Class 1 laser.
- This laser CD Player is equipped with safety switches to avoid exposure when the door is open and the safety interlocks are defeated. Invisible laser radiation is present when the CD Player's drawer is open and the system's interlock has failed or been defeated. It is very important that you avoid direct exposure to the laser beam at all times. Please do not attempt to defeat or bypass the safety switches.
- This unit employs a laser, only qualified service personnel should attempt repair.
This page is left intentionally blank
Getting to know your Portable DVD Player
2

natural_image
Abstract geometric pattern composed of gray triangles and squares on a white background (no text or symbols)Getting to know your Portable DVD Player
You'll be up and running in no time
Ready? Let's begin...
Please read these instructions carefully. They contain important information which will help you get the best from your Portable DVD Player and ensure safe and correct installation and operation.
If you require any further assistance, our technical experts are happy to help. For full details, refer to the product support section at the end of these instructions.
Accessories
- CDVD9SW Portable DVD Player
- Remote control
- 2 x AAA batteries
-
Mains charger
-
In-car charger
- AV cable
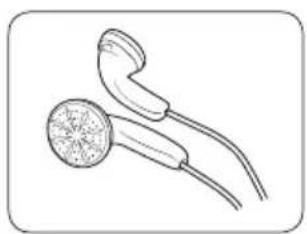
- Earphones
- Instruction manual
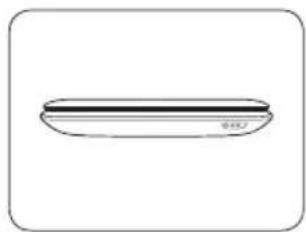
natural_image
Simple line drawing of a flat plate with a horizontal stripe (no text or symbols)Portable DVD Player
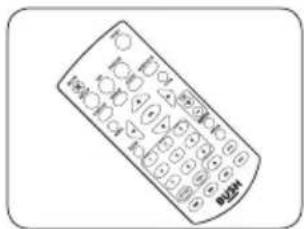
Remote control 2 x AAA batteries Mains charger
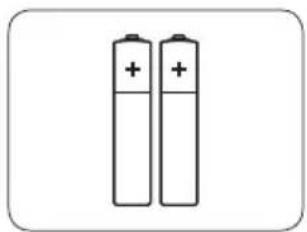
natural_image
Two cylindrical batteries with positive charge markings, no text or symbols presenteries Mains charger
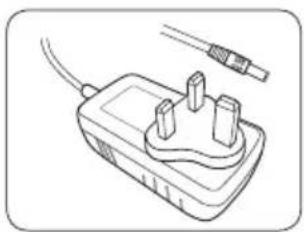
natural_image
Line drawing of a power plug with three pins and a cable, no text or symbols present
natural_image
Simple line drawing of a connector with cable and connector (no text or symbols)In-car charger

natural_image
Pure electrical circuit lines without any symbolsAV Cable Earphones
natural_image
Line drawing of two medical devices with a circular device and a curved tube (no text or symbols)If you require any technical guidance or find that your product is not operating as intended, a simple solution can often be found in the Troubleshooting section of these instructions,
Getting to know your Portable DVD Player
You'll be up and running in no time
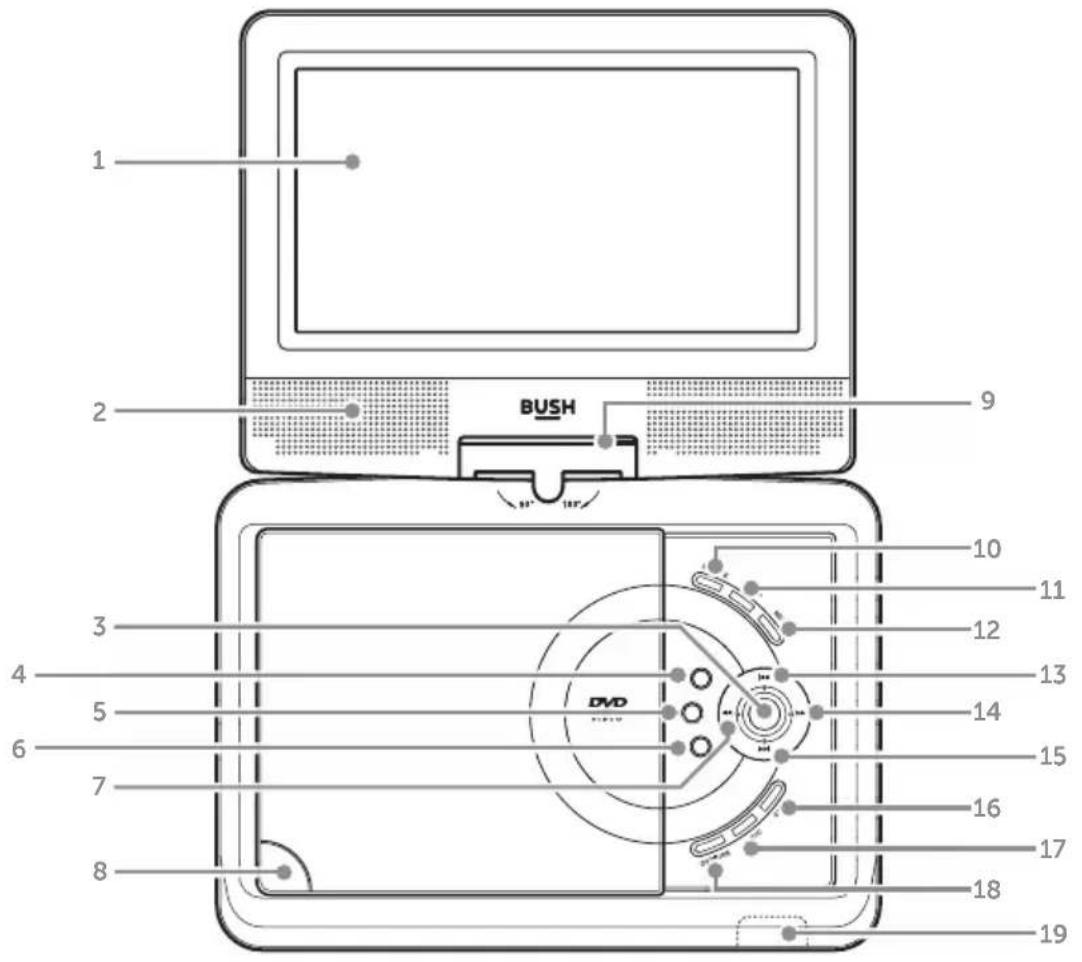
- LCD DISPLAY
- SPEAKERS
- OK button: Press to select options.
- VOLUME+ button: Increase volume level
- ▶II PLAY/PAUSE button: Press to begin playback or pause playback.
- VOLUME- button: Decrease volume level.
- ←SEARCH button: Press to search backwards.
- ▲ DISC COMPARTMENT EJECT button
- DISPLAY SWIVEL
-
SOURCE button: Press to switch input source.
-
SETUP button: Press for setup menu
- MENU button: Press for DVD menu.
- SKIP button: Press to skip previous chapters.
- ▶▶ SEARCH button: Press to search forwards.
- SKIP button: Press to skip next chapters.
- ■ STOP button: Press to stop playback
- AUDIO button: Press to switch audio tracks.
- DVD/USB button: Press to switch between DVD & USB inputs.
- IR SENSOR/STATUS LEDS: Remote control sensor & status LED lights.
Getting to know your Portable DVD Player
You'll be up and running in no time
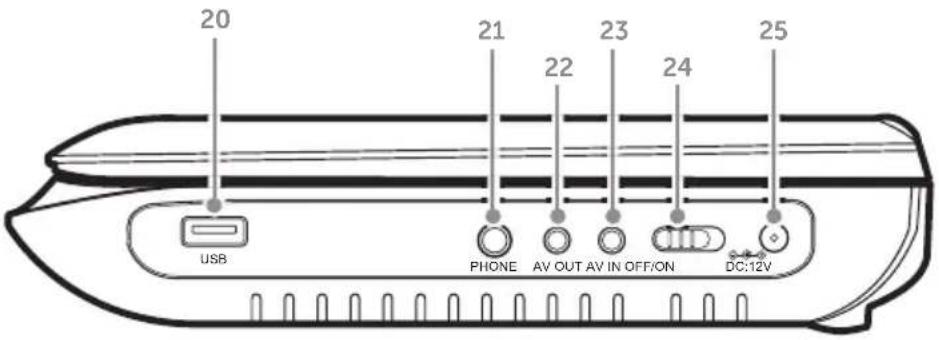
-
USB port: Insert USB flash drive for photo playback.
-
HEADPHONE output socket: Connect headphones for private use. Insert a 3.5mm jack.
-
AV OUT socket: Connect an external viewing source such as a TV.
-
AV IN socket: Connect an external video source such as a full size Portable DVD Player.
-
ON/OFF switch: Power the Portable DVD Player on or off.
-
DC INPUT POWER socket: Connect the mains charger supplied with the Portable DVD Player.
If you require any technical guidance or find that your product is not operating as intended, a simple solution can often be found in the Troubleshooting section of these instructions.
Getting to know your Portable DVD Player
You'll be up and running in no time
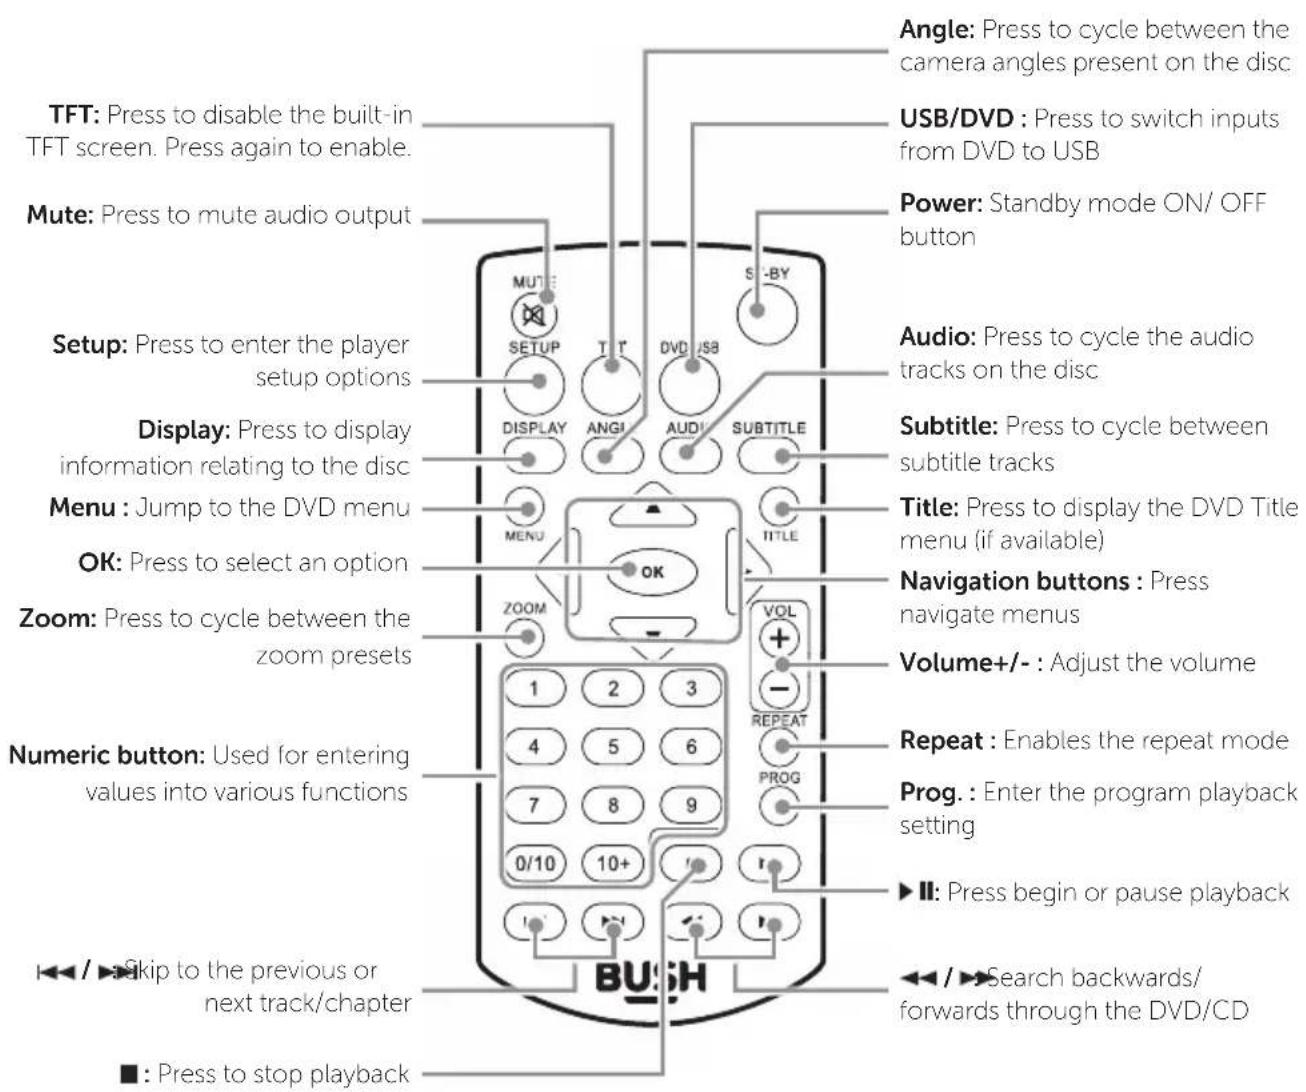
Getting to know your Portable DVD Player
You'll be up and running in no time
Installing the remote batteries
1
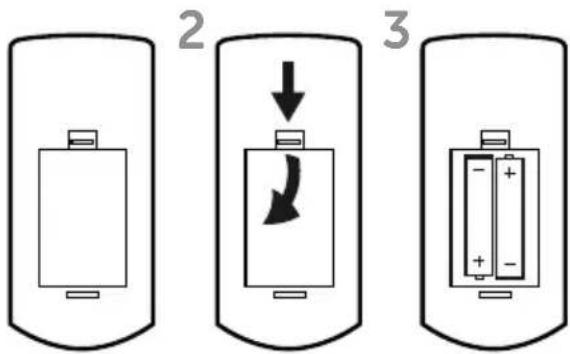
- Remove the battery cover (as shown).
- Insert 2 x AAA batteries, taking note that the polarities match up with the engraved diagrams inside the battery compartment.
- Replace the battery cover.
Battery disposal advice
- Dispose of used batteries with regard to the recycling regulations in your area.
- Do NOT short circuit batteries or throw them into water, the general rubbish or in a fire. Weak batteries can leak and damage the remote control. Replace them in good time!
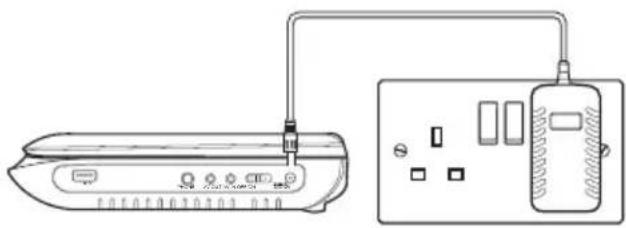
Powering with mains power
natural_image
Line drawing of a portable air conditioner connected to a wall-mounted device (no text or symbols)- Insert the Mains adaptor jack into the DC INPUT socket (25) on the side of the portable DVD player.
- Connect the mains adaptor plug to a wall outlet and power on.
Powering with the in-car power adaptor
If the unit requires charging or powering during vehicle travel you can use the supplied car power adapter.
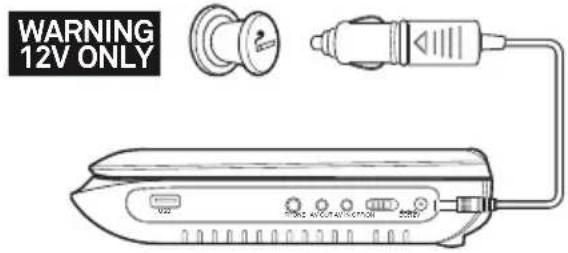
- Ensure the POWER ON/OFF switch (24) is set to the OFF position.
- Insert the small jack end of the car power adapter into the DC input socket (25) on the side of the DVD player.
- Insert the other end into a 12V car power adapter socket.

It is VERY important not to connect to a 24V car power adapter. Please check your vehicle manual before attempting.
- Set the POWER ON/OFF switch (24) to the ON position to use the portable DVD player or follow the charging instructions on page 18.
Adjusting the swivel display
The display can be rotated a total of 270 degrees.
- The display can be rotated 90 degrees Anti-clockwise from the facing front position.
- The display can be rotated 180 degrees Clockwise from the facing front position.
Take care not to rotate any further than the specified angles, as internal wiring can be damaged.
Getting to know your Portable DVD Player
You'll be up and running in no time
TV connection

natural_image
Line drawing of a computer monitor connected to a cable with three connectors, showing ports and cables (no text or symbols)NOTE: before attempting to connect this unit to a TV, ensure that the portable DVD player and TV are both switched off.
- Insert the 3.5mm end of the supplied AV cable into the AV OUTPUT socket (22) on the side of the unit.
- The other ends of the cable contain red & white sockets which carry audio. They can be connected to either the TV inputs or an external amplifier.
Take note to match the colours when connecting.
-
The yellow cable is the video cable and must be connected to the yellow video input on your TV.
-
After tuning your TV to the correct input the playing content of the portable DVD player will appear on the TV screen. To disable the output on the TFT screen of portable DVD player press the TFT ON/OFF button on the remote control.
Press the TFT ON/OFF button once more to enable once more.
Connecting an external source
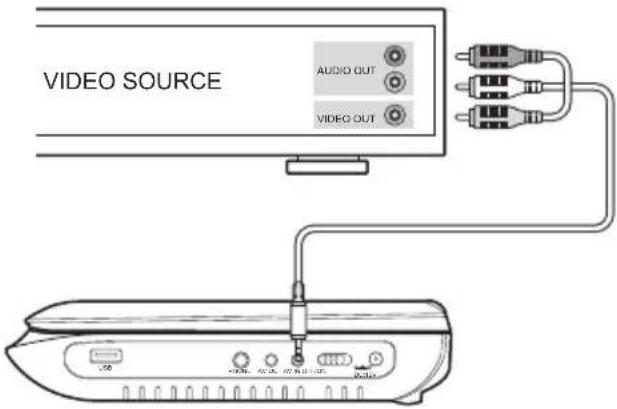
You can connect an external source to the portable DVD player to allow playback on the integrated display.
- Insert the 3.5mm end of the supplied AV cable into the AV INPUT socket (23) on the side of the unit.
- Insert the other ends of the AV cable into your VIDEO SOURCE outputs.
- After making the connections you must press the SOURCE button on the rportable DVD player (10) to switch to the 'AV IN' mode.
- Should you need to switch back to the internal DVD player, press the SOURCE button on the remote or main unit (10) again.
If your video source only has a SCART output, you can purchase a SCART adaptor; and connect the three coloured jacks to the same coloured sockets on the adaptor.
Then connect the adaptor to your video source.
This page is left intentionally blank
Using your Portable DVD Player
3

natural_image
Abstract geometric pattern composed of gray triangles and squares on a white background (no text or symbols)Using your Portable DVD Player
Let's get started
Charging the internal battery
natural_image
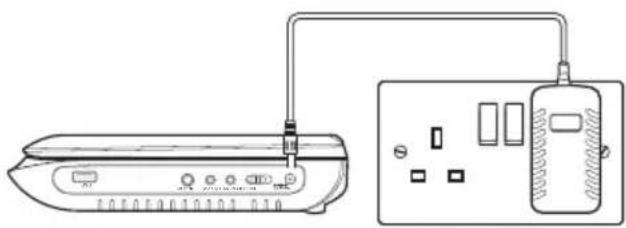
Line drawing of a remote control device connected to an electrical outlet (no text or symbols)Before using the battery, please make sure it is fully charged.
- Insert the Mains adaptor jack into the DC INPUT socket (25) on the side of the portable DVD player.
- Connect the mains adaptor plug to a wall outlet and power on.
- Slide the power switch (24) (to the OFF position. When the battery is fully charged the red LED charging indicator will change to the green LED.
Approx 5 hours charge, and 2 hours usage
If the unit is not in use for a prolonged period of time, it is recommended to charge the built-in battery every three months.
Getting started
- Slide the POWER switch (24) to the ON position (the blue power LED will light up).
- Press the disc compartment eject button (8) to open the disc tray.
- Place a DVD disc onto the disc tray (label facing upwards).
- Close the disc tray and the playback starts automatically.
- When a menu screen appears on the screen, use the navigation buttons to select the menu option you require, then press the OK button (3, or remote) to start playback.
Auto standby mode
In order to save battery power, when not in use the player will enter standby mode after 20 minutes.
To wake the player from standby mode press the STANDBY button on the remote control or set the players POWER switch to the OFF then ON position.
Volume controls
- Use the VOLUME - / + buttons (6, 4) on either the portable DVD player or remote to increase or decrease the listening level.
- Use the MUTE button on the remote to silence the audio, press again to resume.
Stopping a DVD/CD
- Pressing the STOP button once during playback will stop play at the current position.
- Pressing the ▶II PLAY/PAUSE button at this point will resume playback from the position you stopped playback from.
- If you press the ■ STOP button twice, playback will cease and the resume option will not be available.
Play/Pause DVD/CD
- If you need to pause the playback at any time, press the ▶II PLAY/PAUSE button.
- To resume playback press the ▶II PLAY/PAUSE button again.
Skip chapter (DVD) or track (CD)
- Press either ◀◀ or ▶▶I buttons during playback to skip a chapter (DVD) or a track (CD) ahead or backwards.
This function may not work during the "Warning" section of a DVD.
Using your Portable DVD Player
Let's get started
Search forward or backward
- During playback, press either ◀◀ or ▶▶ buttons to fast search forwards or backwards.
- Each press increases the search speed from 2X, 4X, 8X 16X & 32X the next press of the button will resume normal playback.
This function may not work during the "Warning" section of a DVD.
Display (DVD/CD)
- When playing a disc, pressing the DISPLAY button will display various information about the playing disc. You will need to press the DISPLAY button four times to view all the info another press will hide the display info. (Fig 1)

flowchart
graph LR
    A["TITLE ELAPSED"] --> B["TITLE REMAINING"]
    B --> C["CHAPTER ELAPSED"]
    C --> D["CHAPTER REMAINING"]
    D --> E["OFF"]
Fig 1.
Different types of disc will show different options.
Menu (DVD)
- Pressing the MENU button during playback displays the disc main menu.
Title (DVD)
- Pressing the TITLE button during playback displays the discs title menu (if available).
The TITLE menu is the beginning track of a disc. (not all discs contain these and as such the TITLE button may not respond).
Numeric keypad (DVD/CD)
You can use the numeric keys to control various functions on the player, for example:-
TRACK: when playing a CD disc
CHAPTER/TITLE: When playing a DVD disc.
- Input the required chapter or track number using the numeric keypad.
- Selecting chapter or track 1-9 simply press the relevant number button.
- Chapter or track 10, press the 0/10 button.
- Chapter or track 22 (for example) press the 10+ button twice and then the 2 button. If the second digit is '0' press the 0/10 button.
Repeat (DVD/CD)
The repeat function allows you to view a section of a disc repeatedly.
DVD
- Press the REPEAT button to activate the first repeat function CHAPTER.
- Press again to swap to TITLE.
- Press once more to swap to REPEAT ALL.
- Another press of the REPEAT button disables the function.
CD
- Press the REPEAT button to activate the first repeat function REPEAT 1.
- Press again to swap to REPEAT ALL (repeats all track on the current disc).
- Another press of the REPEAT button disables the function.
Some discs may not allow repeat functions.
Using your Portable DVD Player
Let's get started
Multi-angle (DVD)
Some disc contain scenes which have been shot simultaneously from a number of different angles. For these discs, the same scene can be viewed from each of these angles by using the ANGLE button.
- During playback, pressing the ANGLE button will cycle through the available angles (if any exist).
A single DVD disc can contain up to 9 different viewing angles.
Mute (DVD, CD)
This function will instantly silence the audio.
-
Press the MUTE button, the audio will cease.
-
Press the MUTE button again to resume.
Audio tracks (DVD)
It is common for a DVD disc to contains more than one audio track for example 5.1 audio, stereo audio and other languages.
- Press the AUDIO button to cycle through the tracks.
This Portable DVD Player does NOT support DTS audio. If you select a DTS audio track or one is selected automatically no sound will be output. Should this occur select a compatible audio track.
Subtitles (DVD)
Many DVD discs contain subtitle tracks to aid in various ways.
-
Press the SUBTITLE button to activate the first set of subtitles.
-
Press the SUBTITLE button repeatedly to cycle through the available subtitle options.
-
Press the SUBTITLE button repeatedly until you reach OFF to disable the subtitle function.
Zoom (DVD, Picture disc)
To zoom into the displayed image follow the below steps.
-
Press the ZOOM button to activate the zoom setting of 2X. Every subsequent press cycles through the zoom options eg: 3X, 4X, 1/2, 1/3 & 1/4. The next press will return to the OFF setting.
-
When in ZOOM mode you can use the navigation buttons on the remote to scroll the picture up, down, left & right.
Zooming into the picture will degrade the quality of the viewed image as the pixels are being stretched.
USB/DVD
Press the USB/DVD button to switch between DISC playback and USB photo viewer.
Earphone usage
- Connect earphones to the 3.5mm output on the side of the main unit (21).

- Listen at moderate volumes to avoid hearing damage.
- If you hear no sound during playing, do not turn up volume up as the music may suddenly begin at a high volume.
- Excessive sound pressure from earphones and headphones can cause hearing loss.
- To avoid damaging your ears, adjust the volume to the lowest safe level before playing, and turn up to the desired level when playback has started.
Using your Portable DVD Player
Let's get started
JPG picture viewer
JPEG picture discs can be obtained from any good photo developing lab, created manually on a computer or you can load jpg images onto a USB flash drive.
- Insert a disc or USB flash drive containing JPG images into the Portable DVD Player.
- If the files are on a disc the file browser menu will be displayed. If the files are located on a USB flash drive you will need to press the USB/DVD button on the remote to switch to USB mode.
- Use the navigation ( ▲▼◀) buttons to scroll through the list of pictures & press the OK or ▶□ PLAY/PAUSE button to begin a slide show of the folder starting at the selected image.

- Press the MENU button to return to the file browser screen.
- Press the ■ STOP button to display a thumbnail view of the selected folder.
- To display an image indefinitely press the ▶II PLAY/PAUSE button. To resume the slide show press the ▶III PLAY/PAUSE button once again.
- During the slide show the navigation buttons will rotate the displayed image.
- Press the ◀◀/▶buttons to skip to the previous or next image.
- Press the ZOOM button to activate the default zoom setting of 100%. Every subsequent press cycles through the zoom options eg: 100%, 125%, 150%, 200%, 75% & 50%.
- Repeat can be set to SINGLE, REP ONE, REP FOLDER or FOLDER by repeatedly pressing the REPEAT button.
Program playback
- Press the PROG button to begin the program function.
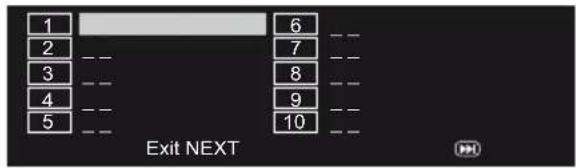
- Use the navigation buttons to highlight program order number.
- Enter the CHAPTER /TRACK number EG:- Chapter/Track 22 would mean pressing the '10+' button twice and then the '2' button.
For more details see 'Numeric keypad' on page 19.
- Repeat steps 2-3 until you have programmed all the chapters/tracks required. Should you require more chapters/tracks than 10, navigate to the NEXT icon and press the OK button. Tracks 11-20 will now be programmable.
- Once the programming is complete navigate to the START icon and press the OK button to begin playback of your programmed sequence.
Using your Portable DVD Player
Let's get started
Setup menu
The setup menu contains various preferences for functions found on the unit. To enter the Setup menu press the SETUP button on the remote control.

Use the ▲▼◀ buttons to scroll; press the OK button to select.
General
TV display
Choose a setting between:-
• 4:3/PS (pan and scan)
• 4:3/LB (letter box)
- Wide (widescreen).
- Wide squeeze
Angle mark
Enabling this function displays an icon for a compatible disc when multiple angles are available for selection.
OSD lang
This option sets the On Screen Display language. Choose between:-
- English
- Spanish
- French
- Portugese
- German
- Dutch
- Italian
Screen saver
When the unit is not in use, the DVD logo will appear as a screen saver to prevent screen burn in. Choose ON or OFF.
Last memory
When set to ON the unit will remember the last position on a disc before the unit was shut down (STANDBY).
Audio (speaker setup)
Downmix
This option allows you to change the way the audio is assigned to each speaker. Choose from:-
• LT/RT - Left / Right mixed mode
• STEREO - Stereo audio output
Video > Quality
Sharpness
Set the video sharpness level. Select from:-
- Low
- Medium
• High
Brightness
Set the video brightness level. Use the ◀/▶buttons to increase or decrease from -20 to +20. Press the OK button to complete the setting.
Contrast
Set the video contrast level. Use the ◀/▶buttons to increase or decrease from -16 to +16. Press the OK button to complete the setting.
Using your Portable DVD Player
Let's get started
Video > Quality
Hue
Set the video hue level. Use the ◀/▶buttons to increase or decrease from -9 to +9. Press the OK button to complete the setting.
Saturation
Set the video saturation level. Use the ◀/▶buttons to increase or decrease from -9 to +9. Press the OK button to complete the setting.
Preferences
TV type
Set this option to whatever type of disc you are watching. NTSC, PAL or AUTO (to set automatically).
Audio
Choose the default audio setting. This means the Portable DVD Player will automatically select this language as the audio track (if available). Select from:-
- English
- Spanish
- French
- Portugese
- German
- Dutch
- Italian
Subtitle
Select the default subtitle language. Select from:-
- English
- Spanish
- French
- Portugese
- German
- Dutch
- Italian
- Off
Disc menu
This option sets the default DVD menu language. Once set if the DVD you are watching contains a menu with your specified language that is used by default. Select from:-
- English
- Spanish
- French
- Portugese
- German
- Dutch
- Italian
Parental
Choose between:-
- Kid Safe - PG-R
• G • R - PG
- NC-17
- PG13 - Adult
When changing the parental level you will be asked to enter the password. The default password is '1234'.
Password
- Enter a new password. First you will be required to enter the current password. This will be '1234' if changing for the first time.
- Once you have entered a correct existing password you can then enter your new password and confirm. Press the OK button to save the new password.
The master override password can be used if you change the default but forget the new password. The master password is '1369'.
Default
Activating this option resets every setting to the factory default.
This page is left intentionally blank
Other information
4

natural_image
Abstract geometric pattern composed of gray triangles and squares on a white background (no text or symbols)Other information
Helpful technical information
Technical specification
Portable DVD Player
| Power Supply: DC 12V 1200mAh | Input: 100-240V ~ 50/60Hz 0.3A |
| Input voltage DC 12V | |
| Battery Lithium battery | |
| Battery capacity 1200 mAH 7.4V | |
| Dynamic range ≥85dB | |
| Video output 1Vp-p 75Ω unbalanced | |
| Frequency response 20Hz~20KHz | |
| Screen size 9" (22.86cm) | |
| Supported formats CDR, JPG, PICTURE CD - CD-R, DVD-R, DVD+R | |
| Supported memory formats USB | |
| Remote control | |
| Battery 2 x AAA | |
Care & maintenance
After using the Portable DVD Player
Set to Standby.
Switch the unit off at the mains and unplug it if you are leaving it unattended for a long period (holidays etc).
Avoid leaving the batteries fitted in the remote control if you leave the unit unattended for long periods. They may leak and damage the remote control.
Care & cleaning
All care and cleaning operations should be carried out with the unit unplugged from the mains power.
Occasionally wipe the cabinet with a lint free duster. Never clean the unit with liquids or solvents.
Product support
5

natural_image
Abstract geometric pattern composed of gray triangles and squares on a white background (no text or symbols)Product support
Help is always at hand
Troubleshooting
No power.
- The internal battery is flat. Re-charge the battery.
- Ensure the mains adaptor is connected to a power supply & the portable DVD player, and is switched ON.
- Make sure there is power to the mains socket.
No picture?
- The TFT button has been pressed disabling the image on the internal display. Press the TFT button to enable the internal display once more.
- Incorrect connections made if using external source or TV. Re-check the connections.
No sound?
- The volume level is too low. Increase the volume.
- Non compatible DTS audio track selected. Choose another audio track as this Portable DVD Player does not support DTS audio.
Distorted picture
• The disc may be dirty. Clean the disc and try again
- The fast forward or rewind mode may be active. Picture distortion in this mode is normal.
Unable to play
• There is no disc in the tray.
- The disc is not loaded properly. Press the disc compartment eject button and re-seat the disc.
- The disc may be dirty. Clean the disc and try again
- The setup menu is obscuring the picture. Press the SETUP button to close the menu
The remote control is not working
- The batteries may be low on power. Replace with new batteries.
- There may be an object obscuring the path to the DVD IR sensor.
- The remote control may be too far away from the IR sensor to work.
Forgotten your pass code.
• The default override pass code is '1369'
If you require any technical guidance or find that your product is not operating as intended, a simple solution can often be found in the Troubleshooting section of these instructions,
Product support
Help is always at hand
Help and assistance
If you require any technical guidance or find that your Portable DVD Player is not operating as intended, a simple solution can often be found in the Troubleshooting section of these instructions or online at
www.argos-support.co.uk
If you still require further assistance, call one of our experts on 0345 604 0105*. To help give us give you a fast and efficient service please have the following information ready:
Model Ref.
CDVD9SW
Serial number
You can find these on the rating plate - a small information panel (usually a sticker or metal plate) on the rear of your product
Date of purchase
This will be shown on your receipt
Local call rates applies*
Lines open 8am-7pm Monday to Saturday and 10am-4pm Sunday.
*Calls to Argos enquiry lines may attract a charge and set up fee from residential lines depending on your call plan/tariff. Mobile and other providers costs may vary, see www.bt.com/pricing for details.
For Security and training purposes, telephone calls to and from customer service centres maybe recorded and monitored. Calls from Republic of Ireland will attract international call charges.
Product support
Help is always at hand
Disposal
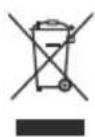
- Disposal of your old product. Your product is designed and manufactured with high quality materials and components, which can be recycled and reused
- When this crossed out wheeled bin symbol is attached to a product it means the product is covered by the European Directive 2002/96/EC.
- Please make yourself aware of the local collection system for electrical and electronic products.
- Please act according to your local rules and do not dispose of your old products with your normal household waste.
- The correct disposal of your old product will help prevent potential negative consequences for the environment and human health.
CE This product is intended for use within the UK. This equipment complies with the essential requirements for the Radio Equipment and Telecommunications Terminal Equipment Directive 1999/5/EC.
This appliance complies with the following EEC directives: 2014/35/EU Low voltage directive / 2014/30/EU EMC directive
If you require any technical guidance or find that your product is not operating as intended, a simple solution can often be found in the Troubleshooting section of these instructions,
Product support
Help is always at hand
BUSH
Call us now and activate your 12 month guarantee
Thank you for choosing Bush. Your new product is guaranteed against faults and breakdowns for 12 months. Don't forget to register it with us today so we can provide you with our best possible after-sales service and useful updates.
www.bushregistration.co.uk
FREEPHONE*
0800 597 8548
Lines are open 8am - 8pm, 365 days a year. *Calls may be recorded and monitored.
Your Bush Guarantee
This product is guaranteed for twelve months from the date of original purchase. Any defect that arises due to faulty materials or workmanship will be repaired free of charge (or if applicable the product will be replaced or the purchase price refunded) where possible during this period by the dealer from who your purchased the unit.
The guarantee is subject to the following provisions:
- The guarantee does not cover accidental damage, misuse, cabinet parts, knobs or consumable items.
- The product must be correctly installed and operated in accordance with the instructions contained in the manual.
- It must be used solely for domestic purposes. The guarantee will be rendered invalid if the product is
re-sold or has been damaged by inexpert repair.
- Specifications are subject to change without notice.
- Bush disclaim any liability for loss or damage arising from the breakdown of the product.
- This guarantee is in addition to and does not diminish your statutory or legal rights.
Important Data Protection Information
If you provide us with information about another person, you confirm that they have appointed you to act for them, to consent to the processing of their personal data including sensitive personal data and that you have informed them of our identity and the purposes (as set out in the Important Data Privacy notice displayed overleaf) for which their personal data will be processed.
You are entitled to ask for a copy of the information we hold about you (for which we may charge a small fee) and to have any inaccuracies in your information corrected.
For quality control and training purposes, we may monitor or record your communications with us.
If your personal details change, if you change your mind about any of your marketing preferences or if you have any queries about how we use your information, please let us know by contacting our Data Protection Officer, Domestic & General, Leicester House 17 Leicester Street, Bedworth, Warwickshire CV12 8JP.
Guarantor: Argos Limi.co 489 499 Awebury B.wd. Millen Keynes MI09 2NW
BUSH
Contact:
www.argos-support.co.uk
Helpline: 0345 604 0105


- Help and Guidance
- Contents
- Safety information
- Getting to know your Portable DVD Player
- Using your Portable DVD Player
- Setup menu
- Other information
- Product support
- Safe
- Safety information
- Important - Please read these instructions fully before installing or operating
- Power source
- Heat build up
- Moisture and water
- Heat sources and flames
- Servicing and repairs
- Laser warnings
- Getting to know your Portable DVD Player
- 2
- Ready? Let's begin...
- Accessories
- Installing the remote batteries
- Battery disposal advice
- Powering with mains power
- Powering with the in-car power adaptor
- Adjusting the swivel display
- Using your Portable DVD Player
- 3
- Charging the internal battery
- Getting started
- Auto standby mode
- Volume controls
- Stopping a DVD/CD
- Play/Pause DVD/CD
- Skip chapter (DVD) or track (CD)
- Search forward or backward
- Display (DVD/CD)
- Menu (DVD)
- Title (DVD)
- Numeric keypad (DVD/CD)
- Repeat (DVD/CD)
- DVD
- CD
- Multi-angle (DVD)
- Mute (DVD, CD)
- Audio tracks (DVD)
- Subtitles (DVD)
- Zoom (DVD, Picture disc)
- USB/DVD
- Earphone usage
- JPG picture viewer
- Program playback
- General
- TV display
- Angle mark
- OSD lang
- Screen saver
- Last memory
- Audio (speaker setup)
- Downmix
- Video > Quality
- Sharpness
- Brightness
- Contrast
- Hue
- Saturation
- Preferences
- TV type
- Audio
- Subtitle
- Disc menu
- Parental
- Password
- Default
- Other information
- 4
- Care & maintenance
- Care & cleaning
- Product support
- 5
- Troubleshooting
- No power.
- No picture?
- No sound?
- Distorted picture
- Unable to play
- The remote control is not working
- Forgotten your pass code.
- Help and assistance
- Disposal
- BUSH
- Call us now and activate your 12 month guarantee
- www.bushregistration.co.uk
- Your Bush Guarantee
- The guarantee is subject to the following provisions:
- Important Data Protection Information
Brand : BUSH
Model : CDVD9SW
Category : Portable DVD Player