
T-701 - Portable DVD Player BUSH - Free user manual and instructions
Find the device manual for free T-701 BUSH in PDF.


| Product Type | Portable DVD Player |
| Brand | Bush |
| Model | T-701 |
| Screen Size | 7 inches |
| Screen Resolution | 480 x 234 pixels |
| Disc Compatibility | DVD, DVD±R/RW, CD, CD-R/RW, MP3, JPEG |
| Playback Formats | DVD, MPEG-4, MP3, WMA, JPEG |
| Power Supply | AC 100-240V, 50/60Hz; DC 9V 1.5A |
| Battery | Rechargeable lithium-ion, up to 3 hours playback |
| Dimensions (W x H x D) | Approx. 8.7 x 6.3 x 1.2 inches (220 x 160 x 30 mm) |
| Weight | Approx. 1.3 lbs (600 g) |
| Audio Output | 3.5mm headphone jack, built-in stereo speakers |
| Video Output | Composite AV output (cable included) |
| Remote Control | Infrared remote included |
| Car Adapter | Included (12V car cigarette lighter adapter) |
| Region Code | Region 2 (Europe) or multi-region (check manual) |
| Parental Control | Yes, password-protected |
| Cleaner Disc Support | Use a soft, dry cloth; avoid liquids |
| Spare Parts Availability | Remote, battery, carrying case (contact support) |
| Operating Temperature | 5°C to 35°C (41°F to 95°F) |
Frequently Asked Questions - T-701 BUSH
User questions about T-701 BUSH
0 question about this device. Answer the ones you know or ask your own.
Ask a new question about this device
Download the instructions for your Portable DVD Player in PDF format for free! Find your manual T-701 - BUSH and take your electronic device back in hand. On this page are published all the documents necessary for the use of your device. T-701 by BUSH.
USER MANUAL T-701 BUSH
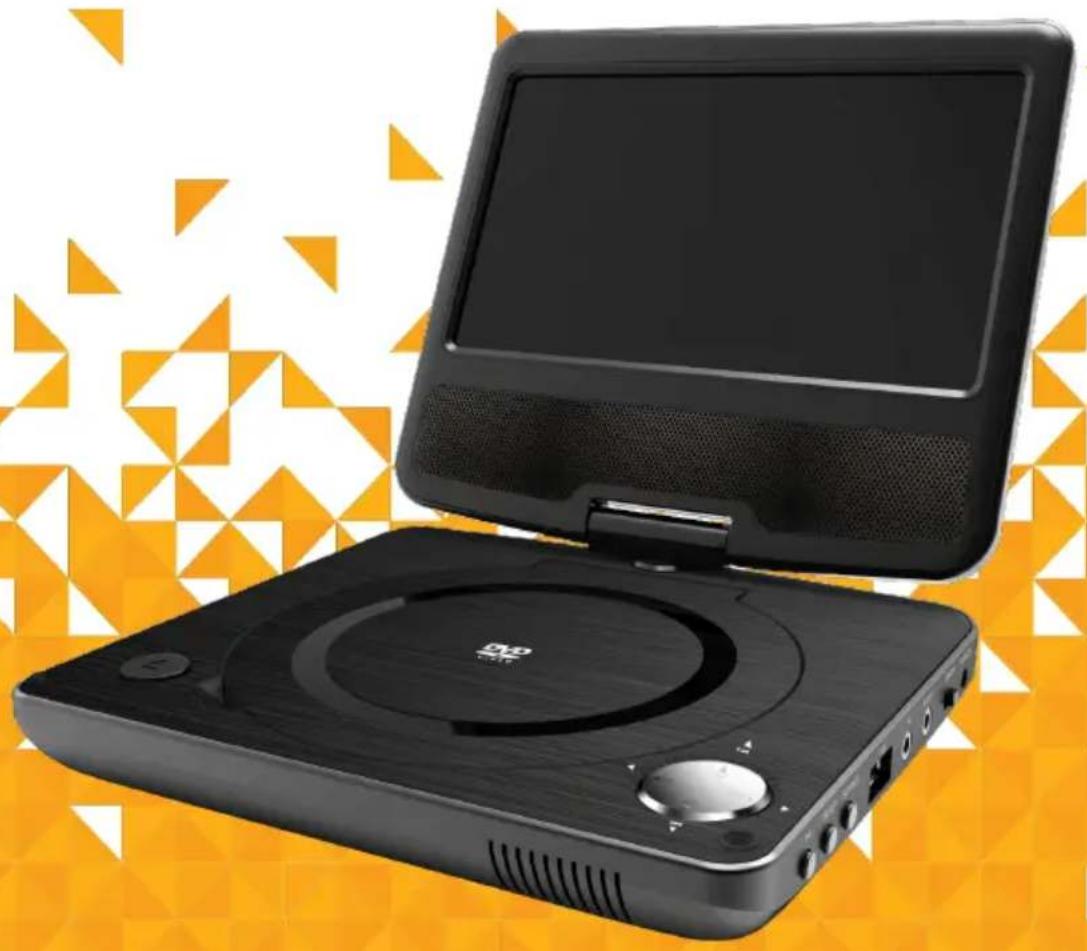
7 Inch Portable DVD Player
Model: T-701
SKU: 134234988
Cat: 5422920
natural_image
Black and white photo of a portable open Sony CD/DVD device with orange geometric background (no text or symbols on device)You'll soon be enjoying your new Bush Portable DVD Player.
It all begins here, with your instructions. Don't worry, there's nothing too technical coming up. Just simple, step-by-step guidance to get you up and running quickly. Sound good? Then let's get started.
Help and Guidance
We're here to help you get the most from your Bush Portable DVD Player. Should you require any guidance; call our Help line on 0345 604 0105. Further contact details can be found online at: www.bush-support.com
Contents
1 Safety information
Power source 6
Ventilation heat and moisture 7
Battery safety 7
Care and maintenance 9
2 Getting to know your DVD player
Accessories 12
Parts 13
Viewing options – swivel screen 15
Charging the internal battery 16
Using the remote control 17
3 Using your DVD player
Basic operation 20
Basic operation – playing a DVD or CD 21
Basic operation – playing a picture disc 22
Using a USB storage device 23
Skip and fast search functions 23
Repeat play functions 24
Zoom function 25
Step function 25
Angle function 25
Audio function 25
Subtitle function 26
Search function 26
Programmed playback 27
Quick access buttons 28
Explanation on display screens 28
Setup menu 29
Setting the rating (parental lock) 31
Changing the password 32
Contents
4 Other information
Connecting the DVD player to a TV 34
Using headphones 35
In car use - charging 35
Technical specification 36
Compatibility 37
Explanation of DVD symbols 37
Caring for discs 37
5 Product support
Troubleshooting 39
Help and assistance 40
Recycling electrical products 41
Guarantee 42
Safety information
1

natural_image
Abstract geometric pattern composed of orange triangles on a white background (no text or symbols)
Safety information
Important - Please read these instructions fully before installing or operating
Power source
- For household and indoor use only
- Keep the appliance and its cord out of reach of children less than 8 years.
- Do not allow children to use the appliance without supervision.
- This appliance can be used by children aged from 8 years and above and persons with reduced physical, sensory or mental capabilities or lack of experience and knowledge if they have been given supervision or instruction concerning use of the appliance in a safe way and understand the hazards involved. Children shall not play with the appliance. Cleaning and user maintenance shall not be made by children unless they are aged from 8 years and above and supervised.
- Fully unwind the cable before plugging in and ensure the cable is positioned away from areas where it is likely to get damaged or cause a trip hazard.
- The output cord of this mains adaptor cannot be replaced. In the event of damage to the cable, jack plug or adaptor, the entire adaptor unit should be replaced.
- Connections must only be made via the mains adaptor supplied, never connect the appliance directly to the 240v mains supply.
- Never use the adaptor supplied with any other appliance.
- Remove mains adaptor from supply if appliance is unused for a long period of time, and during thunderstorms.
- Do not pull on the cable to disconnect from mains supply.
- Switch off and unplug when not in use and before cleaning or servicing the appliance. Servicing of this appliance must only be carried out by a qualified electrician.
- Always ensure the mains adaptor plug is readily unpluggable – do not use with 'lockable' sockets or permanently wire to mains.

Safety information
Important - Please read these instructions fully before installing or operating
Ventilation, heat and moisture
- Keep appliance, cable, mains adaptor plug dry and away from areas where it is likely to get splashed. Avoid using in hot, humid environments.
- Place the appliance on a flat, stable surface with adequate ventilation and away from other sources of heat. Minimum distances around the appliance for adequate ventilation is 10cm. Do not cover or restrict ventilation openings.
- Do not place items with naked flames or containers with liquids on this appliance.
- The mains adaptor will become warm in use; do not cover or place on or near surfaces that could be affected by heat such as table tops and carpets.
Battery safety - DVD player
This DVD player has a built in rechargeable battery (Li-Ion 7.4V 1000mAh) that cannot be replaced.
- Never try to dismantle the DVD player.
- Do not short-circuit the supply terminals.
- Dispose of the DVD player responsibly at local authority household waste recycling facility.
- DO NOT dispose of the DVD player in a fire as the battery may explode or leak.

Safety information
Important - Please read these instructions fully before installing or operating
Battery safety - Remote control

WARNING
DO NOT INGEST BATTERY. CHEMICAL BURN HAZARD.
The remote control supplied with this product contains a coin / button cell battery. Button cells are dangerous - if swallowed they can cause severe internal burns in just 2 hours and can lead to death. If you think batteries might have been swallowed or placed inside any part of the body, seek immediate medical attention.
- Batteries should be installed by an adult. Keep new and used batteries away from children.
- If the battery compartment does not close securely, stop using the remote and keep it away from children.
- CAUTION – Danger of explosion if battery is incorrectly fitted/replaced.
- Only use CR2025 lithium batteries in this remote control.
- Be sure to insert correctly taking care to observe the correct polarity (+ and -).
- Use only batteries of the same or equivalent type as recommended.
- Do not recharge non-rechargeable batteries.
- Never try to dismantle batteries.
- Do not short-circuit the supply terminals.
• Always remove exhausted or dead batteries from the product. - Remove batteries from the product before extended storage.
- Dispose of used batteries responsibly at local authority household waste recycling facility.
- DO NOT dispose of batteries in a fire as the batteries may explode.

Safety information
Important - Please read these instructions fully before installing or operating


The lightning flash with arrowhead symbol, within an equilateral triangle, is intended to alert the user to the presence of uninsulated "dangerous voltage" within the product's enclosure that may be of sufficient magnitude to constitute a risk of electric shock.
CAUTION
RISK OF ELECTRIC SHOCK DO NOT OPEN
WARNING: to reduce the risk of electric shock, do not remove cover (or back). No user serviceable parts inside, refer servicing to qualified service personnel.

The exclamation point within an equilateral triangle is intended to alert the user to presence of important operating and maintenance (servicing) instructions in the literature accompanying the appliance

Invisible laser radiation when open and interlock failed or defeated. Avoid direct exposure to laser beam.
Laser safety
This unit employs an optical laser beam system in the cd mechanism designed with built -in safeguards. Do not attempt to disassemble, refer to qualified service personnel. Exposure to this invisible laser light beam may be harmful to the human eye.
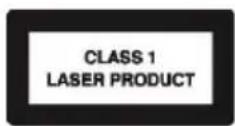
This is a class-1 laser product. Use of controls, or adjustments or procedures other than those specified herein, may result in hazardous laser light beam exposure.
Care and maintenance
Wipe with a soft cloth. If the casing is very dirty, unplug from the mains and dampen the cloth with a weak solution of washing up liquid and water and wipe clean. Allow it to dry thoroughly before using.
This page is left intentionally blank
Getting to know your DVD player 2

natural_image
Abstract geometric pattern with orange triangles and white squares on a white background (no text or symbols)
Getting to know your DVD player
You'll be up and running in no time
Ready? Let's begin...
Please read these instructions carefully. They contain important information which will help you get the best from your DVD player and ensure safe and correct installation and operation.
If you require any further assistance, our technical experts are happy to help. For full details, refer to the product support section at the end of these instructions.
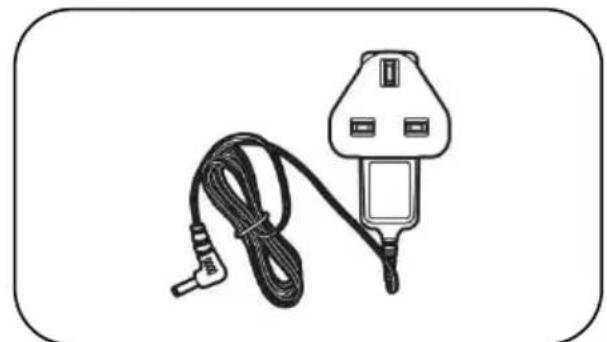
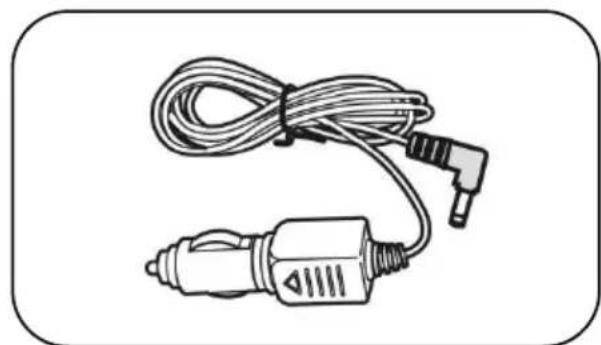
Accessories
natural_image
Line drawing of a 3-pin electrical plug with coiled cable (no text or symbols)Adaptor Car charger cable
natural_image
Line drawing of a handheld electric drill bit with coiled cable and terminal connector (no text or symbols)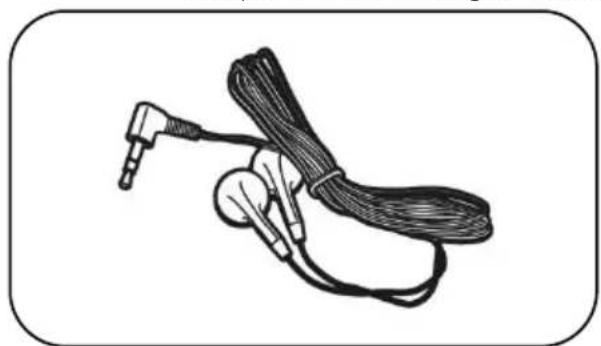
natural_image
Illustration of a black cordless audio jack with attached microphone and ear (no text or symbols)Earphones Remote control
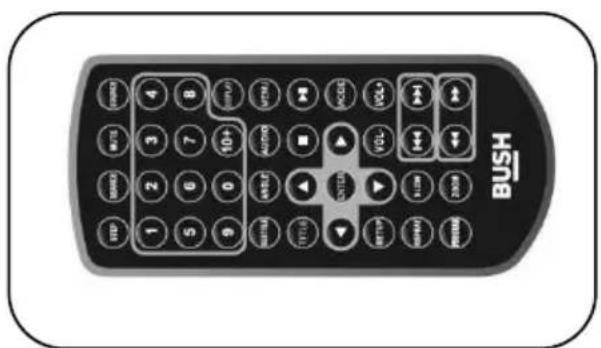
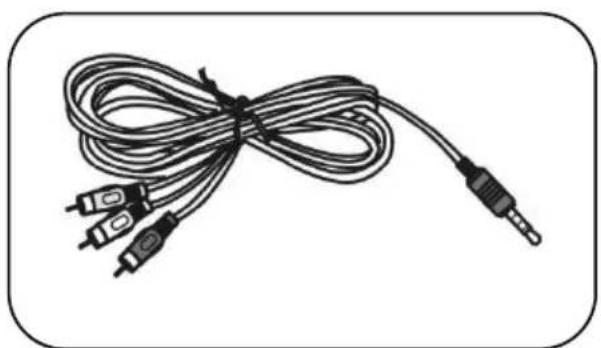
natural_image
Coiled black cable with three connectors, no text or symbols visibleAV adaptor cable
Getting to know your DVD player
You'll be up and running in no time
Parts - Main unit

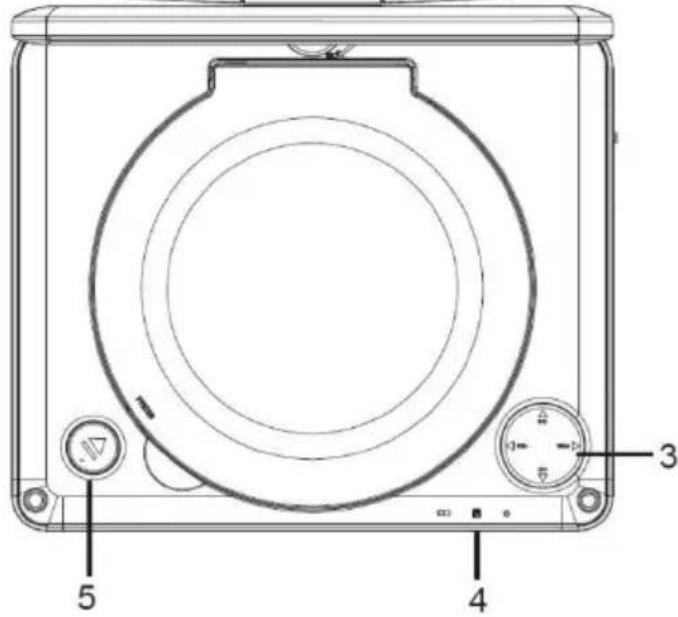

natural_image
Technical line drawing of a curved mechanical component (no text or symbols)1 Screen
2 Speakers
3 Volume Up (+) / Down (-) buttons
Navigation (◀▲▶▼) buttons
Previous (◀◀) / Next (▶◀) buttons
4 Charging and power indicators.
Remote control sensor
5 Disc 'Open' button
6 Play / Pause ( ) ▶ button
7 Setup button
8 Source button
9 USB port
10 Earphone jack
11 AV out jack
12 On/ Off switch
13 DC input jack

Getting to know your DVD player
You'll be up and running in no time
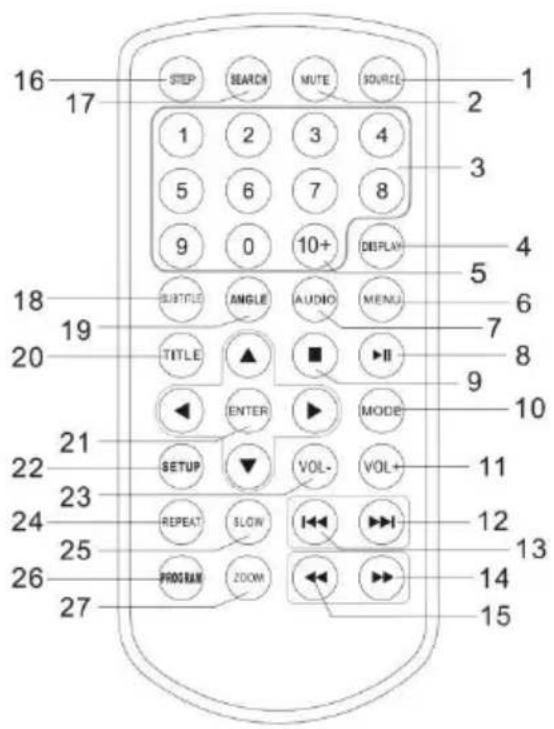
Parts – Remote control
| 1 | Accesses source menu |
| 2 | Cuts and restores sound |
| 3 | Number entry buttons |
| 4 | Provides play status |
| 5 | Press to enter numbers above 10 |
| 6 | Accesses the disc menu |
| 7 | Selects the audio language on a DVD Selects mono or stereo modes on a music CD |
| 8 | Starts play or pauses a disc, track or picture |
| 9 | Stops play |
| 10 | Adjust screen parameters |
| 11 | Increases the volume |
| 12 | Moves to the next chapter or track |
| 13 | Moves to the previous chapter or track |
| 14 | Searches fast forward through the disc |
| 15 | Searches fast backward through the disc |
| 16 | Advances DVD one frame |
| 17 | Goes to a specific play time / point on disc |
| 18 | Selects and turns the subtitles on and of for a DVD |
| 19 | Accesses different camera angles |
| 20 | Accesses DVD title menu |
| 21 | Selects item highlighted |
| Navigates up, down, left and right in menu | |
| 22 | Accesses and exits the main setup menu |
| 23 | Decreases the volume |
| 24 | Accesses the repeat play mode |
| 25 | Searches slowly through the disc |
| 26 | Permits programming of a sequence of DVD chapters or CD tracks to be played |
| 27 | Accesses the zoom feature (if available) |
Getting to know your DVD player
You'll be up and running in no time
Viewing options – swivel screen
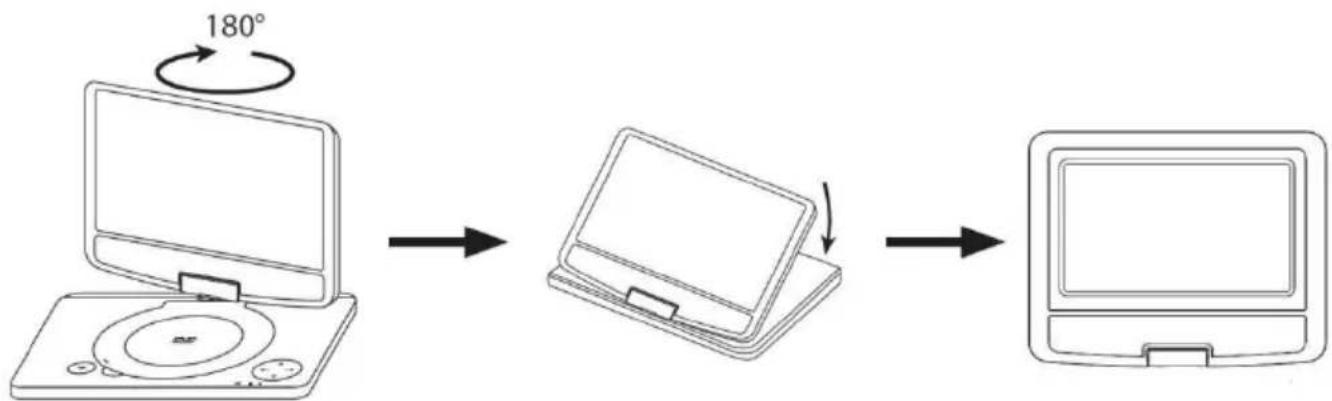
The angle of the screen can be adjusted for ease of viewing and can be rotated by 180^ and folded flat against the base (fig. 1) so that it can be secured to the back of a headrest for use during car journeys.
flowchart
graph LR
    A["180°"] --> B["Open Device"]
    B --> C["Closed Screen"]
Fig. 1

Getting to know your DVD player
You'll be up and running in no time
Charging the internal battery
The internal Lithium polymer DVD battery is supplied with a small amount of charge but it will be necessary to charge for 4 hours before using in battery mode.
- Connect the mains adaptor cable into
the DC jack at the side of the player and plug the mains adaptor into the mains. Ensure the ON/OFF button on the side of the DVD player is OFF. The indicator (at front of the player) will illuminate green and flash to show that the unit is connected to the mains and is in charging mode.
- Allow the unit to fully charge. When
the unit is fully charged the indicator will stop flashing.
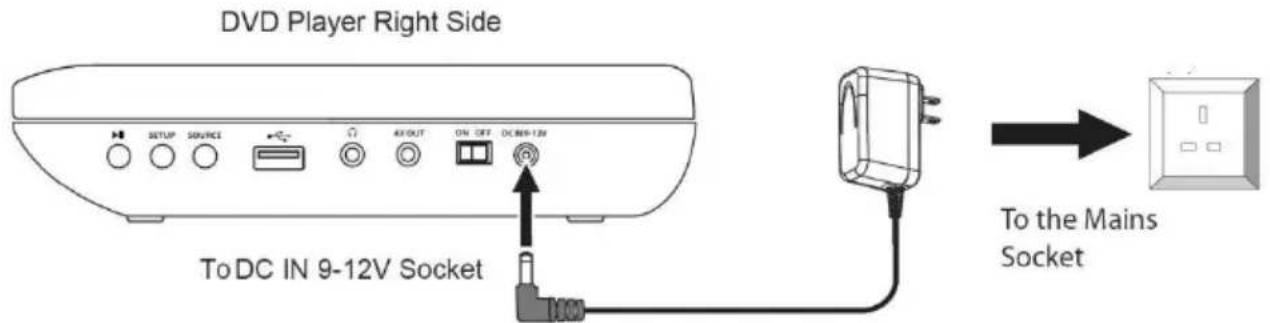
Fig. 2
Notes
• Only charge or recharge the battery indoors.
- Do not recharge the battery when the air temperature is below 0°C or above 45°C.
- Do not overcharge (e.g. longer than 24 hours) as this may shorten the battery life.
- Batteries become hot after heavy use and will become difficult to charge. Allow DVD to cool and wait about an hour between recharges.
Getting to know your DVD player
You'll be up and running in no time
Using the remote control
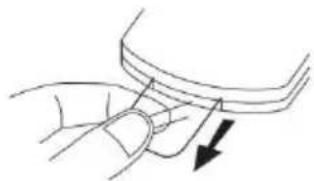
Before using remote for the first time- pull out the clear isolation strip from the battery compartment.
natural_image
Simple line drawing of a hand holding a curved object with an arrow indicating direction (no text or symbols)Fig. 3
- To use the remote control,
ensure that the OFF / ON switch at the side of the main unit is switched to the ON position.
2.
oint the infrared transmitter on the remote control towards the remote control sensor on the player and select the function button of choice.
3.
oint the remote control unit no more than 5m from the remote sensor (directly in front) and at an angle of no greater than 15° (max distance 3m).
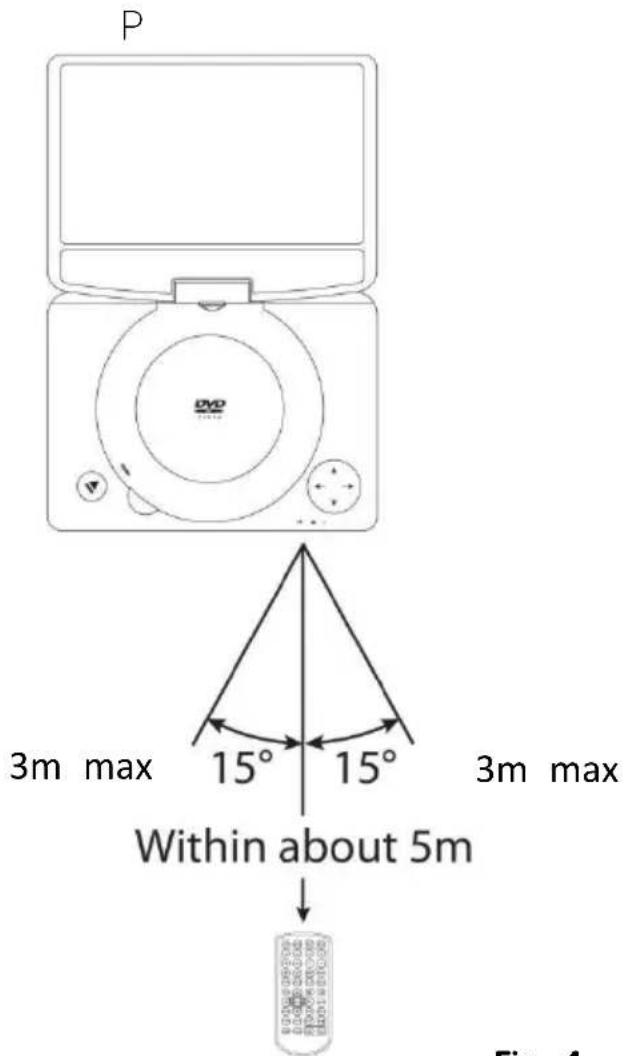
Fig. 4

Getting to know your DVD player
You'll be up and running in no time
To replace the battery in the remote -
-
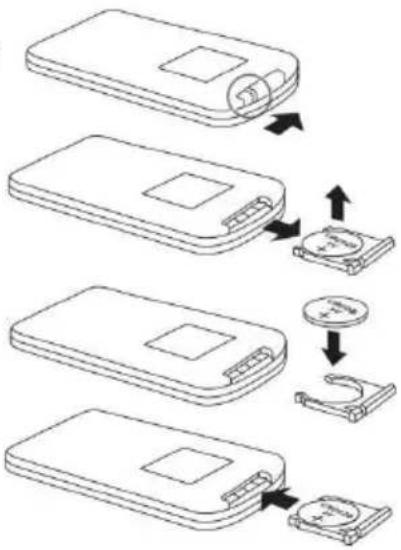
Push the slider at the end of the remote control in the direction shown (fig. 5) and then slide out the battery holder (fig. 6). Remove the spent battery.
-
Insert 1 x CR2025 lithium battery (fig. 7) in accordance with the diagram on the rear of the remote. Take care to observe the correct polarity (+/-). Refit the battery holder (fig. 8).
-
Do not expose the batteries or the installed batteries to excessive heat (e.g. fire, sunshine or position close to radiators etc.).
flowchart
graph TD
    A["Mobile Phone with Interface"] --> B["Device with Digital Interface"]
    B --> C["Assembly to a Digital Interface component"]
    C --> D["Internal Components with Digital Interface"]
Using your DVD player
3

natural_image
Abstract geometric pattern with orange triangles and white squares on a white background (no text or symbols)Using your DVD player
Let's get started
Basic operation
The operations of the DVD player may be selected either by using the buttons on the remote control or in some cases by using buttons / controls on the main unit. For clarity the instructions from this point forward will refer mainly to the controls on the remote control.
- Lift open the lid of the DVD player and when the DVD is playing, tilt the screen for the best viewing angle.
- On first use, peel off the clear protection cover on the screen.
- Press the Disc lid OPEN button to open the DVD door. Remove the card insert.
- Connect the mains adaptor cable into the DC jack at the side of the player and plug in the mains adaptor into the mains. The charging indicator will illuminate green and flash.
- If playing a disc, insert the disc (label side up) and close the disc door, for a double-sided disc place the disc with the A/1 up.
- Move the ON / OFF switch to the ON position to switch on the DVD player. The power indicator will illuminate red and the display will activate.
• The DVD will automatically play.
Using your DVD player
Let's get started Playing a DVD or CD
- The unit will take a few seconds to download the initial data from the disc, the screen will show 'Loading' and the disc type will be displayed for a few seconds in the top left corner of the screen. The disc will start to play automatically.
- If playing a CD, the track number and the elapsed time will be displayed on the screen.
- If playing a DVD, the DVD menu / title will be displayed on the screen where the casting information, product history, movie introduction etc. can be accessed.
- Using the NAVIGATION ( ◀ ▶ ▼ ▲ ) buttons, highlight the desired feature or enter the number of the chapter using the NUMBER buttons and then press the ENTER button to confirm the selection. The disc will now start to play the film.
- To pause play, press the PLAY / PAUSE ▶ button, the pause indicator (Ⅱ) will appear on the screen to show that pause mode has been selected. Press the PLAY / PAUSE ▶ button again, the play indicator (▶) will appear on the screen and the disc will resume playing at the point that the disc was paused.
- To stop play, press the STOP (■) button - ONCE - the stop indicator (■) and 'play key to continue' will appear on the screen. If the PLAY / PAUSB▶() button is pressed the disc will resume playing at the point at which it was stopped. TWICE - the stop indicator (■) will appear on the screen to show stop has been selected. If the PLAY / PAUSB▶() button is pressed the disc will restart at the beginning.
- To adjust the volume to the desired level use the volume buttons on the remote (or press the volume buttons on the main unit). The volume will be displayed on the screen. The sound can be silenced by pressing the MUTE button on the remote control. Press the MUTE button a second time to restore the sound.
- To turn the DVD player off at any time, move the ON / OFF switch to the OFF position.
Using your DVD player
Let's get started
Playing a picture disc
- The unit will take a few seconds to download the initial data from the disc the screen will show 'Loading' and then the picture menu will be displayed on the screen.
- If the player does not automatically start a slide show, press the PLAY / PAUSE ▶ button to display the first picture full screen.
- Press the PLAY / PAUSE ( ) button to pause on a particular picture and the pause indicator ( II ) will be displayed. Press the PLAY / PAUSE ( ▶II ) or NEXT ( ▶I ) buttons to restart the slide show. At the end of the slide show the picture menu will be displayed.
- Press the NEXT (▶) button to advance to the next picture or the PREVIOUS (◀) button to return to the previous picture
- To rotate or flip a picture on the screen press the NAVIGATION (◀ ▶ ▼ ▲) buttons when viewing the picture disc.
- To select a specific picture, enter the picture number directly using the NUMBER and ENTER buttons and the disc will start to play from the picture selected
- To stop play, press the STOP (■) button and the slide show will stop and the screen will show thumbnail sized images.
- Use the NAVIGATION (◀ ▶ ▼ ▲) buttons to move between the images or commands on the menu and press the ENTER button to restart the slide show. If there are more than 8 images on the disc, highlight NEXT using the NAVIGATION (◀ ▶ ▼ ▲) buttons to display the next 8 images.
- To return to the disc menu highlight MENU using the NAVIGATION (◀ ▶ ▼ ▲) buttons or press the MENU button.
- To turn the DVD player off at any time move the ON / OFF switch to the OFF position.
Using your DVD player
Let's get started
Using a USB device
To play music or display pictures stored on a USB storage device.
- Ensure that the ON / OFF switch is in the OFF position.
- Insert the storage device into the USB port.
- Move the ON / OFF switch to the ON position and the screen will activate.
- Press the SOURCE button and using the NAVIGATION (▼▲) buttons highlight 'MEDIA' and then press the ENTER button.
- The storage device will then be highlighted. Press the ENTER button again to display the track or picture menu and use the controls as described in the previous two pages for CDs (music) and Picture disc (pictures).
Skip and fast search functions
1.
o move forward to the next chapter or track on the disc, press the NEXT (▶) button. Press again to move to each successive chapter / track. To return to the beginning of the chapter / track or move to the previous chapter / track; press the PREVIOUS (◀) button. Repeat to move to each previous chapter / track.
2.
o search forward at speed, press the FAST FORWARD (▶) button. Press the button again to increase to the next search speed in the sequence below. Press the PLAY / PAUSE (▶) button at anytime to resume normal play.

flowchart
graph LR
    A["X2"] --> B["X4"]
    B --> C["X8"]
    C --> D["X16"]
    D --> E["X32"]
    E --> F["PLAY"]
    F --> G["Return"]
    G --> A
Using your DVD player
Let's get started
3.
o search backward at speed, press the FAST REVERSE (◀) button. Press the button again to increase the search speed. Press the PLAY / PAUSE ▶ button at anytime to resume normal play.
4.
hen viewing a DVD, press the SLOW button to select slow-motion function and progress forward at 1/2 , 1/4 , 1/8 , 1/16 speed.
Note
- A DVD will not advance or reverse during the 'Warning' section.
- The fast forward / reverse functions (▶ and ◀) are not available for picture CDs.
- Skip and fast search functions may not be available when in pause or stop modes.
Repeat play functions (in play mode)
To repeat a DVD chapter, title or music track continuously, press the REPEAT button.
- Press the REPEAT button ONCE, to repeat the same DVD chapter or music track continuously. The repeat indicator (Chapter/ Track) will appear on the screen.
- Press the REPEAT button A SECOND TIME to repeat the DVD title or all music tracks on the CD / in the folder continuously. The repeat indicator (Title / ALL) will appear on the screen.
- If playing a DVD, press the REPEAT button A THIRD TIME to repeat all titles on the DVD continuously. The repeat indicator ( ⏻ ALL) will appear on the screen.
- Press the REPEAT button once more to turn off the repeat function.
Using your DVD player
Let's get started
Zoom function
This function allows the picture on the screen to be enlarged or shrunk.
- If viewing a DVD. Press the ZOOM button repeatedly until the desired magnification (e.g. x2, x3, x4, 12 , 1/3, 14 , and Off) has been reached. The zoom selected will be shown in the screen.
- If viewing a JPEG file. Press the ZOOM button and then press the FAST FORWARD (▶) / FAST REVERSE (◀) button until the desired magnification (e.g. x50%, 100%, 125%, 150% and 200%) has been reached.
- Use the NAVIGATION (◀ ▶ ▲ ▼) buttons to adjust the position of the picture that that is being viewed on the screen.
Step function
- To advance the DVD frame by frame, press the STEP button. The first press of the button freezes the frame and each subsequent press advances the DVD by one frame. The step indicator (▶) will be displayed on the screen.
- Press the PLAY / PAUSE ( ) button to resume playing at the point that the DVD was paused.
Angle function (not available on all DVDs)
If viewing a DVD equipped with a multi-angle feature this is function allows the scene being played to be viewed from a number of viewing angles. Press the ANGLE button to switch to the next viewing angle. The angle being viewed will be shown on the screen. If angle function not available on the disc being viewed then the symbol will appear on the screen.
Audio function (not available on all DVDs)
If listening to a DVD equipped with a multi-language feature this is function allows the language of the commentary being heard to be selected from those available on the disc. Press the AUDIO button successively to switch to the next available language. The language selected will be shown on the screen.
Using your DVD player
Let's get started
Subtitle function (not available on all DVDs)
If viewing a DVD equipped with a multi-subtitle feature this is function allows a subtitle to be selected from those available on the disc. Press the SUBTITLE button repeatedly to switch to the next available subtitle. The subtitle selected will be shown on the screen.
Search function
This function allows a disc to be played from a specific title, chapter or track; the options available will vary for each disc. For most DVD discs
- If the DVD is in STOP mode,
- Press the SEARCH button and use the NUMBER buttons to enter the desired title number that you want the DVD to play from.
- Play will start immediately.
- If the DVD is currently being played
- To search for a specific chapter in the title being watched, press the SEARCH button ONCE and use the NUMBER buttons to enter the desired chapter.
- Press the SEARCH button TWICE to enter the time (hr:min:sec) in the highlighted field from which the title being watched is required to start playing.
- Press the SEARCH button THREE times to enter the time (hr:min:sec) in the highlighted field from which the chapter being watched is required to start playing.
- Play will start immediately from the point selected.
- If listening to a CD, press the SEARCH button
- (Disc GO TO:--:--) Press ONCE to enter the time (min:sec) in the highlighted field from which the disc is required to start playing.
- (Track GO TO:--:--) Press TWICE to enter the time (min:sec) in the highlighted field from which the track is required to start playing.
- (Select Track:--:--) Press THREE times to enter the track number.
- Play will start immediately from the point selected.
Using your DVD player
Let's get started
Programmed playback
This function allows play to be programmed from a specific title & chapter of a DVD or track of a CD.
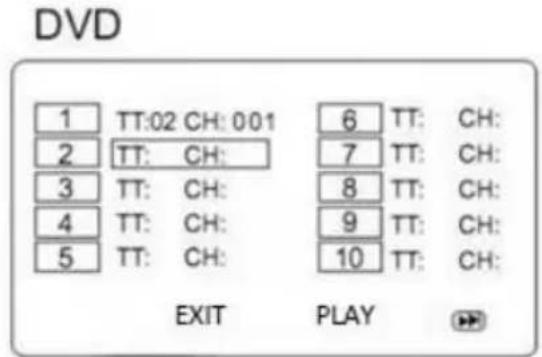
- Press the PROGRAM button to display the programmed playback screen.

-
Enter the first title (e.g. 01, 02 etc.) and chapter numbers or track number to be played using the NUMBER buttons in the highlighted field. As each field is full it will automatically move to the next field. If a title, chapter or track entered is not available on the disc the field will automatically clear.
-
Add the next title, chapter or track numbers to be played and continue until all the desired fields have been programmed.
-
If more than 10 programmed playbacks are required use the NAVIGATION (◄ ► ▲ ▼ ) buttons to highlight NEXT (►►) and further chapters can be added.
-
When all chapters have been programmed use the NAVIGATION (◀ ▶ ▲ ▼) buttons to highlight 'PLAY' and press the ENTER button to start play. 'Program' will be shown on the screen to indicate that the player is in program play mode.
-
If 'EXIT' is highlighted the player will exit the DVD program mode.
-
The programmed chapters will play in sequence and the DVD player will stop automatically after all the programmed titles / chapters / tracks have played.
Using your DVD player
Let's get started
Quick access buttons
MENU Press the MENU button to display the DVD root menu and select the desired option.
TITLE Press the TITLE button to return to the DVD title menu and select the desired option.
DISPLAYPress the DISPLAY button to display a summary of play settings on the screen for the disc being played.
SETUP Press the SETUP button to display the set up menu.
Explanation of information on display screens
1. DVD mode
Press the DISPLAY button repeatedly to scroll through the displays in the sequence below. Press the button five times to clear the display and return to normal viewing

flowchart
graph LR
    A["Title elapsed time"] --> B["Title time remaining"]
    B --> C["Chapter elapsed time"]
    C --> D["Chapter time remaining"]
    D --> E["OFF"]
2 CD mode
Press the DISPLAY button successively to select between the four display screen features.

flowchart
graph TD
    A["Single Elapsed"] --> B["Single Remain"]
    B --> C["Total Elapsed"]
    C --> D["Total Remain"]
    D --> A
3 Picture mode
Press the PROGRAM button successively to select between the options of loading the next picture. For example 'wipe top' will load the next picture from the top edge downwards. 'Diagonal wipe right top' will load the next picture diagonally from the top right hand corner towards the bottom left hand corner.
Using your DVD player
Let's get started
Setup menu (in play or stop modes)
Various features of the player can be changed in the set up menu (see options in the following table).
- Press the SETUP button and the general set up menu will be displayed.
- Use the NAVIGATION (◀▶) buttons to display the desired set up menu (General, Audio, Video, Preference and Password) and display the features in the menu. Please note that the preference menu can only be accessed when the player is in complete 'stop' mode
- Enter the desired submenu by pressing the NAVIGATION (▼) button and then use the (▼▲) buttons to move up or down the list. When highlighted the feature will show the current setting and the options available. Press the ENTER or ▶ buttons to confirm the display and to enter the option submenu for this function.
- Highlight the desired option and press the ENTER button to confirm.
- Press the SETUP button to save the setting and exit this function.
| MENU | FUNCTION | OPTIONS | Default | |
| General | TV Display | 4:3 Panscan4:3 Letterbox16:9Wide squeeze | Wide | |
| Angle mark | On / Off | On | ||
| OSD Lang | English | Eng | ||
| Closed captions | On / Off | On | ||
| Screen Saver | On / Off | On | ||
| Auto standby | Off3 hours4 hours | 3 hours | ||
| Audio | Down mix | Lt /RtStereo | Stereo | |
| Dolby digital | Dual Mono | StereoL-MonoR-MonoMix Mono | Stereo | |
| Dynamic | Full - Off | Off | ||
Using your DVD player
Let's get started
| MENU | FUNCTION | OPTIONS | Default |
| Video | Brightness | -16 to +16 | 0 |
| Contrast | -16 to +16 | 0 | |
| Hue | -9 to +9 | 0 | |
| Saturation | -9 to +9 | 0 | |
| Preference | TV type | PAL AUTO NTSC | PAL |
| Audio | Varies by disc | Eng | |
| Subtitle | Varies by disc | Eng | |
| Disc menu | Varies by disc | Eng | |
| Parental | 1 Kid safe2 G3 PG4 Pg135 Pgr6 R7 Nc178 Adult | Adult | |
| Default | Reset | ||
| Password | Password Mode | On / Off | On |
| Password (change) | Change | ||
Using your DVD player
Let's get started
Setting the rating (parental lock)
Some DVD's have a parental level assigned to the complete disc or particular scenes on the disc. This feature allows the viewing limit to be set and settings are region specific. To activate the parental settings -
- In fully STOP or no disc mode, press the SETUP button and use the NAVIGATION buttons (◀) to display the PREFERENCE menu.
- Enter the submenu by pressing the NAVIGATION (▼button, then use the NAVIGATION buttons▲▼) to highlight PARENTAL and press the ENTER button to confirm.
- Use the NAVIGATION buttons (▼▲) to highlight the viewing level of choice. Press the ENTER button to confirm the selection.
- Enter the pass code (1369) and press the ENTER button to confirm. The viewing level has now been set. Press the SETUP button again to exit this feature.
- If the rating on a DVD is higher than the parental rating set, the DVD will display a screen and it will necessary to enter the password and press the ENTER button before the disc will play.
Notes
Kid safe Suitable for all ages but especially for young children.
G Suitable for all ages.
PG Contains mature themes, may not be suitable for small children under 8 years old.
Pg 13 Contains mature themes, may not be suitable for children under 13 years old.
Pgr Recommended that parents restrict children under 17 from viewing or only view only when supervised by a parent or adult guardian.
R Contains mature themes (usually sex and/or violence). Children under 17 not admitted without an adult.
Nc17 No children under age 17; not recommended for children under age 17.
Adult Material to be viewed only by adults due to graphic sexual scenes
Using your DVD player
Let's get started
Changing the password
To change the password -
1 Press the SETUP button and use the NAVIGATION buttons ( ) to display the PASSWORD menu.
2 Enter the submenu by pressing the NAVIGATION ( ) button, then use NAVIGATION buttons (▲▼) to highlight PASSWORD and press the ENTER button to confirm.
3 Use the NAVIGATION buttons ( ) to highlight PASSWORD (change) and press the ENTER button to confirm the selection.
4 Enter the pass code (1369) and then enter the new pass code twice, before pressing the ENTER button to confirm.
5 The new pass code has now been set.
6 Press the SETUP button to exit this feature.
Note:
• See troubleshooting section for action to be taken for forgotten passwords.
Other information
4

natural_image
Abstract geometric pattern composed of orange triangles on a white background (no text or symbols)
Other information
Connecting the DVD player to a TV
Connecting the DVD player to a TV
To view the content of a DVD disc in larger format, the DVD player may be used connected to a TV.
- Turn off the DVD player and TV and disconnect from the mains.
- Using the jack to AV adaptor cable supplied, insert the black jack plug on the cable into the AV out jack at the side of the player.
- Connect the AV jacks from the adaptor cable to the TV as shown below.
- Slide the OFF / ON switch on the side of the player to the ON position and turn on the TV.
- Select the video mode (AV) for the TV. If there is more than one video channel (AV1, AV2, etc) select the source that the DVD player is connected to. See the TV instruction manual for tuning instructions if the set does not automatically tune.

Fig. 9
CAUTION! ALL EQUIPMENT MUST BE TURNED OFF AND DISCONNECTED FROM THE MAINS BEFORE INSTALLATION
Other information
Using headphones
A stereo headphone jack has been provided so that the set can be used without disturbing others. Plug in the earphones at the point marked 📞' (fig. 10) and adjust the listening volume to your chosen level. Excessive sound pressure from earphones and headphones can cause hearing loss. The speakers will not operate when headphones are fitted.

Fig. 10
In-car use
Charging
A cable has been provided for use with a suitable (12V DC only, centre positive) in-car socket. Plug the car plug into the car socket and the DC jack into the DC input jack at the side of the DVD player (fig. 11). Ensure the DVD player is positioned so as not to distract the driver (must be out of line of sight) when driving.
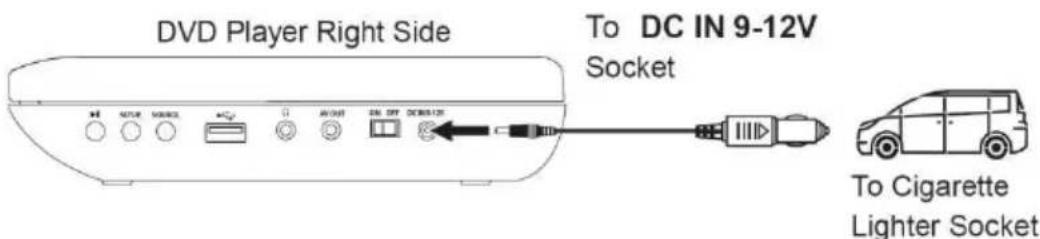
Fig. 11
Notes:
• The car DC plug is fitted with an internal 2 Amp (20mm) fuse.
- Prolonged use/charging of the DVD player (without engine running) will flatten the car battery.
Other information
Technical Specification
| Model | T-701C |
| SKU | 134234988 |
| Cat No: | 5422920 |
| Rated voltage (transformer) | 100 - 240V~ 50/60Hz, 0.5A Max |
| Transformer output | 9V 1.0A |
| Transformer model | GA04-090 1000UK |
| Class rating (transformer) | II (double insulated) |
| DVD player input | 9V - 12V~1.0A |
| Power consumption | 10W |
| Power consumption (standby) | <1W |
| CD/DVD | |
| Laser | |
| Signal system | PAL, NTSC |
| Video output | 1.0V p-p, 75 Ohm |
| Audio output | 1.2Vrms (1kHz, 0dB) |
| Frequency response (audio) | 20Hz to 20kHz |
| Signal to noise ratio (audio) | >80dB |
| Dynamic range (audio) | >85dB |
| Operating conditions | Temperature: 5°C to 40°C |
| Humidity 5% to 90% |



Other information
Compatibility
This DVD player is compatible with the following disc types DVD 8 & 12cm Single sided, single and doubled layered 8 & 12cm Double sided, single layered
CD-Audio 8 & 12cm discs
CD-R
CD-RW
Explanation of DVD symbols

Region code
Number of Audio Tracks
Number of Sub-titles
Screen Format
Angle Indicator
Caring for discs
To obtain the best sound and picture quality from discs treat with care. Dirty, scratched or warped discs will cause broken or intermittent sound and pictures.
- Store discs in their original cases and avoid using in dusty environments
- When holding the disc, take care not to touch the playing surface.
- Do not place the discs in warm or sunny locations
- Never write on the playing surface of the disc or on the label surface with a ballpoint pen. Do not stick labels onto discs.
- Do not bend discs.
- Wipe any dust or fingerprints form the disc using a soft cloth. Wipe from the centre of the disc to the outside and never in a circular motion. Do not use conventional record cleaners, anti static agents, benzene, thinners or solvents.
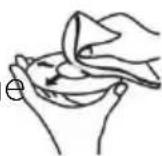
Right

Wrong
Product support
5

natural_image
Abstract geometric pattern composed of orange triangles on a white background (no text or symbols)Product support
Help is always at hand
Troubleshooting
| Observation | Potential cause / solution |
| No powerThe remote control does not work | Is the power lead connected to the mains socket correctly?Does the socket that is being used have power?Has the internal DVD battery been charged? |
| Is the battery exhausted?Has the battery been correctly fitted?Are there obstacles in the between the remote and the sensor on the DVD player or the remote too far away from the sensor? | |
| The DVD player does not play | Has the player been switched on at the OFF/ON switch on the side of the player?Has the disc been loaded upside down?Is the region code and disc type compatible with the DVD player?Is the DVD rating above the parental level set?Is the disc dirty or damaged? |
| Picture distorted | Is the disc dirty or damaged?Some picture distortion is normal during rapid advance or reverse |
| Picture not full screen | Has the correct aspect display been selected for the DVD being used? See set up menu. |
| No, poor, or intermittent sound | Has the mute button on the remote control been pressed?Is the player volume set at minimum?Have earphones been plugged into the earphone socket?Are the connection cables correctly fitted and undamaged?Note: there is no sound output during pause / frame advanc/ slow and search functions |
| Skip / Search function does not work | Some discs are programmed so that these functions do not work in certain sections e.g. during warnings or during displa of legal information.Single chapter discs do not permit the use of skip function |
| Forgotten password | Enter 1369 |
Product support
Help is always at hand
Help and assistance
If you require any technical guidance or find that your Bush appliance is not operating as intended, a simple solution can often be found in the Troubleshooting section of these instructions or online at www.bush-support.com
If you still require further assistance, call one of our experts on 0345 604 0105*. To help give us give you a fast and efficient service please have the following information ready:
Model Ref:
Serial number
Date of purchase



You can find this information on the rating plate – a small sticker (usually a sticker or metal plate on the rear of your product)
This will be shown on your receipt
Local call rate applies*
Lines open 8am-7pm Monday to Saturday and 10am-4pm Sunday.
*Calls to Bush enquiry lines may attract a charge and set up fee from residential lines depending on your call plan / tariff. Mobile and providers costs may vary, see www.bt.com/pricing for details
For security and training purposes, telephone calls to and from customer service centres maybe recorded and monitored. Calls from Republic of Ireland will attract international call charges.

Product support
Help is always at hand
Recycling electrical products
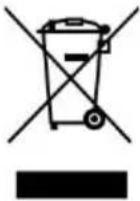
You should now recycle your waste electrical goods and in doing so help the environment.
This symbol means an electrical product should not be disposed of with normal household waste. Please ensure it is taken to a suitable facility for disposal when finished with.
Visit www.recycle-more.co.uk, click on "bank locator" and enter your postcode to find your nearest recycling site.
Product support
Help is always at hand
BUSH
Call us now and register your 12 month guarantee
Thank you for choosing Bush. Your new product is guaranteed against faults and breakdowns for 12 months. Don't forget to register it with us today so we can provide you with our best possible after-sales service and useful updates.
www.bushregistration.co.uk
FREEPHONE*
0800 597 8548
Lines open 8am-8pm, 365 days a year. *Calls may be recorded and monitored.
Your Bush Guarantee
This product is guaranteed for twelve months from the date of original purchase. Any defect that arises due to faulty materials or workmanship will be repaired free of charge (or if applicable the product will be replaced or the purchase price refunded) where possible during this period by the dealer from who your purchased the unit.
The guarantee is subject to the following provisions:
- The guarantee does not cover accidental damage, misuse, cabinet parts, knobs or consumable items.
- The product must be correctly installed and operated in accordance with the instructions contained in the manual.
- It must be used solely for domestic purposes. The guarantee will be rendered invalid if the
product is re-sold or has been damaged by inexpert repair.
- Specifications are subject to change without notice.
- Bush disclaim any liability for loss or damage arising from the breakdown of the product.
- This guarantee is in addition to and does not diminish your statutory or legal rights
Important Data Protection Information
To find out how we and Domestic & General Insurance PLC use your data please refer to the guarantee registration material or visit www.bushregistration.co.uk
Guarantor: Argos Limited - 489 - 499 Avebury Blvd. - Milton Keynes - MK9 2NW
BUSH
Produced for Bush
489-499 Avebury Boulevard, Milton Keynes MK9 2NW
Made in China.
Bush is a registered trademark of Argos Ltd.
Issue 1 10/19


- Help and Guidance
- Contents
- Safety information
- Getting to know your DVD player
- Using your DVD player
- Other information
- Product support
- Safety information
- 1
- Important - Please read these instructions fully before installing or operating
- Power source
- Ventilation, heat and moisture
- Battery safety - DVD player
- Battery safety - Remote control
- WARNING
- CAUTION
- RISK OF ELECTRIC SHOCK DO NOT OPEN
- Laser safety
- Care and maintenance
- Getting to know your DVD player 2
- Getting to know your DVD player
- Ready? Let's begin...
- Viewing options – swivel screen
- Charging the internal battery
- Notes
- Using the remote control
- To replace the battery in the remote -
- Using your DVD player
- 3
- Basic operation
- Let's get started Playing a DVD or CD
- Playing a picture disc
- Using a USB device
- Skip and fast search functions
- Let's get started
- 3.
- 4.
- Note
- Repeat play functions (in play mode)
- Zoom function
- Step function
- Angle function (not available on all DVDs)
- Audio function (not available on all DVDs)
- Subtitle function (not available on all DVDs)
- Search function
- Programmed playback
- Quick access buttons
- Explanation of information on display screens
- DVD mode
- CD mode
- Picture mode
- Setup menu (in play or stop modes)
- Setting the rating (parental lock)
- Changing the password
- Note:
- Other information
- 4
- Connecting the DVD player to a TV
- CAUTION! ALL EQUIPMENT MUST BE TURNED OFF AND DISCONNECTED FROM THE MAINS BEFORE INSTALLATION
- Using headphones
- In-car use
- Charging
- Notes:
- Technical Specification
- Compatibility
- Explanation of DVD symbols
- Caring for discs
- Product support
- 5
- Help and assistance
- Lines open 8am-7pm Monday to Saturday and 10am-4pm Sunday.
- Recycling electrical products
- BUSH
- Call us now and register your 12 month guarantee
- Your Bush Guarantee
- The guarantee is subject to the following provisions:
- Important Data Protection Information
Brand : BUSH
Model : T-701
Category : Portable DVD Player