
PDVD-163C - DVD player BUSH - Free user manual and instructions
Find the device manual for free PDVD-163C BUSH in PDF.


| Product Type | Portable In-Car DVD Player |
| Model | PDVD-163C |
| Brand | Bush |
| Dimensions (Approx.) | 9.1 x 1.5 x 6.7 inches (23 x 3.8 x 17 cm) |
| Weight (Approx.) | 1.5 lbs (0.7 kg) per unit |
| Power Supply | AC 100-240V, 50/60 Hz, <10W; DC 9V 2A adapter; Car charger 12V |
| Battery | Rechargeable lithium, 7.4V, approx 2.5 hours playback |
| Display | TFT screen per unit |
| Disc Playback | DVD, CD, MP3, JPEG; Region 2 |
| Playback Formats | DVD±R/RW, CD-R/RW, JPEG, MP3 |
| Audio Output | Stereo analog; 3.5mm headphone jack |
| Video Output | Composite AV out (3.5mm to RCA) |
| Additional Inputs | USB, SD/MS/MMC slot, AV in |
| Remote Control | 2 included, with full function buttons |
| Car Mounting | Headrest bracket with adjustable angle |
| Dual Unit Operation | Can link two units for simultaneous playback |
| Safety Features | Auto standby (3/4 hours), parental control, password protection |
| Accessories Included | 2 remotes, 2 power adapters, car charger, user manual, AV cables, car brackets, earphones, straps |
| Cleaning | Use a soft, dry cloth; avoid liquids on unit |
| Serviceability | No user-serviceable parts; refer to qualified personnel |
| Warranty | Standard manufacturer warranty (check retailer) |
Frequently Asked Questions - PDVD-163C BUSH
User questions about PDVD-163C BUSH
0 question about this device. Answer the ones you know or ask your own.
Ask a new question about this device
Download the instructions for your DVD player in PDF format for free! Find your manual PDVD-163C - BUSH and take your electronic device back in hand. On this page are published all the documents necessary for the use of your device. PDVD-163C by BUSH.
USER MANUAL PDVD-163C BUSH
natural_image
Two black rectangular electronic devices with a 'BUSH' logo on the front panel, displayed against an orange geometric background (no text or symbols on the devices themselves).You'll soon be enjoying your new Bush In-Car DVD player.
It all begins here, with your instructions. Don't worry, there's nothing too technical coming up. Just simple, step-by-step guidance to get you up and running quickly. Sound good? Then let's get started.
Help and Guidance
We're here to help you get the most from your Bush In-Car DVD player. Should you require any guidance, a simple solution can often be found online at:
www.argos-support.co.uk
If you still require further assistance, call one of our experts on 0345 604 0105.
Contents
1 Safety information
Safety information 6
2 Getting to know your In-Car DVD player
Ready? Let's begin 12
Accessories 12
Main Unit 13
3 Using your In-Car DVD player
Remote control unit 16
SETUP Menu Setting 19
4 Connections
Using the car power adapter (in-car use) 26
Mounting the DVD in a Car. 27
Installation Guide 28
Using the Mains Adapter (for indoor use). 29
Using Earphones 30
Charging the battery 30
Watching a DVD on DVD Player A and B 31
Connecting to a TV. 31
Connecting to a Stereo Receiver or Amplifier 32
5 Other information
Technical specification 36
6 Product support
Troubleshooting 39
Help and assistance 40
1 Safe

natural_image
Abstract geometric pattern with orange triangles and white gaps on a white background (no text or symbols)
Safety information
Important - Please read these instructions fully before installing or operating
Warning: To reduce the risk of electric shock, do not remove the cover or back. There are no user-serviceable parts inside. Refer servicing to qualified personnel.
Warning: To prevent fire or electric shock hazard, do not expose the unit to rain or moisture.
Do not expose the Adaptor and portable DVD to water (dripping or splashing) and no objects filled with liquids, such as vases, should be placed on the unit.
Keep the portable DVD away from direct sunlight and heat source such as radiators or stoves.
Do not block the ventilation openings. Slots and openings on the unit are provided for ventilation. The openings should never be blocked by placing your portable DVD on a cushion, sofa or other similar surface.
Do not place the portable DVD on unstable cart, stand, tripod, bracket or table. The unit may fall, resulting in possible damage or injury.
Never place heavy or sharp objects on the LCD panel or frame.
Only use the AC adapter included with portable DVD. Using any other adapter will void your warranty.
The plug of AC adaptor is used as the disconnect device, the disconnect device shall remain readily operable.
Unplug the power from the outlet when the unit is not in use.
Attention should be drawn to the environmental aspects of battery disposal.
CAUTION: Danger of explosion if battery is incorrectly replaced. Replace only with the same or equivalent type.
WARNING: The battery (battery or batteries or battery pack) shall not be exposed to excessive heat such as sunshine, fire or the like.
WARNING: Excessive sound pressure from earphones or headphones can cause hearing loss.

Safety information
Important - Please read these instructions fully before installing or operating
WARNING: Only use attachments/accessories specified provided by the manufacturer, the portable DVD is supplied by AC adapter, the AC adapter is used as disconnect device, the disconnect device shall remain readily operable.
Caution: Danger of explosion if battery is incorrectly replaced, replaced only with the same or equivalent type (Lithium battery)


Use only power supplies listed in the user instructions.
Adapter model: SEF0900100G1BA
Made By: Shenzhen Mass Power Electronics Limited

This equipment is a Class II or double insulated electrical appliance. It has been designed in such a way that it does not require a safety connection to electrical earth.

To prevent possible hearing damage. do not listen at high volume levels for long periods.
Fully understand user manual before use.
Ensure your player at low volume levels or power off before you leaving.


Manufactured under license from Dolby Laboratories Dolby and the double-D symbol are trademarks of Dolby Laboratories

- Audio and Video
Disc size 12cm Single side, single layer / single side, double layer PAL and NTSC DVD disc Playback time 135min / 240min max
This DVD Player is designed and manufactured to respond to the Region Management Information that is recorded on a DVD disc. If the Region number described on the DVD disc does not correspond to the Region number of this DVD Player, this DVD player can-not play that disc
The Region number of this DVD player is


Safety information
Important - Please read these instructions fully before installing or operating
Safety Precautions
WARNING
RISK OF ELECTRIC SHOCK DO NOT OPEN
Warning: This digital video disc player employs a laser system.
Use of controls, adjustments, or the performance of procedures other than those specified herein may result in hazardous radiation Exposure.
Warning: To prevent direct exposure to laser beam, do not open the enclosure. Visible laser radiation when open.
Warning: Never stare directly into the laser beam.
Caution: Do not install this product in a confined space such as a book case or similar unit.
Warning: when the unit using by child, parents must make sure to let the child understand all contents in Instruction book how battery using to guarantee using battery correctly all the time.
Warning: when find battery overheat, swell or dour, please stop using battery and contact service centre for getting replacement.
Warning: do not charging battery on the place of insufficient ventilation such as: mattress, sofa, cushion, soft mat.....
Warning: we will not take any responsibility if user incorrectly use battery, not following our warning instruction label on the battery case.
Warning: more than 250mm USB extension cord is prohibited to use for USB port
WARNING:
Do not ingest the battery, Chemical Burn Hazard (The remote control supplied with) This product contains a coin/button cell battery.
If the coin/button cell battery is swallowed, it can cause severe internal burns in just 2 hours and can lead to death.
Keep new and used batteries away from children.
If the battery compartment does not close securely, stop using the product and keep it away from children.
If you think batteries might have been swallowed or placed inside any part of the body, seek immediate medical attention.
If you require any technical guidance or find that your product is not operating as intended, a simple solution can often be found in the Troubleshooting

Safety information
Important - Please read these instructions fully before installing or operating
Notes on Copyrights:
It is forbidden by law to copy, broadcast, show,broadcast via cable, play in public, or rent copyrighted material without permission.
This product features the copy protection function developed by Macrovision.Copy protection signals are recorded on some discs. When recording and playing the pictures of these discs picture noise will appear. This product incorporates copyright protection technology that is protected by method claims of certain U.S. Patents and other intellectual property rights owned by Macrovision Corporation and other rights owners. Use of this copyright protection technology must be authorized by Macrovision Corporation, and is intended for home and other limited viewing uses only unless otherwise authorized by macrovision Corporation. Reverse engineering or disassembly is prohibited.

Getting to know your In-Car DVD player
2

natural_image
Abstract geometric pattern with orange triangles and white gaps on a white background (no text or symbols)Getting to know your In-Car DVD player
You'll be up and running in no time
Ready? Let's begin...
Please read these instructions carefully. They contain important information which will help you get the best from your product and ensure safe and correct installation and operation.
If you require any further assistance, our technical experts are happy to help. For full details, refer to the product support section at the end of these instructions.
Accessories
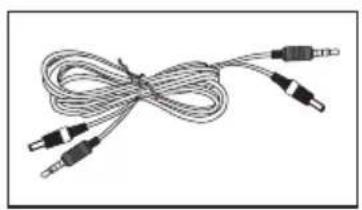
- Remote control* 2
- Power adapter* 2
- Car charger
- User manual
-
DC+AV connecting cable
-
AV cable* 2
- Car Bracket * 2
- Earphone*2
- Straps*2
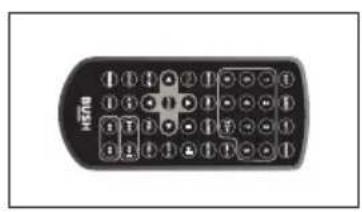
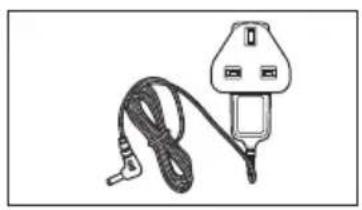
natural_image
Line drawing of a plug with a cord and plug, no text or symbols present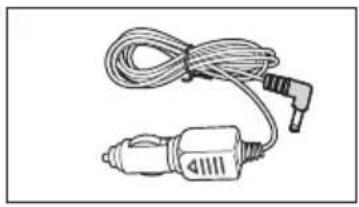
natural_image
Illustration of a handheld electrical plug with coiled cable and terminal connector (no text or symbols)
natural_image
Coiled cable with two connectors and a terminal connector (no text or symbols visible)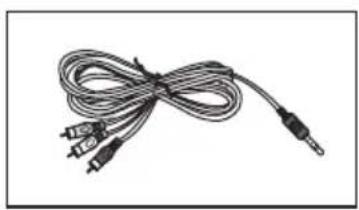
natural_image
Coiled cable with three connectors and a separate terminal connector (no text or symbols visible)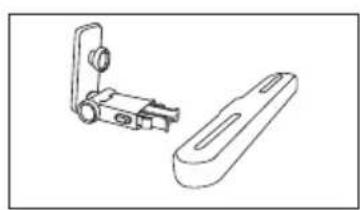
natural_image
Technical line drawing of a mechanical device with a bracket and a rectangular housing (no text or symbols)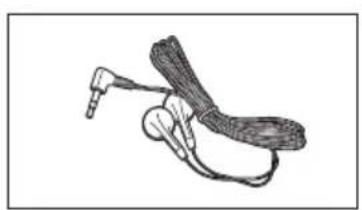
natural_image
Line drawing of a handheld electronic device with a cable and connector (no text or symbols)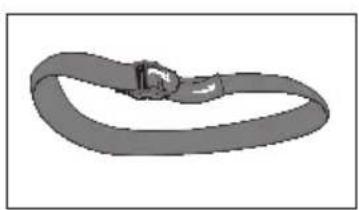
natural_image
3D rendered image of a gray ribbon or strap with a small circular detail (no text or symbols)If you require any technical guidance or find that your product is not operating as intended, a simple solution can often be found in the Troubleshooting
Getting to know your In-Car DVD player
You'll be up and running in no time
MASTER TFT SCREEN

1.CARD SLOT
2. POWER ON/OFF
3. HEADPHONE OUT JACKS
4. VIDEO/AUDIO OUT
5. AV IN
6.USB
- DC OUT
- DC IN 9-12V
- ▶II (PLAY/PAUSE)
10.UP/BACKWORDS/VOL- - DOWN/FORWARDS/VOL+
- ■ STOP

natural_image
Solid orange vertical rectangle with a diagonal edge on the left (no text or symbols)Using your In-Car DVD player
3

natural_image
Abstract geometric pattern with orange triangles and white dots on a white background (no text or symbols)Using your In-Car DVD player
Let's get started
Remote control unit

-
SOURCE DVD/USB.
-
MUTE Disable Audio output.
3.0-9 NUMBER BUTTON Selects numbered items in a menu.
4.DISPLAY To display the playtime and status information.
5.10+ BUTTON In order to select a track 10 or greater, first press 10+, For example; select track 12, first press 10+, and then press number 2 button.
-
MENU Return to DVD root menu(DVD).
-
AUDIO DVD: Press AUDIO repeatedly during playback to hear a different audio language or audio track, if available. CD: Press AUDIO repeatedly during playback to hear a different audio channel (Left, Right, Mix, Stereo).
If you require any technical guidance or find that your product is not operating as intended, a simple solution can often be found in the Troubleshooting
Using your In-Car DVD player
Let's get started
8.PLAY/PAUSE
Press PLAY/PAUSE once to pause playback, pressing PLAY/PAUSE second time will resume the playback.
9.STOP
When this button is pressed once, the unit records the stopped point, from where playback will resume if PLAY(▶) is pressed afterwards. But if STOP button is pressd again instead of PLAY(▶) button, there will be no resume function.
10.MODE
Set LCD parameter(adjust bightness, contrast, and saturation).
11.VOL+
23.VOL-
Adjust volume.
12. Forward Skip
Go to next chapter/ track.
13. Reverse Skip
Go to previous chapter/ track to the beginning.
14. ▶ BUTTON
Press ▶ BUTTON allow skipping ahead at 5-level speed(X2->X4->X8->X16->X32->PLAY), press PLAY button return to normal playback.
15. ◀️ BUTTON
Press ◀ BUTTON allow skipping back at 5-level speed(X2->X4->X8->X16->X32->PLAY), press PLAY button return to normal playback.
16.STEP
Step the motion in DVD mode.
17.SEARCH
Goto time point, title or chapter you want in DVD Mode.
18.SUBTITLE
Press SUBTITLE repeatedly during playback to hear a different subtitle languages.
19.ANGLE
DVD:Press ANGLE will change the view angle, on DVDs that support this feature.
section of these instructions, or online at www.argos-support.co.uk If you still require further assistance, call one of our experts on 0345 604 0105.
Using your In-Car DVD player
Let's get started
- TITLE
Return to DVD title menu
- ENTER
Confirms menu selection..
22.SETUP
Accesses or removes setup menu.
24.REPEAT
Press REPEAT during playback to select a desired repeat mode.
DVD: you can play select repeat chapter/title/off.
CD: you can select repeat single/all/off.
MP3: you can select repeat single/folder/off.
25.SLOW
Press Slow button repeatedly to enter slow playback, and cycle between different speeds.
The speeds are 1/2,1/4,1/8,1/16,and normal.
26.PROGRAM
DVD:The program function enables you to store your favourite tracks from the disc.
Press PROGRAM button, then PROGRAM MENU will appear on screen, now you can use the number key to direct input the titles, chapters or tracks number and select PLAY option.
TO resume normal playback, press PROGRAM and select clear program option on the program menu, press PROGRAM again to exit program menu.
27.ZOOM
DVD: Use ZOOM to enlarge or shrink the video image.
- Press ZOOM during playback or still playback to activate the Zoom function.
The square frame appears briefly in the right bottom of the picture.
- Each press of the ZOOM button changes the TV screen in the following sequence:
2 x size → 3 x size → 4 x size → 1/2 x size → 1/3 x size → 1/4 x size → normal size
JPEG: Use ZOOM to enlarge or shrink the picture.
- Press 'ZOOM'.
2,Used "▶▶" to enlarge,or "◀◀" to shorten the picture.
Use the ▲▼◀▶ button to move through the zoomed picture.
Using your In-Car DVD player
Let's get started
SETUP Menu Setting
General Setup Page
Press SETUP button to get the setup menu. Use direction button ▲▼◀▶to select the preferred item. After finishing settings, press SETUP again to normal display. The following menu items can be changed:
GENERAL: selects the GENERAL PAGE menu.
AUDIO: selects the AUDIO PAGE menu.
VIDEO: selects the VIDEO PAGE menu.
PREFERENCE : selects the PREFERENCE PAGE menu.
PASSWORD: selects the PASSWORD PAGE menu.
General Setup Page

TV DISPLAY: selects the aspect ratio of the playback picture.
4:3 PANSCAN: if you have a normal TV and want both sides of the picture to be trimmed or formatted to fit your TV screen.
4:3 LETTERBOX: if you have a normal TV. In this case, a wide picture with black bands on the upper and lower portions of the TV screen will be displayed.
16:9:wide screen display.
Wide Squeeze: Set screen mode to 4:3.
Angle Mark
Displays current angle setting information on the right hand corner of the TFT screen if available on the disc.
section of these instructions, or online at www.argos-support.co.uk If you still require further assistance, call one of our experts on 0345 604 0105.
Using your In-Car DVD player
Let's get started
OSD Language
You can select your own preferred language settings.
Closed Captions
Closed captions are data that are hidden in the video signal of some discs. Before you select this function, please ensure that the disc contains closed captions information and your TV set also has this function.
Screen Saver
This function is used to turn the screen saver On or Off
Auto Standby
This function is used to select auto standby settings after 3 or 4 hours.
3 HOURS: the unit will turn to standby mode after 3 hours if there is no interaction from user within this period of time.
4 HOURS: the unit will turn to standby mode after 4 hours if there is no interaction from user within this period of time.
OFF: the auto standby function is disabled, and unit will stay in "on" mode even if no interaction from user..
Audio Setup Page
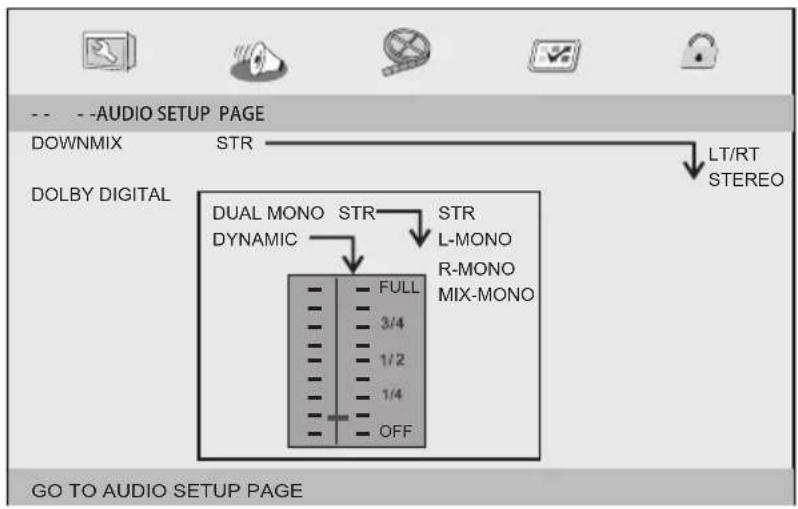
Downmix
This options allows you to set the stereo analog output of your DVD Player.
LT/RT :Select this option if your DVD Player is connected to a Dolby Pro Logic decoder.
If you require any technical guidance or find that your product is not operating as intended, a simple solution can often be found in the Troubleshooting
Using your In-Car DVD player
Let's get started
Stereo :Select this option when output delivers sound from only the two front speakers.
Dolby digital
The options included in Dolby Digital Setup are: 'Dual Mono' and 'Dynamic'.
Dual Mono
Stereo: Left mono sound will send output signals to Left speaker and Right mono sound will send output signals to Right speaker.
L-Mono: Left mono sound will send output signals to Left speaker and Right speaker.
R-Mono: Right mono sound will send output signals to Left speaker and Right speaker.
Mix-Mono: Left and Right mixed mono sound will send output signals to Left and Right speakers.
Dynamic
Dynamic range compression.
Video Setup Page

Brightness, Contrast, Hue, Saturation: setting the video quality.
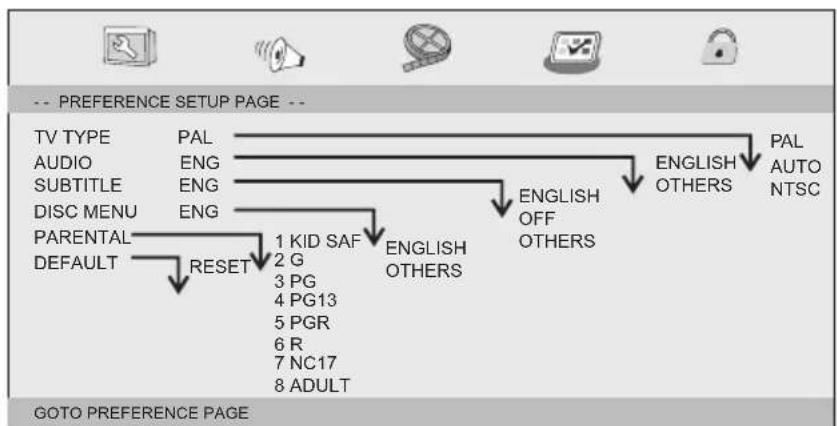
Preference Page
flowchart
graph TD
    A["TV TYPE"] --> B["PAL"]
    C["AUDIO"] --> D["ENG"]
    E["SUBTITLE"] --> F["ENG"]
    G["DISC MENU"] --> H["ENG"]
    I["PARENTAL"] --> J["1 KID SAF"]
    K["DEFAULT"] --> L["RESET"]
    M["PAL AUTO NTSC"] --> N["ENGLISH OTHERS"]
    O["ENGLISH OFF OTHERS"] --> P["ENGLISH OTHERS"]
    Q["GOTO PREFERENCE PAGE"] --> R["8 ADULT"]
    S["3 PG"] --> T["5 PGR"]
    U["4 PG13"] --> V["6 R"]
    W["7 NC17"] --> X["7 ADULT"]
section of these instructions, or online at www.argos-support.co.uk If you still require further assistance, call one of our experts on 0345 604 0105.
Using your In-Car DVD player
Let's get started
TV Type
Selecting the colour system that corresponds to your TV when AV outputs. This DVD Player is compatible with both NTSC and PAL.
PAL - Select this if the connected TV is PAL system. It will change the video signal of a NTSC disc and output in PAL format.
NTSC-Select this if the connected TV is NTSC system. It will change the video signal of a PAL disc and output in NTSC format.
Auto:Chang the video signal output automatic according to the playing disk format.
Audio: Selects a language for audio (if available).
Subtitle: Selects a language for subtitle (if available).
Disc Menu: Selects a language for disc menu (if available).
Parental
Some DVDs may have a parental level assigned to the complete disc or to certain scenes on the disc. This feature lets you set a playback limitation level. The rating levels are from 1 to 8 and are country dependent. You can prohibit the playing of certain discs that are not suitable for your children or have certain discs played with alternative scenes.
Default: Back to the factory setting.
Password Setup Page

Password mode: Set password mode on/off. If set to off, change parental level will not check password.
Password Setup Page
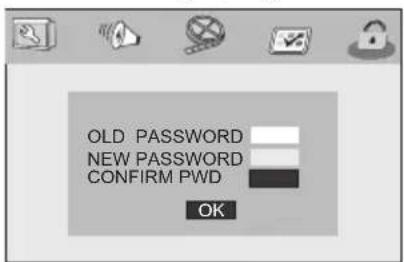
Password: select the menu password change page.
If you require any technical guidance or find that your product is not operating as intended, a simple solution can often be found in the Troubleshooting
Using your In-Car DVD player
Let's get started
OLD PASSWORD: Enter the OLD password, (Factory setting is 1369), and the cursor will jump automatically to NEW PASSWORD
NEW PASSWORD: Enter the NEW password. Enter 4 digits from the remote control unit numeric buttons, and the cursor will automatically jump to CONFIRM PASSWORD.
CONFIRM PASSWORD: Confirm the NEW password by entering it again. If the confirmation is incorrect, the cursor will stay in this column. After entering, the correct new password again, the cursor will jump automatically to OK.
OK: When cursor is on this button, press ENTER key to confirm setting.

Note: If the password has been changed, the parental and disc lock code will also be changed. The default need more space between the letters and "(1369)" should be bold always active even the password has been changed.
Connections
4

natural_image
Abstract geometric pattern with orange triangles and white gaps on a white background (no text or symbols)Using your In-Car DVD player
Let's get started
Using the DVD Players A and B Together (in-car use)
To playback on both DVD players A and B together, use the car power adapter (included) to connect both units to the car's cigarette lighter socket.

The included 12V car power adapter is designed for use with vehicles that have a 12V negative ground electrical system.
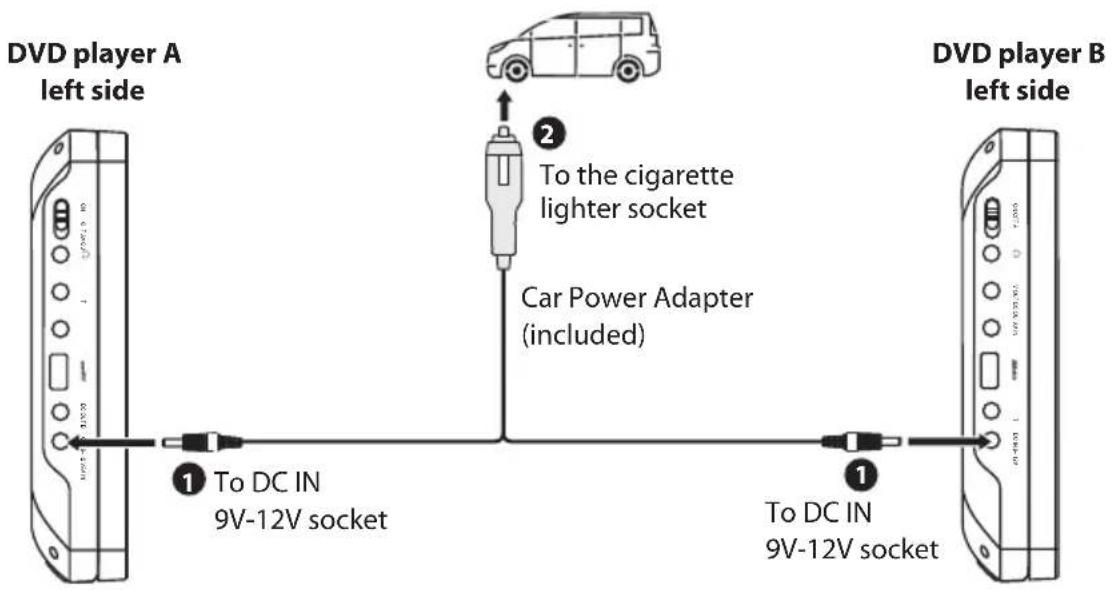
For optimum charging, switch the unit off.

- Disconnect the car power adapter when not in use. Not for use in 24V vehicles.
- Use the provided 12V car power adapter only. Using other car power adapters could damage the unit.
- In the interest of traffic safety, do not operate this unit or view videos while driving.
- Make sure the unit is securely fastened to prevent it from falling or flying through the air in the event of an accident.
- When the inside of the cigarette lighter socket is dirty with ash or dust, the plug section may become hot due to poor contact. Be sure to clean the cigarette lighter socket before use.
• After use, disconnect the 12V car power adapter from both the unit and the cigarette lighter socket.
Using your In-Car DVD player
Let's get started
Mounting the DVD in a Car
Use the supplied mounting kit to install the DVD players at the back of the vehicle's headrests.
- Align the angled support's bolt to the screw hole at the back of the DVD unit. Turn the bolt clockwise and secure the support.
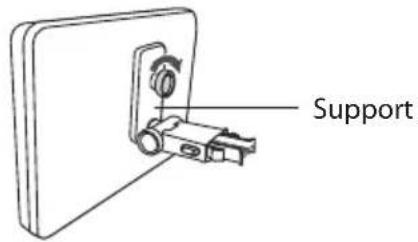
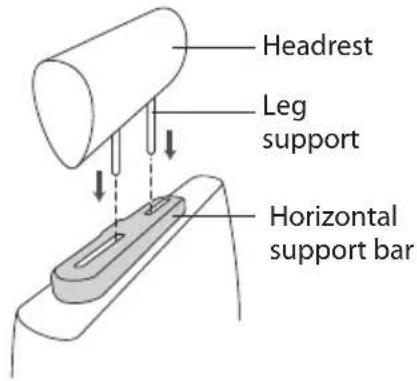
- For car headrests which can be removed, use the following method:
Lift the headrest off its leg supports. Align the horizontal support bar with the headrest leg slots and ensure the horizontal support bar rests securely on the top of the car seat. Re-attach the headrest.
- For car headrests which cannot be removed, use the following method to secure the car mount:

Unscrew the bolts holding the horizontal support bar together. Slip both halves of the support bar around the headrests' leg supports. Screw in the bolts, loosely. Ensure that the support bar is level. Tighten the bolts.

- If the set of 4 x screws (ø4 x 20mm) is not long enough to secure the horizontal support bar to the leg supports, please use the longer set of screws (ø4 x 25mm).
Using your In-Car DVD player
Let's get started
- Grip the DVD firmly with both hands and slot the angled support firmly into the support bar. It will click. Ensure the entire unit is secure.
- Adjust the angle of the DVD unit, then secure by tightening the bolt to the right.
- To remove the DVD from the horizontal support bar, support the DVD unit with one hand. Firmly squeeze and pull the release buttons on either side of the angled support with the other hand.
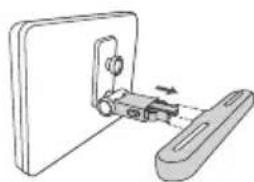
natural_image
Diagram of a mechanical clamp or bracket assembly with a handle and lever (no text or symbols)

natural_image
Simple line drawing of a wall-mounted electrical socket connected to a battery pack (no text or symbols)
- This unit should never be used by the vehicle's driver or left unsecured in the vehicle while driving.
- If this unit is being used in your vehicle, be sure that it is securely fixed to the headrests' leg supports or held safely, and does not obstruct any safety device, including air bags or seat belts, or it may cause injury in case of accidents. Ensure all rear passengers are correctly restrained when this product is in use in the car.
- All passengers should always wear seat belts when using this unit in a moving vehicle.
- If in doubt, please contact your vehicle manufacturer for further advice.
Installation Guide
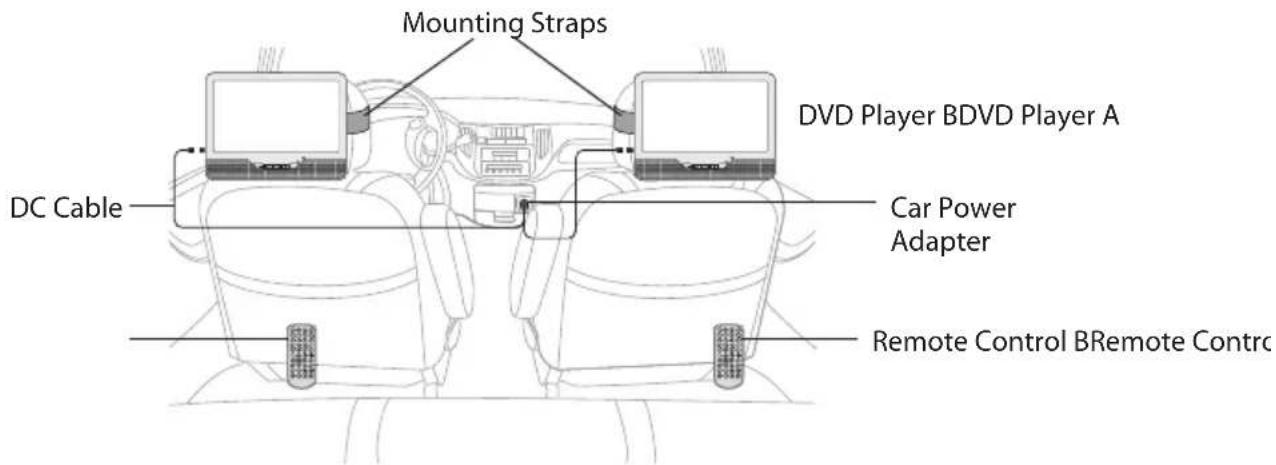
If you require any technical guidance or find that your product is not operating as intended, a simple solution can often be found in the Troubleshooting
Using your In-Car DVD player
Let's get started
Using the Mains Adapter (for indoor use)
The mains adapter (DC9V, 2.0A output) supplied is for using the DVD player A and B. For using the DVD Player A and B separately, one more adapter is needed and is sold separately.
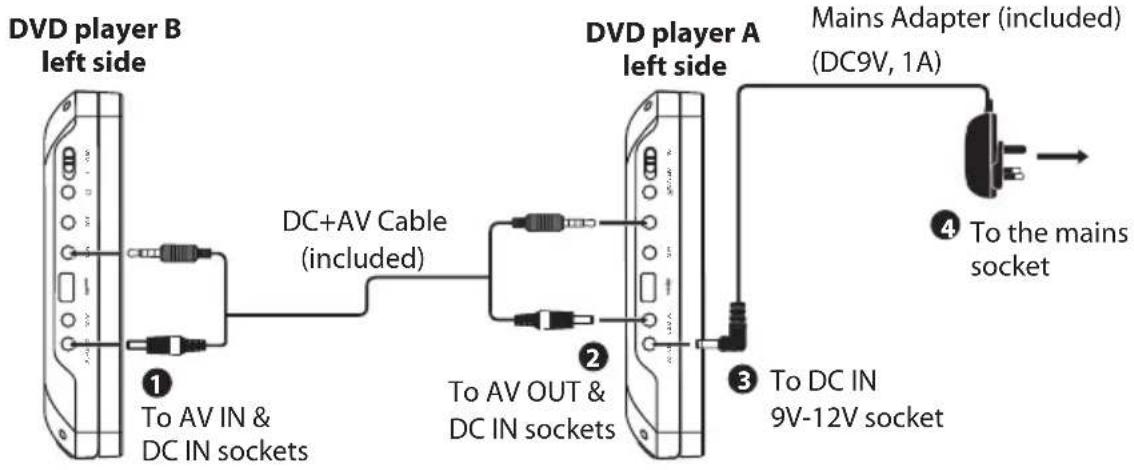
flowchart
graph LR
    A["DVD player B left side"] -->|1 To AV IN & DC IN sockets| B["DC+AV Cable (included)"]
    B -->|2 To AV OUT & DC IN sockets| C["To AV OUT & DC IN sockets"]
    C -->|3 To DC IN 9V-12V socket| D["Mains Adapter (included) (DC9V, 1A)"]
    D -->|4 To the mains socket| E["Output"]
Using the DVD Player A and B with Separate Mains Adapter
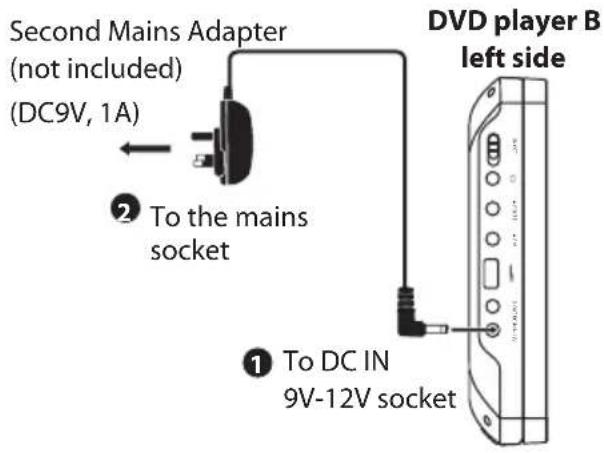
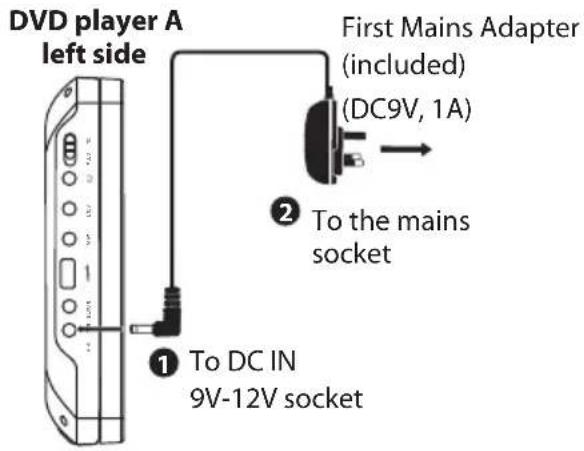
Using your In-Car DVD player
Let's get started
Using Earphones
Turn down the volume before connecting the headphones/earphones. Slowly raise the volume with the headphones/earphones on until you reach your desired volume. When headphones/ earphones are connected, the speaker is automatically disabled.
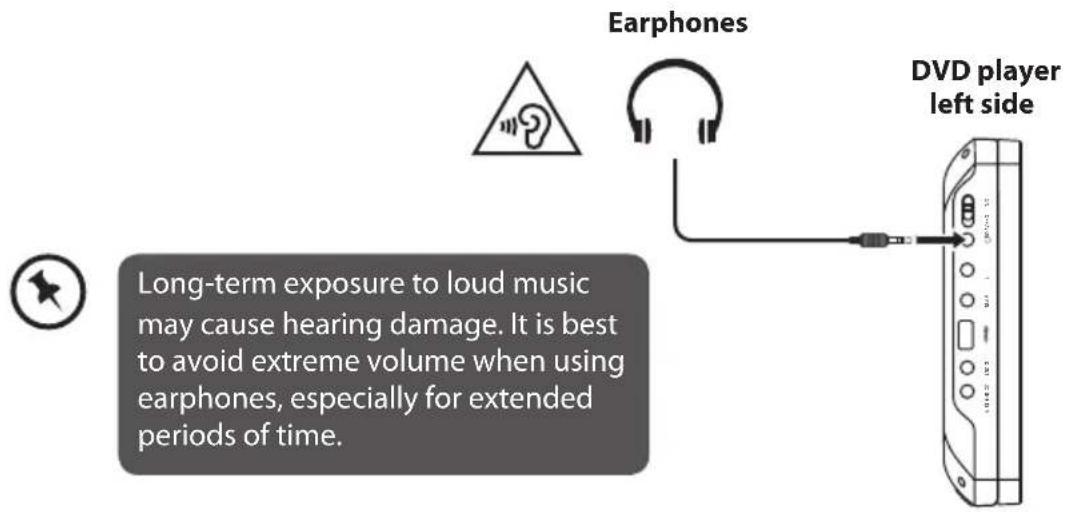
Charging the battery
- Connect with mains adapter or car power adapter.
- The charging indicator lights up red indicating that the battery is in charging mode. When the battery is charged to full capacity, the LED indicator goes green.
- Remove the adapter. The battery is now fully charged and the unit is ready to use.
* Battery Operation time from fully charged battery = Approx. 2.5 hours

- The battery is partially charged at shipment. We suggest that for first time use fully charge the battery. It may take up to 4 hours to fully charge the battery.
- Every time you see the low battery indication on the screen and when the LED indicator flashes in green and red alternatively, you must connect your mains adapter to the unit and the mains socket. The battery will now start to recharge.
- The battery will charge slower when the DVD player is in use.
- It is recommended to turn off the power while the battery is charging.
Using your In-Car DVD player
Let's get started
Watching a DVD on DVD Player A and B
You can watch the same DVD on DVD player A and B at the same time.

- Connect DVD player A and B by using the included DC+AV Cable. Plug the AV Cable into AV OUT socket on the DVD player in which the DVD is inserted; plug the other end of the AV Cable into AV IN socket of the other DVD player.
- Turn on DVD player A and B.
- Operate the controls of the DVD player in which the DVD is inserted.
Connecting to a TV
If your TV has Audio/Video inputs, you can connect the DVD player to your TV using a standard AV cable (included).
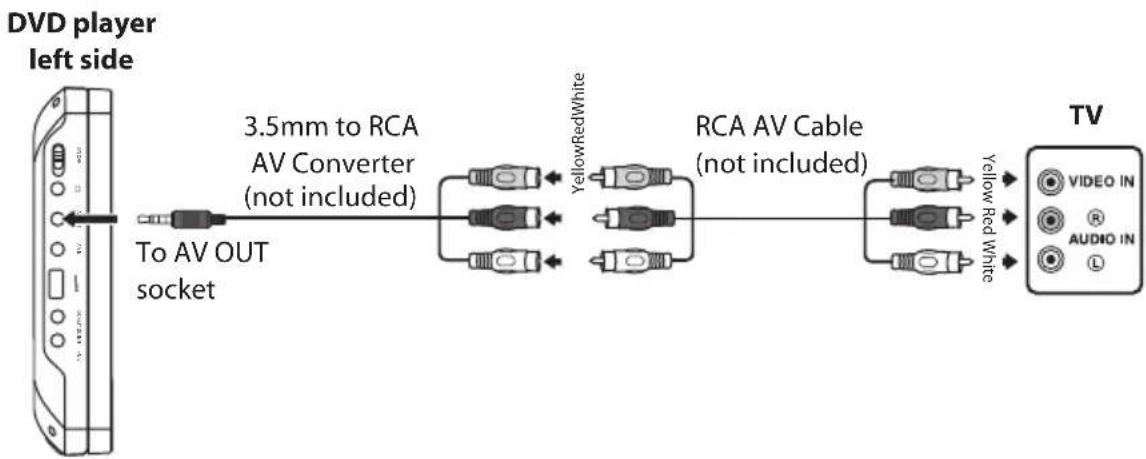
flowchart
graph LR
    A["To AV OUT socket"] --> B["3.5mm to RCA AV Converter (not included)"]
    B --> C["RCA AV Cable (not included)"]
    C --> D["TV"]
    style A fill:#f9f,stroke:#333
    style D fill:#ccf,stroke:#333
Using your In-Car DVD player
Let's get started
Watching a DVD on your TV
- Connect your TV to the DVD player by using a 3.5mm to RCA AV Converter and a standard AV Cable (not included).
- Turn on the DVD player.
- Turn on the TV and follow the instructions included with it to play the DVD.

- Make sure the correct Audio/Video cable is used. Connecting the plugs incorrectly may cause a weak signal.
- If your TV does not have Audio/Video inputs, you will need to purchase an RF modulator (sold separately) and follow the instructions included with it to connect the unit to your TV.
Connecting to a Stereo Receiver or Amplifier
The DVD player can play two channels Dolby Digital.

flowchart
graph LR
    A["To AV OUT socket"] -->|3.5mm to RCA AV Converter (not included)| B["DO NOT CONNECT"]
    A --> C["RedWhite"]
    A --> D["Red White"]
    B --> E["RCA stereo audio Cable (not included)"]
    D --> E
    E --> F["Stereo Receiver / Amplifier"]
    style A fill:#f9f,stroke:#333
    style F fill:#ccf,stroke:#333
Listening on an External Audio Device
-
Connect the DVD player to the left/right Audio IN sockets on the audio device by using a 3.5mm to RCA AV Converter and a standard RCA Stereo Audio Cable (not included).
-
Turn on your audio device and follow the instructions provided with it to select the AUDIO IN function.

- Make sure the correct Audio cable is used. Connecting the plugs incorrectly may cause a weak signal.
- If you have a stereo VCR, make sure you set it to stereo mode.
- Due to copyright protection, DVD movies cannot be copied. If you copy a DVD movie onto a videotape, the resulting copy will be unclear, with poor sound quality. This is NOT caused by a defective DVD system.
Using your In-Car DVD player
Let's get started
Using The Stand For Indoor Use
You can stand the DVD player on a desk or table using the stand.
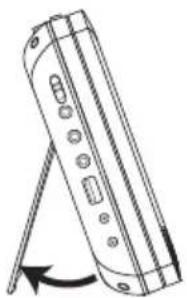
natural_image
Diagram of a handheld device with a curved arrow indicating rotation or change (no text or symbols present)DVD player left side
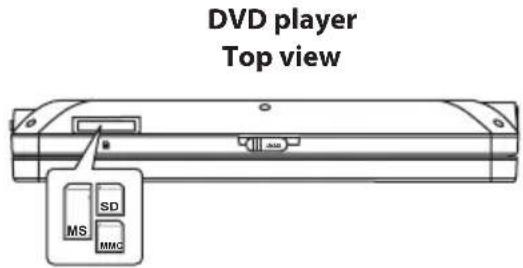
Using a USB Device or/and SD/MS/MMC Card
You can play or view picture files (JPEG) or music files (MP3) from a USB device or SD/MS/MMC card.
- Connect the USB device or SD/MS/MMC card directly to the USB slot or SD/MS/MMC slot on the DVD player.
- Press the SOURCE button to access the data in the drive.
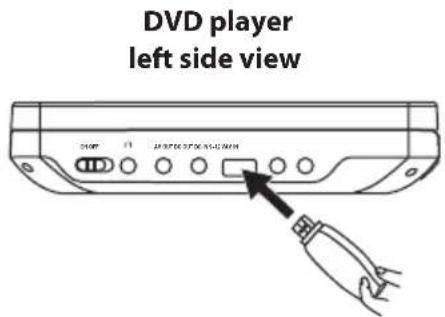
- Use the buttons to select "Media".
- Press the ▶ button on the remote control, and then press the ▲ buttons to highlight "USB", "SD", "MS" or "MMC" depending on the type of device you have connected and then press the ENTER button on the remote control to start playback.
- To remove the USB device or SD/MS/MMC card, press the ■ button to stop playback and then press the SOURCE button followed by the ENTER button on the remote control to exit the USB, SD/MS/MMC card menu. The DVD player will return to disc mode.
Other information
5

natural_image
Abstract geometric pattern with orange triangles and white gaps on a white background (no text or symbols)Other information
Helpful technical information
Parameters and specifications
Electronical parameters
| Item | Standard requirement | |
| Power requirements | : AC 100-240 V, 50/60 Hz | |
| Power consumption | :<10W | |
| Operating humidity | : 5 % to 90 % | |
| Output | VIDEO OUT | :1 Vp-p (75Ω) |
| AUDIO OUT | :1.2 Vrms (1 KHz, 0 dB) | |
System
| Laser | :Semiconductor laser, wavelength 650 nm |
| Signal system | : NTSC / PAL |
| Frequency response | : 20Hz to 20 kHz(1dB) |
| Signal-to-noise ratio | :More than 80 dB (ANALOG OUT connectors only) |
| Dynamic range | :More than 85 dB (DVD/CD) |
Note: Design and specifications are subject to change prior notice.
Battery Parameters
Battery Specifications:
Output: 7.4V
Charge / Discharge Time:
Standard charge time: 3h \~ 4h
Storage and work circumstances:
- Storage circumstances Temperature Humidity
6 months -20°C \~ +45°C 65±20%
1 week -20°C \~ +65°C 65±20%
- Work circumstances Temperature Humidity
Standard charge 0°C \~ +45°C 65±20%
Standard discharge -20°C \~ +65°C 65±20%
Product support
6

natural_image
Abstract geometric pattern with orange triangles and white gaps on a white background (no text or symbols)Product support
Help is always at hand
Troubleshooting
| Question | Answer |
| The DVD does not switch on. | Make sure the DVD player is charged or plugged in.Ensure the ON / OFF switch on the DVD player is in the ON position. |
| The DVD player switches off spontaneously. | The DVD player will switch off automatically without any user intervention if auto standby is witched on. Press the any button on the remote control or DVD player to turn the DVD player back on.The DVD player is unable to read the disc.Ensure the DVD has been inserted with the label side facing upwards.Check the DVD is suitable for playing on the DVD player.Check that the DVD's regional code matches the regional code of the DVD player, region 2.The disc maybe dirty, clean the disc following the information |
| There is no sound or the sound is of poor quality. | Make sure the sound is turned up.Make sure the MUTE function is not on.Ensure the headphones are fully inserted in the socket on the DVD player. |
| The remote control does not work or only works intermittently. | Check the batteries are correctly inserted or change them for new ones.Check that nothing is blocking the signal from the remote control and the remote sensor on the DVD player.Check you are using the correct remote control for the DVD player. |
| The subtitles do not appear. | Check that the DVD provides subtitles. |
| The disc menu language is not correct. | The DVD does not support the language you have selected. |
section of these instructions, or online at www.argos-support.co.uk If you still require further assistance, call one of our experts on 0345 604 0105.
Product support
Help is always at hand
Help and assistance
If you require any technical guidance or find that your Bush In-Car DVD player is not operating as intended, a simple solution can often be found in the Troubleshooting section of these instructions or online at www.argos-support.co.uk
If you still require further assistance, call one of our experts on 0345 604 0105. To help give us give you a fast and efficient service please have the following information ready:
Model Ref.
Serial number
You can find these on the rating plate - a small information panel (usually a sticker or metal plate) on the rear of your product.
Date of purchase
This will be shown on your receipt
Local call rates applies*
Lines open 8am-7pm Monday to Saturday and 10am-4pm Sunday.
*Calls to Argos enquiry lines may attract a charge and set up fee from residential lines depending on your call plan/tariff. Mobile and other providers costs may vary, see www.bt.com/pricing for details.
For security and training purposes, telephone calls to and from customer service centres may be recorded and monitored. Calls from Republic of Ireland will attract international call charges.
If you require any technical guidance or find that your product is not operating as intended, a simple solution can often be found in the Troubleshooting
Product support
Help is always at hand
Disposal

This marking indicates that this product should not be disposed with other household wastes throughout the EU. To prevent possible harm to the environment or human health from uncontrolled waste disposal, recycle it responsibly to promote the sustainable reuse of material resources. To return your used device, please use the return and collection systems or contact the retailer where the product was purchased. They can take this product for environmental safe recycling.
CE
This appliance complies with the following EC directives: 2014/30/EU Low voltage directive 2014/35/EU EMC directive
BUSH
Contact:
www.argos-support.co.uk
Helpline: 0345 604 0105



- Help and Guidance
- Contents
- Safety information
- Getting to know your In-Car DVD player
- Using your In-Car DVD player
- Connections
- Other information
- Product support
- Safe
- Safety information
- Important - Please read these instructions fully before installing or operating
- Safety Precautions
- WARNING
- WARNING:
- Notes on Copyrights:
- Getting to know your In-Car DVD player
- 2
- Ready? Let's begin...
- Accessories
- Using your In-Car DVD player
- 3
- Remote control unit
- 8.PLAY/PAUSE
- 9.STOP
- 10.MODE
- 11.VOL+
- 23.VOL-
- Forward Skip
- Reverse Skip
- ▶ BUTTON
- ◀️ BUTTON
- 16.STEP
- 17.SEARCH
- 18.SUBTITLE
- 19.ANGLE
- SETUP Menu Setting
- General Setup Page
- Video Setup Page
- Preference Page
- TV Type
- Parental
- Password Setup Page
- Connections
- 4
- Using the DVD Players A and B Together (in-car use)
- Mounting the DVD in a Car
- Installation Guide
- Using the Mains Adapter (for indoor use)
- Using the DVD Player A and B with Separate Mains Adapter
- Using Earphones
- Charging the battery
- Watching a DVD on DVD Player A and B
- Connecting to a TV
- Watching a DVD on your TV
- Connecting to a Stereo Receiver or Amplifier
- Listening on an External Audio Device
- Other information
- 5
- Parameters and specifications
- Battery Parameters
- Product support
- 6
- Help and assistance
- Disposal
- BUSH
Brand : BUSH
Model : PDVD-163C
Category : DVD player