
MAD35PS1QGR - Dehumidifier MIDEA - Free user manual and instructions
Find the device manual for free MAD35PS1QGR MIDEA in PDF.


| Product Type | Dehumidifier |
| Model | MAD35PS1QGR |
| Brand | Midea |
| Capacity (Pints per Day) | 35 pints (at 80°F, 60% RH) |
| Coverage Area | Up to 1,500 sq ft |
| Dimensions (W x D x H) | 14.5 x 11.5 x 20.5 inches |
| Weight | 36.5 lbs |
| Power Supply | 115 V / 60 Hz |
| Power Consumption | 550 Watts |
| Water Tank Capacity | 1.8 gallons |
| Auto Shut-Off | Yes, when tank is full |
| Continuous Drain Option | Yes, via included hose |
| Humidistat (Built-in) | Adjustable humidity control |
| Air Filter | Washable mesh filter |
| Defrost Function | Automatic defrost at low temperatures |
| Compressor Type | Rotary compressor |
| Refrigerant | R-410A |
| Operating Temperature Range | 41°F to 90°F |
| Noise Level | 50 dB |
| Energy Star Rated | Yes |
| Warranty | 1 year limited |
| Maintenance | Clean filter every 2 weeks |
| Safety Features | Overheat protection, frost sensor |
| Repairability / Spare Parts | Filters available; authorized service centers |
Frequently Asked Questions - MAD35PS1QGR MIDEA
User questions about MAD35PS1QGR MIDEA
0 question about this device. Answer the ones you know or ask your own.
Ask a new question about this device
Download the instructions for your Dehumidifier in PDF format for free! Find your manual MAD35PS1QGR - MIDEA and take your electronic device back in hand. On this page are published all the documents necessary for the use of your device. MAD35PS1QGR by MIDEA.
USER MANUAL MAD35PS1QGR MIDEA
Rated voltage: 115V Frequency: 60Hz
Warning notices: Before using this product, please read this manual carefully and keep it for future reference.
The design and specifications are subject to change without prior notice for product improvement.
version C - 11 - 2021
en
USER MANUAL
natural_image
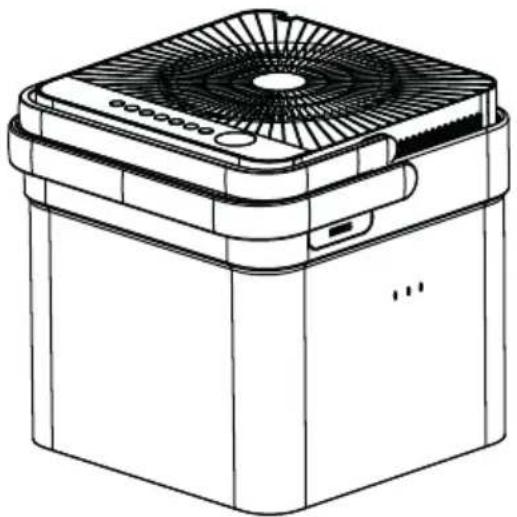
Line drawing of a square electronic device with a fan and ventilation grille (no text or symbols)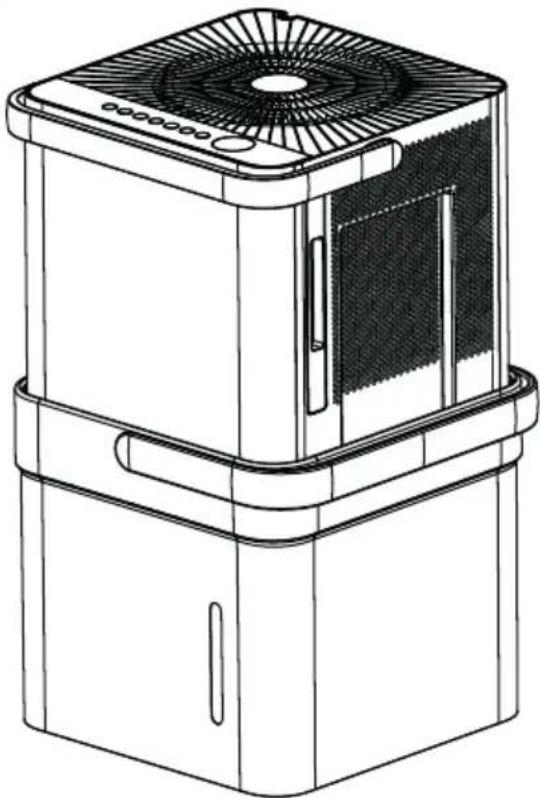
natural_image
Line drawing of a portable air purifier with fan and vent slots (no text or symbols)MAD20S1QWT MAD35S1QWT MAD35PS1QGR MAD50S1QWT MAD50PS1QWT MAD50PS1QGR
www.midea.com
Owner's Manual
Safety Precautions 3
Unit Specifications and Features 6
Set Up Instructions 7
Installation Instructions 8
Operating Instructions .... 10
Care and Cleaning 16
Nesting and Storing Instructions 17
Troubleshooting Tips 18
App Instructions 19
Read This Manual
Inside you will find many helpful hints on how to use and maintain your Dehumidifier properly. A little preventive care on your part can save you a great deal of time and money over the life of your Dehumidifier. You'll find many answers to common problems in the troubleshooting tips - you should be able to fix most of them quickly before calling service. These instructions may not cover every possible condition of use, so common sense and care for safety is required when installing, operating and maintaining this product.

CAUTION
- For support, please call the Service Center at 1-866-646-4332.
- This appliance is not intended for use by people (including children) with reduced physical, sensory, or mental capabilities or lack of experience and knowledge, unless they have been given supervision or instruction concerning use of the appliance by a person responsible for their safety.
• Children should be supervised to ensure that they do not play with the appliance. - The appliance shall be installed in accordance with National wiring regulations and local electrical codes.
NOTICE
All the pictures in this manual are for illustrative purposes only. The actual shape of the dehumidifier you purchased may be slightly different, but its operations and functions are similar.
SAFETY PRECAUTIONS
To prevent injury to the user or personal and property damage, these instructions must be followed. Incorrect operation due to ignoring of instructions may cause harm or damage. The level of risk is shown by the following indications.
WARNING
This symbol indicates a hazardous situation which, if not avoided, could result in death or serious injury.
CAUTION
This symbol indicates a hazardous situation, which, if not avoided, could result in minor or moderate injury.
NOTICE
This symbol addresses practices not related to physical injury.
WARNING
- Do not modify power cord length or share the outlet with other appliances. It may cause electric shock or fire due to overheating.
- Do not operate or stop the unit by inserting or pulling out the power plug. It may cause electric shock.
- Do not allow water to enter into electric parts. It may cause failure or electric shock.
- Do not use the power outlet if it is loose or damaged. It may cause fire and electric shock.
- Do not use or keep the power cord close to heating appliances or heat sources such as fireplaces. It may cause fire and electric shock.
- Do not disassemble or modify unit. It may cause failure and electric shock.
- Do not damage or use an unspecified power cord. It may cause fire and electric shock.
- Do not use the unit near flammable gas or combustibles, such as gasoline, benzene, thinner, etc. It may cause fire.
- Do not operate with wet hands. It may cause electric shock.
- Do not open the unit during operation. It may cause electric shock.
- Do not drink the water from the bucket.
- Do not use the unit in small spaces or place in a sink or shower. Lack of ventilation can cause overheating and fire.
- Do not attempt to repair the unit yourself.

WARNING
- Avoid fire hazard or electric shock.
Do not use an extension cord or an adaptor plug. Do not remove any prongs from the power cord. - Plug in power plug properly.
Otherwise, it may cause electric shock or fire due to excess heat generation.
• Always ensure effective grounding.
Incorrect grounding may cause electric shock. - Unplug the unit if strange sounds, smells, or smoke come from it.
A damaged product may cause fire and electric shock. - Ventilate room before operating the unit if there is a gas leak from other appliances.
- If the power cord is damaged, it must be replaced by the manufacturer or an authorized service center in order to avoid electrical risk.
- Before cleaning, turn off the power and unplug the unit.
- Be sure the dehumidifier has been securely and correctly installed according to the installation instructions in this manual. Save this manual for possible future use in removing or installing this unit.
- Be sure the dehumidifier is properly grounded. To minimize shock and fire hazards, proper grounding is important.
The power cord is equipped with a three-prong grounding plug for protection against shock hazards. - Your dehumidifier must be used in a properly grounded wall receptacle. If the wall receptacle you intend to use is not adequately grounded or protected by a time delay fuse or circuit breaker, have a qualified electrician install the proper receptacle. Ensure the receptacle is accessible after the unit installation.
- Be sure the electrical service is adequate for the model you have chosen. This information can be found on the serial plate, which is located on the side of the cabinet and behind the grille.
- Make sure the bucket is empty of water before nesting unit. It could cause electric shock and/or damage the unit.
- Unplug the unit before nesting it in the bucket. It could cause electric shock and/or damage the unit.
- When unplugging the unit, be sure to grab the plug, not the cord.

CAUTION
- Do not use in places where water may splash onto the unit.
Water may enter the unit and degrade the insulation. It may cause an electric shock or fire. - Place the unit on a level, sturdy section of the floor.
If the unit falls over, it may cause water to spill and damage belongings, or cause electrical shock or fire. - Never insert your finger or other foreign objects into grills or openings. Take special care to warn children of these dangers.
It may cause failure or electric shock. - Do not climb up on or sit on the unit.
You may be injured if you fall or if the unit falls over. - Always insert the filters securely, and take caution to avoid injuries to hand and fingers. Clean filter once every two weeks.
- If water enters the unit, turn the unit off and disconnect the power, contact the Service Center at 1-866-646-4332.
- If the unit is knocked over during use, turn off the unit and unplug it from the main power supply immediately. Visually inspect the unit to ensure there is no damage. If you suspect the unit has been damaged, contact customer service.
- In a thunderstorm, the power should be disconnected to the unit due to lightning.
- Do not run power cord under carpeting. Do not cover cord with throw rugs, runners, or similar coverings. Do not route cord under furniture or appliances. Arrange cord away from traffic area and where it will not be tripped over.
- Do not place anything on top of the unit.
This would restrict airflow, possibly damage the unit and decrease performance.
• Always lift unit with 2 hands using proper lifting technique. - Before turning the unit on, make sure it is seated correctly on the bucket.
- Before lifting ensure the handle is properly attached.
- Only use the bucket that came with the unit. Do not use any other bucket.
- Clean the bucket regularly.
UNIT SPECIFICATIONS AND FEATURES
Product overview
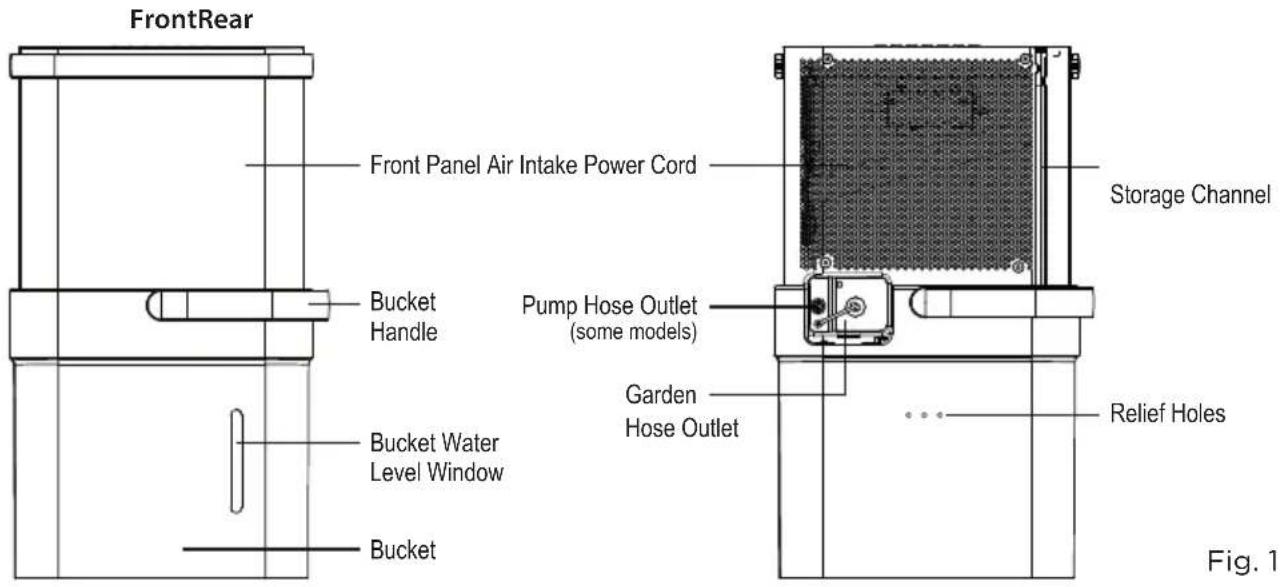
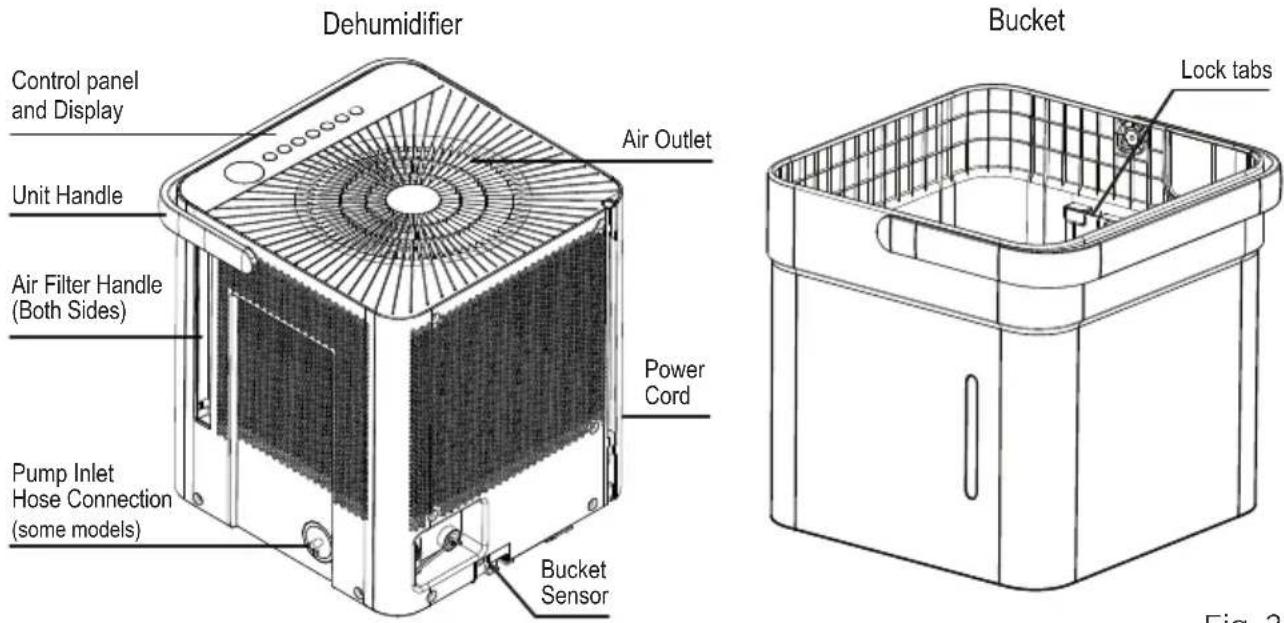
Fig. 2
Accessories
| Pump drain hose (only for units with the drain pump feature) |  |
| Pump inlet hose (only for units with the drain pump feature) |  |
| Normal drain hose | |
| Casters | ^[1704] × 4 |
SET UP INSTRUCTIONS
Step 1:
Separate dehumidifier & bucket from the nested shipping/storage position. Remove all packaging materials from the unit.
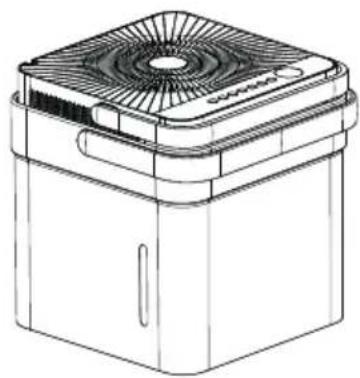
natural_image
Line drawing of a square electronic device with a top panel and ventilation grille (no text or symbols)Nested Shipping & Storage Position
Fig. 3a
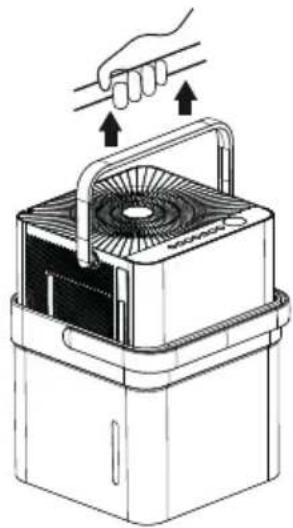
natural_image
Illustration of a hand pressing down on a small appliance with a handle and fan (no text or symbols)Fig. 3b
Step 2:
Rotate dehumidifier 90° and align the arrows on the two labels (one on the bucket and one on the dehumidifier) and carefully sit the dehumidifier down onto the bucket. The water level window in the bucket and the user interface buttons on the dehumidifier should be on the same side when properly stacked. Check to ensure the arrows on the unit and bucket are aligned as in Fig. 4c for proper operation.
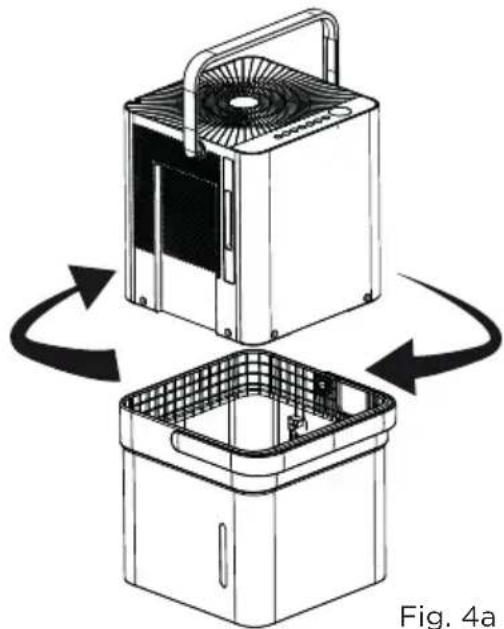
natural_image
Diagram of a device with internal components and airflow arrows, labeled Fig. 4a (no text or symbols on the diagram itself)Rotate dehumidifi er 90°
User Interface Buttons and Water Level Window Aligned on the Same Side
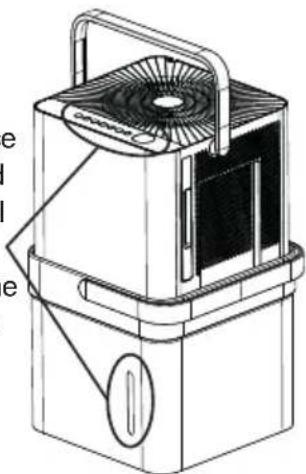
natural_image
Technical line drawing of a portable air purifier with fan and vent (no text or symbols)Fig. 4b
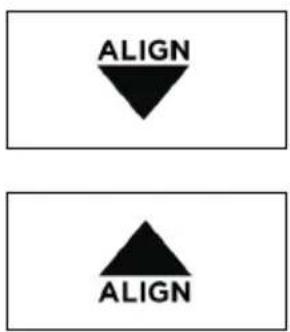
Fig. 4c
Step 3:
Plug the unit in and press the power button and the unit is ready to run in normal (bucket) mode.
INSTALLATION INSTRUCTIONS
Positioning the Unit
The dehumidifier should be placed in the area where dehumidification is desired most. Adjacent rooms in which dehumidification is also desired should allow adequate airflow in and out of the space containing the dehumidifier.
- Do not use outdoors.
- This dehumidifer is intended for indoor residential applications only. This dehumidifier should not be used for commercial or industrial applications.
- Place the dehumidifier on a smooth, level floor strong enough to support the unit with a full bucket of water.
- Allow at least 8" of air space on all sides of the unit for air circulation (at least 16" for air outlet).
- Place the unit in an area where the temperature will not fall below 41°F (5°C). The coils can become covered with frost at at lower temperatures, which may reduce performance.
- Place the unit away from any clothes dryer, heater or radiator.
- Close all doors, windows, and other openings to the outdoors in the room.
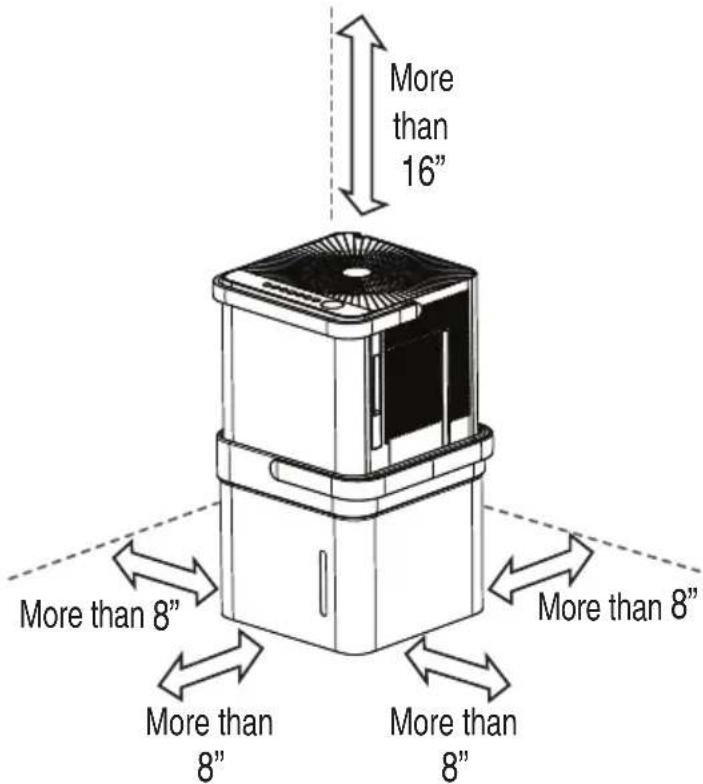
Fig. 5
Optional Caster Installation
To install the casters:
- Remove the Dehumidifier from the bucket.
- Slide each caster into the slot on the bucket's bottom corner as shown below.
- Place the retaining block into the slot to hold the caster in place.
- Repeat this for each corner of the bucket until all 4 casters are installed.

Fig. 6
To remove the casters:
- Use a flathead screwdriver to actuate the tab on the retaining block.
- Remove the retaining block and slide the casters out of the slot on the bucket.

flowchart
graph LR
    A["Top Component"] --> B["Step 1"]
    B --> C["Step 2"]
    C --> D["Step 3"]
Fig. 7
NOTICE
With the casters attached, do not move the unit and bucket assembly while there is water in the bucket. Before rolling the bucket, remove the unit.
Additional Setup and Usage Information
Scan this QR code with your mobile device to see a playlist of helpful videos about your new Cube Dehumidifier.

OPERATING INSTRUCTIONS
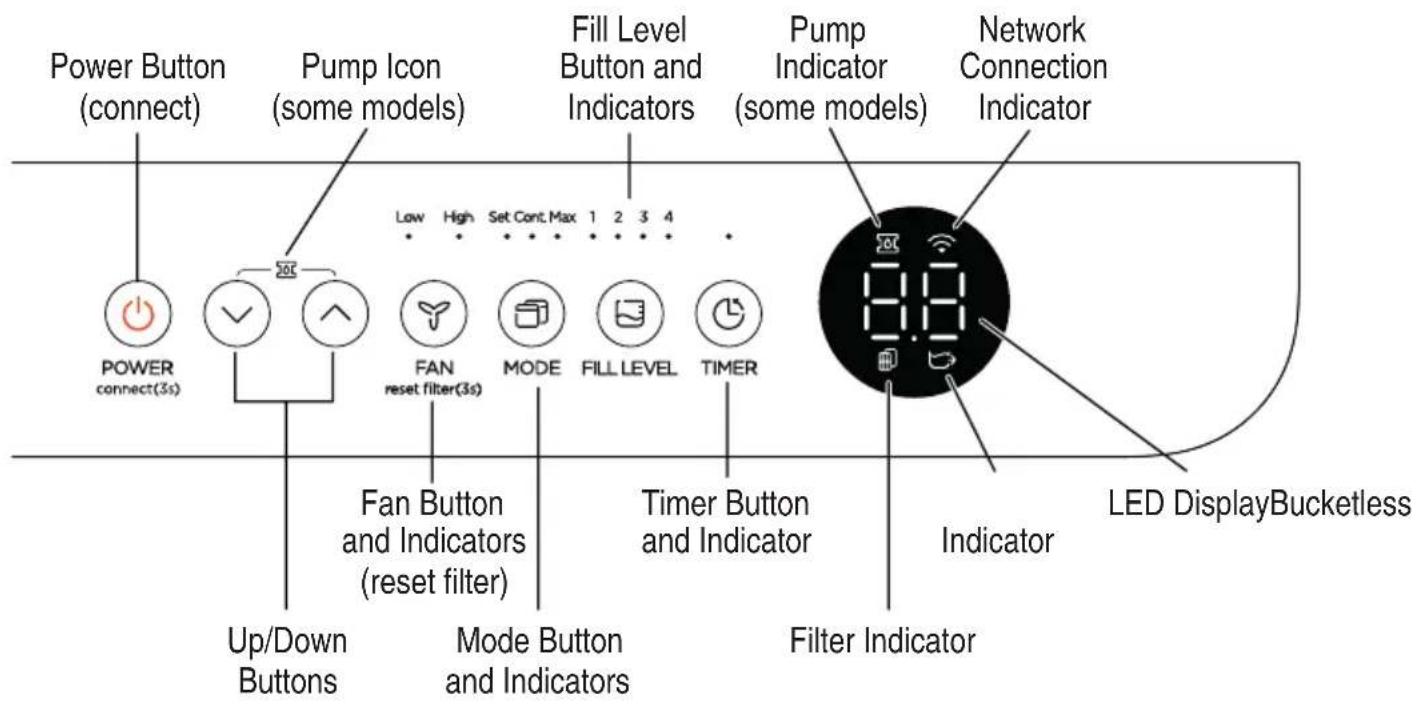
Key Pad Features
NOTICE
The appearance of the control panel on your unit may vary slightly. Functions will be similar.
Operating Instructions
When you push the button to change operation modes, the unit will make a beep sound to indicate that it is changing modes.
Power Button:
Press this button to turn the unit On/Off.
Connect:
Holding the power button for 3 seconds will place the unit in network connection mode to setup wireless control.
Up/Down Buttons:
Press these buttons to adjust the setpoint or to set the time feature.
Pump:
Holding the Up and Down buttons for 3 seconds will activate pump mode if the bucket is in place (some models).
Fan Button:
Press this button to change the fan speed between High and Low.
Filter Reset:
To reset the change filter indicator, hold the fan button for 3 seconds.
Mode Button:
Press this button to change the mode of the dehumidifier between Set mode, Max mode, and Continuous run mode.
Set - The dehumidifier runs until the humidity setpoint has been reached. The dehumidifier will begin running once the humidity rises above the setpoint again.
Max - The dehumidifier will run continuously on High Fan.
Continuous - The dehumidifier will run continuously and the fan speed can be changed in this operating mode.
NOTICE
While operating on continuous and Max modes, the humidity setpoint cannot be adjusted manually.
Fill Level Button:
Press this button to change the required water level before the bucket full switch activates. The options will fill approximately to the amounts shown in the table below:
| Fill level | Models MAD20S1QWT | Models MAD35S1QWT MAD35PS1QGR MAD50S1QWT MAD50PS1QWT MAD50PS1QGR |
| 1 | 1.5 gallons (17 lb) | 2.25 gallons (24 lb) |
| 2 | 2 gallons (21 lb) | 3 gallons (30 lb) |
| 3 | 2.75 gallons (27.5 lb) | 3.75 gallons (36.5 lb) |
| 4 | 3 gallons (29.5 lb) | 4.25 gallons (40.5 lb) |
Choose the option which is most comfortable for you when emptying the bucket.
When the bucket is full, the Display will show P2. The weights above are approximate weights of the bucket when filled with the corresponding volume of water.
NOTICE
For accurate fill levels, ensure the bucket is empty before beginning operation.
Bucketless mode:
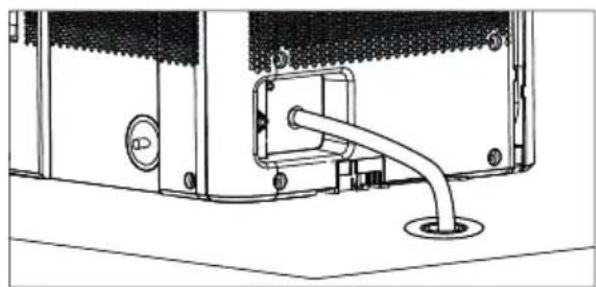
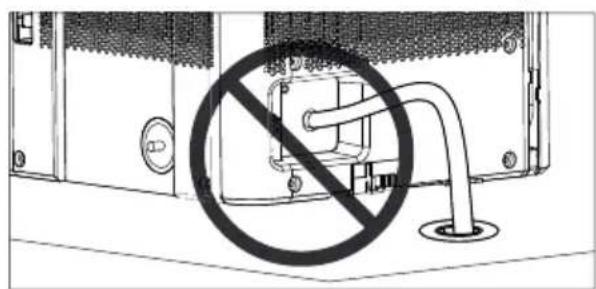
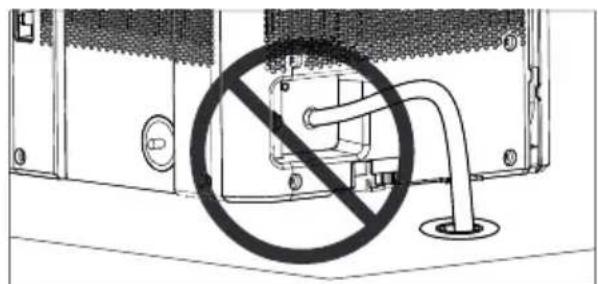
Bucketless mode allows you to run the unit without the bucket in place. The included drain hose or a garden hose must be attached and sloped towards the drain for proper bucketless mode operation. Figure 8 shows a proper slope while figure 9 shows an improper slope. The drain must be located below the dehumidifier. For best drain performance, we recommend the end of the drain hose be 4 inches below the hose connection. To activate bucketless mode, the following steps must be completed within three minutes of plugging the dehumidifier in.
- Press and hold the up and fill level buttons for 3 seconds until the bucketless icon appears on the display.
- Ensure the dehumidifier is on a flat level surface (free of debris).
- Make sure the hose for Bucketless mode is sloped down to the drain (see fig. 8) and does not rise above the connection point (see fig. 9).
To remove the unit from bucketless mode, place the unit back on the bucket.
natural_image
Technical line drawing of a mechanical assembly with a pipe and circular base (no text or symbols)Fig. 8
natural_image
Diagram showing a prohibition symbol over a mechanical device with no text or labelsFig. 9
Timer Button:
Press this button to activate the Timer function. The Timer LED will illuminate indicating timer mode is being set. 0.0 will also appear on the display indicating the number of hours from now until the timer function will initiate. When the timer function initiates, the unit will change its power state. For more information see Timer function under other features on the next page.
Error Codes and Protection Code:
AS - Humidity sensor error - Unplug the unit and plug it back in. If error persists, contact Customer Service.
ES - Tube Temperature sensor of the evaporator error - Unplug the unit and plug it back in. If error persists, contact Customer Service.
P2 - Bucket has reached the set Fill Level- Empty the bucket and place the unit on the bucket properly.
EC - Refrigerant leakage detection - Display area will show EC when the unit detects refrigerant leakage. If error persists, contact Customer Service.
E3 - Unit malfunction - Unplug the unit and plug it back in. If error persists, contact Customer Service.
Eb - Bucket is removed or not in right position - Replace the bucket in the right position. (only available for the unit with pump feature.)
Other Features
Auto Defrost
When frost builds up on the evaporator coils, the compressor will cycle off and Auto Defrost function will run automatically.
3 minute compressor operation delay protection
After the unit has stopped, it can not be restarted in the first 3 minutes to protect compressor operation. The unit will restart automatically after 3 minutes.
Auto-Restart
If the unit stops unexpectedly due to power being cut, it will restart with the previous function setting (except bucketless mode) automatically when the power resumes.
Timer Function
- When activating the Timer function, you are setting the time until the unit changes its power state. This means, if the unit is on, activating the timer function will set the time until the unit will turn off. If the unit is off, activating the timer function will set the time until the unit will turn on.
- The time can be set after pressing the timer button then using the up or down buttons. These buttons will change the time in 0.5 hour increments up to 10 hours. After 10 hours, the time will change in 1 hour increments up to 24.
- If an error code appears during this time, the timer function will be cancelled.
NOTICE
- When first using the dehumidifier, operate the unit continuously 24 hours. Make sure the plastic cover on the continuous drain hose outlet is installed properly so there are no leaks.
- This unit is designed to operate in a working environment between 5°C/41°F and 35°C/95°F.
- Make sure the water bucket is positioned correctly so that the unit can operate properly. When the water in the bucket reaches a certain level, please be careful while moving the unit to avoid spilling.
Removing Collected Water
There are three ways to remove collected water:
1. Emptying the bucket
- When the bucket reaches the set Fill Level, the unit's display will show P2 regardless of power status.
- Using proper lifting techniques, remove the unit from the bucket. Be aware, some residual water may spill from the bottom of the unit while not on the bucket.
- Using two hands, grab the bucket handle and carry it to the desired drainage point. Pouring from a front corner of the bucket (the bucket window is on the front side), empty the bucket. If pouring from the back of the bucket, some water may spill from the relief holes.
- Return the bucket to the desired operating location and place the unit back on the bucket. Be sure the unit is aligned properly.
NOTICE
- When you remove the unit from the bucket do not set the unit on any electrical components as the bottom may be wet.
- Do not set the unit on an uneven surface after removing it from the bucket.
- Ensure the unit is seated properly after returning it to the bucket.
- If the unit is removed from the bucket during operation, the display will show the error code Eb and cease operation until returned to the bucket or changed to bucketless mode.
2. Continuous draining
• Water can be automatically emptied from the unit into a sink, or other type of drain using the included hose.
- To install the hose, remove the drain cap from the rear of the unit and set aside. Insert the included drain hose, or attach a garden hose to the drain outlet. Place the other end of the hose on or near the drain so that water will drain properly.
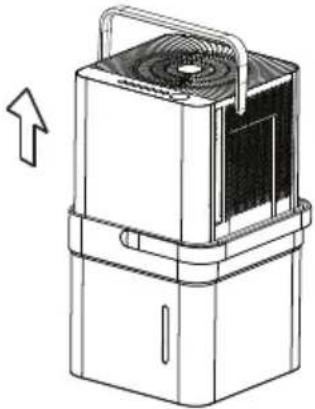
- Lift the unit off the bucket and place it on a level surface.
natural_image
Line drawing of a portable air conditioner unit with airflow direction indicated (no text or symbols)- Lift the bucket using 2 hands and carry to drainage point.
Fig. 10
natural_image
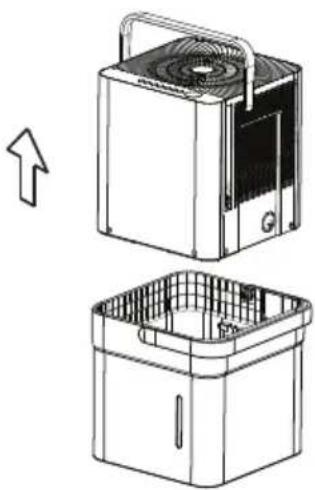
Technical line drawing of a two-part appliance with top and front views, showing internal components and a rising arrow (no text or symbols)- Pour out all of the water.
Fig. 11
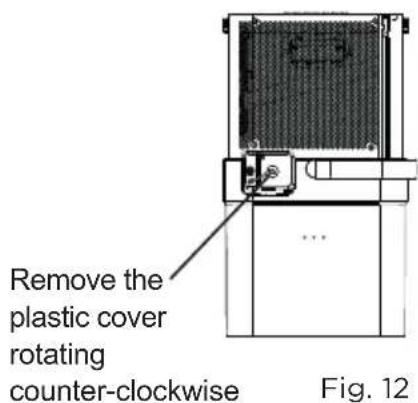
- When removing the drain hose, some water may remain in the hose or the drain outlet. Be sure this water will not spill by drying the wet area before moving the unit.
NOTICE
When using the continuous draining feature, ensure the unit is placed above the sink or drain being used. This will ensure proper draining.
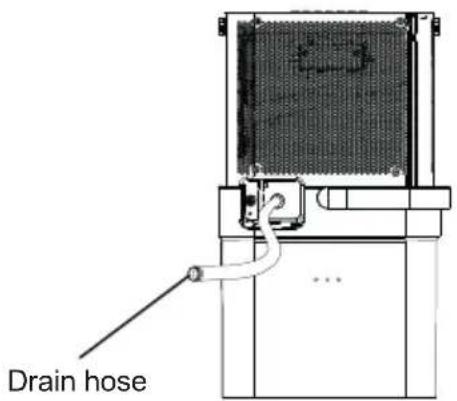
Fig. 13
3. Pump draining (some models)
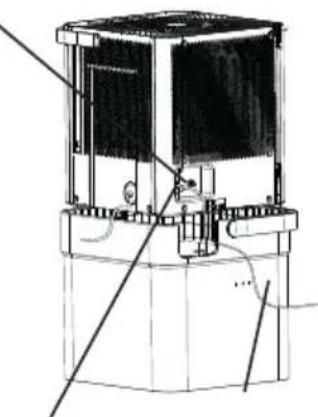
• Water can be pumped from the unit into a sink or other type of drain by putting the unit in pump mode and attaching the included pump hose. Be sure to install both the inlet and outlet pump hoses as shown in the figures on the right.
• To install the pump hose, remove the plug from the pump drain hole and firmly attach the the included pump hose as shown in Fig. 14.
- Initiate pump mode by holding both the up and down arrows for three seconds.
- The pump inlet hose must be placed in the bucket in order to pump the water out of the bucket.
NOTICE
The pump may generate a loud noise for the first 3-5 minutes of operation.
Reinstall the plastic cover
Max pump height: 14 ft. Make sure the hose is properly seated.
To remove the pump hose, push in on the collar around the hose and pull the hose out.
natural_image
Technical line drawing of a mechanical device with no visible text or symbolsPump drain hose outlet
Pump drain hose
Fig. 14
Pump drain hose outlet connection
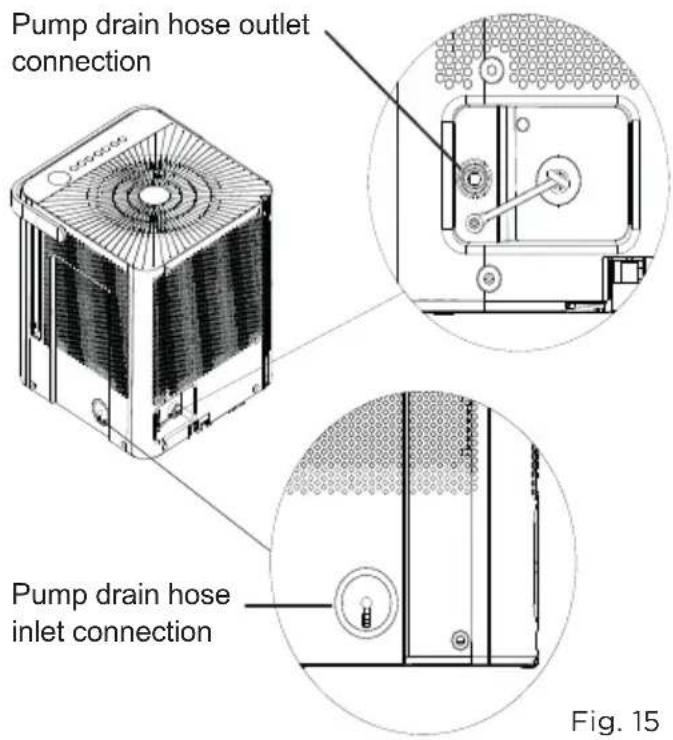
- Make sure the hose is secure so there are no leaks.
- Direct the hose toward the drain, making sure that there are no kinks that will stop the water flowing.
- Place the end of the hose into the drain.
- Select the desired humidity setting and fan speed on the unit for pump draining to start.
- When operating in Bucketless mode the pump cannot be used.
NOTICE
The pump operation light blinks when a failure occurs. Please turn off the unit and disconnect the power cord. Check the following items:
- Cleaning the pump filter:
- Clean the pump filter following the instructions below.
- Check if the drain hose is clean and free of debris.
• Empty the water from the bucket. - Check the hose connection and the bucket for proper fitment. If the error persists, contact Customer Service.
NOTICE
If routing the drain hose outdoors, do not operate when the outdoor temperature is at or below 32^ F ( 0^ C) as the water will freeze, blocking the hose and causing the unit to stop.
Make sure to empty the bucket at least once a week a week when using the pump draining feature. When the pump draining feature is not being used, remove the pump drain hose from the outlet.
CARE AND CLEANING
Turn the dehumidifier off and disconnect the plug from the power source before cleaning.
1. Clean the Grill and Case
- Use water and a mild detergent. Do not use bleach or abrasives.
- Do not splash water directly onto the unit. Doing so may cause an electrical shock, cause the insulation to deteriorate, or cause the unit to rust.
- The air intake and outlet may get dirty during operation, use a vacuum cleaner or brush to clean.
2. Clean the bucket
- Every few weeks, clean the bucket thoroughly. Partially fill the bucket with clean water and mild detergent. Swish it around in the bucket, empty and rinse.
NOTICE
Do not use a dishwasher to clean the bucket.
natural_image
Line drawing of a hand opening a portable air conditioner unit (no text or symbols)Fig. 16
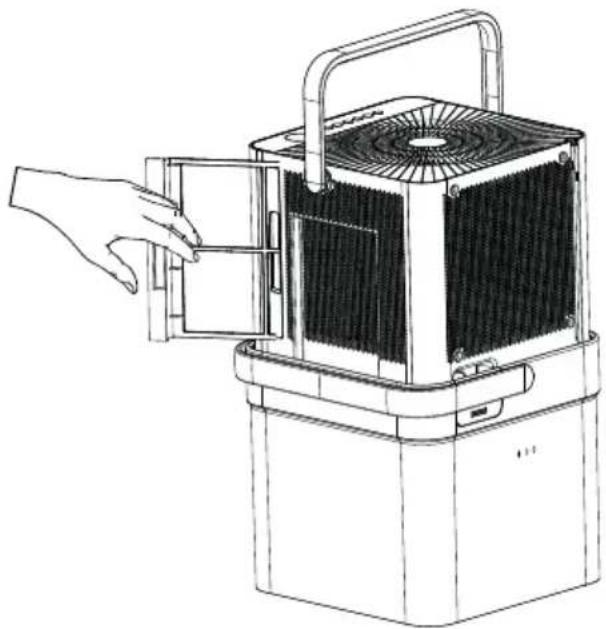
3. Clean the air filters
• To remove the filters, pull each filter outwards.
- Wash the filters with clean water then dry.
- Re-install each filter.
- Reset the filter indicator light following operating instructions on page 10.

CAUTION
To avoid loss of performance or damage to the unit, do not operate the dehumidifier without the filters.
4. When not using the unit for long time periods
- Before storing the unit and bucket, let it rest for one full day so that the system can dry out naturally.
- Clean the unit, water bucket and air filters.
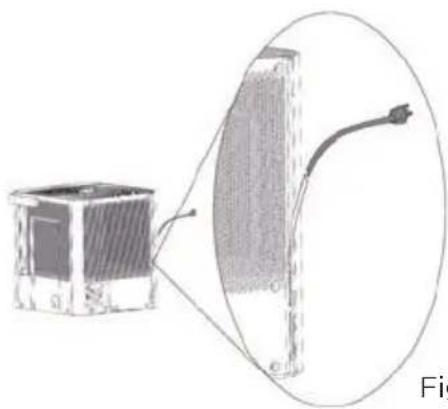
- Ensure the power cord is in the power cord storage channel.
- Nest the unit inside the bucket.
• Cover the unit with a plastic bag. - Store the unit upright in a dry, well-ventilated area.
NESTING AND STORING INSTRUCTIONS
Step 1:
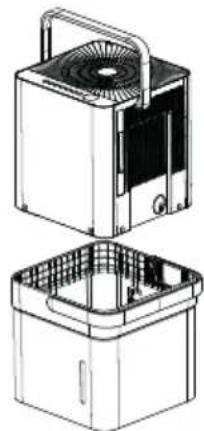
Power off and unplug the unit. Then lift the dehumidifier off the bucket.
Step 2:
Empty all water from bucket.

WARNING
Make sure the bucket is empty before nesting the dehumidifier to avoid risk of electrical shock.
Step 3:
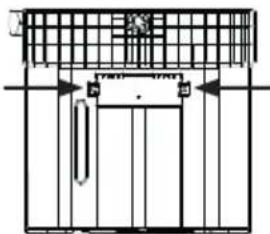
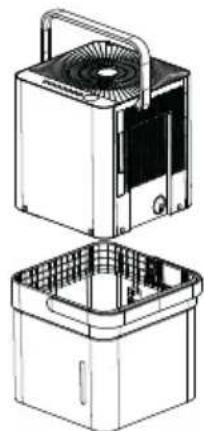
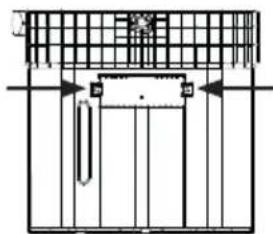
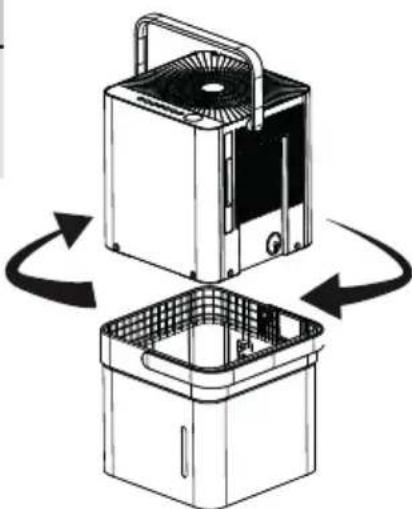
Make sure to press the tabs on the inside bucket feature in so that the unit can nest correctly. See Fig. 18.
Step 4:
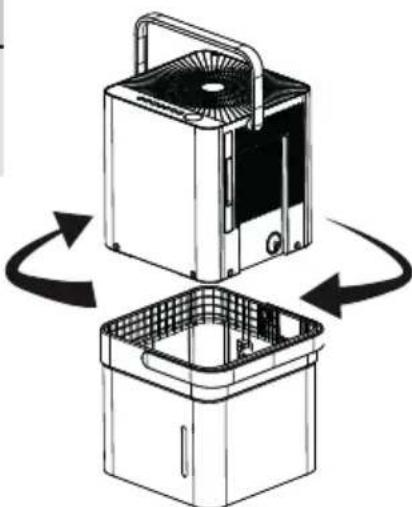
Rotate dehumidifier 90° in either direction and insert into bucket to nest.
NOTICE
Make sure the power cord is properly tucked into the power cord storage channel on the back of the dehumidifier to prevent damage.
natural_image
Diagram of a heat exchanger with a sensor array and a separate view showing internal components (no text or symbols)Fig. 19b
natural_image
Technical line drawing of a two-tiered appliance with open and closed views (no text or symbols)Fig. 17
natural_image
Pure architectural or mechanical diagram showing a gate structure with no text, numbers, or symbolsFig. 18
natural_image
Diagram of a kitchen appliance with two views showing internal components and airflow direction (no text or symbols)Fig. 19a
Step 5:
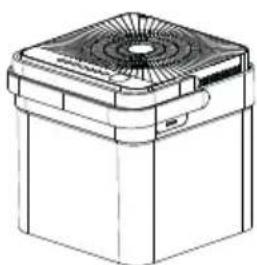
The dehumidifier is nested and ready to store.

CAUTION
When carrying the nested unit, be sure and use the bucket handle to ensure both the dehumidifier and bucket are safely carried.
natural_image
Line drawing of a square electronic device with a circular top and ventilation grille (no text or symbols)Fig. 20
TROUBLESHOOTING TIPS
Before calling for service, review this list. It may save you time and money. This list includes common occurrences that are not the result of defective workmanship or materials in this appliance.
ProblemSolution
| Unit does not start | Make sure the dehumidifiers plug is connected firmly into the wall outlet. |
| Check the house fuse/circuit breaker box. | |
| Dehumidifier has reached its preset level or bucket is full. | |
| Water bucket is not in the proper position. | |
| Dehumidifier does not dry the air as it should | Not enough time to remove the moisture. |
| Make sure there are no curtains, blinds or furniture blocking the front or back of the dehumidifier. | |
| The humidity control may not be set low enough. | |
| Check that all doors, windows and other openings are securely closed. | |
| Room temperature is too low, below 5°C (41°F). | |
| There is a water vapor source in the room. | |
| The unit makes a loud noise when operating | Air filter may be dirty. Clean filter. Refer to Care and Cleaning section. |
| The unit is tilted instead of upright as it should be. | |
| The floor surface is not level. | |
| Frost appears on the coils | This is normal. The dehumidifier has Auto defrost feature. |
| Water on floor | Hose to connector or hose connection may be loose. |
| Intended to use the bucket to collect water, but the back drain plug is removed. | |
| ES, AS, P2, EC, Eb and E3 appear in the display | These are error codes and protection code. Check Operating Instructions. |
| The pump operation on light blinks at 1 Hz | Clean the pump filter. |
| Check the pump hose is not blocked or leaking. | |
| Empty the water bucket. | |
| When operating in bucketless mode, water collects around the bottom of the unit | Check to ensure the unit is level, and there is no debris on the surface. |
| Check the drain hose connection and ensure it is properly seated in the outlet. |
APP INSTRUCTIONS
DECLARATION OF CONFORMITY
We hereby declare that this Dehumidifier is in compliance with the essential requirements and other relevant provisions of Directive 1999/5/EC.
SPECIFICATION OF WIRELESS MODULE
| Model: US-SK105 | Dimensions: 41 x 24 x 5 (mm) |
| Standard: IEEE 802.11 b/g/n | Operation Temperature: 0°C ~ 45°C / 32°F ~ 113°F. |
| Antenna Type: Printed PCB Antenna | Operation Humidity: 10% ~ 85% |
| Frequency band:2400-2483.5MHz | Power Input: DC 5V/300 mA |
| Maximum Transmitted Power: <20 dBm Max |
PRECAUTIONS
- Supports operating systems: iOS 7+ or Android 4+.
- In the event of a OS update, there may be a delay between the update of the OS and a related software update during which your OS may or may not be supported until a new version is released. Your specific mobile phone or problems in your network may prevent the system from working and Midea will not be responsible for any problems that could be caused by incompatibility or network issues.
- This Smart Dehumidifier only supports WPA-PSK/WPA2-PSK (recommended) encryption.
- To ensure proper scanning of the QR code, your smartphone must have at least a 5-megapixel camera.
- Due to unstable network connectivity, requests may time out. If this happens, rerun the network configuration.
- Due to unstable network connectivity, commands may time out. If this happens, the smartphone app and the actual product may display conflicting information. The information displayed on the actual product is always the most accurate available. Refresh the app to re-sync.
NOTICE
Midea will not be responsible for any problems that could be caused by incompatibility or network issues, your wireless router and mobile phone.
SYSTEM OVERVIEW
Devices required to use the Smart Dehumidifi er:
- Smart Phone with compatible iOS or Android system.
- Wireless Router
- Smart Dehumidifier
DOWNLOAD AND INSTALL THE APP
Android QR code Apple QR code




Scan to download app.
- You can also go to Google Play or App Store and search for Midea Air.
NOTICE
All the images in this manual are for reference only, your product and app may look slightly different. The actual product and app instructions have to be considered.
CREATE YOUR ACCOUNT
- Make sure your smartphone is connected to your wireless router and your wireless router has a working 2.4GHz internet connection.
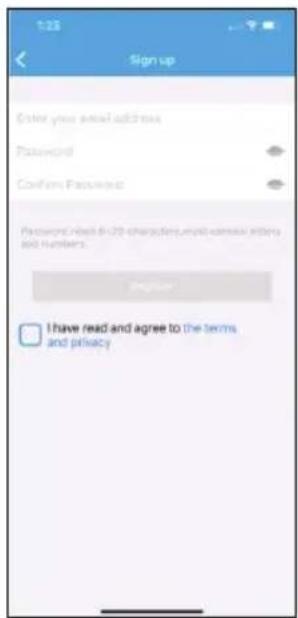
- It is recommended to activate your account immediately to be able to recover your password by email.
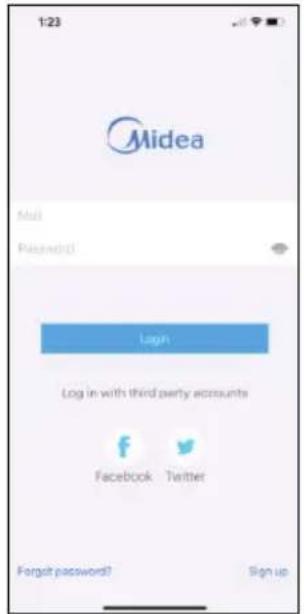
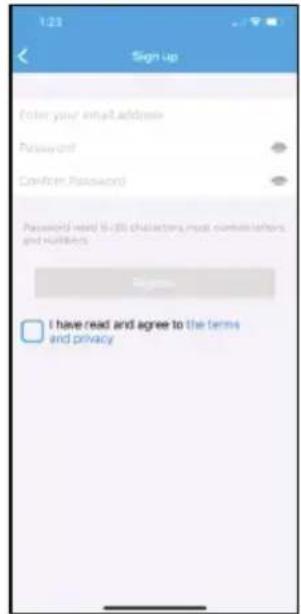
- Press "Sign Up". 2. Enter your email address and password.
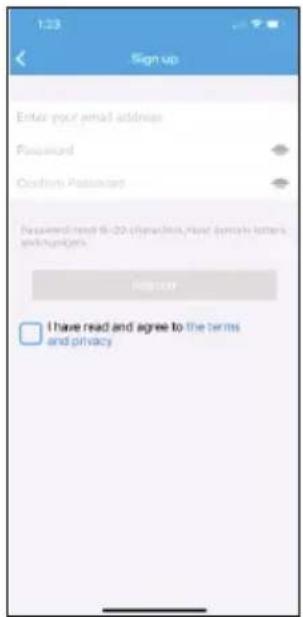
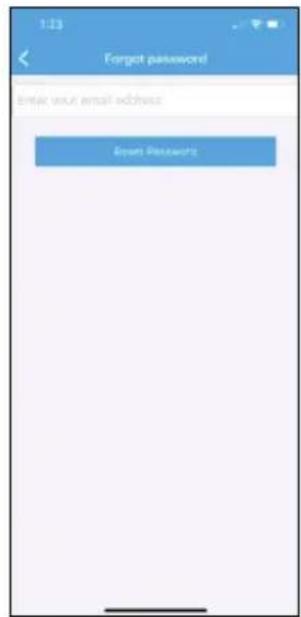
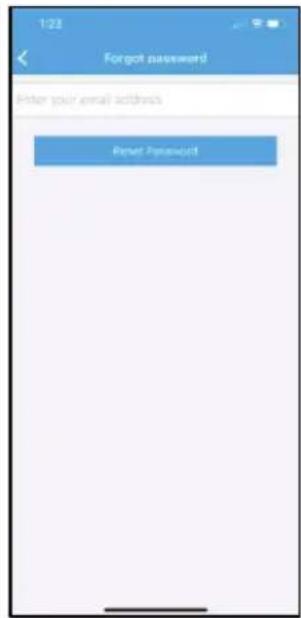
- Press "Registration". 4. If you forget your password, press
"Forgot password?" on the main menu and enter your email address. Then press "Reset Password".
NOTICE
• Make sure your smartphone is able to connect to the wireless network which will be used.
• Make sure also that the device is not connecting to other networks in range.
ADDITIONAL APP AND SMART HOME FUNCTIONS
For additional instructions regarding the features of the app and Smart Home skill capabilities, scan the QR code below.

Deshumidificador Cube MAD
natural_image
Line drawing of a square electronic device with a fan and ventilation grille (no text or symbols)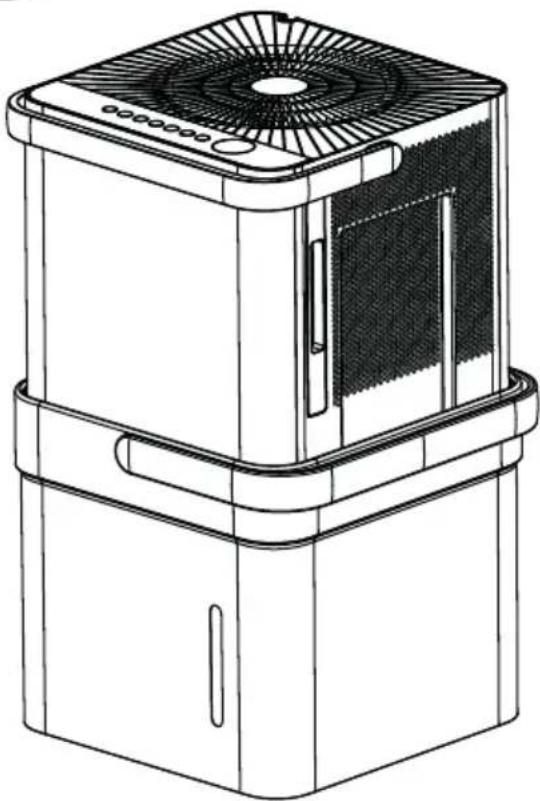
natural_image
Line drawing of a modern air purifier with fan and vent slots (no text or symbols)MAD20S1QWT MAD35S1QWT MAD35PS1QGR MAD50S1QWT MAD50PS1QWT MAD50PS1QGR
Manual del Usuário
natural_image
Line drawing of a square electronic device with a top panel and ventilation grille (no text or symbols)natural_image
Illustration of a hand pressing down on a small appliance with a handle and fan (no text or symbols)Fig. 3b
Paso 2:
natural_image
Diagram of a household appliance with fan and basket components, showing airflow direction (no text or symbols)Gire 90° el deshumidifi cador
natural_image
Technical line drawing of a mechanical device with fan and handle (no text or symbols)Fig. 4b
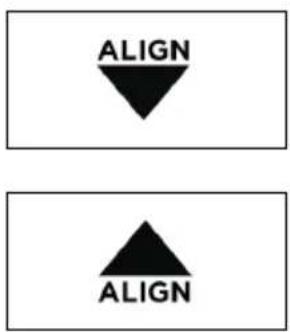
Fig. 4c
Paso 3:
flowchart
graph LR
    A["Top View"] --> B["Assembly Step"]
    B --> C["Front View"]
    C --> D["Assembly Step"]
Fig. 7
AVISO
natural_image
Technical line drawing of a mechanical assembly with a pipe and mounting bracket (no text or symbols)Fig. 8
natural_image
Diagram showing a no-smoking symbol inside a vehicle or enclosure, with no text or labels present.Fig. 9
Botón del Timer :
natural_image
Line drawing of a portable air conditioner unit with airflow direction indicated (no text or symbols)natural_image
Technical line drawing of a two-part appliance with top and front views, showing internal components (no text or symbols)natural_image
Technical line drawing of a mechanical device with no visible text or symbolsnatural_image
Line drawing of a hand opening a portable air conditioner unit (no text or symbols)Fig. 16
natural_image
Diagram of a heat exchanger with a sensor array and a curved heat source, no text or symbols presentFig. 19b
natural_image
Technical line drawing of a two-tiered industrial appliance with fan and vent (no text or symbols)Fig. 17
natural_image
Pure architectural or mechanical diagram showing a grid structure with arrows and no visible text or symbolsFig. 18
natural_image
Diagram of a two-part appliance with internal components and rotation arrows indicating process flow (no text or symbols)Fig. 19a
Paso 5:
natural_image
Line drawing of a square industrial fan or filter unit (no text or symbols)Fig. 20



make yourself at home
- Owner's Manual
- Read This Manual
- CAUTION
- NOTICE
- SAFETY PRECAUTIONS
- WARNING
- UNIT SPECIFICATIONS AND FEATURES
- SET UP INSTRUCTIONS
- Step 1:
- Step 2:
- Step 3:
- INSTALLATION INSTRUCTIONS
- Positioning the Unit
- Optional Caster Installation
- To install the casters:
- To remove the casters:
- Additional Setup and Usage Information
- OPERATING INSTRUCTIONS
- Power Button:
- Connect:
- Up/Down Buttons:
- Pump:
- Fan Button:
- Filter Reset:
- Mode Button:
- Fill Level Button:
- Bucketless mode:
- Timer Button:
- Error Codes and Protection Code:
- Other Features
- Auto Defrost
- minute compressor operation delay protection
- Auto-Restart
- Timer Function
- Removing Collected Water
- Emptying the bucket
- Continuous draining
- Pump draining (some models)
- Reinstall the plastic cover
- Pump drain hose outlet connection
- CARE AND CLEANING
- Clean the Grill and Case
- Clean the bucket
- Clean the air filters
- When not using the unit for long time periods
- NESTING AND STORING INSTRUCTIONS
- Step 4:
- Step 5:
- TROUBLESHOOTING TIPS
- APP INSTRUCTIONS
- DECLARATION OF CONFORMITY
- PRECAUTIONS
- SYSTEM OVERVIEW
- Devices required to use the Smart Dehumidifi er:
- DOWNLOAD AND INSTALL THE APP
- CREATE YOUR ACCOUNT
- ADDITIONAL APP AND SMART HOME FUNCTIONS
- Deshumidificador Cube MAD
- Manual del Usuário
- Paso 2:
- Paso 3:
- AVISO
- Botón del Timer :
- Paso 5:
Brand : MIDEA
Model : MAD35PS1QGR
Category : Dehumidifier