8qt Dual Basket Touchscreen - Deep fryer BELLA - Free user manual and instructions
Find the device manual for free 8qt Dual Basket Touchscreen BELLA in PDF.


| Product Type | Deep Fryer |
| Brand | Bella |
| Model | 8qt Dual Basket Touchscreen |
| Capacity | 8 quarts (total), 4 quarts per basket |
| Number of Baskets | 2 |
| Control Type | Touchscreen |
| Temperature Range | 175°F – 400°F (approx.) |
| Timer | Digital timer up to 60 minutes |
| Power | 1800 watts (typical) |
| Voltage | 120V, 60Hz |
| Dimensions (approx.) | 16.5 x 14.5 x 11.5 inches |
| Weight (approx.) | 12.5 lbs |
| Material | Stainless steel housing, non-stick coated baskets |
| Dishwasher Safe Parts | Baskets are dishwasher safe |
| Cleaning | Wipe exterior with damp cloth; wash baskets and oil container with warm soapy water |
| Safety Features | Automatic shutoff, cool-touch handles, overheat protection |
| Oil Capacity | Up to 7.5 liters (approx.) |
| Accessories Included | 2 fry baskets, lid, instruction manual |
| Repairability | Replacement parts available through Bella customer service |
| Warranty | 1-year limited warranty |
Frequently Asked Questions - 8qt Dual Basket Touchscreen BELLA
User questions about 8qt Dual Basket Touchscreen BELLA
0 question about this device. Answer the ones you know or ask your own.
Ask a new question about this device
Download the instructions for your Deep fryer in PDF format for free! Find your manual 8qt Dual Basket Touchscreen - BELLA and take your electronic device back in hand. On this page are published all the documents necessary for the use of your device. 8qt Dual Basket Touchscreen by BELLA.
USER MANUAL 8qt Dual Basket Touchscreen BELLA
Instruction Manual and Recipe Guide
FREIDORA DE AIRE
CON CANASTA DOBLE
www.bellahousewares.com
natural_image
Abstract logo design featuring a heart and stylized letter 'T' (no text or symbols)THANK YOU
for your purchase
REGISTER AND SIGN UP

natural_image
Generic user profile icon with a plus sign, no text or symbols presentfor special announcements and trendy recipes!
TELL US WHAT YOU THINK!

natural_image
Silhouette of a person with five stars above a speech bubble (no text or symbols)Rate, review or ask us a question.
GO TO: bellahousewares.com
myBELLAlife


Contents
Important safeguards .... 3
For household use only 3
Save these instructions ....3
Additional important safeguards 4
Notes on the Plug 5
Notes on the Cord....5
Plasticizer Warning 5
Electric Power....5
Getting To Know Your 8.0qt dual basket air fryer....6
Dual Touchscreen Control....7-8
Operating Instructions....8
8 Menu selections: AIR FRY, ROAST, BROIL, BAKE, REHEAT, KEEP WARM, FRENCH FRIES,
DEHYDRATE Pre-Programmed TEMPS & TIMES Chart Manual Operation 8-9
Sync Finish 9
Dual Cook....9
Air Fry Technique....9-10
Air Frying Pre-Packaged Frozen Foods 10
Hints For Roast....10
Hints For Broil 10
Hints For Bake....10
Hints For Dehydrate 11-14
User Maintenance Instructions....14
Care & cleaning instructions....14
Storing instructions....14
Recipes....15-17
Warranty 18
Índice
When using electrical appliances, basic safety precautions should always be followed, including the following:
1. READ ALL INSTRUCTIONS.
- Do not touch hot surfaces. Use handles or knobs. Use oven mitts or potholders.
- To protect against electric shock do not immerse cord, plugs, or appliance in water or other liquid.
- This appliance may be used and cleaned by children age 8 and older or by persons with reduced physical, sensory or mental capabilities, or lack of experience and knowledge, ONLY IF they have been given supervision or instruction concerning use of the appliance by a person responsible for their safety.
- Children should be supervised to ensure that they do not play with the appliance.
- Unplug from outlet when not in use and before cleaning. Allow to cool before putting on or taking off parts, and before cleaning the appliance.
- Do not operate any appliance with a damaged cord or plug, or after the appliance malfunctions, or has been damaged in any manner. Bring it to a qualified technician for examination, repair or electrical or mechanical adjustment.
NOTE: DO NOT ATTEMPT TO REPAIR THE UNIT YOURSELF. THIS WILL VOID THE WARRANTY.
- The use of accessory attachments not recommended by the appliance manufacturer may cause injuries.
- Do not use outdoors.
- Do not let cord hang over edge of table or counter, or touch hot surfaces.
- Do not place on or near a hot gas or electric burner, or in a heated oven.
- Extreme caution must be used when moving an appliance containing hot oil or other hot liquids.
- To disconnect, press ⏻ and pull any active fryer basket(s) out of the Air Fryer body. Remove plug from wall outlet.
- Do not use appliance for other than intended use. 15. When using the crisping tray(s), make sure they are properly inserted into each air fryer basket before cooking.
- Make sure the crisping tray is in place before adding food to be air fried.
- Always make sure any active fryer basket is fully inserted and locked into the front of the Air Fryer before operation.
WARNING: Air Fryer will not operate unless the active fryer baskets are fully closed.
CAUTION: After hot air frying, roasting, broiling, baking, or reheating, the fryer baskets, crisping trays (if used) and the cooked foods are hot. Extreme caution must be used when handling the hot Air Fryer baskets and crisping trays.
FOR HOUSEHOLD USE ONLY SAVE THESE INSTRUCTIONS
ADDITIONAL IMPORTANT SAFEGUARDS
CAUTION HOT SURFACES: This appliance generates heat and may release steam during use. Proper precautions must be taken to prevent the risk of burns, fires, or other injury to persons or damage to property.
CAUTION: This appliance is hot during operation and retains heat for some time after turning OFF. Always use oven mitts when handling hot materials and allow metal parts to cool before cleaning. Do not place anything on top of the appliance while it is operating or while it is hot.
- All users of this appliance must read and understand this instruction manual before operating or cleaning this appliance.
- The cord to this appliance should be plugged into a 120V AC electrical outlet only.
- If this appliance begins to malfunction during use, press 📄 and pull any active fryer basket(s) out of the body. Remove plug from wall outlet. Do not use or attempt to repair the malfunctioning appliance. Contact Consumer Service.
- Do not immerse power cord in any liquid. If the power cord to this appliance is damaged, it must be replaced.
- Keep the cord out of reach from children and infants to avoid the risk of electric shock and choking.
- Place the Dual Basket Air Fryer on a flat, stable, heat-resistant work area.
- Do not obstruct the air outlet or air inlets on the back and sides of the Air Fryer, with any objects. Avoid escaping steam from the air outlet during air frying.
- Keep appliance at least 4 inches away from walls or other objects during operation.
- Always use each fryer basket handle to remove each fryer basket.
WARNING: Under- or over-filling the fryer basket may damage the Air Fryer and could result in serious personal injury.
- Never move a hot Air Fryer or an Air Fryer containing hot food. Allow to cool before moving.
WARNING! This Air Fryer should not be used to boil water.
WARNING! This Air Fryer should never be used to deep fry foods.
Notes on the Plug
This appliance has a polarized plug (one blade is wider than the other). To reduce the risk of electric shock, this plug will fit in a polarized outlet only one way. If the plug does not fit fully into the outlet, reverse the plug. If it still does not fit, contact a qualified electrician. Do not modify the plug in any way.
Notes on the Cord
A. A short power-supply cord (or detachable power-supply cord) is to be provided to reduce the risk resulting from becoming entangled in or tripping over a longer cord.
B. Longer detachable power-supply cords or extension cords are available and may be used if care is exercised in their use.
C. If a long detachable power-supply cord or extension cord is used :
- The marked electrical rating of the cord or extension cord should be at least as great as the electrical rating of the appliance;
- If the appliance is of the grounded type, the extension cord should be a grounding-type3-wire cord;
- The longer cord should be arranged so that it does not drape over the countertop or table top where it can be pulled on by children or tripped over unintentionally
Plasticizer Warning
CAUTION: To prevent Plasticizers from migrating from the finish of the counter top or table top or other furniture, place NON-PLASTIC coasters or place mats between the appliance and the finish of the counter top or table top. Failure to do so may cause the finish to darken; permanent blemishes may occur or stains can appear.
Electric Power
If the electrical circuit is overloaded with other appliances, your appliance may not operate properly. It should be operated on a separate electrical circuit from other appliances.
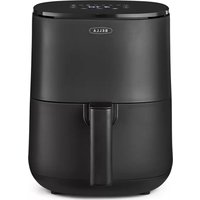
Getting To Know Your 8.0 Qt. Dual Basket Air Fryer
Product may vary slightly from illustration

Dual Touchscreen Control
-
ON/OFF
-
Dual Digital TIME/TEMP Display
-
LEFT L / RIGHT Basket Control
-
AIR FRY
-
ROAST
-
BROIL
-
BAKE
-
REHEAT
-
KEEP WARM KEEP WARM
-
FRENCH FRIES
-
DEHYDRATE
-
TEMP + and -
-
TIME and
-
SHAKE FOOD
-
SYNC FINISH
-
DUAL COOK
-
START/PAUSE

ON/OFF
- When the Air Fryer is plugged in, a tone will sound, the control panel will illuminate, then disappear. The ⏻ button will light up red, indicating that the unit is powered on.
- When ⏻ is pressed, a tone will sound, the ⏻ will turn green, and the L, R, and ⏻ buttons will light up.
- When in operation, press ⏻ to turn both LEFT and RIGHT basket controls OFF.
LEFT/RIGHT Basket Control
- When the pulsing ⏻ is pressed, a tone will sound, you can select to to use the left or right basket independently, or dual cook to use both at the same time.
- Press the L or button to program the Left or Right basket. While Left or Right flashes, press any MENU button to continue.
NOTE: LEFT or RIGHT baskets may be programmed independently, at any time before or during operation. - The L or button will illuminate steadily on the screen when active. To adjust or add programming at any time, press the appropriate L or basket control button. When the button begins to flash, TEMP/TIME can be adjusted.
TEMP (+ or +)/TIME (or+) -
- Press + or on the left side of the control panel to increase or reduce TEMP in 5 degree increments.
- Press + or - on the right side of the control panel to increase or decrease TIME in 1 minute increments.
NOTE: When using DEHYDRATE, TIME will increase or decrease in 1 hour increments.
NOTE: LEFT or RIGHT basket TIME and/or TEMP may be programmed independently, at any time before or during operation. Press the LEFT or RIGHT button. When LEFT or RIGHT begins to flash, programming can be adjusted.
SHAKE
- For all menu selections except BROIL, REHEAT AND DEHYDRATE, 5 tones will sound at 2/3 of the cook time, to remind you to shake the basket.
- Press ☐ to turn this feature OFF. SHAKE will disappear from the screen.
NOTE: shake will not work if cooking time is below 3 minutes
DUAL COOK
- Press ☐ to effortlessly duplicate settings for both LEFT and RIGHT Air Fryer baskets or select Dual cook to program Left and Right basket at the same time. After pressing ☐, you can simply adjust the temperature and time for both baskets at the same time
SYNC FINISH
- Both LEFT and RIGHT baskets must first be programmed.
- Press 📂 to ensure both baskets will complete cooking together.
- HOLD will appear on the display as the Dual Air Fryer synchronizes the final cook times.
NOTE: Once cooking has started SYNC function will not be operable.
START/PAUSE
- Once programming is complete, press to START the cooking process or to PAUSE any operation.
Before Using for the First Time
Remove all packing material and labels from the inside and outside of the Air Fryer. Check that there is no packaging underneath and around each of the fryer baskets and crisping trays.
-
Your Dual Basket Air Fryer is shipped with the 2 crisping trays locked into each fryer basket inside the Air Fryer body.
-
Firmly grasp each fryer basket handle, to pull fryer baskets out of the main body.
-
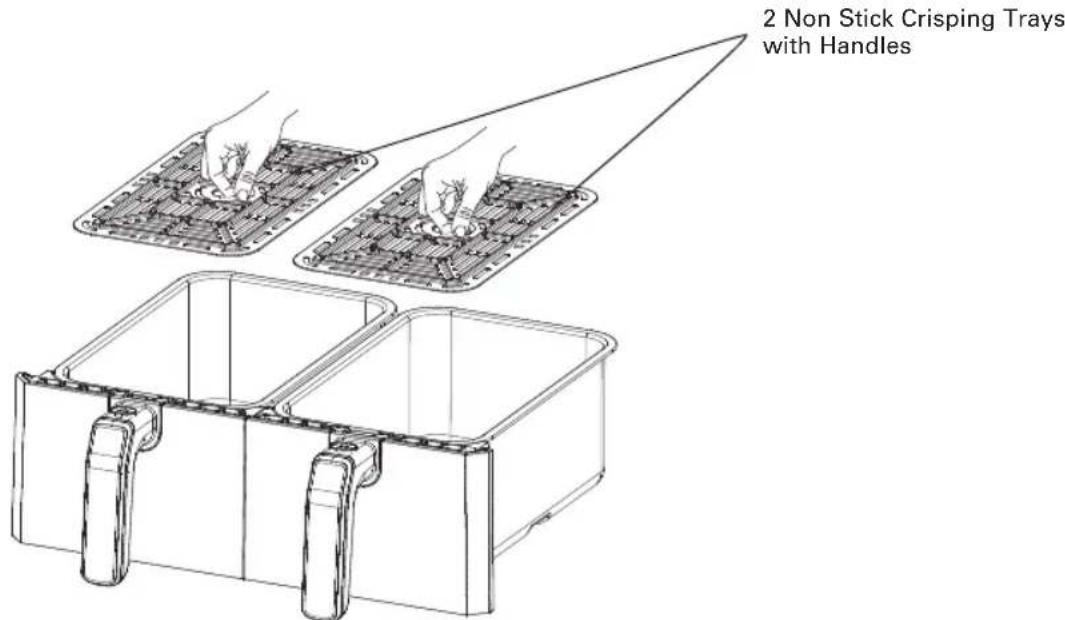
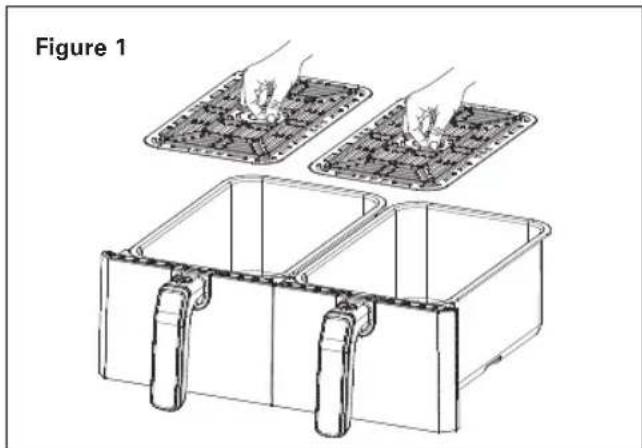
Grasp each crisping tray handle and lift to remove from each basket. (Figure 1)
-
Wash both fryer baskets and crisping trays in hot, soapy water.
-
DO NOT IMMERSE THE AIR FRYER BODY IN WATER. Wipe Air Fryer body with a damp cloth. Dry all parts thoroughly.
-
Replace crisping trays into each fryer basket. With the handle facing up, insert each tray so that the rubber corners fit and lock comfortably into each basket.
-
Due to base unit's gracious front curve, the air fryer baskets must be inserted into the proper sides. The tops of the drawers are labeled L (LEFT) and R (RIGHT). Slide the LEFT air fryer basket/crisping tray into the left side of the Air Fryer body. Slide the RIGHT air fryer basket/crisping tray into the right side of the body. Before use, make sure each basket is fully inserted and locked into place. (Figure 1)
NOTE: During first use, the Dual Air Fryer may emit a slight odor. This is normal and will not affect flavor.
Operating Instructions
IMPORTANT! The maximum food capacity recommended for each Air Fryer basket is 4.0 quarts or 3.75 lbs. of food per basket. Using both baskets will enable you to feed up to 9 people.
WARNING! This Dual Basket Air Fryer should not be used to boil water.
WARNING! This Dual Basket Air Fryer should never be used to deep fry foods.
- Place the Dual Basket Air Fryer on a flat, stable, heat-resistant work area, close to an electrical outlet.
-
If needed, add crisping tray(s). See "Before Using for the First Time" for a detailed description.
-
Place food into either or both fryer baskets. Do not overfill. To ensure proper cooking and air circulation, NEVER fill any fryer basket more than 2/3 full. When air frying fresh vegetables, we do not recommend adding more than 2 to 3 cups of food to the fryer basket.
NOTE: Up to 6 cups of ingredients may be dehydrated as food will shrink to a fraction of its original volume. Place a single layer of ingredients into the empty air fryer basket. Create a second layer by placing the crisping tray into the basket over the ingredients. Add food on top of the crisping tray.
- Insert the assembled fryer basket(s) into the front of the Dual Basket Air Fryer. Always make sure fryer basket(s) are in their proper LEFT/RIGHT position and they are fully closed.
8 Menu Selections: AIR FRY, ROAST, BROIL, BAKE, REHEAT, KEEP WARM, FRENCH FRIES, DEHYDRATE Pre-Programmed TEMPS & TIMES Chart Manual Operation
| Menu Default TEMP | Default TIME TEM | MP Range TIME | Range SHAKE Food | ||
| AIR FRY 400 °F 20 mins | 170 °F - 450 °F | 1 - 60 mins | 2/3 time/ 1x | ||
| ROAST | 400 °F | 35 mins | 350 °F - 450 °F | 1 - 60 mins | 2/3 time/ 1x |
| BROIL | 450 °F | 10 mins | 450 °F | 1 - 30 mins | not recommended |
| BAKE | 350 °F | 16 mins | 170 °F - 400 °F | 1 - 60 mins | 2/3 time/ 1x |
| REHEAT | 250 °F | 6 mins | 170 °F - 400 °F | 1 - 60 mins | not recommended |
| KEEP WARM | 170 °F | 60 mins | 150 °F - 200 °F | 1 - 60 mins | not recommended |
| FRENCH FRIES | 360 °F | 18 mins | 170 °F - 400 °F | 1 - 60 mins | 2/3 time/ 1x |
| DEHYDRATE | 130 °F | 8 hours | 90 °F - 170 °F | 1 hr- 24 hrs | not recommended |
- Plug cord in the wall outlet. An audible tone will sound, the control panel will illuminate. The ⏻ button will light up red.
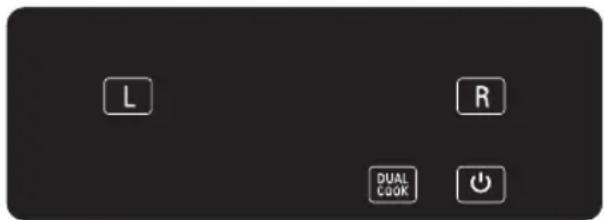
- When the ⏻ is pressed, a tone will sound and the power button will turn green, the control panel will illuminate LEFT, RIGHT and ☑ (Figure 2)
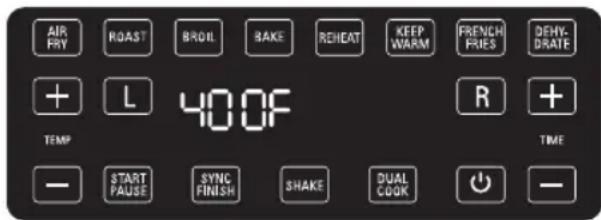
- Select L, R or . Press the desired MENU button. A tone will sound. The LEFT or RIGHT basket control and both the default TEMP (in large numerals) and default TIME (smaller numerals) will flash on the display and alternate between time and temperature. (Figure 3)
Figure 2 Figure 3
Single Basket: Manual Operation
- For single basket cooking, press 📋 to START the cooking process. (Figure 4)
- For dual basket cooking, press the other basket control. (Figure 5) MENU selections will appear.
Figure 4 Figure 5


- Press the desired MENU button for RIGHT basket cooking.
- Press START PANSE to START the cooking process.
- When the selected LEFT basket control begins to flash, press any MENU button to continue. (Figure 3)
- When both the TEMP and TIME light up, press TEMP + or to increase or reduce TEMP in 5 degree increments.
NOTE: Press and hold the TEMP button to fast advance.
- Press TIME + or to increase or decrease TIME in 1 minute increments.
NOTE: Press and hold the TIME button to fast advance.
NOTE: In the dehydrate setting, time is adjusted in 1 hour increments
- When the desired TIME and TEMP appear on the digital display, press [UNIT] to turn the Dual Basket Air Fryer ON. The target TIME will begin to count down. TEMP and remaining TIME will appear on the digital display. (Figure 4) NOTE: To pause air frying immediately, push the basket release button and pull the active fryer basket out of the body at any time. When the basket is replaced, cooking will resume.
NOTE: Press to PAUSE the cooking process. at any time. When is pressed again, cooking will resume.
- When the remaining TIME reaches 00:00, the display will show "Cool Cool" and change to "End End" and beep 5 times when it is safe to remove food.
NOTE: The quantity, density, weight of food will alter the total cooking time necessary. Remember, frying smaller batches will result in shorter cooking times and higher food quality.
IMPORTANT: Always check food halfway through cooking time to determine final cook TIME and TEMP.
- To adjust the air frying TEMP or TIME during operation, use the TEMP or TIME + or to increase or decrease TEMP or TIME as you cook.
Dual Basket: Manual Operation
- Program the Air Fryer LEFT basket following Single Basket: Manual Operation Steps 5 through 10.
- Press the RIGHT basket control. (Figure 6). The menu will appear.
- Press the desired MENU button for RIGHT basket cooking. Adjust TEMP or TIME as needed. A tone will sound to confirm your selection.
- Press START PANASE to begin operation. (Figure 7)
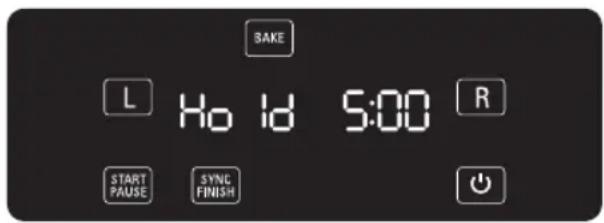
SYNC FINISH
- Program the Dual Air Fryer LEFT and RIGHT baskets following Dual Basket: Manual Operation Steps 1 through 3.
IMPORTANT: Both LEFT and RIGHT baskets must first be programmed.
- Press 📋 to ensure both baskets will complete cooking together.
Press START PANISE to begin operation.
- HOLD will appear on the display on the basket side that is being held as the Dual Air Fryer synchronizes the final cook times. (Figure 8)
NOTE: Once cooking has started SYNC function will not be operable.
DUAL COOK
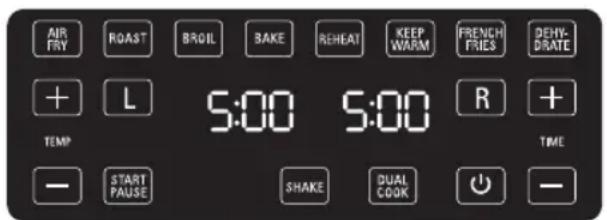
- Press ☐. Settings for the both Air Fryer basket will be automatically duplicated. (Figure 9)
- Press START PANASE to begin operation.
Figure 6 Figure 7


Figure 8 Figure 9

Air Fry Technique
Please consult the Air Fry / Roast Cooking Chart and/or follow package directions for suggested TIME and TEMP.
- Always pat food dry before cooking to encourage browning and avoid excess smoke.
- To assure even cooking/browning, ALWAYS open the active basket halfway through the cook time and check, turn or shake foods in the fryer basket. Some recipes may call to brush or spray oil halfway through cooking. Adjust TEMP or TIME if needed.
WARNING: Extreme caution must be used when handling any hot fryer basket or crisping tray. Avoid escaping steam from the fryer basket and the food.
CAUTION: Always use oven mitts when handling the hot air fryer basket.
CAUTION: Hot oil can collect at the base of the basket. Use caution when removing cooking foods.
- To avoid excess smoke, when cooking naturally high fat foods, such as bacon, chicken wings or sausages, it may be necessary to empty fat from the fryer basket between batches.
- To ensure crispiness, make sure the skin or exterior surface of your food is dry! Air fry small batches of freshly breaded foods. Create more surface area by cutting food into smaller pieces. Press breading onto food to help it adhere. Refrigerate breaded foods for at least 30 minutes before frying. 5. To improve crispiness, dust poultry skin or exterior surface lightly with corn starch. Spray with oil.
- Arrange breaded food in fryer basket so that food is not touching to allow air flow on all surfaces.
- Spray oils work best. Oil is distributed evenly and less oil is needed. Canola, olive, avocado, coconut, grapeseed, peanut, or vegetable oil work well.
- Shake air fried foods out onto serving area. Promptly insert any fryer basket into Air Fryer body and lock into place. Continue air frying subsequent batches, if any. 9. Press REHEAT to air fry food for 6 minutes at 250°F. Simply pull out the active basket to interrupt air frying at any time to check on food serving temperature. Repeat to extend cook time until food is heated to your liking.
- Unplug the Dual Basket Air Fryer when not in use.
Air Frying Pre-Packaged Frozen Foods
- As a rule, depending on the food and amount to be cooked, suggested cook posted cook TIMES may have to be reduced slightly. Always check food halfway through cooking time to determine final cook TIME and TEMP.
• Always check cooking progress after TIME has expired.
Hints For Roast
IMPORTANT! Consult the USDA Cooking Guidelines section of this instruction manual before cooking begins. Always test meat using an accurate cooking thermometer.
- A meat thermometer inserted into the center of the meat should always be used to ensure desired doneness.
- Cook meats to 5 to 10 degrees below desired doneness (internal temperature). Allow meat to stand 15 to 20 minutes before serving. The temperature will continue to rise while standing.
- ROAST large, tender cuts of meat and poultry. Seasoning prior to cooking adds to the flavor and the aroma during cooking.
- A layer of fat on the top of the roast promotes better browning and provides natural basting.
- To speed up browning, brush lean cuts of meat, chicken and fish with oil, margarine or melted butter.
- Place meat (fat side up) and turn over half-way through ROAST time. IMPORTANT: Turn and check food halfway through ROAST time.
- Press SHAKKE to turn this feature OFF. SHAKE will disappear from the screen.
Hints For Broil
- Use BROIL to melt cheese or to brown crumb toppings.
- Typically, BROIL is used for thinner, tender cuts of meats, or marinated meats, chops, poultry or fish, fruits and vegetables
- Dry marinated meats and fish before broiling. ALWAYS pat meat dry to reduce smoke and promote brownness during broiling.
- To speed up browning and add lusciousness, brush lean cuts of meat, chicken and fish with oil or melted butter.
- Trim excess fat from meat and score edges to prevent curling.
- Thaw frozen meats and fish before broiling.
- BROIL TIME is determined by the desired doneness Always use a meat thermometer.
Hints For Bake
- When using BAKE, you may need to lower the bake recipe temperature by 50°F to a minimum of 300°F.
- Check package directions to determine if the container is suitable for use in an Air Fryer.
- Press 📊 to turn this feature OFF. SHAKE will disappear from the screen.
Hints For Dehydrate
NOTE: When manually programming DEHYDRATE menu selection, TIME will increase or decrease in 1 hour increments.
- Dehydrate fresh, ripe foods to preserve nutrients and enhance flavor.
- Your Dual Basket Air Fryer's automated drying makes home dehydration both simple and rewarding and ensures healthy, safe, preservative-free results.
- DEHYDRATE combines low, steady heat with steady convection fan power.
- Precise low temperatures dry out foods evenly without cooking or overheating.
NOTE: Turn food several times during DEHYDRATE.
Air Fry / Roast Cooking Chart
Times are estimated and based on average sizes and weights.
ALWAYS USE A MEAT THERMOMETER TO ENSURE THAT MEAT, POULTRY AND FISH ARE COOKED THOROUGHLY BEFORE SERVING.
NOTE: Frying smaller batches will result in shorter cooking times and higher food quality. Adjust air frying TEMP and TIME as necessary to suit your taste. NOTE: Unless food is pre-packaged and pre-oiled, for browned and crispy results, all foods should be lightly oiled before air frying.
| Single Basket Dual Basket | |||
| Vegetables Temp Time Time | |||
| Asparagus, 1 bunch thin spears 400 °F 5-7 min 10 | -14 min | ||
| Asparagus, 1 bunch thick spears 400 °F 7-9 min 12 | -15 min | ||
| Cauliflower Florets, 3-4 cups | 400 °F 13-18 min | 18-25 min | |
| Egg Plant, 1 1/2 inch cubes (roasted) | 400 °F 15 min | 24 min | |
| Kale, 3 cups, stems removed | 375 °F | 9 min | 15-18 min |
| Peppers, Bell, 1 inch chunks | 375 °F | 10 min | 15-20 min |
| Pickles, breaded | 400 °F 5-7 min 9-13 min | ||
| Potatoes, white, French Fries, (fresh soaked, 1/4 to 1/3 inch thick) | 400 °F 16-20 min | 30-40 min | |
| Potatoes, white, 1 inch cubed | 400 °F 12-14 min | 24-35 min | |
| Potatoes, white, wedges | 390 °F | 20-25 min | 35-40 min |
| Broccoli Florets, 3-4 cups | 400 °F 15-20 min | 22-28 min | |
| Brussels Sprouts, 1lb | 375 °F | 12-15 min | 20-25 min |
| Corn on the Cob, 4 ears | 390 °F | 12-15 min | 18-20 min |
| Carrots, 2 1/2 cups, 1/2 inch pieces | 400 °F 10-12 min | 20-24 min | |
| Mushrooms, 3 cups sliced | 400 °F 10-12 min | 18-22 min | |
| Peppers, Jalapeno, poblano (roasted) | 375 °F | 10 min | 12-15 min |
| Zucchini, 1/4 inch discs | 400 °F 14-17 min | 22-24 min | |
| Root Vevetables, 1/2 inch chunks (roasted) | 400 °F | 15-20 min | 25-40 min |
| Single Basket Dual Basket | |||
| Beef | Temp Time Time | ||
| Hamburger, 1/4lb (up to 4) | 360 °F | 12-16 min | 16-18 min |
| Hot Dogs / Sauages | 360 °F | 10-15 min | 20-25 min |
| Meat Loaf, 1lb | 360 °F | 33-40 min | 45-50 min |
| Steak, 2 (8 oz) Steaks | 360 °F | 8-21 min | 10-24 min |
| Beef Tenderloin, 1lb, rare | 360 °F | 16 min | 18-20 min |
| Beef Tenderloin, 1lb, medium | 360 °F | 18 min | 20-24 min |
| Chicken Temp Time Time | |||
| Chicken Breast, boneless, skinless 360 °F 18-20 min | in 22-25 min | ||
| Chicken Thighs, 6 - 8oz ea, boneless 360 °F 20-25 min | min 28-30 min | ||
| Chicken Tenders/Fingers: battered 360 °F 13-15 min | in 16-19 min | ||
| Chicken Wings, 2lbs 400 °F 22-27 min 40-45 min | |||
| Single Basket Dual Basket | |||
| Pork | Temp Time Time | ||
| Lamb Loin Chops, 1 inch thick | 400 °F 8-12 min | 14-18 min | |
| Pork Chops, 1 inch thick | 375 °F 10 -14 min | 20-25 min | |
| Pork Chops, 2 inch thick | 375 °F 15-19 min | 22-28 min | |
| Single Basket Dual Basket | |||
| Fish and Sea Food | Temp Time Time | ||
| Shrimp, thawed and battered | 325 °F 12 min | 14-15 min | |
| Catfish Fingers, thawed and battered 400 °F 10-15 min | 18-25 min | ||
| Shrimp, thawed and sauced | 325 °F | 5-8min | 10-12 min |
| Salmon Filets, thawed | 400 °F 9-12 min | 17-24 min | |
| Single Basket Dual Basket | |||
| Frozen Foods* | Temp Time Time | ||
| Cheese Sticks | 350 °F 6-9 min | 10-12 min | |
| French Fries, Thick, 2 cups | 400 °F | 17-21 min | 24-30 min |
| French Fries | 400 °F 15-17 min 20-24 min | ||
| Onion Rings | 360 °F 12-16 min 18-22 min | ||
| Chicken nuggets, 12 oz box | 360 °F 10-15 min | 17-22 min | |
| Fish Sticks | 400 °F 12-18 min 18-22 min | ||
| Meatballs, 1 inch, pre-cooked | 390 °F | 7-9min | 11-14 min |
| Pizza 7 inch x 8 inch 360 °F 12-15 min 15-17 min | |||
- All items are to be air fried from frozen (do not thaw).
| Single Basket Dual Basket | |||
| Deserts | Temp Time Time | ||
| Apple Turnovers | 400 °F | 10 min | 14 min |
| Donuts | 350 °F 8 min | 9-11 min | |
USDA Cooking Guidelines
The USDA recommends that meats such as beef and lamb, etc. should be cooked to an internal temperature of 145irc F/63°C. Pork should be cooked to an internal temperature of 160irc F/71°C and poultry products should be cooked to an internal temperature of 170irc F/77°C - 180irc F/82°C to be sure any harmful bacteria has been killed. When reheating meat/poultry products, they should also be cooked to an internal temperature of 165irc F/74°C.
Dehydrate Chart
- Turn food several times during DEHYDRATE for even drying.
| Herb | Temp | Time | Herb | Temp | Time |
| Oregano 135 °F 2-3 hrs Parsley | 135 °F 2-3 hrs | ||||
| Thyme 135 °F 3-4 hrs Rosemary | 135 °F 2-3 hrs | ||||
| Tarragon 135 °F 3-4 hrs Sage 135 °F 3-4 hrs | |||||
| Kale ChipsStems Removed | 135 °F 2-3 hrs |
Fruit / Vegetables
Wash all fruit skins well.
Slice fruit into 1/4 inch thick slices and arrange with space between each slice to ensure even drying.
Rotate foods halfway through DEHYDRATE time for even drying.
| Dehydrate | Temp | Time | Dehydrate | Temp | Time |
| Apple RoundsCoreSlice into 1/4 inch slices | 135 °F 8-9 hrs | Orange SlicesFully driedCitrus is crisp when fully dried | 135 °F 10 | hrs | |
| Mango/Papaya Piecespeal slice into 1/4 inch slices | 135 °F 8-10 hrs | Tomatos RomaSkin side down | 150 °F 8-9 | hrs | |
| Kiwi14 inch rounds | 135 °F 6 hrs | Tomatoes, Cherry/GrapeSkin side down | 150 °F 5-9 | hrs | |
User Maintenance Instructions
This appliance requires little maintenance. It contains no user-serviceable parts. Any servicing requiring disassembly other than cleaning must be performed by a qualified appliance repair technician.
Care & Cleaning Instructions
WARNING! Allow the Dual Basket Air Fryer to cool fully before cleaning.
- Unplug the Dual Basket Air Fryer. Remove fryer baskets from the Air Fryer body. Make sure both fryer baskets and crisping trays have cooled completely before cleaning.
- Wash both fryer baskets and crisping trays in hot soapy water. Do not use metal kitchen utensils or abrasive cleansers or cleaning products as this may damage the non-stick coating.
- Both fryer baskets and crisping trays are dishwasher-safe. For best results, place in the top rack of your dishwasher to clean.
- Wipe the Dual Basket Air Fryer body with a soft, non-abrasive damp cloth to clean.
Storing Instructions
- Make sure the Dual Basket Air Fryer is unplugged and all parts are clean and dry before storing.
- Never store the Dual Basket Air Fryer while it is hot or wet.
- Insert each clean crisping tray into each fryer basket and store inside the Dual Basket Air Fryer body.
- Store Dual Basket Air Fryer in its box or in a clean, dry place.
Recipes
SYNC FINISH DINNER
Honey Ginger Chicken Wings & Air Fried Asian Rutabaga Fries
Serves: 2 or 3
Honey Ginger Chicken Wings
These delicious chicken wings are bathed in a rich, thick simple caramel sauce of made of honey, tamari and freshly grated ginger. A perfect balance of sweet salty ginger spiciness, these wings can be dangerously addictive.
- 1 lb. (6 large) whole chicken wings, split into flats, drums, and tips
• 1 tablespoon toasted sesame oil - 1/2 cup tamari
• 1 (4-inch) piece of fresh ginger, peeled and minced
• 1/4 cup rice vinegar - 1/4 cup honey
• 1/2 cup toasted sesame seeds
• 4 green onions, chopped - In a large bowl, prepare sauce. Combine all ingredients except chicken wings. Mix well. Add chicken wings and stir until chicken is thoroughly immersed.
- Cover and chill for 1 hour. Remove chicken. Reserve sauce.
- Add sauce to a medium saucepan, and bring to a boil. Reduce heat to simmer and cook until reduced by half. Set honey ginger sauce aside and keep warm.
- Add 6 split wings to the LEFT Air Fryer basket.
- Program the LEFT Dual Air Fryer basket to AIR FRY at 370irc F for 20 minutes.
Air Fried Asian Rutabaga Fries
Rutabaga is a little known root vegetable -- a cross between a cabbage and a turnip. The rutabaga has grown in popularity as a low-carb option that rivals the potato when it comes to snacking and overall deliciousness.
- 1 small rutabaga
• 1 tablespoon tamari
• 1 tablespoon olive oil
- teaspoon Chinese five-spice powder
• 1 tablespoon toasted sesame oil
- Use a potato peeler or a paring knife to peel the rutabaga. Then slice the rutabaga into 1/4-inch discs. Slice each disk into sticks.
- Toss the rutabaga fries and Asian sauce into a large zippered bag and shake until all raw rutabaga fries are coated.
- Place 2 to 3 cups of raw rutabaga sticks into the RIGHT Dual Air Fryer basket.
- Program the RIGHT Dual Air Fryer basket to AIR FRY at 430irc F for 15 minutes.
- Press SYNC FINISH to ensure both baskets will complete cooking together. Press START PAUTH to begin operation. HOLD will appear on the display as the Dual Air Fryer HOLDS the Rutabaga Fries to synchronize the final cook times.
NOTE: Shake the rutabaga basket every 5 minutes.
- Before serving, test chicken for doneness. Increase cook time if necessary.
- In a large bowl, add the reserved honey ginger sauce and the wings; toss to coat.
- Transfer to a platter and sprinkle Honey Ginger Chicken Wings with toasted sesame seeds and green onions. Serve with Asian Rutabaga Fries.
Recipes
Drizzled Fried Eggplant Stax
Serves: 2 or 3
We've simplified this recipe for easy weeknight or party preparation. Serve Eggplant Stax as a luscious appetizer. Basil pesto is slathered over air fried eggplant discs topped with shredded mozz and a freshly roasted tomato slice. Finish the presentation with a drizzle of aged balsamic vinegar.
- olive oil cooking spray
• 1 medium eggplant
• 1 cup Italian seasoned Panko breadcrumbs
• 2 tablespoons mayonnaise - 2 tablespoons plus 1/2 cup Italian basil
pesto, separated
• 1 cup freshly shredded mozzarella
• 2 to 3 plum tomatoes
• Balsamic vinegar, for drizzling
- Slice eggplant into 1/4-inch rounds.
- In a small bowl, combine mayonnaise and pesto. Brush onto each disc.
- Firmly press breadcrumbs into each eggplant disc. Place coated eggplant on a plate and allow rest for 5 minutes.
- Program the Dual Air Fryer to AIR FRY at 370irc F for 8 minutes.
- Place 6 breaded eggplant rounds into the air fryer basket. Spray tops with olive oil.
- At the SHAKE alarm, turn each disc over, spray with olive oil, and continue air frying. If discs are not tender, extend cook time 2 minutes or until done to your liking.
- Roast tomatoes. Cut tomatoes into 1/4-inch slices. Add to the RIGHT air fryer basket. Program the Dual Air Fryer to ROAST at 400irc F for 8 minutes.
- Top each eggplant round with pesto, then cheese and 1 slice roasted tomato. If desired, stack another round, add pesto and cheese. Top with tomato and more cheese.
- Return basket back into the Dual Air Fryer and BROIL for 2 minutes, or until cheese melts to your liking.
- Drizzle Eggplant Stax with balsamic vinegar before serving.
Boneless Breaded Roasted Pork Chops & Honey Baked Apples
Serves: 8
Down Home Delicious! Pork chops paired with hot and steamy Honey Baked Apples.
A hearty, simple, satisfying meal as delicious as it is easy to make. We prepared the pork in 2 batches while the apples were baking.
- olive oil cooking spray
- 2 lb. boneless center cut pork chops, cut into 8 (4 oz.) chops
• 8 teaspoons Dijon mustard
• 8 teaspoons mayonnaise
• 1 cup Italian seasoned breadcrumbs
Marinade:
• 1 cup apple cider or juice
• 4 teaspoons brown sugar
• 4 teaspoons Worcestershire sauce
- Whisk marinade ingredients together in a large covered container or zipper bag. Marinate pork for up to 4 hours.
- Remove chops from marinade.
- In a small bowl, combine mayonnaise and mustard.
- Smear 2 teaspoons mustard mayo all over each pork chop. Roll chops into the breadcrumbs and press into place. Repeat with the remaining chops.
- Add 4 breaded pork chops to either basket. Program the Dual Air Fryer to ROAST at 375irc F for 10-14 minutes.
- At the SHAKE alarm, turn chops over.
- Remove first batch of pork chops and add repeat procedures for the second batch.
Recipes
Honey Baked Apples
- 4 golden delicious apples, cored (may substitute any apple of your choice)
• 4 tablespoons honey
• 2 tablespoons butter, divided
- Cinnamon to taste
- Wash and core apples.
- Fill each with 1 tablespoon butter and 1 tablespoon honey.
- Add prepared apples to the empty basket. Program the Dual Air Fryer to BAKE at 350irc F for 30 minutes.
- Press SHAKE FOOD to turn this feature OFF.
- Check Honey Baked Apples for softness. Increase cook time if necessary.
- Cut each apple in half. Sprinkle with cinnamon before serving.
BELLA
Limited TWO-YEAR Warranty
SENSIO Inc. hereby warrants that for a period of TWO YEARS from the date of purchase, this product will be free from mechanical defects in material and workmanship, and for 90 days in respect to non-mechanical parts. At its sole discretion, SENSIO Inc. will either repair or replace the product found to be defective, or issue a refund on the product during the warranty period.
The warranty is only valid for the original retail purchaser from the date of initial retail purchase and is not transferable. Keep the original sales receipt, as proof of purchase is required to obtain warranty validation. Retail stores selling this product do not have the right to alter, modify, or in any way revise the terms and conditions of the warranty.
EXCLUSIONS:
The warranty does not cover normal wear of parts or damage resulting from any of the following: negligent use of the product, use of improper voltage or current, improper routine maintenance, use contrary to the operating instructions, disassembly, repair, or alteration by anyone other than qualified SENSIO Inc. personnel. Also, the warranty does not cover Acts of God such as fire, floods, hurricanes, or tornadoes.
SENSIO Inc. shall not be liable for any incidental or consequential damages caused by the breach of any express or implied warranty. Apart from the extent prohibited by applicable law, any implied warranty of merchantability or fitness for a particular purpose is limited in time to the duration of the warranty. Some states, provinces or jurisdictions do not allow the exclusion or limitation of incidental or consequential damages, or limitations on how long an implied warranty lasts, and therefore, the above exclusions or limitations may not apply to you. The warranty covers specific legal rights which may vary by state, province and/or jurisdiction.
HOW TO OBTAIN WARRANTY SERVICE:
You must contact Customer Service at our toll-free number: 1-866-832-4843. A Customer Service Representative will attempt to resolve warranty issues over the phone. If the Customer Service Representative is unable to resolve the problem, you will be provided with a case number and asked to return the product to SENSIO Inc. Attach a tag to the product that includes: your name, address, daytime contact telephone number, case number, and description of the problem. Also, include a copy of the original sales receipt. Carefully package the tagged product with the sales receipt, and send it (with shipping and insurance prepaid) to SENSIO Inc.'s address. SENSIO Inc. shall bear no responsibility or liability for the returned product while in transit to SENSIO Inc.'s Customer Service Center.
natural_image
Technical line drawing showing hands installing or adjusting a grid-like component into two labeled storage bins (no text or symbols present)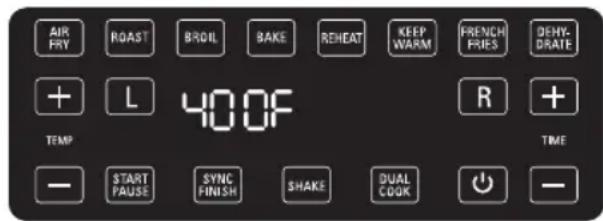
Figure 8 Figure 9

TÉCNICA DE FREÍDO AL AIRE
natural_image
Abstract logo design featuring a stylized heart and letter 'C' (no text or symbols)GRACIAS
por su compra
REGISTRARSE

natural_image
Generic user profile icon with a plus sign, no text or symbols presentnatural_image
Icon of a person with a star rating and speech bubble (no text or symbols)natural_image
Three social media and video platform icons: Facebook, Twitter, and YouTube (no text or symbols beyond logos)BellaLife

BellaLifestyle

bellahousewares.com
For customer service questions or comments
- FREIDORA DE AIRE
- CON CANASTA DOBLE
- THANK YOU
- for your purchase
- myBELLAlife
- Contents
- Índice
- READ ALL INSTRUCTIONS.
- FOR HOUSEHOLD USE ONLY SAVE THESE INSTRUCTIONS
- ADDITIONAL IMPORTANT SAFEGUARDS
- Notes on the Plug
- Notes on the Cord
- Plasticizer Warning
- Electric Power
- Getting To Know Your 8.0 Qt. Dual Basket Air Fryer
- Dual Touchscreen Control
- ON/OFF
- LEFT/RIGHT Basket Control
- TEMP (+ or +)/TIME (or+) -
- SHAKE
- DUAL COOK
- SYNC FINISH
- START/PAUSE
- Before Using for the First Time
- Operating Instructions
- Menu Selections: AIR FRY, ROAST, BROIL, BAKE, REHEAT, KEEP WARM, FRENCH FRIES, DEHYDRATE Pre-Programmed TEMPS & TIMES Chart Manual Operation
- Single Basket: Manual Operation
- Dual Basket: Manual Operation
- Air Fry Technique
- Air Frying Pre-Packaged Frozen Foods
- Hints For Roast
- Hints For Broil
- Hints For Bake
- Hints For Dehydrate
- Air Fry / Roast Cooking Chart
- ALWAYS USE A MEAT THERMOMETER TO ENSURE THAT MEAT, POULTRY AND FISH ARE COOKED THOROUGHLY BEFORE SERVING.
- USDA Cooking Guidelines
- Dehydrate Chart
- Fruit / Vegetables
- User Maintenance Instructions
- Care & Cleaning Instructions
- Storing Instructions
- Recipes
- SYNC FINISH DINNER
- Honey Ginger Chicken Wings & Air Fried Asian Rutabaga Fries
- Honey Ginger Chicken Wings
- Air Fried Asian Rutabaga Fries
- Drizzled Fried Eggplant Stax
- Boneless Breaded Roasted Pork Chops & Honey Baked Apples
- Marinade:
- Honey Baked Apples
- BELLA
- Limited TWO-YEAR Warranty
- EXCLUSIONS:
- HOW TO OBTAIN WARRANTY SERVICE:
- TÉCNICA DE FREÍDO AL AIRE
- GRACIAS
- por su compra
- REGISTRARSE
Brand : BELLA
Model : 8qt Dual Basket Touchscreen
Category : Deep fryer