
MY-5039P - Frying Pan MIDEA - Free user manual and instructions
Find the device manual for free MY-5039P MIDEA in PDF.


| Product Type | Electric Pressure Cooker |
| Brand | Midea |
| Model | MY-5039P |
| Voltage / Frequency | 220-240 V ~ 50/60 Hz |
| Power Consumption | 900-1070 W |
| Inner Pot Diameter | 22 cm |
| Inner Pot Capacity | 5.0 L |
| Working Pressure | 70 kPa |
| Keep Warm Temperature | 60-80 °C |
| Control Type | LED display with push buttons |
| Number of Cooking Functions | 17 (including Rice, Multigrain, Bean/Tendons, Ribs, Baby Food, Reheat, Fish, Meat/Chicken, Steam, Congee, Beef/Mutton, Broth, Soup, Hot Pot, Fast Cook, Porridge, Stew) |
| Preset Timer | Yes (up to 24 hours) |
| Texture Selection | Yes (for select functions) |
| Safety Features | Float valve, anti-block shield, pressure release valve, locking lid, thermal cutout |
| Inner Pot Material | Stainless steel (with non-stick coating?) – refer to manual |
| Accessories Included | Rice paddle, soup spoon, measuring cup, condensation collector, user manual |
| Dishwasher Safe Parts | Inner pot, sealing ring, exhaust valve, accessories (except lid and housing) |
| Clog Prevention | Avoid cooking laver, oatmeal, or dry foods without soaking |
| Power Cord Length | Approx. 1 m (estimation based on typical models) |
| Weight | Approx. 5 kg (estimation for 5L pressure cooker) |
Frequently Asked Questions - MY-5039P MIDEA
User questions about MY-5039P MIDEA
0 question about this device. Answer the ones you know or ask your own.
Ask a new question about this device
Download the instructions for your Frying Pan in PDF format for free! Find your manual MY-5039P - MIDEA and take your electronic device back in hand. On this page are published all the documents necessary for the use of your device. MY-5039P by MIDEA.
USER MANUAL MY-5039P MIDEA
natural_image
Line drawing of a cooking pot with lid and side panel (no text or symbols)(Pictures in the text are for reference only, please refer to the actual product)
Table of Contents
Important Safeguards....2
Specifications 4
Product Structure ....4
Controls and State of the Cooker ....5
Control Panel 5
State of the Cooker....5
Operation Keys ....5
Function Keys 6
Before the First Use ....6
Remove and Install the Anti-Block Shield....6
Remove and Install the Sealing Ring....6
Safe Lid Opening 7
Cooking Preparation....7
Cooking with Your Cooker....8
Pressure Cooking 8
Warming 11
Care and Maintenance 12
Cleaning....12
Electrical Circuit Diagram 12
Troubleshooting....13
Important Safeguards
When using electrical appliances, basic safety precautions should always be followed including the following, please read all instructions.
- Before using this product, please read this User Manual carefully.
- Do not place the unit on an unstable location. It is strictly prohibited to use it on a newspaper, foam or other object that may easily block the vent hole at the bottom.
- Never use it in a place which is near water or fire. Do not use it in a place exposed to direct sunshine or oil splash. Put it in a place out of the reach by children.
-
Never place the product, power cord or plug in water or other liquid.
-
If a spare part such as wire and plug is damaged or the product fails, stop the operation instantly and send it to the service center for inspection and repair. Repair by the user is not allowed.
-
Never make unauthorized replacement of any spare part inside the pressure cooker, as this may cause electric shock, fire or injury.
-
Before use each time, be sure to check the anti-block shield, float valve and exhaust valve for obstruction, wipe the surface of the inner pot and the heating plate to confirm they are free of any foreign object; check the exhaust valve for sealing location.
-
When in use, never hang the power cord on a location which may easily trip over.
-
Avoid cooking food such as laver and oat meal in the pot, as they may easily clog the anti-block shield.
-
When cooking dry food, please soak for a period of time.
-
The maximum cooking amount shall not exceed the MAX level marked inside the inner pot.
-
When in operation, never move this product and prohibit compulsory opening.
-
When in operation, never move your hands or face to the exhaust valve or float valve to avoid being scalded.
-
When in operation, never touch the cover with your hands to avoid being scalded.
-
After cooking, do not open the cover until you confirm that there is no pressure inside or pressure has decreased sufficiently.
-
When opening the cover after cooking, do not touch the inner pot and cover inside with your hands directly to avoid being scalded.
-
Before cleaning this product, please unplug it or disconnect the power supply.
-
It is strictly prohibited to use this product for purposes other than those specified.
-
CAUTION: In order to avoid a hazard due to inadvertent resetting of the thermal cutout, this appliance must not be supplied through an external switching device, such as a timer, or connected to a circuit that is regularly switched on and off by the utility.
-
Keep the cooker out of reach of children. Do not allow them to use the appliance without supervision.
-
This appliance is not intended for use by persons (including children) with reduced physical, sensory or mental capabilities, or lack of experience and knowledge, unless they have been given supervision or instruction, concerning use of the appliance by a person responsible for their safety.
-
This appliance is intended to be used in household and similar applications such as: -staff kitchen areas in shops, offices and other working environments; -farm houses; -by clients in hotels, motels and other residential type environments; -bed and breakfast type environments.
- If the supply cord is damaged, it must be replaced by the manufacturer, its service agent similarly qualified persons in order to avoid a hazard.
- The ducts in the pressure regulator allowing the escape of steam should be checked regularly to ensure that they are not blocked.
Warning: Be careful to avoid spillage on the connector.
Warning: Misuse may cause potential injury.
Warning: The heating element surface is subject to residual heat after use.
The appliance is not intended to be operated by means of an external timer or a separate remote-control system.
This appliance shall not be used by children. Keep the appliance and its cord out of reach of children.
Appliances can be used by persons with reduced physical, sensory or mental capabilities or lack of experience and knowledge if they have been given supervision or instruction concerning use of the appliance in a safe way and understand the hazards involved.
Children shall not play with the appliance.
The appliance must not be immersed.
The container must not be opened until the pressure has decreased sufficiently.

natural_image
Symbol of a trash bin crossed with no visible text or labelsThis marking indicates that this product should not be disposed with other household wastes throughout the EU.
To prevent possible harm to the environment or human health from uncontrolled waste disposal, recycle it responsibly to promote the sustainable reuse of material resources. To return your used device, please use the return and collection systems or contact the retailer where the product was purchased. They can take this product for environmental safe recycling.
Specifications
| Voltage/Frequency P | 220-240V~ 50/60Hz | 900-1070W | |
| Inner Pot Caliber | 22cm 5.0L | Inner Pot Volume | |
| Working Pressure | 70kPa | Warm Temperature | 60°C~80°C |
| Accessories | Rice paddle, soup spoon, measuring cup,Condensation collector user manual. | ||
Product Structure

Controls and States of the Cooker
Control Panel
The control panel of your electric pressure cooker consists of an LED display, 6 operation keys and 5 function keys. Each function has a function indicator light.

flowchart
graph TD
    A["Cancel button"] --> B["Timer"]
    B --> C["Warm"]
    C --> D["Rice"]
    C --> E["Multigrain"]
    C --> F["Bean/Tendons"]
    C --> G["Ribs"]
    C --> H["Baby food"]
    C --> I["Reheat"]
    C --> J["Fish"]
    C --> K["Meat/Chicken"]
    C --> L["Steam"]
    C --> M["Congee"]
    C --> N["Beef/Mutton"]
    C --> O["Broth"]
    P["Hot pot button"] --> Q["Texture"]
    R["Texture button"] --> S["Menu"]
    T["Menu button"] --> U["Stop Button"]
    V["Function indicator"] --> W["Quick function button"]
    X["Start"] --> Y["Stop Button"]
States of the Cooker
Your electric pressure cooker has 4 states which are shown on the LED display and function indicators.
- OPEN state (the LED display shows "OPEN"): means the cooker lid is in the open state.
- Standby state: the LED display shows “----”.
- Preset state: the LED display shows preset time and the time counts down, and the activated function indicator lights up.
- Program operating state: the LED display shows “[---]” and the activated function indicator lights up.
- Keep-Warm state: the LED display shows “OH” and the time counts up, and the “Warm” function indicator lights up.
Operation Keys
The 6 operation buttons include “Cancel”, “Timer”, “Warm”, “Hot pot”, “Texture”, and “Menu”. Cancel button is used to cancel the setting function or cancel the current working state. Timer button is used to pre-set time, Warm button is for keeping the food warm, Hot pot button is for cooking with the lid in open state, Texture button is for setting the food texture and Menu button is for general functions setting.
Function Keys
The most important key is “Cancel”. When the cooker is being programmed or any program is in effect, press this key will cancel the program and take the cooker to standby state. When the cooker is in standby state, pressing this key activates the keep-warm program.
Quick function button
There are 5 quick function buttons, they are: "Fast cook", "Porridge", "Start", "Soup" and "Stew" keys.
Before the First Use
Before the first use, please take out all accessories from the package and read this manual carefully. Please pay particular attention to operational instructions and cautions to avoid any injury or property damage. Please wash the inside of the lid and the inner pot with warm soapy water, rinse and dry thoroughly. Wipe the outer housing with a clean damp cloth. Never immerse the cooker housing in water or any other liquid. The inner pot, sealing ring and exhaust valve and all accessories are dishwasher safe. But never clean the lid and housing in a dishwasher.
Remove and Install the Anti-Block Shield
The anti-block shield can be removed by pushing it on the side to lift it up. To install the anti-block shield, position it in place and press it down.

flowchart
graph LR
    A["Hand holding small object"] --> B["Close-up of circular component"]
    B --> C["Close-up of device"]
Remove and Install the Sealing Ring
The sealing ring can be removed by pulling upwards from the sealing ring rack in sections. To install the sealing ring, pressing it down into the rack section by section. The sealing ring can be installed on either side facing up.

natural_image
Diagram showing two hands holding a circular device with internal components, before and after assembly (no text or symbols)Please note the following:
- Prior to each use, inspect to make sure the sealing ring is well seated in the sealing ring rack and the anti-block shield is mounted properly on the steam release pipe.
• After use, remove any foreign objects from the sealing ring and anti-block shield. - Keep the sealing ring clean to avoid odor. Washing the sealing ring in warm soapy water or dishwater can remove odor. However, it is normal for the sealing ring to absorb the smell of certain acidic foods. That is why it is always a good idea to have more than one sealing ring on hand.
- Never pull the sealing ring by force, as the pulling may cause deformation and affect its function in sealing the pressure.
- A sealing ring with cracks, cuts or other damages should not be used. A new sealing ring replacement should be used.
Safe Lid Opening
- Make sure the pressure cooking program has completed or press "Cancel" key to terminate the program.
- Releasing pressure in one of the following approaches.
Quick Release:
- Press the “Steam Release 🎨” key on the lid handle to let out steam until the float valve drops down.
Caution:
- Please keep hands and face away from the hole on the top of the exhaust valve when using Quick Release. The escaping steam is very hot and can cause scalding.
- Never pull out the exhaust valve when it is letting out steam.
- Please be aware that Quick Release is not suitable for food in large liquid volume or with high starch content (e.g. porridge, congee, sticky liquids, soup, etc.). Food content may splatter out with steam. Use Nature Release instead.
Nature Release:
- Allow the cooker to cool down naturally until the float valve drops down. This may take 10 to 15 minutes after cooking is finished and the cooker is in Keep-Warm mode.
-
Putting a wet towel on the lid can speed up cooling.
-
Open the lid: Hold the lid handle, turn the lid counterclockwise to the open position, and lift the lid up to open.
-
Caution: Do not open the lid until pressure inside the pot is completely released. As a safety feature, until the float valve drops down, the lid is locked and cannot be opened.
- If the float valve is stuck due to food debris or stickiness, you can push it down with a pen or chopsticks when you are certain the pressure has been released by pressing the “Steam Release 🤗” key on the lid handle.
Cooking Preparation
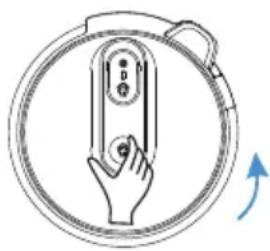
1. Open the lid
Holding the lid handle with your hand, rotate counter-clockwise approximately 30 degrees until the end.
2. Check whether all parts on the lid are assembled properly
Check the float valve and exhaust valve for obstructions. Make sure that the sealing ring is well seated inside its holding rack, the anti-block shield is installed properly and the float valve can move up and down easily.
natural_image
Diagram of a hand pressing a button inside a circular device with an arrow indicating rotation (no text or symbols)3. Take out inner pot, and put in food and liquid
The total amount of food and water should NEVER exceed the maximum level marking of the inner pot. It is recommended that you do not fill the unit over 2/3 full. When cooking foods that expand during cooking such as rice, beans or dried vegetables, do not fill the unit over 1/2 full. Over filling may risk clogging the

vent pipes and developing excess pressure. This could also cause spillage and may damage to the unit.
4. Place the inner pot inside the cooker housing
Before that, be sure to remove foreign objects and wipe dry the outside of the inner pot and the heating element inside of the cooker.
After putting the inner pot inside the housing, rotate the inner pot slightly to ensure good contact between the inner pot and the heating element.

5. Close the lid completely
Hold the lid handle and put the lid on the cooker, with the mark on the lid and mark on the housing rim are aligned.
Rotate the lid clockwise approximately 30 degrees until the end.

natural_image
Illustration of a hand pressing a button inside a circular device with a handle (no text or symbols)Cooking with Your Cooker
Pressure Cooking
This following procedure is “Rice”, “Ribs”, “Fish”, “Congee”, “Multigrain”, “Baby food”, “Meat/Chicken”, “Beef/Mutton”, “Bean/Tendons”, “Reheat”, “Steam”, “Broth” functions.
Instructions for Use
Original flavour soup
Taking the original flavour soup as an example, you may choose other menus as needed.
1 Prepare soup base and clean it. Clean soup base (pork bone, corn, carrot etc.), chop them and then put all into inner cooking pot.
2 Add water to corresponding fill line Add appropriate water to corresponding fill line based on ingredients or personal preference. Note: Water shall not exceed max fill line.
3 Connect the power Insert the power plug and ensure proper connection with the socket.
4 Select function

Press "Soup" button to enter soup cooking state.
5 Soup cooking state Soup cooking completed

If you'd like to switch or cancel current function, press "Cancel" button to select again.
After the soup is completed, the cooker automatically goes into "Keep warm" state.
Pre-set fragrant steamed rice
Eg: Pre-set fragrant steamed rice, to be ready by next morning 7:30am. (Pre-set time refers to count down time, the cooking will be completed when pre-set time has reached. If the current time is 10:30 pm (GMT+8); then the pre-set time shall be 9h (9:00)).
Note: "Reheat", "Hot pot", "Fast Cook", "Porridge", "Soup" and "Stew" functions cannot be pre-set, subject to final product prevail.
1 Prepare rice and water
Place the rinsed rice into the cooking and choose the appropriate water level according to rice amount. Add water until the water level and increase or reduce the amount as desired. Note: Water shall not exceed max fill line.
2 Select function

Close the lid, press the "Menu" button to select the desired function (such as Rice), or choose another menu.
3 Pre-set timer setting Start pre-set

Press the "Timer" button, enter the pre-set time state, and press the "Timer" button continuously to adjust the time.
4

Press "Start" button, the cooking will be finished at appointed time.
Food texture selection
Taking Rice as example, you may also select "Ribs", "Fish", "Congee", "Multigrain", "Baby food", "Meat/Chicken", "Beef/Mutton", "Bean/Tendons", "Steam" and "Broth".
Note: "Reheat", "Hot pot", "Fast Cook", "Porridge", "Soup" and "Stew" functions cannot select texture.
1 Use measurement cup to take rice and wash the rice properly.
Do not use the steel ball to clean the inner pot to avoid scratching the inner pot surface.
2 Close the lid, press the "Menu" button to select the desired function (such as Rice), or choose another menu.
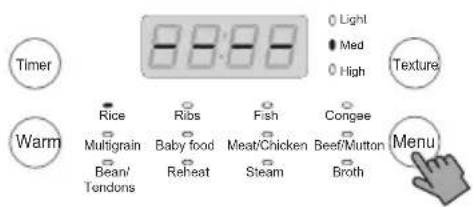
3 Press "Texture" button to select the desired taste, such as "Medium".

4 Press "Start" button to start cooking.

Reheat
Note: When using this function, the maximum amount of rice cannot exceed marks 4.
After stirring loose the rice, sprinkle 50-80 grams of water, press "function" button to select "Reheat" function.
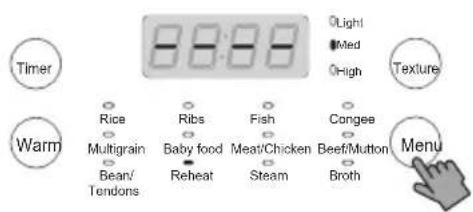
2 Press the "Timer" button to adjust the heating time (adjustable range of 8-20 minutes), then press the "Start" button to start heating.

Warming
Pressing the “Warm” key in standby state activates the “Keep Warm” function. When “Keep Warm” function starts, the keep warm indicator is bright, and “OH” is shown on the screen. counting time in hours, does not display the holding time after time more than 24 hours, display “----”. The “Keep Warm” function can be used with or without the lid closed.
Care and Maintenance
Regular care or maintenance is essential in ensuring that this product is safe for use. If any of the following circumstances take place, please stop using the appliance immediately and contact support team.
- Power cord and plug suffer from expansion, deformation, discoloration, damages, etc.
- A portion of the power cord or the plug gets hotter than usual.
Electric pressure cooker heats abnormally, emitting a burnt smell. - When power on, there are unusual sounds or vibrations.
If there is dust or dirt on the plug or socket, please remove dust or dirt with a dry brush.
Cleaning
Caution: please make sure the appliance has cooled down and is unplugged before cleaning.
- Clean the product after each use. Wipe the black inner housing rim and slot dry with cloth to prevent rusting on the exterior pot rim.
- Remove the lid and take out the inner pot, wash them with detergent, rinse with clear water and then wipe dry with a soft cloth.
- Use water to clean the lid, including the sealing ring (which can be removed), exhaust valve, anti-block shield, and wipe them clean with dry soft cloth. Do not take apart the steam release pipe assembly.
- Clean the cooker body with clean damp cloth. Do not immerse the cooker into water. Do not use a wet cloth to clean the pot while the power cord is plugged into the power outlet.
Electrical Circuit Diagram
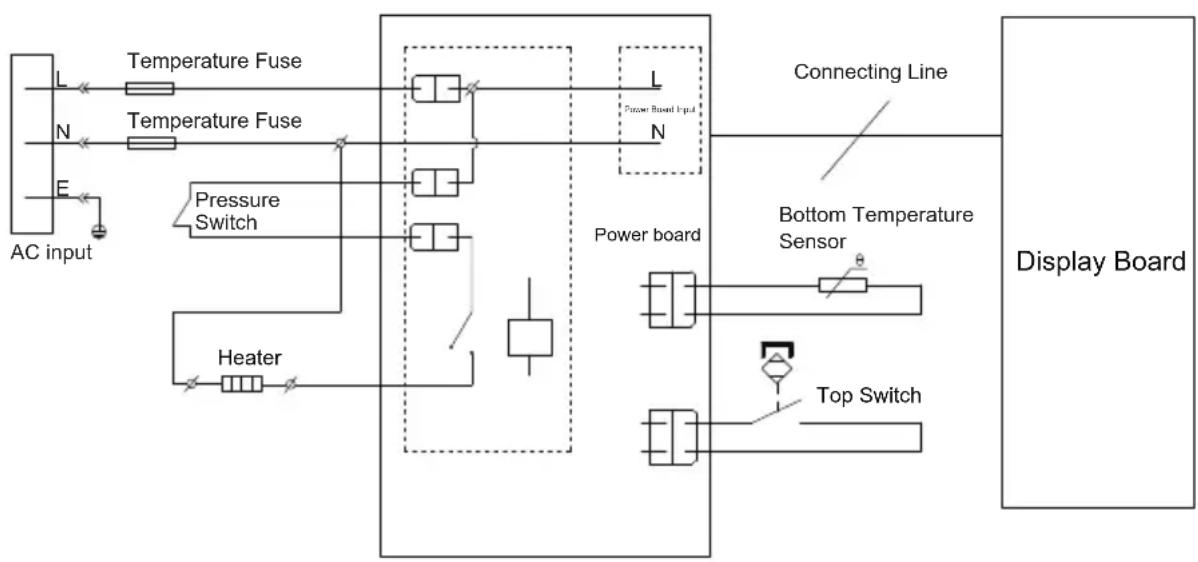
flowchart
graph TD
    A["AC input"] --> B["L"]
    A --> C["N"]
    A --> D["E"]
    B --> E["Temperature Fuse"]
    C --> F["Temperature Fuse"]
    D --> G["Pressure Switch"]
    G --> H["Heater"]
    H --> I["Power board Input L/N"]
    I --> J["Power board"]
    J --> K["Bottom Temperature Sensor"]
    K --> L["Display Board"]
    L --> M["Top Switch"]
    M --> N["Power board"]
Troubleshooting
The cases in the following tables do not always indicate a faulty cooker. Please examine the cooker carefully before contacting the support for repair.
| Problem | Possible Reason Solution | |||
| 1 | Difficult to close the lid | Sealing ring not installed properly Position the sealing ring well | ||
| Float valve in the popped-up position | Press the float valve lightly downwards | |||
| 2 | Difficult to open the lid | Pressure exists inside the cooker | Use the steam release handle to reduce the internal pressure. Open the lid after the pressure is completely released. | |
| Float valve stuck at the popped-up position | Press the float valve lightly with a pen or chopstick. | |||
| 3 | Steam leaks from the side of the lid | No sealing ring | Install the sealing ring | |
| Sealing ring damaged | Replace the sealing ring | |||
| Food debris attached to the sealing ring | Clean the sealing ring | |||
| Lid not closed properly | Open then close the lid again | |||
| 4 | Steam leaks from float valve for over 2 minutes | Food debris on the float valve silicone seal | Clean the float valve silicone seal | |
| Float valve silicone ring worn-out | Replace the float valve silicone seal | |||
| 5 | Float valve unable to rise | Too little food or water in inner pot | Add water according to the recipe | |
| Float valve obstructed by the lid locking pin | Close the lid completely | |||
| 6 | Steam comes out from exhaust valve non-stop | Steam release handle not in sealing position | Turn the release handle to the sealing position | |
| Pressure control fails | Contact support online | |||
| 7 | Display remains blank after connecting the power cord | Bad power connection or no power | Inspect the power cord to ensure a good connection, check the power outlet is active. | |
| Cooker's electrical fuse was blown | Contact support online | |||
| 8 | Product in standby mode, “Close Lid” indicator is on, select the function button but no response | The lid is not closed properly | Close the lid again | |
| 9 | Display | E1 | Open circuit of bottom sensor | Please return the appliance to service center for repairing |
| E2 | Short circuit of bottom sensor | |||
| C1 | Overtemperature protection | Please check whether there is water or food in the pot; after adjustment, the appliance can be normally used after beep stops; otherwise, send it to service center. | ||
| E8 | Open circuit of press switch | Please return the appliance to service center for repairing | ||
| 10 | Rice half cooked or too hard | Too litter water | Adjust dry-rice and water ratio according to recipe | |
| Cover opened prematurely | After cooking cycle completes, leave the cover on for 5 more minutes. | |||
| 11 | Rice too soft | Too much water | Adjust dry-rice and water ratio according to recipe | |
For any technical improvement or change in appearance or name plate, changes shall be placed in the revised manual without further notice. In case of changes in appearance and color, please refer to the actual product for detailed information.


- Table of Contents
- Important Safeguards
- Specifications
- Product Structure
- Controls and States of the Cooker
- Control Panel
- States of the Cooker
- Operation Keys
- Function Keys
- Quick function button
- Before the First Use
- Remove and Install the Anti-Block Shield
- Remove and Install the Sealing Ring
- Please note the following:
- Safe Lid Opening
- Quick Release:
- Caution:
- Nature Release:
- Cooking Preparation
- Open the lid
- Check whether all parts on the lid are assembled properly
- Take out inner pot, and put in food and liquid
- Place the inner pot inside the cooker housing
- Close the lid completely
- Cooking with Your Cooker
- Pressure Cooking
- Instructions for Use
- Original flavour soup
- Pre-set fragrant steamed rice
- Food texture selection
- Reheat
- Warming
- Care and Maintenance
- Cleaning
- Electrical Circuit Diagram
- Troubleshooting
Brand : MIDEA
Model : MY-5039P
Category : Frying Pan