
QT15S - Subwoofer Qtx - Free user manual and instructions
Find the device manual for free QT15S Qtx in PDF.


| Product Type | Active Subwoofer |
| Brand | Qtx |
| Model | QT15S |
| Driver Size | 15 inches |
| Amplifier Power | 500 W RMS |
| Impedance | 8 ohms |
| Frequency Response | 30 Hz - 200 Hz |
| Sound Pressure Level | 120 dB SPL |
| Dimensions (W x H x D) | 480 x 430 x 530 mm |
| Weight | 28 kg |
| Power Supply | AC 220 V, 50/60 Hz |
| Input Connectors | XLR, 1/4" Jack, RCA |
| Output Connectors | XLR Link |
| Controls | Volume, Crossover, Phase |
| Enclosure Material | MDF with vinyl finish |
| Cleaning Instructions | Wipe with a dry, soft cloth. Avoid solvents. |
| Safety Precautions | Do not expose to moisture. Use correct voltage. Ensure proper ventilation. |
| Spare Parts / Repairability | Contact Qtx support for spare parts. Repairs by qualified technicians only. |
| General Information | Designed for PA and live sound reinforcement. Rugged construction for portable use. |
Frequently Asked Questions - QT15S Qtx
User questions about QT15S Qtx
0 question about this device. Answer the ones you know or ask your own.
Ask a new question about this device
Download the instructions for your Subwoofer in PDF format for free! Find your manual QT15S - Qtx and take your electronic device back in hand. On this page are published all the documents necessary for the use of your device. QT15S by Qtx.
USER MANUAL QT15S Qtx
Order ref: QT15SA (170.751UK)
QT18SA (170.754UK)
User Manual

Version 1.1

Caution: Please read this manual carefully before operating
Damage caused by misuse is not covered by the warranty
Introduction
Thank you for choosing a QT-series active subwoofer as part of your sound system. This unit is designed to offer powerful sub frequencies for PA systems in leisure and entertainment applications.
Package Contents
Please check the contents to ensure that the product has been received in good condition with the appropriate mains lead(s). If you find that the product has arrived with any problems, please contact your retailer at once.
Warning
This product contains no user-serviceable parts so make no attempt to try to fix or modify this item yourself as this will invalidate the warranty. We recommend you keep the original package and proof of purchase for any possible replacement or returned demand. To prevent the risk of fire or electric shock, do not expose this appliance to rain or moisture. To prevent electric shock do not remove the cover. No user serviceable parts inside. Refer servicing to qualified service personnel.
Safety: Labelling Conventions
| CAUTIONRISK OF ELECTRIC SHOCKDO NOT OPEN | AVISRISQUE DE CHOC ELECTRIQUENE PAS OUVRIR |
| This symbol indicates that dangerous voltage constituting a risk of electric shock is present within this unit |
| This symbol indicates that there are important operating and maintenance instructions in the literature accompanying this unit. |
Prior to connecting mains, check the supply voltage is correct and the mains lead is OK.
Avoid ingress of water or particles into the enclosure.
If the mains fuse blows continually, refer the unit to qualified service personnel.
Placement
Keep the unit out of direct sunlight and away from heat sources.
Keep the unit away from moisture or dusty environments.
Avoid locations where liquids may be spilled onto the unit.
Ensure that any supporting structures have adequate load capacity for the weight of the unit.
Ensure adequate space for cooling to the rear panel and easy access for controls and connections.
Cleaning
Use a soft cloth with a neutral detergent to clean the cabinet, panel and controls.
To avoid damage, do not use solvents to clean this equipment.
Rear Panel Layout
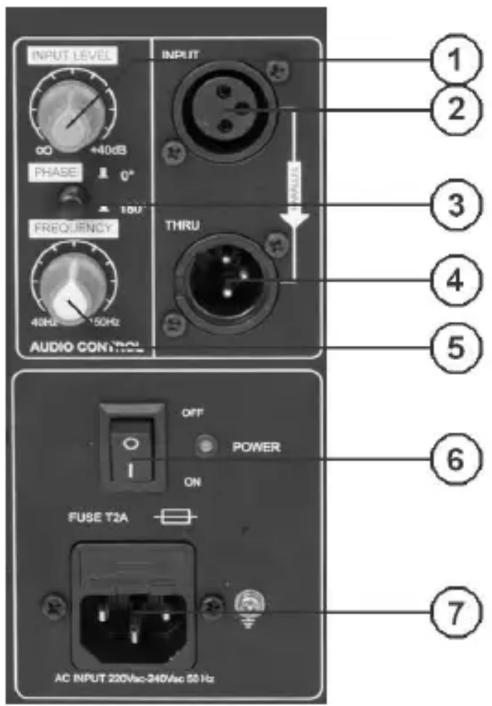
- INPUT LEVEL control
- Line level INPUT XLR
- Phase switch
- Line output THRU XLR
- FREQUENCY control
- Power ON/OFF switch
- IEC mains power inlet
Setup & Operation
With INPUT LEVEL turned fully down and power switch off, connect the IEC to an appropriate mains outlet.
Connect output of mixer or any line level signal to the INPUT via XLR. If the signal is to continue to further active speakers, connect these from the THRU line level XLR.
Begin with the FREQUENCY control in the mid position (12-o-clock position)
Press the power switch on and gradually increase the INPUT LEVEL until the bass signal is heard through the speaker.
Turning the FREQUENCY control up will include more mid frequencies and turning it down will eliminate all but the lowest frequencies. Adjust the FREQUENCY control to the desired tone, noting that lower settings may need the INPUT LEVEL turning up to compensate for the narrower frequency band.
The PHASE switch can help eliminate speakers which are "out-of-phase" from cancelling each other's signals out. The correct setting for this switch is whichever setting gives the loudest output – by a process of trial and error. One or other setting may also help to avoid feedback. If there is no difference in volume or feedback, leave the switch in the "0°" position (out)
To avoid loud noises when powering down, turn down the OUTPUT LEVEL before switching off.
Specifications
| Model | QT15SA | QT18SA |
| Power supply | 220-240Vac 50/60Hz (IEC) | |
| Cutoff Frequency | 40 – 150Hz | |
| Connections | XLR line in, XLR line out | |
| Main driver | 38cm (15") 8Ω | 45cm (18") 8Ω |
| Output handling (max) | 600W | 1000W |
| Dimensions | 515 x 420 x 615mm | 585 x 475 x 675mm |
| Weight | 22kg | 29kg |
Troubleshooting
| No output and no LEDs lit | Check POWER switch is on |
| Check mains lead is connected properly and fuse hasn’t blown | |
| Power LED lit but no sound from external inputs | Check signal leads are OK and connected properly |
| Try turning up the FREQUENCY control | |
| Ensure input signal has some bass content for the sub to produce | |
| Check INPUT LEVEL control is not fully down |


Disposal: The "Crossed Wheelie Bin" symbol on the product means that the product is classed as Electrical or Electronic equipment and should not be disposed with other household or commercial waste at the end of its useful life. The goods must be disposed of according to your local council guidelines.
Errors and omissions excepted. Copyright© 2021.
AVSL Group Ltd. Unit 2-4 Bridgewater Park, Taylor Rd. Manchester. M41 7JQ
AVSL (EUROPE) Ltd, Unit 3D North Point House, North Point Business Park, New Mallow Road, Cork, Ireland


Brand : Qtx
Model : QT15S
Category : Subwoofer