
OCR20 - Radiator DIMPLEX - Free user manual and instructions
Find the device manual for free OCR20 DIMPLEX in PDF.


| Type de produit | Oil-Filled Radiator |
| Brand | Dimplex |
| Model | OCR20 |
| Dimensions (L x W x H) | 640 x 240 x 650 mm |
| Weight | 12 kg |
| Power Supply | 220-240 V, 50 Hz |
| Power Output | 2000 W |
| Heat Settings | 3 levels (low, medium, high) |
| Thermostat | Adjustable with frost protection |
| Safety Features | Overheat protection, tip-over switch |
| Heating Type | Radiant and convective |
| Oil Capacity | 7 liters |
| Cord Length | 1.5 m |
| Warranty | 2 years |
| Maintenance | Wipe with damp cloth; do not submerge in water |
| Repairability | User-replaceable castors and control knob |
Frequently Asked Questions - OCR20 DIMPLEX
User questions about OCR20 DIMPLEX
0 question about this device. Answer the ones you know or ask your own.
Ask a new question about this device
Download the instructions for your Radiator in PDF format for free! Find your manual OCR20 - DIMPLEX and take your electronic device back in hand. On this page are published all the documents necessary for the use of your device. OCR20 by DIMPLEX.
USER MANUAL OCR20 DIMPLEX
Oil Filled Column Heater
OCR15, OCR15Ti, OCR20, OCR20Ti & OCR20Tie
Designed to provide gentle background heating, to take the chill off a room. Ideally to be used with a principal source of heating.
As with all portable heating appliances: This product is suitable only for well insulated spaces or occasional use.
IMPORTANT SAFETY ADVICE
WARNING: To avoid danger of suffocation please remove all packaging materials particularly plastic and EPS and keep these away from vulnerable people, children and babies.
WARNING: To avoid the risk of accidental strangulation from the supply cord all children and vulnerable people must be supervised when in the vicinity of the product whether it is working or not.
DO NOT use the heater in the immediate surroundings of a bath, a shower or a swimming pool.
DO NOT place the heater directly below a fixed socket outlet. The socket-outlet must be accessible at all times to enable the mains plug to be disconnected as quickly as possible.
WARNING: In order to avoid overheating, do not cover the heater.

The heater carries a warning symbol to alert the user to the risk of fire that exists in the heater is accidentally covered.
DO NOT obstruct the air circulation around the radiator, for example with curtains or furniture, as this could cause overheating and a fire risk. See 'Positioning the Radiator'.
DO NOT COVER or obstruct the air inlet and outlet openings in any way.
WARNING: DO NOT use this heater in small rooms when they are occupied by persons not capable of leaving the room on their own, unless constant supervision is provided.
IMPORTANT: If the mains lead of this appliance is damaged, it must be replaced by the manufacturer or its service agent or a similarly qualified person in order to avoid a hazard.
WARNING: In order to avoid a hazard due to inadvertent resetting of the thermal cut-out, this appliance must not be supplied through an external switching device, such as a timer, or connected to a circuit that is regularly switched on and off by the utility.
This appliance can be used by children aged from 8 years and above and persons with reduced physical, sensory or mental capabilities or lack of experience or knowledge if they have been given supervision or instruction concerning the use of the appliance in a safe way and understand the hazards involved. Children shall not play with the appliance. Cleaning and user maintenance shall not be made by children without supervision. Children of less than 3 years should be kept away unless continuously supervised.
Children aged from 3 years and less than 8 years
shall only switch on/off the appliance provided that it has been placed or installed in its intended normal operating position and they have been given supervision or instruction concerning the use of the appliance in a safe way and understand the hazards involved. Children aged from 3 years and less than 8 years shall not plug in, regulate and clean the appliance or perform user maintenance.
CAUTION: Some parts of this product can become very hot and cause burns. Particular attention has to be given where children and vulnerable people are present.
This radiator complies with stringent safety standards but to ensure efficient operation SURFACES OF THE RADIATOR WILL BECOME HOT AND CONTACT WITH THESE AREAS SHOULD BE AVOIDED, particularly between the fins.
The control panel area is designed to be cooler and allow safe operation of the controls at all times.
IMPORTANT: The feet supplied with the appliance must be used.
DO NOT use this heater if it has been dropped.
DO NOT use if there are visible signs of damage to the heater.
Use this heater on a horizontal, flat and stable surface.
WARNING: Servicing and product repairs should only be undertaken by the manufacturers approved service agent. Repairs should only be made by the manufacturer or his service agent.
IMPORTANT: This heater is filled with a precise quantity of special oil. Repairs requiring opening of the oil container are only to be made by the manufacturer or his service agent who should be contacted if there is an oil leak.
When scrapping the heater, follow the regulations concerning the disposal of oil.
WARNING: To reduce risk of fire, keep textiles, curtains, or any other flammable material a minimum distance of 1 m from the appliance.
WARNING: Risk of fire - Do not use this appliance connected through an extension lead or any external switching device such as a plug in timer or remote control plug in adaptor. All heating appliances draw high current through the mains supply and any weakness in the designe, connections or components in these devices can easily result in overheating of the connection points resulting in melting, distortion and even the risk of fire!
DO NOT use the heater on deep pile carpets or the long hair type of rugs, or less than 750mm (30") away
from any overhanging surface. Keep combustible materials such as drapes and other furnishings clear from the front, sides and rear of the heater. Do not use heater to dry your laundry.
DO ENSURE that the mains lead cannot be tripped over.
DO NOT operate the radiator with the mains lead overhanging the fins.
If the radiator is tipped over, unplug it and allow it to cool before standing it back up.
DO NOT pull the radiator along by the mains lead.
The supply cord should be uncoiled before use.
This instruction leaflet belongs to the appliance and must be kept in a safe place. If changing owners, the leaflet must be surrendered to the new owner.
ELECTRICAL CONNECTION
WARNING THIS APPLIANCE MUST BE EARTHED
If the socket outlets in your home are not of the 13 amp BS1363 type they will not accept the plug connected to this heater, therefore cut off the plug. When cut off this plug can constitute a shock hazard if inserted into a socket outlet. It must therefore be disposed of safely.
IMPORTANT: The wires in this mains lead are coloured in accordance with the following code:
BLUE:
NEUTRAL
BROWN:
LIVE
As the colours of the wires in the mains lead may not correspond with the coloured markings in your plug, proceed as follows:
Connect the BROWN wire to the terminal marked 'L' or coloured RED. Connect the BLUE wire to the terminal marked 'N' or coloured BLACK. Note: 'L' or 'N' must not be connected to the EARTH terminal marked 'E' or '∅' or coloured GREEN or GREEN AND YELLOW. If in doubt, consult your electrician.
Assembly and Positioning
FITTING THE CASTORS
WARNING The radiator must only be operated with the wheels and castors fitted and in the upright position.
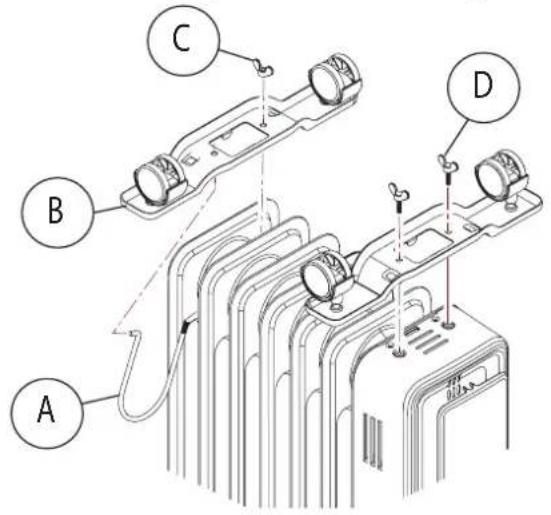
The castors must be fitted to the control panel and between the last and second last fin on the opposite end, as shown in Fig.1.
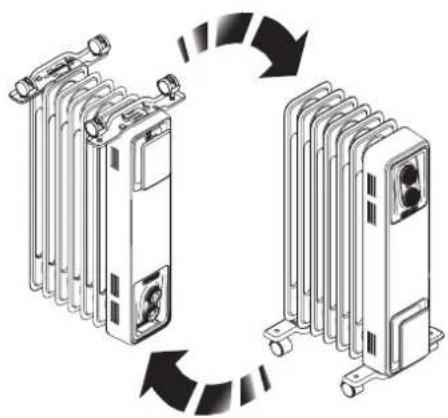
To fit the castors, turn the radiator upside down on a carpet or other soft surface to avoid damage
WARNING : THE RADIATOR IS HEAVY - ENSURE THAT IT IS SUPPORTED TO PREVENT IT FROM TOPPLING. Ask a second person to help with this if necessary.
Locate the wire clamp (A) and remove the winged nut (C). Insert the non threaded end of the wire clamp into one of the holes in the castor plate (B) as shown. Feed the threaded end of the wire clamp between the last and second last column fins ensuring the wire clamp wraps around the column body (sump), some manipulation of the plate and clamp will be required. The threaded end should then be passed through the castor plate and secured using the wing nut.
To fit the castor to the control end, position the castor plate in position and secure using the wing bolts (D). there are guides to ensure the correct positioning and orientation of the caster plate.
Return the radiator to the correct orientation so it rests on the castors. The product is now ready for use.
natural_image
Diagram showing two rows of industrial equipment units connected by a circular arrow, no text or symbols present.Fig. 1
POSITIONING THE HEATER
Select the position for the heater ensuring there is clearance from any furniture and fittings of at least 300mm above the heater and 150mm each side and 300mm from the control and end panel. We recommend maximising the clearance where possible.
Models & General Information
MODELS
| Model Description | Power (W) | |
| OCR15 | 5 fin, thermostat, three heat settings & Neon | 1500 |
| OCR15Ti | 5 fin, thermostat, three heat settings, neon & electro mechanical timer | 1500 |
| OCR20 | 7 fin, thermostat, three heat settings & Neon | 2000 |
| OCR20Ti | 7 fin, thermostat, three heat settings, neon & electro mechanical timer | 2000 |
| OCR20Tie | 7 fin column, thermostat, three heat settings, neon & electronic timer | 2000 |
GENERAL
The radiator is designed for operation on an AC electricity supply, and is suitable for use in domestic dwellings and similar indoor locations.
The radiator is fitted with castors and a handle for ease of movement. A rotary selector switch provide the ability to choose an available heat output and an adjustable thermostat enables the room temperature to be controlled accordingly. It is supplied with a cord and plug and is ready for use once the castors have been correctly fitted.
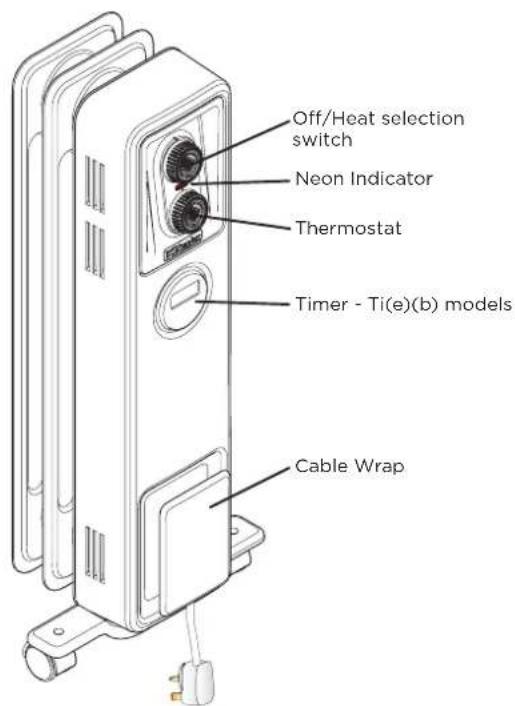
Fig. 2
Operation
IMPORTANT - OBJECTS OR CLOTHING MUST NOT BE PLACED ON THIS HEATER.
Before using the heater ensure that all warnings and instructions have been read carefully.
To activate the heater simply plug it in. Neon indicating lights located at the controls area will illuminate when the appliance is plugged into the mains. This indicates the appliance is energised and ready for use.
CONTROLS
natural_image
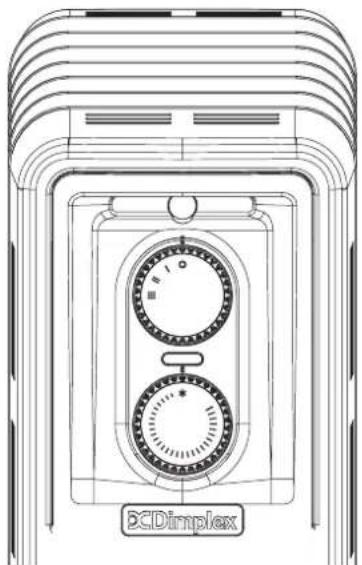
Technical line drawing of a mechanical device with two circular dials and a base plate, labeled 'SCDimplex' at bottom (no other text or symbols)Fig. 3
Thermostat
The Thermostat, see Fig.3 controls the heat output according to the room temperature. This ensures that the heater will not produce heat unnecessarily when the room is warm. To set the temperature you require, turn the thermostat knob clockwise until the required setting is reached. Alternatively to heat a cold room quickly, turn the thermostat knob up fully. When the room has reached the desired temperature, turn the thermostat knob anti-clockwise until the thermostat just clicks off. The heater will now automatically operate at this temperature. The thermostat also has a frost protection setting marked ✿ This setting is useful in areas such as garages, to prevent frost damage. If the thermostat is set to its minimum setting ✿ the heater will cycle on and off to maintain a temperature of approximately 5° to help protect against frost.
Note - Should the heater fail to come on when the thermostat is at a low setting, this may be due to the room temperature being higher than the thermostat setting.
Heat Selector Switches (see Fig.3)
Heat selection is provided via a rotary switch offering four settings. The heat output can be altered to suit the application, conditions and for improve the economy of operation. Available output options are as follows:
| Switch setting | ||||
| Model O I II III | ||||
| OCR15(Ti(e)) | Off 700W 800W | 1500W | ||
| OCR20(Ti(e)) | Off 900W 1100W | 2000W | ||
Timer Models
DIGITAL TIMER (Tie models)
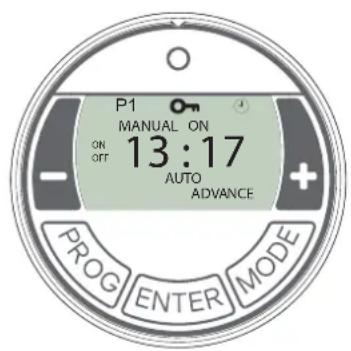
Fig. 4
IMPORTANT: Remember to observe all safety warnings when operating the heater on auto setting, either attended or unattended.
The timer allows you to select 'AUTO' or 'MAN ON' by pressing the 'MODE' button until the required MODE appears at the bottom of the timer display.
'AUTO' MODE allows the heater to switch ON and OFF according to a set 24 Hour program period (see 'Setting Programs' section below).
'MAN ON' MODE allows power to the heater uninterrupted by the program settings.
Key Lock
If 'ENTER' and 'MODE' are pressed within 1 second, the keys will be locked. The user will know the keys are locked as the lock symbol will be displayed on the top left hand corner of the screen. To unlock the keypad, press 'ENTER' and then 'MODE' within 1 second.
Initial Operation
For initial use, plug the heater into a regular household power point and turn the power on. The timer is now ready to be set up for use.
Setting Current Time
- Hold the 'PROGRAM' button until the clock symbol 🔒 appears on the screen. The user can now set the clock.
- The hour digit will flash. To adjust the hour use the '-' & '+' buttons. Confirm the hour digit by pressing 'ENTER'.
- Once 'ENTER' has been pressed the minutes will flash. To adjust the minutes use the '-' & '+' buttons. Confirm the minute digit by pressing 'ENTER'.
- The timer now returns to the default display.
- To reset incorrect time, repeat previous steps.
Once the correct time is set, a total of four ON/OFF time programs can be set for operation.
Setting Programmes
Press the 'PROGRAM' key to set the programs.
You are now setting the programs starting with P1 'ON'.
SETTING P1 ON TIME
- To set the hour use the '-' & '+' buttons. Confirm the hour digit by pressing 'ENTER'.
- To set the minutes use the '-' & '+' buttons. Confirm the minute digit by pressing 'ENTER'.
Note: The minutes can only be set in 10 minute blocks in programme 'MODE'.
SETTING P1 OFF TIME
- To set the hour use the '-' & '+' buttons. Confirm the hour digit by pressing 'ENTER'.
- To set the minutes use the '-' & '+' buttons. Confirm the minute digit by pressing 'ENTER'.
Repeat steps 1 to 4 to programme P2, P3 & P4. After programming P4 'OFF' you automatically exit to the default display.
At any time while programming the timer you can press the 'PROGRAM' button to exit to the default display.
Note: If the 'ON' time is the same as the 'OFF' time the appliance will ignore the program.
The Advance Function
When in 'AUTO' MODE, if the '+' button is pressed for longer than 2 seconds the programme will ADVANCE to the next setting programmed and will only revert back to the program when the subsequent programme time is reached. When the 'ADVANCE' function is running the 'ADVANCE' segment will be displayed on the LCD screen. If the '-' button is pressed when the 'ADVANCE' programme is running the 'ADVANCE' feature will be automatically cancelled and the programme will run as normal.
Note - Timer Memory Back Up Batteries - Once the heater has been left plugged in with the socket switched on for at least 72 hours the timer's memory back up batteries will be fully charged.
Once the timer batteries are fully charged, if there is a power cut or if the heater is disconnected from the mains for less than
six months, then the timer will continue to keep time & the settings in the memory will remain intact. If however the timer back up batteries have not been charged fully, or if the heater is deprived of power for longer than six months, then the time and the programme settings are likely to be lost and you may therefore need to reset the time and the programme before using the AUTO MODE again.
ELECTROMECHANICAL TIMER (Ti(b) models)
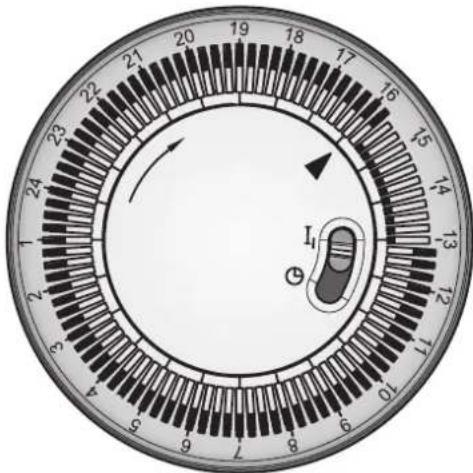
Fig. 5
Setting the time of day
To set the time of day, rotate the timer dial clockwise (indicated by the arrow) until the correct time of day is opposite the reference mark▶- see Fig. 5. The 24-hour clock is used; e.g. time shown for 4 pm is '16' (16:00hrs).
Operation Modes
Set the operation mode using the slide switch on the timer - see Fig. 6:
Position I - Manual operation
This setting allows power to the heater uninterrupted by the timer settings. The heat selector switch and thermostat will control the output (see 'Controls').
Position Ⓤ 'Auto' operation
This setting allows the heater to be switched ON and OFF according to a set 24 hour program period.
DO NOT disconnect this heater from the mains supply unless it is being taken out of use (e.g. in summer or for storage), otherwise the timer clock will stop.
natural_image
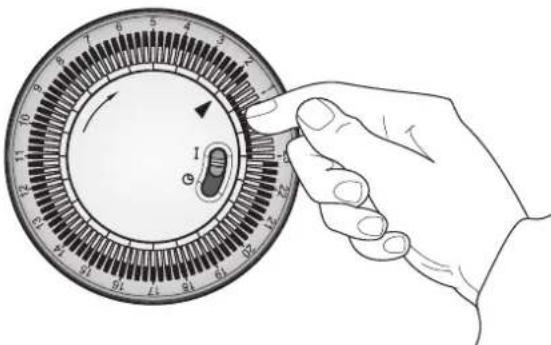
Illustration of a hand holding a circular dial with numbered segments and a knob, no text or symbols present.Fig. 6
Setting the 'Auto' ON and OFF times
To set the timer :
- Using your finger tip or the tip of a pencil, push in as many segments as necessary around the dial, according to the times you don't require heat - see Fig. 6. Each segment pushed in switches the heater OFF for that part of the hour. All other segments will be ON. For example, Fig. 6 shows the timer set to switch the heater OFF between 11pm and 1.45am
- You can select as many ON periods as you like, within the 24-hour day. The settings will repeat every day until changed.
- To change ON and OFF times, simply push in any 'ON' segments you wish to cancel and pull out new 'ON' segments as required.
Note: each segment represents 15minute period
Safety Features
This appliance incorporates a number of safety devices. In addition to the 'Important Safety Advice' section your attention is drawn to the following;
Tilt Switch
The tilt switch will prevent the heater from working if it is accidentally tipped over on its side.
If the radiator is tipped over while it is hot, disconnect the power and allow it to cool, then stand the radiator back upright. Reconnect the power - normal operation should be resumed.
Safety Overheat Protection
The heater is fitted with a thermal safety cut-out which will switch off the heater should it overheat for any reason. If the cut-out operates it is the result of abnormal overheating. The appliance should be disconnected from the power supply and customer services should be contacted for further advice - see 'After Sales Service'.
DO NOT attempt to reuse the product until the fault has been suitably rectified.
Additional
Storage
If the radiator is not required for long periods, for example during the summer, it should be stored in a dry place and preferably covered to prevent the accumulation of dirt and dust. The supply cord should be neatly coiled around the cable wrap (see Fig. 1) and the plug should be inserted in to the plug pin holes provided in the cable wrap.
IMPORTANT
The heater must be kept plugged in at the mains to retain the time and the programmed settings. If unplugged from the mains, resetting the time and the programmed settings will be necessary.
Cleaning
WARNING - ALWAYS DISCONNECT THE POWER SUPPLY BEFORE CLEANING THE HEATER.
Do not use detergents, abrasive cleaning powder or polish of any kind on the body of the heater.
Allow the heater to cool, then wipe with a dry cloth to remove dust and a damp cloth (not wet) to clean off stains. Be careful not to allow moisture in to the heater.
Recycling
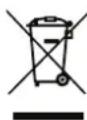
For electrical products sold within the European Community.
At the end of the electrical products useful life it should not be disposed of with household waste.
Please recycle where facilities exist. Check with your Local Authority or retailer for recycling advice in your country.
| Model Identifier(s): OCR10(Ti(e)) OCR15(Ti(e)) OCR20(Ti(e)) OCR25(Ti(e)) | ||||||
| Heat output | ||||||
| Nominal heat output | Pnom | 1.0 | 1.5 | 2.0 | 2.5 | kW |
| Minimum heat output (indicative) | Pmin | 0.4 | 0.7 | 0.9 | 1.0 | kW |
| Maximum continuous heat output | Pmax,c | 1.0 | 1.5 | 2.0 | 2.5 | kW |
| Auxiliary electricity Consumption | ||||||
| At nominal heat output | elmax | 0.0 | 0.0 | 0.0 | 0.0 | kW |
| At minimum heat output | elmin | 0.0 | 0.0 | 0.0 | 0.0 | kW |
| In standby mode | eISB | 0.0 | 0.0 | 0.0 | 0.0 | kW |
| Type of heat output/ room temperature control | ||||||
| With mechanical thermostat room temperature control | Yes | |||||
| Contact details | GDHV, Milbrook House, Grange Drive, Hedge End, Southampton, SO30 2DF | |||||
Guarantee
What does a Dimplex Guarantee cover?
Dimplex products deliver reliable service for normal, household use in domestic settings. All Dimplex products are individually tested before leaving the factory.
If you are a consumer and you experience a problem with your Dimplex product, which is found to be defective due to faulty materials or workmanship within the Guarantee Period, this Dimplex Guarantee will cover repair or - at the discretion of Dimplex - replacement with a functionally equivalent Dimplex product.
Your product is under Guarantee for 1 year from the date of purchase or the date of delivery of the product, if later. The 1 year Guarantee is extended for an additional 2 years when you register the product with Dimplex, within 28 days of purchase. If you do not register the product with Dimplex within 28 days, your product will remain warranted for 1 year only. To validate your extended Guarantee register with us online at: http://register.dimplex.co.uk. N.B. Each qualifying product needs to be registered with Dimplex individually. Please note that the extended Guarantee is only available in the UK and Ireland.
The Dimplex Guarantee is conditional upon you providing the original purchase receipt as proof of purchase. Please therefore retain your receipt as proof of purchase.
If you do experience a problem with your Dimplex product please call the Helpline on +44 [0]344 879 3588 or visit https://www.dimplex.co.uk/support. For ROI please email serviceireland@glendimplex.com or call +353(0)1 842 4833. We will need details of your Dimplex product and a description of the fault which has occurred. Once we receive your information and proof of purchase we will contact you to make the necessary arrangements. If your Dimplex product is not covered by this Dimplex Guarantee there may be a charge to repair your product. However, we will contact you for agreement to any charges before any chargeable service is carried out.
What is not covered by a Dimplex Guarantee?
The Dimplex Guarantee does not cover any of the following:
Any fault or damage to your Dimplex product due to faulty materials or workmanship occurring outside the Guarantee Period. Normal wear and tear including parts that might wear out over time or consumables, such as filters.
Any fault or damage occurring to any pre-owned Dimplex product or to any other equipment or property.
Accidental damage to your Dimplex product or damage to your Dimplex product from external sources (for example, transit, weather, electrical outages or power surges).
Fault or damage to your Dimplex product which is:
- Not due to faulty materials or workmanship or which is due to circumstances outside Dimplex's control.
- Caused by use of your Dimplex product for anything other than normal domestic household purposes in the country where it was purchased.
- Caused by any misuse, abuse or negligent use of the Dimplex product, including but not limited to any failure to use it in accordance with the Operating Instructions supplied with the product.
- Caused by any failure to assemble, install clean and maintain your Dimplex product in accordance with the Operating Instructions supplied with the product unless this was carried out by Dimplex or its authorised dealers.
- Caused by repairs or alterations to your Dimplex product not carried out by Dimplex service personnel or its authorised dealer(s).
- Caused by use of any consumables or spare parts for your Dimplex product which are not Dimplex - specified.
Terms and Conditions
The Dimplex Guarantee is valid for 1 calendar year, plus 2 if registered, from the date of purchase of your Dimplex product from a recognised retailer in the country of purchase and use, or the date of delivery of the product if later, always provided the original receipt has been retained and is produced as proof of purchase.
You must provide to Dimplex or its authorised agents on request the original receipt as proof of purchase and - if required by Dimplex - proof of delivery. If you are unable to provide this documentation, you will be required to pay for any repair work required. Any repair work under the Dimplex Guarantee will be carried out by Dimplex or its authorised dealer(s) and any parts that are replaced will become the property of Dimplex. Any repairs performed under the Dimplex Guarantee will not extend the Guarantee Period.
Any replacement of your Dimplex product by Dimplex during the Guarantee Period will start the 3 year Guarantee Period afresh from the date of delivery of the replacement Dimplex product to you. (*Please keep original online Guarantee registration email and sales receipt for your original purchase as proof of the additional 2 years, in case of the unlikely event you experience an issue). The Dimplex Guarantee does not entitle you to recovery of any indirect or consequential loss or damage including but not limited to loss or damage to any other property.
The Dimplex Guarantee is in addition to your statutory rights as a consumer and your statutory rights are not affected by this Dimplex Guarantee.
Contact Dimplex A brand of the Glen Dimplex UK Limited, trading as Glen Dimplex Heating & Ventilation
If you have any questions about what the Dimplex Guarantee covers and does not cover or how to claim under the Dimplex Guarantee, please contact us:
Glen Dimplex Heating & Ventilation, Grange Drive, Hedge End, Southampton SO30 2DF
Telephone: 0344 879 3588
Email: customer.services@glendimplex.com
Visit: www.dimplex.co.uk
- IMPORTANT SAFETY ADVICE
- ELECTRICAL CONNECTION
- WARNING THIS APPLIANCE MUST BE EARTHED
- Assembly and Positioning
- FITTING THE CASTORS
- POSITIONING THE HEATER
- Models & General Information
- GENERAL
- Operation
- Thermostat
- Heat Selector Switches (see Fig.3)
- Timer Models
- Key Lock
- Initial Operation
- Setting Current Time
- Setting Programmes
- SETTING P1 ON TIME
- SETTING P1 OFF TIME
- The Advance Function
- ELECTROMECHANICAL TIMER (Ti(b) models)
- Setting the time of day
- Operation Modes
- Setting the 'Auto' ON and OFF times
- Safety Features
- Tilt Switch
- Safety Overheat Protection
- Additional
- Storage
- IMPORTANT
- Cleaning
- Recycling
- Guarantee
- What does a Dimplex Guarantee cover?
- What is not covered by a Dimplex Guarantee?
- Terms and Conditions
- Contact Dimplex A brand of the Glen Dimplex UK Limited, trading as Glen Dimplex Heating & Ventilation
Brand : DIMPLEX
Model : OCR20
Category : Radiator