
RX9911 - Electric heating DIMPLEX - Free user manual and instructions
Find the device manual for free RX9911 DIMPLEX in PDF.


| Product Type | Electric Fan Heater |
| Brand | Dimplex |
| Model | RX9911 |
| Dimensions (H x W x D) | 250 x 150 x 200 mm |
| Weight | 2.5 kg |
| Power Supply | 220–240 V, 50/60 Hz |
| Power Consumption | 1500 W (max) |
| Heating Technology | Ceramic heating element |
| Heat Settings | 2 heat levels (750 W / 1500 W) |
| Fan Modes | Fan only, low heat, high heat |
| Thermostat | Adjustable thermostat with temperature range 5–35 °C |
| Oscillation | Wide-angle oscillation (70°) |
| Safety Features | Overheat protection, tip-over switch, cool-touch housing |
| Control Type | Manual controls with rotary knobs |
| Noise Level | ≤ 45 dB (on low setting) |
| Coverage Area | Up to 20 m² |
| Maintenance | Clean external surfaces with a damp cloth; do not immerse |
| Repair / Spare Parts | Contact Dimplex customer service for spare parts and repairs |
| Certifications | CE, RoHS |
Frequently Asked Questions - RX9911 DIMPLEX
User questions about RX9911 DIMPLEX
0 question about this device. Answer the ones you know or ask your own.
Ask a new question about this device
Download the instructions for your Electric heating in PDF format for free! Find your manual RX9911 - DIMPLEX and take your electronic device back in hand. On this page are published all the documents necessary for the use of your device. RX9911 by DIMPLEX.
USER MANUAL RX9911 DIMPLEX
Please note that some of the contact details on this PDF document may not be current.
Please use the following details if you need to contact us:
Telephone: 0844 879 3588 Email: customer.services@gdcgroup.co.uk
The customer support section of our website also features a wide range of information which may be of use to you and is available 24 hours a day. It includes:
- Operating and installation instructions
- Easy 'How to use' guides for storage heaters
• Service and repairs
• Where to buy our products
• Literature downloads
• Heating requirement calculator
Visit - www.dimplex.co.uk/support
Pilot Wire Programming Cassette - Model No. RX9911

T9908/010/A
Display
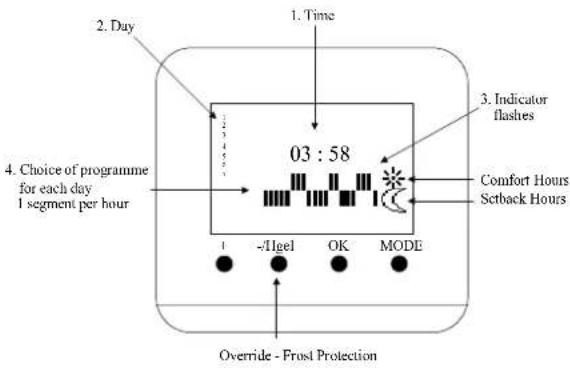
General Description
The RX9911 can only be used in RPX, EVX and EVS heaters.
They offer either individual programming (each individual heater has a programming cassette) or group programming from a master heater through the pilot wire. Group programming can drive up to 20 slave heaters.
Two heating positions are offered: comfort and economy setback, with temperatures set using the controls on the heater.
A choice of heating programmes are available for each day of the week. There are 7 pre-set programmes, from P1 to P7 or a customised programme P=. The seven pre-set programmes and customised programme will remain stored even if the mains supply is cut off for more than seven hours. However, the day and time will have to be set again as the built in battery will only operate for seven hours maximum when removed from the heater.
Installation
The RX9911 is rated at 230V.
- Using a narrow bladed screwdriver, carefully release the cover from the slot on the heater
- Insert the programmer fully so that it clicks into position
- Turn the control knob on the heater(s) to the PROG position
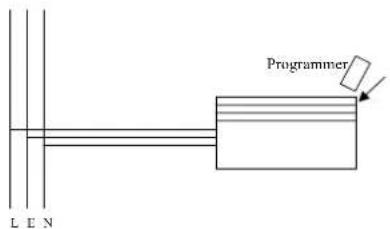
Individual Programming:
Fit one programmer to each RPX, EVX or EVS heater. (NB. When the heater is installed, the black pilot wire in the mains supply cable should be trimmed back in accordance with the installation instructions.
Programming for a Zone:
The heater containing the RX9911 is the Master heater and connected by the black pilot wire to the Slave heaters. The Master heater determines the Programme and heating levels for all the heaters (Comfort, Setback and Frost Protection), but the actual comfort and setback temperatures should still be set on each individual heater (see heater instructions). The master heater will switch between comfort and setback according to the programme. On every slave heater, turn the position button to PROG.
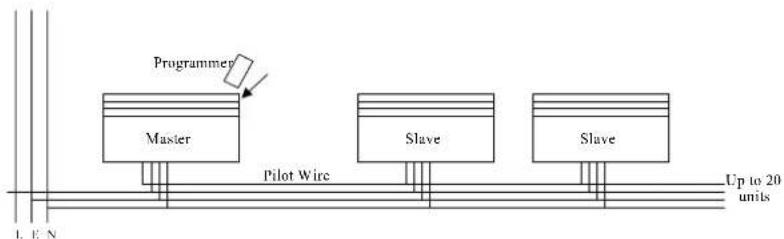
| Electrical Connection Master/Slave Heaters | Do NOT connect the BLACK (PILOT) SIGNAL WIRE to earth.When the programmer drives other heaters, connect the pilot wire from the "master" unit to the pilot wire of a "slave" heater and then from one slave heater to another (in series).Any 240V insulated cable may be used to link pilot wires around the ring main. The signal current is low. Suitable connections would be either an additional single core wire marked or colour coded appropriately or use a 4 core cable throughout the heater ring. |
| Operating Instructions | The RX9911 can be programmed either inserted directly into the heater or out of the heater. If choosing the latter option, the cassette must be first left in the heater for 15 minutes to charge the battery. Remember that the battery only lasts for seven hours. |
| Setting the time: | 00.00 flashesPress themodebutton once until hour flashesAlter the hours with+or - sign and confirm OKAlter the minutes with+or - sign and confirm OKAlter the days with+or - sign and confirm OKThe black arrow marks the selected day (e.g. 1 = Monday, 2 = Tuesday etc). |
| Choosing the programmes: | Press mode twice (once for 2 seconds and once again briefly - P1 should flash) then with the + or - sign scroll through the preset programme choices P1 to P7 and P=. Select the programme for day 1 (Monday) by pressing OK. Follow this sequence for each day of the week.To choose the customised programme select P=, press mode and change the temperature levels for every hour of the day by pressing + for comfort. and - for setback.Then, after completing the 24 hours, confirm the day with OK.The programmer will revert to the original display screen (time + day + ...) only after day 7 has received a programme. |
| Frost Protection/Holiday Setting: | The frost protection setting is continuous during the days it is set.To set frost protection, press and hold the-/Hgel button until "HG : 01" appears. If used as a group programmer all heaters will be set to frost protection. Press + or - to set the number of days required for frost protection (99 days maximum) e.g. "HG : 04" = 4 days. Press OK to confirm.After the set frost protection period has elapsed, the heater automatically returns to the original programme.To cancel frost protection before the end of the set period, press-/Hgel to return to the registered programme. |
| Overriding the master programme: | When slave heaters are connected to a master, it is possible to manually override the master programme by turning the control button on each slave heater to the required position (comfort, setback, frost protection or off). To cancel the manual override, turn back to the PROG position. |
| Problem Solving | Display flashes and the timer cannot be adjusted: Exit the existing mode by pressing OK to return to the beginning.Cassette has been out of the heater for more than seven hours: Return to the heater to charge (the internal battery lasts for seven hours). |
| General Cleaning | WARNINGBEFORE UNDERTAKING CLEANING WORK ON THE CONTROLLER OR APPLIANCE IMMEDIATELY DISCONNECT THE ELECTRICITY SUPPLY EITHER BY SWITCH OFF AT THE ADJACENT DOUBLE POLE SWITCH.The outside of the appliance should be wiped over with a soft damp cloth and then dried. Do not use detergents or abrasives. |
| After Sales Service | Your Dimplex Control is guaranteed for one year from date of purchase. We undertake to exchange or repair free of charge within this period, any part found to be defective.Should you require after sales service, please get in touch with the supplier through whom you purchased the appliance, or your nearest Service Agent.Please do not initially return a faulty appliance or part of an appliance to us as this may result in transit damage and/or delay in providing service. Let us know your difficulty quoting the model number and series of the appliance. We will then take the appropriate action. |
421AA0791.B00 NR/BLA 44/00
Brand : DIMPLEX
Model : RX9911
Category : Electric heating