
HYC40LI - Saw HYUNDAI - Free user manual and instructions
Find the device manual for free HYC40LI HYUNDAI in PDF.


| Product Type | Cordless Circular Saw |
| Brand | Hyundai |
| Model | HYC40LI |
| Voltage | 40 V |
| Battery Type | Lithium-ion |
| Blade Diameter | 165 mm (6.5 inches) |
| Max Cutting Depth at 90° | 55 mm (2.2 inches) |
| Max Cutting Depth at 45° | 40 mm (1.6 inches) |
| Bevel Capacity | 0° to 45° |
| No-Load Speed | 4500 RPM |
| Weight (without battery) | 3.2 kg (7.1 lbs) |
| Dimensions (L x W x H) | 300 x 200 x 250 mm |
| Safety Features | Electric brake, blade guard, safety switch |
| Maintenance | Regular blade cleaning and lubrication |
| Spare Parts Availability | Authorized service centers and online |
| Repairability | Modular design for easy part replacement |
| General Information | User manual available for download |
Frequently Asked Questions - HYC40LI HYUNDAI
User questions about HYC40LI HYUNDAI
0 question about this device. Answer the ones you know or ask your own.
Ask a new question about this device
Download the instructions for your Saw in PDF format for free! Find your manual HYC40LI - HYUNDAI and take your electronic device back in hand. On this page are published all the documents necessary for the use of your device. HYC40LI by HYUNDAI.
USER MANUAL HYC40LI HYUNDAI
natural_image
Technical line drawing of a mechanical chainings device (no text or symbols)Thank You For Purchasing Your HYUNDAI Product
We work very hard to give all of our customers the best possible service. If you have any problems, before leaving negative feedback, please contact us to give us a chance to resolve the issue. We would be delighted if you left us positive feedback! Thank you for purchasing this product.
Important!

⚠ WARNING : READ THE INSTRUCTION BOOKLET THOROUGHLY BEFORE USING THE MACHINE. Keep for future reference and pass it on if the machine is loaned or sold to another user.
This manual has been produced by Hyundai Power Products and should be kept with the product. Please read and understand these instructions before you use your product. Failure to do this may result in personal injury or damage to the product.
The safety precautions and warnings are to ensure your safety and protect you from harm or damage to the product.
The information contained in this manual was accurate at the time of production, however HYUNDAI Power Products may make modifications to the product without notification.
Contents
Safety Information......4-12
Features......13
Machine Information......14
Assembly and Operation......15-21
Maintenance and Storage.....22-23
Troubleshooting....24
Disposal....25
Declaration of Conformity......26
Notes......27-29
Useful Information......30
Contact Us....31
Intended Use
This chain saw is only designed for cutting of brushes, trunks or timber beams up to a diameter according the guide bar length. It is only allowed to cut wood. Every other use of the machine is a not intended use. Furthermore a professional use for tree services is strictly forbidden.
During the use of the chain saw the user has to arrange for personal protective equipment according to the manual and also to the named pictograms on the chain saw. Parts of the intended use are also the details in the manual regarding safety warnings and references for use / maintenance. People/ User who work with the chain saw or make maintenances on it must be familiar with the manual. It is only allowed to assemble on the chain saw the manufacturers original or approved spare parts (guide bar; saw chain, spark plug e.g.) as well as the allowed combinations of guide bar / saw chain as named in the manual.
The user and not the manufacturer is liable for every accident which results from a combination of not intended use or a not allowed change of the construction on the machine.
The chain saw is only intended to use outdoor.
Residual Risks
Even with the intended use of the appliance there is always a residual risk, which can not prevented. According to the type and construction of the appliance the following potential hazards might apply:
Contact with exposed saw teeth of the saw chain (cutting hazards)
Access to the rotating saw chain (cutting hazards)
Unforeseen, abrupt movement of the guide bar (cutting hazards)
Flung out of parts from the saw chain (Cutting / injection hazards)
Flung out of parts of the work piece
Inhalation of work peace particles, emissions from the gasoline engine
Skin contact with the fuel (gasoline / oil)
Loss of hearing, if no required ear protection used during work.
General Power Tool Safety Warnings

WARNING Read all safety warnings and all instructions. Failure to follow the warnings and instructions may result
in electric shock, fire and/or serious injury. Save all warnings and instructions for future reference.
The term "power tool" in the warnings refers to your mains-operated (corded) power tool or battery-operated (cordless) power tool.
1) Work area safety
a) Keep work area clean and well lit. Cluttered or dark areas invite accidents.
b) Do not operate power tools in explosive atmospheres, such as in the presence of flammable liquids, gases or dust.
Power tools create sparks which may ignite the dust or fumes.
c) Keep children and bystanders away while operating a power tool. Distractions can cause you to lose control.
Safety Information (Continued)
2) Electrical safety
a) Power tool plugs must match the outlet. Never modify the plug in any way. Do not use any adapter plugs with earthe (grounded) power tools. Unmodified plugs and matching outlets will reduce risk of electric shock.
b) Avoid body contact with earthed or grounded surfaces, such as pipes, radiators, ranges and refrigerators. There is an increased risk of electric shock if your body is earthed or grounded.
c) Do not expose power tools to rain or wet conditions. Water entering a power tool will increase the risk of electric shock.
d) Do not abuse the cord. Never use the cord for carrying, pulling or unplugging the power tool. Keep cord away from heat, oil, sharp edges or moving parts. Damaged or entangled cords increase the risk of electric shock.
e) When operating a power tool outdoors, use an extension cord suitable for outdoor use. Use of a cord suitable for outdoor use reduces the risk of electric shock.
f) If operating a power tool in a damp location is unavoidable, use a residual current device (RCD) protected supply. Use of an RCD reduces the risk of electric shock.
3) Personal safety
a) Stay alert, watch what you are doing and use common sense when operating a power tool. Do not use a power tool while you are tired or under the influence of drugs, alcohol or medication. A moment of inattention while operating power tools may result in serious personal injury.
b) Use personal protective equipment. Always wear eye protection. Protective equipment such as dust mask, non-skid safety shoes, hard hat, or hearing protection used for appropriate conditions will reduce personal injuries.
c) Prevent unintentional starting. Ensure the switch is in the off-position before connecting to power source and/or battery pack, picking up or carrying the tool. Carrying power tools with your finger on the switch or energising power tools that have the switch on invites accidents.
d) Remove any adjusting key or wrench before turning the power tool on. A wrench or a key left attached to a rotating part of the power tool may result in personal injury.
e) Do not overreach. Keep proper footing and balance at all times. This enables better control of the power tool in unexpected situations.
f) Dress properly. Do not wear loose clothing or jewellery. Keep your hair, clothing and gloves away from moving parts. Loose clothes, jewellery or long hair can be caught in moving parts.
g) If devices are provided for the connection of dust extraction and collection facilities, ensure these are connected and properly used. Use of dust collection can reduce dust-related hazards.
4) Power tool use and care
a) Do not force the power tool. Use the correct power tool for your application. The correct power tool will do the job better and safer at the rate for which it was designed.
b) Do not use the power tool if the switch does not turn it on and off. Any power tool that cannot be controlled with the switch is dangerous and must be repaired.
c) Disconnect the plug from the power source and/or the battery pack from the power tool before making any adjustment changing accessories, or storing power tools. Such preventive safety measures reduce the risk of starting the power tool accidentally.
d) Store idle power tools out of the reach of children and do not allow persons unfamiliar with the power tool or these instructions to operate the power tool. Power tools are dangerous in the hands of untrained users.
e) Maintain power tools. Check for misalignment or binding of moving parts, breakage of parts and any other condition that may affect the power tool's operation. If damaged, have the power tool repaired before use. Many accidents are caused
Safety Information (Continued)
poorly maintained power tools.
f) Keep cutting tools sharp and clean. Properly maintained cutting tools with sharp cutting edges are less likely to bind and are easier to control.
g) Use the power tool, accessories and tool bits etc. in accordance with these instructions, taking into account the working conditions and the work to be performed. Use of the power tool for operations different from those intended could result in a hazardous situation.
5) Battery tool use and care
a) Recharge only with the charger specified by the manufacturer. A charger that is suitable for one type of battery pack may create a risk of fire when used with another battery pack.
b) Use power tools only with specifically designated battery packs. Use of any other battery packs may create a risk of injury and fire.
c) When battery pack is not in use, keep it away from other metal objects, like paper clips, coins, keys, nails, screws or other small metal objects, that can make a connection from one terminal to another. Shorting the battery terminals together may cause burns or a fire.
d) Under abusive conditions, liquid may be ejected from the battery; avoid contact. If contact accidentally occurs, flush with water. If liquid contacts eyes, additionally seek medical help. Liquid ejected from the battery may cause irritation or burns.
6) Service
a) Have your power tool serviced by a qualified repair person using only identical replacement parts. This will ensure that the safety of the power tool is maintained.
Battery Pack Safety Warnings
a) Do not dismantle, open or shred cells or battery pack.
b) Do not short-circuit a battery pack. Do not store battery packs haphazardly in a box or drawer where they may short-circuit each other or be short-circuited by conductive materials. When battery pack is not in use, keep it away from other metal objects, like paper clips, coins, keys, nails, screws or other small metal objects, that can make a connection from one terminal to another. Shorting the battery terminals together may cause burns or a fire.
c) Do not expose battery pack to heat or fire. Avoid storage in direct sunlight.
d) Do not subject battery pack to mechanical shock.
e) In the event of battery leaking, do not allow the liquid to come into contact with the skin or eyes. If contact has been made, wash the affected area with copious amounts of water and seek medical advice.
f) Seek medical advice immediately if a cell or battery pack has been swallowed.
g) Keep battery pack clean and dry.
h) Wipe the battery pack terminals with a clean dry cloth if they become dirty.
i) Battery pack needs to be charged before use. Always refer to this instruction and use the correct charging procedure.
j) Do not maintain battery pack on charge when not in use.
k) After extended periods of storage, it may be necessary to charge and discharge the battery pack several times to obtain maximum performance.
I) Battery pack gives its best performance when it is operated at normal room temperature (20 °C ± 5 °C).
m) When disposing of battery packs, keep battery packs of different electrochemical systems separate from each other.
n) Recharge only with the charger specified by REDBACK. Do not use any charger other than that specifically provided for use with the equipment. A charger that is suitable for one type of battery pack may create a risk of fire when used with another battery pack.
Safety Information (Continued)
o) Do not use any battery pack which is not designed for use with the equipment.
p) Keep battery pack out of the reach of children.
q) Retain the original product literature for future reference.
r) Remove the battery from the equipment when not in use.
s) Dispose of properly.
t) Use a charger approved according to EN 60335-2-29
Instruction Before Use
1. Before using your cordless chain saw
Your Battery Pack is UNCHARGED and it must be fully charged once before it is used.
The battery charger supplied is matched to the Li-ion battery for use with this tool. Do not use another battery charger.
2. Charging your Battery Pack
The Li-ion battery is protected against over discharging. When the battery is empty, the trimmer will switch o by means of a protective circuit: The trimmer head will stop rotating.
Note: In a warm environment or after heavy use, the Battery Pack may become too hot to permit charging.
Allow time for the battery to cool down before recharging.
3. Storage of the charger and battery
For long-term storage, it is preferable that the battery is fully charged and stored in a dry place at a temperature between 10 and 25 °C.
The charger should be stored in the same conditions as the battery, taking care that no foreign objects such metal chips or other can not enter through the ventilation slots of the charger.
Chainsaw Safety
- Keep all parts of the body away from the saw chain when the chain saw is operating. Before you start the chain saw, make sure the saw chain is not contacting anything. A moment of inattention while operating chain saws may cause entangleme of your clothing or body with the saw chain.
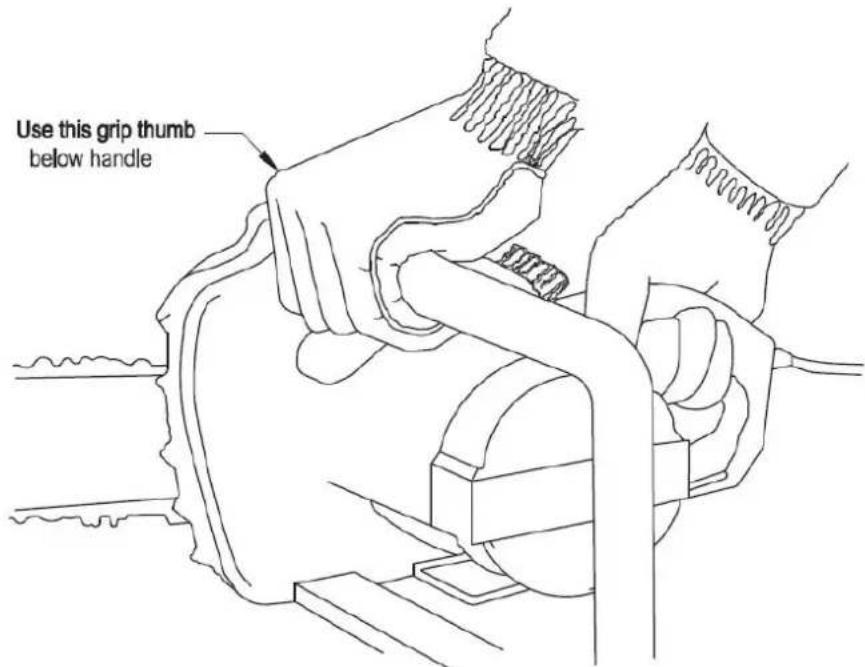
- Always hold the chain saw with your right hand on the rear handle and your left hand on the front handle. Holding the chain saw with a reversed hand configuration increases the risk of personal injury and should never be done.
- Hold the power tool by insulated gripping surfaces only, because the saw chain may contact hidden wiring. Saw chains contacting a live wire may make exposed metal parts of the power tool live and could give the operator an electric shock.
- Wear safety glasses and hearing protection. Further protective equipment for head, hands, legs and feet is recommended. Adequate protective clothing will reduce personal injury by flying debris or accidental contact with the saw chain.
- Do not operate a chain saw in a tree. Operation of a chain saw while up in a tree may result in personal injury.
- Always keep proper footing and operate the chain saw only when standing on fixed, secure and level surface. Slippery or unstable surfaces such as ladders may cause a loss of balance or control of the chain saw.
- When cutting a limb that is under tension be alert for spring back. When the tension in the wood fibres is released the spring loaded limb may strike the operator and/or throw the chain saw out of control.
- Use extreme caution when cutting brush and saplings. The slender material may catch the saw chain and be whipped toward you or pull you off balance.
- Carry the chain saw by the front handle with the chain saw switched off and away from your body. When transporting or
Safety Information (Continued)
storing the chain saw always fit the guide bar cover. Proper handling of the chain saw will reduce the likelihood of accidental contact with the moving saw chain.
- Follow instructions for lubricating, chain tensioning and changing accessories. Improperly tensioned or lubricated chain may either break or increase the chance for kickback.
- Keep handles dry, clean, and free from oil and grease. Greasy, oily handles are slippery causing loss of control.
- Cut wood only. Do not use chain saw for purposes not intended. For example: do not use chain saw for cutting plastic, masonry or non-wood building materials. Use of the chain saw for operations different than intended could result in a hazardous situation.
Causes and Operator Prevention of Kickback
Kickback may occur when the nose or tip of the guide bar touches an object, or when the wood closes in and pinches the saw chain in the cut.
Tip contact in some cases may cause a sudden reverse reaction, kicking the guide bar up and back towards the operator.
Pinching the saw chain along the top of the guide bar may push the guide bar rapidly back towards the operator.
Either of these reactions may cause you to lose control of the saw which could result in serious personal injury. Do not rely exclusively upon the safety devices built into your saw. As a chain saw user, you should take several steps to keep your cutting jobs free from accident or injury.
Kickback is the result of tool misuse and/or incorrect operating procedures or conditions and can be avoided by taking proper precautions as given below:
- Maintain a firm grip, with thumbs and fingers encircling the chain saw handles, with both hands on the saw and position your body and arm to allow you to resist kickback forces. Kickback forces can be controlled by the operator, if proper precautions are taken. Do not let go of the chain saw.
- Do not overreach and do not cut above shoulder height. This helps prevent unintended tip contact and enables better control of the chain saw in unexpected situations.
- Only use replacement bars and chains specified by the manufacturer. Incorrect replacement bars and chains may cause chain breakage and/or kickback.
- Follow the manufacturer's sharpening and maintenance instructions for the saw chain. Decreasing the depth gauge height can lead to increased kickback.
Safety Information (Continued)
1. Felling a tree
When bucking and felling operations are being performed by two or more persons at the same time, the felling operations should be separated from the bucking operation by a distance of at least twice the height of the tree being felled. Trees should not be felled in a manner that would endanger any person, strike any utility line or cause any property damage. If the tree does make contact with any utility line, the company should be notified immediately.
The chain saw operator should keep on the uphill side of the terrain as the tree is likely to roll or slide downhill after it is felled.
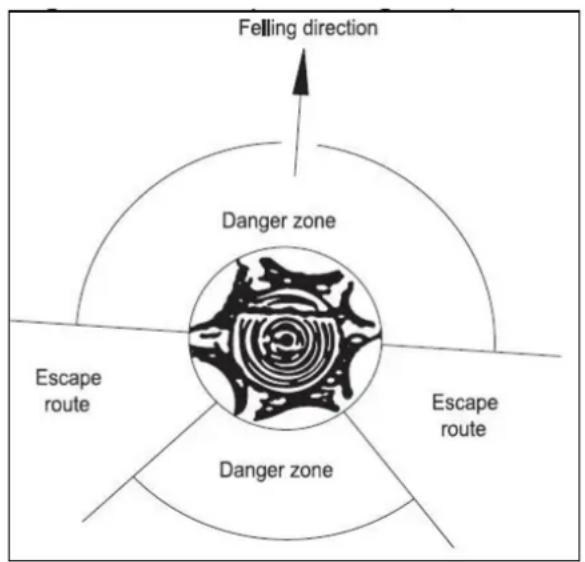
An escape path should be planned and cleared as necessary before cuts are started. The escape path should extend back and diagonally to the rear of the expected line of fall as illustrated in Figure 3.
Before felling is started, consider the natural lean of the tree, the location of larger branches and the wind direction to judge which way the tree will fall.
Remove dirt, stones, loose bark, nails, staples and wire from the tree..
flowchart
graph TD
    A["Felling direction"] --> B["Danger zone"]
    B --> C["Escape route"]
    B --> D["Danger zone"]
    D --> E["Escape route"]
    style A fill:#f9f,stroke:#333
    style B fill:#ccf,stroke:#333
    style C fill:#cfc,stroke:#333
    style D fill:#fcc,stroke:#333
    style E fill:#ffc,stroke:#333
Figure 3 Figure 4

2. Notching Undercut
Make the notch 1/3 the diameter of the tree, perpendicular to the direction of fall as illustrated in Figure 4. Make the lower horizontal notching cut first. This will help to avoid pinching of either the saw chain or the guide bar when the second notch is being made.
3. Felling Back Cut
Make the felling back cut at least 2 inches (50.8 mm) higher than the horizontal notching cut as illustrated in Figure 4. Keep the felling back cut parallel to the horizontal notching cut. Make the felling back cut so enough wood is left to act as a hinge. The hinge wood keeps the tree from twisting and falling in the wrong direction. Do not cut through the hinge. As the felling cut gets close to the hinge the tree should begin to fall. If there is any chance that the tree may not fall in the desired direction or it may rock back and bind the saw chain, stop cutting before the felling back cut is complete and use wedges of wood, plastic or aluminum to open the cut and drop the tree along the desired line of fall.
When the tree begins to fall remove the chain saw from the cut, stop the motor, put the chain saw down, then use the retreat path planned. Be alert for overhead limbs falling and watch your footing.
Safety Information (Continued)
4. Limbing a Tree
Limbing is removing the branches from a fallen tree. When limbing, leave larger lower limbs to support the log off the ground. Remove the small limbs in one cut as illustrated in Figure 5. Branches under tension should be cut from the bottom up to avoid binding the chain saw.
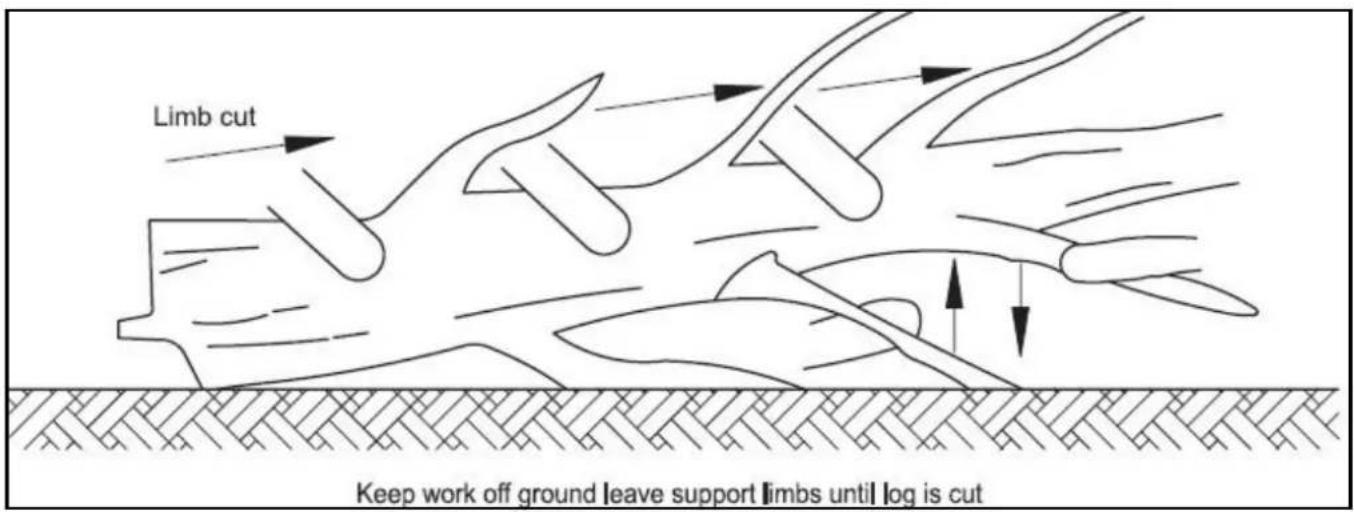
Figure 5
Safety Information (Continued)
5. Bucking a Log
Bucking is cutting a log into lengths. It is important to make sure your footing is firm and your weight is evenly distributed on both feet. When possible, the log should be raised and supported by the use of limbs, logs or chocks. Follow the simple directions for easy cutting.
When the log is supported along its entire length as illustrated in Figure 6, it is cut from the top (overbuck).
When the log is supported on one end, as illustrated in Figure 7, cut 1/3 the diameter from the underside (underbuck). Then make the finished cut by over bucking to meet the first cut. When the log is supported on both ends, as illustrated in Figure 8, cut 1/3 of that diameter from the top over buck. Then make the finished cut by underbucking the lower 2/3 to meet the first cut. When bucking on a slope always stand on the uphill side of the log, as illustrated in Figure 9. When “cutting through”, to maintain complete control release the cutting pressure near the end of the cut without relaxing your grip on the chain saw handles. Don't let the chain contact the ground. After completing the cut, wait for the saw chain to stop before you move the chain saw. Always stop the motor before moving from tree to tree.
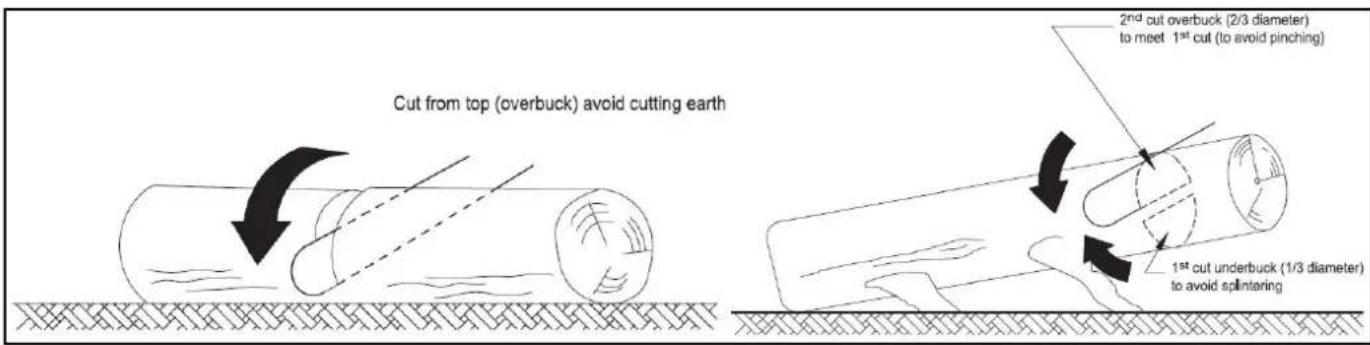
Figure 6
Figure 7
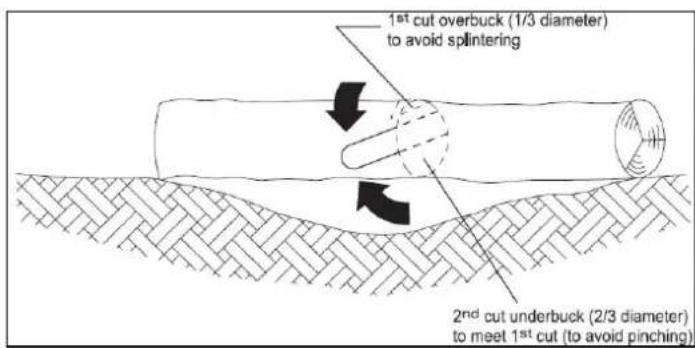
Figure 8
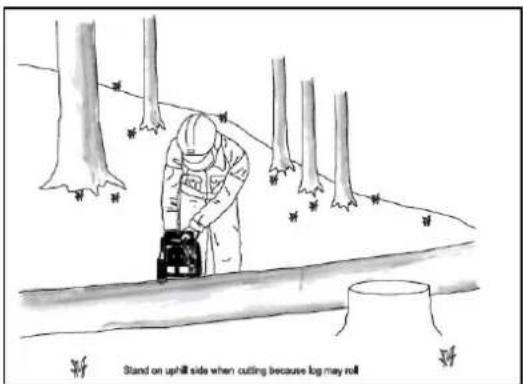
Figure 9
Safety Information (Continued)
Symbols On The Machine









Li-ion
To reduce the risk of injury, user must read instruction manual
Warning
Wear dust mask
Wear ear protection
Do not expose to moisture
Wear eye protection
Do not burn the battery
Do not expose to rain or water
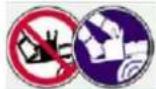
Hold the chain saw by two hands
Danger of Kickback: never cut with the tip of the chainsaw
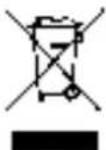
This product has been marked with a symbol relating to removing electric and electronic waste. This means that this product shall not be discarded with household waste but that it shall be returned to a collection system which conforms to the European Directive 2002/96/CE. It will then be recycled or dismantled in order to reduce the impact on the environment. Electric and electronic equipment can be hazardous for the environment and for human health since they contain hazardous substances.
Do not dispose of batteries. Return exhausted batteries to your local collection or recycling point.
Features
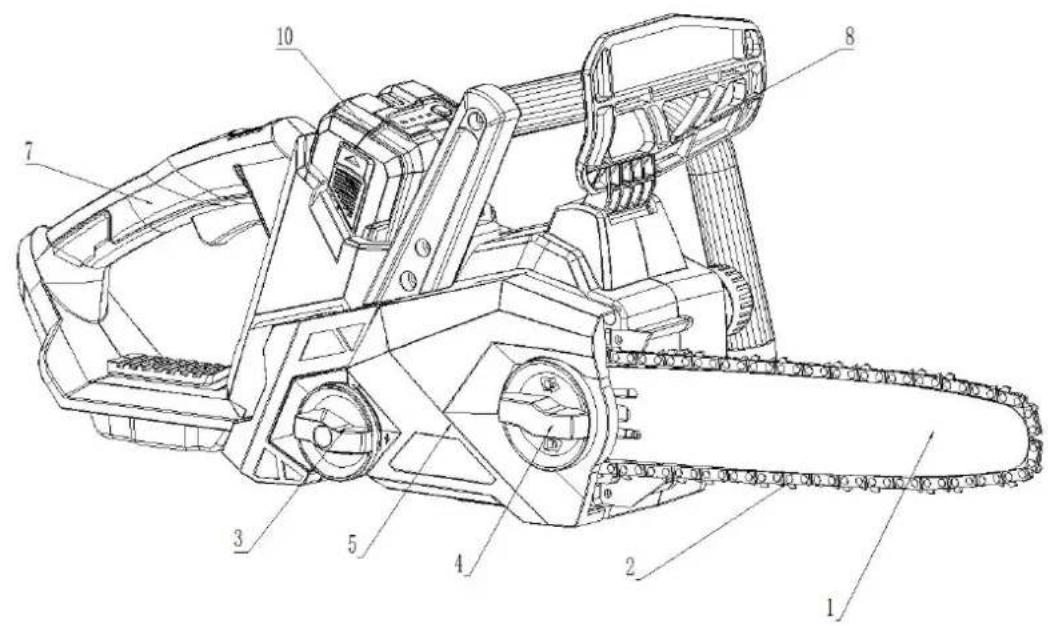


natural_image
Technical line drawing of a U-shaped mechanical component with labeled part '13' (no other text or symbols)-
Chain bar
-
Hand guard
2.Chain
-
Spiked bumper
-
Chain tensioning knob
-
Battery pack
-
Locking knob
-
Lock off button
5.Cover plate
- On/off switch
6.Oil filler cap
-
Blade cover
-
Rear handle
Machine Information
Package Contents
- Chainsaw body
- Chain guide bar
- Saw chain
- Operator's manual
We recommend that you purchase your accessories from the same store that sold you the tool. Use good quality accessories marked with a well-known brand name. Choose the type according to the work you intend to undertake. Refer to the accessory packaging for further details. Store personnel can assist you and offer advice.
Specification
| Model | HYC40Li |
| Voltage | 40V DC |
| Battery pack | HYBAT40Li25 |
| Chain speed | 17m/s |
| Oil tank capacity | 180ml |
| Guide bar length | 14"/355mm |
Noise Information (determined according to ISO 22868, EN 3744)
A weighted sound pressure LpA: 89 dB (A), K pA = 3 dB (A)
A weighted sound power LwA.d: 103 dB (A)
Vibration Information (determined according to ISO 22867):
Vibration emission value: ah = 3.5 m/s2 Uncertainty K = 1.5 m/s2

WARNING: national laws can limit the use of the tool refer to noise emission.
The declared vibration total value may be used for comparing one tool with another, and may also be used in a preliminary assessment of exposure.

WARNING: The vibration emission value during actual use of the power tool can differ from the declared value depending on the ways in which the tool is used dependant on the following examples and other variations on how the tool is
How the tool is used and the materials are cut or drilled.
The tool being in good condition and well maintained
The use the correct accessory for the tool and ensuring it is sharp and in good condition.
The tightness of the grip on the handles and any anti vibration accessories are used.
And the tool is being used as intended by its design and these instructions.
This tool may cause hand-arm vibration syndrome if its use is not adequately managed. Hands may become dull numbing.

WARNING: To be accurate, an estimation of exposure level in the actual conditions of use should also take account of all parts of the operating cycle such as the times when the tool is switched off and when it is running idle but not actually doing the job. This may significantly reduce the exposure level over the total working period.
Help to minimize your vibration exposure risk.
ALWAYS use sharp chisels, drills and blades.
Maintain this tool in accordance with these instructions and keep well lubricated (where appropriate).
If the tool is to be used regularly then invest in anti vibration accessories.
Avoid using tools in temperatures of 10irc C or less.
Plan your work schedule to spread any high vibration tool use across a number of days.
Assembly and Operation

WARNING! Do not connect the chain saw to mains before it is completely assembled. Always use gloves when handling the chain.
Assembly / Replacement of the Guide Bar and Chain
The chain must be so fitted over the guide bar that the cutting edges of the cutters (a) face in the direction that the chain runs.
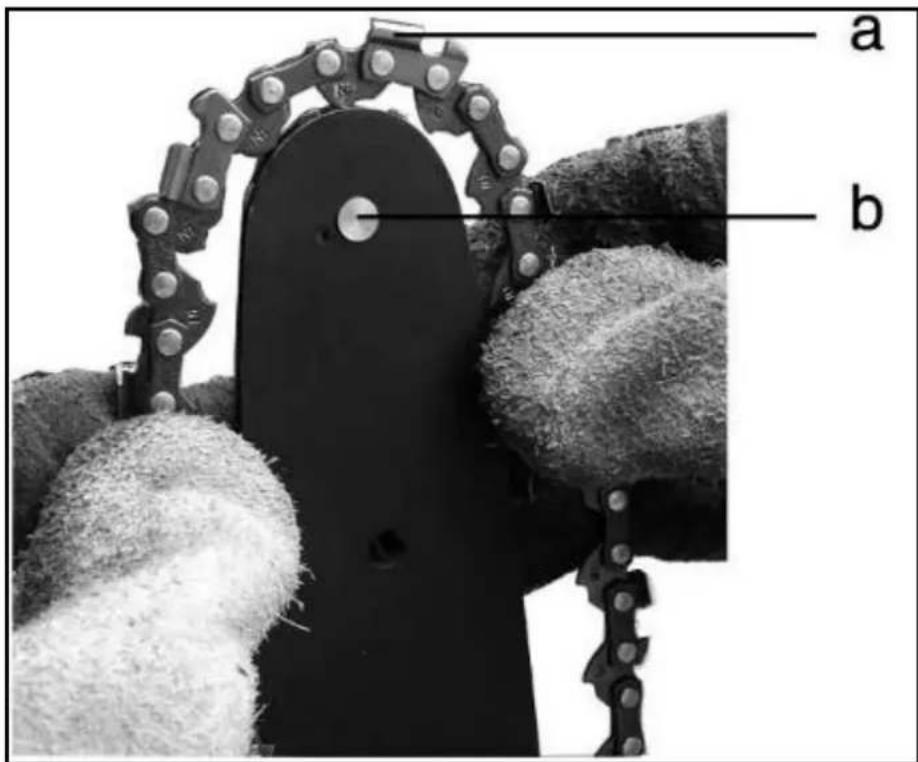
Hold the guide bar with the nose upwards and place the saw chain so on sprocket of the guide bar engage into the chain links and the bottom sections of the drive links are situated in the groove of the bar. The chain is correctly tensioned when it is still possible to raise it by 2-4 mm. The direction of rotation of the saw chain is indicated by two arrows on the drive-sprocket cover.
Assembly and Operation
Chain and Chain Bar Assembly

natural_image
Technical line drawing of a mechanical assembly with gears and levers (no text or symbols)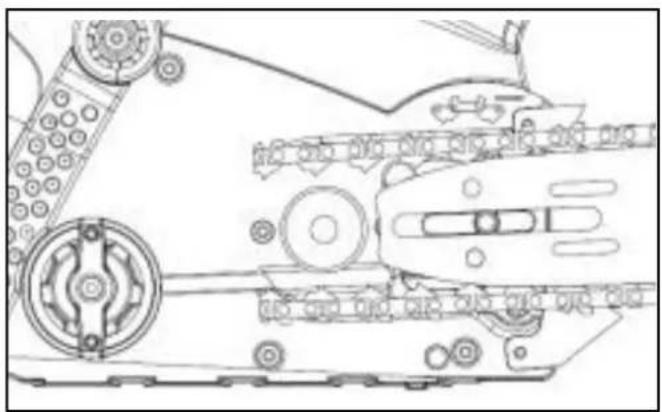
natural_image
Technical line drawing of a mechanical assembly with gears and shafts (no text or symbols)
natural_image
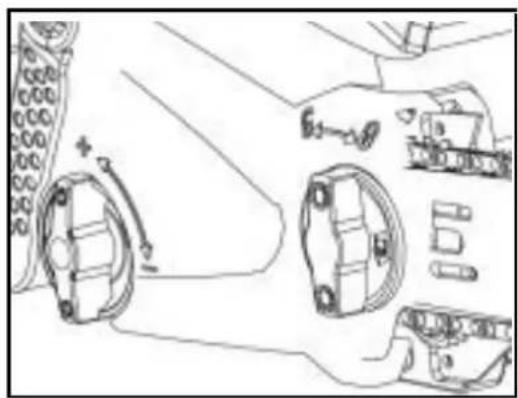
Technical line drawing of mechanical components and parts (no text or symbols)- Unpack all parts carefully.
- Place the chain saw on any suitable flat surface with the motor facing downwards.
- Fit the chain onto the drive sprocket and guide the chain bar. So that the fastening bolt lit into the keyway of the chain bar. Check if all parts are seated properly and hold chain and chain bar in a level position.
- Fit cover. Check that arrows are still aligned
- Use the chain tension knob to get the correct tension in the chain. Finally tighten the sprocket cover knob.
Battery Pack Assembly

natural_image
Technical line drawing of a chain-linking machine (no text or symbols)
natural_image
Technical line drawing of a chain-linking machine (no text or symbols)Put the battery pack(10) as shown above, taking care to press any button to prevent accidental Starting.
Assembly and Operation (Continued)
Starting
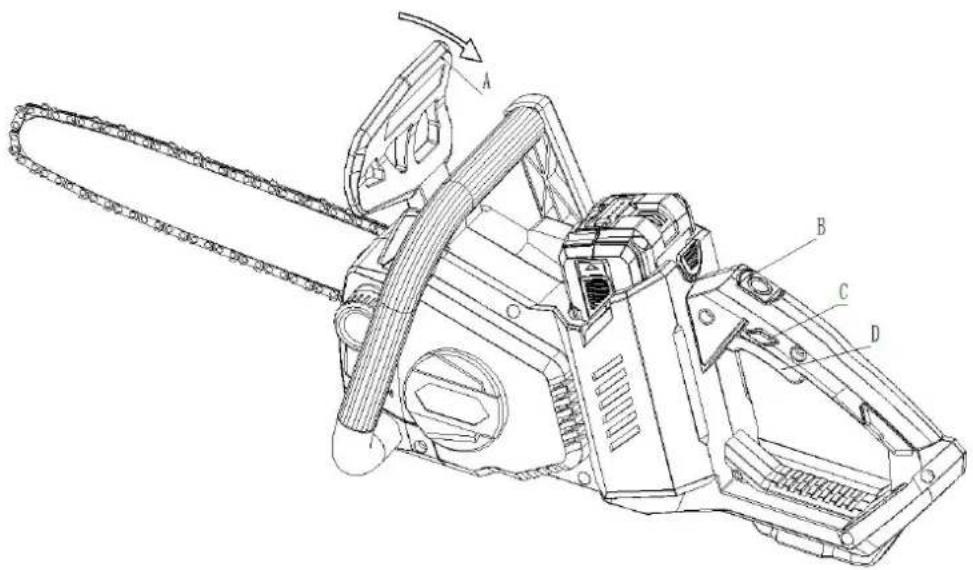
- Push brake baffle (A) to Startup
2: You will heard sound of beep from the switch(B). The light will be green when everything is ok and flicker if with some problems.
3: Press the lock switch (C) and open the switch wrench.
Lubrication

Important: the chain saw is not supplied filled with oil. It is essential to fill with oil before us. Never operate the chain saw without chain oil or at an empty oil tank level, as this will res extensive damage to the product.
Chain life and cutting capacity depend on optimum lubrication. Therefore, the chain is automatically oiled during operation via oil outlet.
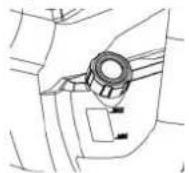


Filling oil tank:
- Set chain saw on any suitable surface with oil filler cap facing upward.
- Clean area around the oil filler cap with cloth unscrew cap.
- Do not remove filter insert during filling.
- Add chain saw oil until reservoir is full.
- Avoid dirt or debris entering oil tank, refit oil filler cap (4) and tighten.

Important: To allow venting of the oil reservoir, small breather channels are provided between the oil filler cap and the strainer, to prevent leakage ensure machine is left in a horizontal position (oil filler cap (4) uppermost) when not in use.
It is important to use only the recommended oil to avoid damage to the chain saw. Never use recycled/old oil of non approved oil will invalidate the warranty.
Assembly and Operation (Continued)
Lubrication

Important: the chain saw is not supplied filled with oil. It is essential to fill with oil before us. Never operate the chain saw without chain oil or at an empty oil tank level, as this will res extensive damage to the product.
Chain life and cutting capacity depend on optimum lubrication. Therefore, the chain is automatically oiled during operation via oil outlet.
natural_image
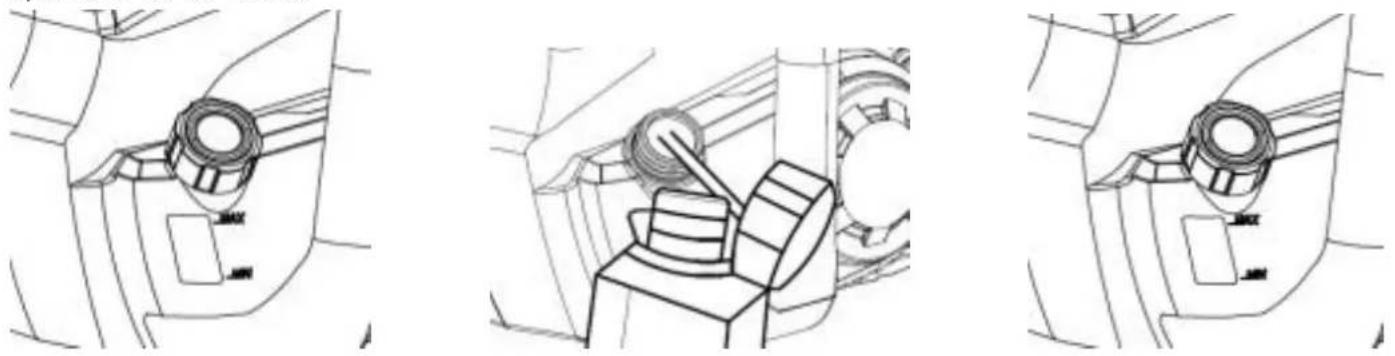
Three technical line drawings showing mechanical components and assembly (no text or symbols)Filling oil tank:
- Set chain saw on any suitable surface with oil filler cap facing upward.
- Clean area around the oil filler cap with cloth unscrew cap.
- Do not remove filter insert during filling.
- Add chain saw oil until reservoir is full.
- Avoid dirt or debris entering oil tank, refit oil filler cap (4) and tighten.

Important: To allow venting of the oil reservoir, small breather channels are provided between the oil filler cap and the strainer, to prevent leakage ensure machine is left in a horizontal position (oil filler cap (4) uppermost) when not in use.
It is important to use only the recommended oil to avoid damage to the chain saw. Never use recycled/old oil of non approved oil will invalidate the warranty.
Assembly and Operation (Continued)
Starting
1.Switching on and off (See fig. A)
Check the voltage and current supply: The voltage and current supply must comply with the ratings on the type plate.
For switching on the machine, press the lock-off button(3), then fully press the on/off switch(2) and hold in this position. The lock-off button(3) can now be released. For switching off, release the on/off switch(2).

natural_image
Technical line drawing of a mechanical component with no visible text or symbols2. Fill the Oil Reservoir (See fig. B)
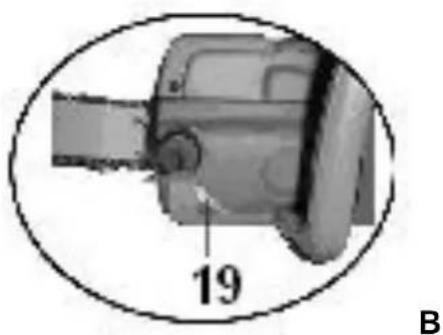
Check oil level gauge (19) prior to starting and regularly during operation. Refill oil when oil level is low. The oil tank filling will last approx. 16 minutes, depending on sawing intensity and stops. (Fig. B) Check new replaced chain tension approx. every 10 minutes during operation.
Assembly and Operation (Continued)
Checking Charge Status
The unit has an LED state of charge indicator on the handlebar.
4 LED lights lit = 100% battery power
3 LED lights lit = 75% battery power
2 LED lights lit = 50% battery power
1 LED light lit = 25% battery power

natural_image
Technical line drawing of a mechanical component with internal slots and a highlighted connector (no text or symbols)Charging The Battery
- Plug the charger into an AC outlet 220-250V (normal household voltage).
- Insert the battery into the slots of the charger and slide into place until the battery locks into place.
- The LED will flash green while the battery is charging.
- Once the battery is fully charged, the LED indicator will show a steady green light.
- Remove the battery by pressing and holding the latch button and sliding out of the charger.
- Do not leave the battery on the charger. Remove it when it is fully charged.
- Lithium-ion batteries have no memory effect - a partial charge will not damage your battery.
WARNING! Charge in a safe location away from moisture and heat sources!
Assembly and Operation (Continued)
Kickback Safety Devices
This saw has a low-kickback chain and reduced kickback chain bar. Both items reduce the chance of kickback. Kickback can still occur with this saw.
The following steps will reduce the risk of kickback.
- Use both hands to grip saw while saw is running. Use firm grip. Thumbs and fingers must wrap around sa handles.
- Keep all safety items in place on saw. Make sure they work properly.
- Do not overreach or cut above shoulder height.
- Keep solid footing and balance at all times.
- Stand slightly to left side of saw. This keeps your body from being in direct line with chain.
- Do not let guide bar nose touch anything when chain is moving.
- Never try cutting through two logs at same time. Only cut one log at a time.
- Do not bury guide bar nose or try plunge cut (boring into wood using guide bar nose).
- Watch for shifting of wood or other forces that may pinch chain.
- Use extreme caution when reentering a previous cut.
- Use low-kickback chain and guide bar supplied with this chain saw.
- Never use dull or loose chain. Keep chain sharp with proper tension.
General Behaviour
Use the chain saw only with secure footing. Hold the chain saw at the right-hand side of your body. (See fig

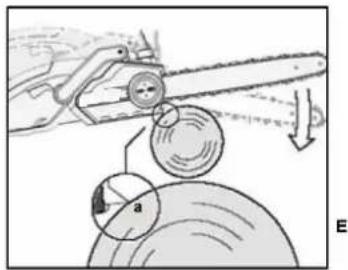
The chain must be running at full speed before it makes contact with the wood. Use the metal gripping teeth secure the saw onto the wood before starting to cut. Use the gripping teeth as a leverage point "a" while cu (See fig. E)
Do not operate the chain saw with arms fully extended or attempt to saw areas which are difficult to reach, ladder. Never use the chain saw above shoulder height. (See fig. F)

natural_image
Two identical illustrations of a person climbing a ladder, each with a cross mark, against a plain background (no text or symbols)Maintenance and Storage
Saw Maintenance and Kickback Safety
Follow maintenance instructions in this manual. Proper cleaning of saw and chain and guide bar maintenance can reduce chances of kickback. Inspect and maintain saw after each use. This will increase the service life of your saw.
Note: Even with proper sharpening, risk of kickback can increase with each sharpening.
Maintenance and Storage of Chains
- Before moving from one place to another before servicing
- Before changing accessories or attachments, such as saw chain and guard
- Inspect chain saw before and after each use. Check saw closely if guard or other part has been damaged. Check for any damage that may affect operator safety or operation of saw. Check for alignment or binding of moving parts. Check for broken or damaged parts. Do not use chain saw if damage affects safety or operation. Have damage repaired by authorized service center.
- Maintain chain saw with care. • Never expose saw to rain.
- Keep chain sharp, clean, and lubricated for better and safer performance.
- Follow steps outlined in this manual to sharpen chain.
- Keep handles dry, clean, and free of oil and grease.
- Keep all screws and nuts tight.
- When servicing, use only identical replacement parts.
- When not in use, always store chain saw in a high or locked place, out of children's reach in a dry place
Replacing Saw Chain / Chain Bar
Replace chain when cutters are too worn to sharpen or when chain breaks. Only use replacement chain noted in this manual. Always include new drive sprocket when replacing chain. This will maintain proper driving of chain. Inspect guide bar before sharpening chain. A worn or damaged guide bar is unsafe. A worn or damaged guide bar will damage chain. It will also make cutting harder.
Fit the tensioning catch into the new bar by tightening the screw clockwise. The catch protrude must be fitted into the bar hole.
Care of Guide Bar
Uneven bar wear causes most guide bar problems. Incorrect sharpening of chain cutter and depth gauge settings often cause this. When bar wears unevenly, it widens guide bar groove (See Fig. G). This causes chain clatter and rivet popping. Saw will not cut straight. Replace guide bar if this occurs.
Inspect guide bar before sharpening chain. A worn or damaged guide bar is unsafe. A worn or damaged guide bar will damage chain. It will also make cutting harder.

FIG G
Maintenance and Storage (Continued)
Normal Guide Bar Maintenance
- Remove guide bar from chain saw.
- Remove sawdust from guide bar groove periodically. Use putty knife or wire (See Fig. H).
- Clean oil slots after each day of use.
- Remove burrs from sides of guide bar. Use fl at fi le to make side edges square.
Replace guide bar when
• bar is bent or cracked
• inside groove of bar is badly worn
(Note: When replacing guide bar, see Replacement Parts and Accessories for replacement information. See Parts List for correct bar.)

FIG H
Sharpening Saw Chain

WARNING: Remove battery pack from chain saw before servicing. Severe injury or death could occur from body contact with moving chain.
WARNING: Cutting edges on chain are sharp. Use protective gloves when handling chain.
Keep chain sharp. Your saw will cut faster and more safely. A dull chain will cause undue sprocket, guide bar, chain, and motor wear. If you must force chain into wood and cutting creates only sawdust with few large chips, chain is dull.
Please contact customer service agent or approved service agent for sharpening.
Troubleshooting
| Symptom Possible Causes Possible | Solution | |
| Chain saw fails to operate | Out of batteryFuse faulty | Charge the battery packReplace fuse |
| Chain saw operates intermittently | Loose connectionInternal wiring defectiveOn/Off switch defective | Contact service agentContact service agentContact service agent |
| Dry chain | No oil in reservoirVent in oil filler cap cloggedOil passage clogged | Refill oilClean capClean oil passage outlet |
| Kickback Brake/Run Down Brake | Brake does not stop chain | Contact service agent |
| Chain/chain bar overheats | No oil in reservoirVent in oil filler cap cloggedOil passage cloggedChain is over tensionedDull chain | Refill oilClean capClean oil passage outletAdjust locking knobSharpen chain or replace |
| Chain saw rips, vibrates, does not saw properly | Chain tension too looseDull chainChain worn outChain teeth are facing in the wrong direction | Adjust locking knobSharpen chain or replaceReplace chainReassemble with chain in correct direction |
Recycling and Disposal

natural_image
Symbol of a trash bin with crossed lines indicating no waste or discharge (no text or labels)We do not offer a takeback scheme for the recovery of Waste Electrical Electronic Equipment (WEEE) & Batteries. Instead the responsibility to dispose of WEEE and/or Batteries is passed onto you by us.
So when it becomes necessary to dispose of your machine you must take it to your local Civic Amenity Site. For further information please contact your local Authority for disposal advice.
You MUST make sure that all unused oil and fuel is disposed of correctly either beforehand or at your local Civic Amenity Site.
- Under NO circumstances must any fuel or oil be put down any drains
- Certain products contain WEEE waste which should not be disposed of in your domestic waste
- You MUST recycle WEEE in accordance with your local authority or recycling centre.
- Certain products contain batteries which should not be disposed of in your domestic waste
- You MUST recycle batteries in accordance with your local authority or recycling centre.
- Unwanted packaging and materials should be stored and taken to a recycling centre so it can be disposed of in a manner which is compatible with the environment.
We are a Member of the VALPAK National Compliance Scheme and our registration number is RM08660. For further information about disposal please contact your Local Authority.
You can also get more advice and guidance about recycling at the following website http://www.recycle-more.co.uk
Should you pass this product on to another user either sold or loaned, you MUST pass on this user manual. This will make sure that all other users can use and maintain this machine safely.
Environmental Protection
- Environmental protection should be a priority of considerable importance when using the machine, for the benefit of both social coexistence and the environment in which we live. Try not to cause any disturbance to the surrounding area.
- You must comply with local regulations and provisions for the disposal of packaging, oils, petrol, filters, damaged parts or any elements which have a strong impact on the environment. This waste must not be disposed of as normal waste. It needs to be separated and taken to specified waste disposal centres where the material will be recycled.
- You must comply with local regulations for the disposal of waste materials after mowing.
- When disposing, do not pollute the environment with the machine, but hand it over to a disposal centre, in accordance with the local laws in force.
| Importer and Authorised Representative | |
| Genpower LtdIsaac Way, Pembroke Dock, SA72 4RW | |
| Country of Origin: | China |
| Description: | 40V Chainsaw |
| SKU Code: | HYC40Li |
| Date of Issue: | 17/09/21 |
| Regulations and Directives of Compliance | |
| •2006/42/EC The Machinery Directive•2014/30/EU Annex II Electromagnetic Compatibility Directive•2011/65/EU RoHS•2000/14/EC Noise Emissions in the Environment by Equipment for use Outdoors.•EN ISO 11681-1, EN 61000-6-1, EN 55012 | |
| Statement of Declaration | |
| We the importer and authorised representative of the product described confirm conformity within the provisions of applicable regulations and directives listed within this document. | |
| Signed on Behalf of Genpower Ltd | |
Place of Issue: Genpower LtdSignatory Name: Roland LlewellinPosition: Managing DirectorRJLleweln...... ...... ...... | |
Notes
Notes
Notes
Check Out Our YouTube Channel
Our videos on YouTube include:
- Unboxing
- Assembly of your machine
• How to service your machine - Products in use
- 'How To' videos
- Product features
Go to www.hundaisupport.co.uk or search 'Hyundai Power Products' in YouTube.
Warranty
Proof of purchase will be required before you make a warranty claim.
Full warranty terms and conditions can be found on the HYUNDAI POWER PRODUCTS website: www.hyundaipowerproducts.co.uk
Manual Updates
Our manuals are constantly being reviewed and updated. Should you find an error, omission or something unclear, please contact us for assistance.
We reserve the right to make any modifications without prior notice whenever necessary.
Our latest manuals are also placed online.
All our manuals can be downloaded at: www.hyundaipowerproducts.co.uk
Returning Your Product
If you are returning your product, please contact the dealer for their returns policy.
Leaving A Review
We work very hard to give all of our customers the best possible service. If you have any problems, before leaving negative feedback, please contact us to give us a chance to resolve the issue. We would be delighted if you left us positive feedback!
To leave a review, please go to: uk.trustpilot.com/review/hyundaipowerequipment.co.uk
Ordering Spare Parts
You can find the part you are looking for in the ‘Spare Parts’ section of this manual or visit power-spares.co.uk
Contact Us
Our friendly aftersales team will be more than happy to help you!

Phone
Call our team on 01646 687880, open Monday-Friday 8.30am-5pm.

aftersales@hyundaipowerproducts.co.uk

Online Live Chat
Go to www.hyundaipowerproducts.co.uk Live chat is open Monday-Friday from 8.30am-5pm.

Post
Genpower Limited, Isaac Way, Pembroke Dock, Pembrokeshire, SA72 4RW, UK.
Importer:
GENPOWER LTD
Isaac Way, London Road,
Pembroke Dock, UNITED KINGDOM, SA72 4RW
T: +44 (0) 1646 687 880 F: +44 (0) 1646 686 198
E: info@hyundaipowerproducts.co.uk
www.hyundaipowerproducts.co.uk
Imported/Distributed by Genpower Ltd for The United Kingdom & Ireland





- Thank You For Purchasing Your HYUNDAI Product
- Important!
- Contents
- Intended Use
- Residual Risks
- General Power Tool Safety Warnings
- Safety Information (Continued)
- 2) Electrical safety
- 3) Personal safety
- 4) Power tool use and care
- Battery Pack Safety Warnings
- Instruction Before Use
- Before using your cordless chain saw
- Charging your Battery Pack
- Storage of the charger and battery
- Chainsaw Safety
- Causes and Operator Prevention of Kickback
- Felling a tree
- Notching Undercut
- Felling Back Cut
- Limbing a Tree
- Bucking a Log
- Symbols On The Machine
- Features
- Machine Information
- Package Contents
- Assembly and Operation
- Assembly / Replacement of the Guide Bar and Chain
- Chain and Chain Bar Assembly
- Battery Pack Assembly
- Assembly and Operation (Continued)
- Starting
- Lubrication
- Filling oil tank:
- 1.Switching on and off (See fig. A)
- Fill the Oil Reservoir (See fig. B)
- Checking Charge Status
- Charging The Battery
- Kickback Safety Devices
- General Behaviour
- Maintenance and Storage
- Saw Maintenance and Kickback Safety
- Maintenance and Storage of Chains
- Replacing Saw Chain / Chain Bar
- Care of Guide Bar
- Maintenance and Storage (Continued)
- Normal Guide Bar Maintenance
- Sharpening Saw Chain
- Troubleshooting
- Recycling and Disposal
- Environmental Protection
- Notes
- Check Out Our YouTube Channel
- Warranty
- Manual Updates
- Returning Your Product
- Leaving A Review
- Ordering Spare Parts
- Contact Us
- Phone
- Online Live Chat
- Post
Brand : HYUNDAI
Model : HYC40LI
Category : Saw