EPH1500 - Heating Creda - Free user manual and instructions
Find the device manual for free EPH1500 Creda in PDF.


| Type | Panel Heater / Convector Heater |
| Power Supply | 220-240 V ~ 50 Hz |
| IP Rating | IPX4 (splash proof) |
| Insulation Class | Class II (double insulated) |
| Heating Principle | Natural convection |
| Control Variants | Mechanical (Newera Plus) or Electronic (Newera Electronic, Style) |
| Operating Modes | Comfort, Eco, Frost-Free (~7°C) |
| Heating Indicator (Electronic) | Red LED (V1) illuminates during heating |
| Lock Function | Yes (mechanical and electronic models) |
| Pilot Wire (Electronic) | Yes (black wire for external programmer) |
| Installation | Wall-mounted, minimum clearance distances apply, requires qualified electrician |
| Maintenance (Cleaning) | Clean grilles twice a year with vacuum or brush; wipe casing with damp cloth |
| Professional Maintenance | Internal check every 5 years |
| Use | Indoor domestic only |
| Warranty | 24 months for parts (conditions apply) |
| Compliance | BS7671 IEE Wiring Regulations |
Frequently Asked Questions - EPH1500 Creda
User questions about EPH1500 Creda
0 question about this device. Answer the ones you know or ask your own.
Ask a new question about this device
Download the instructions for your Heating in PDF format for free! Find your manual EPH1500 - Creda and take your electronic device back in hand. On this page are published all the documents necessary for the use of your device. EPH1500 by Creda.
USER MANUAL EPH1500 Creda
Documentation for installation and use to be retained by user
natural_image
Blank rectangular frame with horizontal striped pattern on top and bottom edges (no text or symbols)
natural_image
Simple line drawing of a vertical panel with horizontal lines and a shaded top section (no text or symbols)Creda
Mechanical or electronic convector
Newera Plus HPH - Electronic EPH
Electronic Plinth EPHP - Style PPH
Newera Electronic Plinth EPHP
Newera Style PPH
The product you have just purchased has undergone numerous tests and inspections to guarantee the highest quality. We hope it will give you complete satisfaction.
INSTALLATION OF THE PANEL HEATER
Please read the instructions before starting to install the heater. Disconnect the power before carrying out any work on the heater. Keep these instructions even after your heater has been installed.
1) Where to install your heater?
- This equipment was designed to be installed in a residence. Please ask your distributor before using it for any other purpose.
- The panel heater should be installed according to normal trade practice and in compliance with legislation in the relevant country (BS7671 the IEE Wiring Regulations).
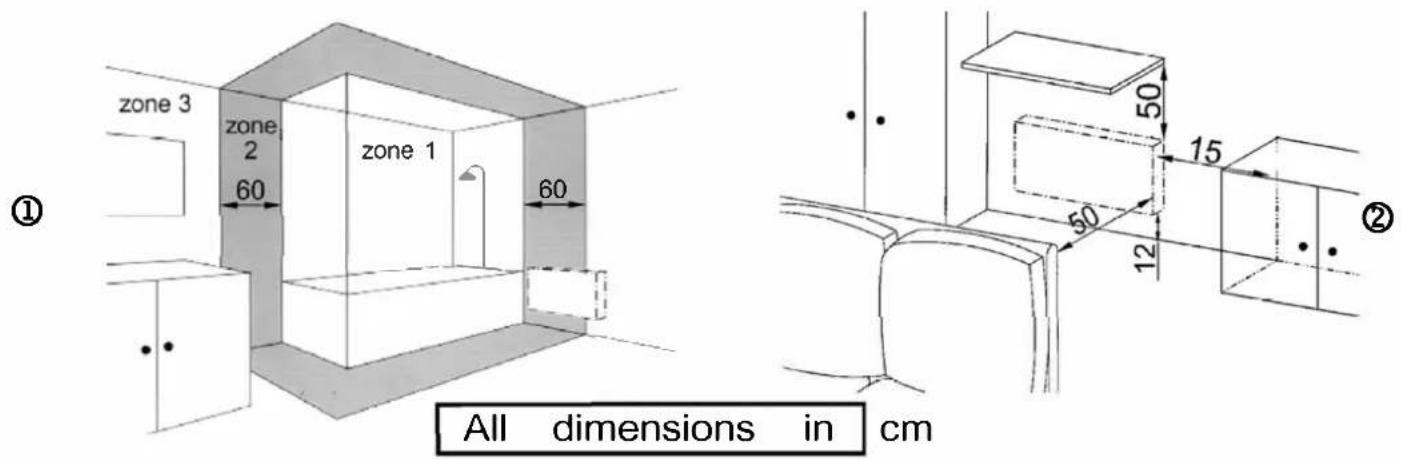
- The equipment is class 2 (double insulated) and is protected against splashed water (IPx4). Therefore it can be installed in zone 2, provided the panel heater's controls cannot be reached by a person using the shower or bath. ①
- Comply with the minimum clearance distances for positioning of the panel heater. ②
- If your wall covering is laid on foam, a spacer the same thickness as the foam must be placed under the panel heater's support. This ensures there is free space behind the panel heater to make sure its control settings are not adversely affected.
- Do not install the panel heater:
In a draught likely to affect the control settings (under a fan, etc.).
Under a fixed mains power socket.
2) How to install the panel heater (Newera Plus / Electronic)
2-1.1) Mount the wall support
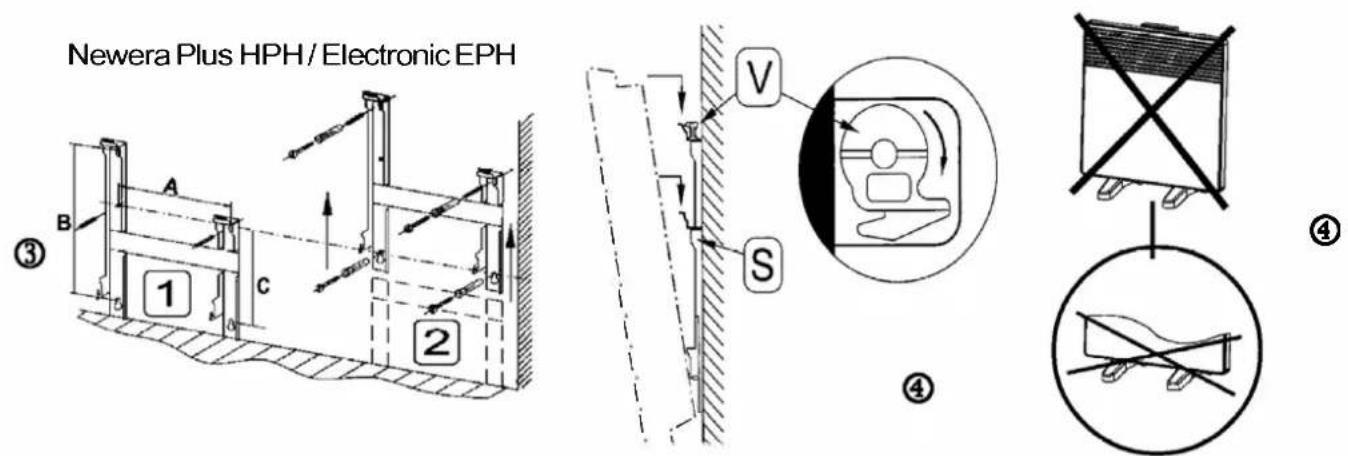
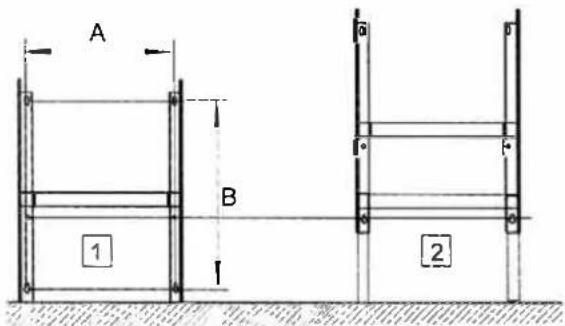
- Place the attachment lug on the floor. ③.1
- Mark the holes, to determine the position of the lower attachments.
- Raise the attachment lug, making the previously marked holes coincide so that you can locate the remaining two holes. ③.2
- Drill holes and put the inserts into place
- Fix the support.
- Mount the panel heater on mounting S as shown. Lock the lock V. ④
2-1.2) Mount the wall support (Newera Electronic Plinth)
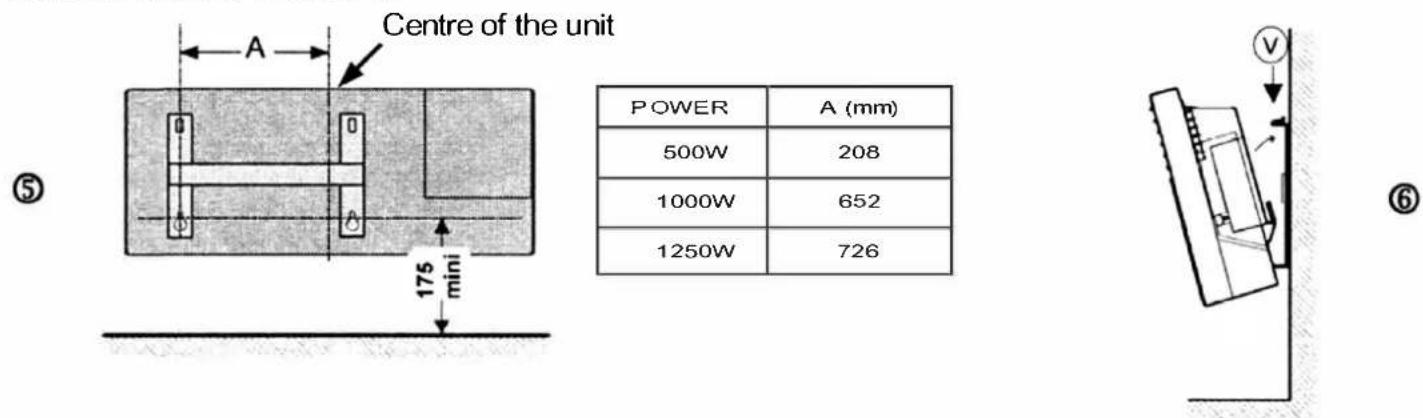
- Mark the holes, to determine the position of the lower attachment fig. ⑤
- Drill holes and put the inserts into place.
- Fix the support.
- Mount the panel heater on mounting S as shown ⑥, lock the lock V
2) How to install the panel heater (Newera Style)
2-1.3) Mount the wall support
- Place the attachment lug on the floor. ⑦.1
- Mark the holes, to determine the position of the lower attachments.
- Raise the attachment lug, making the previously marked holes coincide so that you can locate the remaining two holes. ⑦.2
- Drill holes and put the inserts into place
- Fix the support.
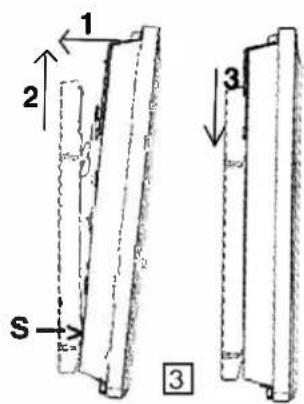
2-1.4) Locking the panel heater onto its wall mounting : ⑦.3
- Mount the panel heater on mounting S as shown in the diagram then raise and hook over the top of the bracket.
2-2.1) Connecting the Newera Plus panel heater
The panel heater must be powered with 220 240V 50Hz
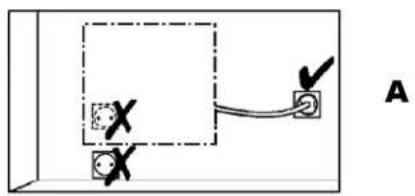
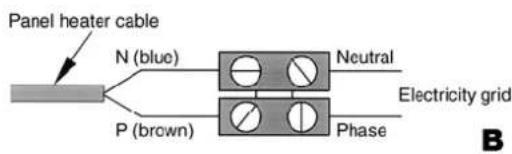
- The panel heater must be connected to the mains, either by a 2-wire cable (Brown = Phase, Blue = Neutral) via connection box (Mechanical thermostat : diagram A and B) ;
- The installation must be equipped with an all pole disconnection mechanism with a break contact distance of at least 3mm in each pole.
- Earthing is prohibited. Do not connect the pilot wire (black) to earth.
- The heater must be installed by a qualified electrician in accordance with the local regulations. The brown and blue wires must NOT be connected to earth. If the heater wire is damaged, it must be replaced by a qualified person to avoid hazard.
2-2.2) Connect the Newera Electronic and Style panel heaters :
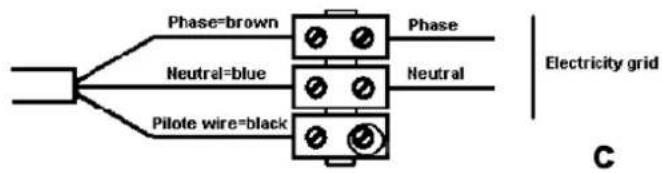
- The panel heater must be powered with 220-240V 50Hz - The panel heater must be connected to the mains by a 2-wire cable (Brown=Phase, Blue=Neutral), by means of a connection box (A and C). The installation must be equipped with an all pole disconnection mechanism with a break contact distance of at least 3 mm in each pole.
- Earthing is prohibited.
Do not connect the pilot wire (black) to earth.
- The heater must be installed by a qualified electrician in accordance with the local regulations. The mains wires and the pilot (black) wire must NOT be connected to earth. If the heater wire is damaged, it must be replaced by a qualified person to avoid hazard.
- If a pilot or piloted panel heater is protected by a 30mA residual current device (RCD), the pilot wire's power supply must be protected by the same RCD as the heater.
flowchart
graph TD
    A["Power Supply"] --> B["Phase=brown"]
    A --> C["Neutral=blue"]
    A --> D["Pilote wire=black"]
    B --> E["Phase"]
    C --> F["Neutral"]
    D --> G["Electricity grid"]
USING THE PANEL HEATER
3.1) Mechanical Range (Newera Plus)
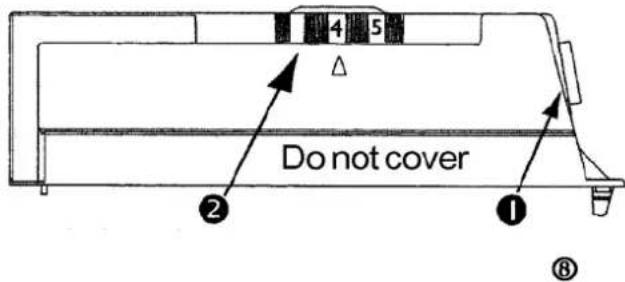
1) Description of the control unit : ⑧
① → ⚙/1 / ⏻ switch (stop/0) OFF.
② → Temperature adjustment control knob.
2) Setting the comfort temperature

The comfort temperature is the temperature that you would like while the room is occupied.
a) Put the ① switch to ⚙ (1) ON.
b) Mechanical : set the ② control knob to between 4 and 5.
c) Wait a few hours for the temperature to stabilise.
d) If the setting is satisfactory (if necessary use a thermometer to check), note the position for future reference.
3) Frost-Free mode
This mode is used to keep the temperature at approximately 7^ C in the room when you are absent from the house for a prolonged period (i.e. more than 24 hours).
a) Leave the ① switch ON (1).
b) Set the ② control knob to ✿.
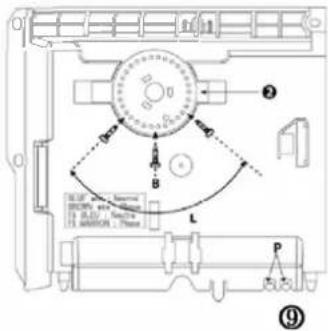
4) Locking the controls : ⑨
It is possible to lock or limit use of the ② control knob and lock the ① switch to prevent unauthorised manipulation of the panel heater (children, etc.).
a) Unhook the panel heater from its wall mounting.
b) Remove the slugs P on the back of the thermostat from their mountings.
c) Select position B to lock the control knob or position L to limit the amount it can be turned.
3.2) Electronic Range (Newera Electronic, Electronic Plinth and Style)
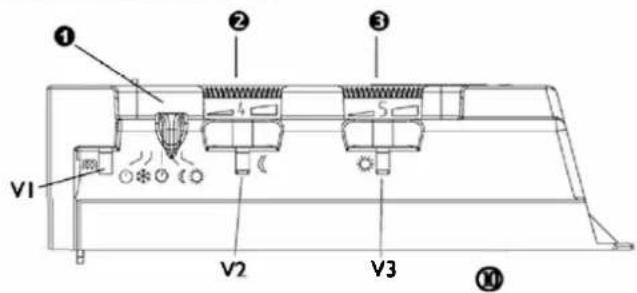
1) Description of the control unit : Ⓜ
① → Mode switch knob.
② → ECO temperature set value adjustment knob.
③ → COMFORT temperature set value adjustment knob.
V1 → Heating light.
V2 → ECO mode light.
V3 → COMFORT light.
2) Setting the comfort temperature :
The comfort temperature that you would like while the room is occupied.
a) Set the cursor ① to ⚙, the heating light V3 comes on.
b) Set the control knob ③ to 5, the heating light V1 comes on, if the room temperature is below the required temperature.
c) Wait a few hours until the temperature stabilizes.
d) If the setting is satisfactory (if necessary use a thermometer to check), note the position.
If the setting is not satisfactory, adjust it and start again from point c.
3) Setting the Eco (setback) temperature :
This is the required temperature during periods when the room is unoccupied.
It is recommended that this mode should be used if the room is unoccupied for more than 2 hours.
a) Set the cursor ① switch knob to (, the heating light V2 comes on.
b) Adjust the control knob ② between 3 and 4. The heating light V1 comes on if the ambient temperature is lower than the desired Eco temperature.
c) Wait a few hours until the temperature stabilizes.
d) If the setting is satisfactory (if necessary use a thermometer to check), note the position for future reference. If the setting is not satisfactory, adjust it and start again from point c.
4) Frost-Free mode

This mode is used to keep the temperature at approximately 7^ C in the room when you are absent from the house for a prolonged period (i.e. more than 24 hours).
a) Set the cursor ① to ✦.
5) The heating indicator : V1
This light indicates periods during which the element is heating. The light flashes a soon as the desired temperature is reached.
6) Switching off the device : ⏻

To set the device to the Off position, move the cursor to ⏻.
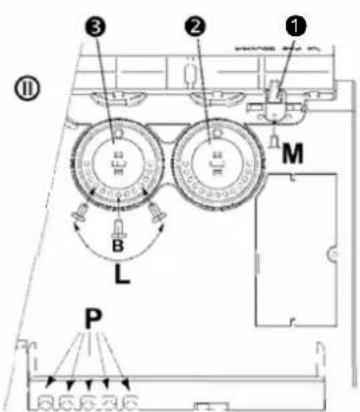
7) Locking the controls : ⑪
It is possible to lock or limit the range of use of thumb-wheels ② and ③ and lock selector switch cursor ① to prevent the inadvertent manipulation of the device (by children, etc).
a) Detach the device from its wall bracket.
b) On the back of the thermostat box, detach pins P from their supports.
c) Choose position B to lock the thumb-wheels or position L to limit the range of use of the thumb-wheels.
Choose one of the positions M to lock the switch in the desired mode.
8) Programming mode : ⏻
This device has a thermostat capable of receiving orders from a programmer. It recognizes the following commands:
-COMFORT : Temperature set using the thumb-wheel ③
- ECO : Temperature set using the thumb-wheel ②
To activate the programming mode set cursor ① to Ⓙ.
In this way, by connecting the pilot wire to a timer, you can program your Comfort and Economy temperature periods. It is possible to connect several devices to one timer and, in this way, make energy savings.
NB: When there is no command given over the pilot wire, the device heats in the Comfort mode. HG and load-shedding commands override the Economy and Comfort modes. On changing from the Comfort mode to the Economy mode, the changeover time is approximately 12 seconds.
RECOMMENDATIONS FOR USE
- There is no point in setting the unit to its maximum, the room temperature will not rise any faster.
- Switch the unit off by putting cursor ① to ⏻.
- Remember to lower the temperature if you go out for several hours.
If you go out for : less than 2 hours, do not touch the controls.
2 to 24 hours, lower the Ⓞ control knob by two graduations (mechanical), set the cursor Ⓞ to ⌐ (electronic).
more than 24 hours or in the summer, put the ② control knob or cursor to (※).
If you have several units in the room, let them all operate simultaneously. This will give you a more uniform temperature without increasing electricity consumption.
WARNINGS

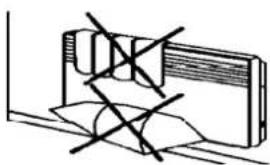
This appliance is not intended for use by young children or infirm persons without supervision. Young children should be supervised to ensure that they do not play play with the appliance, lean against the front or insert objects or paper In It. Do not totally or partially block the grilles on the front or Inside of the appliance, as this may cause overheating. If the supply cord is damaged, it must be replaced by a service agent or similarly qualified person in order to avoid a hazard (applies to all units). All work on the interior of the appliance must be carried out by a qualified electrician.
natural_image
Simple line drawing of a window with no text, numbers, or symbolsMAINTENANCE
To maintain performances of your unit, you should clean the upper and lower grilles of the unit about twice a year using a vacuum cleaner or a brush.
Have a professional check the inside of the unit every five years.
Dirt may collect on the grille of the unit if the atmosphere is polluted. This phenomenon is due to the poor quality of the ambient air. In this case, it is recommended to check that the room is well ventilated (ventilation, air inlet, etc.), and that the air is clean. The unit will not be replaced under the guarantee because of this type of dirt.
The unit casing should be cleaned with a damp cloth. Never use abrasive products.
TROUBLE-SHOOTING
If the unit does not heat :
Make sure that the installation circuit breakers are switched on.
Check the air temperature in the room.
The unit is permanently heating :
Make sure that is not in a draught and that the temperature setting has not been changed.
Electronic range (only) : Newera Electronic, Electronic Plinth and Style.
The unit does not heat :
Check that the programmer is in COMFORT mode.
The unit does not carry out programming orders :
Make sure that the programming unit is being correctly used (refer to its user's manual) or that the programmer is properly inserted in its housing and that it is operating normally (batteries?).
This unit with electronic control is equipped with a microprocessor that can be disturbed by some severe mains voltage disturbances (outside EC standards defining the disturbance protection level).
If there are any problems (thermostat blocked, etc.) switch off the unit power supply (fuse, circuit breaker, etc.) for about 10 minutes to allow the unit to start again.
Have your energy distributor check your power supply if the phenomenon occurs frequently.
WARRANTY CONDITIONS
KEEP THIS DOCUMENT IN A SAFE PLACE
(This certificate should only be produced if you are making a complaint, with the proof of purchase attached)
We guarantee that should this heater prove to be defective by reason of faulty workmanship or material within 24 months of the date of purchase or commencement of hire purchase we will replace the defective parts FREE OF CHARGE on condition that,
a) The appliance has been correctly installed and used only on the supply circuit or voltage stamped on the rating plate.
b) The appliance has been used in accordance with these instructions and has not been tampered with or otherwise subject to misuse, neglect or accident.
c) The appliance has not been taken apart, modified or repaired except by a person authorised by us.
d) EVIDENCE of the date of purchase in the form of an invoice, receipt (or hire purchase document) is included with the Appliance if returned under guarantee.
MODEL/CAI. NUMBER :
SERIAL NUMBER*:
CUSTOMER'S NAME AND ADRESS*:
*This information is shown on the rating which can be seen on the left-side or behind the front grille of the unit.
Applied Energy Products Limited
Morley Way, Peterborough PE2 9JJ
www.applied-energy.com
Technical Services Tech line 08709 000430
Tech fax 08709 000530
INSTALLER'S STAMP
- Documentation for installation and use to be retained by user
- Mechanical or electronic convector
- Newera Plus HPH - Electronic EPH
- Electronic Plinth EPHP - Style PPH
- INSTALLATION OF THE PANEL HEATER
- 1) Where to install your heater?
- 2) How to install the panel heater (Newera Plus / Electronic)
- 2-1.1) Mount the wall support
- 2-1.2) Mount the wall support (Newera Electronic Plinth)
- 2) How to install the panel heater (Newera Style)
- 2-1.3) Mount the wall support
- 2-1.4) Locking the panel heater onto its wall mounting : ⑦.3
- 2-2.1) Connecting the Newera Plus panel heater
- 2-2.2) Connect the Newera Electronic and Style panel heaters :
- - Earthing is prohibited.
- USING THE PANEL HEATER
- 3.1) Mechanical Range (Newera Plus)
- 1) Description of the control unit : ⑧
- 2) Setting the comfort temperature
- 3) Frost-Free mode
- 4) Locking the controls : ⑨
- 3.2) Electronic Range (Newera Electronic, Electronic Plinth and Style)
- 1) Description of the control unit : Ⓜ
- 2) Setting the comfort temperature :
- 3) Setting the Eco (setback) temperature :
- 4) Frost-Free mode
- 5) The heating indicator : V1
- 6) Switching off the device : ⏻
- 7) Locking the controls : ⑪
- 8) Programming mode : ⏻
- RECOMMENDATIONS FOR USE
- WARNINGS
- MAINTENANCE
- TROUBLE-SHOOTING
- If the unit does not heat :
- The unit is permanently heating :
- The unit does not heat :
- The unit does not carry out programming orders :
- WARRANTY CONDITIONS
- KEEP THIS DOCUMENT IN A SAFE PLACE
Brand : Creda
Model : EPH1500
Category : Heating