
TV-40LE90T2 - Television Vivax - Free user manual and instructions
Find the device manual for free TV-40LE90T2 Vivax in PDF.


| Product Type | LED Television |
| Screen Size | 40 inches (101.6 cm) |
| Resolution | 1920 x 1080 (Full HD) |
| Refresh Rate | 60 Hz |
| Dimensions (without stand) | 90.2 x 52.1 x 8.3 cm |
| Weight (without stand) | 7.5 kg |
| Power Supply | 100-240 V, 50/60 Hz |
| Power Consumption (typical) | 75 W |
| Standby Power Consumption | < 0.5 W |
| Connectivity | 2 x HDMI, 1 x USB, 1 x VGA, 1 x AV, 1 x Component, 1 x RF, 1 x LAN |
| Audio Output | 2 x 8 W speakers |
| Supported Video Formats | MPEG-4, AVI, MKV, MP4 |
| Supported Audio Formats | MP3, AAC, WMA |
| Tuner | DVB-T2/C/S2 |
| VESA Mount | 200 x 200 mm |
| Operating System | Linux-based (proprietary) |
| Remote Control | IR remote with numeric keys |
| Energy Class | A |
| Cleaning Instructions | Unplug before cleaning; use soft, dry cloth; avoid solvents |
| Safety Features | Overvoltage protection, child lock, tip-over stand |
| Spare Parts Availability | Remote, stand, power cord available from vendor |
| Repairability Index | 5.5 / 10 |
Frequently Asked Questions - TV-40LE90T2 Vivax
User questions about TV-40LE90T2 Vivax
0 question about this device. Answer the ones you know or ask your own.
Ask a new question about this device
Download the instructions for your Television in PDF format for free! Find your manual TV-40LE90T2 - Vivax and take your electronic device back in hand. On this page are published all the documents necessary for the use of your device. TV-40LE90T2 by Vivax.
USER MANUAL TV-40LE90T2 Vivax
natural_image
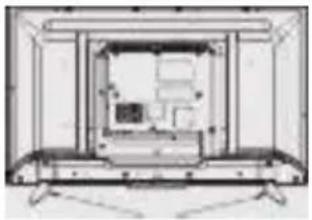
Technical line drawing of a computer monitor interior with no visible text or symbols- Postavite tijelo televizora na ravnu površinu te postavite bazu televizora na njega. Osigurajte da se rupe vijaka poklapaju.
natural_image
Technical line drawing of a mechanical assembly or enclosure with no visible text or symbols- Pričvrstite tijelo i bazu televizora sa dodatna 4 vijka (vijci bez gumene podloge).
- Završeno
TV-40LE90T2
natural_image
Technical line drawing of a device rear panel with internal components and mounting holes (no text or symbols)- Postavite tijelo televizora na ravnu površinu te postavite bazu televizora na njega. Osigurajte da se rupe vijaka poklapaju.

natural_image
Technical line drawing of a flat-screen TV or audio device front view showing internal components and ventilation slots (no text or symbols)- Pričvrstite tijelo i bazu televizora sa dodatna 4 vijka (vijci bez gumene podloge). 3.Završeno
Upozorenje


Upozorenje
Uređaj treba čuvati od visokih temperatura, uređaja za grijanje ili direktne sunčeve svjetlosti. Uređaj zahtjeva dobru ventilaciju. Osigurajte 10 cm razmaka između televizora i drugih uređaja ili zidova kabineta.


Televizor treba čuvati od kiše, vlage prašine kako bi se spriječio strujni udar ili kratki spoj. Ne prekrivajte otvore za ventilaciju prekrivačima, zastorima novinama i sl.

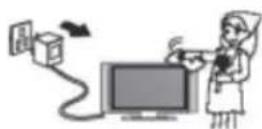
Ne čatite televizor sa berzinskim, kernjekim ili alkoholnim sredstima polito će to dovesti do oštečenja uređaja.
Zaslon možete čistiti makom kripom nakon isključi varja priključka za napajanje. Ne brilite zalon pretjenano te ga me grebite, dodrinjbe ili udanaje tvr dim prednimta.
natural_image
Illustration of a person holding a screen and a prohibition symbol next to a computer (no text or symbols present)Ne postavljajte kabel napajanja 8 druge kabele tarno gdje se na njih može stati ili zapeli. Ne mojte preoptere 11 utičnicu.

Ne neta-vljaje stražnji poklopac posito on sa drži viso ki napon te može dovesti do strujnog udana. Unutarnja podšelenja i pro-vjene monaju izvoditi kvalificinani profesiornaci.
Tablica sadržaja
Tablica sadržaja ....
Kontrolno sučelje ....
Dijagram žičnog sučelja......
Daljinski upravljač......
Izbornik slike ....
Izbornik zvuka ....
natural_image
Line drawing of a blank flat-screen monitor with a small screen icon and a downward arrow at the bottom (no text or symbols)

1 /POWER
Uključite televizor ili ga prebacite u poziciju mirovanja.
2 Ulaz
Tipka odabira ulaza signala.
3 Izbornik
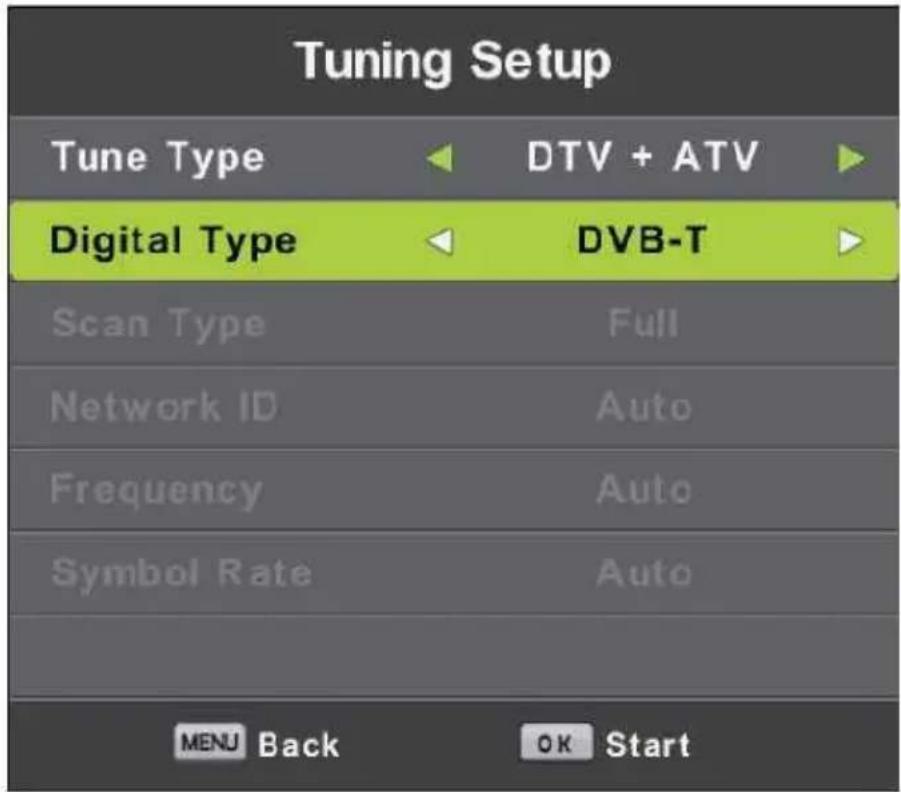
Automatsko podešavanje
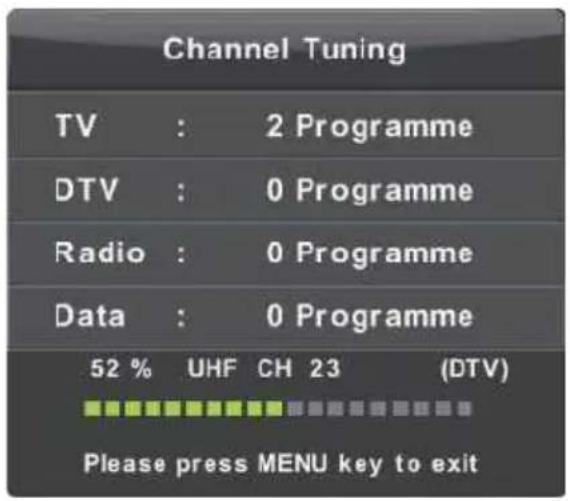
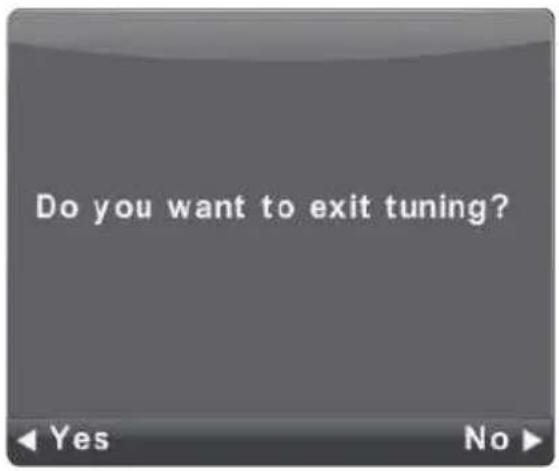
Pri prvom podešavanju odaberite Izbornik te pritisnite tipku lijeve strelice kako bi preskočili podešavanje ATV programa. Ista stvar vrijedi ukoliko želimo preskočiti DTV programe.


Trenutni program
Postavite broj kanala.
Sustav boja
Odaberite sustav boja
Zvučni sustav
Odaberite zvučni sustav
Fino podešavanje
Posebno prilagodite frekvenciju kanala.
Pretraživanje
Pokrenite pretraživanje kanala.
DTV Ručno podešavanje
Informacije o signalu
Izbornik slike
- Pritisnite ▼ / ▲ kako bi odabrali
Audio Jezici
Izbornik glazbe
Izbornik filma
Izbornik teksta
natural_image
Technical line drawing of a computer monitor interior with no visible text or symbols- Postavite telo televizora na ravnu površinu pa postavite bazu televizora na njega. Vodite računa da se rupe zavrtanja poklapaju.

natural_image
Technical line drawing of a mechanical assembly or enclosure with no visible text or symbols- Pričvrstite telo i bazu televizora sa dodatna 4 zavrtnja (zavrtnji bez gumene podloge). 3.Završeno
TV-40LE90T2
natural_image
Technical line drawing of an electronic device rear panel with ventilation grilles and buttons (no text or symbols)- Postavite telo televizora na ravnu površinu pa postavite bazu televizora na njega. Vodite računa da se rupe zavrtanja poklapaju.

natural_image
Technical line drawing of a front-mounted electronic device with internal components and ventilation slots (no text or symbols)- Pričvrstite telo i bazu televizora sa dodatna 4 zavrtnja (zavrtnji bez gumene podloge). 3.Završeno
Upozorenje

Upozorenje!

Rezervni delovi za održavanje nisu uključeni.
natural_image
Illustration showing a no-smoking sign, a road with smoke, and a computer monitor (no text or symbols)

natural_image
Illustration of a computer monitor with a cartoon character on top, labeled 'Televizor' (no other text or symbols)natural_image
Illustration of a person operating a TV with a monitor and cable, no text or symbols presentNe čistite televizor agresivnim hemijskim sredstvima jer će to da dovede do oštećenja uređaja.

natural_image
Illustration showing a person using a device with no restrictions, a chair, and a computer monitor (no text or symbols)Ne postavljajte kabl napajanja ili druge kablove tamo gdje se na njih može stati ili za njih zapeti. Nemojte da preopteretite utičnicu.
Ne postavljajte televizor na nestabilnu površinu..

natural_image
Illustration of a cable being inserted into a computer monitor, showing electrical connections (no text or symbols)
natural_image
Cartoon illustration of a person sitting at a desk viewing a TV (no text or symbols visible)Ne skidajte stražnji poklopac jer visoki napon može da izazove strujni udar. Unutrašnja podešavanja i provere moraju da izvode kvalifikovani profesionalci.
Ne postavljajte otvorene izvore plamena, poput sveća, na ili blizu televizora. Isključite kabl napajanja i kontaktirajte servis ukoliko neki neuobičajeni predmeti ili voda dospeju u televizor.
natural_image
Illustration of a computer monitor with a crossed-out black-and-white symbol above it (no text or labels)
Automatsko podešavanje
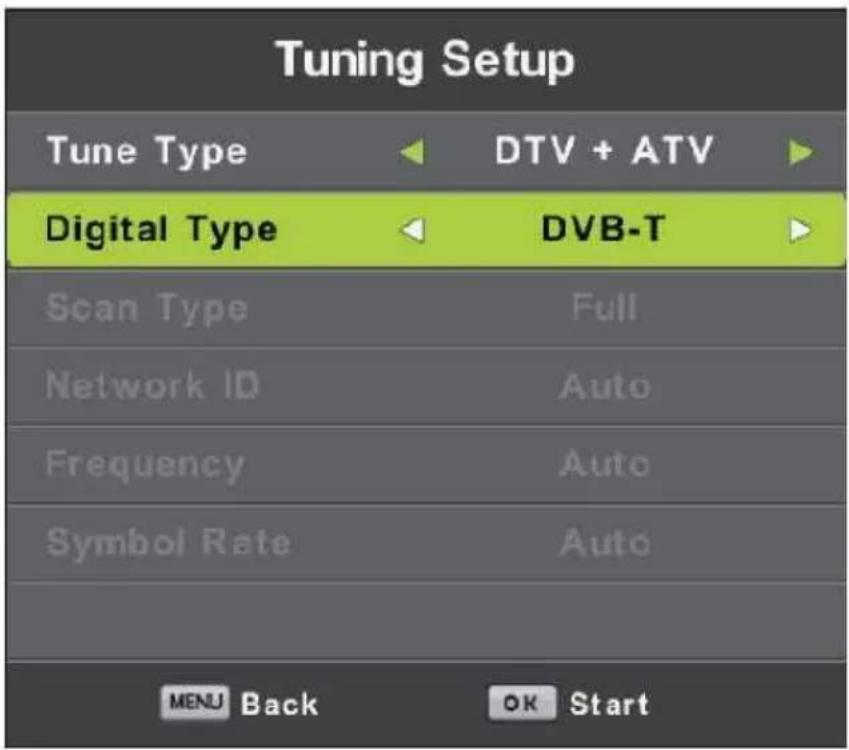
Pri prvom podešavanju birajte Meni i pritisnite taster leve strelice kako biste preskočili podešavanje ATV programa. Ista stvar vredi ukoliko želimo da preskočimo DTV programe.


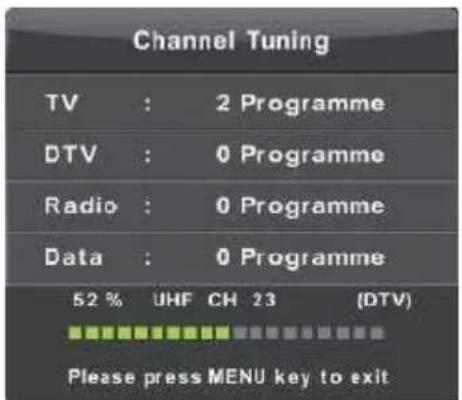

Upotreba menija
Meni kanala


Trenutni program
Postavite broj kanala.
Sistem boja
Birajte sistem boja
Zvučni sistem
Birajte zvučni sistem
Fino podešavanje
Posebno prilagodite frekvenciju kanala.
Pretraživanje
Pokrenite pretraživanje kanala.
DTV Ručno podešavanje
Pritisnite žuti taster za ulazak u donji meni

Informacije o signalu
Meni slike
Pritisnite taster MENU za prikaz glavnog menija.
- Pritisnite ▼/▲ kako biste birali opciju koju želite da podesite u meniju SLIKA.
- Pritisnite OK za podešavanje.
- Posle završetka podešavanja, pritisnite taster MENU kako biste sačuvali promene i vratili se na prethodni meni.
Način SLIKA
- Prit isnite ▼/▲ kako biste birali opciju koju želite da podesite u meniju ZAKLJUČAVANJE.
- Pritisnite OK/ ◀/▶ kako biste podesili.
- Posle završetka podešavanja pritisnite MENU kako biste se vratili na prethodni meni.
Zaključavanje sistema

Pritisnite ▼/▲ kako biste birali Zaključavanje sistema, zatim pritisnite OK kako biste izveli sledeće 3 opcije. Zadata lozinka je 0000. Ukolike zaboravite postavljenu lozinku nazovite servisni centar. Birajte Postavi lozinku kako biste ušli u podmeni za postavljanje nove lozinke.
Postavljanje lozinke

- Pritisnite ▼/▲ kako biste birali opcije koje želite da podesite u meniju PODEŠAVANJE.
- Pritisnite OK za podešavanje.
- Posle završetka pritisnite OK kako biste sačuvali promene i vratili se na prethodni meni.
Jezik
Audio Jezici
Meni za muziku
Meni za film
Meni teksta
Attaching the Stand to the TV
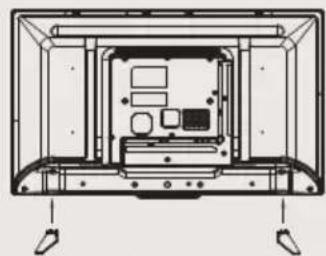
1. Assemble the stand
Before attaching/detaching the stand, make sure to turn off the TV.
-Before performing work spread cushioning over the base area to lay the LED TV on.
This will prevent it from being damaged.
TV-32LE90T2
Stand installation instruction
natural_image
Technical line drawing of a device interior with labeled components (no text or symbols)- Place the TV body on a flat table, and put the TV base on it, ensure the screw holes matching.

natural_image
Technical line drawing of a mechanical assembly with no visible text or symbols- Fix the TV body and TV base with another 4 pcs of screws (The one without gasket on it).
- Finished.
TV-40LE90T2
Stand installation instruction

natural_image
Top-down schematic of a device rear panel with internal components and connectors (no text or labels)- Place the TV body on a flat table, and put the TV base on it, ensure the screw holes matching.

- Fix the TV body and TV base with another 4 pcs of screws (The one without gasket on it).
- Finished.
Warning

Warning

No any spare parts for maintenance attached. Do not open the back cover to avoid electric shock. Please contact our after-sale service personnel if necessary
Warning: Do not open the back cover to avoid electric shock. No additional spare parts are inside the case. Any questions, please contact our service personnel.

A triangle with a lighting arrow in: Remind you of probable high voltage here in case of electric shock.

A triangle with an exclamatory mark in :Remind you that the parts here are very important .if replacement etc.is needed,please refer to relevant technical Specifications.
Warning: Do not put the TV in rainy or foggy places to prevent from fire or electric shock. Do not apply hard objects to attrite or knock on the liquid crystal screen since these may cause scratches or damages.
Warning: Modifying the product without any authorization is forbidden.
NOTE:
excessive sound pressure from earphones and headphones can cause hearing loss. An appliance coupler is used as the disconnect device, the disconnect device shall remain readily operable.
Safety
Please immediately pull out the AC power plug from adapter if there is an abnormal sound or smell or the LED TV has sound but no picture, and contact after sales support.
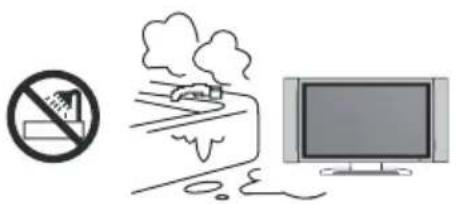
The LED TV should be kept from high temperature heating objects or direct sunlight. It requires good ventilation. Allow 10cm between the LED TV and other appliances or built-in cabinet walls.


natural_image
Illustration of a computer monitor displaying a cartoon character (no text or symbols present)The LED TV should be kept free from rain, damp and dust to prevent electrical shock and short circuits. Do not cover the ventilation openings with table clothes, curtains, newspapers etc.


Do not wipe the LED TV with any petrol, chemical or alcohol based solvents as it will lead to product damage of the panel and cabinet.
You may clean the display panel with a soft clean cloth after pulling out the power plug. Do not repeatedly wipe the panel, nor scrape, tap or strike the panel with a hard object.

natural_image
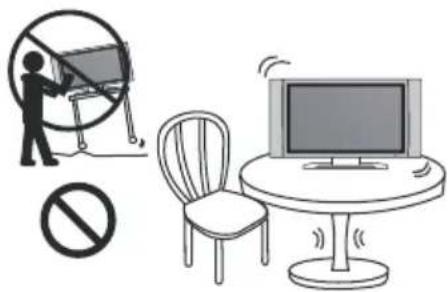
Illustration showing a person using a large circle to interact with a monitor, another figure holding a board, and a chair (no text or symbols present)Do not place the power cord or other cables across a walkway in case it is trampled on. Do not overload the power cord or power socket.
Do not place the LED TV on an unstable surface.

natural_image
Illustration of a cable being connected to a monitor with lightning bolts (no text or symbols)
natural_image
Cartoon illustration of a man sitting at a desk with a TV, holding a pointer (no text or symbols present)Do not disassemble the back cover as it contains high voltages inside and will cause electric shock. Internal adjustments and checks should only be conducted by qualified professionals.
Do not place naked flame sources, such as lit candles on or near the LED TV.
Please pull out the power plug and contact after sales support if there are abnormal objects or water in the TV.

natural_image
Illustration of a computer monitor with a crossed-out floral symbol above it (no text or labels)
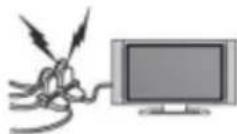
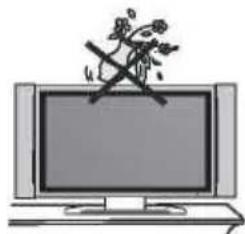
Pull out the power cord and antenna cable during electrical storms so the LED TV is not damaged by electrical surges. Keep all people away from the antenna cable during electrical storms.
Table of Contents
Warning......
Safety....
Table of Contents......
Control Panel....
Terminal Wiring Diagram....
RemoteControl....
Picture Menu....
Sound Menu....
Channel Menu....
Lock System......
Setup Menu....
USB Operation ....
Media Menu....
Troubleshooting......
Product introduction
1. Brief Introduction
Production Introduction
Congratulations! You have chosen the latest generation high definition liquid crystal television. Endowed with high display quality and light weight, it is power-saving and radiationless with high sensitivity television reception. The new generation liquid crystal television will bring you safe&comfortable brand new visual experience.
Applying color active matrix TFT with brand new technologies, the product can provide high quality display image, flicker free television, VCD&DVD programs. In addition, it can be used as definition digital television or computer display. We believe the product will surely make you satisfied.
Thank you for purchasing and using our products!
Control panel
The control button for front panel is at the bottom of the TV
LED TV-32LE90T2
LED TV-40LE90T2

1 /POWER
Turn the TV on or enter into standby mode.
② INPUT
Signal source selection button.
③ MENU
Enter/exit the main menu.
4 VOL -
Volume decreasing short cut key; enter into the next menu and adjust OSD options (decreasing).
⑤ VOL +
Volume increasing short cut key; enter into the next menu and adjust OSD options(increasing).
⑥ CH-
Channel decreasing short cut key; decrease the channel No. and select the last option in the menu.
⑦ CH+
Channel increasing short cut key; increase the channel No. and select the next option in the menu.
Connecting Cables
This LED TV has digital multimedia performance and can be connected to multiple external devices. The following diagram presents the connections to other video and audio appliances.

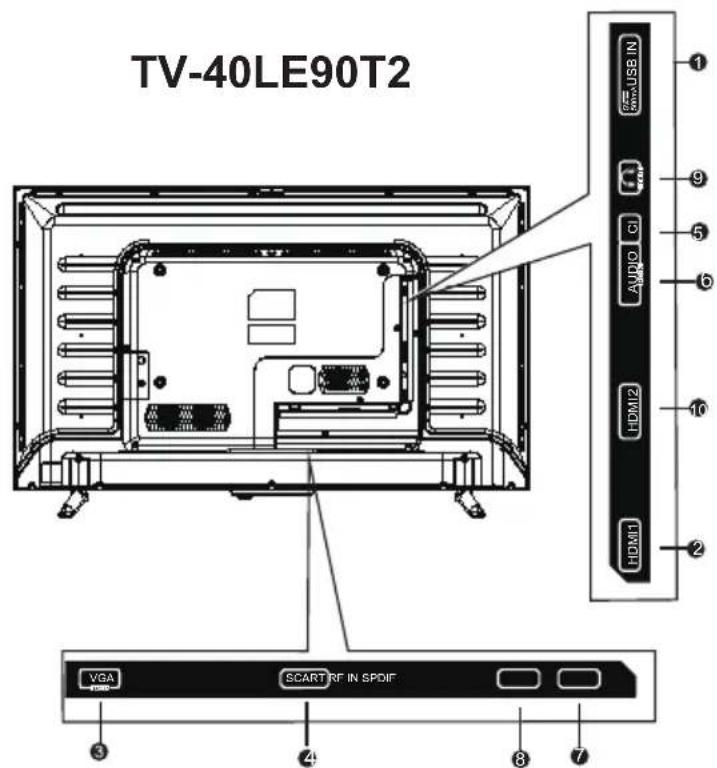
1. USB:
It is used to updating the software of the DVB-T/C and DTV, and it should only be operated by a qualified TV technician.
User can access multi-media files stored in the USB device.
The supported format includes :
*.dat, *.vob, *.mpg and *.avi video formats. Besides, *.jpg, *.bmp and *.mp3
(DTV1080P hd programs burn, you must use more than streaming system of speed or move hard disk).
2/10.HDMI1/HDMI2:
High-definition multimedia interface.
Note: Acceptable video signal 480P/576P/720P/1080i/1080P
3. VGA:
This can be connected with the D-sub 15 pin signal cable to your PC.
4. SCART:
Scart input
-
Cl: Cl input.
-
AUDIO:
PC audio input.
- SPDIF:
Digital TV sound output.
- RF IN(T)
Antenna/close circuit TV or Digital TV terminal.
- EARPHONE:
Headphone to headphones.
Descriptions of Television Remote Control
Most of your television's functions are available via the menus that appear on the screen. The remote control supplied with your set can be used to navigate through the menus and to configure all the general settings.
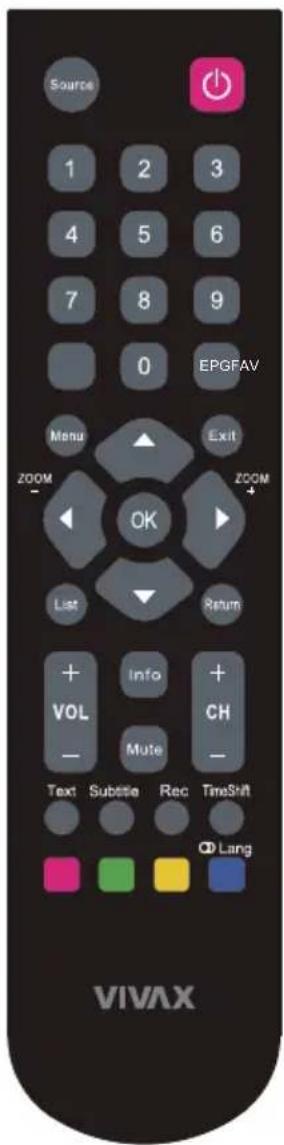
Mute (MUTE) Reduce the TV's volume to its minimum level. Press again to restore the volume.
(On/Off button) Turns the TV on or off.
0-9 (numeric buttons) Enters channel numbers.
Info Display the status information.
Return Return you to the previous channel in TV mode.
Source Press to select signal source.
Menu Bring up the menu system.
▲▼◀▶ (up, down, left and right direction buttons) Highlights different items in the menu system and adjusts the menu controls.
OK To open the corresponding submenu and activate a setting menus; to enter into Channel list.
List Press to select the Recorded List.
Exit Exits the menu system.
VOL +/- Increase or decreases the TV's volume.
CH +/- Scan up or down through the current channel list.
Zoom +/- Press to select the desired screen format. (In USB mode, it is unavailable.)
FAV Press the FAV button to browse the channels set in your favorite list.
EPG Toggles the Electronic Program Guide between on and off. Only applicable for digital channels. (not available for some models.)
Text Teletext
Subtitle Press to display the Subtitle Language menu.
Rec Press to record the TV program you are watching in DTV mode.
TimeShift Press the Time Shift button to pause the program you are watching to activate Time Shift function.
Red button In corresponding mode, press it to enter the right function as hint.
Green button In corresponding mode, press it to enter the right function as hint.
Yellow button In corresponding mode, press it to enter the right function as hint.
Blue button(○ Lang) In corresponding mode, press it to enter the right function as hint.
(LANG)change audio language.
NOTES 1. Do not mix old and new batteries or different types.
-
When the batteries are to be exhausted, the leakage may occur and cause the damage to the remote.
-
If the device is not to be used for a long period of time, remove the batteries to battery leakage.
-
WARNING: The batteries shall not be exposed to excessive heat such as sunshine, fire or the like.
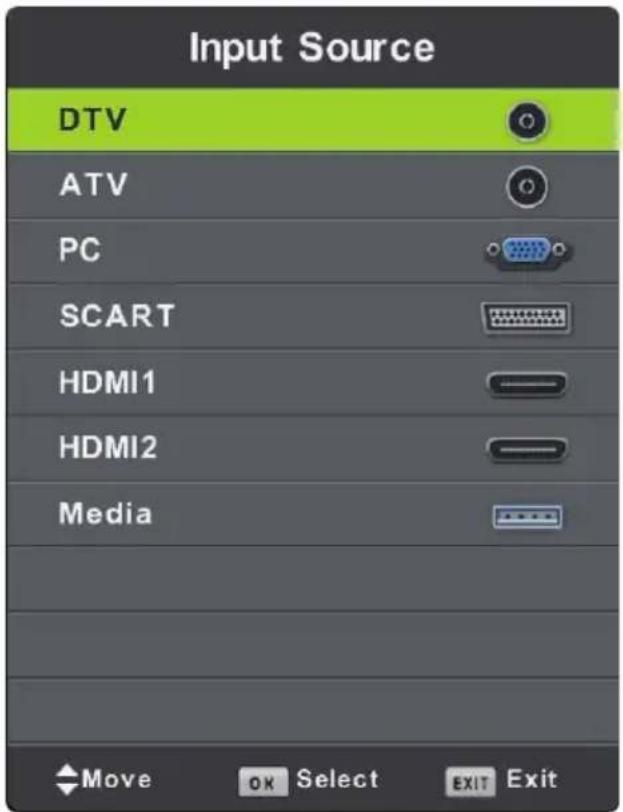
Press SOURCE button to display the input source list,
Press ▼ / ▲ or OK button to select the input source you want to enter,
Press OK button to enter the input source,
Press EXIT button to quit.
Connect an RF cable from the TV's input called "RF-In" and to your TV Aerial socket.
Select Language
Press ◀ / ▶ button to select the language to be used for menus and message.
Select Country
Press ▼ / ▲ button to highlight country menu.
Press ◀ / ▶ button to select the country you want to enter.

First Time Setup

Auto Tuning
First tuning ATV, press Menu and left arrow button to skip ATV tuning, Second tuning DTV, press Menu and left arrow button to skip DTV tuning.


Channel Menu
Press MENU button to display the main menu.
Press ◀ / ▶ button to select CHANNEL in the main menu.
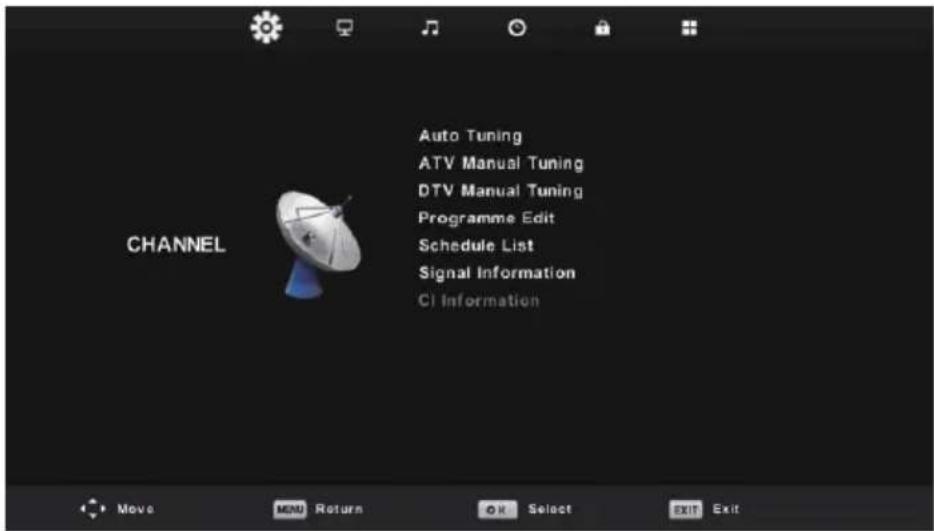
- Press ▼ / ▲ button to select the option that you want to adjust in the CHANNEL menu.
- Press OK button to adjust.
- After finishing your adjustment, Press OK button to save and return to the previous menu.
Auto Tuning
Press ▼ / ▲ button to select Auto Tuning, then press OK/▶ button to enter.


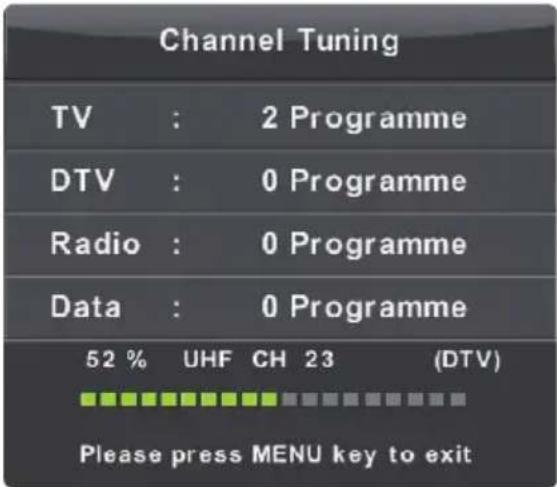

ATV Manual Tuning

Current CH
Set the channel number.
Color System
Select the color system
Sound System
Select the Sound system
Fine-Tune
Adjust the frequency of the channel finely.
Search
Start searching channel.
DTV Manual Tuning
Press ▼ / ▲ button to select DTV Manual Tuning, then press OK button to enter sub-menu.
Press ◀ / ▶ button to select channel, then press OK button to search program.

Programme Edit
Press ▼ / ▲ button to select Programme Edit, then press OK button to enter sub-menu.
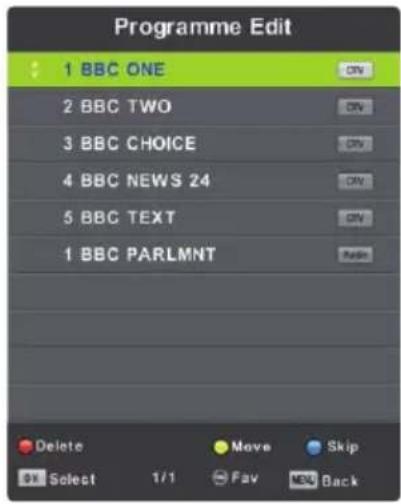

The three colored key is the shortcut key for programming the channel.
First press ▼ / ▲ to highlight the channel you want to select, then:
Press the Red button to delete the program in the list.
Press the Yellow button to move the channel in the list.
Press the Blue button to skip the selected channel.
Press Fav button to add or remove the channel to your favorite list.
(Your TV set will skip the channel automatically when using CH+/- to view the channels.)
Menu Operation
Schedule List
Press ▼ / ▲ button to select Schedule List, then press OK button to enter sub-menu. It is available in DTV source.
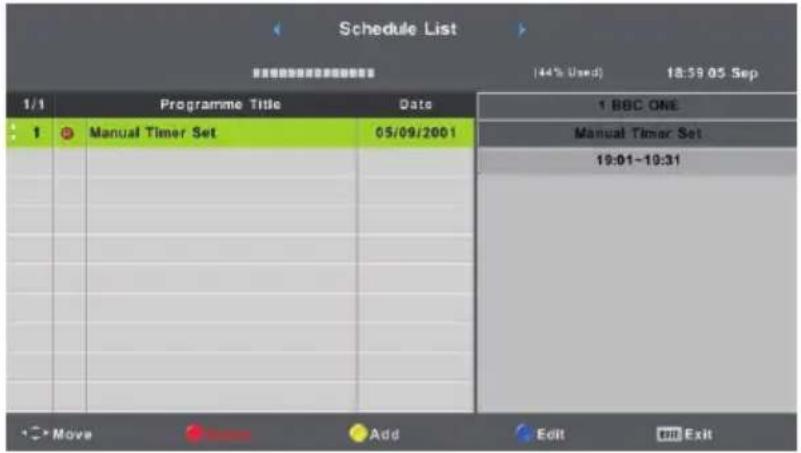
Press the YELLOW button to enter the interface below.

When the time appointment is conflict, it will produce a warning message.

Signal Information
Press ▼ / ▲ button to select Signal Information, press the OK button to see the detail information about the signal. Only available when there is signal in DTV.

Picture Menu
Press MENU button to display the main menu.
Press ◀ / ▶ button to select PICTURE in the main menu.

- Press ▼ / ▲ button to select the option that you want to adjust in the PICTURE menu.
- Press OK button to adjust.
- After finishing your adjustment, Press MENU button to save and return back to the previous menu.
Picture Mode
Press ▼ / ▲ button to select Picture Mode, then press OK button to enter sub-menu.
You can change the value of contrast, brightness, colour, sharpness and tint when the picture is in Personal mode.

Menu Operation
Contrast/ Brightness/ Colour/ Tint / Sharpness
Press ▼ / ▲ button to select option, then press ◀ / ▶ button to adjust.
Contrast Adjust the highlight intensity of the picture, but the shadow of the picture is invariable.
Brightness Adjust the optical fiber output of the entire picture, it will effect the dark region of the picture.
Colour Adjust the saturation of the color based on your own like.
Tint Use in compensating color changed with the transmission in the NTSC code.
Sharpness Adjust the peaking in the detail of the picture.
Colour Temp
Change the overall color cast of the picture.
Press ▼ / ▲ button to select Colour Temperature, then press OK button to enter sub-menu.
Press ◀ / ▶ button to select. (Available Picture mode: Cold, Normal, Warm).
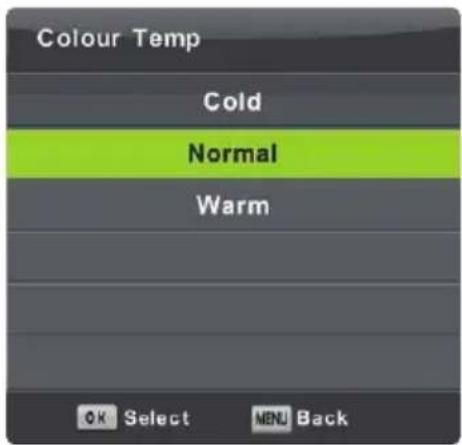
Cold Increase the blue tone for the white.
Normal Increase the sex-linked colors for the white.
Warm Increase the red color for the white.
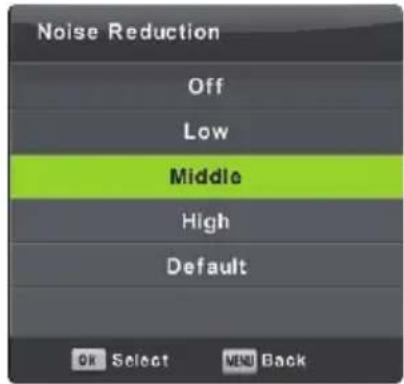
Noise Reduction
To filter out and reduces the image noise and improve picture quality.
Press ▼ / ▲ button to select Noise Reduction, then press OK button to enter sub-menu.
Menu Operation
Off Select to turn off video noise detection.
Low Detect and reduce low video noise.
Middle Detect and reduce moderate video noise.
High Detect and reduce enhanced video noise.
Default Set as Default.
Sound Menu
Press MENU button to display the main menu.
Press ◀ / ▶ button to select SOUND in the main menu.
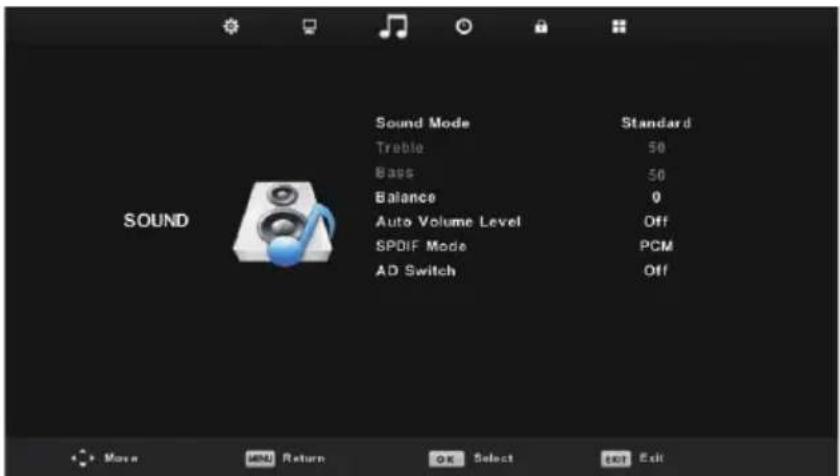
- Press ▼ / ▲ button to select the option that you want to adjust in the SOUND menu.
- Press OK button to adjust.
- After finishing your adjustment, Press OK button to save and return to the previous menu.

Sound Mode
Press ▼ / ▲ button to select Sound Mode, then press OK button to enter sub-menu.
Press▼/▲ button to select.
Menu Operation
You can change the value of Treble and Bass when the sound is in Personal mode.
Standard Produces a balanced sound in all environments.
Music Preserves the original sound.Good for musical programs.
Movie Enhances treble and bass for a rich sound experience.
Sports Enhances vocals for sports.
Personal Select to customize picture settings.
Note: The treble and bass are only available in Personal mode, you can adjust them as you like.
Balance
Press ▼ / ▲ button to select option, Press ◀ / ▶ button to adjust.
Auto Volume level
Press ▼ / ▲ button to select Auto Volume Level, then press ◀ / ▶ button to select On or Off.
SPDIF Mode
Press ▼ / ▲ button to select SPDIF Mode, then press ◀ / ▶ button to select Off / PCM / Auto.
AD Switch
Press ▼ / ▲ button to select AD Switch, then press ◀ / ▶ button to select On or Off. Amblyopia function for the blind, the tracks will be mixed describe the current screen. It need codestream to support.
NOTE:
Balance: This item can adjust the speaker's output, it enables you to listen to best at your position. Auto Volume Level: This item is used for reducing the difference between channel and program's volume automatically.
Time Menu
Press MENU button to display the main menu.
Press ◀ / ▶ button to select TIME in the main menu.

- Press ▼ / ▲ button to select the option that you want to adjust in the TIME menu.
- Press OK button to adjust.
- After finishing your adjustment, Press OK button to save and return to the previous menu.
Time Zone
Press ▼ / ▲ button to select Time Zone, then press OK button to enter sub-menu.

Press ▼ / ▲ / ◀ / ▶ button to select time zone.
Sleep Timer

Press ▼ / ▲ button to select Sleep Timer, then press OK button to enter sub-menu.
Press ▼ / ▲ button to select. (Available options are: Off, 15min, 30min, 45min, 60min, 90min, 120min, 240min).
Auto Standby
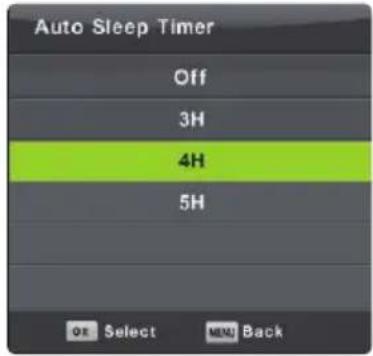
Press ▼ / ▲ button to select Auto Standby, then press OK button to enter sub-menu.
Press ▼ / ▲ button to select.
Tips: The remote control does not make any operation in the hypothesis time, it will close down automatically. If you do any operation, it will reset the time.
OSD Timer
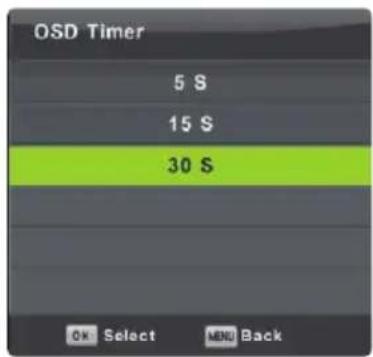
Press ▼ / ▲ button to select OSD Timer, then press OK button to enter sub-menu.
Press ◀ / ▶ button to select.
Lock Menu
Press MENU button to display the main menu.
Press ◀ / ▶ button to select LOCK in the main menu.

- Press ▼ / ▲ button to select the option that you want to adjust in the LOCK menu.
- Press OK/ ◀ / ▶ button to adjust.
- After finishing your adjustment, Press MENU button to return back to the previous menu
Menu Operation
System Lock

Press ▼ / ▲ button to select System Lock, then press OK button to make the following 3 options valid.
Default password is 0000, and if forget what you set, please call the service center.
Set Password
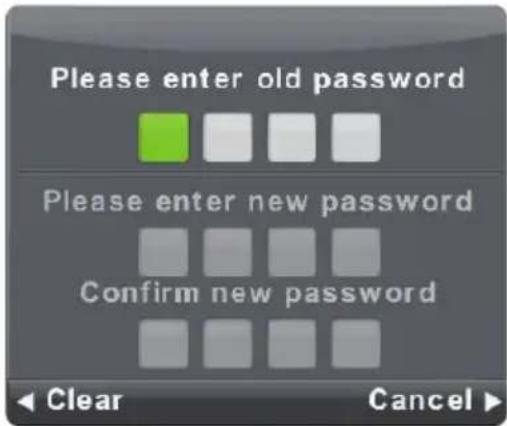
Press ▼ / ▲ button to select Set Password, then press OK button to enter sub-menu to set new password.
Channel Lock

Press ▼ / ▲ button to select Channel Lock then press OK button to enter sub-menu to select.
Press button to lock or unlock the Green channel.
Menu Operation
Parental Guidance

Press ▼ / ▲ button to select Parental Guidance, then press OK button to enter sub-menu to select the number of age which is suitable for your children.
Key Lock
Press ▼ / ▲ button to select Key Lock, then press ◀ / ▶ button to select Off or On. When Key Lock's status is on, you can't use the Key panel button.
Hotel Mode
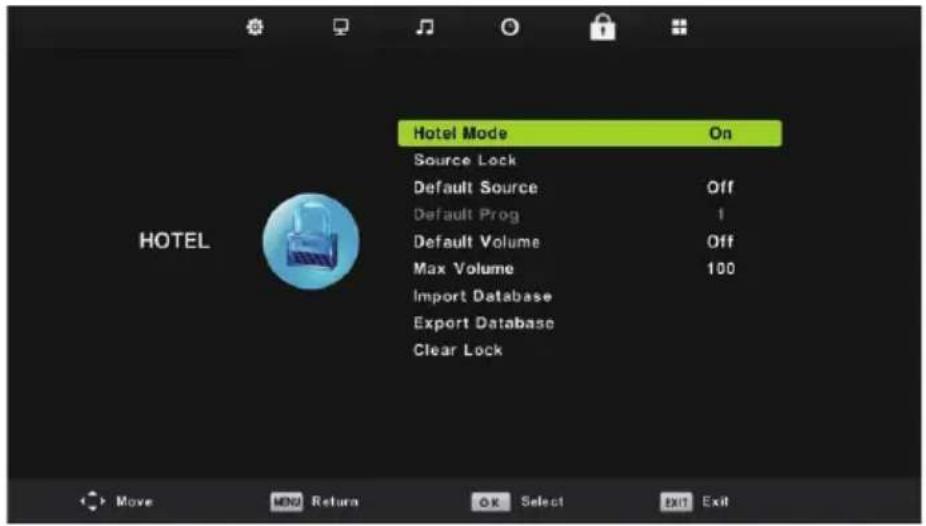
- Press ▼ / ▲ button on the remote control to select Hotel Mode in the Lock menu.
- Press OK button on the remote control to enter the sub-menu.
- After finishing your adjustment, Press MENU button to save and return back to the previous menu.
Hotel Mode
Press ▼ / ▲ button to select Hotel Mode, then press ◀ / ▶ button to select On or Off.
Source Lock
Press ▼ / ▲ button to select Source Lock, then press OK button to enter sub-menu to select.
Default Source
Press ▼ / ▲ button to select Default Source, then press OK button to enter sub-menu to select.
Default Prog
Press ▼ / ▲ button to select Default Prog, then press ◀ / ▶ button to adjust. It is available when the default source is DTV or ATV.
Max Volume
Press ▼ / ▲ button to select Max Volume, then press ◀ / ▶ button to adjust.
Clear Lock
Press ▼ / ▲ button to select Clear Lock, then press OK button to clear the setting you have done before.
Setup Menu
Press MENU button to display the main menu.
Press ◀ / ▶ button to select SETUP in the main menu.
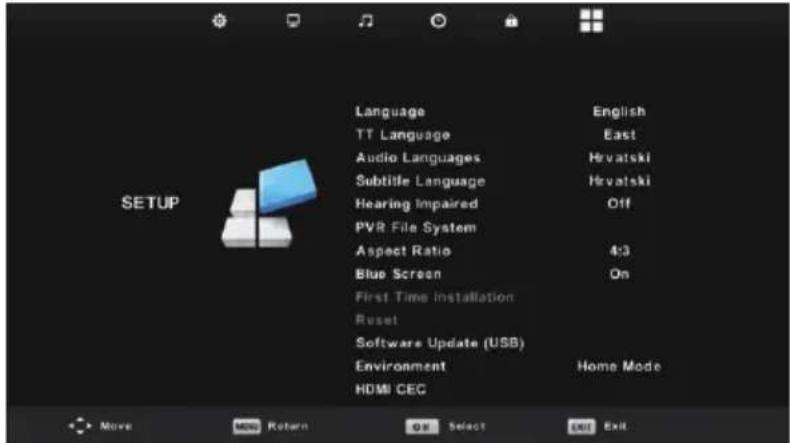
- Press ▼ / ▲ button to select the option that you want to adjust in the SETUP menu.
- Press OK button to adjust.
- After finishing your adjustment, Press OK button to save and return to the previous menu.
Language
Select an OSD menu language can be displayed. Default English
is selected as menu language.
Press ▼ / ▲ / ◀ / ▶ button to select Menu Language.

TT Language
Press ▼ / ▲ button to select TT Language, then press OK button to enter sub-menu.
Press ▼ / ▲ / ◀ / ▶ button to select TT language.

Menu Operation
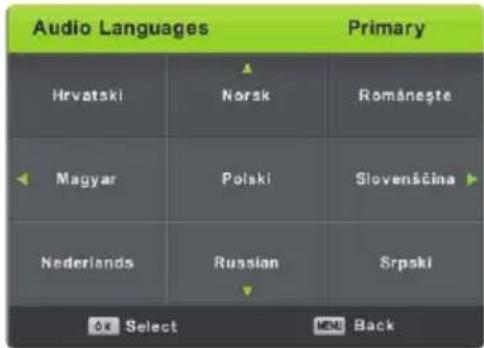
Audio Languages
Press ▼ / ▲ button to select Audio Languages, then press OK button to enter sub-menu.
Press ◀ / ▶ button to select the Primary /Secondary of Audio Languages.
Press ▼ / ▲ / ◀ / ▶ button to select the Audio Languages.
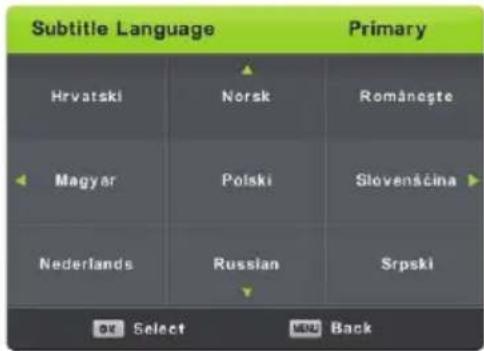
Subtitle Language
Press ▼ / ▲ button to select Subtitle Language, then press OK button to enter sub-menu.
Press ◀ / ▶ button to select the Primary /Secondary of Subtitle Language.
Press ▼ / ▲ / ◀ / ▶ button to select the Subtitle Language.
Hearing Impaired
Press ▼ / ▲ button to select Hearing Impaired, then press OK button to select On or Off.
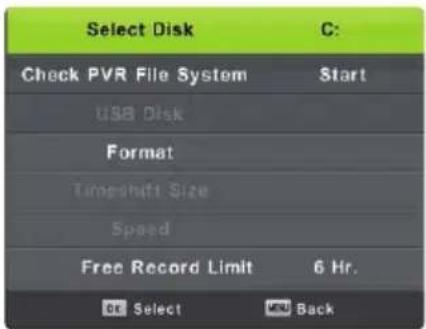
PVR File System
Press ▼ / ▲ button to select PVR File System, then press OK button to enter sub-menu.
Press ▼ / ▲ button to select Check PVR File System,
then press OK button to enter. Then it will check the USB speed.
Menu Operation
Aspect Ratio
Press ▼ / ▲ button to select Aspect Ratio, then press OK button to enter sub-menu.
Press ▼ / ▲ button to select aspect ratio. (Available options are: Auto, 4:3,16:9, Zoom1, Zoom2).

Blue Screen
Press ▼ / ▲ button to select Blue Screen, then press OK button to select On or Off.
First Time Installation
Press ▼ / ▲ button to select First time installation, then press OK button to enter.
Reset
Press ▼ / ▲ button to select Reset, then press OK button to enter sub-menu.
Software Update(USB)
Press ▼ / ▲ button to select Software Update (USB), plug your USB device in the USB slot, then press OK button to update the right software.
HDMI CEC
Press ▼ / ▲ button to select HDMI CEC, then press OK button to enter the sub-menu.

CEC Control Press ◀ / ▶ button to turn the CEC Control on or off.
Audio Receiver Press ◀ / ▶ button to turn the Audio Receiver on or off.
Device Auto Power Off Press ◀ / ▶ button to turn the Device Auto Power Off on or off.
Device List Press OK button to open the list of device.
Screen Menu(Only PC Mode)
Press MENU button to display the main menu.
Press ◀ / ▶ button to select SCREEN in the main menu.

- Press ▼ / ▲ button to select the option that you want to adjust in the SCREEN menu.
- Press OK button to adjust.
- After finishing your adjustment, Press OK button to save and return to the previous menu.
Auto Adjust
Press OK button to start adjusting H-Offset/V-Offset/Size/Phase automatically.
H-Offset.
Adjust the horizontal position of the picture.
Press ▼ / ▲ button to select H-Offset, then press OK button to enter sub-menu.
V-Offset
Adjust the vertical position of the picture.
Press ▼ / ▲ button to select V-Offset, then press OK button to enter sub-menu.
Size
Adjust the display size.
Press ▼ / ▲ button to select Size, then press OK button to enter sub-menu.
Phase
Adjust the horizontal interfering lines.
Press ▼ / ▲ button to select Phase, then press OK button to enter sub-menu.
Position Reset
Press ▼ / ▲ button to select Position Reset, then press OK button to enter.
Notes:
- Noise Reduction in PICTURE option is invalid.
- AD Switch in SOUND option is invalid.
- TIME menu and description are the same as that for mode.DTV or ATV
- Channel Lock and Parental Guidance in LOCK option is invalid.
- Audio Languages, Subtitle Language, Hearing Impaired and PVR File System in SETUP option is invalid.
- mode has no CHANNEL menu. PC
Meida
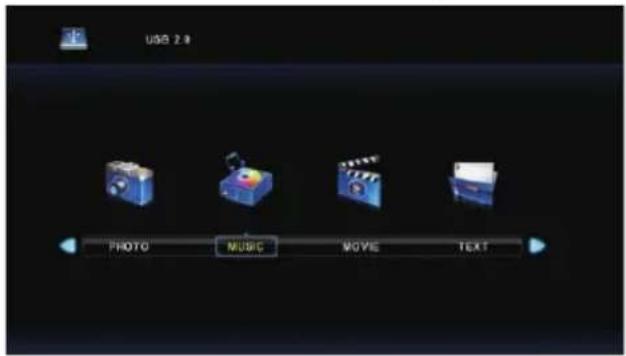
Note: Before operating Media menu, Plug in USB device, then press INPUT button to set the Input Source to Media.
Press ▼ / ▲ button to select Media in the Source menu, then press OK button to enter.

Press ◀ / ▶ button to select the option you want to adjust in the main Media menu, then press OK button to enter.
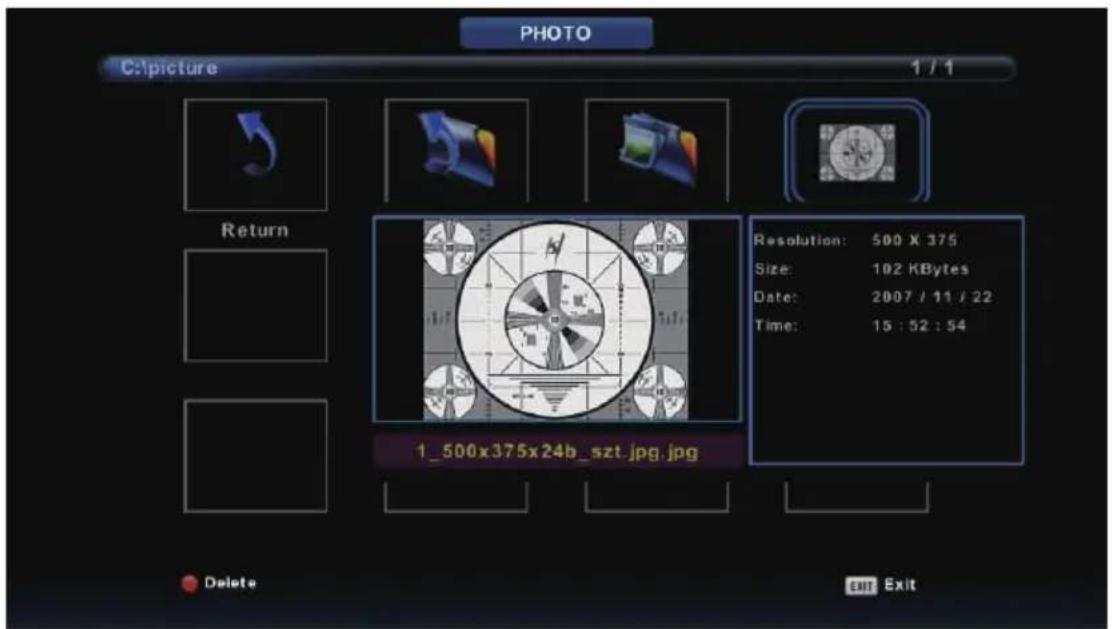
Photo Menu
Press ◀ / ▶ button to select PHOTO in the main menu, then press OK button to enter.
Press Exit button to return to the previous menu and exit menu to quit.

Press ◀ / ▶ button to select the file you want to watch in the file selecting menu, then press OK button to display picture.
When highlighting the option you select, the file information will appear on the right and picture will be previewed in the center.
Music Menu
Press ◀ / ▶ button to select MUSIC in the main menu, then press OK button to enter. Press Exit button to return to the previous menu and exit menu to quit.
![MUSIC G:\Music\MA 1.7.2 Return Up Folder ALAC Album [ size(8x8) ] 10_(04K_) - mA x 11_(04K_) - mA x 1_(14K_12K) x 2_(14K_12K) boar, 3_(22K_12) boar, 4_(22K_15) boar, 5_(14K_31-UC) bo, Delete Get](/content/2026/05/977867/images/06c7e8c9504ff585e74e3fda93012b2950fb6c8b3921385f0e8a681210c72ed3.jpg)
Press ◀ / ▶ button to select return option to the previous menu.
Press ◀ / ▶ button to select drive disk you want to listen, then press OK button to enter.

Movie Menu
Press ◀ / ▶ button to select MOVIE in the main menu, then press OK button to enter.
Press Exit button to return to the previous menu and exit menu to quit.

Press ◀ / ▶ button to select drive disk you want to watch, then press OK button to enter. Press OK button to play the selected movie.
Press OK button to select menu in the bottom you want to run, then press OK button to operate.
Press Exit button to back to the previous menu and exit button to quit the entire menu.
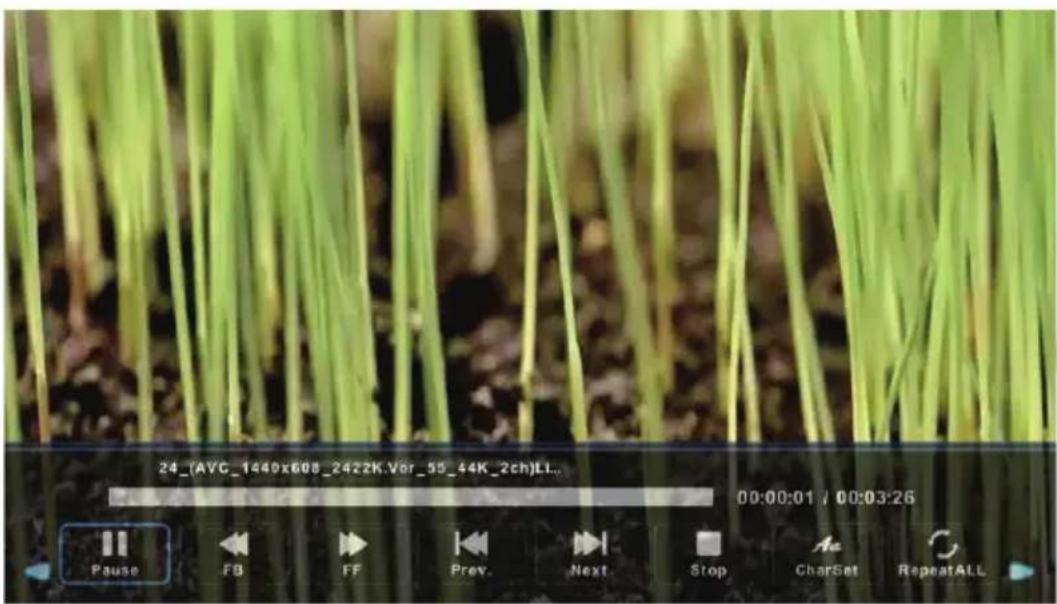
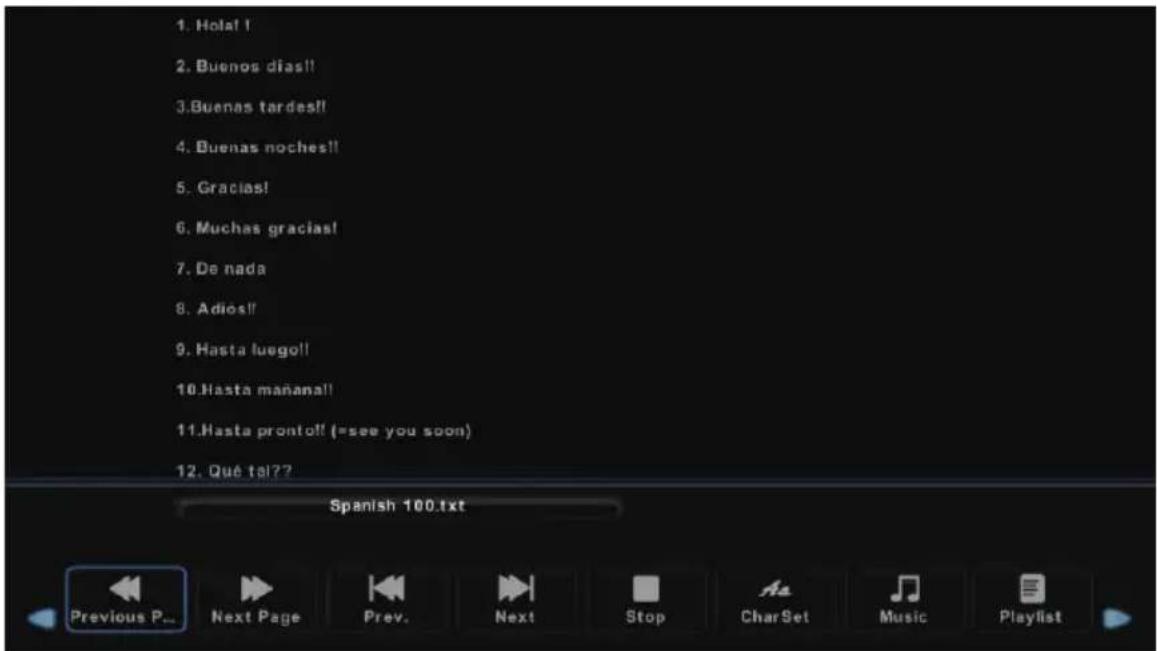
Text Menu
Press ◀ / ▶ button to select TEXT in the main menu, then press OK button to enter.
Press Exit button to return to the previous menu and exit menu to quit.

Press ◀ / ▶ button to select drive disk you want to watch, then press OK button to enter.
Press ◀ / ▶ button to select return option to back to the previous menu.
Troubleshooting
No image and voice


Possible causes:
Resolutions:
*Power cord, antenna or input devices are not connected;
*The TV set is not powered on.
*Check Power cord, antenna and input devices;
*Press Power key on the remote control;
*Press Power key on the set to power it off for 5 seconds and then re-power it on.
No voice


Possible causes:
*The volume is too low; Muted;
*Incorrect sound system.
Resolutions:
*Press Volume key to turn up the volume;
*Press Mute key to cancel Mute mode.
Well connect vonconnection to the background sound;
*Change the sound system in the menu.
Snows and noises:

Possible causes:
*The cable is damaged or gets loose;
*Incorrect channel preset;
*Improper antenna positioning.
Resolutions:
*Check whether the connection of the antenna cable,
DVD and the cables is correct;
*Reset channels or fine tune the channel;
*Adjust the direction of the antenna.
Achromatic colour


Possible causes:
*Incorrect Colour system settings; Low chroma level setting ;
*Improper antenna positioning.
Resolutions:
*Change the colour system into the local system in the menu;
*Increase chroma level;
*Adjust the direction of the antenna.
Remote control is no effect :

×
Possible causes:
*Battery runs up;
*Incorrect battery loading;
Resolutions:
*Check the battery electricity or replace the battery;
*Check if the poles of the battery are correct.
POŠTOVANI!
Zahvaljujemo na kupnji Vivax uređaja i nadamo se da ćete biti zadovoljni odabirom. Ako u jamstvenom roku bude potreban popravak proizvoda, mollimo savjetujte se sa ovlaštenim prodavačem koji Vam je proizvod prodao ili nas kontaktirajte na dolje navedene brojeve i adrese. MOLIMO VAS DA PRIJE UPORABE PROIZVODA PAŽLJIVO PROČITATE UPUTE PRILOŽENE UZ PROIZVODI
JAMSTVENI LIST
VIVAX
HR
MODEL UREĐAJA
SERIJSKI BROJ
DATUM PRODAJE
BROJ RAČUNA PRODAVATELJA
POTPIS I PEČAT PRODAVATELJA
POTPIS I PEČAT PRODAVATELJA
- Ovom garancijom garantira proizvođač proizvoda, preko KIM TEC d.o.o., kao uvoznika i davatelja garancije u Republici Bosni i Hercegovini besplatan popravak istog u skladu s važećim propisima i u skladu s uvjetima opisanim u ovom garantnom listu. Ovom garancijom garantiramo da će predmet ove garancije raditi bez greške uzrokovane eventualnom lošom izradom i lošim materijalom izrade. Svi eventualno nastali kvarovi biti će besplatno otklonjeni u ovlaštenom servisu u garantnom roku.
- UVJETI GARANCIJE Garantni rok počinje teći od dana kupnje proizvoda i traje 12 mjeseci, osim za Vivax Imago televizore (CRT, LCD, PDP) za koje jamstvo traje 24 mjeseca.
- U slučaju kvara na proizvodu koji je predmet ove garancije, obavezujemo se da ćemo isti popraviti u najkraćem mogućem roku, a najkasnije u roku od 45 dana. Ako se proizvod ne može popraviti ili se ne popravi u roku od 45 dana, biti će zamijenjen novim. Ako popravak proizvoda traje duže od 10 dana, garancija će se produžiti za vrijeme trajanja popravka.
- Garancija se priznaje samo uz račun o kupnji, te uz ovaj garantni list koji mora biti ispravno popunjen odnosno mora sadržavati datum prodaje, pečat i potpis prodavatelja.
- Davalac garancije osigurava servis i rezervne dijelove 7 godina od datuma kupnje.
- GARANCIJA NE OBUHVAĆA
POTPIS I PEČAT PRODAVCA
-
Ovom garancijom garantuje proizvođač proizvoda, preko KIM TEC CG d.o.o., kao uvoznika i davaoca garancije u Republici Crnoj Gori besplatan popravak istog u skladu s važećim propisima i u skladu s uslovima opisanim u ovom garantnom listu. Ovom garancijom garantujemo da će predmet ove garancije raditi bez greške uzrokovane eventualnom lošom izradom i lošim materijalom izrade. Svi eventualno nastali kvarovi biti će besplatno otklonjeni u ovlaštenom servisu u garantnom roku.
-
USLOVI GARANCIJE Garantni rok počinje teći od dana kupovine proizvoda i traje 24 mjeseca.
-
U slučaju kvara na proizvodu koji je predmet ove garancije, obavezujemo se da ćemo isti popraviti u najkraćem mogućem roku, a najkasnije u roku od 45 dana. Ako se proizvod ne može popraviti ili se ne popravi u roku od 45 dana, biće zamijenjen novim. Ako popravak proizvoda traje duže od 10 dana, garancija će se produžiti za vrijeme trajanja popravke.
-
Garancija se priznaje samo uz račun o kupovini, te uz ovaj garantni list koji mora biti ispravno popunjen odnosno mora sadržiti datum prodaje, pečat i potpis prodavaoca.
-
Davalac garancije osigurava servis i rezervne dijelove 7 godina od datuma kupnje.
-
GARANCIJA NE OBUHVATA Redovnu provjeru, održavanje uz zamjenu dijelova koji se troše normalnom upotrebom. Prilagođavanje ili promjene za poboljšanje proizvoda za primjenu koje nijesu opisane u tehničkim uputama za korištenje, osim ako je za te promjene predočena saglasnost KIM TEC CG d.o.o.
-
Garancija se ne priznaje u sljedećim slučajevima: Ako kupac ne predoči ispravan garantni list i račun o kupovini. Ako se kupac nije pridržavao uputa o korištenju proizvoda. Ako je proizvod otvaran, prepravljan ili popravljan od neovlaštene osobe. Ako su kvarovi na proizvodu nastali djelovanjem više sile kao što su: udar groma, strujni udari u električnoj mreži elementame nepogode i slično. Ako su kvarovi nastali oštećivanjem zbog nepropisane upotrebe ili nepravilnim transportovanjem. Ako je kvar nastao greškom u sistemu na koji je proizvod priključen.
-
Ovaj garantni list ne miljenja zakonska potrošačka prava važeća u Republici Crnoj Gori u odnosu na ona koja propisuje proizvođač. Naziv davaoca garancije: Kim Tec CG d.o.o. Čemovsko polje bb, 81000 Podgorica, Crna Gora
CENTRALNI SERVIS (CALL CENTAR):
Kim Tec CG d.o.o., Čemovsko Polje bb,
Tel: 020/608-251, E-mail za opšte upite: servis@kimtec-cg.com
SERVIS
DATUM PRIJEMA UREĐAJA U SERVIS
DATUM POPRAVKA
DATUM PRIJEMA UREĐAJA U SERVIS
DATUM POPRAVKA
DATUM PRIJEMA UREĐAJA U SERVIS
DATUM POPRAVKA
POPIS SERVISNIH MJESTA
VIVAX
CG
| Grad | Ovlašteni servis | Br. telefona | Adresa |
| PODGORICA | TV C. ĐEČEVIĆ | 020 620 981 | Bulevar Save Kovačevića 153 |
| NIKŠIĆ | TV SERVIS NENAD | 069 024 945 | Kosovska bb |
| NIKŠIĆ | TV SERVIS GORANOVIĆ | 040 213 868;067 502 663 | Ljubljanska 3 |
| BIJELO POLJE | DIGITAL TV SERVIS -MUZUROVIĆ | 050 431 399 | Škurije Međenovića |
| BIJELO POLJE | VIDEO KOMERC | 050 431 265 | Radomira Medojevića bb |
| BERANE | TV SERVIS KUDUK | 051 234 664 | Donje Luge bb |
| PLJEVLJA | TV SERVIS JOVO | 069 087 325 | Rudarsko naselje bb |
| BAR | RTV servis Lalić | 030 311 810 | Makedonsko naselje bb |
| TIVAT | SERVIS MIKI | 069 046 712 | Gradlošnica bb |
INFORMACIJA POTROŠAČIMA

VIVAX
SR
Poš tovani.
Zahvačujuemo Viem na lugevini proizivrsta iz nade distribuzione i nadamo se da četa biti zadovojeni luborom.
Malimo Visa da pre upotrebe protivoda pradljivo pročitata tehniklu dokumetaciju i da se priklom upotrebne predriševate prikloženih uputlavne.
REKLAMACJA U SLUČAJU NE SAOBRAZNOSTI PROJEVOJA
U slučaju meseodnomnosti proizvođa mo žele: ijsvili nehamsaci u prošenou -trigovou kord kega a sba uređaj kupiš, nadi ostravanja svojih prava iz černa 52, odrosenio černa 56. Zakona o zašili potrošalbe ( SI plaćnik 6.214 ).
Kosova Electronic Service Center
Kosova Electronic Service Center
-VIVAX Air Conditions; White Goods and Small Home Appliances
TÊ NDERUAR!
- TV-40LE90T2
- Upozorenje
- Tablica sadržaja
- /POWER
- Automatsko podešavanje
- Trenutni program
- Sustav boja
- Zvučni sustav
- Fino podešavanje
- Pretraživanje
- DTV Ručno podešavanje
- Informacije o signalu
- Izbornik slike
- Audio Jezici
- Izbornik glazbe
- Izbornik filma
- Izbornik teksta
- Upozorenje!
- Upotreba menija
- Meni kanala
- Meni slike
- Način SLIKA
- Jezik
- Meni za muziku
- Meni za film
- Attaching the Stand to the TV
- Assemble the stand
- TV-32LE90T2
- Warning
- Safety
- Table of Contents
- Product introduction
- Brief Introduction
- Control panel
- Connecting Cables
- USB:
- 2/10.HDMI1/HDMI2:
- VGA:
- SCART:
- Descriptions of Television Remote Control
- First Time Setup
- Auto Tuning
- Channel Menu
- DTV Manual Tuning
- Programme Edit
- Menu Operation
- Schedule List
- Signal Information
- Picture Menu
- Picture Mode
- Contrast/ Brightness/ Colour/ Tint / Sharpness
- Colour Temp
- Noise Reduction
- Sound Menu
- Sound Mode
- Balance
- Auto Volume level
- SPDIF Mode
- AD Switch
- NOTE:
- Time Menu
- Time Zone
- Sleep Timer
- Auto Standby
- OSD Timer
- Lock Menu
- Parental Guidance
- Key Lock
- Hotel Mode
- Source Lock
- Default Source
- Default Prog
- Max Volume
- Clear Lock
- Setup Menu
- Language
- TT Language
- Audio Languages
- Subtitle Language
- Hearing Impaired
- PVR File System
- Aspect Ratio
- Blue Screen
- First Time Installation
- Reset
- Software Update(USB)
- HDMI CEC
- Screen Menu(Only PC Mode)
- Auto Adjust
- H-Offset.
- V-Offset
- Size
- Phase
- Position Reset
- Notes:
- Meida
- Photo Menu
- Music Menu
- Movie Menu
- Text Menu
- Troubleshooting
- No image and voice
- Possible causes:
- Resolutions:
- No voice
- Snows and noises:
- Achromatic colour
- Remote control is no effect :
- POŠTOVANI!
- JAMSTVENI LIST
- VIVAX
- HR
- MODEL UREĐAJA
- SERIJSKI BROJ
- DATUM PRODAJE
- BROJ RAČUNA PRODAVATELJA
- POTPIS I PEČAT PRODAVATELJA
- POTPIS I PEČAT PRODAVCA
- SERVIS
- DATUM PRIJEMA UREĐAJA U SERVIS
- DATUM POPRAVKA
- POPIS SERVISNIH MJESTA
- INFORMACIJA POTROŠAČIMA
- SR
- Poš tovani.
- REKLAMACJA U SLUČAJU NE SAOBRAZNOSTI PROJEVOJA
- Kosova Electronic Service Center
- TÊ NDERUAR!
Brand : Vivax
Model : TV-40LE90T2
Category : Television