
DHG-HDD250 - DVD Recorder SONY - Free user manual and instructions
Find the device manual for free DHG-HDD250 SONY in PDF.


| Product Type | High-Definition Digital Video Recorder (HD DVR) with hard disk drive (250GB) |
| Model | DHG-HDD250 |
| Brand | Sony |
| Recording Capacity | At least 30 hours of high-definition or up to 200 hours of standard-definition programming |
| Power Supply | 120 V AC, 60 Hz |
| Power Consumption | Approximately 45 W (typical) |
| Video Outputs | HDMI (with DVI adapter), Component Video (Y Pb Pr), Composite Video, S-Video |
| Audio Outputs | Analog stereo (RCA), Digital optical (TOSLINK) |
| Connections | CABLE IN, ANT IN, USB (reserved), G-LINK IR Blaster, CONTROL S IN, CableCARD slot |
| Special Features | Pause live TV, rewind/fast forward, Chasing Playback, simultaneous record & play, TV Guide On Screen interactive program guide, CableCARD support for encrypted digital cable, parental lock, favorites, chapter marks |
| Remote Control | Multi-device (DVR, TV, DVD, AMP) with programmable IR codes, learning capability |
| Format Support | 1080i, 720p, 480p, 480i, Native, Variable, SD Out, Auto HDMI |
| Dimensions (Approx.) | 430 mm × 310 mm × 65 mm (W × D × H) |
| Weight (Approx.) | 3.5 kg (7.7 lbs) |
| Safety and Maintenance | Do not block ventilation; avoid moisture, heat, dust; unplug before cleaning with dry cloth; refer servicing to qualified personnel |
| Warranty | Limited: 1 year parts, 90 days labor (U.S. and Canada) |
| Accessories Included | Remote control (with AA batteries), HDMI cable, Component video cable, Composite A/V cable, G-LINK IR Blaster, AC power cord, HDMI-to-DVI adapter |
Frequently Asked Questions - DHG-HDD250 SONY
User questions about DHG-HDD250 SONY
0 question about this device. Answer the ones you know or ask your own.
Ask a new question about this device
Download the instructions for your DVD Recorder in PDF format for free! Find your manual DHG-HDD250 - SONY and take your electronic device back in hand. On this page are published all the documents necessary for the use of your device. DHG-HDD250 by SONY.
USER MANUAL DHG-HDD250 SONY
High-Definition Digital Video Recorder
Operation Manual
HDTV
HDMI



DHG-HDD250
DHG-HDD500
WARNING
To reduce the risk of fire or electric shock, do not expose the HD Digital Video Recorder to rain or moisture.
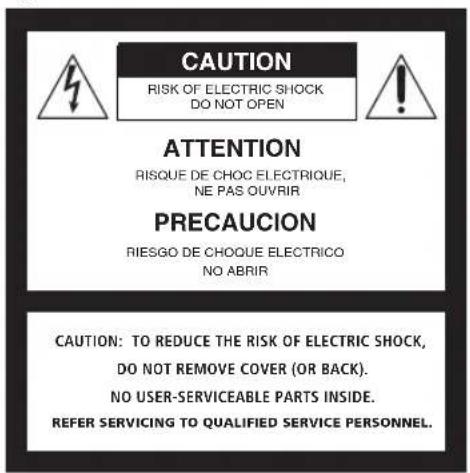

This symbol is intended to alert the user to the presence of uninsulated "dangerous voltage" within the product's enclosure that may be of sufficient magnitude to constitute a risk of electric shock to persons.

This symbol is intended to alert the user to the presence of important operating and maintenance (servicing) instructions in the literature accompanying the appliance.
The apparatus shall not be exposed to dripping or splashing and no objects filled with liquids, such as vases, shall be placed on the apparatus.
Note to the Cable TV/Satellite Dish Installer
This reminder is provided to call the cable TV system/satellite dish installer's attention to Article 820-40 of the National Electric Code (U.S.A.) that provides guidelines for proper grounding and, in particular, specifies that the cable ground shall be connected to the grounding system of the building as close to the point of cable entry as practical.
SAFETY PRECAUTIONS
☐Operate the HD Digital Video Recorder only on 120 V AC.
☐One blade of the power plug is wider than the other for safety purposes and will fit into the power outlet only one way. If you are unable to insert the plug fully into the outlet, contact your dealer.
□If any liquid or solid object falls into the HD Digital Video Recorder, unplug it and have it checked by qualified personnel before operating it further.

To reduce the risk of electric shock, do not use this polarized plug with an extension cord, receptacle, or other outlet unless the blades can be fully inserted to prevent blade exposure.

You are cautioned that any changes or modifications not expressly approved in this manual could void your Limited Warranty.
Regulatory Information: FCC Part 15
This equipment has been tested and found to comply with the limits for a Class B digital device pursuant to Part 15 of the FCC Rules. These limits are designed to provide reasonable protection against harmful interference in a residential installation. This equipment generates, uses and can radiate radio frequency energy and, if not installed and used in accordance with the instructions, may cause harmful interference with radio communications. However, there is no guarantee that interference will not occur in a particular installation. If this equipment does cause harmful interference to radio or television reception, which can be determined by turning the equipment off and on, the user is encouraged to try to correct the interference by one or more of the following measures:
☐Reorient or relocate the receiving antennas.
☐Increase the separation between the equipment and receiver.
☐Connect the equipment into an outlet on a circuit different from that to which the receiver is connected.
Consult the dealer or an experienced radio/TV technician for help.
This device complies with part 15 of the FCC Rules. Operation is subject to the following two conditions: (1) This device may not cause harmful interference, and (2) this device must accept any interference received, including interference that may cause undesired operation.
If you have questions about this Sony product, please contact the Sony Customer Information Service Center at 1-800-222-SONY (7669).
Protecting the HD Digital Video Recorder
☐To prevent internal heat build-up, do not block the ventilation openings.
☐To prevent internal heat build-up, do not block the ventilation openings.
☐Do not install the HD Digital Video Recorder in a hot or humid place, or in a place subject to excessive dust or mechanical vibration.
Owner's Record
The model and serial numbers are located at the rear of the HD Digital Video Recorder and also on the HD digital recorder box (white label). Record these numbers and refer to them whenever you call upon your Sony dealer regarding this product.
Model Number:
Serial Number:
The Ground Truth image displays a single, solid horizontal line, which is a stylistic or background element (like a ruled paper line or separator), not a placeholder for text. According to Rule 2, such stylistic/background lines must be ignored by the OCR result. The OCR content provided is "", which consists of no characters. This correctly represents the line in the GT by ignoring it entirely. Since the OCR output includes no underscores for this line, this complies with the “Stylistic/Background Lines (Ignore)” rule. Therefore, the OCR result is consistent with the Ground Truth.
CAUTION
Do not attempt to modify this product in any way without written authorization from Sony Electronics, Inc. Unauthorized modification could void the user's authority to operate this product. This equipment is intended to receive and decode signals transmitted according to ATSC Digital Television Standard A/53 and is intended to be used with an appropriate antenna and display device that you must provide.
NOTE
This high-definition digital video recorder is capable of receiving analog basic, digital basic and digital premium cable television programming by direct connection to a cable system providing such programming. A security card ("CableCARD™ device") provided by your cable operator is required to view encrypted subscription digital programming. Certain advanced and interactive digital cable services such as video-on-demand, a cable operator's enhanced program guide and data-enhanced television services may require the use of a leased set-top box available directly from the cable operator. For more information contact your local cable operator.
This high-definition digital video recorder also includes a QAM demodulator which should allow you to receive unencrypted digital cable television programming via subscription service to a cable TV service provider. Availability of digital cable television programming in your area depends on the type of programming and signal provided by your cable TV service provider.
Trademarks and Copyrights
Sony is a trademark of Sony Corporation.
In the United States, TV Guide On Screen and other related marks are registered marks of Gemstar-TV Guide International, Inc. and/or one of its affiliates. In Canada, TV Guide On Screen is a registered mark of Transcontinental Inc., and is used under license by Gemstar-TV Guide International, Inc.
The TV Guide On Screen system is manufactured under license from Gemstar-TV Guide International, Inc. and/or one of its affiliates.
The TV Guide On Screen system is protected by one or more of the following issued United States patents 6,498,895; 6,418,556; 6,331,877; 6,239,794; 6,154,203; 5,940,073; 4,908,713; 4,751,578; 4,706,121.
DOLBY Manufactured under license from Dolby Laboratories Licensing Corporation. Dolby and the double-D symbol are trademarks of Dolby Laboratories Licensing Corporation.
HDMI Multimedia Interface (HDMI™) technology. HDMI, the HDMI logo
and High-Definition Multimedia Interface are trademarks or registered trademarks of HDMI Licensing LLC.
CableCARD ^™ is a trademark of Cable Television Laboratories, Inc.
This product incorporates copyright protection technology that is protected by U.S. patents and other intellectual property rights. Use of this copyright protection technology must be authorized by Macrovision Corporation, and is intended for home and other limited consumer uses only unless otherwise authorized by Macrovision. Reverse engineering or disassembly is prohibited.
IMPORTANT SAFETY INSTRUCTIONS
For your protection, please read these instructions completely, and keep this manual for future reference. Carefully observe and comply with all warnings, cautions and instructions placed on the unit, or described in the operating instructions or service manual.
DO NOT REMOVE THE CABINET COVER OR YOU MAY BE EXPOSED TO DANGEROUS VOLTAGE. REFER SERVICING TO QUALIFIED SERVICE PERSONNEL ONLY.
- Read these instructions.
- Keep these instructions.
- Heed all warnings.
- Follow all instructions.
- Do not use this apparatus near water.
- Clean only with dry cloth.
- Do not block any ventilation openings. Install in accordance with the manufacturer's instructions
- Do not install near any heat sources such as radiators, heat registers, stoves or other apparatus (including amplifiers) that produce heat.
- Do not defeat the safety purpose of the polarized or grounding-type plug.
- Protect the power cord from being walked on or pinched particularly at plugs, convenience receptacles and the point where they exit from the apparatus.
- Only use attachments/accessories specified by the manufacturer.
- Use only with the cart, stand, tripod, bracket, or table specified by the manufacturer, or sold with apparatus. When a cart is used, use caution when moving the cart/apparatus combinations to avoid injury from tip-over.

- Unplug this apparatus during lightning storms or when unused for long periods of time.
- Refer all servicing to qualified service personnel. - Servicing is required when the apparatus has been damaged in any way, such as power-supply cord or plug is damaged, liquid has been spilled or objects have fallen into the apparatus, the apparatus has been exposed to rain or moisture, does not operate normally, or has been dropped.
Precautions

Hard disk drive precautions
The hard disk has a high storage density which enables long recording duration and quick access to the written data. However, it can easily be damaged by shock, vibration or dust, and should be kept away from magnets. To avoid losing important data, observe the following precautions.
- Do not allow the recorder to receive a strong shock.
- Do not place the recorder in a location subject to mechanical vibrations or in an unstable location.
- Do not move the r cord connected, or any other cords.
- Do not use the recorder in a place subject to extreme changes in temperature (temperature gradient greater than 10^ C/hour).
- Do not attempt to change the hard disk. This may result in a malfunction and will void your warranty.
- You cannot recover lost data if the hard disk is damaged. It is recommended that you use the hard disk as a temporary storage space and dub important data to a DVD or VCR for backup. Note that any recordings made cannot be compensated for should the hard disk drive malfunction.

CAUTION: Unplug the AC power cord from the outlet and then wait 30 seconds before moving the HD DVR in any way. The HD DVR can record programming even when in power off/standby mode and the spinning hard drive could be damaged by movement.

Placement precautions
- Inadequate ventilation or proximity to a heat source will cause decreased performance and reliability. Although the HD DVR is designed to automatically power off in extreme heat conditions, adequate care must be taken to avoid excessive heat build up.
- Do not place the recorder on a soft surface, such as a rug and do not place on an uneven surface in which all four of the feet do not evenly support the recorder. Such improper placement may block the ventilation holes on the bottom of the recorder.
- Do not place the recorder in a confined space such as a bookshelf or similar unit.
- Do not place the recorder in a location near heat sources, or in a place subject to direct sunlight, excessive dust or mechanical shock.
-
This recorder will shut automatically to protect the hard disk in extreme heat conditions.
-
Do not place the recorder in an inclined position. It is designed to be operated in a horizontal or vertical position only.
- Keep the recorder away from the equipment with strong magnets, such as a microwave oven, large soundspeakers or other equipment.
- Keep the recorder away from liquid and moisture source such as kitchen sink, wash bowl, bath tub, shower, laundry tub or wet basement. Do not unplug with wet hand.
- Do not place heavy objects on the recorder.
- Do not place objects which may splash or drip liquids, such as plants or fountains, on or near the recorder.
- Do not place on top of the TV.

IMPORTANT NOTICE
This recorder is capable of holding a still video image or on-screen display image on your television screen for an extended period of time. If you leave a still video image or on-screen display image displayed on your TV for an extended period of time you risk permanent damage to your television screen. Plasma display panels and projection televisions are especially susceptible to this. Refer to your TV's operating instructions for further information.
Ventilation Clearance
When installing the unit, please allow enough space on all sides as indicated in the illustrations.
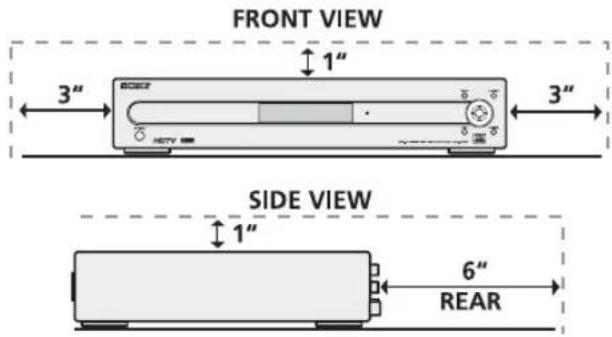
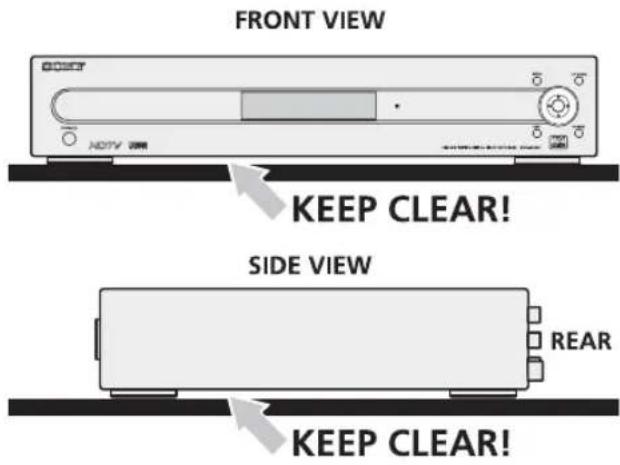
Also, when placing the unit, make sure it is on a firm, flat surface. Keep the space below the unit clear, this is to allow ventilation under the unit.
Care and Maintenance
Unplug the unit from the wall outlet before cleaning. Use a dry, soft cloth to wipe dust off the unit.
Do not allow dust to accumulate under the unit. Do not use liquid or aerosol cleaners. Never use strong solvents such as thinner or benzene for cleaning.
Damage requiring service: Do not attempt to service the unit by yourself. Opening the cabinet may expose you to dangerous voltage or other hazards, and will void your warranty. Unplug the unit from the wall outlet and refer servicing to qualified service personnel.
Table of Contents
Introduction to High-Definition Digital Video Recorder (HD DVR)
Package Contents ....3
Optional Item ....3
Features 4
Front Panel Indicators and Controls .. 5
Display Window ......6
Rear Panel Connectors....7
Remote Control....9
Programming the Remote Control ..... 12
Manufacturer's Codes.... 14
Using your DVR Remote Control with Other Equipment ....16
Connections
Basic Connection 17
Connecting Additional Equipment ....23
About CableCARD™ Devices .....26
Auto Setup 28
Changing TV channels with your HD DVR Remote Control....29
Using the Menus
How to Access and Navigate in the Menus....31
Using the Recent Channels Menu..... 32
Using the Favorite Menu ....33
Accessing the Recordings List......34
Accessing the TV Guide On Screen™ Feature ....34
Using the Recording History Menu ... 35
Using the Preferences Menu ....36
Using the Help Menu 43
Parental Lock 44
Rating Guidelines......46
Digital Video Recorder
Understanding the Status Bar......49
Pausing TV....50
Using Trick Play Features ....51
Recording Programs....53
Playing Recorded Programs ....55
Deleting Recorded Programs .....55
Using Chapter Marks ....56
Using the TV Guide On Screen™ System
TV Guide On Screen System Components......61
Using the LISTINGS Service......64
Using the SEARCH Service......65
Using the RECORDINGS Service.....67
Using the SCHEDULE Service......68
Using the SETUP Service ......69
Recording a Program from TV Guide On Screen System......70
References
Learning About Available Video Services....73
Learning About Screen Modes......76
TROUBLESHOOTING ....79
Specifications 84
END-USER LICENSE AGREEMENT FOR SOFTWARE INCLUDED WITH YOUR SONY HIGH-DEFINITION DIGITAL VIDEO RECORDER ....85
GNU GENERAL PUBLIC LICENSE....86
Index....93
LIMITED WARRANTY ......97
Introduction to High-Definition Digital Video Recorder (HD DVR)
Congratulations on your purchase of the Sony® HD Digital Video Recorder. This manual is to be used for the following models: DHG-HDD250 and DHG-HDD500. Although there is a difference in the recording capacity between the two models, both models feature the same operation.
Package Contents
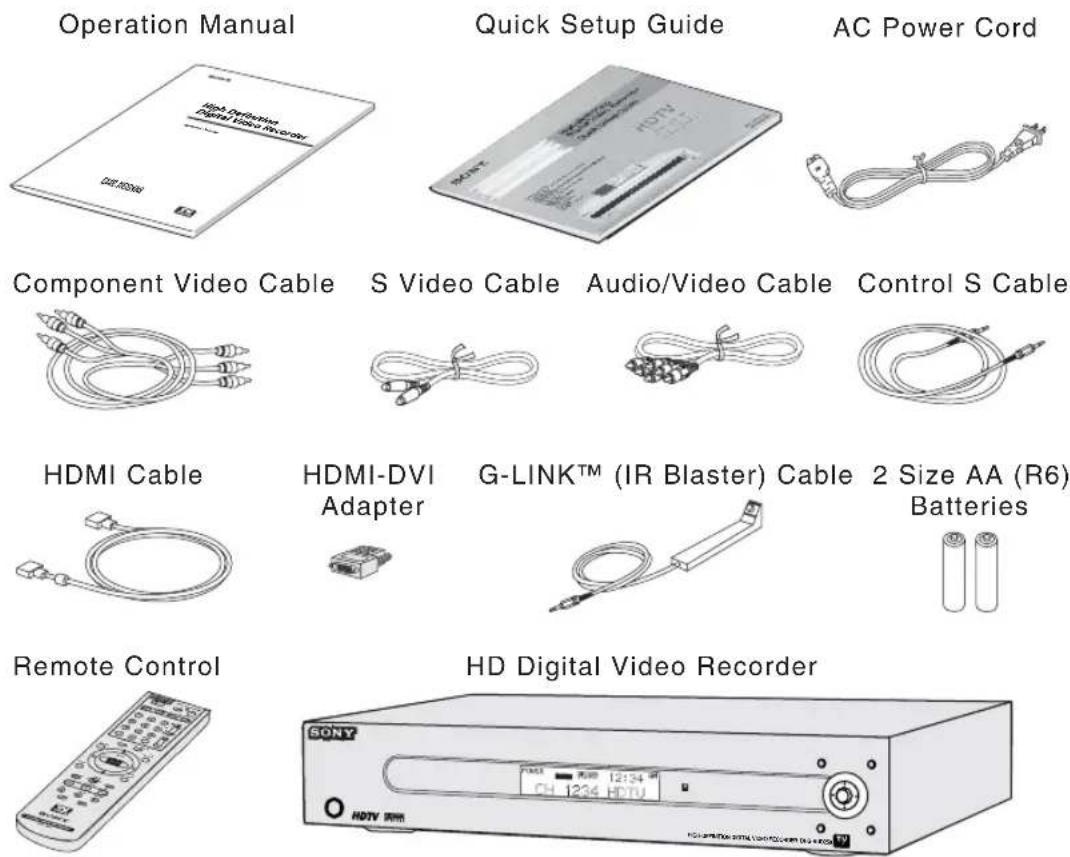
The package contains the following. Be sure to check these items before you start making connections.
Optional Item
A CableCARD™ device can be used with this HD DVR to receive encrypted digital cable programming from many cable TV service providers. Contact your retailer or cable TV service provider for information about the availability of CableCARD devices.
Features
Some of the features you will enjoy with your new HD DVR include:
Digital Reception — You can watch digital television programs and enjoy the improved audio/video quality offered by these programs. With high-definition signal reception, you can watch TV signals broadcast in HDTV for the clearest possible broadcast picture.
Digital Video Recorder — Watch TV on your schedule. Pause, rewind and fast forward shows at the press of a button. With digital video recording you can store at least 30 hours of high-definition programming or up to 200 hours of standard-definition content (60 hours/400 hours for model DHG-HDD500). The Recordings List provides quick access to shows available for viewing. You can watch a previously recorded show while simultaneously recording another show. You can also enjoy Chasing Playback; watching a show from the beginning while it is being recorded.
☐ TV Guide On Screen™ System— The interactive program guide features up to eight (8) days of program listings as well as the ability to search and automatically record programs.
☐ Component Video (Y P_B P_R ) Output — Provides a high-quality video output to many high-definition capable TVs and displays.
☐ HDMI Video Output — Provides an uncompressed, all-digital audio/video interface between this HD DVR and any HDMI-equipped TV. HDMI supports enhanced, or high-definition video, plus up to 5.1 channel digital audio.
CableCARD™ device — Provides cable subscribers with access to digitally encrypted cable channels that will enable you to receive not only standard definition but also high definition television. The CableCARD, which is provided by your cable TV service provider, is inserted into the HD DVR's rear panel CableCARD slot. (Check with your cable TV service provider about CableCARD service details, limitations, pricing and availability. For more information about CableCARD in this manual, see page 25.)
Front Panel Indicators and Controls

Control Panel Description
| 1 POWER button | Turns the HD DVR on or into inactive standby (off). |
| 2 Display Window | Shows the current status of the HD DVR with the following indicators: Power, Recording, Dolby Digital®, Clock, Channel Number and Name (if available); see details on page 6.The Format setting is displayed when pressing the FORMAT button. |
| 3 EXIT button | Clears on-screen displays and returns to normal viewing. |
| 4 Joystick/SELECT button | Navigate on-screen menus and guides by moving the joystick either up, down, left or right. Press the joystick to select an on-screen item. |
| 5 FORMAT button | Sets the output resolution. Depending on the type of TV that the HD DVR is connected to, available Format settings may include; 1080i, 720p, 480p, Native, Variable 1, Variable 2, Variable 3, SD Out and Auto HDMI. Choose the best format for your TV (See “Learning About Available Video Services” on page 73.) |
| 6 TV GUIDE button | Shows the TV Guide On ScreenTM interactive program guide (if available) which contains a list of current and future programs. To return to normal viewing press TV Guide again or the EXIT button. |
| The TV GuideTM service requires access to selected broadcasts which may not be available in all cases. | |
| 7 MENU button | Shows the main menu on the screen. To return to normal viewing press the EXIT button. |
Display Window

| Display Description | |
| 8 Power indicator | Shows that the HD DVR is on. Note that your HD DVR may continue to record programming even when the Power indicator is off. |
| 9 REC indicator | Shows that the HD DVR is currently recording a program. Recorded programs can be found in the Recordings List by pressing the REC LIST button or by selecting “RECORDINGS” from the TV Guide On ScreenTM system. |
| 10 Dolby Digital indicator | Shows when current output is in Dolby Digital ®. For more information on audio settings, see "Audio" on page 40. |
| 11 Clock | Shows time information. The time is automatically set by the TV Guide On Screen interactive program guide.When first installed, the clock will not display time information until the TV Guide On Screen system can set the time. Leave your HD DVR connected to an antenna or cable TV service in the standby (off) position for several hours (such as overnight) to allow the correct time to be set. |
| 12 Channel Number and Name display | When viewing live programs, channel number and name (if available) are displayed.When viewing a program from the RECORDINGS LIST, the program title (if available) is displayed.When the FORMAT button is pressed, the format setting is displayed briefly. |
Rear Panel Connectors

| Connection Description | |
| 13 CABLE IN | Connects to a coaxial cable coming directly from your cable TV service outlet. Connection from a cable box that is supplied by your cable TV service provider is not recommended. |
| 14 ANT IN | Connects to an over-the-air or terrestrial antenna. |
| 15 Component Video OUT (Y P_B P_R ) | Provides high-definition or standard-definition component video signal to a Y/ P_B/P_R -compatible monitor. The COMPONENT OUT connector is not available if the HDMI OUT connector is connected to an HDMI-compatible monitor. |
| 16 AUDIO OUT | Provides analog audio signals to a TV or other device. |
| 17 SD OUT: VIDEO OUT/S VIDEO OUT | Provides standard-definition composite video signal to a DVD-Recorder, VCR or TV set. For a better quality picture connection, use the S Video jack if it is available. |
| Menus and on-screen displays are available from the SD OUT connectors only when the FORMAT setting is set to SD OUT. With other FORMAT settings, no menus or on-screen displays are visible. | |
| 18 HDMI OUT | Provides an uncompressed all-digital audio/video interface between the HD DVR and an HDMI-compatible monitor. HDMI (High-Definition Multimedia Interface) supports either standard-definition or high-definition video, plus up to 5.1 channels of digital audio. You can use the supplied HDMI to DVI adapter to supply video to a monitor with a DVI-HDTV input. When using the adapter, a separate audio connection is required.The HDMI connector has a higher priority when both the HDMI and COMPONENT outputs are connected to a monitor(s). To enable the COMPONENT output, disconnect the HDMI cable from the HDMI OUT connector. |
(continued)
| Connection Description | |
| 19 CONTROL S IN | Allows the HD DVR to receive remote control signals from other Sony®infrared-controlled equipment that have a CONTROL S OUT function. For example, it may be useful to connect to the CONTROL S OUT jack of a Sony TV so that you may point your HD DVR remote control at the TV and remote control commands will be passed directly to your HD DVR. |
| 20 DIGITAL AUDIO OUT | Use an optical digital audio cable (not supplied) to send a digital audio signal to an A/V amplifier or other device. The availability of Dolby Digital®or PCM audio depends on the broadcaster. Use the Dolby Digital audio menu to select the appropriate audio settings that are best suited for the program content and the connected equipment. (See “Audio” on page 40.) |
| 21 USB (Universal Serial Bus) | Reserved for potential future applications. |
| 22 G-LINK IR Blaster | Use the supplied G-LINKTM (IR Blaster) to enable automatic recording to a VCR using the TV Guide On ScreenTM system. Connect the IR Blaster to the G-LINK connector and place the IR blaster in front of your VCR. |
| 23 CableCARD slot | A CableCARDTM device provided by your cable TV service provider can be inserted in the CableCARD slot. (See “About CableCARDTM Devices” on page 26.) |
| 24 AC IN | Use the supplied AC power cord to connect your HD DVR to a power outlet. |
Remote Control
Inserting Batteries
Insert two AA (R6) batteries (supplied) into the remote control as shown in the illustration below. Be sure to match the + and - terminals on the batteries to the diagram inside the battery compartment.
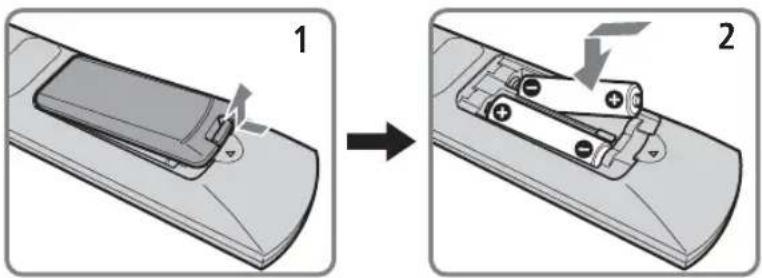
If you anticipate not using the remote control for an extended period of time, remove the batteries to avoid possible damage from battery leakage.
Avoid exposing the remote control to moisture, placing it in direct sunlight, near a heat source or where the humidity is high. Handle the remote control with care.
Remote Control Description

Button Description
1 DEVICE SWITCH Select the equipment (DVR, TV, DVD or AMP) that you want to operate. The section "Using Your Remote Control to Operate Other Equipment" describes which buttons are available for each device.
② FORMAT Press to set the output resolution to either 1080i, 720p, 480p, 480i, Native, Variable 1, Variable 2, Variable 3, SD Out or Auto HDMI formats. Depending on the type of TV that DVR is connected to, available Formats may change. Choose the best format for your TV. (See "Learning About Available Video Services" on page 73.)
③ SCREEN MODE Press repeatedly to step through the available screen mode settings. (See "Learning About Screen Modes" on page 76.)
4 0-9 ENTER Press to change channels directly and enter numerical values in on-screen displays.
5 . (dot) Use with the 0-9 and ENTER buttons to select subchannels for certain digital stations (for example, channel 2.1, if available).
6 INFO Press to show station and program information (if available) in the banner at the top of the screen.
7 MENU Press to open main menu. While in the TV Guide On Screen™ system menu, press to open sub-menus.
⑧ NAVIGATION RING Press the ring up, down, left and right to move the highlight in on-screen displays.
⑨ SCROLL BAR Scroll up or down to move the highlight in on-screen displays. Press and hold to select an on-screen option.
10 EXIT Press to close on-screen displays.
11 PLAY Press to play a program at normal speed.
12 REPLAY Press to replay the current program for a set period of time.
13 PAUSE Press to pause playback.
14 REW Press to play a program in fast rewind mode. Press repeatedly to cycle through the available REW speeds.
15 STOP Press to stop the playback of a recorded program.
16 REC (record) Press and hold the REC button for one second to start recording the current program.
| Button | Description | |
| 17 | PREV Press to replay the current program from the previous Chapter Mark (if available) or from the beginning of the Live TV pause time. | |
| 18 | AUX (Power) Press to turn the selected TV, DVD or AMP on or off. (See “Using your DVR Remote Control with Other Equipment” on page 16.) | |
| 19 | DVR (Power) Press to turn the HD DVR on or into stand-by mode. The HD DVR may still record previously scheduled programs even when in stand-by mode. | |
| 20 | PIC MODE Press to switch between the Picture Mode settings of compatible Sony® TVs. | |
| 21 | TV/VIDEO Press to switch between the various inputs of your TV. (See “Using your DVR Remote Control with Other Equipment” on page 16.) | |
| 22 | CH (channel) +/- Press to change channels. When the program guide is open, pressing the CH+/- buttons pages through the guide channels. | |
| 23 | VOL (volume) +/- Press to adjust the volume of your TV or AMP. (See “Using your DVR Remote Control with Other Equipment” on page 16.) | |
| 24 | FAVORITE Press to open the Favorite List. | |
| 25 | TV GUIDE Press to open the TV Guide On ScreenTM interactive program guide. Press again to exit the guide. | |
| 26 | REC LIST Press to open the RECORDINGS List which contains any programs that may have been recorded and are available for play back. | |
| 27 | ADVANCE Press to advance forward a set period of time when playing back a recorded program. | |
| 28 | FF Press to play a program in fast forward mode. Press repeatedly to cycle through the available FF speeds. | |
| 29 | SLOW Press to play a program in slow speed. Press repeatedly to cycle through the available SLOW speeds. | |
| 30 | NEXT Press to advance forward to the next Chapter Mark (if available) or to Live TV when playing back a recorded program. | |
If you lose your remote control, you may use the front panel buttons to operate your HD DVR (see page 5). Contact your nearest Sony dealer to order a suitable replacement remote control. To find the dealer nearest you, please refer to "Contacting Sony" on page 79.
Programming the Remote Control
If you would like to use your HD DVR's remote control to control other equipment, you may need to program your remote control. Follow the steps below to program the remote control.
The equipment must have infrared (IR) remote capability in order to be used with the remote control.
Turn to "Manufacturer's Codes" on page 14 and find the three-digit code number for the manufacturer of your component. If more than one code number is listed, use the number listed first.
1 Power on the HD DVR and the device which you want to operate with the HD DVR's remote control.
2 Slide the Remote Control's Device Switch to the device you want to program (such as TV or DVD).
3 Press and hold the AUX POWER and MENU buttons simultaneously for five (5) seconds. The LED (light emitting diode) will begin to blink slowly.
4 Enter the three-digit code from the Manufacturer's Code list found on pages 14 and 15.
5 Press the SELECT or ENTER button on your remote control to store your code selection. The LED will illuminate for two (2) seconds if the code is accepted or it will quickly blink for two (2) seconds if the code was not accepted.
6 The LED will stop flashing once the above step is done.
To check if the code number works, aim the HD DVR's remote control at the device and press the AUX POWER button to see if the device will turn on and off. If it does not respond, try using another code listed for that manufacturer.
- You may enter either a DVD or VCR manufacturer's code under the DVD device switch setting. The default device for this setting is DVD. If a VCR's manufacturer code is entered, the DVD position on the device switch will control the VCR.
- If you enter a new code, it will overwrite the previously entered code.
- In some cases, your device may not be compatible with your remote control; in such cases you will need to use its remote control to operate the device.
- Whenever the batteries are removed, the codes may revert to factory settings and you will need to reprogram the remote control.
To Search for a Code to Program the Remote Control
If your device is not listed in the Manufacturer's Code list, try the following:
1 Power on the HD DVR and the device that you want to operate with the HD DVR's remote control.
2 Slide the switch at the left top corner of the remote control to the name of the device you want to program, such as a TV or DVD Player.
3 Press and hold the AUX POWER and MENU buttons simultaneously for five (5) seconds. The LED will begin to blink slowly.
4 Enter one of the temporarily assigned numbers for your device from the table below.
Device Temporarily Assigned Code
| TV 100 |
| DVD 600 |
| VCR 300 |
| AMP 500 |
5 Try controlling the device with the HD DVR's remote control (e.g., power, volume, etc.). If the remote control works, skip to step 7. If not proceed to step 6.
6 Press the NEXT button on the remote control to assign the next available manufacturer code. Return to step 5. You may continue the process of selecting the next available code until the LED begins fast blinking. Fast blinking indicates that no additional manufacturer codes are available to test.
7 Press the SCROLL BAR or ENTER button on your remote control to store your code selection. The LED will illuminate for two (2) seconds to indicate that the code is accepted.
To Reset to the Factory Default Code Setting
1 Press and hold the AUX POWER and MENU buttons simultaneously for five (5) seconds. The LED will begin to blink slowly.
2 Enter code 999.
3 Press the SCROLL BAR or ENTER button on your remote control to restore the factory default code setting. The LED will illuminate for two (2) seconds when the code is accepted.
Manufacturer's Codes
When you are ready to program your HD DVR's remote control to operate other connected devices, refer to the list below. If there is more than one code listed under your device, try entering them one by one until you come to the correct code for that particular device. In some cases, you may not be able to operate your connected device with the HD DVR's remote control. In such cases, use the remote control that came with your device.
As you enter a code number it will overwrite your previously entered code.
When you anticipate not using your remote control for an extended period of time, it is recommended that the batteries be removed from the remote control. When the batteries are removed from the remote control, it is possible that the programmed manufacturer's codes may be lost and would need to be reprogrammed.
TV Codes
| Manufacturer Code | |
| Sony 101 | |
| Admiral (M. Wards) | 102, 114, 109 |
| ABC 112 | |
| Bell & Howell (M. Wards) | 114, 109, 138 |
| Broksonic 103, 112 | |
| Craig 122, 123, 120, 121 | |
| Croslex 111 | |
| Curtis Mathis 103, 119, 123 | |
| Daewoo 135, 136, 103 | |
| Dayton 116 | |
| Dynasty 113 | |
| Emerson 122, 113, 120, 121, 123, 103, 115 | |
| Fisher 125 | |
| General Electric | 102, 118, 103, 107 |
| Goldstar 103, 113, 112, 130 | |
| Hitachi 131, 113, 103, 132 | |
| JC Penny | 103, 102, 130, 107 |
| JVC | 128, 129 |
| Manufacturer Code | |
| KTV 133, 113, 103, 123, 134 | |
| Loewe | 111 |
| LXI (Sears) | 102, 103, 111, 125, 119, 112 |
| Magnavox | 111, 112, 113, 107 |
| Mitsubishi/ MGA | 124, 103, 112 |
| NEC | 103, 112 |
| Panasonic | 118, 116, 117, 107 |
| Philco | 111, 118, 109 |
| Philips | 111 |
| Pilot 103 | |
| Pioneer | 137, 118, 119 |
| Portland 103, 108 | |
| Quasar | 110, 107 |
| Radio Shack | 102, 112, 124, 123 |
| RCA/ PROSCAN | 102, 103, 104, 105, 106, 107, 108 |
| Samsung | 126, 112, 113, 103 |
| Sanyo 125 | |
| Scott | 123, 112 |
| Manufacturer Code | |
| Sharp | 114, 113, 115 |
| Signature 2000 (M. Wards) | 114, 109 |
| Sylvania | 111, 112, 108 |
| Symphonic | 123, 139 |
| Technika | 109 |
| Toshiba | 119, 114 |
| Vidtech | 131, 103, 112 |
| Wards | 113, 103, 115, 112 |
| Zenith | 108, 110 |
VCR Codes
| Manufacturer Code | |
| Sony 301, 302, 303 | |
| Aiwa | 338 |
| Audio Dynamic | 314 |
| Bell & Howell (M. Wards) | 330, 343 |
| Broksonic 317, 319 | |
| Canon | 309, 308 |
| Citizen | 332 |
Manufacturer Code
| Curtis Mathes 304, 338, 309 | |
| Daewoo 341, 312, 309 | |
| DBX 314, 336, 337 | |
| Dimensia 304 | |
| Emerson 319, 320, 316, 317, 318, 341 | |
| Fisher 330, 334, 335, 333 | |
| Funai 338 | |
| General Electric | 329, 304, 309 |
| Go Video 322, 339, 340 | |
| Goldstar 332 | |
| Hitachi 306, 304, 305, 338 | |
| Instant Replay 309, 308 | |
| JC Penney 309, 305, 304, 330, 314, 336, 337 | |
| JVC 314, 336, 337 | |
| Kenwood | 314, 336, 332, 337 |
| LXI (Sears) | 323, 305, 333, 334, 330, 335, 338 |
| Magnavox | 310, 308, 309 |
| Marantz | 314, 336, 337 |
| Marta | 332 |
| Memorex | 309, 335 |
| Minolta | 305, 304 |
| Mitsubishi/ MGA | 323, 324, 325, 326 |
| Multitech | 325, 338, 321 |
| NEC | 314, 336, 337 |
| Olympic | 309, 308 |
| Optimus 327 | |
| Panasonic | 308, 309, 306, 307 |
| Pentax | 305, 304 |
| Philco | 308, 309 |
| Philips | 310, 308, 309 |
| Pioneer | 308 |
| Quasar | 306, 308, 309 |
Manufacturer Code
| RCA/PROSCAN | 309, 305, 308,310, 311, 312,313 |
| Realistic | 309, 330, 328,335, 324, 338 |
| Sansui | 314 |
| Singer | 315 |
| Samsung | 322, 313, 321 |
| Sanyo 330, 335 | |
| Scott | 312, 313, 321,335, 323, 324,325, 326 |
| Sharp | 327, 325, 328 |
| Shintom | 315 |
| Signature 2000(M. Wards) | 336, 327 |
| Sylvania 310, 308, 309,338 | |
| Symphonic | 338 |
| Tashiro | 332 |
| Tatung | 314, 336, 337 |
| Teac | 314, 336, 338,337 |
| Technics 309, 308 | |
| Teknika | 338, 342 |
| Toshiba | 312, 311 |
| Wards | 327, 328, 335,331, 332 |
| Yamaha | 330, 314, 336,337 |
| Zenith | 331 |
DVD Players
Manufacturer Code
| Sony | 601, 617, 621 |
| JVC 606 | |
| Magnavox | 603, 607, 608 |
| Panasonic | 604, 609, 610 |
| Philips | 603, 607, 611, 612 |
| Pioneer | 605, 613, 614 |
| RCA | 602 |
Manufacturer Code
| Samsung | 615, 616 |
| Toshiba | 603, 618 |
| Zenith | 619, 620 |
AMP (Amplifier)
Manufacturer Code
| Sony | 501, 521 |
| Aiwa | 524 |
| Bose 522, 523, 524 | |
| B & K | 525, 526 |
| Carver | 519, 538 |
| Denon | 516, 517, 518, 527, 528, 529 |
| Fosgate | 532 |
| Haitai | 504 |
| Harmon | 519, 530, 531, 532 |
| Kardon | |
| JVC 506, 507, 508, 533 | |
| Kenwood | 504, 505, 534, 535, 536 |
| Magnavox | 537, 538, 542 |
| Marantz | 537, 538, 539, 540, 541, 542 |
| McIntosh 520 | |
| NAD | 539 |
| Nakamichi | 543, 544, 545 |
| Onkyo | 512, 513, 546, 547, 548 |
| Panasonic | 549, 550, 551, 552 |
| Pioneer | 502, 503, 553, 554, 555, 556, 557, 558 |
| Sansui | 538 |
| Sharp | 534 |
| Technics | 509, 510, 511 |
| Yamaha | 514, 515, 559, 560, 561 |
Using your DVR Remote Control with Other Equipment
Operating a TV
Move the device switch to the TV position.
| Press | To Do This... | Press | To Do This... |
| Power the TV on/off | Use the arrow buttons and Scroll/Select bar to make selections and adjustments in the TV menu | ||
| Enter a channel number | |||
| Change channels on the TV | Change the TVs Screen Mode settings | ||
| Adjust the volume | Change the TVs Pic Mode settings | ||
| Display TV menu Change the TVs input settings |
Operating a DVD Player (or VCR)
Move the device switch to the DVD position.
| Press | To Do This... | Press | To Do This... |
| AUX | Power the DVD on/off Rewind a DVD | ||
| 0-9 | Enter numbers Fast Forward a DVD | ||
| MENU | Display the menu | Stop playing a DVD | |
 | Use the arrow buttons and Scroll/Select bar to make selections and adjustments | Play a DVD in slow speed | |
| REPLAY | Return to the previous DVD chapter | ||
| Play a DVD | ADVANCE | Advance to the next DVD chapter | |
| Pause a DVD | Begin recording a VCR (hold REC button for 1 second) |
Operating an Amplifier
Move the device switch to the AMP position.
| Press To Do This... | |
| AUX | Power the Amp on/off |
| [4660] | Adjust the volume |
Connections
The connections you choose to make will depend on the video services you receive and on the connections available with your TV, audio amplifier, or recording device (VCR or DVD Recorder). Select the appropriate examples for your conditions in the following pages.
Basic Connection
Connecting to Antenna/Cable

flowchart
graph TD
    A["Cable TV Wall Jack Panel"] --> B["Antenna"]
    B --> C["1"]
    C --> D["2"]
    D --> E["CABLE IN"]
    D --> F["ANT IN"]
    D --> G["COMPONENT OUT 10724/7232/4852x4120"]
    G --> H["AUDIO OUT"]
    H --> I["SD OUT"]
    I --> J["VIDEO OUT"]
    I --> K["S VIDEO OUT"]
    J --> L["HDMI OUT"]
    K --> L
    L --> M["CONTROL S IN"]
    M --> N["DIGITAL AUDIO OUT"]
    N --> O["OPTICAL"]
    N --> P["USB"]
    N --> Q["G-LINK"]
1 Connect the RF coaxial cable from your antenna to the HD DVR ANT IN connector.
2 Connect the RF coaxial cable from your cable service to the HD DVR CABLE IN connector.
It is not recommended to connect the RF output of a cable set-top box or other device to your HD DVR. The available picture quality may be reduced and certain HD DVR features may not be available in this case.
Connecting TV/Monitor
HD DVR Connection Panel
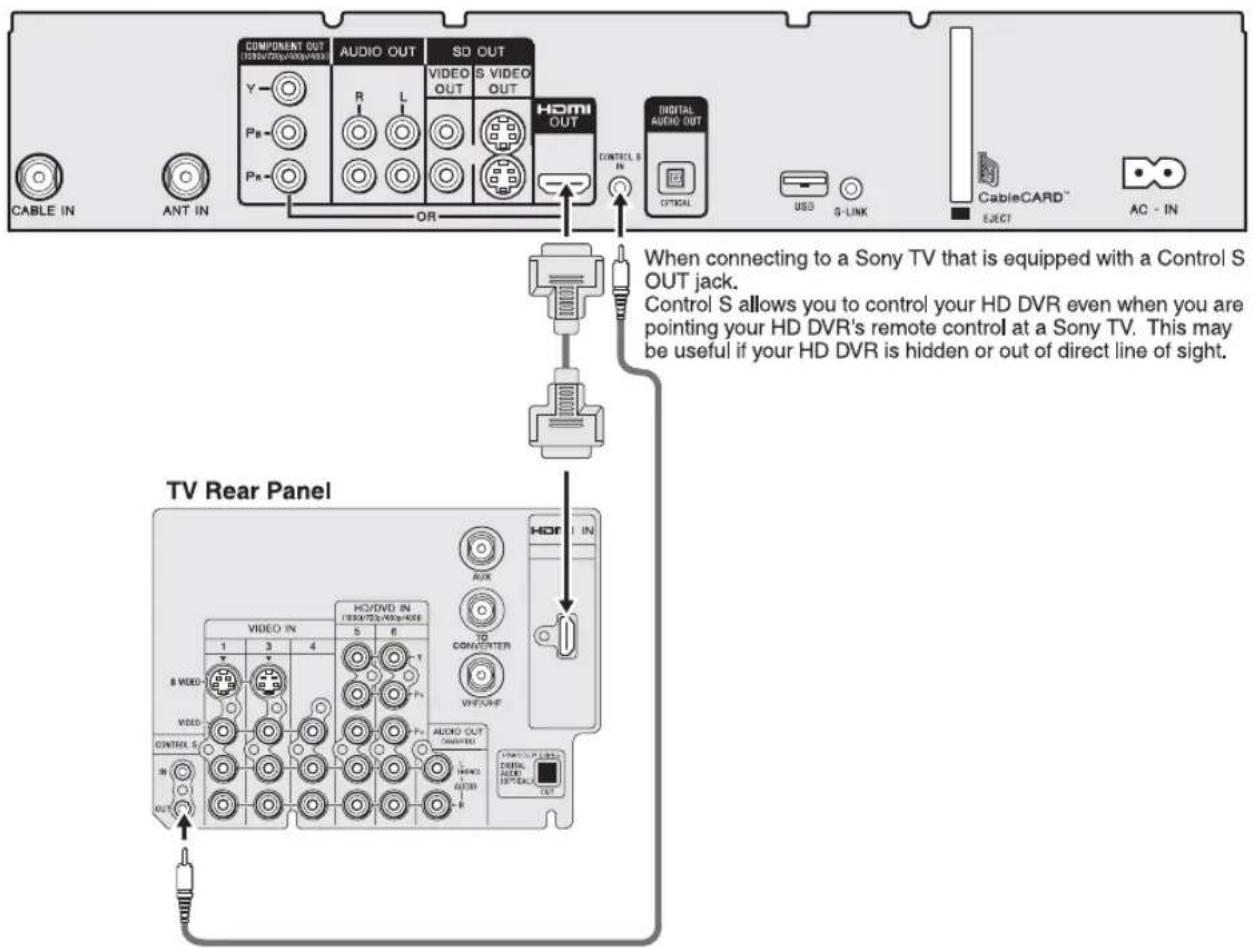
Connect the HD DVR's HDMI output jack to the HD TV's HDMI input jack using the HDMI cable (supplied).
If you are connecting an audio system, connect the digital audio optical cable to your audio system for your home theater.
If the HDMI-equipped TV to which the HD DVR is connected does not support Dolby Digital® audio input via the HDMI connection select "off" in the Preferences/Audio/Dolby Digital menu. If "Auto On" is selected, no audio may be heard from the TV.
HD TV with DVI connector
HD DVR Connection Panel
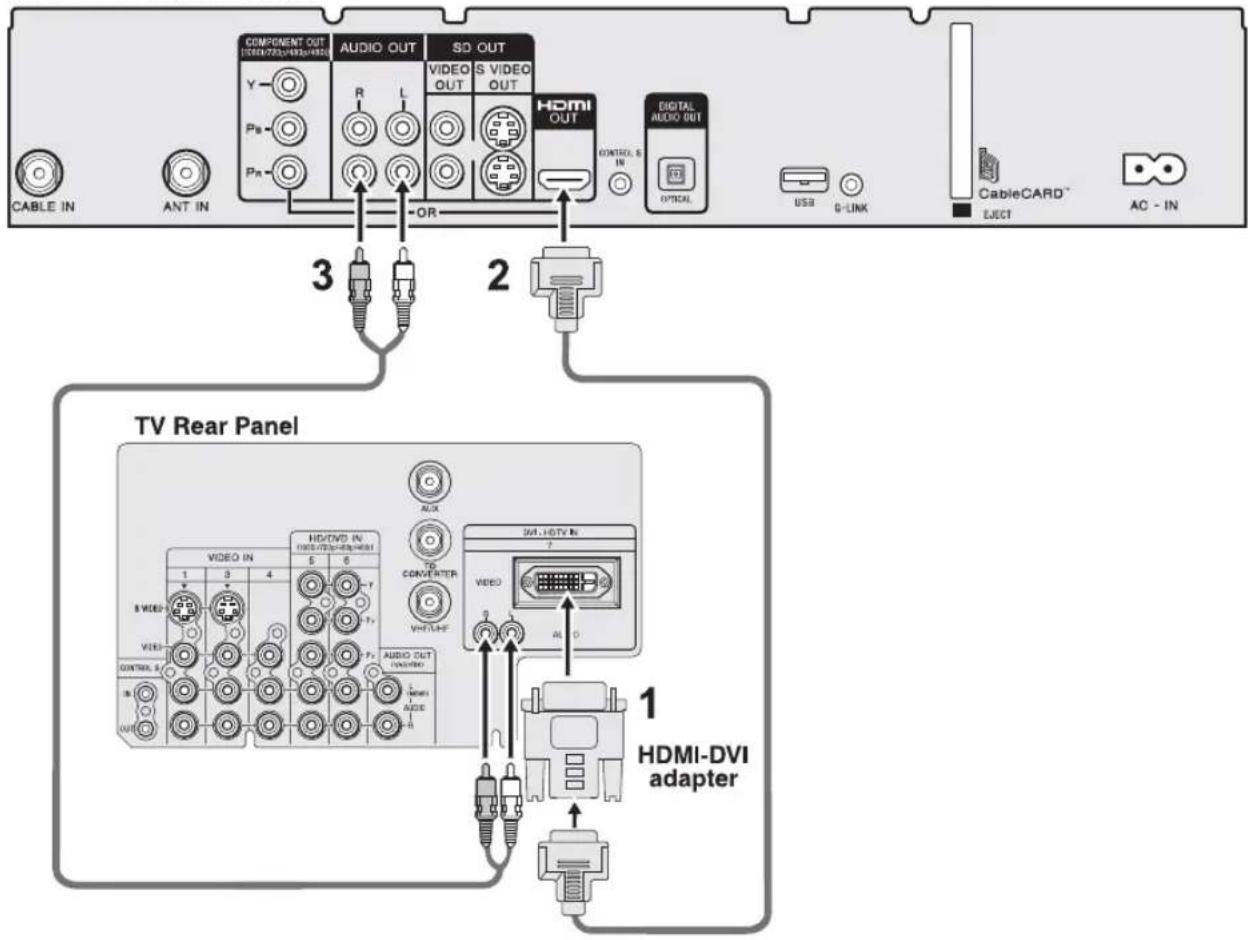
1 Securely connect the DVI adapter (supplied) to the HD TV's DVI input.
2 Connect the HD DVR's HDMI output jack to the HDMI-DVI adapter attached to the HD TV using the HDMI cable (supplied).
3 Connect the HD DVR's Audio OUT to the HD TV's Audio IN using an audio cable.
If you are connecting to an audio system:
- Connect the digital audio optical cable to the HD DVR Digital Audio Optical OUT and to the Digital Audio Optical IN of your home theater audio system.
- Connect the Audio OUT of your home theater audio system to the HD TV's Audio IN.
Although the HD DVR's HDMI connector outputs both video and audio, a TV's DVI connector can only accept video. So it is important to make a separate audio connection to your TV (or audio system) when using the DVI-HDMI adapter.
TV with component connector
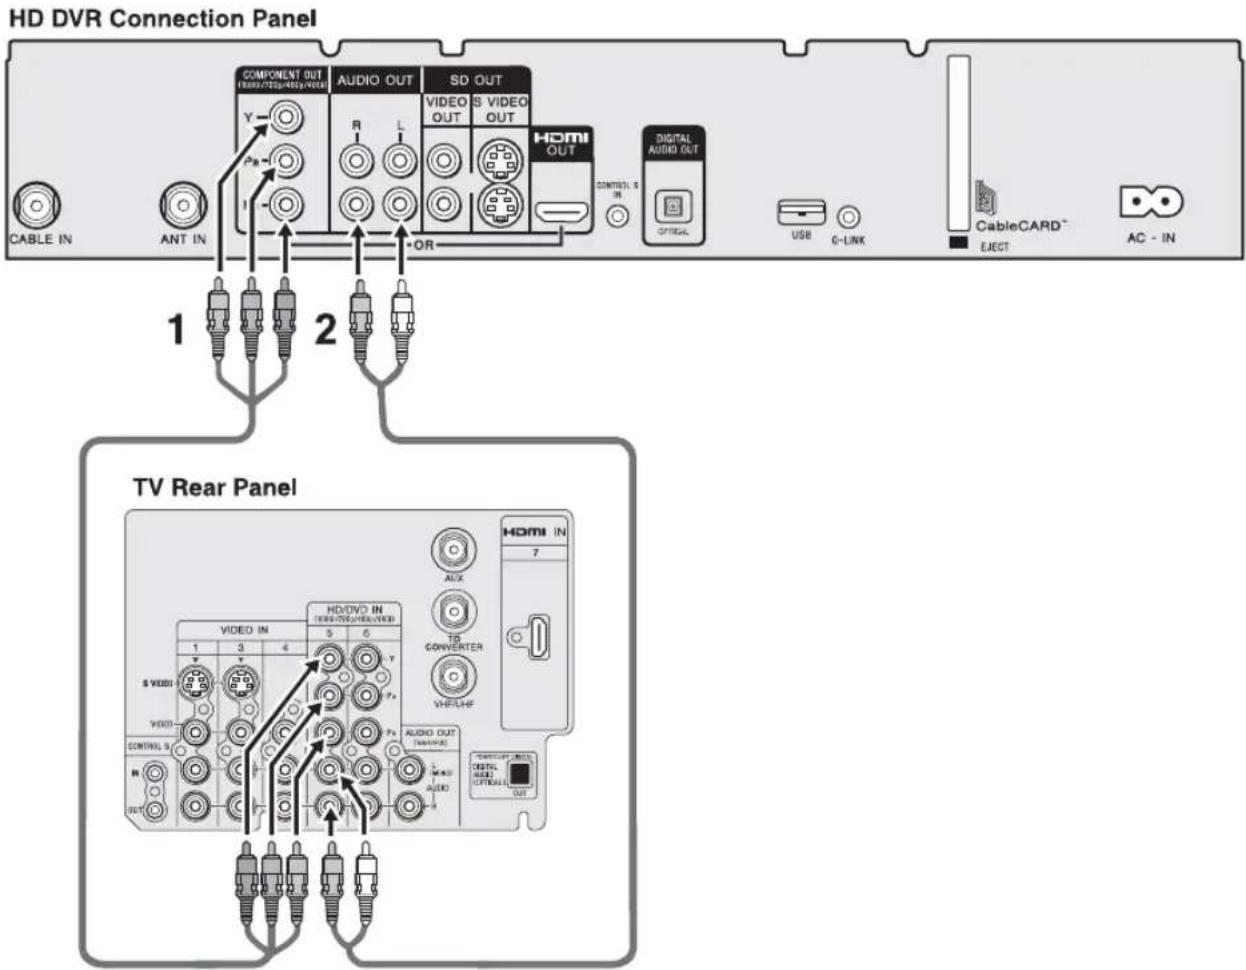
1 Connect the HD DVR's component output jacks to the TV's component video input jacks using a component video cable (Y, PB, PR)(supplied).
2 Connect the HD DVR's Audio OUT to the HD TV's Audio IN using an audio cable.
If you are connecting to an audio system:
- Connect the digital audio optical cable to the HD DVR Digital Audio Optical OUT and to the Digital Audio Optical IN of your home theater audio system.
- Connect the Audio OUT of your home theater audio system to the HD TV's Audio IN.
If your HDTV's component video input does not support certain video formats (such as 1080i or 480i), use the HD DVR's FORMAT button to select a compatible format (such as 720p). For more information on the FORMAT feature see page 73.
TV with composite connector
HD DVR Connection Panel

Connect the HD DVR's composite output jacks to the TV's composite input jacks using a composite video cable (supplied).
If your TV comes with an S Video input, use the S Video connection instead of the composite video connection for better picture quality.
When connecting to a TV with a composite or S Video cable, the FORMAT should be set to SD OUT to ensure that menus and on-screen displays are visible. With the composite or S Video connections, any other FORMAT setting will display only video images and no menu or on-screen displays. For more information on the FORMAT feature see page 73.
Inserting and Removing a CableCARD™ Device

Inserting a CableCARD device
1 Remove tape and insert the CableCARD into the CableCARD slot on the HD DVR.
2 Gently push the card into the slot until it clicks into place.
For more information about using CableCARD and activation, see "Activating CableCARD Service" on page 26.
Do not remove the tape covering the CableCARD slot until you are ready to insert the card. This will prevent any foreign objects from entering into the CableCARD slot. If you use a CableCARD, keep the card inserted in the slot at all times.
Removing a CableCARD device
In the event you want to cancel your service, contact your cable TV service provider.
1 Turn off the HD DVR.
2 Push the eject button on the HD DVR's CableCARD slot to release the card.
3 Pull CableCARD straight out of the slot to remove it.
To install a different CableCARD, follow the instructions in "Activating CableCARD Service" on page 26.
Once a CableCARD device is removed, your HD DVR will no longer decrypt digital cable TV programming services that require a CableCARD device.
If you will no longer use CableCARD services, you may need to adjust the cable TV service level or edit the channels you receive in the TV Guide On Screen™ Setup menu, see page 69.
Always press the "Eject button" to remove the card from the slot. Never pull out the card without first pressing the "Eject button." Before reinserting the card, be sure to press the "Eject button" again. This will prepare the CableCARD slot to properly accept the card without damaging either the CableCARD device or the slot. Do not allow the card to tilt at an angle during insertion. Be sure to insert the card straight into the slot.
Connecting Additional Equipment
Connecting a DVD Recorder or VCR
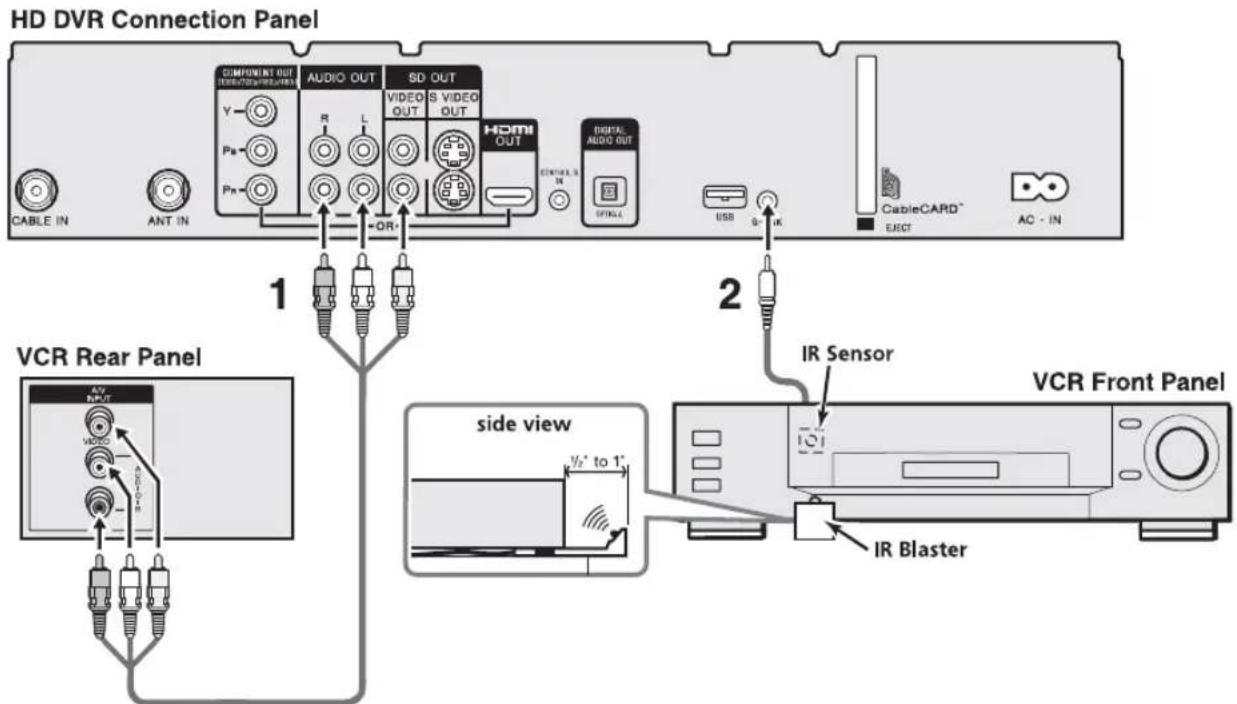
flowchart
graph TD
    A["HD DVR Connection Panel"] --> B["1: VCR Rear Panel"]
    A --> C["2: VCR Front Panel"]
    B --> D["side view"]
    C --> E["VCR Front Panel"]
    D --> F["Side View"]
    E --> G["IR Sensor"]
    E --> H["IR Blaster"]
1 Connect your HD DVR's composite A/V output to your DVD recorder/VCR's composite A/V input using the composite A/V cable (supplied).
If your DVD or VCR recorder is equipped with an S Video jack, use the S Video cable to connect to the HD DVR instead of the composite video cable for better picture quality.
If your DVD recorder is equipped with a component video input (Y,PB,PR), use the component video cable instead of the yellow composite or S Video cables. When using the component video cable to connect to a DVD Recorder, the FORMAT setting should be set to either 480i or 480p depending on which formats the DVD Recorder can accept. For more information on the FORMAT feature see page 73.
2 Only if connecting to a VCR, connect the IR Blaster to your HD DVR's G-LINK™ jack, then place the IR Blaster below and in front of the VCR, about 1/2 " to 1". For best results, place the IR Blaster directly below the VCR's IR receiving area.
Although it's possible to make recordings from the HD DVR with your DVD Recorder, the HD DVR can only automatically control VCRs to record with the G-LINK IR Blaster.
If the IR Blaster does not seem to be working correctly, check that the IR Blaster is positioned directly below the VCR's IR receiving area.
Connecting a Video and Digital Audio System
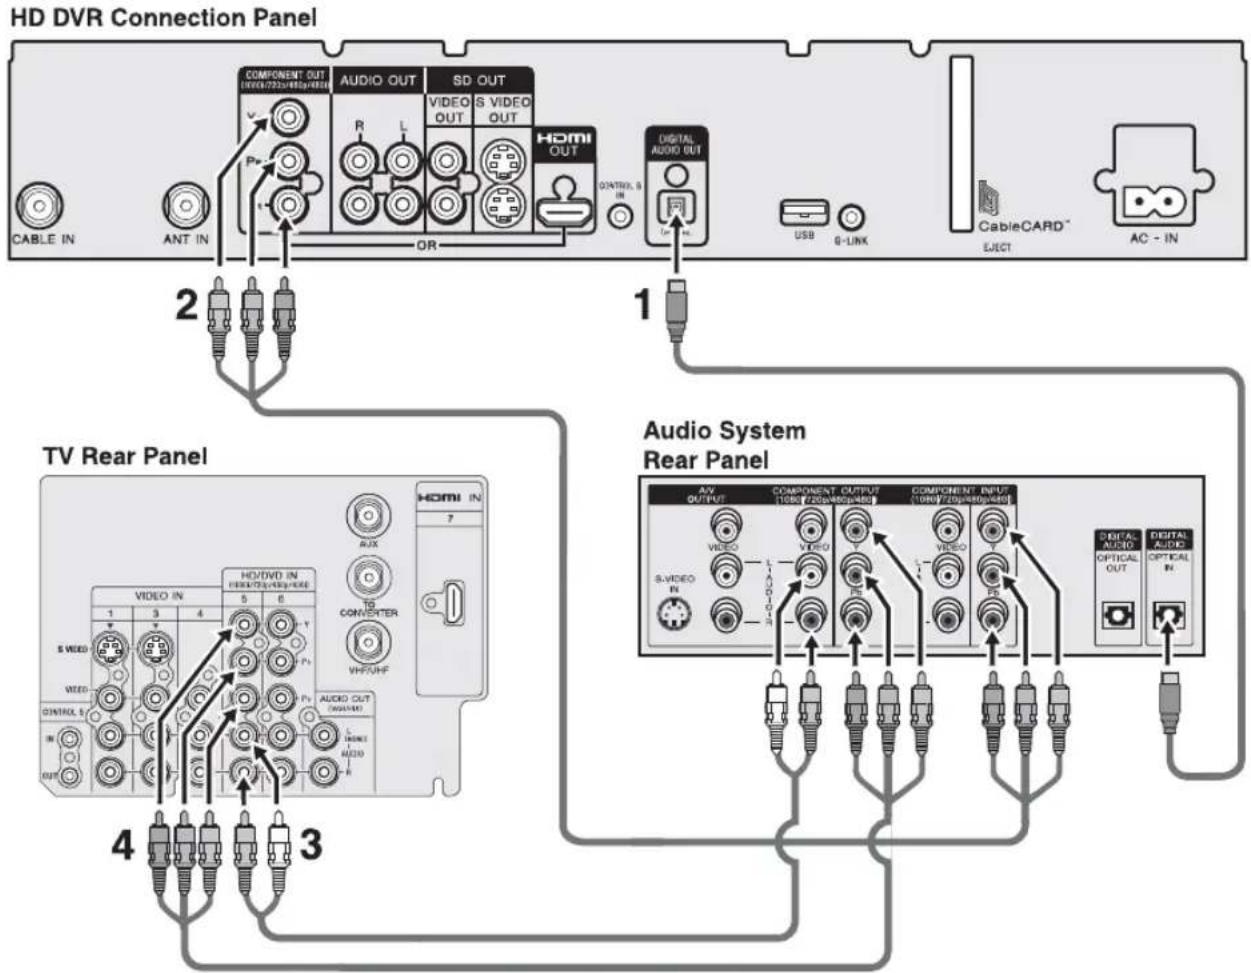
flowchart
graph TD
    A["HD DVR Connection Panel"] --> B["Component OUT"]
    A --> C["Audio OUT"]
    A --> D["SD OUT"]
    A --> E["Video OUT"]
    A --> F["S VIDEO OUT"]
    A --> G["HDMI OUT"]
    A --> H["Digital Audio Out"]
    B --> I["CABLE IN"]
    C --> J["ANT IN"]
    D --> K["OR"]
    E --> L["USB"]
    F --> M["O-LINK"]
    G --> N["CableCARD™"]
    H --> O["AC - IN"]

    P["TV Rear Panel"] --> Q["VIDEO IN"]
    P --> R["VIDEO OUT"]
    P --> S["HDMI IN"]
    P --> T["AUX"]
    P --> U["CONVERTER"]
    P --> V["VH/VOHP"]
    P --> W["VIDEO IN"]
    P --> X["VIDEO OUT"]
    P --> Y["HDMI IN"]
    P --> Z["AUX"]
    P --> AA["CONVERTER"]
    P --> AB["VH/VOHP"]

    AC["Audio System Rear Panel"] --> AD["AV OUTPUT"]
    AC --> AE["COMPONENT OUTPUT"]
    AC --> AF["COMPONENT INPUT"]
    AC --> AG["S-VIDEO IN"]
    AC --> AH["S-VIDEO OUT"]
    AC --> AI["DECITAL AUDIO OPTICAL OUT"]
    AC --> AJ["DECITAL AUDIO OPTICAL IN"]
1 Connect your HD DVR's Digital Audio Optical OUT to Digital Audio Optical IN of your audio system using a Digital Audio Optical cable (not supplied).
2 Connect your Audio System's Audio OUT to Audio IN of your TV using an Audio cable.
3 Connect the HD DVR's component output jacks to the Audio System's component input jacks using a component video cable (Y, PB, PR).
4 Connect the Audio System's composite output jacks to the TV's composite input jacks using a composite video cable.
Connecting the AC Power Cord
HD DVR Connection Panel

When all necessary connections are completed be sure to connect the power cord.
1 Connect the supplied AC power cord to the HD DVR rear panel AC IN.
2 Connect the other end into the nearest AC power outlet.

Please note, the HD DVR is factory set to 1080i Format. Some HD TV's and all SD TV's are not capable of displaying 1080i Format. In such cases, keep pressing the FORMAT button on the remote control or the front panel to change the Format setting on the HD DVR to: 720p for some HD TV's or HD Monitors, SD OUT for any SD TVs.
About CableCARD™ Devices
The CableCARD device provides cable subscribers with access to digitally encrypted cable channels — without the use of a cable box — this will enable you to receive not only standard definition but also high-definition television where available. The CableCARD device, which is provided by your cable TV service provider, can be inserted into the HD DVR's rear panel CableCARD slot (see page 22).
Activating CableCARD Service
Before you can use CableCARD service, you need to insert a CableCARD device (supplied by your cable TV service provider) and activate it.
You will be able to receive programming using a CableCARD device — except in the following circumstances:
- Your cable TV service provider does not provide CableCARD service in your viewing area.
- You want to access your cable TV service provider's interactive or advanced features (such as video-on-demand or, in some cases, pay-per-view).
At this time, these services require a bidirectional link, which is only available through the use of a separate cable box. The CableCARD device is currently a unidirectional device and cannot provide these advanced services. Check with your cable TV service provider for CableCARD service details, limitations, pricing and availability, all of which are determined by your cable TV service provider.
1 Gently push the card into the slot, until it locks into place (see page 22).
2 Turn on the HD DVR and the TV. Complete the HD DVR Auto Setup and TV Guide™ Setup if you have not done so already.
3 Within a few minutes after the auto setup is complete, information about activating the CableCARD™ device should automatically appear on screen. If such information does not appear within a few minutes, you may be able to see it within the Menu/Preferences/System/CableCARD menu (see page 36). Typically the instructions will include the telephone number of your cable TV service provider. An authorized cable TV installer or you may then call your cable TV service provider to request that the CableCARD device be activated.
4 After your CableCARD is activated, your cable TV service provider will upload the service information, including the channel list, to the CableCARD.
5 After the CableCARD has acquired channels from your cable TV service provider, the HD DVR will tune to the first available channel.
CableCARD™ Messages
Here are some of the messages you might see on your screen. When you see them, follow the actions required.
| Message Do This... | |
| Make sure you have a cable connection. Please wait while the CableCARD defines your channel list. | If your CableCARD device is inserted correctly, select OK to remove the message or let the message automatically disappear when the channel list is defined. |
| Acquiring data from CableCARD Please standby... | Wait for the screen to displayDigital Channels Found: xxxAnalog Channels Found: xxxIf a list of channels is not found after several minutes, then an error message will be displayed. |
| CableCARD Error. No channels were found. | Select OK to remove the message and then contact your cable TV service provider to resolve the issue. If you see this message while you are running Wizard, complete the setup first and then contact your cable TV service provider. |
| CableCARD removed. Do you want to run Auto Scan now? | Select Yes to display the Auto Scan screen and to start Auto Scan.Select No to cancel the Auto Scan. |
| Please wait while your CableCARD updates. | Do not remove the card while receiving updates. Wait for the update to complete. |
Auto Setup
Before you can enjoy the TV Guide On Screen ^TM System, you will need to perform the Auto Setup.
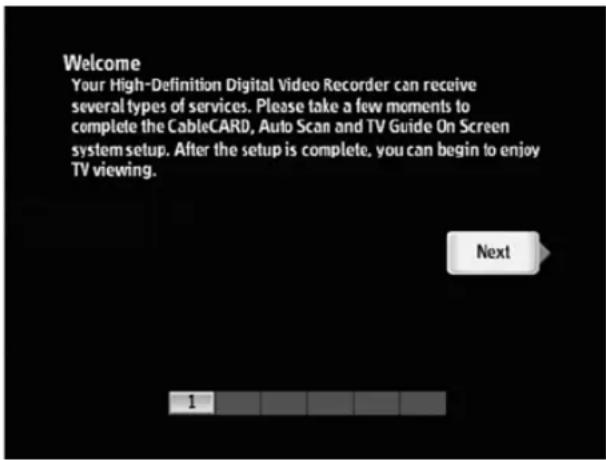
1 When your HD DVR is first powered on, the set up screen will automatically appear.
If you do not see any image, check the connections to the TV. Also check the FORMAT setting by pressing the FORMAT button until the Front Panel Window displays a Format setting that is compatible with your TV and TV connections (see page 73 for more information about Format settings).
2 Follow the on screen set up, selecting the types of signals your HD DVR will receive.
The TV Guide On Screen system setup must be completed before using other features of the HD DVR.
3 The HD DVR will automatically search for available stations. This may take up to 30 minutes, or more, depending on the number and types of channels available. After the auto set up is completed, the TV Guide On Screen system set up screen appears.
4 Enter your country, zip or postal code and indicate again which types of signals your HD DVR will receive. You may also select to allow an external VCR to be controlled by your HD DVR.
5 After the TV Guide On Screen ^™ set up is complete, Listings or correct time information will not immediately be available. Make sure to turn the HD DVR off overnight and you will begin to see program guide information appear for your area within 24 hours.
6 Within 24 hours after completing the TV Guide On Screen System setup, you may see a message asking you to select from several cable TV service providers and subscription service levels (basic service, premium service, etc.). Select the appropriate service provider and subscription level to view the correct guide information for your area and subscription.
To continue receiving listings, turn off your HD DVR overnight or when not in use.
The TV Guide On Screen system may display incorrect time and date information until correct information is received soon after the HD DVR is first connected to a broadcast or cable signal. Correct time information will typically appear within 24 hours.
Changing TV channels with your HD DVR Remote Control
After you have successfully performed the remote control programming on page 12 you will be able to operate your HD DVR and other home theater equipment with the remote control. Refer to “Using your DVR Remote Control with Other Equipment” on page 16.
To Do This... Do This...
| Activate the remote control to Operate the HD DVR | Slide device switch to DVR |
| Tum on/off the HD DVR | Press POWER |
| Tune directly to a channel | To tune to an analog channel, press 0-9 to select channel.For digital sub-channels, press 0-9, press 0-9 again, and then ENTER.For example, to select sub-channel 21.13.Press 2+1+1+3, and then press ENTER. |
As you navigate through the channels with your remote control for live TV programs, you will see the "Info Banner" at the top of the screen. The Info Banner may display the following information if it is available: channel number, channel logo, channel name, broadcast resolution, closed caption indicator, terrestrial channel icon ("T" if applicable), current time, program title, program duration, program airtime, recording in progress icon (if applicable), program rating and Parental Lock icon (if applicable).

Using the Menus
This section covers the MAIN MENU of the HD DVR. It is the gateway to all of the applications available on the HD DVR to customize and enjoy them.

The screen is shown in 4:3 aspect ratio. The screen may appear differently depending on your TV, Format and Wide Mode settings.
How to Access and Navigate in the Menus
1 Press the MENU button on the remote control or on the front panel of the HD DVR to display the on-screen MAIN MENU.
2 Use ↑ and ↓ to highlight the desired menu icon. Press SELECT on the Navigator Bar to confirm your selection.
3 Follow the instructions on the screen.
4 For instructions on using a specific menu, see the page in this section that talks about that menu.
5 Press the MENU or EXIT button to exit the menu.
Press MENU once to display the on screen menu and either press again or press EXIT to return to normal viewing.
Using the Recent Channels Menu

To access the Recent Channels Menu, follow these steps
-
Display Menu
-
Highlight

- Press to select


Use the scroll bar to navigate channels.
Press SELECT to tune to a channel.
To exit the menu, press EXIT or MENU.
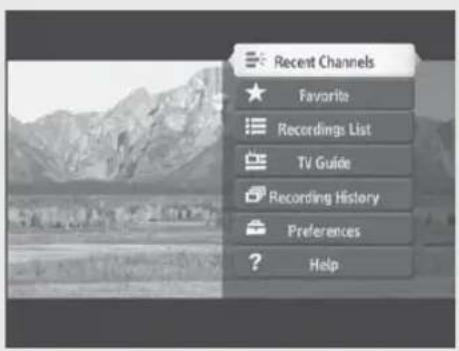
The Recent Channels feature lists up to 18 of the most recently viewed channels. Only channels that have been viewed about a minute will be listed.
The Recent Channels list can also be accessed as a Favorite category.
Using the Favorite Menu

To access the Favorite Menu, follow these steps:
-
Display Menu
-
Highlight

- Press to select


Use the scroll bar to navigate favorites.
Press SELECT to tune to a channel.
To exit the menu, press EXIT or MENU.

The Favorite feature lets you create up to 13 categories of favorite channels that you specify. You may then quickly tune your favorite channels by selecting a category and then selecting a channel within that category.
Creating a List of Favorite Channels While Viewing a Program
While you are viewing a broadcast program and you wish to add the channel to your list:
1 While no other menus are displayed, press ➤ to open the Options menu.
2 Highlight and select "Add to Favorite" to add the channel to a Favorite Category.
If the current channel is already available in a Favorite Category, "Delete from Favorite" appears instead of "Add to Favorite." You may select "Delete from Favorite" if you wish to remove the channel from a Favorite Category.
3 Highlight the category to which you want to add the channel.
Creating or Editing Favorite Categories
1 Press MENU to display the menu.
2 Highlight and select Preferences.
3 Highlight and select Favorite Options.
4 Highlight and select Create New Category
5 Name a new category by using the Navigation button or Scroll button.
6 Select OK to confirm.
Note that you may always access the Recent Channels list (see previous page) as a Favorite Category.
Accessing the Recordings List

To access the Recordings List, follow these steps:
-
Display Menu
-
Highlight

- Press to select

Or press the REC LIST button
Use arrow buttons to highlight a selection.
Press SELECT to confirm the selection.
To exit the menu, press EXIT or TV GUIDE.

For information on how to use the Recordings List feature, see "Using the RECORDINGS Service" on page 67.
Accessing the TV Guide On Screen™ Feature

To access the TV Guide On Screen Listings, follow these steps:
-
Display Menu
-
Highlight

- Press to select


Or press the TV GUIDE button
Use arrow buttons to highlight a selection. Press SELECT to confirm the selection.
To exit the menu, press EXIT or TV GUIDE.

For information on how to use the TV Guide On Screen system feature, see "Using the TV Guide On Screen™ System" on page 59.
Pressing TV GUIDE while in the LISTINGS, RECORDINGS or other TV Guide On Screen system screen will exit the guide and tune to the currently tuned channel. Pressing EXIT while in a guide menu will exit the guide and tune to the channel that was last tuned before entering the guide.
The TV Guide On Screen system setup must be completed before services such as Recordings or Listings are available (see page 28 for more information).
Using the Recording History Menu

To access the Recording History Menu, follow these steps:
-
Display Menu
-
Highlight
-
Press to select
Use arrow buttons to highlight and review details. Press SELECT to view further details.
To exit the menu, press EXIT or MENU.
The Recording History menu displays up to 100 of the most recent recording events. The Recording History may be a useful reference to any Recording Event that may have been scheduled. Recording events are programs that have been recorded or for some reason did not record as planned. Each recording event contains information on the channel number, date and time of recording, recording status and title and channel name if available.
A recording event can apply to the HD DVR's hard disk drive or to a VCR if VCR Control has been set up.
To play recorded programs, use the Recordings List feature to select and play back shows that have been recorded. For programs recorded on a VCR, use the VCR for play back.
Using the Preferences Menu

To access the Preferences Menu, follow these steps:
-
Display Menu
-
Highlight

- Press to select


Use arrow buttons to change settings.
Press SELECT to confirm the selection.
To exit the menu, press EXIT or MENU.

You can access the following from the Preferences Menu: System, Recording, Screen, Audio, Parental Lock, CH+/- List (Channel List), Recent Channels Options, Favorite Options.
Options Descriptions
System
System Menu: Allows you to display system information about your HD DVR. This menu may be useful to troubleshoot issues related to signal strength or signal quality.
Diagnostics: Displays technical information about the current channel that may be used by your authorized cable TV service provider installation professional.
CableCARD: Displays information provided by your Cable TV service provider. If a valid CableCARD™ device is not inserted in the HD DVR, no information may appear in this menu.
Auto Off: Select the start time of the daily Auto Off or disable the Auto Off feature.
The Auto Off feature sets a time at which your HD DVR is automatically turned off each day. To make sure your HD DVR continues to receive fresh program guide information, it is recommended to allow the Auto Off feature to power off the HD DVR each day.
Remote Control Code: The Remote Control Code menu allows you to set the IR code of the remote control and of the HD DVR. You may select code 50 (factory default) or code 51. This setting may be useful if you have more than one Sony® HD DVR or Sony Digital Cable Receiver in your home and you wish to avoid interference between the two devices. Follow the on-screen instructions for setting the IR code to make sure that both the remote control and HD DVR IR code are correctly set.
Options Descriptions
Recording
Live TV Pause Time: The Live TV Pause Time feature allows you to set the amount of time of live TV programming that will be saved. For example, if you set the Live TV Pause Time to 30 minutes, you will be able to pause live TV for up to 30 minutes before the paused point is no longer available. The Live TV Pause Time setting does not change how programs are recorded to the List. However, setting a shorter Live TV Pause Time will allow more programs to be recorded to the List.
If the Live TV Pause setting is changed, the availability of programming in the current Live TV Pause time period will be refreshed.
See page 50 for a list of actions that will cause the LIVE TV Pause Time to be refreshed.
Replay Time: Select the length of instant replay time for the scene from 2, 5, 15, 30, 60 or 300 seconds when the REPLAY button is pressed.
Advance Time: Select the length of advance play time from 2, 5, 15, 30, 60 or 300 seconds when the ADVANCE button is pressed.
FF/REW Speed: The FF/REW Speed feature allows you to set the rate or rates of fast forward and rewind that are assigned to the FF and REW buttons on the remote control. If you set more than one rate of FF or REW speed, the FF and REW buttons will progressively toggle through the available speeds each time the button is pressed.
Slow Speed: The Slow Speed feature allows you to set the rate or rates of slow speed that are assigned to the SLOW button on the remote control. If you set more than one rate of slow speed, the SLOW button will progressively toggle through the available speeds each time the button is pressed. Available speeds are 1/2, 1/3, 1/4 and 1/8 of actual speed.
Smart Cue Adjust: The Smart Cue Adjust feature allows you to set the amount of time, in seconds, that is automatically adjusted in the transition between fast forward or rewind modes and play mode. So while you are fast forwarding or rewinding a program, the Smart Cue feature compensates for the delayed response between when you see a program segment you want to view and the time when you are able to press the PLAY button on the remote control.
Options Descriptions
| Screen | Closed Caption On/Off: Select Off to turn off Closed Captioning display or select On to display analog closed captioning with Basic Only On or digital closed captioning with Advanced and Basic On. |
| Closed Caption Options:Basic Analog Services: Select CC1-CC4 to display basic Closed Captioning, if available. Select Text1-Text4 for network or station information, if available.Advanced Digital Services: Allows you to select advanced digital (EIA-708) closed caption options. Select from available options, if any.Advanced Digital Settings: Allows you to make additional settings for digital closed caption options.As BroadcastSmall TextLarge TextCustom: Allows you to customize with the following settings: Size, Style, Text color, Edge color, Edge type, Background and Window color. Select OK to apply the customized setting.Info Banner Size: Displays the information of the current program when changing channels or when the INFO button is pressed. Select Large or Small Info Banner Size. |
Options Descriptions
Screen Mode: You may select a picture size that best suits your TV for both standard-definition and high-definition programming. See page 76 for more information about Screen Mode settings:
High Def to Standard Def: The Screen Mode settings when viewing 1080i or 720p content output in a 480p or 480i Format include Letterbox, Side Crop and Squeeze. Use Letterbox to reproduce the original wide image with black borders on top and bottom. Use Side Crop to remove the sides of the original wide image without any black borders. Use Squeeze to view an adjusted image without any black borders.
Standard Def to High Def: The Screen Mode settings when viewing 480p or 480i content output in a 720p or 1080i Format include Normal, Stretch, Side Stretch and Adjust (with 16 discrete settings; Adjust 1 - Adjust 16). Use Normal to reproduce the original image with black borders on the sides. Use Stretch and Side Stretch to view an adjusted image without any black borders. Use Adjust to view an image that you may adjust later in 16 different steps without any black borders.
High Def to High Def: The temporary Screen Mode settings when viewing 1080i or 720p content output in a 1080i or 720p Format include Standard, Expand and Shrink. Use Standard to reproduce the original image. Use Expand and Shrink to view an adjusted image. These temporary settings may be useful when viewing certain HD content that was originally created in an SD format. The HD to HD Screen Mode settings return to the default (Standard) each time the channel is changed or the HD DVR is turned off.
Options Descriptions
| Audio | Dolby Digital: If you are using an external audio system or TV that supports Dolby Digital® audio, select Auto On (The unit is shipped with factory setting of Off.). If you are using an audio system or TV that only receives PCM digital audio signals, select Off.Do not select the Auto On setting if connecting to a device that is not capable of decoding Dolby Digital audio. Doing so may cause the audio receiver to create unwanted noise that could potentially cause harm to audio equipment. |
| Default Digital Audio: Select from one of the following: English, Spanish, French and Native. The HD DVR will output the associated audio track if it is available from the broadcast. | |
| Current Digital Audio: Select the available audio tracks of the current program, if any. | |
| Default Analog Audio: Select from one of the following: Stereo, SAP or Mono. When you view a program broadcast in mono, you will hear only mono sound, even though Stereo mode is set. When Second Audio Program "SAP" mode is set, the programs second audio program is heard in mono, if available. | |
| Current Analog Audio: Select Stereo, SAP or Mono.Selecting Stereo will provide stereo reception when a program is broadcast in stereo. Select SAP to automatically switch to Second Audio Program when a signal is received. If no SAP signal is present, the audio remains in Stereo mode. Select Mono to reduce noise during a weak stereo broadcast. |
Options Descriptions
Parental Lock You must first create an initial password to use this function.
Once your password is set, you can select from the following options to block the programs with Rating Options, Restricted by Channel, Restrict by Time.
Change Password allows you to change the existing password. Country allows you to make selection of the country in which you would like to base your restrictions.
For U.S.A.:
Rating Options: Options include, TV Rating, Movie Rating and Unrated. Select OK or Cancel to set the ratings. For Unrated select either Allow Unrated or Block Unrated.
For Canada:
Rating Options: Options include, English Rating, French Rating, U.S.A. Rating (applies to TV rating setting) select OK or Cancel to set.
Enter your password: Enter your password or select Cancel. You must setup your password to use the Parental Lock function.
For detailed information on the Parental Lock feature, see the Parental Lock section beginning on page 44.
CH +/- List The CH +/- List contains all of the channels to which your HD
DVR will tune as you use the CH+/- buttons. Note that the channels to which your HD DVR can tune may not be the same channels which may be listed in the TV Guide On Screen ^TM program guide. To modify the channels which appear in the program guide, use the SETUP menu of the TV Guide On Screen system.
Edit Channel List: Allows you to edit the channel list. Select channels that you want to remove from the CH+/- List.
You may also add or remove a channel from the CH+/- List without using the CH+/- menu. While viewing a channel and no other menus are displayed, press ➤ to display the options menu. Select Manual Add or Manual Delete to edit the current channel from the CH+/-.
Auto Add from Antenna: Add new antenna channels, if available, to the CH+/- List.
Auto Scan: Select Auto Scan Antenna, Auto Scan Cable or Auto Scan All to remove existing channels and add new channels, if available, to the CH+/- List.
| Options Descriptions | |
| Recent Channels Options | Video Lock: Select Unlock to allow channels to be changed as you move through the Recent Channels List. Select Lock to keep the current channel tuned until a new channel is selected from the Recent Channels List. |
| Favorite Options | Sort: Select Channel Number Sort to order channels by number. Select Channel Name Sort to order channels alphabetically.Video Lock: Select Unlock to allow channels to be changed as you move through the Favorite List. Select Lock to keep the current channel tuned until a new channel is selected from the Favorite List.Edit Channel: Allows you to add or delete channels in Favorite Categories.Edit Category Name: Allows you to edit the name of Favorite Categories.Delete Category: Allows you to delete a Favorite Category.Create New Category: Allows you to create up to 13 different Favorite Categories. |
When the Recent Channels and Favorite video lock settings are set at Unlock, the channel will change as you navigate Recent and Favorite channels and the current channel's Live TV Pause will be reset. To keep the current channel's Live TV Pause, select the Lock setting.
Using the Help Menu

To access the Help Menu, follow these steps:
-
Display Menu
-
Highlight

- Press to select


Use arrow buttons to make selections.
Press SELECT to confirm the selection.
To exit the menu, press EXIT or MENU.
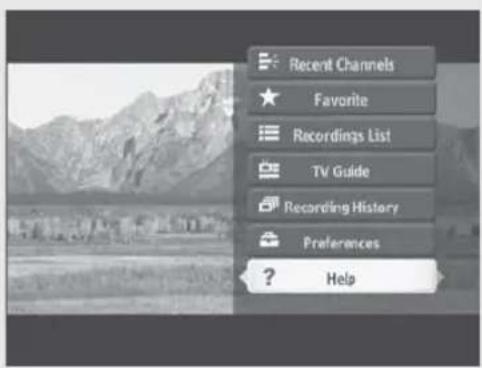
Press MENU, highlight HELP and press SELECT to display Help Topics. Highlight a topic and then select OK.
Parental Lock
Creating a Password
You must first create a password to use the Parental Lock feature. Parental Lock passwords are comprised of four digits.
1 Press the MENU button and the main menu will appear.
2 Highlight Preferences and press SELECT.
3 Highlight Parental Lock and press SELECT to display the Password entry box.
4 Enter a four-digit password using the 0-9 buttons then press SELECT.
You must confirm your new password by re-entering the password again.
Once a password is created, you will see a "Your password is set" message. You will then be prompted to select the restriction options: Rating Options, Restrict by Channel, Restrict by Time, Change Password and Country.
You can also create a password while viewing a program.
1 Press the arrow button and the menu will appear.
2 Use the and arrow button to highlight Restrict this Channel.
3 Enter the Password (or press SELECT if you have already created a Password) to restrict the current channel.
You can highlight Cancel and press SELECT to exit from the password entry screen. If you select Cancel during your password creation, your password will not be created.
Changing a Password
You may change the password by selecting the Change Password option under Parental Lock. To get to the Parental Lock menu, follow the first 4 steps from Creating a Password.
Forgot or Lost Your Password?
See lost password under troubleshooting section of this manual (see page 83).
| Options Description | |
| Rating Options | See "Rating Guidelines" on page 46 |
| Restrict by Channel | Allows you to restrict viewing of the selected channels. Select the Restrict by Channel under the Parental Menu to display all the receivable channels and you can press SELECT to Lock the channel. A channel can also be restricted while you are watching it. When no other menus are displayed, press the ➤ button to display the Options Menu. Highlight and select "Restrict this channel" to add that channel to the restricted list. |
| Restrict by Time | Allows you to restrict viewing by entering the daily time and duration. Select the start time and duration with ↑/↓ buttons or scroll with SELECT button. Highlight "OK" on the screen then press SELECT to set the restriction. |
| Change Password | Allows you to change the Parental Control password. If you have forgotten your password, see "Lost Password" on page 79. |
| Country | Allows you to select the appropriate available rating system for your location. |
Rating Guidelines
There are different ratings for Movies and TV programs. Make your rating selections according to the table below. You also have the option of blocking unrated TV programs or movies by selecting “Allow” or “Block”.
If you choose to block unrated TV programs, the following programs may be blocked: emergency broadcasts, political programs, news programs, public service announcements, religious programs and weather.
U.S. Rating Guidelines:
Movie Rating Defined as
G All children and General Audience
PG Parental Guidance suggested
PG13 Parental Guidance for children under 13
R Restricted viewing, Parental Guidance is suggested for children under 17
NC-17 and X No one 17 or under allowed
| TV Program | Defined as |
| TV-Y | All children |
| TV-Y7 | Directed to children 7 and older |
| TV-G | General Audience |
| TV-PG | Parental Guidance suggested |
| TV-14 | Parents strongly cautioned |
| TV-MA | Mature audience only |
| Content | Defined as |
| FV | Fantasy violence |
| D | Suggestive dialogue |
| L | Strong language |
| S | Sexual situations |
| V | Violence |
Canadian Rating Guidelines:
| English Rating | Defined as |
| C | All children. |
| C8 | Children 8 years and older. |
| G | General programming. |
| PG | Parental Guidance. |
| 14+ | Viewers 14 and older. |
| 18+ | Adult programming. |
| French Rating | Defined as |
| G | General programming. |
| 8 ans+ | Not recommended for young children. |
| 13 ans+ | Not recommended for ages under 13. |
| 16 ans+ | Not recommended for ages under 16. |
| 18 ans+ | Programming restricted to adults. |
Viewing blocked programs
When you try to view a blocked channel there will be a message indicating the restriction. The restriction can be temporarily removed until a channel change or playback ends by entering the correct password when asked.
Recording a program with Parental Locks
Your HD DVR will also record blocked programs. While recording and during the playback if the Parental Lock is set, the audio and video will be muted and an appropriate message will appear. To view the recorded program, enter the correct password.
Digital Video Recorder
Understanding the Status Bar
The Status Bar provides information about the currently displayed program.

1 While viewing a program, press the ↑ button or any of the Trick Play buttons (such as PLAY, PAUSE, etc.) to display the status bar.
2 While the status bar is displayed, press the ↑ button again to display the Chapter Mark area of the status bar.
3 Press while the Chapter Mark Icons are displayed to exit the Chapter Mark Icons.
4 Press the Scroll/Select bar to add a Chapter Mark, if desired (see page 56).
5 If no buttons are pressed, the status bar will automatically disappear after several seconds.
6 Press the PLAY button to return to normal viewing.
Pausing TV
Using the Pause Feature
Do not let small interruptions cause you to miss a moment of your favorite show. Use the pause feature to pause a live or recorded program until you are ready to begin viewing again.
1 Press the PAUSE button.
2 Live TV programs are held in pause for up to 30, 60 or 90 minutes, depending on the Live TV Pause Time setting (see page 37). Recorded TV programs are held indefinitely.
The screen saver feature will appear after 10 minutes of no activity. Press any button to remove the screen saver.
3 Press the PAUSE button again or press the PLAY button to return to normal viewing.
Live TV Pause Time
The HD DVR's Live TV Pause Time feature allows you to set the amount of time of live TV programming that will be saved (see "Live TV Pause Time" on page 37). If the Live TV Pause Time is set to 30 minutes, you will be able to view and control up to 30 minutes of programming. The live TV pause time is re-set in the following cases:
- When the TV channel is changed.
- When the HD DVR is turned off (standby).
- When the Live TV Pause Time setting is changed (see page 37).
- When the current or default audio settings are changed (see page 40).
- When the Auto Off feature occurs (see page 36).
- When power is removed from the HD DVR by unplugging the AC power cord or through a power interruption.
- When a recording begins or ends.
Understanding the Screen Saver Feature
The Screen Saver feature automatically appears after 10 minutes without any activity. The screen saver can appear if a program is paused for at least 10 minutes or if a menu is displayed for at least 10 minutes without any activity. Press any button to remove the screen saver and return to normal viewing.
While most menus will continue to appear on screen until they are removed or until the Screen Saver is activated, the TV Guide On Screen™ system will automatically be removed from the screen after 5 minutes without any activity.
Using Trick Play Features
◀◀ REW and FF ▶▶ (Rewind) (Fast Forward)

natural_image
Black-and-white landscape photo of a mountain range with trees and a clear sky, no visible text or symbols.1 Press the REW (Rewind) or FF (Fast Forward) button to rewind or fast forward live or recorded programs. Each time the REW or FF button is pressed, the next available rewind or fast forward speed begins. Available speeds include 3X, 9X, 30X and 90X (see page 37).
2 Continue pressing the REW or FF button until the play mode returns or simply press the PLAY button to return to normal viewing.
▶ SLOW

natural_image
Black-and-white landscape photo of a mountain range with trees and a clear sky, no visible text or symbols.1 Press the SLOW button to play live or recorded programs in slow mode. Each time the SLOW button is pressed, the next available SLOW speed begins. Available speeds include 1/2, 1/3, 1/4 and 1/8 (see page 37).
2 Continue pressing SLOW button until the play mode returns or simply press the PLAY button to return to normal viewing.
←● REPLAY and ADVANCE ●→

natural_image
Black-and-white landscape photo of a mountain range with a speedometer overlay showing time (12:00) and location (North Shore), no readable text or symbols on the main scene.1 Press the REPLAY or ADVANCE button to jump back or forward while viewing live or recorded programs. Available jump times include 2, 5, 15, 30, 60 and 300 seconds (see page 37).
2 The previous playback mode returns after the program has jumped back or forward.
PREVIOUS and NEXT

natural_image
Black-and-white landscape photo of a mountain range with a video player interface showing time and location (no readable text or symbols in the scene)1 If you have set Chapter Marks in a live or recorded program (see page 56), press the PREV or NEXT button to jump back or forward to the next available Chapter Mark. If no Chapter Marks have been set, the PREV button will jump to the beginning of the live TV pause time or to the beginning of a recorded program. If no Chapter Marks have been set, the NEXT button will jump to live TV or to the end of a recorded program.
2 The previous playback mode returns after the program has jumped back or forward.
■ STOP

1 Press the STOP button to stop playback of a recorded program. The STOP button has no function when viewing live TV.
2 Select EXIT TO LIVE TV to begin watching live TV or select DELETE to delete the recorded program before returning to live TV.
Recording Programs
Scheduled Recordings
Programs can be recorded for future viewing in several ways. To schedule programs that will broadcast in the future, use the TV Guide On Screen™ feature to find programs and schedule recordings. See "Using the SCHEDULE Service" on page 68 for more information on scheduled recordings.
Recording Live Programs
REC (Record) Button in TV Guide On Screen Listings

1 Press the TV Guide button to open the TV Guide On Screen Listings screen. The current program is highlighted.
2 Press and hold the REC button for one second to schedule a one time recording of the current program.
Options Menu or REC (Record) Button

1 While no other menus are displayed, press the ➤ button on the remote control to display the Options Menu or press and hold the REC (Record) button for one second.
2 Select the RECORD option.
3 The TV Guide On Screen Manual Recording menu appears. See page 71 for more information on the TV Guide On Screen manual Recording feature.
4 Confirm that the date, recording start and end times and channel are correct and adjust if needed.
5 Select "set recording" to confirm the recording.
The above steps ("manual recording") will create a recording without a program title or program description ("unknown"). Use the TV Guide On Screen Listings to make a recording with a program title and description.
Playing Recorded Programs
Programs that have been recorded can be accessed from the RECORDINGS List. See "Using the RECORDINGS Service" on page 67 for more information.
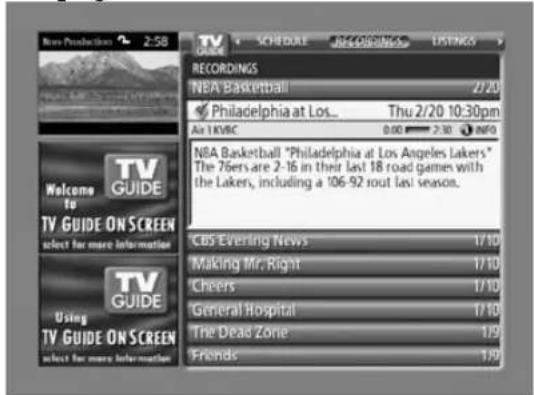
1 Press the REC LIST button on the remote control.
2 Highlight a program to play back.
3 Press PUSH SELECT button to begin playback.
Deleting Recorded Programs
To clear room for more future recordings, programs in the RECORDINGS List can be manually deleted.
To Do This... Do This...
Manually delete a program from the RECORDINGS List Highlight the program, press the MENU button on the remote control and then select "delete episode".
Manually delete a program after viewing it While viewing a recorded program and no other menus are displayed, press the ➤ button on the remote control to display the Options menu. Select "Delete" to delete the program.
The Options menu will also automatically appear when a recorded program has reached its end.
Some programs may be automatically deleted, depending on the programs "keep until" setting and on the available capacity of the HD DVR's hard disk drive.
If many recordings are scheduled with the "keep until" setting at "I delete", the HD DVR's maximum recording capacity may be reached. In that case, no additional recordings will be completed. Delete recorded programs to allow new recordings to be completed.
Using Chapter Marks
Chapter Marks can be used to mark favorite points in both live and recorded programs.

Setting Chapter Marks
1 While viewing a program and no other menus are displayed, press the SELECT button on the remote control to set a Chapter Mark at the current point of the program.
2 The status bar appears, showing where in the program the Chapter Mark has been added.
It may not be possible to add Chapter Marks to certain music-only programming or certain digital cable channels.
Viewing Chapter Marks
1 While viewing a program and no other menus are displayed, press the ↑ button to display the status bar.
2 While the status bar is displayed, press the button again to display the Chapter Mark thumbnail images.
The beginning and end of recorded and live TV programs automatically have a START and END Chapter Mark.
3 Use the ◆ and ➤ buttons to highlight the available Chapter Marks.
Using Chapter Marks
| To Do This... Do This... | |
| Skip to the next Chapter Mark | While viewing a program, press the PREV (Previous) or NEXT buttons on the remote control to jump back or jump forward to the next available Chapter Mark. |
| If no Chapter Marks have been set, the PREV or NEXT buttons will jump to the default Chapter Marks at the Start or End of the program. | |
| Navigate to a Chapter Mark | While viewing a program and no other menus are displayed, press the ↑ button on the remote control to display the status bar and press ↑ again to display the Chapter Mark thumbnails. Use the ◀ and ➤ buttons to highlight the available Chapter Marks. Press the SELECT button on the remote control to select a Chapter Mark and skip directly to that point in the program. |
| Edit a Chapter Mark | While viewing a recorded program and no other menus are displayed, press the ➤ button to display the Options Menu. Select the Edit Chapter Mark option and then select which Chapter Mark you would like to edit. You can select to either delete, edit the name of the Chapter Mark, go to the Chapter Mark or hide/un-hide the Chapter Mark. |
Using the TV Guide On Screen™ System
Your HD DVR features the TV Guide On Screen interactive program guide that provides an 8-day rolling list of TV programming. This makes recording as easy as highlighting a program title. To record the program, press RECORD button on the remote control. Use the TV Guide On Screen system to find the shows you want to watch, and set them for automatic recording. The TV Guide On Screen system does not require a phone connection, and what's more, the service is free!
The on-screen interactive TV program guide provides the following main services.
- LISTINGS: Shows the available program listings for the next eight days including today. Provides a description of programs selected.
- SEARCH: Allows you to find shows by keyword or by the following categories: Alphabetically, HDTV, Movies, Sports, Children, Educational, News, Variety, Series.
- RECORDINGS: Provides a list of recorded programs or currently recording program.
- SCHEDULE: Allows you to review, edit, or delete "Record" and "Remind" events that you set previously.
- SETUP: Allows you to make changes in the System Settings, Channel Display and Default Options after initial Guide Setup is completed.
The TV Guide On Screen interactive program guide provides listings for cable-ready, cable box, and digital cable services as well as over-the-air broadcast. It does not provide listings for satellite services.
For the TV Guide On Screen system to function properly, the HD DVR must be turned off when not in use (such as when you are out of the house or overnight).
The TV Guide On Screen system setup must be completed before services such as Recordings or Listings are available (see page 28 for more information).
The Initial Guide Setup
The Guide uses Setup information to provide you with show listings and lineups in your area--which are updated several times a day.
Welcome Screen
Initial TV setup leads you to the Welcome screen or press the Guide key to begin setup.
• The Welcome screen lists features in the Guide.
- Press SELECT to begin the TV Guide On Screen™ system setup.

Confirming your settings
After all of the setup steps have been completed, verify the setup information is correct. If it is, select "Yes" to end setup. If it is not, select "No", repeat setup process and the setup returns to the Welcome screen.

To Access the TV Guide On Screen™ System
1 Press the TV Guide button on the remote control or on the front panel of the HD DVR to display the on-screen menu.
2 Press the ◀/▶ buttons, or scroll up or down on the Scroll Bar, to highlight the desired menu icon. Press SELECT to make selection and confirm.
3 Use the ◀/▶ buttons to move from one set of information to the next.
4 Follow the instructions on the screen.
5 For instructions on using a specific menu, see the page in this section that describes that menu.
6 Press EXIT or TV Guide MENU to exit the menu.

Press MENU once to display the panel menu, and press again to close the panel menu.
TV Guide On Screen System Components

Approximately 24 hours after the Auto Setup is completed, you will see this TV Guide On Screen LISTINGS screen whenever you press the TV Guide button on your remote control or on the front panel of your HD DVR.
| Screen Components Descriptions | |
| Video Window Displays the current TV video while the TV Guide On Screen system is displayed. | |
| Clock Displays the current time. | |
Lock/Unlock | Allows to set the Video Window to remain on a single channel (Lock) or change channels (Unlock) as you navigate through Listings. Press the Menu button while channel logo or Listings Service is highlighted to display the option. Press the ← / → buttons to make the selection then press SELECT. |
| When the video setting is in Unlock, the video window will change as you navigate the TV Guide on Screen Listings and the current channel's Live TV Pause will be reset. To keep the current channel's Live TV Pause while navigating the Listings, select the Lock setting. | |
| Service Bar | Provides access to the 5 main Guide Services. Press ← / → buttons on the remote control to scroll to the other services, which include: RECORDINGS, LISTINGS, SEARCH, SCHEDULE, SETUP. The Current Service Label is displayed with indentation. |
| Screen Components | Descriptions |
| Time Slot | Provides program airing time. |
| Title | Displays the show's title. Highlighted title indicates the active title. |
| Info Box | Provides information on the highlighted program. |
| Info Button | Press the INFO button on the remote control to cycle through the various Info Box sizes, Small (default setting), Large, No. The Info Button will appear on the button bar only if changes or additional information is available. |
| Panel Menu / Panel Ad | Displays Menu items while in LISTINGS. It displays product or show information (advertisement). |
| Panel Menu provides the following options: Episode Option, Keyword Search, Search Options, Group Options, Grid Options, General Default Options, Record Options, Remind Options, Schedule Options. | |
| Channel Logo | Displays the channel logo for easy network identification. |
| Remind Icon | When this icon is displayed in the Schedule, a reminder will appear on the screen while you are viewing the TV with the set frequency. |
 | Once: Select to set one time show reminder for time, channel, input and destination combination. |
 | Daily: Select to set a reminder to appear each day, Monday through Sunday. (Daily reminder is available only for the manual reminder.) |
 | Weekly: Select to set for once a week reminder. |
 | Regularly: Select to set reminder. |
 | Off (not cancel): Select to keep the time, channel, input, destination in the list without reminding until the frequency is changed. |
 | Remind Suspended: Indicates that show is suspended due to a schedule conflict (show remains in Schedule). When the conflict no longer exists the reminder icon will reappear with the set frequency. |
| Cancel (no icon displayed): Select to cancel the reminder. Highlight Cancel and press OK. | |
Record Icon | When this icon is displayed, it indicates that the program will be recorded.Once: Indicates that the program is set to record once. |
 | Daily: Select to set Monday through Sunday manual recording only. |
 | Weekly: Indicates that the program is set to record once a week on the same day of the week, on the same time and channel. |
 | Regularly: Indicates that the program is set to record every time the program airs on the same time and channel. |
 | Off (not cancel): Indicates that the program is kept in the list but will not record this program until the frequency is changed. |
 | Record Suspended: Indicates that show is suspended due to a schedule conflict (show remains in Schedule). When the conflict no longer exists the record icon will reappear with the set frequency. |
| Cancel (no icon displayed): Select to cancel the recording. Highlight Cancel and press OK. | |
TV GuideTM Logo | When this icon is displayed, it indicates that you are in TV Guide On Screen service. |
| Current Service Label | Indicates the current TV Guide On Screen service you are in. |
HDTV Show Icon | When this icon is displayed, it indicates that the program is broadcasting in HDTV. |
| Tile Displays the specific TV station and program of the current listing. | |
Using the LISTINGS Service
To access the LISTINGS:
Press

Press or scroll / to highlight a listing;
Then press SELECT to select.
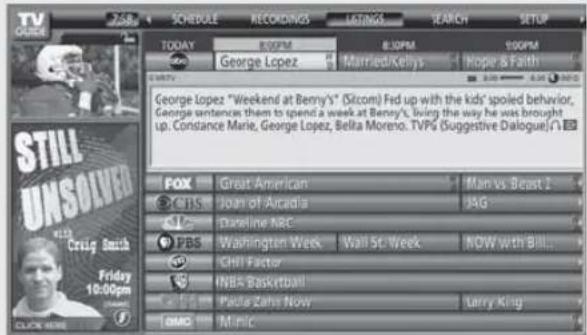
When the LISTINGS appear, press the INFO button to display a Help screen for detailed guide. To exit the Help screen, press the INFO button again.
Use the SELECT bar to scroll or /// buttons to navigate within the LISTINGS.
Up to 8 days of program listings can be viewed.
To Do This... Do This...
| View listings | Press the TV GUIDE button on your remote control or front panel of your HD DVR. |
| Find out about a program | Navigate with ↑ / ↓ / ◀ / ➤ buttons to highlight the program and then press INFO. The description of the program appears in the window for you to read. |
| Tune to a program currently airing | Press SELECT to tune to current show highlighted in listing. |
| Record a program | Press and hold the REC (Record) button on the remote control for one second while the desired program is highlighted for a one-time recording. Press and hold again to schedule a regular recording and repeat for a weekly recording or to cancel the recording. |
| Change the size of the Info box | While highlighting a program, press the INFO button on the remote control. |
| Adjust the LISTINGS options | While the LISTINGS tab is highlighted, press the MENU button on the remote control to view the options that may be adjusted. |
| Use Short Cuts to jump hours ahead (While in LISTINGS) | Enter the number on the remote control which corresponds to the number of hours you want to move ahead then press ➤ button to view the program listings. |
| Use Short Cuts to jump hours back (While in LISTINGS) | Enter the number on the remote control which corresponds to the number of hours you want to move back then press ➤ button to jump back. |
| Use Short Cuts to jump to channel number (While in LISTINGS) | Enter the number of the channel you want to tune to on the remote control to and press Select to jump to your desired channel. |
| Exit Short Cuts menu | Press MENU to exit the Short Cuts menu. |
Using the SEARCH Service
To access SEARCH:
-
Press
-
Scroll ♦ to the SERVICE bar
-
Press once


Press ↓ or scroll down to highlight an option;
Then press SELECT to select.
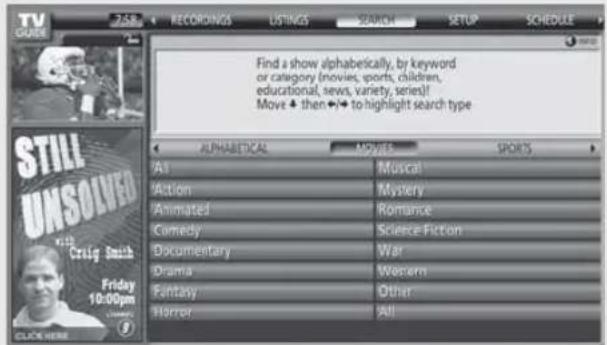
SEARCH service allows you to find a program from different categories. When SEARCH is highlighted on the Service Bar, some of the following categories may appear just below the Service Bar: KEYWORD, ALPHABETICAL, MOVIES, SPORTS, CHILDREN, EDUCATIONAL, NEWS, VARIETY, SERIES, HDTV. Press /// and SELECT button to select one of the search categories.
To Do This... Do This...
ALPHABETICAL search 1. Highlight ALPHABETICAL then select.

- Press ↓ button to move to the alphabet list and select the first letter of the show you are searching. Choose SELECT to display the show beginning with that letter.
- Press or button to highlight the name of the show then choose SELECT to display the times and channels for this program.
- Choose SELECT to watch or press the Menu button to display the Episode Option menu to set a recording, a reminder or tune to the channel at airing time.
To Do This... Do This...
KEYWORD search

- Highlight KEYWORD and choose SELECT to display the Keyword search menu.
- Highlight New Search then press OK. The Search Options menu will appear.
- Press the ◆ or ➤ button to select a category to search. Highlight Enter Keyword and choose SELECT to display the keyboard.
- Use arrow keys to highlight a character and press SELECT to enter the character. Highlight DONE when finished typing the word and then choose SELECT to show the list of matching shows for that keyword.
- Press the ↑ or ↓ button to highlight the name of the show then choose SELECT to display the times and channels for this program.
- Choose SELECT to watch or press the Menu button to display the Episode Option menu to set a recording, a reminder or tune to the channel at airing time.
The Guide stores all the keywords you create. To edit or delete a keyword, highlight the keyword and press the Menu button. The Search Options menu is displayed.
Using the RECORDINGS Service
To access RECORDINGS:
- Press

Press ↓ or scroll down to highlight a recording or episode folder; Then press ☐ to select.
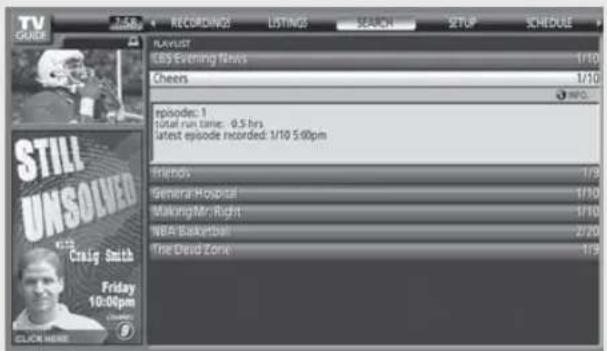
The RECORDINGS provides a list of previously recorded or currently recording programs on the HD DVR. With RECORDINGS highlighted on the Service Bar press the MENU button to display the panel menu.
1 Choose "Group" or "List" to display the way you want the listing to appear on the RECORDINGS. The "Group" displays the recorded shows without listing of every recorded episode. The "List" displays the recorded shows with every recorded episode.
2 Choose the sorting method by selecting "Title" to display recorded programs by alphabetical order by title or "Date" to display recorded programs by date and time with most recent recording at the top of the list.
3 When the selection is made, highlight "Done" and press SELECT to confirm your selections. Press SELECT again to close the panel menu and return to the RECORDINGS with your options.
To Do This... Do This...
| View a program from “List” | Highlight the episode to display Info box with information of the episode. |
| View a program from “Group” | Highlight the program title and press SELECT to display recorded episodes. |
View an episode now Highlight an episode, and press SELECT to view now.
Display episode option Highlight an episode and press MENU.
The following options are available: "go to Service Bar" to close the menu and return to the SCHEDULE Service Bar, "resume" to start the episode from where last stopped or from beginning, "play from beginning," "delete episode" and "cancel" to close the menu without making any changes and return to the highlighted program.
Using the SCHEDULE Service
To access SCHEDULE:
-
Press
-
Scroll to the SERVICE bar
-
Press twice


Press ↓ or scroll down to highlight an option;
Then press SELECT to select.
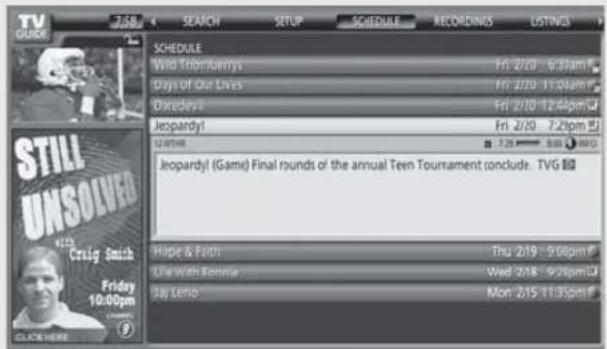
SCHEDULE allows you to review, edit or delete record and remind upcoming events which you have already set.
1 Highlight SCHEDULE on the Service Bar then highlight the event.
2 Press the MENU button to display the options in panel menu.
To Do This... Do This...
| Edit Recording from a panel menu | 1 | While SCHEDULE is highlighted, scroll down to highlight the desired program you want to edit. |
| 2 | Press MENU to display “Schedule Option” menu. | |
| 3 | Scroll down to select and highlight “edit recording.” | |
| 4 | Use the scroll bar and ↑/↓/♦/♦ to edit the recording options. | |
| 5 | Press SELECT to highlight the “schedule recording” then press SELECT again to exit the panel menu. | |
| Delete Recording | 1 | Highlight the program you want to delete then press MENU to display the “episode options.” |
| 2 | Scroll down to select and highlight “delete recording.” | |
| 3 | Delete confirmation will appear, press SELECT to delete the program. | |
| Set Record or Remind events with remote control | 1 | While SCHEDULE is highlighted on the Service Bar, press MENU. |
| 2 | Choose “new manual recording” or “new manual reminder” and press SELECT. | |
| 3 | Enter the pertinent information such as date, start and stop time and channel number. | |
| 4 | Press SELECT to set the event then press SELECT again to exit the panel menu. | |
| Switch Record to Remind or vice versa | 1 | Highlight the program you want to change the event setting, press MENU to display the “Schedule Option” menu. |
| 2 | Highlight “set recording” or “set reminder” to switch your event option and press SELECT. | |
| 3 | Highlight “schedule reminder” or “schedule recording” and press SELECT. Press SELECT again to exit the panel menu. | |
| Resolve Record/Remind conflict | When a conflict occurs with the selection you made a message will appear to let you know the reasons of the conflict. You will have an option to continue or not to proceed with your selection. Highlight your choice and press SELECT. Consider making different event settings. | |
Using the SETUP Service
To access SETUP:
-
Press
-
Scroll ♦ to the SERVICE bar
-
Press twice


Press ↓ or scroll down to highlight an option;
Then press SELECT to select.
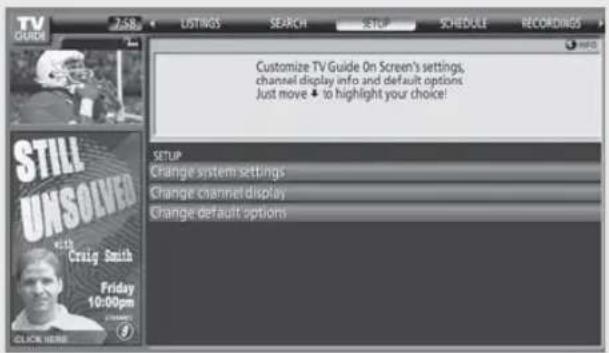
You can customize the TV Guide On Screen system settings. If you have not completed the initial setup please do so now. This service is only available after you have completed the TV Guide On Screen system setup (see page 28).
To Do This... Do This...
Change System Settings
This option allows you to change or update the current settings of: zip or postal code, cable or antenna setup and recording device.
1 Highlight SETUP in the Service Bar.
2 Scroll down and highlight the "Change system settings" then press SELECT.
3 Follow the on screen instructions.
Change Channel Display
This option allows you to edit channel information that appears in LISTINGS. The changes you can make are: re-order the position of channel, change the tune channel number, and switch a channel "On" to always be displayed, "Off" to never display or "Auto-Hide" to display only when program information is available.
1 Once the "Change Channel Display" is highlighted in the SETUP service, press SELECT.
2 Highlight a channel then press MENU to display Option menu.
3 Make the changes using SELECT scroll bar and ↑/↓ buttons.
4 Highlight "done" and press SELECT. Press SELECT again to exit the menu.
Change Default Options
This option allows you to make changes in the following default settings: "General defaults" allows you to set the Info Box size and Auto-Guide feature to turn "on" (default) or "off" when the HD DVR is powered on; "Record defaults" allows you to set recording start and end time (default setting is on time) and select recording device type (default is HD DVR); "Remind defaults" allows you to select whether to auto tune and adjust reminder time if using auto tune.
1 Once one of your selections from "default" is highlighted in the SETUP service, press MENU to display the Option menu. Make the changes using SELECT scroll bar and ↑/↓ buttons.
2 Highlight "done" and press SELECT. Press SELECT again to exit the menu.
Recording a Program from TV Guide On Screen™ System
A program can be recorded or the recording settings can be changed from any one of the following services: LISTINGS, SEARCH and SCHEDULE.
There are three (3) ways to set a program for recording.

1. Recording with the Remote Control's REC Button
While the current program is highlighted in the TV Guide On Screen system, press the REC (Record) button for at least one second to schedule the recording of the current live TV program.
| To Do This... Do This... | |
| Record with default settings | Press and hold the REC button for one second to schedule a one-time recording. |
| Record regularly | Press and hold the REC button twice to record the program every time it airs on the same channel starting at the same time. |
| Record weekly | Press and hold the REC button three (3) times to record the program each time it airs on the same day of the week on the same channel starting at the same time. |
| Record canceling | Press and hold the REC button four (4) times, or while highlighting the program press MENU button to display Episode Options. Scroll down to highlight delete recording then press SELECT button. Press Yes to confirm record canceling. |
2. Recording from a Panel Menu
- While in LISTINGS highlight a program which you want to record and press MENU to display an options menu.
- Highlight set recording and choose SELECT to view more options.
- Highlight the frequency option. You have the options of Once, Regularly, Weekly and Off. Press the ◀/► button to make your selection.
- Highlight the Start or End option to choose On time or choose the options available between 120 minutes early to 120 minutes late.
- Highlight recorder and select Hard Disk or VCR (if VCR control is enabled).
- If applicable, highlight keep to enter the number of episodes to keep, until to enter how long you want to keep the record event, and quality to choose the recording quality.
- The record icon will appear next to the program title indicating the recording frequency.
3. Recording Manually
- Highlight SCHEDULE on the Service Bar and press MENU to display the Schedule Options.
- Highlight new manual recording and choose SELECT to display the Recording Options menu.
- Enter the date, recording start time, recording end time and channel number. Use the 0-9 keys to enter the numerals and use the left and right arrow button to enter the necessary information.
- Press the ◀/▶ button to choose the input source for the recording.
- Highlight recorder and select Hard Disk or VCR (if VCR control is enabled).
- If applicable, highlight keep to enter the number of episodes to keep, until to enter how long you want to keep the record event, and quality to choose the recording quality.
- The record icon will appear next to the program title indicating the recording frequency.
The Quality setting in the Record Options menu is only applied to analog recordings since digital recordings are stored in the same digital format as they are received. Choosing the best Quality settings for a recording from an analog channel (HQ or HSP settings) will result in higher-quality recordings, but will use more of the HD DVR's recording capacity. Choosing the extended capacity Quality settings for a recording from an analog channel (EP or SLP settings) will result in a lower-quality recording, but will use less of the HD DVR's recording capacity. In order from highest quality to lowest quality, the options are HQ, HSP, SP, LP, EP and SLP.
Recording Starting!
A notification of the recording will appear on the screen if you are watching a channel that is different than the upcoming scheduled recording. When the notice appears you can choose to start or cancel the recording.

References
In this section you will find frequently asked questions and troubleshooting, product specifications, license agreements and the limited warranty.
Learning About Available Video Services
Your HD DVR can receive a variety of programs and make them available to you on your schedule. The HD DVR can receive signals from both an antenna and from a cable TV service provider. Receivable signals from an antenna include both analog and digital broadcasts. Digital broadcasts may be available in either standard-definition (SD) or high-definition (HD) formats. Cable TV services that can be received include analog cable (unscrambled), unencrypted digital cable and encrypted digital cable. Reception of encrypted digital cable services requires the use of a CableCARD™ device. Contact your cable TV service provider for information about the availability of SD or HD services, unencrypted digital cable services and CableCARD services.

Analog signals are the conventional type that have been available for decades. Standard characteristics of an analog signal are 4:3 aspect ratio (an almost square image screen), with a native resolution (picture quality) of 640 × 480 , active lines interlaced scanning of 480 lines per screen, and stereo or mono sound.
Digital signal formats and the digital picture quality (resolution) are classified into the following three categories: High-Definition (HD), Enhanced Definition (ED) and Standard Definition (SD). Your HD DVR is classified under the High-Definition category. Your connections should reflect the best possible picture quality available with your equipment. This will allow you to take best advantage of your HD DVR. You will receive digital signals through the HD DVR and view programs on your TV.
Table 1: Signal Comparison
| Signal Format | Analog | Digital (SD) | Digital (HD) |
| Active lines 480i | 480p, 480i | 720p or 1080i | |
| Sound Stereo or Mono | Dolby Digital® (5.1 ch)PCM Audio (2 ch) | Dolby Digital (5.1 ch)PCM Audio (2 ch) | |
| Aspect Ratio 4: 3 4: 3 or 16: 9 16: 9 | |||
Broadcasts can be received in three formats: Analog, digital (standard definition) or digital (high definition). The "p" in case of 480p and 720p stands for "progressive" and "i" in the 480i and 1080i stands for "interlaced." In each of these formats, the picture is updated every sixtieth of a second; a full picture for the progressive and a half picture for the interlaced. In comparing resolutions for analog and digital, analog provides 345,600 pixels (multiply the 720 by 480), while digital provides a maximum resolution of 2,073,600 pixels. Thus, showing you why the picture from the digital signal is so clear and crisp.
To display clear crisp pictures, you need to choose the correct display format. The digital signal that comes into your HD DVR will need to go out in the correct format for the connected equipment (e.g., TV, DVD, etc.). Take a look at the actual rear panel of your HD DVR or the illustration on page 7. This will help you to familiarize yourself with the types of outputs your HD DVR has. Also, take a look at the rear panel of your other equipment to see the input signal types on them.
The table below provides the different connection types and their display formats.
Table 2: Format Settings
| Connection Type Available Display Formats | ||
 | HDMI 1080i, 720p, 480p, 480i, Native, Variable 1,Variable 2, Variable 3, SD Out (Menus notavailable with SD Out setting), Auto HDMI | |
or* | Component(Y, PB, PR) | 1080i, 720p, 480p, 480i, Native, Variable 1,Variable 2, Variable 3, SD Out (Menus notavailable with SD Out setting) |
 | S Video All formats converted to 480i (Menusavailable only with SD Out setting) | |
 | Composite(SD Out) | All formats converted to 480i (Menusavailable only with SD Out setting) |
* The HDMI connector has a higher priority when both the HDMI and COMPONENT outputs are connected to a monitor(s) with this unit. To enable the COMPONENT output, disconnect the HDMI cable from the HDMI OUT Connector. See “Rear Panel Connectors” on page 7.
Depending on the type of TV that the HD DVR is connected to, available Format settings may include the following:
Table 3: Display Formats
| Display Format Mode Input Signal Format Output Signal Format | |
| 1080i All Formats 1080i | |
| 720p All Formats 720p | |
| 480p All Formats 480p | |
| 480i All Formats 480i | |
| Native | |
| 1080i 1080i | |
| 720p 720p | |
| 480p 480p | |
| 480i 480i | |
| Variable 1 | |
| 1080i 1080i | |
| 720p 720p | |
| 480p/480i 480p | |
| Variable 2 | |
| 1080i/720p 1080i | |
| 480p/480i 480p | |
| Variable 3 | |
| 1080i/720p 720p | |
| 480p/480i 480p | |
| SD Out* All Formats Auto HDMI or 480p | |
| Auto HDMI** | All Formats Changes according to monitor type |
*Menus are only available on the S Video and Composite outputs with the SD Out setting. Only video will be viewable from the HDMI or Component outputs with the SD Out setting.
** Auto HDMI only available when the HD DVR's HDMI jack is connected to an active HDMI or DVI-HDTV monitor.
Learning About Screen Modes
TV programs can be created in a variety of aspect ratios or Screen Modes. The most common are 4:3 and 16:9. TVs or monitors most often have an aspect ratio of 4:3 or 16:9.
To allow a wide variety of programs to be best displayed on the various TV and monitor shapes, your HD DVR features several Screen Mode settings. There are three categories of Screen Mode settings: HD to SD, SD to HD and HD to HD. In the case of HD to SD, when a high-definition broadcast is received and is then output by your HD DVR in standard-definition format, the Screen Mode settings of Letterbox, Side Crop and Squeezed are available.
HD Content to SD Output
When high-definition content is received and output in standard-definition, the following Screen Mode settings are available:
Table 4: HD Content/SD Output
| Letterbox | Select Letterbox to view full 16:9 image within the 4:3 output. | |
 | ||
| Side Crop | Select Side Crop to fill the 4:3 output. No black bars on the top and bottom are visible, but some of the video image is lost on each side. | |
 | ||
| Squeezed | Select Squeezed to fill the 4:3 output. No black bars on the top and bottom are visible, but the video image is adjusted so that objects may appear taller or thinner than normal. | |
 | ||
SD Content to HD Output
When standard-definition content is received and output in a high-definition format, the following Screen Mode settings are available:
Table 5: SD Content/HD Output
| Normal | The Normal setting will display black bars on the left and right sides of a 16:9 a screen. | |
 | ||
| Stretch | The Stretch setting will horizontally stretch a 4:3 image to fill a 16:9 screen. | |
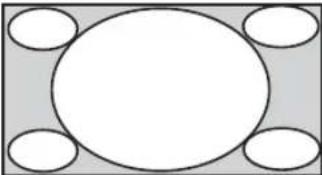 | ||
| Side Stretch | The Side Stretch setting will stretch the 4:3 image more at the sides than in the middle to fill a 16:9 screen and produce less distortion in the central area of the image. | |
 | ||
| Adjust | The Adjust setting allows the 4:3 image to be adjusted in 16 (Adjust 1 - Adjust 16) steps* when viewing the full-screen image. This flexible setting may permit the best display of certain programs on your display, but is cropped on the top and bottom. | |
 | ||
| * Press SCREEN MODE button then use ↑/↓ to adjust. Press 📄 button, to apply the picture size change. | ||
Many TVs also have options that allow the screen image to be stretched, cropped, etc. The above illustrations assume that the TV's screen adjustments are in their default or normal mode and that the broadcast image is either a standard 16:9 or 4:3 aspect ratio.
High-definition content output in high-definition format
The following temporary Screen Mode settings are available when viewing high-definition content output in a high-definition format. Note that the setting is returned to Standard after each channel change.
Table 6: HD Content/HD Output
| Standard (Factory Default) | Select the Standard setting when you want to view a high-definition image with no adjustment. |
 | |
| Expand (Temporary) | Select the Expand setting to horizontally stretch a 16:9 image. This may be useful for some broadcasts that were produced in 4:3 aspect ratio and are broadcast in a 16:9 aspect ratio. Objects in the image will appear wider than normal and left and right portions of the image will not be shown. |
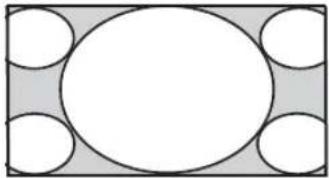 | |
| Shrink (Temporary) | Select the Shrink setting to horizontally compress a 16:9 image. Objects in the image will appear thinner than normal and black bars will appear at the left and right side of the 16:9 image. |
 |
To choose a Screen Mode, use the SCREEN MODE button on the remote control or change the default setting of the Screen Mode in the main menu.
Contacting Sony
If, after reading these operating instructions, you have additional questions related to the use of your Sony® HD DVR, please call our Customer Information Services Center at:
For US residents only: 1-800-222-SONY (7669)
For Canadian residents only: 1-877-899-SONY (7669)
Before calling the Sony Customer Information Services Center, please write down the model and serial numbers of your HD DVR. You can find the model number on the front of your HD DVR. The serial number can be found in the Preferences/System/System Menu screen or printed on the back of your HD DVR.
You may also contact Sony at the Sony Support & Registration web site:
www.sony.com/support
TROUBLESHOOTING
TV Guide On Screen System
| Symptoms Possible Remedies | |
| TV Guide does not appear after setting the unit up | In some cases, it can take up to 24 hours or longer for the TV Guide On Screen System to appear. It can take several minutes to restore the Gemstar data if there is a power loss. |
| 24 hours has elapsed and TV Guide still has not appeared | Make sure that the signal is connected directly to the HD DVR.A cable box may not pass the signal required for TV Guide.Also, there may be times when it takes longer than 24 hours to receive the TV Guide signal. |
| Difficult to receive TV Guide data with my dual-feed cable system (“A” and “B” feed) | Try both feeds when leaving the DVR in Standby mode (to collect data).In a system with “A” and “B” cable feeds, the data is likely to be delivered on a channel on the opposite feed of what you typically select when you leave the DVR in Standby mode.If, after trying both feeds, TV Guide still does not have data, please contact Sony at 1-800-222-SONY. |
| Channel line-up (channel names and logos) appear in the LISTINGS screen, but there are no program titles | If you can see the channel line-up, you are receiving data, but it may take another 24 hours before the program title data arrives. |
| Guide listings or correct time information disappeared after a power failure | Place the HD DVR in standby mode and new guide listings or correct time information should begin to be available within 24 hours. Correct time information may often appear more quickly. |
| Some channel numbers in the Guide are incorrect | Correct channels using the Change Channel Display under Setup. |
| Guide show listings have not been received | Listings usually appear within 24 hours after a successful Setup.Check the connections between the HD DVR, cable and antenna.Verify Setup information under Change System Settings.Review Screen 4 and Screen 5 in the Initial Guide Setup section. |
| A show that had been set to Record was not recorded | Check the Recording History list to confirm that the recording had been scheduled or why it may not have been recorded.If recording to a VCR, make sure the VCR is turned Off before the recording begins.Make sure there is a tape in the VCR.Check the placement of the G-LINKTM IR Blaster in front of the VCR.Check the Schedule menu and verify that the show is listed before the recording begins. |
| The HD DVR did not tune to a show that was scheduled with the Reminder feature | Check the Schedule menu and verify that the show is listed. |
| A show was set to Auto-Tune and did not | Check the Schedule menu and verify that the show is listed as a Reminder.Highlight the show under Listings and do the following:Press the MENU button on the remote control.Use the down arrow to highlight Edit Reminder, and press SELECT.Verify that the Auto-Tune option reads Yes.The HD DVR must be on at the scheduled time for Auto-Tune. |
Remote Control
| Symptoms Possible Remedies | |
| Remote control does not operate | The batteries could be weak. Replace the batteries.Check the orientation of the batteries.Move the device switch to the DVR position. You may have inadvertently moved the device switch to the TV, DVD or AMP position, which changes the remote control mode.Make sure the correct Remote Control Codes are set for both the remote control and for the HD DVR (see page 14).Make sure the HD DVR's power cord is connected securely to the wall outlet.Locate the HD DVR at least 3-4 feet away from fluorescent lights. |
| Cannot change channels with the remote control | If you are using the HD DVR remote to change channels, first move the device switch on the remote control to the DVR position. |
| Remote control does not operate non-Sony equipment | If the remote control batteries have been replaced recently, the code numbers for other manufacturer's equipment may need to be reset.There may be more than one code for the equipment that you are attempting to operate.There is a possibility that some non-Sony equipment cannot be operated by your Sony TV remote. You may need to use the equipment's original remote control. |
CableCARD™ Device
| Symptoms Possible Remedies | |
| Problems using CableCARD or CableCARD services | Check that the CableCARD is inserted properly (see page 22).The CableCARD must be activated by your cable TV service provider before you can receive selected digital cable TV services. See the CableCARD activation instructions on page 26.Check the CableCARD menu option (see page 26). This can be useful in providing information to an authorized cable TV service technician or repair person.Contact your cable TV service provider. |
Channels
| Symptoms Possible Remedies | |
| Cannot receive upper channels (UHF) when using an antenna | Use Auto Add from Antenna in the Preferences/CH+/- menu to add receivable channels that are not presently in the HD DVR's memory (see page 41). |
| HD DVR is fixed to one channel | Use Auto Scan in the Preferences/CH+/- menu to find receivable channels that are not presently in the HD DVR's memory (see page 41). |
| Cannot receive any cable TV channels | Remove the CableCARD and use Auto Scan in the Preferences/CH+/- menu to find receivable channels that are not presently in the HD DVR's memory (see page 41). If channels become available when not using CableCARD, check with your Cable TV service provider regarding CableCARD service. |
| Some digital cable channels are not being displayed | Use the Edit CH+/- List in the Preferences/CH+/- menu to confirm that the channel is added to the receivable channel list.Certain cable TV service providers have limitations on the broadcast of digital cable channels. Check with your cable TV service provider for more information.Check with your cable TV service provider to see if the channels are scrambled or encrypted. You may need a CableCARD device to view those channels. Some optional digital cable broadcast formats may not be supported. If your cable TV service provider is broadcasting digital signals in a non-standard format, you will need to acquire a cable box directly from your cable TV service. |
| Cannot tune directly to a channel using the 0-9 buttons | If a station with the same channel number is available from both the cable and antenna input (for example, cable channel 6 and antenna channel 6), when first entering the channel number, the HD DVR will tune to either the cable or antenna channel, depending on the currently tuned channel. To tune the other duplicate channel, enter the number again, or press CH+. |
Audio
| Symptoms Possible Remedies | |
| Good picture, no sound | Make sure the Current Digital Audio or Current Analog Audio settings (Preferences/Audio) are set to a receivable audio track, such as “English” or “Stereo” (see page 40).If using an HDMI connection to a DVI-equipped TV, an additional analog or digital audio connection to the TV or audio system is required (see page 19).If using an HDMI connection to a TV that is equipped with an HDMI jack but does not support Dolby Digital® audio reception, you may need to set the Dolby Digital option to “Off” (Preferences/Audio) to hear audio via the HDMI connection. |
| Audio and Video are not synchronized | Change the channel to reset the audio/video synchronization.Press the PAUSE button on the Remote Control, press the REPLAY button to move back several seconds, then press PAUSE again to resume play. |
Video
| Symptoms Possible Remedies | |
| No picture, no sound | Make sure the power cord is plugged in and the POWER indicator on the display window is lit.Press the FORMAT button to select an output format that is compatible with your TV (see page 10).Make sure that the TV is powered on and the correct input (such as video 1, video 6, etc.) is selected on the TV.If connected to a TV using the component video output, make sure that the HD DVR is not also connected to a TV using the HDMI jack. The HDMI jack becomes active and the component video jack becomes inactive when an HDMI connection detected.Try another channel, it could be station trouble. |
| Video and sound are present, but no menus appear | If you are viewing an image on an HDTV, first press EXIT, then press the FORMAT button to select a video format that is compatible with your TV, such as “1080i”. If you are viewing an image on an SDTV, press the FORMAT button to select the “SD OUT” format. |
| “Black box” on screen | You have selected a text option in the Closed Caption Options menu and no text is available. To turn off this feature, set the Closed Caption On/Off setting (Preferences/Screen) to Off. If you were trying to select closed captioning, select CC1 instead of Text 1-4. |
| Bars appear at the top and bottom of the screen | Press the SCREEN MODE button to select an appropriate aspect ratio that best fits the current broadcast and your TV.Some wide-screen programs are filmed in aspect ratios that are greater than 16:9, such as 2.35:1. Your TV may display these programs with bars at the top and bottom of the screen. |
| Distorted Picture | Check to see if you have selected the proper FORMAT and SCREEN MODE.Adjust the Screen Mode or Aspect Ratio of your TV. |
| Flashing or scrolling screen or slow channel changes when changing channels | If the HD DVR's FORMAT is set to Native or Variable 1, 2 or 3 the format may change when changing channels. To avoid the flashing, scrolling or slowness found in some TV's when changing formats, set the FORMAT to a fixed setting such as 1080i or 720p. |
General
| Symptoms Possible Remedies | |
| Time does not display on the front panel | Press TV Guide > Setup > Change system settings to confirm your TV Guide On Screen settings so that it has the correct “zip code”, antenna on input “Air”, or Cable on input “CABLE”.After making changes, power off the HD DVR to receive the correct time; some occasions it may take 24 hours or more to acquire the time. |
| Recording failed and recording history showed “Recording not permitted by service provider” | Your cable service provider has the ability to restrict the recording of any program they provide. Contact your cable company for more details. |
| Trick play is not available | There are channels that do not allow trick play. Examples are:☐ Digital Cable “audio only” music channels.☐ Very small number of cable systems may choose to transmit certain channels in a non-standard encoding format that may prevent trick play.☑ In both cases, recording, play and skip to beginning/end are still available. |
| Reset HD DVR | There are two ways to reset the HD DVR:☐ Pull the AC power cable, or☐ Simultaneously press and hold EXIT and TV GUIDE buttons on the front panel for 10 seconds. |
| HD DVR does not respond to commands | Check that the AC power cord is plugged in to an AC power outlet.High temperature may cause the HD DVR to automatically power off as a protective measure:☐ Check that adequate ventilation space is available around the HD DVR and that it is not near a heat source.☐ Check to see if ventilation vents are blocked, clear the vents.☐ Unplug the unit, move it to a cooler location, let it cool for a while and then re-plug the unit.The HD DVR may be reset by simultaneously pressing the EXIT and TV GUIDE buttons on the front panel of the HD DVR for 10 seconds. |
| Lost password | In the password screen (see page 44), enter the following master password: 4357. The master password clears your previous password; it cannot be used to temporarily unblock channels. |
| HD DVR makes a “clicking” sound when switching between cable and antenna channels | This is a normal sound that results from the HD DVR switching between the available inputs. |
| No Closed Captioning is available when viewing a previously recorded program | The HD DVR CC setting must be selected before starting a recording. It is not possible to change the CC setting after a recording has started. |
| Cannot pause, fast-forward, rewind or record certain channels | Certain digital music channels available from some cable TV service providers are not broadcast in a format that permits digital recording. In such cases, it is not possible to pause, rewind etc. It may also be the case that certain digital cable channels other than digital music channels could also be sent in a format that is not recordable. Consult with your cable TV service provider about what channels, if any, may not be recordable. |
Specifications
| Broadcast standards NTSC American TV Standard (480i),ATSC (8VSB terrestrial), ATSC Compliant 8VSB (1080i, 720p, 480p, 480i)QAM on cable ITU-T J.83 Annex B compliant 64/256QAM |
| Channel coverage VHF: 2-13UHF: 14-69CATV: 1-125Digital: 1-999 |
| Antenna 75-ohm external antenna terminal for VHF/UHF and digital terrestrial |
| Power requirements DHG-HDD250: ~AC 120 V, 60 Hz, 45WDHG-HDD500: ~AC 120 V, 60 Hz, 58W |
| Supplied accessories Remote Control RM-Y823 (1)Size AA (R6) batteries (2)AC Power CordAudio/Video Cable (1)S Video Cable (1)G-LINKTM (IR Blaster) Cable (1)HDMI TM Cable (1)HDMI to DVI Adapter (1)Control S Cable (1)Component Video Cable (1)Operating ManualQuick Setup Guide |
| Inputs/outputs AC Power Input (1)Antenna IN (1)Cable IN (1)HDMI OUT (1)Composite Video OUT (2): Vp-p, 75 ohms unbalanced, sync negativeS Video OUT (2): Y/1 Vp-p, 75 ohms unbalanced, sync negative, C/0.286 Vp-p(Burst signal), 75 ohmsComponent Video OUT (1): Y/1.0 Vp-p, 75 ohms unbalanced, sync negative; Pb/0.7 Vp-p, 75 ohmsAudio L/R OUT (2)Digital Audio Optical OUT (1)G-LINK(IR) OUT (1)Control S IN (1)USB-A port (1)CableCARDTM slot (1) |
| CPU MIPS 4KEc, 300MHz, 420 MIPS |
| Memory DDR SDRAM: 128MB, 183 MHz, Flash 32MB |
| Hard Disk Drive DHG-HDD250: 250GBDHG-HDD500: 500GB |
| Dimensions (W/H/D) 430mm x 83.7mm x 356.5mm (16 ^15/_16 × 3^1/_4 × 14 inches) |
| Mass DHG-HDD250: 5.0 kg (11.1 lbs)DHG-HDD500: 5.8 kg (12.8 lbs) |
| Optional Accessories HDMI Cable DLC-HM15 (1.5m)HDMI Cable DLC-HM30 (3.0m)HDMI Cable DLC-HM50 (5.0m) |
Design and specifications are subject to change without notice.
END-USER LICENSE AGREEMENT FOR SOFTWARE INCLUDED WITH YOUR SONY HIGH-DEFINITION DIGITAL VIDEO RECORDER
YOU SHOULD CAREFULLY READ THE FOLLOWING AGREEMENT BEFORE USING THE SOFTWARE INCLUDED WITH THE HIGH-DEFINITION DIGITAL VIDEO RECORDER ("HD DVR") PRODUCT. USING THIS SOFTWARE INDICATES YOUR ACCEPTANCE OF THE AGREEMENT.
The following software modules included with the HD DVR product is not subject to this EULA:
MontaVista Linux Kernel
binutils
busybox
Freetype2 font engine
gnu privacy guard (gpg)
xfs
xfsprogs
libacc
libc
libstdc++
libm
(the "Excluded Modules"). Please refer to the supplement titled "Open Source and 3rd Party Software" for terms and conditions governing the use of the Excluded Modules, and for other notices and provisions relating to certain third party modules included with the SONY SOFTWARE.
IMPORTANT-READ CAREFULLY: This End-User License Agreement ("EULA") is a legal agreement between you and Sony Electronics Inc. ("SONY"), the licensor of the software (other than the Excluded Modules) included with the SONY HD DVR product and related materials ("SONY SOFTWARE"). This EULA covers the SONY SOFTWARE. The SONY SOFTWARE includes computer software, whether stored on any media or downloaded from a designated site of SONY for SONY SOFTWARE users, the associated media, any printed materials, and any "on-line" or electronic documentation and all updates and upgrades thereto. You may use the SONY SOFTWARE solely in conjunction with the SONY HD DVR product that accompanied the SONY SOFTWARE. By installing, copying or otherwise using the SONY SOFTWARE, you agree to be bound by the terms of this EULA. If you do not agree to the terms of this EULA, SONY is unwilling to license the SONY SOFTWARE to you. In such event, you may not use or copy the SONY SOFTWARE.
SONY SOFTWARE LICENSE
The SONY SOFTWARE is protected by copyright laws and international copyright treaties, as well as other intellectual property laws and treaties. The SONY SOFTWARE is licensed, not sold.
GRANT OF LICENSE. This License grants you the following right:
Use of SONY SOFTWARE. You may use the SONY SOFTWARE in conjunction with the SONY HD DVR. You may install appropriate elements of the SONY SOFTWARE on personal computers that are networked to the SONY HD DVR for use solely with the SONY HD DVR.
Back-up Copy. You may make one back-up copy of SONY SOFTWARE solely for archival purposes.
DESCRIPTION OF REQUIREMENTS, RESTRICTIONS, RIGHTS AND LIMITATIONS Limitation on Reverse Engineering, Decompilation and Disassembly. You may not modify, reverse engineer, decompile, or disassemble the SONY SOFTWARE in whole or in part.
Separation of Components. The SONY SOFTWARE is licensed as a single product. Its component parts may not be separated for use on more than one computer unless expressly authorized by Sony.
Data Files. The SONY SOFTWARE may create data files automatically for use with the SONY SOFTWARE. Any such data files will be deemed as part of the SONY SOFTWARE.
Rental. You may not rent or lease the SONY SOFTWARE.
Software Transfer. You may permanently transfer all of your rights under this EULA only as part of a sale or transfer of SONY SOFTWARE accompanying the sale or transfer of the SONY HD DVR that it is used with, provided you retain
no copies, transfer all of the SONY SOFTWARE (including all copies, component parts, the media and printed materials, all versions and any upgrades of the SONY SOFTWARE and this EULA), and the recipient agrees to the terms of this EULA.
Termination. Without prejudice to any other rights, SONY may terminate this EULA if you fail to comply with the terms and conditions of this EULA. In such event, you must destroy all copies of the SONY SOFTWARE and all of its component parts.
Confidentiality. You agree to keep information contained in SONY SOFTWARE which is not publicly known confidential to yourself, and not to disclose such information to others without SONY's prior written approval.
Dependent Software. The software, network services or other products other than SONY SOFTWARE upon which the SONY SOFTWARE's performance depends on might be interrupted or discontinued at the discretion of the suppliers (software suppliers, service providers, or Sony). Sony and its suppliers do not warrant that those software, network services or other products will continue to be available, or will operate without interruption or modification.
COPYRIGHT
All title and copyright in and to the SONY SOFTWARE (including but limited to any images, photographs, animation, video, audio, music, text and "applets", incorporated into the SONY SOFTWARE), and any copies of the SONY SOFTWARE, are owned by SONY or its suppliers. All rights not specifically granted under this EULA are reserved by SONY.
HIGH RISK ACTIVITIES
The SONY SOFTWARE is not fault-tolerant and is not designed, manufactured or intended for use or resale as on-line control equipment in hazardous environments requiring fail-safe performance, such as in the operation of nuclear facilities, aircraft navigation or communication systems, air traffic control, direct life support machines, or weapons systems, in which the failure of the SONY SOFTWARE could lead to death, personal injury, or severe physical or environmental damage ("High Risk Activities"). SONY and its suppliers specifically disclaim any express or implied warranty of fitness for High Risk Activities.
U.S. GOVERNMENT RESTRICTED RIGHTS
SONY SOFTWARE is provided with RESTRICTED RIGHTS. Use, duplication, or disclosure by the United States Government is subject to restriction as set forth in subparagraph (c) (1) and (2) of the Commercial Computer Software-Restricted Rights at 48 CFR 52.227-19, as applicable. Manufacturer is Sony Electronics Inc., 16450 West Bernardo Drive, San Diego, CA 92127.
EXCLUSION OF WARRANTY ON SONY SOFTWARE
You expressly acknowledge and agree that use of the SONY SOFTWARE is at your sole risk. The SONY SOFTWARE is provided "AS IS" and without warranty of any kind and SONY and SONY's licensors (hereinafter, SONY and SONY's licensor's shall be collectively referred to as "SONY") EXPRESSLY DISCLAIM ALL WARRANTIES, EXPRESS OR IMPLIED, INCLUDING, BUT NOT LIMITED TO, THE IMPLIED WARRANTIES OF MERCHANTABILITY AND FITNESS FOR A PARTICULAR PURPOSE. SONY DOES NOT WARRANT THAT THE FUNCTIONS CONTAINED IN THE SONY SOFTWARE WILL MEET YOUR REQUIREMENTS, OR THAT THE OPERATION OF THE SONY SOFTWARE WILL BE CORRECTED. FURTHERMORE, SONY DOES NOT WARRANT OR MAKE ANY REPRESENTATIONS REGARDING THE USE OR THE RESULTS OF THE USE OF THE SONY SOFTWARE IN TERMS OF ITS CORRECTNESS, ACCURACY, RELIABILITY, OR OTHERWISE. NO ORAL OR WRITTEN INFORMATION OR ADVICE GIVEN BY SONY OR A SONY AUTHORIZED REPRESENTATIVE SHALL CREATE A WARRANTY OR IN ANY WAY INCREASE THE SCOPE OF THIS WARRANTY. SHOULD THE SONY SOFTWARE PROVE DEFECTIVE YOU (AND NOT SONY OR A SONY AUTHORIZED REPRESENTATIVE) ASSUME THE ENTIRE COST OF ALL NECESSARY SERVICING, REPAIR OR CORRECTION. SOME JURISDICTIONS DO NOT ALLOW THE EXCLUSION OF IMPLIED WARRANTIES, SO THE ABOVE EXCLUSION MAY NOT APPLY TO YOU.
LIMITATION OF LIABILITY
HEREINAFTER, SONY, ITS AFFILIATES AND THEIR RESPECTIVE LICENSOR'S SHALL BE COLLECTIVELY REFERRED TO AS "SONY", SONY SHALL NOT BE
LIABLE FOR ANY INCIDENTAL OR CONSEQUENTIAL DAMAGES FOR BREACH OF ANY EXPRESS OR IMPLIED WARRANTY, BREACH OF CONTRACT, NEGLIGENCE, STRICT LIABILITY OR ANY OTHER LEGAL THEORY RELATED TO THIS PRODUCT. SUCH DAMAGES INCLUDE, BUT ARE NOT LIMITED TO, LOSS OF PROFITS, LOSS OF REVENUE, LOSS OF DATA, LOSS OF USE OF THE PRODUCT OR ANY ASSOCIATED HARDWARE, DOWN TIME AND USER'S TIME, EVEN IF SONY HAS BEEN ADVISED OF THE POSSIBILITY OF SUCH DAMAGES. IN ANY CASE, SONY'S ENTIRE LIABILITY UNDER ANY PROVISION OF THIS EULA SHALL BE LIMITED TO THE AMOUNT ACTUALLY PAID ALLOCABLE TO THE ASSOCIATED HARDWARE. SOME STATES DO NOT ALLOW THE EXCLUSION OR LIMITATION OF CONSEQUENTIAL OR INCIDENTAL DAMAGES, SO THE ABOVE EXCLUSION OR LIMITATION MAY NOT APPLY TO YOU.
AUTOMATIC UPDATE FEATURE
From time to time, SONY may automatically update or otherwise modify the SONY SOFTWARE, for example for purposes of enhancement of security functions, error correction and improvement of updating functions at such time as you interact with SONY's or SONY's designee's server(s). Any such updates/modifications shall be deemed SONY SOFTWARE for purposes of this EULA. You by acceptance of this EULA consent to such update/modification.
SEVERABILITY
If any part of this EULA is held invalid or unenforceable, the other parts will remain valid.
APPLICABLE LAW
This EULA shall be governed by the local law of the State of California, USA. Should you have any questions concerning this EULA or this limited warranty, you may contact SONY by writing to SONY at Sony Technical Response Center, 12451 Gateway Boulevard, Fort Myers, Florida 33913.
SUPPLEMENT
OPEN SOURCE AND 3RD PARTY SOFTWARE
GPL Software.
As to the following GPL software, you have a right to receive, modify and distribute the source code of the software:
MontaVista Linux Kernel
binutils
busybox
Freetype2 font engine
gnu privacy guard (gpg)
xfs
xfsprogs
You can download the source code from the following site:
http://www.sony.com/linux
This GPL software is governed by the following terms and conditions:
GNU GENERAL PUBLIC LICENSE
Version 2, June 1991
Copyright (C) 1989, 1991 Free Software Foundation, Inc., 59 Temple Place, Suite 330, Boston, MA 02111-1307 USA. Everyone is permitted to copy and distribute verbatim copies of this license document, but changing it is not allowed.
Preamble
The licenses for most software are designed to take away your freedom to share and change it. By contrast, the GNU General Public License is intended to guarantee your freedom to share and change free software--to make sure the software is free for all its users. This General Public License applies to most of the Free Software Foundation's software and to any other program
whose authors commit to using it. (Some other Free Software Foundation software is covered by the GNU Library General Public License instead.) You can apply it to your programs, too.
When we speak of free software, we are referring to freedom, not price. Our General Public Licenses are designed to make sure that you have the freedom to distribute copies of free software (and charge for
this service if you wish), that you receive source code or can get it if you want it, that you can change the software or use pieces of it in new free programs; and that you know you can do these things.
To protect your rights, we need to make restrictions that forbid anyone to deny you these rights or to ask you to surrender the rights. These restrictions translate to certain responsibilities for you if you distribute copies of the software, or if you modify it.
For example, if you distribute copies of such a program, whether gratis or for a fee, you must give the recipients all the rights that you have.
You must make sure that they, too, receive or can get the source code. And you must show them these terms so they know their rights.
We protect your rights with two steps: (1) copyright the software, and (2) offer you this license which gives you legal permission to copy, distribute and/or modify the software.
Also, for each author's protection and ours, we want to make certain that everyone understands that there is no warranty for this free software. If the software is modified by someone else and passed on, we
want its recipients to know that what they have is not the original, so that any problems introduced by others will not reflect on the original authors' reputations.
Finally, any free program is threatened constantly by software patents. We wish to avoid the danger that redistributors of a free program will individually obtain patent licenses, in effect making the program proprietary. To prevent this, we have made it clear that any patent must be licensed for everyone's free use or not licensed at all.
The precise terms and conditions for copying, distribution and modification follow.
GNU GENERAL PUBLIC LICENSE
TERMS AND CONDITIONS FOR COPYING, DISTRIBUTION AND MODIFICATION
- This License applies to any program or other work which contains a notice placed by the copyright holder saying it may be distributed under the terms of this General Public License. The "Program", below,
refers to any such program or work, and a "work based on the Program" means either the Program or any derivative work under copyright law: that is to say, a work containing the Program or a portion of it, either verbatim or with modifications and/or translated into another language. (Hereinafter, translation is included without limitation in the term "modification".) Each licensee is addressed as "you".
Activities other than copying, distribution and modification are not covered by this License; they are outside its scope. The act of running the Program is not restricted, and the output from the Program is covered only if its contents constitute a work based on the Program (independent of having been made by running the Program). Whether that is true depends on what the Program does.
- You may copy and distribute verbatim copies of the Program's source code as you receive it, in any medium, provided that you conspicuously and appropriately publish on each copy an appropriate copyright notice and disclaimer of warranty; keep intact all the notices that refer to this License and to the absence of any warranty; and give any other recipients of the Program a copy of this License along with the Program.
You may charge a fee for the physical act of transferring a copy, and you may at your option offer warranty protection in exchange for a fee.
- You may modify your copy or copies of the Program or any portion of it, thus forming a work based on the Program, and copy and distribute such modifications or work under the terms of Section 1 above, provided that you also meet all of these conditions:
a) You must cause the modified files to carry prominent notices stating that you changed the files and the date of any change.
b) You must cause any work that you distribute or publish, that in whole or in part contains or is derived from the Program or any part thereof, to be licensed as a whole at no charge to all third parties under the terms of this License.
c) If the modified program normally reads commands interactively when run, you must cause it, when started running for such interactive use in the most ordinary way, to print or display an announcement including an appropriate copyright notice and a notice that there is no warranty (or else, saying that you provide a warranty) and that users may redistribute the program under these conditions, and telling the user how to view a
copy of this License. (Exception: if the Program itself is interactive but does not normally print such an announcement, your work based on the Program is not required to print an announcement.)
These requirements apply to the modified work as a whole. If identifiable sections of that work are not derived from the Program, and can be reasonably considered independent and separate works in themselves, then this License, and its terms, do not apply to those sections when you distribute them as separate works. But when you distribute the same sections as part of a whole which is a work based on the Program, the distribution of the whole must be on the terms of this License, whose permissions for other licensees extend to the entire whole, and thus to each and every part regardless of who wrote it.
Thus, it is not the intent of this section to claim rights or contest your rights to work written entirely by you; rather, the intent is to exercise the right to control the distribution of derivative or collective works based on the Program.
In addition, mere aggregation of another work not based on the Program with the Program (or with a work based on the Program) on a volume of a storage or distribution medium does not bring the other work under the scope of this License.
- You may copy and distribute the Program (or a work based on it, under Section 2) in object code or executable form under the terms of Sections 1 and 2 above provided that you also do one of the following:
a) Accompany it with the complete corresponding machine-readable source code, which must be distributed under the terms of Sections 1 and 2 above on a medium customarily used for software interchange; or, b) Accompany it with a written offer, valid for at least three years, to give any third party, for a charge no more than your cost of physically performing source distribution, a complete machine-readable copy of the corresponding source code, to be distributed under the terms of Sections 1 and 2 above on a medium customarily used for software interchange; or,
c) Accompany it with the information you received as to the offer to distribute corresponding source code. (This alternative is allowed only for noncommercial distribution and only if you received the program in object code or executable form with such an offer, in accord with Subsection b above.)
The source code for a work means the preferred form of the work for making modifications to it. For an executable work, complete source code means all the source code for all modules it contains, plus any associated interface definition files, plus the scripts used to control compilation and installation of the executable. However, as a special exception, the source code distributed need not include anything that is normally distributed (in either source or binary form) with the major components (compiler, kernel, and so on) of the operating system on which the executable runs, unless that component itself accompanies the executable.
If distribution of executable or object code is made by offering access to copy from a designated place, then offering equivalent access to copy the source code from the same place counts as distribution of the source code, even though third parties are not compelled to copy the source along with the object code.
-
You may not copy, modify, sublicense, or distribute the Program except as expressly provided under this License. Any attempt otherwise to copy, modify, sublicense or distribute the Program is void, and will automatically terminate your rights under this License. However, parties who have received copies, or rights, from you under this License will not have their licenses terminated so long as such parties remain in full compliance.
-
You are not required to accept this License, since you have not signed it. However, nothing else grants you permission to modify or distribute the Program or its derivative works. These actions are prohibited by law if you do not accept this License. Therefore, by modifying or distributing the Program (or any work based on the Program), you indicate your acceptance of this License to do so, and all its terms and conditions for copying, distributing or modifying the Program or works based on it.
-
Each time you redistribute the Program (or any work based on the Program), the recipient automatically receives a license from the original licensor to copy, distribute or modify the Program subject to these terms and conditions. You may not impose any further restrictions on the recipients' exercise of the rights granted herein. You are not responsible for enforcing compliance by third parties to this License.
-
If, as a consequence of a court judgment or allegation of patent infringement or for any other reason (not limited to patent issues), conditions are imposed on you (whether by court order, agreement or otherwise) that contradict the conditions of this License, they do not excuse you from the conditions of this License. If you cannot distribute so as to satisfy
simultaneously your obligations under this License and any other pertinent obligations, then as a consequence you may not distribute the Program at all. For example, if a patent license would not permit royalty-free redistribution of the Program by all those who receive copies directly or indirectly through you, then the only way you could satisfy both it and this License would be to refrain entirely from distribution of the Program.
If any portion of this section is held invalid or unenforceable under any particular circumstance, the balance of the section is intended to apply and the section as a whole is intended to apply in other circumstances.
It is not the purpose of this section to induce you to infringe any patents or other property right claims or to contest validity of any such claims; this section has the sole purpose of protecting the integrity of the free software distribution system, which is implemented by public license practices. Many people have made generous contributions to the wide range of software distributed through that system in reliance on consistent application of that system; it is up to the author/donor to decide if he or she is willing to distribute software through any other system and a licensee cannot impose that choice.
This section is intended to make thoroughly clear what is believed to be a consequence of the rest of this License.
-
If the distribution and/or use of the Program is restricted in certain countries either by patents or by copyrighted interfaces, the original copyright holder who places the Program under this License may add an explicit geographical distribution limitation excluding those countries, so that distribution is permitted only in or among countries not thus excluded. In such case, this License incorporates the limitation as if written in the body of this License.
-
The Free Software Foundation may publish revised and/or new versions of the General Public License from time to time. Such new versions will be similar in spirit to the present version, but may differ in detail to address new problems or concerns.
Each version is given a distinguishing version number. If the Program specifies a version number of this License which applies to it and "any later version", you have the option of following the terms and conditions either of that version or of any later version published by the Free Software Foundation. If the Program does not specify a version number of this License, you may choose any version ever published by the Free Software Foundation. 10. If you wish to incorporate parts of the Program into other free programs whose distribution conditions are different, write to the author to ask for permission. For software which is copyrighted by the Free Software Foundation, write to the Free Software Foundation; we sometimes make exceptions for this. Our decision will be guided by the two goals of preserving the free status of all derivatives of our free software and of promoting the sharing and reuse of software generally.
NO WARRANTY
-
BECAUSE THE PROGRAM IS LICENSED FREE OF CHARGE, THERE IS NO WARRANTY FOR THE PROGRAM, TO THE EXTENT PERMITTED BY APPLICABLE LAW. EXCEPT WHEN OTHERWISE STATED IN WRITING THE COPYRIGHT HOLDERS AND/OR OTHER PARTIES PROVIDE THE PROGRAM "AS IS" WITHOUT WARRANTY OF ANY KIND, EITHER EXPRESSED OR IMPLIED, INCLUDING, BUT NOT LIMITED TO, THE IMPLIED WARRANTIES OF MERCHANTABILITY AND FITNESS FOR A PARTICULAR PURPOSE. THE ENTIRE RISK AS TO THE QUALITY AND PERFORMANCE OF THE PROGRAM IS WITH YOU. SHOULD THE PROGRAM PROVE DEFECTIVE, YOU ASSUME THE COST OF ALL NECESSARY SERVICING, REPAIR OR CORRECTION.
-
IN NO EVENT UNLESS REQUIRED BY APPLICABLE LAW OR AGREED TO IN WRITING WILL ANY COPYRIGHT HOLDER, OR ANY OTHER PARTY WHO MAY MODIFY AND/OR REDISTRIBUTE THE PROGRAM AS PERMITTED ABOVE, BE LIABLE TO YOU FOR DAMAGES, INCLUDING ANY GENERAL, SPECIAL, INCIDENTAL OR CONSEQUENTIAL DAMAGES ARISING OUT OF THE USE OR INABILITY TO USE THE PROGRAM (INCLUDING BUT NOT LIMITED TO LOSS OF DATA OR DATA BEING RENDERED INACCURATE OR LOSSES SUSTAINED BY YOU OR THIRD PARTIES OR A FAILURE OF THE PROGRAM TO OPERATE WITH ANY OTHER PROGRAMS), EVEN IF SUCH HOLDER OR OTHER PARTY HAS BEEN ADVISED OF THE POSSIBILITY OF SUCH DAMAGES.
END OF TERMS AND CONDITIONS
How to Apply These Terms to Your New Programs
If you develop a new program, and you want it to be of the greatest possible use to the public, the best way to achieve this is to make it free software which everyone can redistribute and change under these terms.
To do so, attach the following notices to the program. It is safest to attach them to the start of each source file to most effectively convey the exclusion
of warranty; and each file should have at least the "copyright" line and a pointer to where the full notice is found.
This program is free software; you can redistribute it and/or modify it under the terms of the GNU General Public License as published by the Free Software Foundation; either version 2 of the License, or (at your option) any later version.
This program is distributed in the hope that it will be useful, but WITHOUT ANY WARRANTY; without even the implied warranty of MERCHANTABILITY or FITNESS FOR A PARTICULAR PURPOSE. See the GNU General Public License for more details.
You should have received a copy of the GNU General Public License along with this program; if not, write to the Free Software Foundation, Inc., 59 Temple Place, Suite 330, Boston, MA 02111-1307 USA
Also add information on how to contact you by electronic and paper mail. If the program is interactive, make it output a short notice like this when it starts in an interactive mode:
Gnomovision version 69, Copyright (C) year name of author
Gnomovision comes with ABSOLUTELY NO WARRANTY; for details type 'show w'.
This is free software, and you are welcome to redistribute it under certain conditions; type 'show c' for details.
The hypothetical commands 'show w' and 'show c' should show the appropriate parts of the General Public License. Of course, the commands you use may be called something other than 'show w' and 'show c'; they could even be mouse-clicks or menu items--whatever suits your program.
You should also get your employer (if you work as a programmer) or your school, if any, to sign a "copyright disclaimer" for the program, if necessary. Here is a sample; alter the names:
Yoyodyne, Inc., hereby disclaims all copyright interest in the program 'Gnomovision' (which makes passes at compilers) written by James Hacker.
Ty Coon, President of Vice
This General Public License does not permit incorporating your program into proprietary programs. If your program is a subroutine library, you may consider it more useful to permit linking proprietary applications with the library. If this is what you want to do, use the GNU Library General Public License instead of this License.
LGPL Software.
As to the following LGPL software, you have a right to receive, modify and distribute the source code of the software:
libgcc
libc
libstdc++
libm
You can download the source code from the following site:
http://www.sony.com/linux
This LGPL software is governed by the following terms and conditions:
GNU LESSER GENERAL PUBLIC LICENSE
Version 2.1, February 1999
Copyright (C) 1991, 1999 Free Software Foundation, Inc., 59 Temple Place, Suite 330, Boston, MA 02111-1307 USA. Everyone is permitted to copy and distribute verbatim copies of this license document, but changing it is not allowed.
[This is the first released version of the Lesser GPL. It also counts as the successor of the GNU Library Public License, version 2, hence the version number 2.1.]
Preamble
The licenses for most software are designed to take away your freedom to share and change it. By contrast, the GNU General Public Licenses are
intended to guarantee your freedom to share and change free software--to make sure the software is free for all its users.
This license, the Lesser General Public License, applies to some specially designated software packages--typically libraries--of the Free Software Foundation and other authors who decide to use it. You can use it too, but we suggest you first think carefully about whether this license or the ordinary General Public License is the better strategy to use in any particular case, based on the explanations below.
When we speak of free software, we are referring to freedom of use, not price. Our General Public Licenses are designed to make sure that you have the freedom to distribute copies of free software (and charge for this service if you wish); that you receive source code or can get it if you want it; that you can change the software and use pieces of it in new free programs; and that you are informed that you can do these things.
To protect your rights, we need to make restrictions that forbid distributors to deny you these rights or to ask you to surrender these rights. These restrictions translate to certain responsibilities for you if you distribute copies of the library or if you modify it. For example, if you distribute copies of the library, whether gratis or for a fee, you must give the recipients all the rights that we gave you. You must make sure that they, too, receive or can get the source code. If you link other code with the library, you must provide complete object files to the recipients, so that they can relink them with the library after making changes to the library and recompiling it. And you must show them these terms so they know their rights.
We protect your rights with a two-step method: (1) we copyright the library, and (2) we offer you this license, which gives you legal permission to copy, distribute and/or modify the library.
To protect each distributor, we want to make it very clear that there is no warranty for the free library. Also, if the library is modified by someone else and passed on, the recipients should know that what they have is not the original version, so that the original author's reputation will not be affected by problems that might be introduced by others.
Finally, software patents pose a constant threat to the existence of any free program. We wish to make sure that a company cannot effectively restrict the users of a free program by obtaining a restrictive license from a patent holder. Therefore, we insist that any patent license obtained for a version of the library must be consistent with the full freedom of use specified in this license.
Most GNU software, including some libraries, is covered by the ordinary GNU General Public License. This license, the GNU Lesser General Public License, applies to certain designated libraries, and is quite different from the ordinary General Public License. We use this license for certain libraries in order to permit linking those libraries into non-free programs.
When a program is linked with a library, whether statically or using a shared library, the combination of the two is legally speaking a combined work, a derivative of the original library. The ordinary General Public License therefore permits such linking only if the entire combination fits its criteria of freedom. The Lesser General Public License permits more lax criteria for linking other code with the library.
We call this license the "Lesser" General Public License because it does Less to protect the user's freedom than the ordinary General Public License. It also provides other free software developers Less of an advantage over competing non-free programs. These disadvantages are the reason we use the ordinary General Public License for many libraries. However, the Lesser license provides advantages in certain special circumstances.
For example, on rare occasions, there may be a special need to encourage the widest possible use of a certain library, so that it becomes a de-facto standard. To achieve this, non-free programs must be allowed to use the library. A more frequent case is that a free library does the same job as widely used non-free libraries. In this case, there is little to gain by limiting the free library to free software only, so we use the Lesser General Public License. In other cases, permission to use a particular library in non-free programs enables a greater number of people to use a large body of free software. For example, permission to use the GNU C Library in non-free programs enables many more people to use the whole GNU operating system, as well as its variant, the GNU/Linux operating system.
Although the Lesser General Public License is Less protective of the users' freedom, it does ensure that the user of a program that is linked with the Library has the freedom and the wherewithal to run that program using a modified version of the Library.
The precise terms and conditions for copying, distribution and modification follow. Pay close attention to the difference between a "work based on the library" and a "work that uses the library". The former contains code derived from the library, whereas the latter must be combined with the library in order to run.
GNU LESSER GENERAL PUBLIC LICENSE
TERMS AND CONDITIONS FOR COPYING, DISTRIBUTION AND MODIFICATION 0. This License Agreement applies to any software library or other program which contains a notice placed by the copyright holder or other authorized party saying it may be distributed under the terms of this Lesser General Public License (also called "this License"). Each licensee is addressed as "you".
A "library" means a collection of software functions and/or data prepared so as to be conveniently linked with application programs (which use some of those functions and data) to form executables.
The "Library", below, refers to any such software library or work which has been distributed under these terms. A "work based on the Library" means either the Library or any derivative work under copyright law: that is to say, a work containing the Library or a portion of it, either verbatim or with modifications and/or translated straightforwardly into another language. (Hereinafter, translation is included without limitation in the term "modification".)
"Source code" for a work means the preferred form of the work for making modifications to it. For a library, complete source code means all the source code for all modules it contains, plus any associated interface definition files, plus the scripts used to control compilation and installation of the library.
Activities other than copying, distribution and modification are not covered by this License; they are outside its scope. The act of running a program using the Library is not restricted, and output from such a program is covered only if its contents constitute a work based on the Library (independent of the use of the Library in a tool for writing it). Whether that is true depends on what the Library does and what the program that uses the Library does.
- You may copy and distribute verbatim copies of the Library's complete source code as you receive it, in any medium, provided that you conspicuously and appropriately publish on each copy an appropriate copyright notice and disclaimer of warranty; keep intact all the notices that refer to this License and to the absence of any warranty; and distribute a copy of this License along with the Library.
You may charge a fee for the physical act of transferring a copy, and you may at your option offer warranty protection in exchange for a fee.
- You may modify your copy or copies of the Library or any portion of it, thus forming a work based on the Library, and copy and distribute such modifications or work under the terms of Section 1 above, provided that you also meet all of these conditions:
a) The modified work must itself be a software library. b) You must cause the files modified to carry prominent notices stating that you changed the files and the date of any change.
c) You must cause the whole of the work to be licensed at no charge to all third parties under the terms of this License.
d) If a facility in the modified Library refers to a function or a table of data to be supplied by an application program that uses the facility, other than as an argument passed when the facility is invoked, then you must make a good faith effort to ensure that, in the event an application does not supply such function or table, the facility still operates, and performs whatever part of its purpose remains meaningful.
(For example, a function in a library to compute square roots has a purpose that is entirely well-defined independent of the application. Therefore, Subsection 2d requires that any application-supplied function or table used by this function must be optional: if the application does not supply it, the square root function must still compute square roots.)
These requirements apply to the modified work as a whole. If identifiable sections of that work are not derived from the Library, and can be reasonably considered independent and separate works in themselves, then this License, and its terms, do not apply to those sections when you distribute them as separate works. But when you distribute the same sections as part of a whole which is a work based on the Library, the distribution of the whole must be on the terms of this License, whose permissions for other licensees extend to the entire whole, and thus to each and every part regardless of who wrote it. Thus, it is not the intent of this section to claim rights or contest your rights to work written entirely by you; rather, the intent is to exercise the right to control the distribution of derivative or collective works based on the Library. In addition, mere aggregation of another work not based on the Library with the Library (or with a work based on the Library) on a volume of a storage or distribution medium does not bring the other work under the scope of this License.
- You may opt to apply the terms of the ordinary GNU General Public License instead of this License to a given copy of the Library. To do this, you must alter all the notices that refer to this License, so that they refer to the ordinary GNU General Public License, version 2, instead of to this License. (If a newer
version than version 2 of the ordinary GNU General Public License has appeared, then you can specify that version instead if you wish.) Do not make any other change in these notices.
Once this change is made in a given copy, it is irreversible for that copy, so the ordinary GNU General Public License applies to all subsequent copies and derivative works made from that copy.
This option is useful when you wish to copy part of the code of the Library into a program that is not a library.
- You may copy and distribute the Library (or a portion or derivative of it, under Section 2) in object code or executable form under the terms of Sections 1 and 2 above provided that you accompany it with the complete corresponding machine-readable source code, which must be distributed under the terms of Sections 1 and 2 above on a medium customarily used for software interchange.
If distribution of object code is made by offering access to copy from a designated place, then offering equivalent access to copy the source code from the same place satisfies the requirement to distribute the source code, even though third parties are not compelled to copy the source along with the object code.
- A program that contains no derivative of any portion of the Library, but is designed to work with the Library by being compiled or linked with it, is called a "work that uses the Library". Such a work, in isolation, is not a derivative work of the Library, and therefore falls outside the scope of this License.
However, linking a "work that uses the Library" with the Library creates an executable that is a derivative of the Library (because it contains portions of the Library), rather than a "work that uses the library". The executable is therefore covered by this License. Section 6. states terms for distribution of such executables.
When a "work that uses the Library" uses material from a header file that is part of the Library, the object code for the work may be a derivative work of the Library even though the source code is not. Whether this is true is especially significant if the work can be linked without the Library, or if the work is itself a library. The threshold for this to be true is not precisely defined by law.
If such an object file uses only numerical parameters, data structure layouts and accessors, and small macros and small inline functions (ten lines or less in length), then the use of the object file is unrestricted, regardless of whether it is legally a derivative work. (Executables containing this object code plus portions of the Library will still fall under Section 6.)
Otherwise, if the work is a derivative of the Library, you may distribute the object code for the work under the terms of Section 6. Any executables containing that work also fall under Section 6, whether or not they are linked directly with the Library itself.
- As an exception to the Sections above, you may also combine or link a "work that uses the Library" with the Library to produce a work containing portions of the Library, and distribute that work under terms of your choice, provided that the terms permit modification of the work for the customer's own use and reverse engineering for debugging such modifications.
You must give prominent notice with each copy of the work that the Library is used in it and that the Library and its use are covered by this License. You must supply a copy of this License. If the work during execution displays copyright notices, you must include the copyright notice for the Library among them, as well as a reference directing the user to the copy of this License. Also, you must do one of these things:
a) Accompany the work with the complete corresponding machine-readable source code for the Library including whatever changes were used in the work (which must be distributed under Sections 1 and 2 above); and, if the work is an executable linked with the Library, with the complete machine-readable "work that uses the Library", as object code and/or source code, so that the user can modify the Library and then relink to produce a modified executable containing the modified Library. (It is understood that the user who changes the contents of definitions files in the Library will not necessarily be able to recompile the application to use the modified definitions.)
b) Use a suitable shared library mechanism for linking with the Library. A suitable mechanism is one that (1) uses at run time a copy of the library already present on the user's computer system, rather than copying library functions into the executable, and (2) will operate properly with a modified version of the library, if the user installs one, as long as the modified version is interface-compatible with the version that the work was made with.
c) Accompany the work with a written offer, valid for at least three years, to give the same user the materials specified in Subsection 6a, above, for a charge no more than the cost of performing this distribution.
d) If distribution of the work is made by offering access to copy from a designated place, offer equivalent access to copy the above specified materials from the same place.
e) Verify that the user has already received a copy of these materials or that you have already sent this user a copy.
For an executable, the required form of the "work that uses the Library" must include any data and utility programs needed for reproducing the executable from it. However, as a special exception, the materials to be distributed need not include anything that is normally distributed (in either source or binary form) with the major components (compiler, kernel, and so on) of the operating system on which the executable runs, unless that component itself accompanies the executable.
It may happen that this requirement contradicts the license restrictions of other proprietary libraries that do not normally accompany the operating system. Such a contradiction means you cannot use both them and the Library together in an executable that you distribute.
- You may place library facilities that are a work based on the Library side-by-side in a single library together with other library facilities not covered by this License, and distribute such a combined library, provided that the separate distribution of the work based on the Library and of the other library facilities is otherwise permitted, and provided that you do these two things:
a) Accompany the combined library with a copy of the same work based on the Library, uncombined with any other library facilities. This must be distributed under the terms of the Sections above.
b) Give prominent notice with the combined library of the fact that part of it is a work based on the Library, and explaining where to find the accompanying uncombined form of the same work.
-
You may not copy, modify, sublicense, link with, or distribute the Library except as expressly provided under this License. Any attempt otherwise to copy, modify, sublicense, link with, or distribute the Library is void, and will automatically terminate your rights under this License. However, parties who have received copies, or rights, from you under this License will not have their licenses terminated so long as such parties remain in full compliance.
-
You are not required to accept this License, since you have not signed it. However, nothing else grants you permission to modify or distribute the Library or its derivative works. These actions are prohibited by law if you do not accept this License. Therefore, by modifying or distributing the Library (or any work based on the Library), you indicate your acceptance of this License to do so, and all its terms and conditions for copying, distributing or modifying the Library or works based on it.
-
Each time you redistribute the Library (or any work based on the Library), the recipient automatically receives a license from the original licensor to copy, distribute, link with or modify the Library subject to these terms and conditions. You may not impose any further restrictions on the recipients' exercise of the rights granted herein. You are not responsible for enforcing compliance by third parties with this License.
-
If, as a consequence of a court judgment or allegation of patent infringement or for any other reason (not limited to patent issues), conditions are imposed on you (whether by court order, agreement or otherwise) that contradict the conditions of this License, they do not excuse you from the conditions of this License. If you cannot distribute so as to satisfy simultaneously your obligations under this License and any other pertinent obligations, then as a consequence you may not distribute the Library at all. For example, if a patent license would not permit royalty-free redistribution of the Library by all those who receive copies directly or indirectly through you, then the only way you could satisfy both it and this License would be to refrain entirely from distribution of the Library.
If any portion of this section is held invalid or unenforceable under any particular circumstance, the balance of the section is intended to apply, and the section as a whole is intended to apply in other circumstances. It is not the purpose of this section to induce you to infringe any patents or other property right claims or to contest validity of any such claims; this section has the sole purpose of protecting the integrity of the free software distribution system which is implemented by public license practices. Many people have made generous contributions to the wide range of software distributed through that system in reliance on consistent application of that system; it is up to the author/donor to decide if he or she is willing to distribute software through any other system and a licensee cannot impose that choice.
This section is intended to make thoroughly clear what is believed to be a consequence of the rest of this License.
-
If the distribution and/or use of the Library is restricted in certain countries either by patents or by copyrighted interfaces, the original copyright holder who places the Library under this License may add an explicit geographical distribution limitation excluding those countries, so that distribution is permitted only in or among countries not thus excluded. In such case, this License incorporates the limitation as if written in the body of this License.
-
The Free Software Foundation may publish revised and/or new versions of the Lesser General Public License from time to time. Such new versions will be
similar in spirit to the present version, but may differ in detail to address new problems or concerns.
Each version is given a distinguishing version number. If the Library specifies a version number of this License which applies to it and "any later version", you have the option of following the terms and conditions either of that version or of any later version published by the Free Software Foundation. If the Library does not specify a license version number, you may choose any version ever published by the Free Software Foundation.
- If you wish to incorporate parts of the Library into other free programs whose distribution conditions are incompatible with these, write to the author to ask for permission. For software which is copyrighted by the Free Software Foundation, write to the Free Software Foundation; we sometimes make exceptions for this. Our decision will be guided by the two goals of preserving the free status of all derivatives of our free software and of promoting the sharing and reuse of software generally.
NO WARRANTY
-
BECAUSE THE LIBRARY IS LICENSED FREE OF CHARGE, THERE IS NO WARRANTY FOR THE LIBRARY, TO THE EXTENT PERMITTED BY APPLICABLE LAW. EXCEPT WHEN OTHERWISE STATED IN WRITING THE COPYRIGHT HOLDERS AND/OR OTHER PARTIES PROVIDE THE LIBRARY "AS IS" WITHOUT WARRANTY OF ANY KIND, EITHER EXPRESSED OR IMPLIED, INCLUDING, BUT NOT LIMITED TO, THE IMPLIED WARRANTIES OF MERCHANTABILITY AND FITNESS FOR A PARTICULAR PURPOSE. THE ENTIRE RISK AS TO THE QUALITY AND PERFORMANCE OF THE LIBRARY IS WITH YOU. SHOULD THE LIBRARY PROVE DEFECTIVE, YOU ASSUME THE COST OF ALL NECESSARY SERVICING, REPAIR OR CORRECTION.
-
IN NO EVENT UNLESS REQUIRED BY APPLICABLE LAW OR AGREED TO IN WRITING WILL ANY COPYRIGHT HOLDER, OR ANY OTHER PARTY WHO MAY MODIFY AND/OR REDISTRIBUTE THE LIBRARY AS PERMITTED ABOVE, BE LIABLE TO YOU FOR DAMAGES, INCLUDING ANY GENERAL, SPECIAL, INCIDENTAL OR CONSEQUENTIAL DAMAGES ARISING OUT OF THE USE OR INABILITY TO USE THE LIBRARY (INCLUDING BUT NOT LIMITED TO LOSS OF DATA OR DATA BEING RENDERED INACCURATE OR LOSSES SUSTAINED BY YOU OR THIRD PARTIES OR A FAILURE OF THE LIBRARY TO OPERATE WITH ANY OTHER SOFTWARE), EVEN IF SUCH HOLDER OR OTHER PARTY HAS BEEN ADVISED OF THE POSSIBILITY OF SUCH DAMAGES.
END OF TERMS AND CONDITIONS
How to Apply These Terms to Your New Libraries
If you develop a new library, and you want it to be of the greatest possible use to the public, we recommend making it free software that everyone can redistribute and change. You can do so by permitting
redistribution under these terms (or, alternatively, under the terms of the ordinary General Public License).
To apply these terms, attach the following notices to the library. It is safest to attach them to the start of each source file to most effectively convey the exclusion of warranty; and each file should have at least the
"copyright" line and a pointer to where the full notice is found.
Copyright (C)
This library is distributed in the hope that it will be useful, but WITHOUT ANY WARRANTY; without even the implied warranty of MERCHANTABILITY or FITNESS FOR A PARTICULAR PURPOSE. See the GNU Lesser General Public License for more details.
You should have received a copy of the GNU Lesser General Public License along with this library; if not, write to the Free Software Foundation, Inc., 59 Temple Place, Suite 330, Boston, MA 02111-1307 USA
Also add information on how to contact you by electronic and paper mail. You should also get your employer (if you work as a programmer) or your school, if any, to sign a "copyright disclaimer" for the library, if necessary. Here is a sample; alter the names:
Yoyodyne, Inc., hereby disclaims all copyright interest in the library 'Frob' (a library for tweaking knobs) written by James Random Hacker.
Ty Coon, President of Vice
That's all there is to it!
FreeType2 Font Engine
The following special provisions apply to the FreeType2 Font Engine: Portions of this software are copyright© 1996-2002 The FreeType Project (www.freetype.org). All rights reserved. http://www.freetype.org
libjpeg
The following applies to the libjpeg software module:
This software is based in part on the work of the Independent JPEG Group.
libpng
The following special provisions apply to the libpng software module:
COPYRIGHT NOTICE, DISCLAIMER, and LICENSE:
If you modify libpng you may insert additional notices immediately following this sentence.
libpng version 1.2.6, September 12, 2004, is Copyright (c) 2004 Glenn Randers-Pehrson, and is
distributed according to the same disclaimer and license as libpng-1.2.5 with the following individual added to the list of Contributing Authors
Cosmin Truta
libpng versions 1.0.7, July 1, 2000, through 1.2.5 - October 3, 2002, are Copyright (c) 2000-2002 Glenn Randers-Pehrson, and are distributed according to the same disclaimer and license as libpng-1.0.6 with the following individuals added to the list of Contributing Authors
Simon-Pierre Cadieux
Eric S. Raymond
Gilles Vollant
and with the following additions to the disclaimer:
There is no warranty against interference with your enjoyment of the library or against infringement. There is no warranty that our efforts or the library will fulfill any of your particular purposes or needs. This library is provided with all faults, and the entire risk of satisfactory quality, performance, accuracy, and effort is with the user.
libpng versions 0.97, January 1998, through 1.0.6, March 20, 2000, are Copyright (c) 1998, 1999 Glenn Randers-Pehrson, and are distributed according to the same disclaimer and license as libpng-0.96, with the following individuals added to the list of Contributing Authors:
Tom Lane
Glenn Randers-Pehrson
Willem van Schaik
libpng versions 0.89, June 1996, through 0.96, May 1997, are Copyright (c) 1996, 1997 Andreas Dilger Distributed according to the same disclaimer and license as libpng-0.88, with the following individuals added to the list of Contributing Authors:
John Bowler
Kevin Bracey
Sam Bushell
Magnus Holmgren
Greg Roelofs
Tom Tanner
libpng versions 0.5, May 1995, through 0.88, January 1996, are Copyright (c) 1995, 1996 Guy Eric Schalnat, Group 42, Inc.
For the purposes of this copyright and license, "Contributing Authors" is defined as the following set of individuals:
Andreas Dilger
Dave Martindale
Guy Eric Schalnat
Paul Schmidt
Tim Wegner
The PNG Reference Library is supplied "AS IS". The Contributing Authors and Group 42, Inc. disclaim all warranties, expressed or implied, including, without limitation, the warranties of merchantability and of fitness for any purpose. The Contributing Authors and Group 42, Inc. assume no liability for direct, indirect, incidental, special, exemplary, or consequential damages, which may result from the use of the PNG Reference Library, even if advised of the possibility of such damage. Permission is hereby granted to use, copy, modify, and distribute this source code, or portions hereof, for any purpose, without fee, subject
to the following restrictions:
-
The origin of this source code must not be misrepresented.
-
Altered versions must be plainly marked as such and must not be misrepresented as being the original source.
-
This Copyright notice may not be removed or altered from any source or altered source distribution.
The Contributing Authors and Group 42, Inc. specifically permit, without fee, and encourage the use of this source code as a component to supporting the PNG file format in commercial products. If you use this source code in a product, acknowledgment is not required but would be appreciated.
A "png_get_copyright" function is available, for convenient use in "about" boxes and the like:
printf("%s", png_get_copyright(NULL));
Also, the PNG logo (in PNG format, of course) is supplied in the files
"pngbar.png" and "pngbar.jpg (88x31) and "pngnow.png" (98x31).
Libpng is OSI Certified Open Source Software. OSI Certified Open Source is a certification mark of the Open Source Initiative.
Glenn Randers-Pehrson
glennrp@users.sourceforge.net
September 12, 2004
Zlib
The following applies to the zlib software module:
Copyright (C) 1995-2003 Jean-loup Gailly and Mark Adler
Index
Symbols
.(dot) 10
Numerics
0-9 10
1080i 39, 75
480i 39, 75
480p 39, 75
720p 39, 75
A
AC IN 8, 25
Add to Favorite 33
Adjust 39, 77
ADVANCE 11
Advance Time 37
Advanced Digital Services 38
Advanced Digital Settings 38
ALPHABETICAL 65
AMP (Amplifier) 15
ANT IN 7
As Broadcast 38
Audio 40
AUDIO OUT 7
Auto Add 81
Auto Add from Antenna 41
Auto HDMI 75
Auto Scan 41, 81
Auto Setup 28
Auto-Tune 80
AUX (Power) 11
B
Basic Analog Services 38
blocked programs 47
C
CABLE IN 7
CableCARD 3, 4, 22, 26, 27, 36, 81
CableCARD Service 26
CableCARD slot 8
Canadian Rating Guidelines 46
CAUTION iii
CH (channel) +/- 11
CH+/- List 41
Change Password 41, 45
Channel Logo 62
Channel Number and Name display 6
Chapter Mark 49
Chapter Marks 56, 57
CHILDREN 65
Clock 6, 61
Closed Caption 38
coaxial cable 17
Component 74
component 24
Component Video 4, 7
component video 20
Composite 74
composite 21, 23, 24
composite output 21
Connections
Connecting an Audio System 24
CONTROL S IN 8
Country 41, 45
Create New Category 42
Current Analog Audio 40
Current Digital Audio 40
Current Service Label 63
Custom 38
D
Default Analog Audio 40
Default Digital Audio 40
Delete Category 42
Deleting 55
DEVICE SWITCH 10
Diagnostics 36
Digital Audio Optical 24
DIGITAL AUDIO OUT 8
Digital Reception 4
Digital Video Recorder 4
Display Formats 75
Display Window 5
Dolby Digital 40
Dolby Digital indicator 6
DVD Players 15
DVI 19
DVR (Power) 11
E
Edit Category Name 42
Edit Channel 42
Edit Channel List 41
Editing Favorite 33
EDUCATIONAL 65
ENTER 10
EXIT 10
EXIT button 5
Expand 39, 78
F
Factory Default 13
FAVORITE 11
Favorite category 32
Favorite Menu 33
Favorite Options 42
FF 11
FF/REW Speed 37
FORMAT 10, 28, 82
Format 39
FORMAT button 5
Format Settings 74
Front Panel 10
G
G-LINK IR Blaster 8, 80
H
HD 76, 77, 78
HD DVR ANT IN 17
HD DVR CABLE IN 17
HDMI 18, 19, 74
HDMI OUT 7
HDMI Video 4
HDMI-DVI adapter 19
HDTV 65
HDTV Show Icon 63
Help Menu 43
High Def to High Def 39
High Def to Standard Def 39
|
IMPORTANT SAFETY INSTRUCTIONS iv INFO 10
Info Banner 38
Info Box 62
Info Button 62
Inserting Batteries 9
J
Joystick/SELECT button 5
K
KEYWORD 65
L
Large Text 38
Letterbox 39, 76
LISTINGS 59
LISTINGS Service 64
Live TV Pause Time 37
Lock 42
Lock/Unlock 61
Lost password 83
M
MAIN MENU 31
Manufacturer's Codes 14
MENU button 5
Menus
Channel 33, 36
Parent 34, 35
Mono 40
Movie Rating 41
MOVIES 65
N
Native 75
NAVIGATION RING 10
NEWS 65
NEXT 11
Next 52
Normal 39, 77
0
Operating a DVD Player (or VCR) 16
Operating a TV 16
Operating an AMP 16
Owner's Record ii
P
Package Contents 3
Panel Menu / Panel Ad 62
Parental Control 43
Parental Lock 41, 44
Password 44, 45
PAUSE 10
Pause 50
PCM digital audio signals 40
PIC MODE 11
PLAY 10
Playing 55
POWER button 5
Power indicator 6
Precautions v, vi
Preferences Menu 36
PREV 11
Previous 52
Q
Quality 71
R
Rating Guidelines 46
Rating Options 41, 45
Ratings
Unrated 46
REC (record) 10
REC indicator 6
REC LIST 11
Recent Channels 32
Recent Channels Options 42
Record 53, 54
Record Icon 63
Recording 37
Recording History Menu 35
RECORDINGS 59
Recordings List 34
RECORDINGS Service 67
Remind Icon 62
Remote Control 9, 29
Description 10
Programming 12
REPLAY 10
Replay Time 37
Restrict by Channel 45
Restrict by Time 41, 45
Restricted by Channel 41
REW 10
S
S Video 74
S VIDEO OUT 7
SAFETY PRECAUTIONS ii
SAP 40
SCHEDULE 59
Schedule 80
Scheduled Recordings 53
Screen 38
SCREEN MODE 10, 78
Screen Mode 39
Screen Saver 50
SCROLL BAR 10
SD 76, 77
SD OUT 7
SD Out 75
SEARCH 59
SEARCH Service 65
SERIES 65
Service Bar 61
Setting the Rating 44
SETUP 59
Setup 79
Shrink 39, 78
Side Crop 39, 76
Side Stretch 39, 77
Signal Comparison 74
SLOW 11
Slow Speed 37
Small Text 38
Smart Cue Adjust 37
Sort 42
SPORTS 65
Squeeze 39
Squeezed 76
Standard 39, 78
Standard Def to High Def 39
Status Bar 49
Stereo 40
STOP 10
Stop 53
Stretch 39, 77
System 36
System Menu 36
T
Tile 63
Time Slot 62
Title 62
Trick Play 51
TV Codes 14
TV GUIDE 11
TV GUIDE button 5
TV Guide Logo 63
TV Guide On Screen 4, 28, 59, 60
TV Guide On Screen Components 61
TV Guide On Screen Feature 34
TV Rating 41
TV/VIDEO 11
U
U.S. Rating Guidelines 46
Unlock 42
Unrated 41
USB 8
USB (Universal Serial Bus) 8
V
Variable 1 75
Variable 2 75
Variable 3 75
VARIETY 65
VCR 80
VCR Codes 14
Video Lock 42
VIDEO OUT 7
Video Window 61
View listings 64
VOL (volume) +/- 11
W
WARNING ii
Welcome Screen 60
SONY.
LIMITED WARRANTY
SONY ELECTRONICS INC. (for U.S. Sales) or SONY OF CANADA LTD. (for Canadian Sales) warrants this product including accessories against defects in material or workmanship for the time periods and as set forth below. Pursuant to this Limited Warranty, SONY will, at its option, (i) repair the product using new or refurbished parts or (ii) replace the product with a refurbished product. In the event of a defect, these are your exclusive remedies. For purposes of this Limited Warranty, "refurbished" means a product or part that has been returned to its original specifications.
Labor: For a period of 90 days from the original date of purchase of the product ("Labor Warranty"), SONY will, at its option, repair or replace with refurbished product, product determined to be defective. If SONY elects to replace the product after this Labor Warranty has expired but while the Parts Warranty below is still in effect, it will do so for the applicable labor charge.
Parts: For a period of one (1) year from the original date of purchase of product ("Parts Warranty"), SONY will supply new or refurbished replacement parts in exchange for parts determined to be defective.
Accessories: Included accessories are covered by this Limited Warranty for a period of one (1) year.
Instructions: To obtain warranty service, you must deliver the product, freight prepaid, in either its original packaging or packaging affording an equal degree of protection to the SONY authorized service facility specified. It is your responsibility to backup any data, software or other materials you may have stored or preserved on your unit. It is likely that such data, software, or other materials will be lost or reformatted during service and SONY will not be responsible for any such damage or loss. A dated purchase receipt is required. For specific instructions on how to obtain warranty service for your product,
Visit SONY's Web Site:
/www.sony.com/service
Or call the Sony Customer Information Service Center
1-800-222-SONY
[1-800-222-7669]
For an accessory or part not available from your authorized dealer, call:
1-800-488-SONY
[1-800-488-7669]
Repair / Replacement Warranty: This Limited Warranty shall apply to any repair, replacement part or replacement product for the remainder of the original Limited Warranty period or for ninety (90) days, whichever is longer. Any parts or product replaced under this Limited Warranty will become the property of SONY.
This Limited Warranty only covers product issues caused by defects in material or workmanship during ordinary consumer use; it does not cover product issues caused by any other reason, including but not limited to product issues due to commercial use, acts of God, misuse, limitations of technology, or modification of or to any part of the SONY product. This Limited Warranty does not cover SONY products sold AS IS or WITH ALL FAULTS or consumables (such as fuses or batteries). This Limited Warranty is invalid if the factory-applied serial number has been altered or removed from the product. This Limited Warranty is valid only in the United States (for U.S. Sales) and Canada (for Canadian Sales).
LIMITATION ON DAMAGES: SONY SHALL NOT BE LIABLE FOR ANY INCIDENTAL OR CONSEQUENTIAL DAMAGES FOR BREACH OF ANY EXPRESS OR IMPLIED WARRANTY ON THIS PRODUCT. DURATION OF IMPLIED WARRANTIES: EXCEPT TO THE EXTENT PROHIBITED BY APPLICABLE LAW, ANY IMPLIED WARRANTY OF MERCHANTABILITY OR FITNESS FOR A PARTICULAR PURPOSE ON THIS PRODUCT IS LIMITED IN DURATION TO THE DURATION OF THIS WARRANTY.
Some states or jurisdictions do not allow the exclusion or limitation of incidental or consequential damages, or allow limitations on how long an implied warranty lasts, so the above limitations or exclusions may not apply to you. This Limited Warranty gives you specific legal rights and you may have other rights which vary from state to state or jurisdiction to jurisdiction.



- High-Definition Digital Video Recorder
- WARNING
- Note to the Cable TV/Satellite Dish Installer
- SAFETY PRECAUTIONS
- Regulatory Information: FCC Part 15
- Protecting the HD Digital Video Recorder
- Owner's Record
- CAUTION
- NOTE
- Trademarks and Copyrights
- IMPORTANT SAFETY INSTRUCTIONS
- DO NOT REMOVE THE CABINET COVER OR YOU MAY BE EXPOSED TO DANGEROUS VOLTAGE. REFER SERVICING TO QUALIFIED SERVICE PERSONNEL ONLY.
- Precautions
- Hard disk drive precautions
- Placement precautions
- IMPORTANT NOTICE
- Ventilation Clearance
- Care and Maintenance
- Table of Contents
- Introduction to High-Definition Digital Video Recorder (HD DVR)
- Connections
- Using the Menus
- Digital Video Recorder
- Using the TV Guide On Screen™ System
- References
- Package Contents
- Optional Item
- Features
- Front Panel Indicators and Controls
- Remote Control
- Inserting Batteries
- Remote Control Description
- Button Description
- Programming the Remote Control
- To Search for a Code to Program the Remote Control
- To Reset to the Factory Default Code Setting
- Manufacturer's Codes
- Using your DVR Remote Control with Other Equipment
- Operating a TV
- Operating a DVD Player (or VCR)
- Operating an Amplifier
- Basic Connection
- Connecting TV/Monitor
- HD TV with DVI connector
- TV with component connector
- TV with composite connector
- Inserting and Removing a CableCARD™ Device
- Inserting a CableCARD device
- Removing a CableCARD device
- Connecting Additional Equipment
- Connecting the AC Power Cord
- About CableCARD™ Devices
- Activating CableCARD Service
- CableCARD™ Messages
- Auto Setup
- Changing TV channels with your HD DVR Remote Control
- How to Access and Navigate in the Menus
- Using the Recent Channels Menu
- Using the Favorite Menu
- Creating a List of Favorite Channels While Viewing a Program
- Creating or Editing Favorite Categories
- Accessing the Recordings List
- Accessing the TV Guide On Screen™ Feature
- Using the Recording History Menu
- Using the Preferences Menu
- Options Descriptions
- System
- Recording
- Using the Help Menu
- Parental Lock
- Creating a Password
- Changing a Password
- Forgot or Lost Your Password?
- Rating Guidelines
- U.S. Rating Guidelines:
- Movie Rating Defined as
- Canadian Rating Guidelines:
- Viewing blocked programs
- Recording a program with Parental Locks
- Understanding the Status Bar
- Pausing TV
- Using the Pause Feature
- Live TV Pause Time
- Understanding the Screen Saver Feature
- Using Trick Play Features
- ←● REPLAY and ADVANCE ●→
- PREVIOUS and NEXT
- ■ STOP
- Recording Programs
- Scheduled Recordings
- Recording Live Programs
- REC (Record) Button in TV Guide On Screen Listings
- Options Menu or REC (Record) Button
- Playing Recorded Programs
- Deleting Recorded Programs
- To Do This... Do This...
- Using Chapter Marks
- Setting Chapter Marks
- Viewing Chapter Marks
- The Initial Guide Setup
- Welcome Screen
- Confirming your settings
- To Access the TV Guide On Screen™ System
- TV Guide On Screen System Components
- Using the LISTINGS Service
- Using the SEARCH Service
- Using the RECORDINGS Service
- Using the SCHEDULE Service
- To access SCHEDULE:
- Using the SETUP Service
- To access SETUP:
- Change System Settings
- Change Channel Display
- Change Default Options
- Recording a Program from TV Guide On Screen™ System
- Recording with the Remote Control's REC Button
- Recording from a Panel Menu
- Recording Manually
- Recording Starting!
- Learning About Available Video Services
- Learning About Screen Modes
- HD Content to SD Output
- SD Content to HD Output
- High-definition content output in high-definition format
- Contacting Sony
- www.sony.com/support
- TROUBLESHOOTING
- END-USER LICENSE AGREEMENT FOR SOFTWARE INCLUDED WITH YOUR SONY HIGH-DEFINITION DIGITAL VIDEO RECORDER
- SONY SOFTWARE LICENSE
- COPYRIGHT
- U.S. GOVERNMENT RESTRICTED RIGHTS
- EXCLUSION OF WARRANTY ON SONY SOFTWARE
- LIMITATION OF LIABILITY
- AUTOMATIC UPDATE FEATURE
- SEVERABILITY
- APPLICABLE LAW
- SUPPLEMENT
- OPEN SOURCE AND 3RD PARTY SOFTWARE
- GNU GENERAL PUBLIC LICENSE
- NO WARRANTY
- END OF TERMS AND CONDITIONS
- GNU LESSER GENERAL PUBLIC LICENSE
- libjpeg
- libpng
- Cosmin Truta
- Index
- Symbols
- Numerics
- A
- B
- C
- D
- E
- F
- G
- H
- |
- J
- K
- L
- M
- N
- 0
- P
- Q
- R
- S
- T
- U
- V
- W
- SONY.
- LIMITED WARRANTY
Brand : SONY
Model : DHG-HDD250
Category : DVD Recorder