
RDR-HXD710 - DVD Recorder SONY - Free user manual and instructions
Find the device manual for free RDR-HXD710 SONY in PDF.


| Product Type | DVD Recorder |
| Brand | Sony |
| Model | RDR-HXD710 |
| Dimensions (W x H x D) | 430 x 65 x 330 mm |
| Weight | Approx. 3.2 kg |
| Power Consumption | 20 W (standby: 0.5 W) |
| Power Supply | AC 220-240 V, 50/60 Hz |
| Recording Media | DVD-R, DVD-RW, DVD+R, DVD+RW, DVD-RAM |
| Playback Formats | DVD Video, DVD-R/RW, Video CD, Audio CD, MP3, JPEG |
| Hard Drive Capacity | 160 GB |
| Video Inputs | Composite, S-Video, Component |
| Video Outputs | HDMI, Component, Composite, S-Video |
| Audio Outputs | Optical digital, Coaxial digital, Analog stereo |
| Special Features | Timer recording, pause live TV, playlist editing, upscaling to 1080p |
| Maintenance and Cleaning | Clean exterior with soft dry cloth; use lens cleaner disc for optical pickup |
| Safety Precautions | Avoid moisture, do not block ventilation, unplug during storms |
| Spare Parts and Repairability | Contact Sony support for replacement parts; repair by qualified technicians only |
| General Information | Free user manual available in PDF; supports multiple languages |
Frequently Asked Questions - RDR-HXD710 SONY
User questions about RDR-HXD710 SONY
0 question about this device. Answer the ones you know or ask your own.
Ask a new question about this device
Download the instructions for your DVD Recorder in PDF format for free! Find your manual RDR-HXD710 - SONY and take your electronic device back in hand. On this page are published all the documents necessary for the use of your device. RDR-HXD710 by SONY.
USER MANUAL RDR-HXD710 SONY
natural_image
Abstract grayscale graphic with curved lines and a grid background, no text or symbols present.DVD Recorder
Operating Instructions
RDR-HXD710
RDR-HXD910
HDMI ^TM
HIGH-DEFINITION MULTIMEDIA INTERFACE

DVD+ReWritable

VIDEO/R/RW



Digital Video Broadcasting
Important Information
Should you experience a problem with this recorder, please refer to the trouble shooting section on page 104. If you are unable to rectify the problem, contact the Sony Customer Information Centre on
08705 111 999
(Monday-Friday from 8:30am to 6:00pm)
Please ensure you have the following information available before calling the helpline:
Date of purchase: ____
Serial number: ____
Model number: ____
Post code: ____
Detailed fault
description: ____
Signal strength
and signal
quality: ____
Notes:
- You can check the signal strength and signal quality using the menu system of this recorder.
Page 90 explains how to display the main menu on screen, and page 93 explains how to obtain the signal strength display.
The serial number and the model number are located on the rear of the recorder. - This recorder is only designed for use in the United Kingdom. Compliance with digital terrestrial TV broadcast standards in other countries is not guaranteed.
WARNING
To prevent fire or shock hazard, do not expose the unit to rain or moisture.
To avoid electrical shock, do not open the cabinet. Refer servicing to qualified personnel only.
The mains lead must only be changed at a qualified service shop.

This appliance is classified as a CLASS 1 LASER product. The CLASS 1 LASER PRODUCT MARKING is located on the laser protective housing inside the enclosure.

Disposal of Old Electrical & Electronic Equipment (Applicable in the European Union and other European countries with separate collection systems)
This symbol on the product or on its packaging indicates that this product shall not be treated as household waste. Instead it shall be handed over to the applicable collection point for the recycling of electrical and electronic equipment. By ensuring this product is disposed of correctly, you will help prevent potential negative consequences for the environment and human health, which could otherwise be caused by inappropriate waste handling of this product. The recycling of materials will help to conserve natural resources. For more detailed information about recycling of this product, please contact your local Civic Office, your household waste disposal service or the shop where you purchased the product.
CAUTION
The use of optical instruments with this product will increase eye hazard. As the laser beam used in this DVD recorder is harmful to eyes, do not attempt to disassemble the cabinet.
Refer servicing to qualified personnel only.
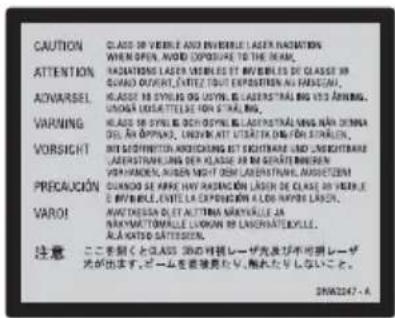
This label is located on the laser protective housing inside the enclosure.
Notice for customers in the United Kingdom and Republic of Ireland
A moulded plug complying with BS1363 is fitted to this equipment for your safety and convenience.
Should the fuse in the plug supplied need to be replaced, a 5 AMP fuse approved by ASTA or BSI to BS1362, (i.e., marked with or mark) must be used.
If the plug supplied with this equipment has a detachable fuse cover, be sure to attach the fuse cover after you change the fuse. Never use the plug without the fuse cover. If you should lose the fuse cover, please contact your nearest Sony service station.
Precautions
- This unit operates on 220 – 240 V AC, 50/60 Hz. Check that the unit's operating voltage is identical with your local power supply.
To prevent fire or shock hazard, do not place objects filled with liquids, such as vases, on the apparatus.
Precautions
This equipment has been tested and found to comply with the limits set out in the EMC Directive using a connection cable shorter than 3 metres.
On safety
Should any solid object or liquid fall into the cabinet, unplug the recorder and have it checked by qualified personnel before operating it any further.
About the hard disk drive
The hard disk has a high storage density, which enables long recording durations and quick access to the written data. However, it can easily be damaged by shock, vibration or dust, and should be kept away from magnets. To avoid losing important data, observe the following precautions.
- Do not apply a strong shock to the recorder.
- Do not place the recorder in a location subject to mechanical vibrations or in an unstable location.
- Do not place the recorder on top of a hot surface, such as a VCR or amplifier (receiver).
- Do not use the recorder in a place subject to extreme changes in temperature (temperature gradient less than 10^ / hour ).
- Do not move the recorder with its mains lead connected.
- Do not disconnect the mains lead while the power is on.
- When disconnecting the mains lead, turn off the power and make sure that the hard disk drive is not operating (the clock is displayed in the front panel display and all recording or dubbing has stopped).
- Do not move the recorder for one minute after you have unplugged the mains lead.
- Do not attempt to replace or upgrade the hard disk by yourself, as this may result in malfunction.
If the hard disk drive should malfunction, you cannot recover lost data. The hard disk drive is only a temporary storage space.
About repairing the hard disk drive
- The contents of the hard disk drive may be checked in case of repair or inspection during a malfunction or modification. However, the contents will not be backed up or saved by
Sony.
- If the hard disk needs to be formatted or replaced, it will be done at the discretion of Sony. All contents of the hard disk drive will be erased, including contents that violate copyright laws.
On power sources
- The recorder is not disconnected from the AC power source (mains) as long as it is connected to the wall outlet, even if the recorder itself has been turned off.
- If you are not going to use the recorder for a long time, be sure to disconnect the recorder from the wall outlet. To disconnect the AC power cord (mains lead), grasp the plug itself; never pull the cord.
- Before disconnecting the AC power cord (mains lead), check that the recorder's hard disk is not operating (recording or dubbing) on the front panel display.
On placement
- Place the recorder in a location with adequate ventilation to prevent heat build-up in the recorder.
- Do not place the recorder on a soft surface such as a rug that might block the ventilation holes.
- Do not place the recorder in a confined space such as a bookshelf or similar unit.
- Do not place the recorder in a location near heat sources, or in a place subject to direct sunlight, excessive dust, or mechanical shock.
- Do not place the recorder in an inclined position. It is designed to be operated in a horizontal position only.
- Keep the recorder and discs away from equipment with strong magnets, such as microwave ovens, or large loudspeakers.
- Do not place heavy objects on the recorder.
On recording
- Note that the contents of the recording cannot be compensated for under any and all conditions, including conditions that may arise due to a malfunction of this unit.
- Make trial recordings before making the actual recording.
Copyrights
- Television programmes, films, video tapes, discs, and other materials may be copyrighted. Unauthorized recording of such material may be contrary to the provisions of the
copyright laws. Also, use of this recorder with cable television transmission may require authorization from the cable television transmitter and/or programme owner.
- This product incorporates copyright protection technology that is protected by U.S. patents and other intellectual property rights. Use of this copyright protection technology must be authorized by Macrovision, and is intended for home and other limited viewing uses only unless otherwise authorized by Macrovision. Reverse engineering or disassembly is prohibited.
Copy guard function
Since the recorder has a copy guard function, programmes received through an external tuner (not supplied) may contain copy protection signals (copy guard function) and as such may not be recordable, depending on the type of signal.
IMPORTANT NOTICE
Caution: This recorder is capable of holding a still video image or on-screen display image on your television screen indefinitely. If you leave the still video image or on-screen display image displayed on your TV for an extended period of time you risk permanent damage to your television screen. Plasma display panels and projection televisions are especially susceptible to this.
If you have any questions or problems concerning your recorder, please consult your nearest Sony dealer.
About this manual
Check your model name
The instructions in this manual are for 2 models: RDR-HXD710 and RDR-HXD910. Check your model name by looking at the front panel of the recorder.
- In this manual, the internal hard disk drive is written as “HDD,” and “disc” is used as a general reference for the HDD, DVDs, or CDs unless otherwise specified by the text or illustrations.
- Instructions in this manual describe the controls on the remote. You can
also use the controls on the recorder if they have the same or similar names as those on the remote.
- The on-screen display illustrations used in this manual may not match the graphics displayed on your TV screen.
- RDR-HXD710/HXD910 are used for illustration purposes.
- The explanations regarding DVDs in this manual refer to DVDs created on this recorder. The explanations do not apply to DVDs that are created on other recorders and played back on this recorder.
Table of Contents
Important Information 2
WARNING 2
Precautions 3
Ways to Use Your DVD Recorder 9
Quick Guide to Disc Types 10
Recordable and playable discs 10
Playable discs 12
Hookups and Settings 14
Hooking Up the Recorder 14
Step 1: Unpacking 14
Step 2: Connecting the Aerial Cable 15
Step 3: Connecting the Video Cords/HDMI Cords ..... 16
About the SMARTLINK features (for SCART connections only). 18
Using the PROGRESSIVE button....19
Step 4: Connecting the Audio Cords ..... 20
Step 5: Connecting the Mains Lead .....21
Step 6: Preparing the Remote 22
Controlling TVs with the remote 22
Controlling the volume of your AV amplifier (receiver) with the remote. . . . . . . . 23
If you have a Sony DVD player or more than one Sony DVD recorder. . . . . . . . 24
Step 7: Easy Setup 25
Connecting a VCR or Similar Device 26
Connecting to the LINE 3 jack. 26
Connecting to the LINE 2 IN or LINE 4 IN jacks . . . . . . . . . . . . . . . . . . . . . . . . . . . . . . . . . . . . . . . . . . . . . . . . . . . . . . . . . . . 27
Connecting to a Satellite or Digital Tuner 28
Seven Basic Operations — Getting to Know Your DVD Recorder
- Inserting and Formatting a DVD Disc (Disc Info) 29
Inserting a Disc 29
Formatting a DVD disc (Disc Info)....29
- Recording a Programme 31
Checking the disc status while recording 32
-
Playing the Recorded Programme (Title List) 32
-
Displaying the Playing Time and Play Information 34
Checking the playing/remaining time. 35
-
Changing the Name of a Recorded Programme 36
-
Labelling and Protecting a Disc 38
Labelling a disc 38
Protecting a disc 38
- Playing the Disc on Other DVD Equipment (Finalise) 39
Unfinalising a disc 40
Guide to Digital Services 41
EPG (Electronic Programme Guide) 41
Viewing a list of available channels 41
Viewing programmes related to a specific category. 42
Programme information 43
Displaying the programme information 43
Viewing a digital text service 44
Selecting digital text from dedicated digital teletext channels 44
Selecting digital text from other channels 45
Favourites 45
Setting a favourite list. 45
Moving to a different favourite list 46
Watching or listening to a favourite channel 46
Index 47
Timer Recording 48
Before Recording 48
Recording mode. 48
Unrecordable pictures 49
Timer Recording (Standard/EPG) 49
Setting the timer manually (Standard) 49
Recording TV programmes using the EPG application 51
Using the Quick Timer function 53
Adjusting the recording picture quality and size. 53
Creating chapters in a title 54
Checking/Changing/Cancelling Timer Settings (EPG) 55
Checking/Changing/Cancelling Timer Settings (Timer List) 56
Automatically erasing old titles (Auto Title Erase) 57
Recording From Connected Equipment 58
Recording from connected equipment with a timer (Synchro Rec) ..... 58
Recording from connected equipment without a timer. 59
Playback 60
Playing 60
Playback options 62
Adjusting the picture quality 63
Adjusting the sound quality 64
Pausing a TV Broadcast (TV Pause)....65
Playing from the beginning of the programme you are recording (Chasing Playback) 65
Playing a previous recording while making another (Simultaneous Rec and Play)66
Searching for a Title/Chapter/Track, etc. 67
Searching by Thumbnail (Visual Search)....67
Searching by title number or time code 67
Playing MP3 Audio Tracks or JPEG Image Files 68
Selecting an MP3 album or track. 68
Selecting a JPEG album or image. 69
About MP3 audio tracks and JPEG image files 70
MP3 audio tracks or JPEG image files that the recorder can play. . . . . . . . . . . . 70
About playback order of albums, tracks, and files 71
Erasing and Editing 72
Before Editing 72
Edit options for the HDD and DVD-RWs (VR mode)....72
Edit options for DVD+RWs/DVD-RWs (Video mode)/DVD+Rs/DVD-Rs. . . . . . . 73
Erasing and Editing a Title 73
Erasing a chapter (Delete Chapter)....74
Erasing a section of a title (A-B Erase) 74
Erasing multiple titles (Erase Titles) 75
Dividing a title (Divide)....75
Erasing all titles on the disc....76
Erasing titles to open up disc space (Disc Map) 76
Creating chapters manually....76
Creating and Editing a Playlist 77
Moving a Playlist title (Change Order)....78
Combining multiple Playlist titles (Combine) 78
Dividing a Playlist title (Divide) 78
Dubbing (HDD DVD) 79
Before Dubbing 79
About "Dub Mode" 79
Dubbing 81
Dubbing a single title (Title Dub) 81
Dubbing multiple titles (Dub Selected Titles)....82
DV Dubbing 84
Before DV Dubbing 84
Preparing for DV dubbing 84
Recording an Entire DV Format Tape (One Touch Dubbing) 86
Program Edit 86
Settings and Adjustments 89
Clock and Language Settings (Settings) 89
Clock 89
Language....89
Digital TV settings (DTV Settings) 90
Favourites 90
Parental Lock....90
Tuning 91
Technical Information 93
Video Settings (Video) 94
Audio Settings (Audio) 96
Recording and Parental Control Settings (Features) 99
Parental Control (Password) 101
Disc and Remote Control Settings/Factory Settings (Options) 101
Easy Setup (Resetting the Recorder) 103
Additional Information 104
Troubleshooting 104
Self-diagnosis Function (When letters/numbers appear in the display) ..... 109
Notes About This Recorder 110
Specifications 111
About i.LINK 112
Guide to Parts and Controls 113
Glossary 117
Language Code List 119
Area Code 119
Digital TV Channel List 120
Index 121
Ways to Use Your DVD Recorder
A list of recordable and playable discs is on page 10.
Quick Guide to Disc Types
Recordable and playable discs
| Type Disc Logo | Icon used in this manual | Formatting (new discs) | Compatibility with other DVD players (finalising) | |||
| Hard disk drive (internal) | HDD | HDD | (Formatting unnecessary) | Dub HDD contents to a DVD to play on other DVD players | ||
| DVD+RW |  DVD+ReWritable DVD+ReWritable  DVD+ReWritable DVD+ReWritable | +RW | Automatically formatted in +VR mode | Playable on DVD+RW compatible players (automatically finalised) | ||
| DVD-RW | VR mode |  RW *2 RW *2  RW RW  | -RWVR | Format in VR mode (page 29) | Playable only on VR mode compatible players (finalisation unnecessary) | |
| Video mode | -RW Video | Format in Video mode (page 29) | Playable on most DVD players (finalisation necessary) (page 39) | |||
| DVD+R DVD+R DL |  DVD+R DVD+R  DVD+R DL DVD+R DL | +R | Automatically formatted | Playable on most DVD players (finalisation necessary) (page 39) | ||
| DVD-R |  R R4.7 R R4.7 | -R | Automatically formatted | Playable on most DVD players (finalisation necessary) (page 39) | ||
Usable disc versions (as of March 2005)
- 8x-speed or slower DVD+RWs
- 6x-speed or slower DVD-RWs (Ver.1.1, Ver.1.2 with CPRM ^*1 )
• 16x-speed or slower DVD+Rs - 16x-speed or slower DVD-Rs (Ver.2.0, Ver.2.1)
- 2.4x-speed DVD+R DL (Double Layer) discs
“DVD+RW,” “DVD-RW,” “DVD+R,” “DVD+R DL,” and “DVD-R” are trademarks.
*1 CPRM (Content Protection for Recordable Media) is a coding technology that protects copyrights for images.
*2 This logo applies to 4x and 6x speed DVD-RW discs.
| Recording Features Editing Features | ||||||||
| Rewrite (page 48) | Auto Chapter (page 99) | Manual Chapter (page 76) | Record 16:9 sizes (page 53) | Change title name (page 73) | Delete title (page 75) | A-B Erase (page 74) | Playlist (page 77) | |
| Yes Yes | Yes Yes Yes | Yes Yes Yes | ||||||
| Yes Yes | No No Yes | Yes Yes No | ||||||
| Yes Yes | Yes Yes Yes | Yes Yes Yes | ||||||
| Yes Yes | No Yes | *3 | Yes Yes | No No | ||||
| No Yes | No No Yes Yes | *4 | No No | |||||
| No Yes | No Yes | *3 | Yes Yes | *4 | No No | |||
Discs that cannot be recorded on
- 8 cm discs
• DVD-Rs in VR mode (Video Recording format)
*3 Only if the recording mode is LSP, SP, HSP, or HQ.
*4 Erasing titles does not free up disc space.
playable discs
| Type Disc Logo | Icon used in this manual | Characteristics | |
| DVD VIDEO |  |  | Discs such as movies that can be purchased or rented |
| VIDEO CD |  |  | VIDEO CDs or CD-Rs/CD-RWs in VIDEO CD/Super VIDEO CD format |
| CD |  |  | Music CDs or CD-Rs/CD-RWs in music CD format that can be purchased |
| DATA DVD — |  | DVD+RWs/DVD+Rs/DVD-RWs/DVD-Rs/DVD-ROMs containing JPEG image files | |
| DATA CD — |  | CD-ROMs/CD-Rs/CD-RWs containing MP3 audio tracks or JPEG image files | |
| 8 cm DVD+RW/DVD-RW/DVD-R | — | — | 8 cm DVD+RW, DVD-RW, and DVD-R recorded with a DVD video camera. (Still images recorded with a DVD video camera cannot be played.) |
“DVD VIDEO” and “CD” are trademarks.
Discs that cannot be played
• PHOTO CDs
- CD-ROMs/CD-Rs/CD-RWs that are not recorded in music CD or Video CD format, or do not contain MP3 or JPEG files
• Data part of CD-Extras
- DVD-ROMs that do not contain JPEG files or are not in DVD Video format
- DVD Audio discs
- DVD-RAMs
• HD layer on Super Audio CDs
- DVD VIDEOs with a different region code (page 13)
- DVD-Rs recorded in VR mode (Video Recording format)
Maximum recordable number of titles
| Disc Number of titles* |
| HDD 300 |
| DVD-RW/DVD-R 99 |
| DVD+RW/DVD+R 49 |
| DVD+R DL 49 |
* The maximum length for each title is eight hours.
Note on playback operations of DVD VIDEOS/VIDEO CDs
Some playback operations of DVD VIDEOs/VIDEO CDs may be intentionally set by software producers. Since this recorder plays DVD VIDEOs/VIDEO CDs according to the disc contents the software producers designed, some playback features may not be available. Also, see the instructions supplied with the DVD VIDEOs/VIDEO CDs.
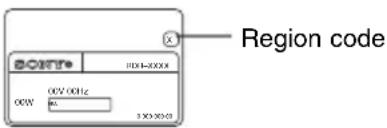
Region code (DVD VIDEO only)
Your recorder has a region code printed on the rear of the unit and will only play DVD VIDEOS (playback only) labelled with identical region codes. This system is used to protect copyrights. DVD VIDEOS labelled will also play on this recorder.
If you try to play any other DVD VIDEO, the message “Playback prohibited by region code.” will appear on the TV screen. Depending on the DVD VIDEO, no region code indication may be labelled even though playing the DVD VIDEO is prohibited by area restrictions.
Music discs encoded with copyright protection technologies
This product is designed to play back discs that conform to the Compact Disc (CD) standard. Recently, various music discs encoded with copyright protection technologies are being marketed by some record companies. Please be aware that among those discs, there are some that do not conform to the CD standard and may not be playable by this product.
Note on DualDiscs
A DualDisc is a two sided disc product which mates DVD recorded material on one side with digital audio material on the other side.
However, since the audio material side does not conform to the Compact Disc (CD) standard, playback on this product is not guaranteed.
Notes
- Some DVD+RWs/DVD+Rs, DVD-RWs/DVD-Rs, or CD-RWs/CD-Rs cannot be played on this recorder due to the recording quality or physical condition of the disc, or the characteristics of the recording device and authoring software. The disc will not play if it has not been correctly finalised. For more information, see the operating instructions for the recording device.
- You cannot mix VR mode and Video mode on the same DVD-RW. To change the disc's format, reformat the disc (page 29). Note that the disc's contents will be erased after reformatting.
- You cannot shorten the time required for recording even with high-speed discs.
- It is recommended that you use discs with “For Video” printed on their packaging.
- You cannot add new recordings to DVD+Rs, DVD-Rs, or DVD-RWs (Video mode) that contain recordings made on other DVD equipment.
- In some cases, you may not be able to add new recordings to DVD+RWs that contain recordings made on other DVD equipment. If you do add a new recording, note that this recorder will rewrite the DVD menu.
- You cannot edit recordings on DVD+RWs, DVD-RWs (Video mode), DVD+Rs, or DVD-Rs that are made on other DVD equipment.
- If the disc contains PC data unrecognizable by this recorder, the data may be erased.
- You may not be able to record on some recordable discs, depending on the disc.
Hooking Up the Recorder
Follow steps 1 to 7 to hook up and adjust the settings of the recorder.
Notes
- Plug cords securely to prevent unwanted noise.
- Refer to the instructions supplied with the components to be connected.
- You cannot connect this recorder to a TV that does not have a SCART or video input jack.
- Be sure to disconnect the mains lead of each component before connecting.
Step 1: Unpacking
Check that you have the following items:
- Audio/video cord (phono plug × 3 ↔ phono plug × 3) (1)
- Mains lead (1)
- Aerial cable (1)
- Remote commander (remote) (1)
• R6 (size AA) batteries (2)
Step 2: Connecting the Aerial Cable
Connect the aerial cable by following the steps below. Do not connect the mains lead until you reach "Step 5: Connecting the Mains Lead" on page 21.


: Signal flow
1 Disconnect the aerial cable from your TV and connect it to AERIAL IN on the rear panel of the recorder.
2 Connect AERIAL OUT of the recorder to the aerial input of your TV, using the supplied aerial cable.
Step 3: Connecting the Video Cords/HDMI Cords
Select one of the following patterns A through E, according to the input jack on your TV monitor, projector, or AV amplifier (receiver). This will enable you to view pictures.
A Connecting to a SCART input jack
When you set “Line1 Output” to “S Video” or “RGB” in “Easy Setup” (page 25), use a SCART cord that conforms to the selected signal.
B Connecting to a video input jack
You will enjoy standard quality images.
© Connecting to an S VIDEO input jack
You will enjoy high quality images.
D Connecting to component video input jacks (Y, P_B/C_B , P_R/C_R )
You will enjoy accurate colour reproduction and high quality images.
If your TV accepts progressive 525p/625p format signals, you must use this connection and set “Component Out” in “Video” setup to “On” (page 95). Then press PROGRESSIVE on the remote to send progressive video signals. For details, see “Using the PROGRESSIVE button” on page 19.
E Connecting to an HDMI input jack (RDR-HXD910 only\*)
Use a certified HDMI cord (not supplied) to enjoy high quality digital picture and sound through the HDMI OUT jack.

flowchart
graph TD
    subgraph_Video_Out_1["To HDMI OUT (RDR-HXD910 only)"]
        A["TV, projector, or AV amplifier (receiver)"] --> B["TV"]
        C["TV, projector, or AV amplifier (receiver)"] --> D["TV"]
        E["To HDMI OUT"] --> F["To HDMI OUT (RDR-HXD910 only)"]
        G["To HDMI OUT"] --> H["To HDMI OUT (RDR-HXD910 only)"]
        I["To HDMI OUT"] --> J["To HDMI OUT (RDR-HXD910 only)"]
        K["To HDMI OUT"] --> L["To HDMI OUT (RDR-HXD910 only)"]
        M["To HDMI OUT"] --> N["To HDMI OUT (RDR-HXD910 only)"]
        O["To HDMI OUT"] --> P["To HDMI OUT (RDR-HXD910 only)"]
        Q["To HDMI OUT"] --> R["To HDMI OUT (RDR-HXD910 only)"]
        S["To HDMI OUT"] --> T["To HDMI OUT (RDR-HXD910 only)"]
        U["To HDMI OUT"] --> V["To HDMI OUT (RDR-HXD910 only)"]
        W["To HDMI OUT"] --> X["To HDMI OUT (RDR-HXD910 only)"]
        Y["To HDMI OUT"] --> Z["To HDMI OUT (RDR-HXD910 only)"]
        AA["To HDMI OUT"] --> AB["To HDMI OUT (RDR-HXD910 only)"]
        AC["To HDMI OUT"] --> AD["To HDMI OUT (RDR-HXD910 only)"]
        AE["To HDMI OUT"] --> AF["To HDMI OUT (RDR-HXD910 only)"]
        AG["To HDMI OUT"] --> AH["To HDMI OUT (RDR-HXD910 only)"]
        AI["To HDMI OUT"] --> AJ["To HDMI OUT (RDR-HXD910 only)"]
        AK["To HDMI OUT"] --> AL["To HDMI OUT (RDR-HXD910 only)"]
        AM["To HDMI OUT"] --> AN["To HDMI OUT (RDR-HXD910 only)"]
        AO["To HDMI OUT"] --> AP["To HDMI OUT (RDR-HXD910 only)"]
        AQ["To HDMI OUT"] --> AR["To HDMI OUT (RDR-HXD910 only)"]
        AS["To HDMI OUT"] --> AT["To HDMI OUT (RDR-HXD910 only)"]
        AU["To HDMI OUT"] --> AV["To HDMI OUT (RDR-HXD910 only)"]
        AW["To HDMI OUT"] --> AX["To HDMI OUT (RDR-HXD910 only)"]
        AY["To HDMI OUT"] --> AZ["To HDMI OUT (RDR-HXD910 only)"]
        BA["To HDMI OUT"] --> BB["To HDMI OUT (RDR-HXD910 only)"]
        BC["To HDMI OUT"] --> BD["To HDMI OUT (RDR-HXD910 only)"]
        BE["To HDMI OUT"] --> BF["To HDMI OUT (RDR-HXD910 only)"]
        BG["To HDMI OUT"] --> BH["To HDMI OUT (RDR-HXD910 only)"]
        BI["To HDMI OUT"] --> BJ["To HDMI OUT (RDR-HXD910 only)"]
        BK["To HDMI OUT"] --> BL["To HDMI OUT (RDR-HXD910 only)"]
        BM["To HDMI OUT"] --> BN["To HDMI OUT (RDR-HXD910 only)"]
        BO["To HDMI OUT"] --> BP["To HDMI OUT (RDR-HXD910 only)"]
        BPB["TO HDMI OUT"] --> BPBb["P_B/C_B"]
        BPC["P_B/C_B"]
        BPD["P_B/C_B"]
        BPE["P_B/C_B"]
        BPF["P_B/C_B"]
        BPG["P_B/C_B"]
        BPH["P_B/C_B"]
        BPI["P_B/C_B"]
        BPJ["P_B/C_B"]
        BPK["P_B/C_B"]
        BPL["P_B/C_B"]
        BPM["P_B/C_B"]
        BPN["P_B/C_B"]
        BPO["P_B/C_B"]
        BPP["P_B/C_B"]
        BPQ["P_B/C_B"]
        BP_R["P_B/C_B"]
        BP_S["P_SVIDEO Cord (not supplied)"]
        BT["SVIDEO Cord (not supplied)"]
    end

    subgraph Video_Out_1
        B
        C
        D
        E
        F
        G
        H
        I
        J
        K
        L
        M
    end

    subgraph Video_Out_2
        B
        C
        D
        E
        F
        G
        H
        I
    end

    subgraph Video_Out_3
        B
        C
        D
        E
    end

    subgraph Video_Out_4
        B
        C
        D
    end

    subgraph Video_Out_5
        B
        C
        D
    end

    subgraph Video_Out_6
        B
        C
        D
    end

    subgraph Video_Out_7
        B
        C
    end

    subgraph Video_Out_8
        B
        C
    end

    subgraph Video_Out_9
        B
        C
    end

    subgraph Video_Out_10
        B
        C
    end

    subgraph Video_Out_11
        B
        C
    end

    subgraph Video_Out_12
        B
        C
    end

    subgraph Video_Out_13
        B
        C
    end

    subgraph Video_Out_14
        B
        C
    end

    subgraph Video_Out_15
        B
        C
    end

    subgraph Video_Out_16
        B
        C
    end

    subgraph Video_Out_17
        B
        C
    end

    subgraph Video_Out_18
        B
        C
    end

    subgraph Video_Out_19
        B
        C
    end

    subgraph Video_Out_20
        B
        C
    end

    subgraph Video_Out_21
        B
        C
    end

    subgraph Video_Out_22
        B
        C
    end

    subgraph Video_Out_23
        B
        C
    end

    subgraph Video_Out_24
        B
        C
    end

    subgraph Video_Out_25
        B
        C
    end

    subgraph Video_Out_26
        B
        C
    end

    subgraph Video_Out_27
        B
        C
    end

    subgraph Video_Out_28
        B
        C
    end

    subgraph Video_Out_29
        B
        C
    end

    subgraph Video_Out_30
        B
        C
    end

    subgraph Video_Out_31
        B
        C
    end

    subgraph Video_Out_32
        B
        C
    end

    subgraph Video_Out_33
        B
        C
    end

    subgraph Video_Out_34
        B
        C
    end

    subgraph Video_Out_35
        B
        C
    end

    subgraph Video_Out_36
        B
        C
    end

    subgraph Video_Out_37
        B
        C
    end

    subgraph Video_Out_38
        B
        C
    end

    subgraph Video_Out_39
        B
        C
    end

    subgraph Video_Out_40
        B
        C
    end

    subgraph Video_Out_41
        B
        C
    end

    subgraph Video_Out_42
        B
        C
    end

    subgraph Video_Out_43
        B
        C
    end

    subgraph Video_Out_44
        B
        C
    end

    subgraph Video_Out_45
        B
        C
    end

    subgraph Video_Out_46:
            A["HDMI IN"]
            B["TV, projector, or AV amplifier (receiver)"]
            AC["HDMI IN"]
            AD[": Signal flow"]

    subgraph Video_Out_47:
            AE["HDMI IN"]
            AF["TV, projector, or AV amplifier (receiver)"]

    end
When playing "wide screen" images
Some recorded images may not fit your TV screen. To change the picture size, see page 94.
If you are connecting to a VCR
Connect your VCR to the LINE 3 jack on the recorder (page 26).
Notes
- Do not connect more than one type of video cord between the recorder and your TV at the same time.
- You cannot use the PROGRESSIVE button with the connections Ⓑ and Ⓒ.
-
When you connect the recorder to your TV via the SCART jacks, the TV's input source is set to the recorder automatically when you start playback. If necessary, press TV/VIDEO to return the input to the TV.
-
For correct SMARTLINK connection, you will need a SCART cord that has the full 21 pins. Refer to your TV's instruction manual as well for this connection.
- If you connect this recorder to a TV with SMARTLINK, set "Line1 Output" to "Video" in "Easy Setup."
- You cannot connect the HDMI OUT jack (connection E) to DVI jacks that are not HDCP compliant (e.g., DVI jacks on PC displays).
* This DVD recorder is based on version 1.1 of High-Definition Multimedia Interface Specifications.
This DVD recorder incorporates High-Definition Multimedia Interface (HDMI ^TM ) technology.
HDMI, the HDMI logo and High-Definition Multimedia Interface are trademarks or registered trademarks of HDMI Licensing LLC.
About the SMARTLINK features (for SCART connections only)
If the connected TV (or other connected equipment such as a set top box) complies with SMARTLINK, NexTView Link ^3 , MEGALOGIC ^1 , EASYLINK ^2 , CINEMALINK ^2 , Q-Link ^3 , EURO VIEW LINK ^4 , or T-V LINK ^*5 , this recorder automatically runs the SMARTLINK function after you complete the connection pattern A on page 16 (the SMARTLINK indicator lights up when you turn on your TV). You can enjoy the following SMARTLINK features.
• TV Direct Rec
You can easily record what you are watching on your TV (page 31).
- One Touch Play
You can turn on the recorder and TV, set the TV's input to the recorder, and start playback with one touch of the ▷ (play) button (page 61).
- One Touch Menu
You can turn on the recorder and TV, set the TV to the recorder's channel, and display the Title List menu with one touch of the TITLE LIST button (page 61).
- One Touch Timer
You can turn on the recorder and TV, set the TV to the recorder's channel, and display the timer programming menu with one touch of the TIMER button (page 50).
• Automatic Power Off
The recorder will turn off automatically if the recorder is not used after you turn off the TV.
- One Touch EPG
You can turn on the recorder and TV, set the TV to the recorder's channel, and display the Electronic Programme Guide screen with one touch of the GUIDE) button on the remote (page 41).
• EPG Title Download
The recorder will automatically download and set the title of the programme being recorded from LINE 1 according to the title name displayed in the EPG of the connected TV or STB.
*1 “MEGALOGIC” is a registered trademark of Grundig Corporation.
*2 “EASYLINK” and “CINEMALINK” are trademarks of Philips Corporation.
*3 "Q-Link" and "NexTView Link" are trademarks of Panasonic Corporation.
*4 "EURO VIEW LINK" is a trademark of Toshiba Corporation.
*5 "T-V LINK" is a trademark of JVC Corporation.
Hint
SMARTLINK also works with TVs or other equipment having EPG Timer Control, EPG Title Download, and Now Recording functions. For details, refer to the operating instructions supplied with your TV or other equipment.
Notes
- The SMARTLINK features are available only when “Video” is selected in “Line1 Output.”
- The SMARTLINK features are not available for devices connected via the DVD recorder's LINE 3 jack.
- The SMARTLINK features are not available when “Power Save” is set to “On” (page 102).
- Not all TVs respond to the functions above.
Using the PROGRESSIVE button
By using the PROGRESSIVE button, you can select the signal format in which the recorder outputs video signals: interlace or progressive.
1 Connect the recorder using the COMPONENT VIDEO OUT jacks (pattern D on page 16).
2 Set “Component Out” in “Video” setup to “On” (page 95).
3 Press the PROGRESSIVE button.
“PROGRESSIVE” appears in the front panel display when the recorder outputs progressive signals.
◆Progressive
Select this when:
- your TV accepts progressive signals, and, - the TV is connected to the COMPONENT VIDEO OUT jacks.
Note that the pictures will not be clear or no picture will appear if you select progressive signal output when either of the above conditions is not met.
◆Interlace
Set to this position when:
- your TV does not accept progressive signals, or, - your TV is connected to jacks other than the COMPONENT VIDEO OUT jacks (LINE 2 OUT (VIDEO or S VIDEO)).
Hint
When you select progressive signal output, you can fine-tune the signal according to the type of software you are watching (page 95).
Step 4: Connecting the Audio Cords
Select one of the following patterns A or B, according to the input jack on your TV monitor, projector, or AV amplifier (receiver). This will enable you to listen to sound.
A Connecting to audio L/R input jacks
This connection will use your TV's or stereo amplifier's (receiver's) two speakers for sound. You can enjoy the following surround effects (page 64).
• TV: Dynamic, Wide, Night
- Stereo amplifier (receiver): Standard, Night
B Connecting to a digital audio input jack
If your AV amplifier (receiver) has a Dolby ^1 Digital, DTS ^2 , or MPEG audio decoder and a digital input jack, use this connection. You can enjoy Dolby Digital (5.1ch), DTS (5.1ch), and MPEG audio (5.1ch) surround effects.

flowchart
graph TD
    A["TV, projector, or AV amplifier (receiver)"] --> B["DVd recorder"]
    B --> C["AV amplifier (receiver) with a decoder"]
    C --> D["Speaker"]
    C --> E["Front (R)"]
    C --> F["Subwoofer"]
    C --> G["Rear (R)"]
    C --> H["Speaker"]
    B --> I["Coaxial digital cord (not supplied)"]
    B --> J["Optical digital cord (not supplied)"]
    B --> K["HDMI cord (not supplied)"]
    B --> L["to DIGITAL OUT (COAXIAL or OPTICAL)"]
    B --> M["to LINE 2 OUT (R-AUDIO-L)"]
    B --> N["to HDMI OUT (RDR-HXD910 only)"]
    B --> O["Line 2 OUT"]
    O --> P["(red)"]
    O --> Q["(white)"]
    O --> R["(yellow)*"]
    O --> S["(yellow)"]
    O --> T["(yellow)"]
    O --> U["(red)"]
    V["Input"] --> W["VIDEO"]
    W --> X["L"]
    X --> Y["AUDIO"]
    Y --> Z["R"]
    style A fill:#f9f,stroke:#333
    style B fill:#ccf,stroke:#333
    style C fill:#cfc,stroke:#333
    style D fill:#fcc,stroke:#333
    style E fill:#cff,stroke:#333
    style F fill:#ffc,stroke:#333
    style G fill:#fcc,stroke:#333
    style H fill:#ffc,stroke:#333
    style I fill:#fcc,stroke:#333
    style J fill:#fcc,stroke:#333
    style K fill:#fcc,stroke:#333
    style L fill:#fcc,stroke:#333
    style M fill:#fcc,stroke:#333
    style N fill:#fcc,stroke:#333
    style O fill:#fcc,stroke:#333

: Signal flow
* The yellow plug is used for video signals (page 16).
Hint
For correct speaker location, see the operating instructions supplied with the connected components.
Notes
- Do not connect your TV's audio output jacks to the LINE IN (R-AUDIO-L) jacks at the same time. This will cause unwanted noise to come from your TV's speakers.
- In the connection Ⓐ, do not connect the LINE IN (R-AUDIO-L) and LINE 2 OUT (R-AUDIO-L) jacks to your TV's audio output jacks at the same time. This will cause unwanted noise to come from your TV's speakers.
- In the connection B, after you have completed the connection, make the appropriate settings under "Audio Connection" in "Easy Setup" (page 25). Otherwise, no sound or a loud noise will come from your speakers.
- With the connection B, the surround sound effects of this recorder cannot be used.
- When you connect the recorder to an AV amplifier (receiver) using an HDMI cord (RDR-HXD910 only), you will need to do one of the following:
- Connect the AV amplifier (receiver) to the TV with the HDMI cord.
- Connect the recorder to the TV with a video cord other than HDMI cord (component video cord, SVIDEO cord, or audio/video cord).
^*1 Manufactured under license from Dolby Laboratories. "Dolby," and the double-D symbol are trademarks of Dolby Laboratories.
*2 "DTS" and "DTS Digital Out" are trademarks of Digital Theater Systems, Inc.
Step 5: Connecting the Mains Lead
Connect the supplied mains lead to the AC IN terminal of the recorder. Then plug the recorder and TV mains leads (power cords) into the mains. After you connect the mains lead, you must wait for a short while before operating the recorder. You can operate the recorder once the front panel display lights up and the recorder enters standby mode.
If you connect additional equipment to this recorder (page 26), be sure to connect the mains lead after all connections are complete.

Step 6: Preparing the Remote
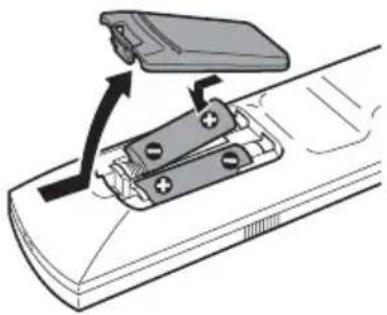
You can control the recorder using the supplied remote. Insert two R6 (size AA) batteries by matching the and ends on the batteries to the markings inside the battery compartment. When using the remote, point it at the remote sensor R on the recorder.
natural_image
Diagram of a remote control panel with battery and switch mechanism (no text or labels)Notes
- If the supplied remote interferes your other Sony DVD recorder or player, change the command mode number for this recorder (page 24).
- Use the batteries correctly to avoid possible leakage and corrosion. Do not touch the liquid with bare hands should leakage occur. Observe the following:
- Do not use a new battery with an old battery, or batteries of different manufacturers.
- Do not attempt to recharge the batteries.
- If you do not intend to use the remote for an extended period of time, remove the batteries.
- If battery leakage occurs, wipe out any liquid inside the battery compartment, and insert new batteries.
- Do not expose the remote sensor (marked the front panel) to strong light, such as direct sunlight or lighting apparatus. The recorder may not respond to the remote.
Controlling TVs with the remote
You can adjust the remote's signal to control your TV.
If you connected the recorder to an AV amplifier (receiver), you can use the supplied remote to control the AV amplifier's (receiver's) volume.
Notes
- Depending on the connected unit, you may not be able to control your TV or AV amplifier (receiver) with some or all of the buttons below.
- If you enter a new code number, the code number previously entered will be erased.
- When you replace the batteries of the remote, the code number may be reset to the default setting. Set the appropriate code number again.

1 Slide the TV/DVD switch to TV.
2 Hold down I/ ^1 .
3 Enter your TV's manufacturer code (see "Code numbers of controllable TVs" below) using the number buttons.
4 Release I/⏻.
When the TV/DVD switch is set to TV, the remote performs the following:
| Buttons Operations | |
| Turns your TV on or off | |
| (volume) +/- Adjusts the volume of your TV | |
| PROG +/- Selects the programme position on your TV | |
| TV/DVD Switches your TV's input source | |
| Number buttons and SET, -/--* | Selects the programme position on your TV |
* If you use the number buttons to select the TV's programme position, press -/-- followed by the number buttons for two-digit numbers.
To operate the TV/DVD button (for SCART connections only)
When the TV/DVD switch is set to DVD, the TV/DVD button switches between the recorder and the last input source selected on the TV. Point your remote at the recorder when using this button.
When you connect the recorder to the TV via the SCART jacks, the input source for the TV is set to the recorder automatically when you start playback. To watch another source, press the TV/DVD button to switch the TV's input source.
Code numbers of controllable TVs
If more than one code number is listed, try entering them one at a time until you find the one that works with your TV.
| Manufacturer Code number | |
| Sony 01 (default) | |
| Aiwa 01 (default) | |
| Grundig 11 | |
| Hitachi 23, 24, 72 | |
| Loewe 06, 45 | |
| Nokia 15, 16, 69, 73 | |
| Panasonic | 17, 49 |
| Philips 06, 07, 08, 23, 45, 72 | |
| Saba | 12, 13, 36, 43, 74, 75 |
| Manufacturer Code number | |
| Samsung | 06, 22, 23, 71, 72 |
| Sanyo 25 | |
| Sharp | 29 |
| Telefunken | 12, 13, 36, 43, 74, 75 |
| Thomson | 12, 13, 43, 74, 75 |
| Toshiba | 38 |
| LG | 06 |
| JVC | 33 |
Controlling the volume of your AV amplifier (receiver) with the remote

1 Slide the TV/DVD switch to DVD.
2 Hold down I/☐, and enter the manufacturer code (see the table below) for your AV amplifier (receiver) using the number buttons.
3 Release I/☐.
The (volume) + / - buttons control the AV amplifier's volume.
If you want to control the TV's volume, slide the TV/DVD switch to TV.
Hint
If you want to control the TV's volume even when the TV/DVD switch is set to DVD, repeat the steps above and enter the code number 90 (default).
Code numbers of controllable AV amplifiers (receivers)
If more than one code number is listed, try entering them one at a time until you find the one that works with your AV amplifier (receiver).
| Manufacturer Code number |
| Sony 78, 79, 80, 91 |
| Denon 84, 85, 86 |
| Kenwood 92, 93 |
| Onkyo 81, 82, 83 |
| Pioneer 99 |
| Sansui 87 |
| Technics 97, 98 |
| Yamaha 94, 95, 96 |
If you have a Sony DVD player or more than one Sony DVD recorder
If the supplied remote interferes with your other Sony DVD recorder or player, set the command mode number for this recorder and the supplied remote to one that differs from the other Sony DVD recorder or player.
The default command mode setting for this recorder and the supplied remote is DVD3.
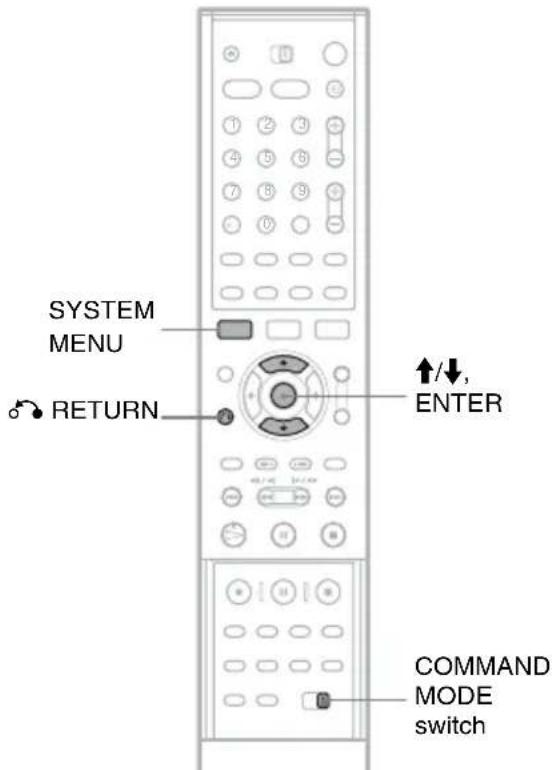
1 Press SYSTEM MENU.
The System Menu appears.
2 Select "SETUP," and press ENTER.
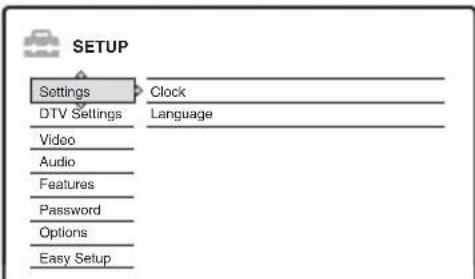
3 Select "Options," and press ENTER.

4 Select "Command Mode," and press ENTER.

5 Select the Command mode (DVD1, DVD2, or DVD3), and press ENTER.
6 Slide the COMMAND MODE switch on the remote so it matches the mode you selected above.
To return to the previous step
Press o RETURN.
Check that the command mode switch on the remote is set to the default setting of DVD3 before you try to change the command mode for the recorder. If the command mode for the remote is changed to DVD1 or DVD2, you may be unable to operate this recorder.
Step 7: Easy Setup
Make the basic adjustments by following the on-screen instructions in “Easy Setup.”

1 Turn on the recorder and switch the input selector on your TV so that the signal from the recorder appears on your TV screen.
The message about the initial settings appears.
- If this message does not appear, select “Easy Setup” from “SETUP” in the System Menu to run “Easy Setup” function (“Settings and Adjustments” on page 89).
2 Press ENTER.
Follow the on-screen instructions to make the following settings.
◆Auto Tune
The recorder will automatically capture and store the available TV and Radio channels.
◆Clock
The recorder will automatically search for a clock signal. If a clock signal cannot be found, set the clock manually using /// , and press ENTER.
◆TV Type
If you have a wide-screen TV, select “16:9.” If you have a standard TV, select either “4:3 Letter Box” (shrink to fit) or “4:3 Pan Scan” (stretch to fit). This will determine how “wide-screen” images are displayed on your TV.
◆ Component Out
If you are using the COMPONENT VIDEO OUT jack, select "On."
◆Line1 Output
To output video signals, select "Video." To output S video signals, select "S Video." To output RGB signals, select "RGB." Select "Video" to enjoy the SMARTLINK features.
- If you set “Component Out” to “On,” you cannot select “RGB.”
◆Audio Connection
If you connected an AV amplifier (receiver) using either a digital optical or coaxial cord, select “Yes: DIGITAL OUT” and set the digital output signal (page 97).
3 Press ENTER when "Finish" appears.
“Easy Setup” is finished.
To return to the previous step
Press 📋 RETURN.
Hints
- If your AV amplifier (receiver) has an MPEG audio decoder, set “MPEG” to “MPEG” (page 97).
- If you want to run “Easy Setup” again, select “Easy Setup” from “SETUP” in the System Menu (page 103).
Connecting a VCR or Similar Device
After disconnecting the recorder's mains lead from the mains, connect a VCR or similar recording device to the LINE IN jacks of this recorder.
Use the DV IN jack on the front panel if the equipment has a DV output jack (i.LINK jack) (page 84).
See also the instruction manual supplied with the connected equipment.
To record on this recorder, see “Recording from connected equipment without a timer” on page 59.
Connecting to the LINE 3 jack
Connect a VCR or similar recording device to the LINE 3 jack of this recorder.
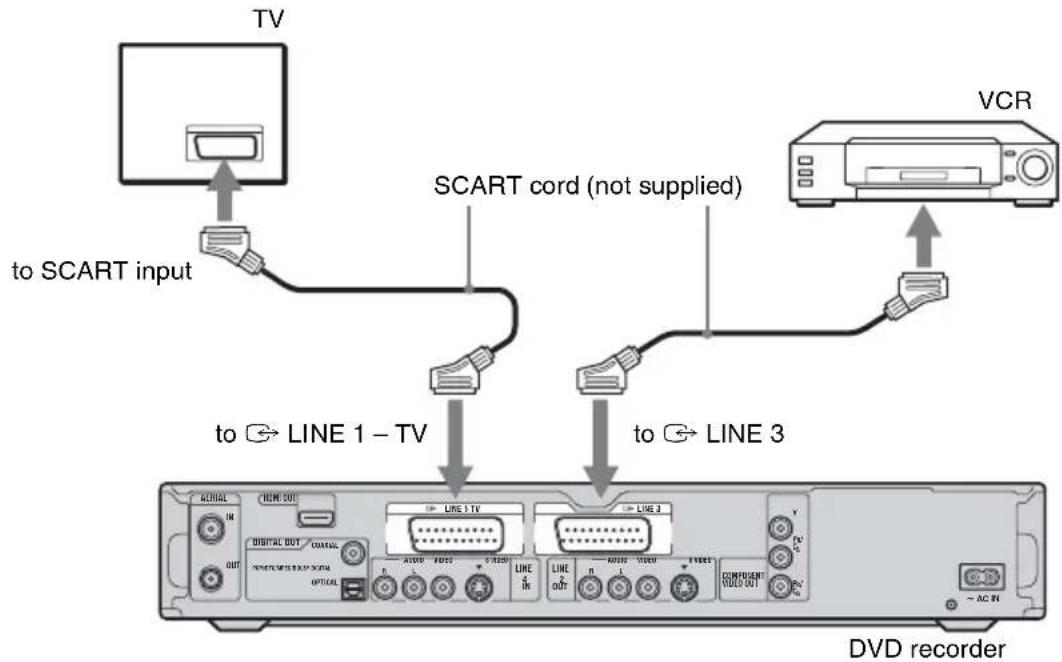
Notes
- Pictures containing copy protection signals that prohibit any copying cannot be recorded.
- If you pass the recorder signals via the VCR, you may not receive a clear image on your TV screen.

flowchart
graph LR
    A["DVD recorder"] --> B["VCR"]
    B --> C["TV"]
    B -->|X| C
Be sure to connect your VCR to the DVD recorder and your TV in the order shown below. To watch video tapes, watch the tapes through a second line input on your TV.
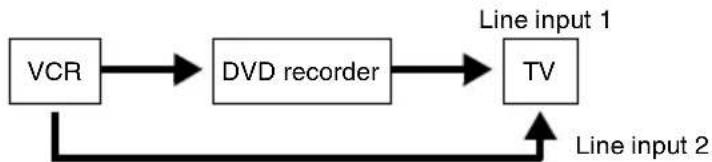
flowchart
graph LR
    A["VCR"] --> B["DVD recorder"]
    B --> C["TV"]
    D["Line input 2"] --> C
    C --> E["Line input 1"]
- The SMARTLINK features are not available for devices connected via the DVD recorder's LINE 3 jack.
- When you record to a VCR from this DVD recorder, do not switch the input source to TV by pressing the TV/VIDEO button on the remote.
- If you disconnect the recorder's mains lead, you will not be able to view the signals from the connected VCR.
Connecting to the LINE 2 IN or LINE 4 IN jacks
Connect a VCR or similar recording device to the LINE 2 IN or LINE 4 IN jacks of this recorder. If the equipment has an S-video jack, you can use an S-video cord instead of an audio/video cord.

Hint
When the connected equipment outputs only monaural sound, connect only the L (MONO) and VIDEO input jacks on the front of the recorder. Do not connect the R input jack.
Notes
- Do not connect the yellow LINE IN (VIDEO) jack when using an S-video cord.
- Do not connect the output jack of this recorder to another equipment's input jack with the other equipment's output jack connected to the input jack of this recorder. Noise (feedback) may result.
- Do not connect more than one type of video cord between the recorder and your TV at the same time.
Connecting to a Satellite or Digital Tuner
Connect a satellite or digital tuner to this recorder using the LINE 3 jack. Disconnect the recorder's mains lead from the mains when connecting the tuner.
To use the Synchro-Rec function, see below.

If the satellite tuner can output RGB signals
This recorder accepts RGB signals. If the satellite tuner can output RGB signals, connect the TV SCART connector on the satellite tuner to the LINE 3 jack, and set "Line3 Input" of "Scart Setting" to "Video/RGB" in "Video" setup (page 95). Note that this connection and setup disable the SMARTLINK function. If you want to use the SMARTLINK function with a compatible set top box, see the instructions supplied with the set top box.
If you want to use the Synchro Rec function
This connection is necessary to use the Synchro-Recording function. See “Recording from connected equipment with a timer (Synchro Rec)” on page 58.
Set "Line3 Input" of "Scart Setting" in "Video" setup (page 95) according to the specifications of your satellite tuner. See your satellite tuner's instructions for more information.
If you are using a B Sky B tuner, be sure to connect the tuner's VCR SCART jack to the LINE 3 jack. Then set "Line3 Input" of "Scart Setting" according to the specifications of the VCR SCART jack on your satellite tuner.
Notes
- Synchro-Recording does not work with some tuners. For details, see the tuner's operating instructions.
- If you disconnect the recorder's mains lead, you will not be able to view the signals from the connected tuner.
1. Inserting and Formatting a DVD Disc (Disc Info)
Inserting a Disc

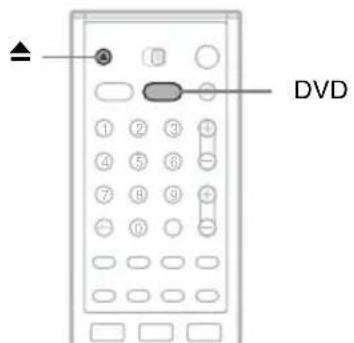
1 Press DVD.
2 Press ▲ (open/close), and place a disc on the disc tray.

natural_image
Illustration of a hand using a circular tool on a wooden base, no text or symbols presentWith the recording/playing side facing down
3 Press ▲ (open/close) to close the disc tray.
Wait until "LOAD" disappears from the front panel display.
Unused DVDs are formatted automatically.
Formatting a DVD disc (Disc Info)
+RW -RWVR -RWVideo
New discs are automatically formatted when inserted. If necessary, you can manually re-format a DVD+RW or DVD-RW disc to make a blank disc. For DVD-RWs, you can select a recording format (VR mode or Video mode) according to your needs (page 10).

1 Insert a disc.
See "Inserting a Disc" on page 29.
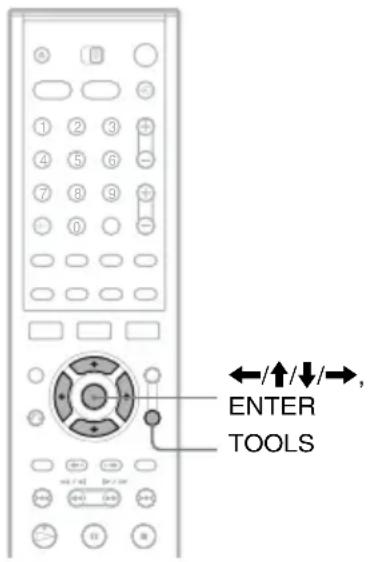
2 Press TOOLS.
The TOOLS menu appears.

flowchart
graph TD
    A["Close"] --> B["Disc Info"]
    B --> C["Record"]
    C --> D["Play"]
    D --> E["Line Audio Input"]
Options for the disc or picture
The TOOLS menu displays options applicable to the entire disc (e.g. disc protection), recorder (e.g. audio settings during recording), or multiple items on a list menu (e.g. erasing multiple titles). The displayed options differ depending on the situation and disc type.
3 Move the cursor down the TOOLS menu until "Disc Info" is selected, and press ENTER.
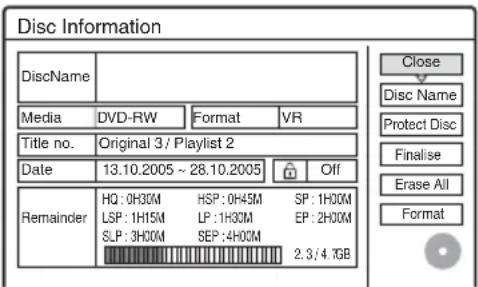
Example: When a DVD-RW (VR mode) is inserted.

1 "Disc Name" (DVD only)
2“Media”: Disc type
③“Format”: Recording format type (DVD-RW only)
4 “On”/“Off”: Indicates whether protection is set (DVD-RW in VR mode only)
5 "Title no.": Total number of titles
⑥“Date”: Dates of when the oldest and the most recent titles were recorded (DVD only)
7 "Continuous Rem. Time"/"Remainder" (approximate)
- The remaining recording time in each of the recording modes
- Disc space bar
- Remaining disc space/total disc space
8Disc setting buttons
“Disc Name” (page 38)
"Protect Disc" (page 38)
"Finalise"/"Unfinalise" (page 39)
"Erase All" (page 76)
"Format"
Available settings differ depending on the disc type.
4 Select "Format," and press ENTER.
5 Select "OK," and press ENTER.
For DVD-RWs, select "VR" or "Video," and press ENTER.
All contents on the disc are erased.
Hints
- By reformatting, you can change the recording format on DVD-RWs, or record again on DVD-RWs that have been finalised.
- For DVD+RWs and DVD-RWs (Video mode), you can check free space and title location on the disc using the Disc Map display (page 76).
Note
On this model, 1 GB (read “gigabyte”) is equivalent to 1 billion bytes. The larger the number, the larger the disc space.
2. Recording a Programme
HDD +RW -RWVR -RWVideo +R -R
This section introduces the basic operation to record the current TV programme to the hard disk (HDD) or to a disc (DVD). For an explanation of how to make timer recordings, see page 48.
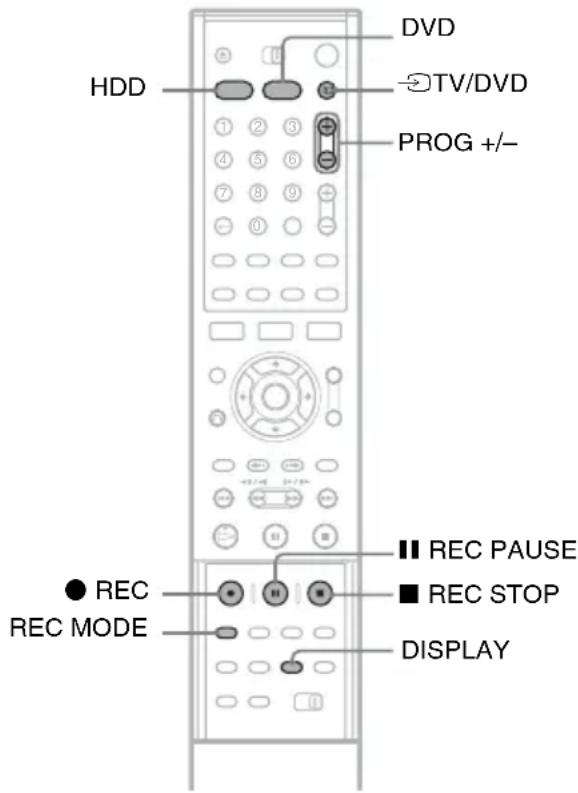
1 Press HDD or DVD.
When you record to a DVD, insert a recordable DVD (see “Inserting a Disc” on page 29).
2 Press PROG +/- to select the programme position or input source you want to record.
3 Press REC MODE repeatedly to select the recording mode.
Each time you press the button, the display on the TV screen changes as follows:

flowchart
graph LR
    HQ --> HSP --> SP --> LSP
    SEP --> SLP --> EP --> LP
For more details about the recording mode, see page 48.
4 Press ● REC.
Recording starts.
Recording stops automatically after 8 hours of continuous recording or when the HDD or DVD is full.
To stop recording
Press ■ REC STOP located beneath the remote control cover.
Note that it may take a few seconds for recorder to stop recording.
To pause recording
Press ■ REC PAUSE located beneath the remote control cover.
To restart recording, press the button again.
To watch another TV programme while recording
If your TV is connected to the LINE 1 – TV jack, set your TV to the TV input using the TV/DVD button and select the programme you want to watch. If your TV is connected to the LINE OUT or COMPONENT VIDEO OUT jacks, set the TV to TV input using the TV/DVD button (page 22).
TV Direct Rec
If you use the SMARTLINK connection, you can easily record what you are watching on your TV. When the TV is turned on or in standby mode, press ● REC. The recorder automatically turns on and starts recording what you are watching on the TV.
Hint
If you do not want to watch TV while recording, you can turn off the TV.
Notes
- If “TV” appears in the front panel display, you cannot turn off the TV or change the programme position during TV Direct Rec. To turn off the function, set “TV Direct Rec” to “Off” in “Features” setup (page 99).
- After pressing ● REC, it may take a short while to start recording.
- You cannot change the recording mode while recording or during recording pause.
- If there is a power failure, the programme you are recording may be erased.
- To use the TV Direct Rec function, you must first set the recorder's clock correctly.
Checking the disc status while recording
You can check the recording information such as recording time or disc type.
Press DISPLAY twice during recording.
The recording information appears.

①Disc type/format
2 Recording status
3 Recording mode
4 Recording time
Press DISPLAY to turn off the display.
3. Playing the Recorded Programme (Title List)
HDD +RW -RWVR -RW Video +R -R
To play a recorded title, select the title from the Title List.

1 Press HDD or DVD.
If you select DVD, insert a DVD (see
"Inserting a Disc" on page 29).
Playback starts automatically depending on the disc.
2 Press TITLE LIST.
To show the extended Title List, press TOOLS to select "Display List," and press ENTER.
Title List with Thumbnail Images (Example: DVD-RW in VR mode)

Extended Title List

①Disc type:
Displays a media type, HDD or DVD. Also displays the title type (Original or Playlist) for DVD-RWs (VR mode).
2Disc space (remainder/total)
3 Title information:
Displays the title number, title name, and recording date. Title size is shown in the Thumbnail title list.
● (red): Indicates that the title is currently being recorded.
●: Indicates that the title is currently being dubbed.
: Indicates the protected title.
“NEW” (or N): Indicates that the title is newly recorded (not played back) (HDD only).
S: Indicates that the Update function is set (HDD only) (page 50).
COPY: Indicates titles containing "Copy-Once" copy protection signals (HDD only) (page 80).
4 Scroll bar:
Appears when all of the titles do not fit on the list. To view the hidden titles, press ↑/↓.
5 Title's thumbnail picture
The still images for each title are displayed.
3 Select a title, and press ENTER.
The sub-menu appears.
The sub-menu displays options applicable only to selected item. The displayed options differ depending on the model, situation, and disc type.
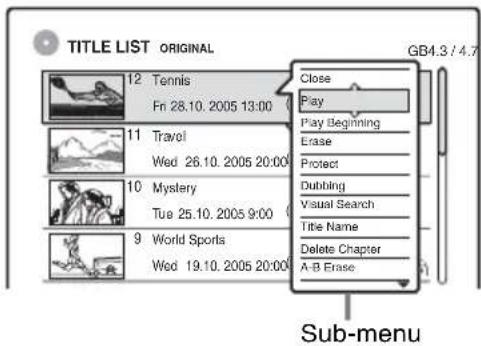
4 Select "Play," and press ENTER.
Playback starts from the selected title.
To stop playback
Press ■.
To scroll the list display by page (Page mode)
Press ← while the list display is turned on. Each time you press ← the entire Title List changes to the previous/next page of titles.
About the Title List for HDD/DVD-RWs (VR mode)
You can switch the Title List to show Original or Playlist.
While the Title List menu is turned on, press TOOLS to select either "Original" or "Playlist," and press ENTER.
For details, see “Edit options for the HDD and DVD-RWs (VR mode)” on page 72.
To change the title order (Sort)
While the Title List menu is turned on, press TOOLS to select "Sort Titles." Press ↑/↓ to select the item, and press ENTER.
| Order Sorted |
| By Date in order of when the titles were recorded. The title that is recorded most recently is listed at the top. |
| By Title in alphabetical order. |
| By Number in order of recorded title number. |
Order Sorted
| Unseen Title (HDD only) | in order of when the titles were recorded. The title that is recorded most recently and not played back is listed at the top. Playlist titles are not displayed. |
To change a title thumbnail picture (Thumbnail) (HDD/DVD-RW in VR mode only)
You can select a favourite scene for the thumbnail picture shown in the Title List menu.
1 Press TITLE LIST in stop mode.
2 Select a title whose thumbnail picture you want to change, and press ENTER. The sub-menu appears.
3 Select "Set Thumbnail," and press ENTER. The selected title starts to play in the background.
4 While watching the playback picture, press ▷, Ⅱ, or ◀◀/▶▶ to select the scene you want to set for a thumbnail picture, and press ENTER.
The display asks for confirmation.
5 Select "OK," and press ENTER. The scene is set for the title's thumbnail picture.
To turn off the Title List
Press TITLE LIST.
Hints
- After recording, the first scene of the recording (the title) is automatically set as the thumbnail picture.
- You can select "TITLE LIST" from the System Menu.
Notes
- The title names may not appear for DVDs created on other DVD recorders.
- The letters that cannot be displayed are replaced with “*.”
- It may take a few seconds for the thumbnail pictures to be displayed.
• After editing, the title thumbnail picture may change to the first scene of the recording (title). - After dubbing, the title thumbnail picture set on the source recording is cancelled.
4. Displaying the Playing Time and Play Information

You can check the playing time and remaining time of the current title, chapter, or track. Also, you can check the disc name recorded on the DVD/CD.
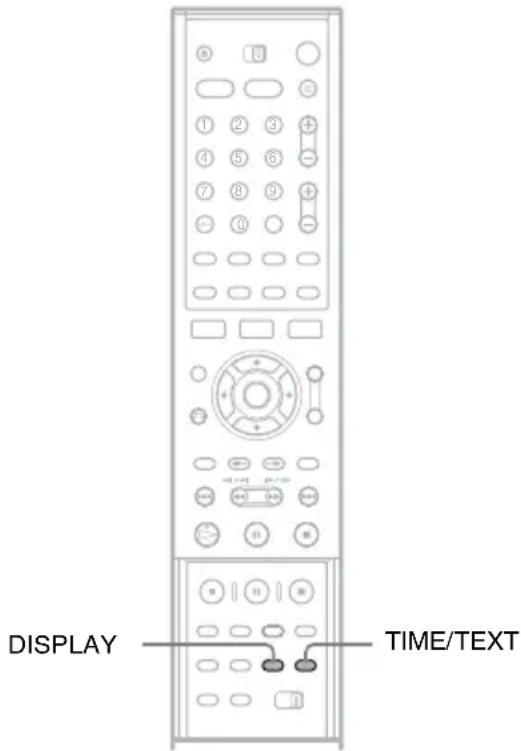
Press DISPLAY repeatedly.
Each time you press the button, the display changes as follows:
Display 1 → Display 2 → Display off
The displays differ depending on the disc type or playing status.
◆ Display 1
Example: When playing a DVD VIDEO

flowchart
graph TD
    A["1"] --> B["Title 1"]
    C["2"] --> D["Angle 3(5)"]
    E["3"] --> F["1: English DolbyDigital 2/0"]
    G["4"] --> H["End"]
1 Title number/name
(Shows either track number, track name, scene number, or file name for CDs, VIDEO CDs, DATA DVDs, or DATA CDs.)
2 Available functions for DVD VIDEOS (angle/ audio/ subtitle, etc.), or playback data for DATA DVDs and DATA CDs
3 The current selected function or audio setting (appears only temporarily) Example: Dolby Digital 5.1 ch

4 The current selected angle
◆ Display 2
Example: When playing a DVD-RW (VR mode)

flowchart
graph LR
    1 --> A["CD-FM IR"]
    A --> B["SP"]
    B --> C["T1"]
    C --> D["0:00:45"]
    D --> E["8"]
    2 --> F["Movie"]
    3 --> G["Movie"]
    4 --> H["Movie"]
    5 --> I["Movie"]
    6 --> J["Movie"]
    7 --> K["Movie"]
1Disc type *1/format (page 10)
2 Title type ( only appears for Playlists) (page 72)
③Play mode
4 Recording mode (page 48)
5 Playing status bar *2
6 Title number (chapter number ^3 ) (page 67) (Shows either track number, scene number, album number ^3 , or file number for CDs, VIDEO CDs, DATA DVDs, or DATA CDs.)
7 Album name appears for CDs with CD text, DATA DVDs or DATA CDs when you press TIME/TEXT repeatedly.
8 Playing time (remaining time ^*3 )
*1 Displays Super VIDEO CDs as "SVCD," DATA CDs as "CD" and DATA DVDs as "DVD."
*2 Does not appear with VIDEO CDs, DATA DVDs, and DATA CDs.
*3 Displayed when you press TIME/TEXT repeatedly.
Hints
- If “DTS” is set to “Off” in “Audio” setup, the DTS track selection option will not appear on the screen even if the disc contains DTS tracks (page 97).
- When “Auto Display” is set to “On” (default) in “Options” setup (page 102), playback information automatically appears when the recorder is turned on, etc.
Note
The letters or symbols that cannot be displayed are replaced with “*.”
Checking the playing/remaining time
You can view the playing or time information displayed on the TV screen and the front panel display.
Press TIME/TEXT repeatedly.
The displays differ depending on the disc type or playing status.
◆ Front panel display
Example: When playing a DVD
Playing time and number of the current title

flowchart
graph TD
    A["T 1 1:03:24"] --> B["Remaining time of the current title"]
    B --> C["T 1 - 1:15:36"]
    C --> D["Playing time and number of the current chapter"]
    D --> E["C 2 0:22:30"]
    E --> F["Remaining time of the current chapter"]
    F --> G["C 2 - 0:13:20"]
Example: When dubbing a DVD
Remaining time of dubbing in progress

Example: When playing a VIDEO CD
Playing time and number of the current scene or track

Example: When playing a CD
Track playing time and the current track/index number

Remaining time of the current track

Playing time of the disc

Remaining time of the disc

CD text (when available)
Example: When playing an MP3 audio track
Playing time and number of the current track

Current album number
Example: When viewing a JPEG image
Current file number and total number of files in the current album

Current album number and total number of albums
Notes
- The recorder can only display the first level of a CD's text, such as the disc name.
- The letters or symbols that cannot be displayed are replaced with “*.”
- Playing time of MP3 audio tracks may not be displayed correctly.
5. Changing the Name of a Recorded Programme
You can label a DVD, title, or program by entering characters. You can enter up to 64 characters for a title or disc name, but the actual number of characters displayed in the menus such as the Title List will vary. The steps below explain how to change the name of the recorded programme.
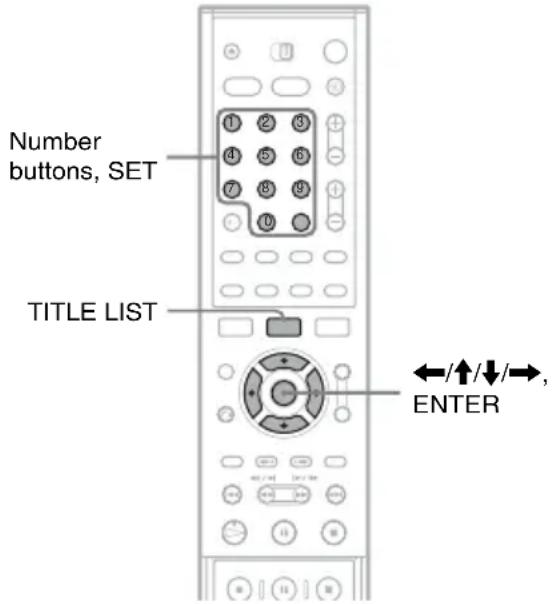
1 Press TITLE LIST.
2 Select a title, and press ENTER.
The sub-menu appears.
3 Select "Title Name," and press ENTER.
The display for entering characters appears.
4 Press ←/↑/↓/→ to move the cursor to the right of the screen and select “A” (upper-case), “a” (lower-case), or “Symbol,” and press ENTER.
The characters of the selected type are displayed.
5 Press ←/↑/↓/→ to select the character you want to enter, and press ENTER.
The selected character appears at the top of the display.
Example: Input Title Name

6 Repeat steps 4 and 5 to enter the remaining characters.

To erase a character, move the cursor to the right of the character at the input row. Select "Back" and press ENTER.
To insert a character, move the cursor to the right of the point where you want to insert the character. Select the character and press ENTER.
To erase all of the characters, select “Clear All” and press ENTER.
7 Select "Finish," and press ENTER.
To cancel the setting, select "Cancel."
To use the number buttons
You can also use the number buttons to enter characters.
1 In step 5 above, press a number button repeatedly to select a character.
Example:
Press the number 3 button once to enter “D.” Press the number 3 button three times to enter “F.”
2 Press SET and select the next character.
3 Select "Finish" and press ENTER.
Hints
- You can erase all displayed characters by pressing and holding CLEAR for 2 seconds or more.
- You can switch between “A” (upper-case), “a” (lower-case), or “Symbol” even if you press INPUT SELECT.
6. Labelling and Protecting a Disc
You can execute options effective for the entire disc using the Disc Information display.
Labelling a disc
+RW
-RWVR
-RWvideo
+R
-R
1 Insert a disc.
See "Inserting a Disc" on page 29.
2 Press TOOLS to select "Disc Info," and press ENTER.
Example: When the inserted disc is a DVD-RW (VR mode).

3 Select "Disc Name," and press ENTER.
Enter the disc name in the “Input Disc Name” display (page 36).
Note
You can enter up to 64 characters for a DVD's disc name. The disc name may not appear when the disc is played on other DVD equipment.
Protecting a disc
-RWVR
1 Insert a disc.
See “Inserting a Disc” on page 29.
2 Press TOOLS to select "Disc Info," and press ENTER.
3 Select "Protect Disc," and press ENTER.
4 Select "Protect," and press ENTER.
To cancel the protection
Select "Don't Protect" in step 4.
Hint
You can set protection for individual titles (page 73).
7. Playing the Disc on Other DVD Equipment (Finalise)
+RW
-RWVR
-RWVideo
+R
-R
Finalising is necessary when you play discs recorded with this recorder on other DVD equipment.
When you finalise a DVD+RW, DVD-RW (Video mode), DVD+R, or DVD-R, a DVD menu will be automatically created, which can be displayed on other DVD equipment.
Before finalising, check the differences between the disc types in the table below.
Differences between the disc types
| +RW | Discs are automatically finalised when removed from the recorder. However, you may need to finalise the disc for certain DVD equipment, or if the recording time is short. You can edit or record on the disc even after finalising. |
| -RWVR | Finalising is unnecessary when playing a disc on VR format compatible equipment.Even if your other DVD equipment is VR format compatible, you may need to finalise the disc, especially if the recording time is short. You can edit or record on the disc even after finalising. |
| -RW Video | Finalising is necessary when playing on any equipment other than this recorder. After finalising, you cannot edit or record on the disc. If you want to record on it again, unfinalise or reformat the disc (page 29). However, if you reformat the disc, all recorded contents will be erased. |
| +R | Finalising is necessary when playing on any equipment other than this recorder. |
| -R | After finalising, you cannot edit or record on the disc. |

1 Insert a disc.
See "Inserting a Disc" on page 29.
2 Press TOOLS to select "Disc Info," and press ENTER.
The “Disc Information” display appears.
3 Select "Finalise," and press ENTER.
The display shows the approximate time required for finalising and asks for confirmation.

4 Select "OK," and press ENTER.
The recorder starts finalising the disc.
Hint
You can check whether the disc has been finalised or not. If you cannot select “Finalise” in step 3 above, the disc has already been finalised.
Notes
- Depending on the condition of the disc, recording, or the DVD equipment, discs may not play even if the discs are finalised.
- The recorder may not be able to finalise the disc if it was recorded on another recorder.
Unfinalising a disc
-RWVR
-RWvideo
For DVD-RWs (Video mode)
DVD-RW (Video mode) that have been finalised to prohibit additional recording or editing can be unfinalised to allow further recording or editing.
For DVD-RWs (VR mode)
If you cannot record or edit on a DVD-RW (VR mode) that has been finalised with other DVD equipment, “This disc was finalised. Unfinalise it.” may appear.
Note
The recorder is not able to unfinalise DVD-RWs (Video mode) that have been finalised on another recorder.
1 Insert a disc.
See "Inserting a Disc" on page 29.
2 Press TOOLS to select "Disc Info," and press ENTER.
The “Disc Information” display appears.
3 Select "Unfinalise," and press ENTER.
The recorder starts unfinalising the disc.
Unfinalising may take several minutes.
Guide to Digital Services

Note
Digital Services availability depends on the broadcaster. Digital Services are not instantly available when the recorder is first turned on.
EPG (Electronic Programme Guide)
The EPG provides a quick and easy way to:
• View a complete list of all available channels.
• View a channel list related to a chosen category.
- Set a programme to be recorded (page 51).
Viewing a list of available channels
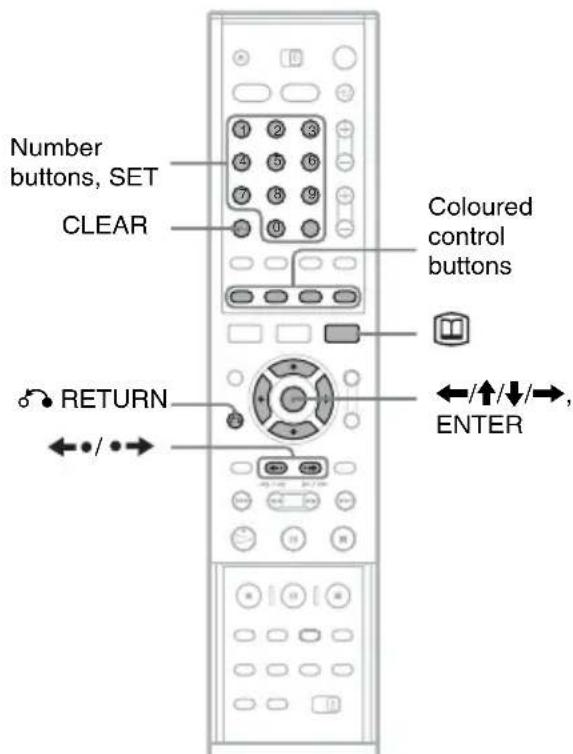
1 Press the button to display the EPG.
This display consists of an information box and a ten channel programme list covering a two hour period.
Example of EPG Display:

1 Indicates the TV or Radio mode. The Radio mode is indicated by a Radio icon
2 Indicates the Local Channel Number and the Channel name of the programme that is currently highlighted in the list
③ Indicates the currently highlighted programme and allows you to move around the list
4 Channel name
5 Indicates the currently viewed programme
6 Indicates if a timer recording is associated with the event (page 52)
7 Coloured Control buttons
⑧ Truncated programme title in case the name is too long to be displayed in the cell
⑨ Event bar (e.g. Indicates a timer recording has been set during this time)
10 Time slot
11 Icon tray. Depending on the channel and programme settings some icons may appear in the display:
☐: Either the channel or the programme is locked (page 90)
Timer event icons (page 52)
12 Indicates the current time and date
2 Press the ←/↑/↓/→ buttons or enter a channel number using the number buttons to move around the list.
If you press the button after highlighting the last programme on the right, the schedule for the next two hours is displayed (depending on availability from the broadcaster).

3 Press the GREEN button to toggle the display between the 2 hours schedule viewing (half hour time slots) and the 30 minutes schedule viewing (15 minutes time slots).
4 Press the /buttons to display the previous/next ten channels.
5 Press the BLUE/YELLOW buttons to view the next or previous 24 hours programme schedule.
6 Select a programme you wish to view. Once highlighted, press the ENTER button.
The full screen dialog appears with the description of the programme displayed in the information box.
7 Select "View Channel," and press ENTER to view the programme.
Hints
- The time range can be moved up to 8 days from the current time.
- In step 2 above, you can access directly the desired channel position by using the numbered buttons on the remote control.
Viewing programmes related to a specific category.
This feature allows you to search for programmes related to a particular topic.
For example, if you select ‘News’ from the category pop-up list, then only programmes related to News will be shown in the EPG.
Note
The category of each programme is determined by the broadcaster.
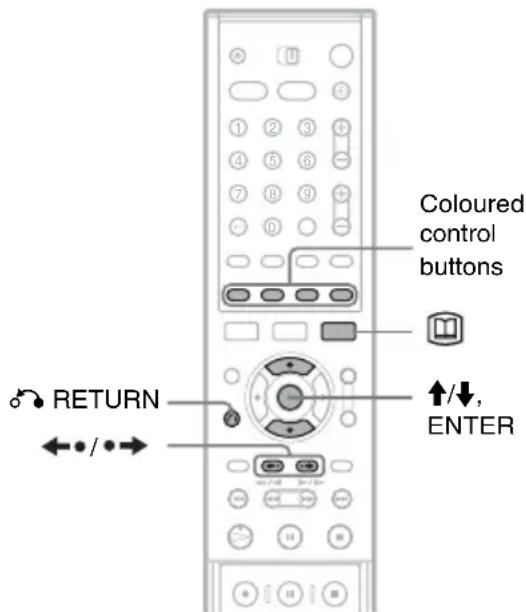
1 Press the button to display the EPG.
2 Press the RED button. The category pop-up list appears.

3 Press the ↑/↓ buttons to highlight the category you want, then press the ENTER button.
The chosen category is displayed in a title bar at the top of the EPG display and only programmes related to that category will be shown in the list.
◆Some examples of category types are as follows:
All Programmes: This gives a complete channel list.
Favourite List 1: Displays the favourite channels you have stored in the Favourite list 1 folder (page 45).
Films: Displays movies available for viewing.
News: Displays all news channels.
Entertainment: Displays all entertainment channels.
Sports: Displays all sports channels.
Kids: Displays all children's channels.
Music: Displays all music channels.
4 Press the ↑/↓ buttons to highlight a current time broadcasted programme you wish to view, then press the ENTER button.
The sub menu appears with the description of the programme displayed in the information box.
5 Select "View Channel," and press ENTER to view the programme.
To scroll the Category display by page (Page mode)
Press ← while the Category display is turned on to change to the previous/next Category page.
Hint
In Step 4 above, the EPG application also allows you to set a timer recording, see page 52 for more details.
Programme information
The programme information display provides a quick and easy way to:
• View descriptions of the programmes being broadcast now and next on the current channel.
• View descriptions of the programmes being broadcast now and next on the other channels.
- Switch between TV and RADIO channels.
Displaying the programme information

1 Press the button to display the programme information screen.
The Information display appears showing a description of the current programme on view.

2 Press the / buttons to toggle the display between a description of the current programme and the next programme on that channel.
3 Press the ↑/↓ buttons or enter a channel number using the number buttons to display programme information on other channels.
4 Press the TV/RADIO button to switch between the TV and Radio channels
5 When viewing information for the currently highlighted channel, press the ENTER button to exit the information display and view the programme.
To scroll the Information display by page (Page mode)
Press while the Information display is turned on to change to the previous/next page.
Hint
Press the button while the Information screen is turned on to toggle only the channels registered in the latest displayed Favourite List, see “Moving to a different favourite list” on page 46.
Viewing a digital text service
Many digital TV channels broadcast information via their text service. This digital service includes high quality digital text and graphics along with advanced navigation options. Additionally, this recorder has access to dedicated text channels transmitted by the broadcasters.
Note
The appearance, content and navigation methods of all digital text services are decided by the broadcaster.
Selecting digital text from dedicated digital teletext channels

1 Select a dedicated channel that is broadcasting digital text.
If you do not know the number of a dedicated digital text channel, you can use the 'Electronic Programme Guide' by pressing the button to find one (page 41).
2 Once the text page is displayed (this may take some time), follow the on-screen instructions to obtain your required selection.
On some pages the TV programme may also be displayed on the text screen. On-screen instructions will inform you how to change the displayed programme.
3 If you are instructed to press 'OK' or 'Select' when viewing the text pages, press the ENTER button.
4 When you have finished viewing the text service, follow the on screen instructions, or press the PROG +/- button to exit.
Selecting digital text from other channels
Digital text services may also be available on other digital channels. This is sometimes indicated by a small symbol on your TV screen, superimposed on the programme you are watching.
1 Select a channel.
2 Press the (Text) button or RED button or the button indicated on screen by the broadcaster.
3 Once the text information is displayed, you can access required information by using the /// buttons, the coloured buttons and/or the numbered buttons on the remote control.
If you are instructed to press 'OK' or 'Select' when viewing the text pages, press the ENTER button on your remote control.
4 When you have finished viewing the text service displays, follow the on screen instructions, or press the PROG +/- button to exit.
Favourites
The Favourite application gives you the option to:
- Store your favourite channels into one of four TV or four Radio lists.
- Add or delete channels to the Favourites List.
- Quickly display a favourite channel on screen.
Setting a favourite list
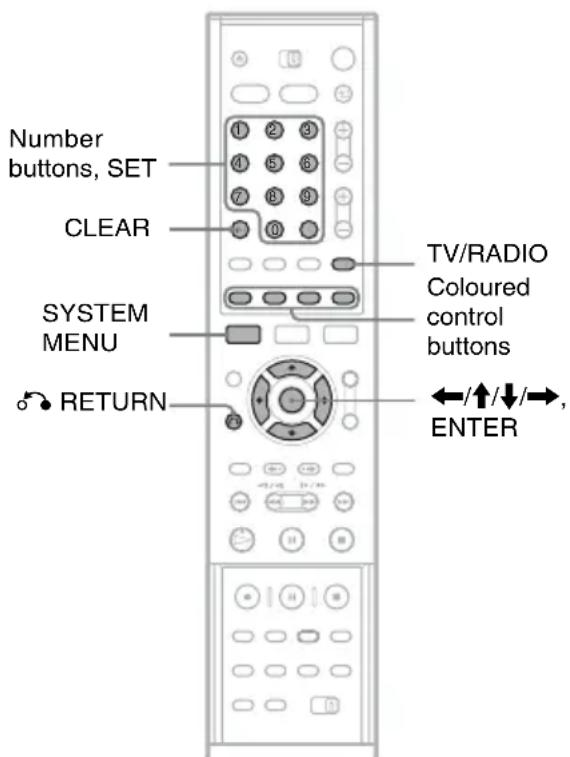
1 Press SYSTEM MENU.
The System Menu Display appears.
2 Select "SETUP," and press ENTER.
The Setup Display appears.
3 Select "DTV Settings," and press ENTER.

4 Select "Favourites," and press ENTER
The DTV Settings- Favourites List 1 display appears.
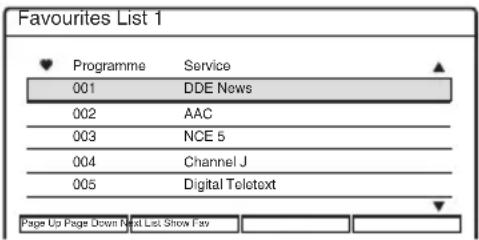
This display shows all the TV or Radio channels available to you.
5 Press the TV/RADIO button to display either your favourite TV or favourite Radio channels at any time.
The Radio mode is indicated by the presence of a Radio icon in the Favourite List panel.
6 Press the ↑/↓ buttons or enter a channel number to highlight a channel you want to add as a favourite, then press the ENTER button.

If you do not wish to choose from one of the five channels in the display, press the RED or GREEN button to view the previous or next five channels available.
Deleting a favourite channel
A channel selected as a favourite is identified by an icon next to the programme number.
In Step 6 above press the ↑/↓ buttons to highlight the channel you want to delete from your
Favourite List, then press ENTER: the Icon next to the programme number disappears.
Hints
- Press the BLUE button to view the list showing only your favourite channels.
- Press the BLUE button once again when you wish to return to the previous favourite channel setting display.
Moving to a different favourite list
1 While a Favourite List is displayed, press repeatedly the YELLOW button on the remote control until the favourite list you want to view is displayed.
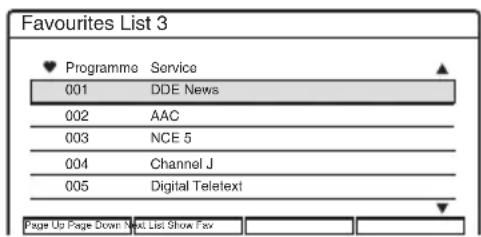
2 To add a channel to this new list, press the ↑/↓ buttons to highlight the channel you wish to add and press the ENTER button.
3 When you have stored all your favourite channels, press the RETURN button repeatedly to come back to normal operation.
Watching or listening to a favourite channel

1 While in normal operation mode, press the button on the remote control.
A Favourite List display appears.
Indicates the currently viewed channel

Each favourite list is represented by a coloured button.
2 Press the TV/RADIO button to display either your favourite TV or favourite Radio channels at any time.
The Radio mode is indicated by the presence of a Radio icon in the Favourite List panel.
3 Press the coloured buttons on the remote control that represents the desired list to be displayed.
4 Press the ↑/↓ button to highlight the channel you wish to view or listen to, then press the ENTER button.
To scroll the Favourite List display by page (Page mode)
Press ★while the Favourite List display is turned on to change to the previous/next page.
Hint
If you wish, the currently viewed channel can be added to the favourite list. Simply press the coloured button indicated in the display to add it to the list.
Index
The Index application is an easy way to display a scrollable list of all the tuned channels, including your favourites channel lists, and allows one of these to be selected.

1 While in normal operation mode, press the ENTER button on the remote control.
The Index display appears.

2 Press the TV/RADIO button to display either the TV or the Radio channels at any time.
The Radio mode is indicated by the presence of a Radio icon in the Index panel.
3 Press the coloured buttons on the remote control if you wish to display your Favourites Lists.
4 Press the ↑/↓ buttons to highlight the desired channel, then press the ENTER button to exit the index menu and view the selected channel.
To scroll the Index display by page (Page mode)
Press ← while the Index display is turned on to change to the previous/next page.
Timer Recording
Before Recording
Before you start recording...
- This recorder can record on various discs. Select the disc type according to your needs (page 10).
- Check that the disc has enough available space for the recording (page 29). For HDD, DVD+RWs, and DVD-RWs, you can free up disc space by erasing titles (page 76).
- Adjust the recording picture quality and picture size if necessary (page 53).
Hint
Timer recordings will be made regardless whether or not the recorder is turned on. You can turn off the recorder without affecting the recording even after recording starts.
Notes
- If any digital teletext is operated while recording, it's contents will be recorded on the disc.
- If the subtitles are displayed while recording, they will be recorded on the disc.
- To play a recorded disc on other DVD equipment, finalise the disc (page 39).
Recording mode
Like the SP or LP recording mode of VCRs, this recorder has eight different recording modes. Select a recording mode according to the time and picture quality you need. For example, if picture quality is your top priority, select the High Quality mode (HQ). If recording time is your priority, Super Extended Play mode (SEP) can be a possible choice. Note that recording times in the following table are approximate and the actual times may differ. Note also that the maximum continuous recording time for a single title is eight hours. Contents beyond this time will not be recorded.
Press REC MODE repeatedly to switch the recording modes.
| Recording mode | Recording time (hours) | |
| HDD DVD* | ||
| RDR-HXD710 | RDR-HXD910 | |
| HQ (High quality) | 33 53 1 | |
| HSP ↑ 51 81 1 hr. | 30 min. | |
| SP (Standard mode) | 67 107 2 | |
| LSP ↓ 85 135 2 hr. | 30 min. | |
| LP ↓ 103 164 3 | ||
| EP ↓ 137 217 4 | ||
| SLP ↓ 204 325 6 | ||
| SEP (Long duration) | 269 428 8 | |
* The recording time for DVD+R DL (Double Layer) discs is as follows:
HQ: 1 hour 48 minutes
HSP: 2 hours 42 minutes
SP: 3 hours 37 minutes
LSP: 4 hours 31 minutes
LP: 5 hours 25 minutes
EP: 7 hours 14 minutes
SLP: 10 hours 51 minutes
SEP: 14 hours 28 minutes
"HQ+" recording mode
“HQ+” records pictures in higher quality than HQ on the HDD. Set “HQ Setting” in “Features” setup to “HQ+” (page 100). Maximum recording time is 21 hours for RDR-HXD710, or 34 hours for RDR-HXD910. “HQ” appears in the display.
Note
Situations below may cause slight inaccuracies with the recording time.
– Recording a programme with poor reception, or a programme or video source of low picture quality
– Recording on a disc that has already been edited
– Recording only a still picture or just sound
Unrecordable pictures
Pictures with copy protection cannot be recorded on this recorder.
When the recorder receives a copy guard signal, the recorder continues to record but only a blank, grey coloured screen will be recorded.
| Copy control signals | Recordable discs | ||
| Copy-Free | HDD | +RW | -RWVR |
| -RWVideo | +R | -R | |
| Copy-Once | HDD | ||
| -RWVR | (CPRM*) | ||
| Copy-Never None (a blank screen is recorded) | |||
* The recorded disc can be played only on CPRM compatible equipment (page 10).
Timer Recording (Standard/EPG)
HDD +RW -RWVR -RWVideo +R -R
You can set the timer for a total of 30 programmes up to one month in advance.
There are two methods to set the timer: the standard method and EPG method.
- Standard: Set the date, time, and programme position of the programme manually.
- EPG: Set a programme to be recorded based on the information provided by the EPG (Electronic Programme Guide) (page 51). This method allows you to set the timer up to 8 days from the current time (depending on programme availability from the broadcaster).
Setting the timer manually (Standard)

1 Press TIMER.

2 Select an item using ←/→ and adjust using ↑/↓.
“Date”: Sets the date.
The item changes as follows:
Today Tomorrow ..... Thu
28.10 (1 month later) Sun (every Sunday)
↔ ..... ↔ Sat (every Saturday) ↔
Mon-Fri (Monday to Friday) ↔ Mon-Sat
(Monday to Saturday) Sun-Sat (Sunday to
Saturday) Today
"Start": Sets the start time.
"Stop": Sets the stop time.
“Source”: Selects the input source as follows:
TV Line (External input) Radio TV
“Prog.”: Selects the TV/Radio programme position or input line.
"Media": Selects the media, HDD or DVD.
- If you want to change the setting for the Mode or Update functions, select “Details” and press ENTER. Select an item using / and set using / .
“Mode”: Selects the recording mode (page 48).
“Update” (HDD only): Automatically records over a previously recorded programme that is set to be recorded daily or weekly.
To return to the Timer programming menu, select “Previous” and ENTER.
- If you make a mistake, select the item and change the setting.
3 Select "OK," and press ENTER.
The Timer List (page 56) appears. The TIMER REC indicator lights up on the front panel and the recorder is ready to start recording.
Unlike a VCR, there is no need to turn off the recorder before the timer recording starts.
To stop recording during timer recording
Open the remote's cover and press ■ REC STOP.
Note that it may take a few seconds for the recorder to stop recording.
Rec Mode Adjust
If there is not enough available disc space for the recording, the recorder automatically adjusts the recording mode to enable the entire programme to be recorded. This function is normally set to “On.”
To cancel this function, press TOOLS while the Timer List is displayed. Select “Rec Mode Adjust” and press ENTER. Select “Off” and press ENTER.
If the timer settings overlap
Overlapped timer settings are shown as follows.

To store the setting as shown, select “OK.” The programme that starts first has priority and the second programme starts recording only after the first programme has finished (page 57).
To cancel the overlapped setting, select "Cancel."
To confirm, change, or cancel timer recording
See “Checking/Changing/Cancelling Timer Settings (Timer List)” on page 56.
To extend the recording duration time while recording
1 Press TOOLS during recording to select "Extend Rec," and press ENTER.

2 Press ↑/↓ to select the duration time. You can set the duration in increments of 10 minutes, for a maximum of 60 minutes.
3 Select "OK" and press ENTER.
One Touch Timer
If you use the SMARTLINK connection, you can easily display the timer programming menu. When the TV is turned on or in standby mode, press TIMER. The recorder automatically turns on and the TV's input is switched to the recorder. The Timer programming menu appears.
Hint
You can play the recorded programme by selecting the programme title in the Title List.
Notes
- If a message indicating that the disc is full appears on the screen, change the disc, or make available space for the recording (HDD/DVD+RW/DVD-RW only) (page 75).
- Check that the clock is correctly set before setting the timer recording. If not, the timer recording cannot be made.
To record a satellite programme, turn on the satellite tuner and select the satellite programme you want to record. Leave the satellite tuner turned on until the recorder finishes recording. If you connect equipment with a timer function, you can use the Synchro Rec function (page 58). - Even if the timer is set for the same daily or weekly programme, the timer recording cannot be made if it overlaps with a programme that has priority. “” wall appear next to the overlapped setting in the Timer List. Check the priority order of the settings.
- Even if the timer is set, timer recordings cannot be made while recording a programme that has priority.
- The Rec Mode Adjust function only works with a timer recording. It does not function with Quick Timer or Synchro Rec. In addition, the Rec Mode Adjust function does not work when recording to the HDD while “Auto Title Erase” is set to “On.”
Recording TV programmes using the EPG application
The EPG application is a feature that simplifies setting the timer. Just select the programme you wish to record in the EPG display. The date, time, and channel of that programme are set automatically.

1 Press HDD or DVD.
When you record to a DVD, insert a recordable DVD (see “Inserting a Disc” on page 29).
2 Press the button to display the EPG.
3 Press the ←/↑/↓/→ buttons or enter a channel number using the number buttons to move around the list.

To know more about the navigation options in the EPG application, see page 41.
4 Select a current time TV/radio broadcast or a future programme you wish to record. Once highlighted, press the ENTER button.
The sub menu appears with the description of the programme displayed in the information box.
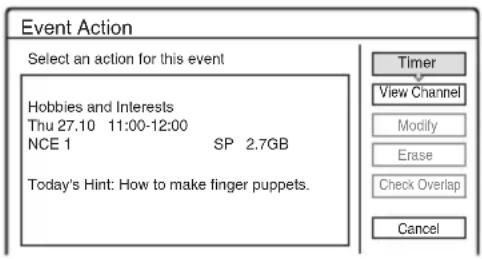
In case 18 displayed: Indicates that the programme is age limited (page 90).
5 Select "Timer," and press ENTER.
The Timer setting confirmation display appears

“Modify,” allows you to adjust the timer setting, see page 55.
6 Select "OK," and press ENTER.
- In case of a current TV/radio broadcast timer setting, your recorder will immediately start recording.
- In case of a future programme timer setting, you can see that an event bar and a new icon appears in the EPG display indicating that a timer event is associated to that programme.
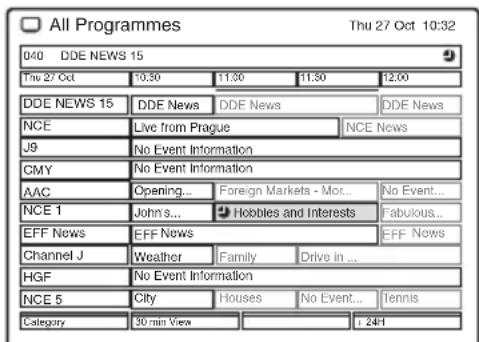
Your recorder will automatically begin recording when the programme starts.
◆Some examples of timer event icon types are as follows:
(1) (red): Indicates the programme is set as timer and whole programme can be recorded.
(grey): Indicates the programme is set as timer but only a part of the programme can be recorded. (e.g. because of timer setting overlap).
● (red): Indicates the programme is now recording.
To scroll the EPG display by page (Page mode)
Press ← while the EPG display is turned on to display the previous/next ten channels.
To stop recording during timer recording
Open the remote's cover and press ■ REC STOP. Note that it may take a few seconds for the recorder to stop recording.
If the timer settings overlap
See page 50.
To confirm, change, or cancel timer recording
See “Checking/Changing/Cancelling Timer Settings (EPG)” (page 55).
Hint
The Rec Mode Adjust function also works with this timer method (page 50).
Notes
- It is not possible to extend the recording duration time of the timer recording set using the EPG application timer setting.
- This recorder is featured with an EPG timer auto extend functionality that allows EPG timer recordings to be made in case of broadcast early start (before the scheduled start time) or broadcast late finishing (after the scheduled end time).
- The EPG programme start and end time are determined by the broadcaster.
Using the Quick Timer function
You can set the recorder to record in 30-minute increments.
Press ● REC repeatedly to set the duration.
Each press advances the time in 30-minute increments. The maximum duration is six hours.

The time counter decreases minute by minute to 0:00, then the recorder stops recording (power does not turn off). Even if you turn off the recorder during recording, the recorder continues to record until the time counter runs out.
Note that the Quick Timer function does not work if “TV Direct Rec” is set to “On” in “Features” setup (page 99).
To cancel the Quick Timer
Press ● REC repeatedly until the counter appears in the front panel display. The recorder returns to normal recording mode.
Adjusting the recording picture quality and size
You can adjust the recording picture quality and picture size.
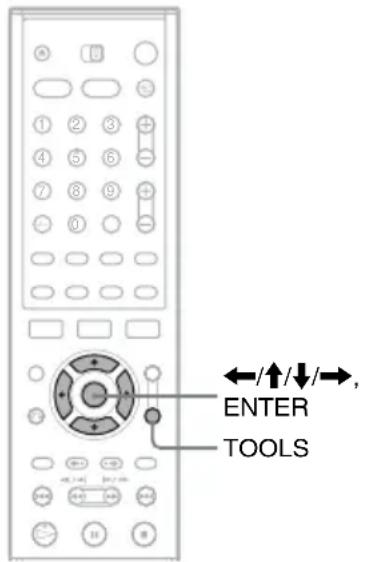
1 Before recording starts, press TOOLS to select "Rec Settings," and press ENTER.

2 Select the item you want to adjust, and press ENTER.
The adjustment display appears.
Example: Rec NR
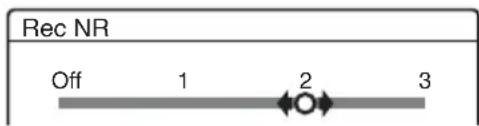
“Rec Mode”: Selects the recording mode for the desired recording time and picture quality. For more information, see “Recording mode” on page 48.
“HDD Line Rec. Picture Size”: Sets the picture size of the programme to be recorded on the HDD.
• 4:3: Sets the picture size to 4:3.
- 16:9: Sets the picture size to 16:9 (wide mode).
- Auto (default): Automatically selects the actual picture size.
“DVD Line Rec. Picture Size”: Sets the picture size of the programme to be recorded on the DVD.
- 4:3: Sets the picture size to 4:3.
- 16:9 (default): Sets the picture size to 16:9 (wide mode).
“DVD Line Rec. Picture Size” works with DVD-Rs and DVD-RWs (Video mode) when the recording mode is set to HQ, HSP, SP, or LSP. For all other recording modes, the screen size is fixed at “4:3.”
For DVD-RWs (VR mode), the actual picture size is recorded regardless of the setting. For example, if a 16:9 size picture is received, the disc records the picture as 16:9 even if “DVD Line Rec. Picture Size” is set to “4:3.”
For DVD+RWs/DVD+Rs, the screen size is fixed at "4:3."
“Rec NR” (noise reduction): Reduces noise contained in the video signal.
“Rec Video Equalizer”: Adjusts the picture in greater detail.
Press ↑/↓ to select the item you want to adjust, then press ENTER.
- Contrast: Changes the contrast.
- Brightness: Changes the overall brightness.
- Colour: Makes the colours deeper or lighter.
3 Adjust the setting using ←/↑/↓/→, and press ENTER.
The default setting is underlined.
"Rec NR": (weak) Off 1 \~ 2 \~ 3 (strong)
"Rec Video Equalizer":
- Contrast: (weak) -3 0 3 (strong)
- Brightness: (dark) -3 0 \~ 3 (bright)
• Colour: (light) -3 \~ 0 \~ 3 (deep)
Repeat steps 2 and 3 to adjust any other items.
Notes
- If one programme contains two picture sizes, the selected size is recorded. However, if the 16:9 signal cannot be recorded as 16:9, it is recorded as 4:3.
- Remnants of images may appear on your screen when using “Rec NR.”
- “Rec Video Equalizer” does not affect the input of the DV IN jack and does not work with RGB signals.
Creating chapters in a title
The recorder can automatically divide a recording (a title) into chapters by inserting chapter marks during recording. To disable this function, set “Auto Chapter” in “Features” setup to “Off” (page 99).
When recording on the HDD or a DVD-RW (VR mode)
The recorder detects changes in the picture and sound and automatically inserts chapter marks. You can also insert and erase chapter marks manually (page 76).
When recording on other recordable discs
Chapter marks are inserted at approximately 6-minute intervals during recording.
Note
When dubbing (page 79), the chapter marks in the dubbing source are not retained in the dubbed title.
Checking/Changing/ Cancelling Timer Settings (EPG)
HDD +RW -RWVR -RWVideo +R -R
You can check, change, or cancel timer settings using the EPG menu.

1 Press the button to display the EPG.
A timer setting can be identified thanks to the event bar and the timer event icon displayed in the EPG screen. For details, see page 51.

2 Press the ←/↑/↓/→ buttons to select a future timer event you want to check/change/cancel. Once highlighted, press the ENTER button.
The Event Action menu appears.
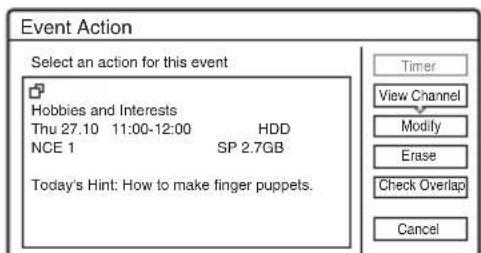
3 Press the ↑/↓ buttons to select the options. Once highlighted, press the ENTER button.
The sub menu appears:
"Modify": Changes the timer setting. Select an item using / and adjust using / . Select "OK" and press ENTER.
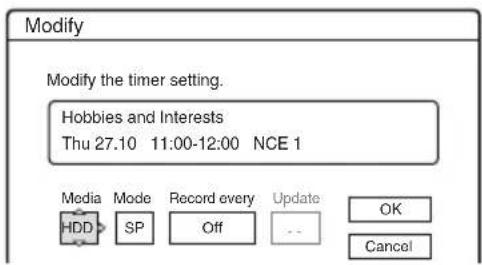
Note
If you set “Record every” to an other option than “Off”, then your EPG timer recording will be converted into a standard timer recording: the timer event icon disappears from the EPG display.
"Erase": Erases the timer setting. Select "OK" and press ENTER.

"Check Overlap": Checks for overlapped settings.

Select "Close" to return to the EPG screen. To change or cancel the setting, repeat steps 2 and 3 above.
Checking/Changing/ Cancelling Timer Settings (Timer List)
HDD +RW -RWVR -RW Video +R -R
You can check, change, or cancel timer settings using the Timer List.

1 Press SYSTEM MENU.
The System Menu appears.
2 Select "TIMER LIST," and press ENTER.
The Timer List appears.

Timer information displays the recording date, time, recording mode, etc.
☐: Indicates that the setting is overlapped by another setting.
(green): Indicates the setting can be recorded.
● (red): Indicates the setting currently being recorded.
○ (grey): Indicates that the setting cannot be recorded in the selected recording mode.
: Indicates the setting being recorded on the HDD.
●: Indicates the setting being recorded on a DVD.
☐: Indicates the setting that the Update function is set for.
When all of the timer settings do not fit on the list, scroll bar appears.
To view the hidden timer settings, press ↑/↓.
3 Select the timer setting you want to check/change/cancel, and press ENTER.
The sub-menu appears.
4 Select one of the options, and press ENTER.
"Modify": Changes the timer setting.
Select an item using ←/→ and adjust using
↑/↓. For the recording Mode or Update functions, select "Details" and change the settings (page 50). Select "OK," and press ENTER.

"Erase": Erases the timer setting. Select "OK," and press ENTER.
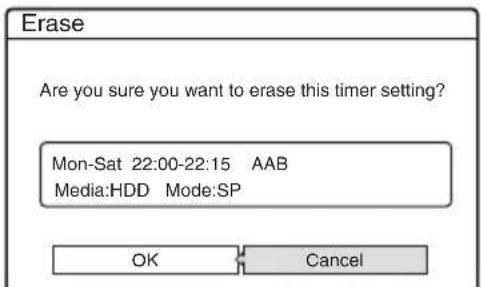
"Check Overlap": Checks for overlapped settings.
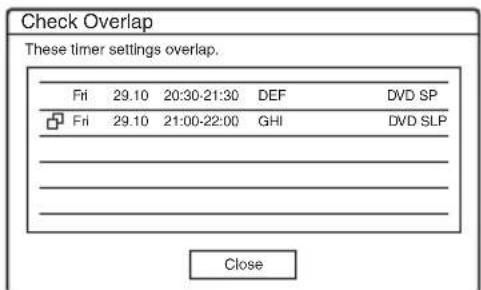
Select "Close" to return to the Timer List.
“Info”: Displays the timer setting information box along with the disc space required to record the whole programme (according to the selected recording mode).
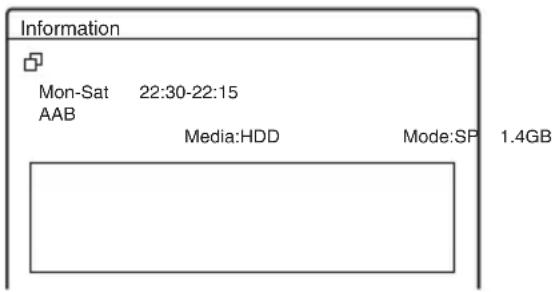
Press ⬇ RETURN to come back to the Timer List.
To change or cancel the setting, repeat steps 3 and 4 above.
When the timer settings overlap
The programme that starts first has priority and the second programme starts recording only after the first programme has finished.

When the recordings start at the same time
The programme that is set last has priority. In this example, timer setting B is set after A, so the first part of timer setting A will not be recorded.

When the end time of one recording and the start time of another are the same
After finishing the previous recording, the other recording may be delayed.
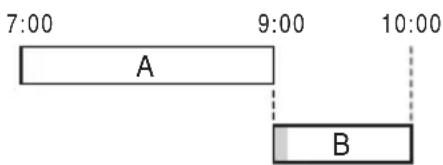
To scroll the list display by page (Page mode)
Press ← while the list display is turned on.
Each time you press ←•/; the entire Timer
List changes to the previous/next page of timer settings.
To turn off the Timer List
Press TIMER LIST or 📋 RETURN.
Hint
While recording, you cannot modify the timer setting for the current recording, but you can extend the recording duration of the recording time (page 50).
Notes
- Even if the timer is set, timer recordings cannot be made while recording a programme that has priority.
- Even if the timer is set for the same daily or weekly programme, the timer recording cannot be made if it overlaps with a programme that has priority. “” will appear next to the overlapped setting in the Timer List. Check the priority order of the settings.
Automatically erasing old titles (Auto Title Erase)
HDD
If there is not enough space for a timer recording, the recorder automatically erases old titles recorded on the HDD. The oldest, played title is erased. The protected titles are not erased.
1 Press TIMER LIST.
The Timer List appears.
2 Press TOOLS to select "Auto Title Erase," and press ENTER.
3 Select "On," and press ENTER.
The default setting is "Off."
Recording From Connected Equipment

Recording from connected equipment with a timer (Synchro Rec)
You can set the recorder to automatically record programmes from connected equipment that has a timer function (such as a satellite tuner). Connect the equipment to the LINE 3 jack of the recorder (page 28).
When the connected equipment turns on, the recorder starts recording a programme from the LINE 3 jack.
1 Before recording, select HDD or DVD.
If you select DVD, insert a recordable DVD (see “Inserting a Disc” on page 29).
2 Set "Synchro Rec" in "Features" setup to "Record to HDD" or "Record to DVD" (page 100).
3 Press INPUT SELECT repeatedly to select "L3."
4 Select the line input audio when recording a bilingual programme on DVD-RWs (VR mode).
Press TOOLS to select “Line Audio Input,” and press ENTER. Then select “Bilingual,” and press ENTER.
5 Press REC MODE repeatedly to select the recording mode.
For details about the recording mode, see page 48.
6 Set the timer on the connected equipment to the time of the programme you want to record, and turn it off.
7 Press SYNCHRO REC.
The SYNCHRO REC indicator lights up on the front panel. The recorder is ready to start Synchro-Recording.
The recorder automatically starts recording when it receives an input signal from the connected equipment. The recorder stops recording when the connected equipment turns off.
To stop recording
Press ■ REC STOP or SYNCHRO REC.
To cancel Synchro Rec
Press SYNCHRO REC.
The SYNCHRO REC indicator on the recorder turns off.
Notes
- The recorder starts recording only after detecting the video signal from the connected equipment. The beginning of the programme may not be recorded regardless of whether or not the recorder's power is on or off.
- During Synchro-Recording, other operations such as normal recording cannot be done.
- To use the connected equipment while the recorder is standing by for Synchro-Recording, cancel Synchro-Recording by pressing SYNCHRO REC. Be sure to turn off the connected equipment and press SYNCHRO REC to reset Synchro-Recording before the timer recording starts.
- The Synchro Rec function does not work with some tuners. For details, see the tuner's operating instructions.
- While the recorder is standing by for Synchro-Recording, the Auto Clock Set function (page 89) does not work.
If the timer settings of a Synchro-Recording and another timer recording overlap
Regardless of whether or not the programme is a Synchro Rec programme, the programme that starts first has priority and the second programme starts recording only after the first programme has finished.

Recording from connected equipment without a timer
You can record from a connected VCR or similar device. To connect a VCR or similar device, see “Connecting a VCR or Similar Device” on page 26. Use the DV IN jack on the front panel if the equipment has a DV output jack (i.LINK jack).
1 Press HDD or DVD.
If you select DVD, insert a recordable DVD (see "Inserting a Disc" on page 29).
2 Press INPUT SELECT to select an input source according to the connection you made.
The front panel display changes as follows:
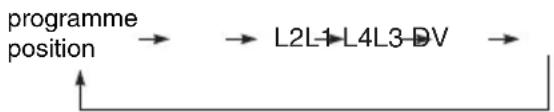
flowchart
graph LR
    A["programme position"] --> B["L2L1-L4L3-DV"]
    B --> C
3 Select the line input audio when recording a bilingual programme on DVD-RWs (VR mode).
Press TOOLS to select “Line Audio Input,” and press ENTER. Then select “Bilingual,” and press ENTER.
4 Press REC MODE repeatedly to select the recording mode.
For details about the recording mode, see page 48.
5 Press II REC PAUSE to set this recorder to record pause.
6 Insert the source tape into the connected equipment and set to playback pause.
7 At the same time, press ■ REC PAUSE on this recorder and the pause or play button on the connected equipment.
Recording starts.
To stop recording, press ■ REC STOP on this recorder.
If you connect a digital video camera with a DV IN jack
See “DV Dubbing” on page 84 for an explanation of how to record from the DV IN jack.
Hint
You can adjust the settings for the recording picture before recording. See “Adjusting the recording picture quality and size” on page 53.
Notes
- When recording a video game image, the screen may not be clear.
- Any programme that contains a Copy-Never copy guard signal cannot be recorded. The recorder continues to record, but a blank screen will be recorded.
Playback
Playing

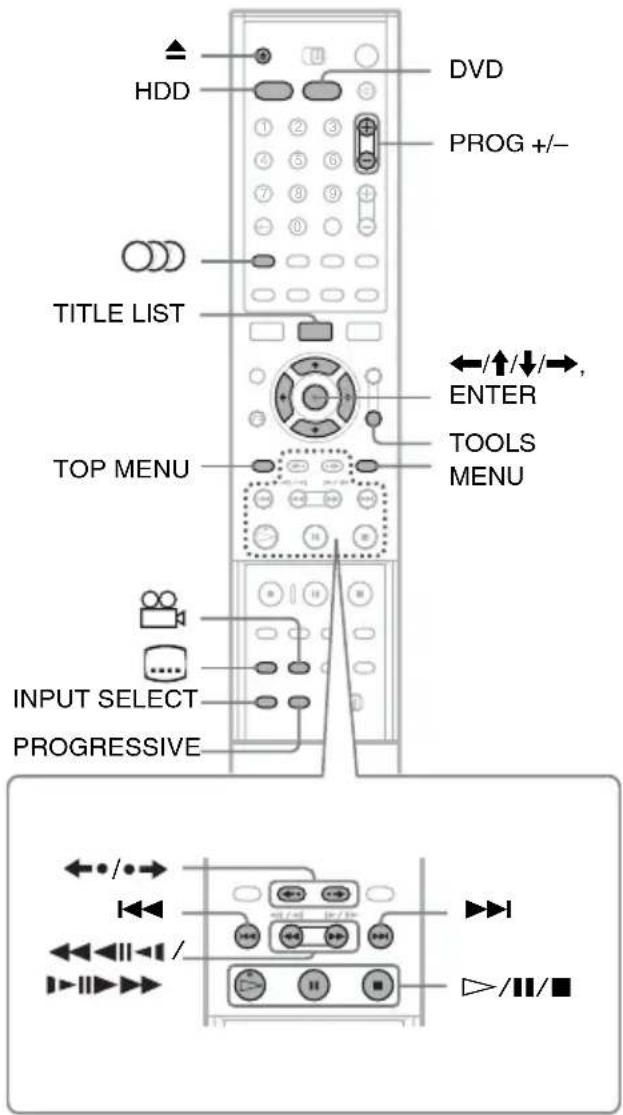
1 Press HDD or DVD.
- If you select DVD, insert a disc (see "Inserting a Disc" on page 29).
- If you insert a DVD VIDEO, VIDEO CD, or CD, press ▷. Playback starts.
2 Press TITLE LIST.
For details about the Title List, see “3. Playing the Recorded Programme (Title List)” on page 32.
Example: DVD-RW (VR mode)
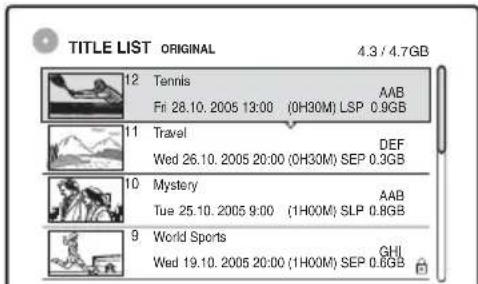
3 Select the title, and press ENTER.
The sub-menu appears.
4 Select "Play," and press ENTER.
Playback starts from the selected title.
To use the DVD's Menu
When you play a DVD VIDEO, or a finalised DVD+RW, DVD-RW (Video mode), DVD+R, or DVD-R, you can display the disc's menu by pressing TOP MENU or MENU.
To play VIDEO CDs with PBC functions
PBC (Playback Control) allows you to play VIDEO CDs interactively using the menu on your TV screen.
When you start playing a VIDEO CD with PBC functions, the menu appears.
Select an item using the number buttons and press ENTER. Then, follow the instructions in the menu (press ▷ when “Press SELECT” appears).
The PBC function of Super VIDEO CDs does not work with this recorder. Super VIDEO CDs are played in continuous play mode only.
To stop playback
Press ■.
To playback quickly with sound (Scan Audio)
When you press ▶ during playback of a title recorded in the HDD, you can play quickly with dialogue or sound (“x1.5” appears).
No sound is output when you press ▶ two or more times to change search speed.
To resume playback from the point where you stopped (Resume Play)
When you press ▷ again after you stop playback, the recorder resumes playback from the point where you pressed ■.
To start from the beginning, press TOOLS to select “Play Beginning,” and press ENTER. Playback starts from the beginning of the title/track/scene.
The point where you stopped playing is cleared when:
- you open the disc tray (except for HDD).
- you play another title (except for HDD).
- you switch the Title List menu to Original or Playlist (HDD/DVD-RW in VR mode only).
– you edit the title after stopping playback.
– you change the settings on the recorder. - you turn off the recorder (VIDEO CD/CD/DATA DVD/DATA CD only).
- you make a recording (except for HDD/DVD-RWs in VR mode).
- you switch between JPEG and MP3.
Note
You cannot resume playback during TV Pause.
To play restricted DVDs (Parental Control)
If you play a restricted DVD, the message “Do you want temporarily change parental control to *?” appears on your TV screen.
1 Select "OK" and press ENTER.
The display for entering your password appears.
2 Enter your four-digit password using the number buttons.
3 Press ENTER to select "OK."
The recorder starts playback.
To register or change the password, see “Parental Control (DVD VIDEO only)” on page 99.
To lock the disc tray (Child Lock)
You can lock the disc tray to prevent children from ejecting the disc.
When the recorder is turned on, hold down ■ until "LOCKED" appears in the front panel display.
The ▲ (open/close) button does not work while the Child Lock is set.
To unlock the disc tray, hold down ■ until
“UNLOCKED” appears in the front panel display when the recorder is turned on.
One Touch Play
If you use the SMARTLINK connection, you can easily start playing.
Press ▷. The recorder and your TV automatically turn on and the TV's input is switched to the recorder. Playback starts automatically.
One Touch Menu
If you use the SMARTLINK connection, you can easily display the Title List.
Press TITLE LIST. The recorder and your TV automatically turn on and the TV's input is switched to the recorder. The Title List appears.
Hints
- You can also use the ▷ button in step 3 (page 60) to start playback.
- Even if you select “Factory Setup” in “Options” setup (page 102), the Child Lock remains set.
Playback options
To check the position of the buttons below, see the illustration on page 60.
 | tons | Operations |
| [audio) Selects one of the audio tracks recorded on the disc when pressed repeatedly. | ||
| -HC1G | -RWVR DVD | |
| [BY42] | CD | |
 | DVD: Selects the language. | |
| [GCA] | HDD -RWVR: Selects the main or sub sound. | |
 | VCD CD: Selects stereo or monaural audio tracks. | |
 | (subtitle) Selects a subtitle language when pressed repeatedly. | |
 | ||
| (angle) Selects an angle when pressed repeatedly. | ||
 | If various angles (multi-angles) for a scene are recorded on the disc, “appears in the front panel display. | |
 | ||
 | ||
 | RESSIVE Switches the type of video output signal to interlace or progressive format(page 19). | |
 C C | +RW -RWVR | |
| [76H4] T | +R -R | |
 H H | VCD | |
| [8XKK] | instant replay/advance) | Replays the scene/briefly fast forwards the scene. |
 N N | ||
 Z Z | +RW RWVR | |
 S S | +R -R | |
| [HZC2] W | ||
 | (previous)/next) | Goes to the beginning of the previous/next title/chapter/scene/track.For the HDD, you cannot go to the beginning of the previous/next title. |
 | reverse/fast forward) | Fast reverses/fast forwards the disc when pressed during playback. |
| [2HDZ] | Search speed changes as follows: | |
 | fast reverse fast forward | |
 | *1 | |
| *2 | |
| When you press and hold the button, fast forward/fast reverse continues at the selected speed until you release the button. | |
| *1 When you press ▶ once during playback of a title recorded in the HDD, you can play quickly with sound (“x1.5” appears). | |
| *2 ▶ 3 and 3 ▶ are only available for the HDD and DVDs. | |
| ||
| ||
| [7BKD] | v, freeze frame) | Plays in slow motion when pressed for more than one second in pause mode. |
| [TWEZ] | Plays one frame at a time when pressed briefly in pause mode. | |
 | D +RW -RWVR | |
 | Video + R -R | |
 | D VCD * | |
| *Playback direction only | ||
 | ||
 | Pause) Pauses playback. | |


[Non-Text]
Notes
- Angles and subtitles cannot be changed with titles recorded on this recorder.
- 96 kHz PCM audio and DTS audio do not have surround effects.
- The surround effects do not work while performing playback quickly with sound.
Notes on playing DTS sound tracks on a CD
- When playing DTS-encoded CDs, excessive noise will be heard from the analogue stereo jacks. To avoid possible damage to the audio system, the consumer should take proper precautions when the analogue stereo jacks of the recorder are connected to an amplification system. To enjoy DTS Digital Surround™ playback, an external 5.1-channel decoder system must be connected to the digital jack of the recorder.
- Set the sound to “Stereo” using the (audio) button when you play DTS sound tracks on a CD (page 62).
Notes on playing DVDs with a DTS sound track
DTS audio signals are output only through the DIGITAL OUT (COAXIAL or OPTICAL) jack.
When you play a DVD with DTS sound tracks, set "DTS" to "On" in "Audio" setup (page 97).
Adjusting the picture quality

1 Press TOOLS during playback to select "Video Settings," and press ENTER.

2 Select an item, and press ENTER.
The adjustment display appears.
“Y NR” (luminance noise reduction):
Reduces noise contained in the luminance element of the video signal.
“C NR” (chroma noise reduction): Reduces noise contained in the colour element of the video signal.
“BNR” (block noise reduction): Reduces “block noise” or mosaic like patterns in the picture.
“MNR” (mosquito noise reduction): Reduces the faint noise appearing around the outlines of the images. The noise reduction effects are automatically adjusted within each setting range according to the video bit rate and other factors.
“DVE” (digital video enhancer): Sharpens the outlines of the images.
“PB Video Equalizer” (Playback video equalizer): Adjusts the picture in greater detail.
Select an item and press ENTER.
- Contrast: changes the contrast.
- Brightness: changes the overall brightness.
- Colour: makes the colours deeper or lighter.
- Hue: changes the colour balance.
3 Press ←/→ to adjust the setting, and press ENTER.
The default settings are underlined.
| “Y NR”: (weak) Off | 1 | 2 | 3 (strong) |
| “C NR”: (weak) Off | 1 | 2 | 3 (strong) |
| “BNR”: (weak) Off | 1 | 2 | 3 (strong) |
| “MNR”: (weak) Off | 1 | 2 | 3 (strong) |
| “DVE”*: (weak) | 1 | 2 | 3 (strong) |
"PB Video Equalizer":
- Contrast: (weak) -3 0 3 (strong)
- Brightness: (dark) -3 0 3 (bright)
- Colour: (light) -3 0 \~ 3 (deep)
- Hue: (red) -3 0 3 (green)
Repeat steps 2 and 3 to adjust any other items.
* “1” softens the outlines of the images. “2”
enhances the outlines and “3” enhances them more than “2.”
Notes
- If the outlines of the images on your screen become blurred, set “BNR” and/or “MNR” to “Off.”
- Depending on the disc or the scene being played, the above BNR, MNR, Y NR, or C NR effects may be hard to discern. And, these functions may not work with some screen sizes.
- When using the DVE function, noise found in the title may become more apparent. In this case, it is recommended that you use the BNR function with the DVE function. If the condition still does not improve, set the DVE level to “1” or “Off.”
Adjusting the sound quality

1 Press TOOLS during playback to select "Audio Settings," and press ENTER.
2 Select an item, and press ENTER.
“Surround” (TVS): Selects one of the surround modes.
TVS* (TV Virtual Surround) lets you enjoy virtual surround sound effects created from the front left and right speakers. The selected setting is displayed in the front panel display for a few seconds.
- Off: No surround effect
- Dynamic: Creates one set of virtual rear speakers.
- Wide: Creates five sets of virtual rear speakers.
- Night: Creates five sets of virtual rear speakers. Effective at low volume.
- Standard: Creates three sets of virtual rear speakers. Effective when you use two separate front speakers.
*TVS was developed by Sony to produce home surround sound with just a stereo TV.
“Audio Filter”: Selects the digital filter to reduce noise above 22.05 kHz (Fs* is 44.1 kHz), 24 kHz (Fs is 48 kHz), or 48 kHz (Fs is above 96 kHz).
- Sharp(default): Provides a wide frequency range and spatial feeling.
- Slow: Provides smooth and warm sound.
“AV SYNC”: When the video is delayed, this function delays the audio for synchronization with the video (0 to 120 milliseconds). Larger numbers indicate a longer audio delay for synchronization with the video. When dubbing to a VCR or other video recording equipment, be sure to return this setting to 0 ms (default).
* Sampling frequency of audio source. This function only adjusts the output signals from the LINE 1 – TV, LINE 3, or LINE 2 OUT (AUDIO L/R).
3 Press ←/↑/↓/→ to select the option, and press ENTER.
Notes
- There may be little effect by changing the Audio Filter depending on the disc or playback environment.
- To enjoy the surround TVS modes, set “Digital Out” to “On” and “Dolby Digital” to “D-PCM” and “MPEG” to “PCM” in “Audio” setup.
- The volume may be reduced when surround effects are set.
- When the playback signal does not contain a signal for the rear speakers, the surround effects will be difficult to hear.
- In addition, the surround effects may also be difficult to hear depending on the title being played and the environment where the recorder is being used.
- When you select one of the surround modes, turn off the surround settings of the connected TV or amplifier (receiver).
- Make sure that your listening position is between and at an equal distance from your speakers, and that the speakers are located in similar surroundings.
- When you use the DIGITAL OUT (COAXIAL) jack to listen to MPEG audio signals and set “MPEG” to “MPEG” in “Audio” setup, no sound will come from your speakers if you select one of the TVS modes.
- The surround effects do not work while performing playback quickly with sound.
Pausing a TV Broadcast (TV Pause)
You can pause a current TV broadcast, and then continue watching the programme at a later time. This is useful when you receive an unexpected phone call or visitor while watching TV.
1 While viewing a TV broadcast with this recorder, press Ⅱ.
The picture pauses. You can pause the picture for up to three hours.
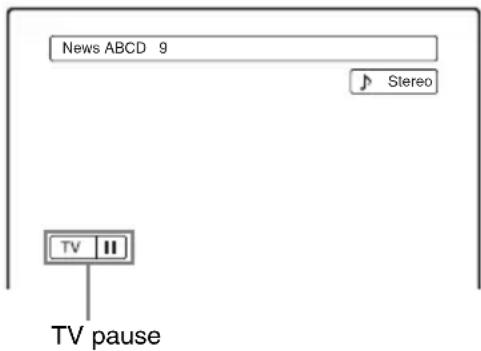
2 Press ▪ or ▷ again to resume watching the programme.
Notes
-
Paused titles are not saved to the HDD.
• This function is cancelled when: -
■ (stop) is pressed.
- PROG +/- is pressed.
- DVD is pressed.
- ▲ (open/close) is pressed.
– TITLE LIST is pressed. - INPUT SELECT is pressed.
– (Electronic Programme Guide) is pressed.
– the recorder is turned off. - a timer recording or Synchro Recording is started.
– DV dubbing or regular dubbing is started.
- It may take a few seconds to resume playback of the paused programme.
- Even if you fast forward the recorded programme, there will always be a time difference of about one minute or more between the recorded programme and the current TV broadcast.
Playing from the beginning of the programme you are recording (Chasing Playback)
HDD -RWVR
“Chasing Playback” allows you to view the recorded part of a programme while the recording is being made. You do not need to wait until the recording finishes.
Press TOOLS while recording to select "Chasing Playback," and press ENTER.
Playback starts from the beginning of the programme you are recording.
When you fast forward to the point that you are recording, Chasing Playback returns to normal playback.
Notes
- For DVD-RWs (VR mode), this function does not work when recording:
-on a 1x-speed DVD-RW.
– in the HQ or HSP recording mode.
- The DVD's picture on your TV screen freezes for a few seconds when you fast forward/fast reverse or instant replay/advance the recording.
- Chasing Playback is possible from one minute or more after recording starts.
- Even if you fast forward the recorded programme, there will always be a time difference of about one minute or more between the recorded programme and the current TV broadcast.
Playing a previous recording while making another (Simultaneous Rec and Play)

“Simultaneous Rec and Play” allows you to view a previously recorded programme while recording programmes. Playback continues even if a timer recording starts. Use this function as follows:
- While recording to the HDD:
Play another title on the HDD.
Play a previously recorded programme on a DVD by pressing DVD. - While recording to a DVD: Play a previously recorded programme on the HDD by pressing HDD.
- While recording to a DVD-RW (VR mode) ^1 : Play another title on the same DVD-RW (VR mode) disc. ^2
*1 Simultaneous Rec and Play function does not work when you record:
-on a 1x-speed DVD-RW.
– in the HQ or HSP recording mode.
*2 Picture noise may appear depending upon the condition of the recording, or when playing a title recorded in the HQ or HSP recording mode. The picture freezes for a few seconds when you use fast forward/fast reverse or instant replay/advance.
You can also play a DVD VIDEO, VIDEO CD, Super VIDEO CD, CD, DATA DVD, or DATA CD while recording on the HDD.
Example: Play another title on the HDD while recording to the HDD.
1 While recording, press TITLE LIST to display the HDD Title List.
2 Select the title you want to play, and press ENTER.
3 Select "Play" from the sub-menu, and press ENTER.
Playback starts from the selected title.
Example: Play a DVD while recording to the HDD.
1 While recording, press DVD and insert the DVD into the recorder.
2 Press TITLE LIST to display the DVD Title List.
3 Select the title you want to play, and press ENTER.
4 Select "Play" from the sub-menu, and press ENTER.
Playback starts from the selected title.
Note
You cannot play a DVD or VIDEO CD recorded in the NTSC colour system while recording on the HDD. When playing a VIDEO CD, be sure to set “Colour System” to “PAL” (page 100).
Searching for a Title/ Chapter/Track, etc.
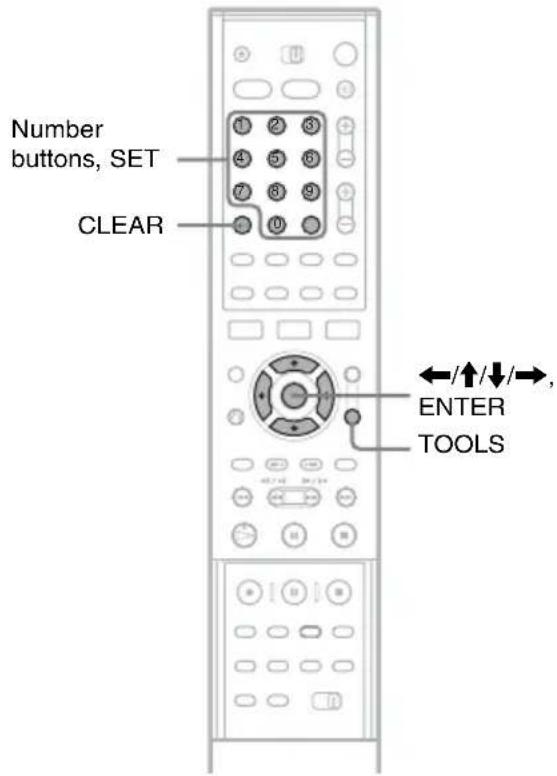
Searching by Thumbnail (Visual Search)
HDD +RW -RWVR -RW Video +R -R
Each chapter is displayed as a thumbnail. You can search for the desired scene visually.
1 Press TOOLS during playback to select "Visual Search," and press ENTER.

2 Select a scene using / , and press ENTER.
Playback of the selected scene is started.
Searching by title number or time code
HDD +RW -RWVR -RW Video +R -R DVD VCD CD DATA DVD DATA CD
You can search a disc by title, chapter, scene or track. As titles and tracks are assigned individual numbers, select the title or track by entering its number. You can also search for a scene using the time code.
1 Press TOOLS during playback to select a search method, and press ENTER.
"Title Search" (for DVDs)
"Chapter Search" (for HDD/DVDs)
"Track Search" (for CDs/DATA CDs)
"Search" (for VIDEO CDs)
"Album Search" (for DATA DVDs/DATA CDs)
“Time Search” (for HDD/DVDs): Searches for a starting point by entering the time code.
"File Search" (for DATA DVDs/DATA CDs)
The display for entering the number appears. Example: Title Search

The number in parentheses indicates the total number of titles, tracks, etc.
2 Press the number buttons to select the number of the title, chapter, track, time code, etc., you want.
For example: Time Search
To find a scene at 2 hours, 10 minutes, and 20 seconds, enter "21020."
If you make a mistake, press CLEAR to cancel the number, then select another number.
3 Press SET.
The recorder starts playback from the selected number.
Note
"Title Search" is not applicable to the HDD.
Playing MP3 Audio Tracks or JPEG Image Files
DATA DVD DATA CD
You can play MP3 audio tracks and JPEG image files on DATA CDs (CD-ROMs/CD-Rs/CD-RWs) or JPEG image files on DATA DVDs (DVD-ROMs/DVD+RWs/DVD+Rs/DVD-RWs/DVD-Rs).

1 Insert a disc.
See "Inserting a Disc" on page 29.
2 Press ▷.
For MP3 discs, playback starts from the first MP3 audio track on the disc.
For JPEG files, a slideshow of the pictures on the disc begins.
If the DATA CD contains both MP3 audio tracks and JPEG image files, playback starts from the JPEG image files the first time ▷ is pressed.
Selecting an MP3 album or track
1 Press TITLE LIST.
The album list appears.
To change the page, press ←• →

2 Select an album, and press ENTER.
The sub-menu appears.
3 Select "View Album," and press ENTER.
The track list appears.
To change the page, press ←•/•→

4 Select a track, and press ENTER.
"Play": Plays the track.
"Play Beginning": Plays the beginning of the track.
"Track Data": Shows data about the track such as artist and album name.
To stop playback
Press ■.
To fast review or forward a track
Press ◀◀/▶▶ during playback.
To go to the previous or next MP3 audio track
Press ◀◀◀ or ▶▶◀ during playback. If you repeatedly press ◀◀◀ or ▶▶◀, you will go to the previous or next album.
To go to the previous or next album
Press ← during playback.
Hint
Press the (audio) button to switch between stereo or monaural audio tracks.
Selecting a JPEG album or image
1 Press TITLE LIST.
The album list appears.
To change the page, press


2 Select an album, and press ENTER.
The sub-menu appears.
3 Select "View Album," and press ENTER.
The image list appears.
To change the page, press ←•/•→

4 Select an image, and press ENTER.
“View Image”: Shows the image on the entire screen.
“Slideshow”: Shows the images in the album as a slideshow.
“Image Data”: Shows data about when the picture was taken.
To stop viewing the JPEG image
Press ■.
To view the previous or next picture
Press ◀◀◀/▶▶ while the picture is displayed.
To rotate a picture
Press TOOLS while the image is displayed to select “Rotate Right” or “Rotate Left,” and press ENTER.
To change the slideshow speed
Press TOOLS while the album list or image list is displayed to select “Slideshow Speed,” and press ENTER. Then select the speed from “Fast” (quick), “Normal,” and “Slow.”
To go to the previous or next album
Press ← while the JPEG image is displayed.
Hints
- If you are playing a DATA CD that has both MP3 and JPEG files, you can switch between photo and music albums by using the / buttons when the album list is displayed.
- You can rotate a JPEG image by using the / buttons when the image is displayed.
- Press DISPLAY repeatedly to show information about the JPEG album or image on your TV screen. Then press TIME/TEXT to toggle between the current selected image number and album number.
Notes
- If the DVD disc, such as a disc from a DVD video camera, contains both video and JPEG images, only the video can be played back.
- Some JPEG files, especially files of three million pixels or more, may lengthen the slideshow interval.
- Rotated JPEG images will not be saved when you press
- or switch to another folder.
- Images larger than 720 × 480 will be reduced to 720 × 480 when displayed.
- Images larger than 4 mega bytes cannot be displayed.
- Progressive JPEG images cannot be displayed.
- When you attempt to play a broken file or a file that does not satisfy the play conditions, appears but the recorder cannot play the file.
About MP3 audio tracks and JPEG image files
MP3 is audio compression technology that satisfies certain ISO/MPEG regulations. JPEG is image compression technology.
You can play MP3 (MPEG1 Audio Layer 3) format audio tracks and JPEG image files on DATA CDs (CD-ROMs/CD-Rs/CD-RWs) or JPEG image files on DATA DVDs (DVD-ROMs/DVD+RWs/DVD+Rs/DVD-RWs/DVD-Rs). DATA CDs discs must be recorded according to ISO9660 Level 1, Level 2 or Joliet format for the recorder to recognize the MP3 tracks. DATA DVDs must be recorded in Universal Disc Format (UDF). You can also play discs recorded in MultiSession.
See the instructions supplied with the CD-R/CD-RW/DVD-R/DVD-RW drives and the recording software (not supplied) for details on the recording format.
Note on MultiSession/Border discs
If MP3 audio tracks or JPEG image files are recorded in the first session/border, the recorder will also play MP3 audio tracks or JPEG image files in other sessions/borders. If audio tracks and images in Music CD format or Video CD format are recorded in the first session/border, only the first session/border will be played back.
Note
The recorder may not be able to play some DATA CDs/DATA DVDs created in the Packet Write format.
MP3 audio tracks or JPEG image files that the recorder can play
The recorder can play the following tracks and files:
- MP3 audio tracks with the extension ".MP3," ".mp3," or "Mp3."
- JPEG image files with the extension ".JPEG," ".jpg," ".JPG," ".Jpg," ".jpeg," or ".Jpeg."
- JPEG image files that conform to the DCF* image file format.
* “Design rule for Camera File system”: Image standards for digital cameras regulated by JEITA (Japan Electronics and Information Technology Industries Association).
Notes
- The recorder will play any data with the extension “.MP3,” “.mp3,” “Mp3,” “.JPEG,” “.jpg,” “.JPG,” “.Jpg,” “.jpeg,” or “.Jpeg” even if they are not in MP3 or JPEG format. Playing these data may generate a loud noise which could damage your speaker system.
- The recorder does not conform to audio tracks in mp3PRO format.
- Some files cannot be played.
- The letters that cannot be displayed are replaced with “*.”
About playback order of albums, tracks, and files
Albums play in the following order:
Structure of disc contents
Tree 1 Tree 2 Tree 3 Tree 4 Tree 5
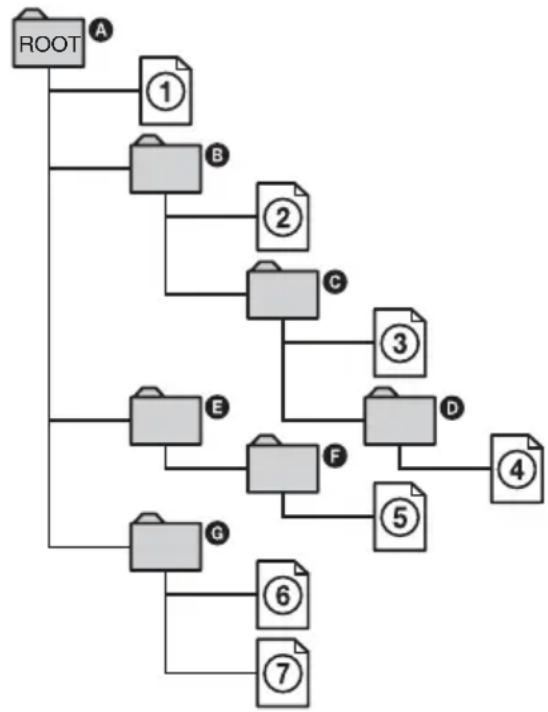
flowchart
graph TD
    A["ROOT"] --> B["1"]
    A --> C["2"]
    A --> D["3"]
    A --> E["4"]
    A --> F["5"]
    A --> G["6"]
    A --> H["7"]
    B --> I["B"]
    C --> J["C"]
    D --> K["D"]
    E --> L["F"]
    F --> M["G"]
    G --> N["7"]

Album

MP3 audio track/
JPEG image file
When you insert a DATA CD/DATA DVD and press ▷, the numbered tracks (or files) are played sequentially, from ① through ⑦.
For JPEG image file, press to go to the next album. (For instance, when you want to go from ① to ②.)
Any sub-albums/tracks (or files) contained within a currently selected album take priority over the next album in the same tree. (Example: C contains D so ④ is played before ⑤.) When you press TITLE LIST and the list of album names appears (page 35), the album names are arranged in the following order: A → B → C → D → F → G. Albums that do not contain tracks (or files) (such as album E) do not appear in the list.
Hints
- If you add numbers (01, 02, 03, etc.) to the front of the track/file names when you store the tracks (or files) in a disc, the tracks and files will be played in that order.
- Since a disc with many trees takes longer to start playback, it is recommended that you create albums with no more than two trees.
Notes
- Depending on the software you use to create the DATA DVD/DATA CD, the playback order may differ from the above illustration.
- No more than a total of 199 individual folders can be played. (Folders that do not contain JPEG/MP3 files are counted as well.)
- No more than a total of 999 folders and files can be played. (Files other than JPEG/MP3 files, and folders that do not contain JPEG/MP3 files are counted as well.)
- No more than 200 folders and files can be recognized in a single folder. (Folders that do not contain JPEG/MP3 files are counted as well.)
- Proceeding to the next or another album may take some time.
- This recorder supports MP3 audio bit rates up to 160 kbps.
Erasing and Editing
Before Editing
This recorder offers various edit options for various disc types. Before you edit, check the disc type in the front panel display, and select the option available for your disc (page 10).
Notes
- You may lose the edited contents if you remove the disc or a timer recording starts while editing.
- DVD discs created by DVD video cameras cannot be edited on this recorder.
Edit options for the HDD and DVD-RWs (VR mode)
HDD
-RWVR
You can enjoy advanced edit functions. First you have two options for the HDD and DVD-RWs (VR mode): editing either the original recording (called the “original”), or the playback information created from the original (called a “Playlist”). Since each is different in nature and offers different merits, read the following and select the one that better suits your needs.
To edit original titles
Edits made to the original titles are final. If you plan to retain an unaltered original recording, create and edit a Playlist (see below). The edit functions available for original titles are:
- Labelling a title (page 73).
- Setting protection against erasure (page 73).
– Erasing a title (page 73).
– Erasing multiple titles (page 75).
– Erasing a section of a title (A-B Erase) (page 74).
– Erasing all titles on the disc (page 76).
– Erasing a chapter (page 74). - Dividing one title into two titles (HDD only) (page 75).
To create and edit Playlist titles
A Playlist is a group of Playlist titles created from the original title for editing purposes. When you create a Playlist, only the control information necessary for playback, such as the playback order, is stored on the disc. Since the original titles are left unaltered, Playlist titles can be re-edited.
Example: You have recorded the final few matches of a football tournament on a DVD-RW (VR mode). You want to create a digest with the goal scenes and other highlights, but you also want to keep the original recording.

flowchart
graph TD
    A["Original"] --> B["Player 1: Running to Basketball"]
    B --> C["Player 2: Running to Soccer"]
    C --> D["Player 3: Running to Volleyball"]
    D --> E["Player 4: Running to Tennis"]
    E --> F["Player 5: Running to Golf"]
    F --> G["Player 6: Running to Hockey"]
    G --> H["Player 7: Running to Volleyball"]
    H --> I["Player 8: Running to Soccer"]
    I --> J["Player 9: Running to Volleyball"]
    J --> K["Player 10: Running to Tennis"]
    K --> L["Player 11: Running to Golf"]
    L --> M["Player 12: Running to Hockey"]
    M --> N["Player 13: Running to Volleyball"]
    N --> O["Player 14: Running to Tennis"]
    O --> P["Player 15: Running to Golf"]
    P --> Q["Player 16: Running to Hockey"]
    Q --> R["Player 17: Running to Volleyball"]
    R --> S["Player 18: Running to Tennis"]
    S --> T["Player 19: Running to Golf"]
    T --> U["Player 20: Running to Hockey"]
In this case, you can compile highlight scenes as a Playlist title. You can even rearrange the scene order within the Playlist title (“Creating and Editing a Playlist” on page 77).
The advanced edit functions available for Playlist titles are:
- Setting protection against erasure (HDD only) (page 73).
- Labelling a title (page 73).
– Erasing a title (page 73).
– Erasing multiple titles (page 75).
– Erasing a section of a title (A-B Erase) (page 74).
– Rearranging the title order (page 78). - Dividing a title into multiple titles (page 75).
- Combining multiple titles into one title (page 78).
– Erasing a chapter (page 74).
Hint
You can display the disc's Playlist titles in the Title List (Playlist), or the original titles in the Title List (Original). To switch the two Title Lists, press TOOLS while a Title List is displayed, and select “Original” or “Playlist.”
Notes
- The Playlist title calls up data from the original titles for playback. When an original title is used for a Playlist title, the original title cannot be erased.
- If a message appears and indicates that the disc's control information is full, erase or edit unnecessary titles.
- Playlist titles containing titles recorded with the “Copy-Once” copy protection signal cannot be dubbed or moved (page 80).
Edit options for DVD+RWs/DVD-RWs (Video mode)/DVD+Rs/DVD-Rs
+RW
-RWVideo
+R
-R
You can perform simple edits. Since Video mode titles are actual recordings on the disc, you cannot undo any edits you make. The edit functions available for Video mode titles are:
- Setting protection against erasure (page 73).
- Labelling a title (page 73).
– Erasing a title (page 73).
– Erasing multiple titles (page 75). - Erasing a section of a title (A-B Erase) (DVD+RWs only) (page 74).
– Erasing all titles on the disc (page 76). - Erasing titles to open up disc space (Disc Map) (DVD+RWs and DVD-RWs (Video mode) only) (page 76).
Notes
- When editing a DVD+R or DVD-R, finish all editing before finalising the disc. You cannot edit a finalised disc.
- The available disc space does not increase even when you erase titles for DVD+Rs and DVD-Rs.
- If a message appears and indicates that the disc's control information is full, erase or edit unnecessary titles.
Erasing and Editing a Title
HDD
+RW
-RWVR
-RWvideo
+R
-R
This section explains the basic edit functions. Note that editing is irreversible. To edit the HDD or DVD-RWs (VR mode) without changing the original recordings, create a Playlist title (page 77).

1 Press TITLE LIST.
For HDD titles or DVD-RWs in VR mode, press TOOLS and select “Original” or “Playlist” from the TOOLS menu to switch the Title Lists, if necessary.
2 Select a title, and press ENTER.
The sub-menu appears.
3 Select an option, and press ENTER.
You can make the following edits to the title. "Erase": Erases the selected title. Select "OK" when asked for confirmation.
"Protect": Protects the title. Select "On" when the Protection display appears. "☐" appears next to the protected title. To cancel the protection, select "Off."
"Title Name": Allows you to enter or re-enter a title name (page 36).
"Set Thumbnail": Changes the title's thumbnail picture that appears in the Title List (page 34).
"A-B Erase": Erases a section of the title (page 74).
"Delete Chapter": Erases chapter units of the title while viewing thumbnails (see below).
"Divide": Divides a title into two titles (page 75).
Hints
- You can erase multiple titles at one time (page 75), or erase all of the titles on the disc at once (page 76).
- You can automatically erase titles that have already played.
- You can label or re-label DVDs (page 38).
Note
DVD-RW (VR mode) playlist titles cannot be protected.
Erasing a chapter (Delete Chapter)
HDD -RWVR
Thumbnails are displayed for each chapter. You can easily select and erase a section in a title. Note that erasing a chapter cannot be undone.
1 After step 2 of “Erasing and Editing a Title,” select “Delete Chapter,” and press ENTER.
2 Select a thumbnail of the chapter using / , and press ENTER.

flowchart
graph TD
    A["Chapter 4(30) 0:12:45"] --> B["Action Sequence"]
    B --> C{OK}
    B --> D{Cancel}
    B --> E{Reset All}
• To cancel the selection, press ENTER again.
• To erase multiple chapters, repeat step 2.
- To reset all selections, select "Reset All."
3 Select "OK," and press ENTER.
The display asks for confirmation.
4 Select "Yes," and press ENTER.
Erasing a section of a title (A-B Erase)
HDD +RW -RWVR
You can select a section (scene) in a title and erase it. Note that erasing scenes in a title cannot be undone.
1 After step 2 of "Erasing and Editing a Title," select "A-B Erase" and press ENTER.
The display for setting point A appears.
- To return to the beginning of the title, press ▪ and then press ◀◀◀.

2 Select point A by pressing ◀◀/▶▶, and press ENTER.
The display for setting point B appears.
3 Select point B by pressing ◀◀/▶▶, and press ENTER.
The display asks for confirmation.
- To reset either point A or B, select “Change A” or “Change B,” and go to step 2 or 3.
- To preview the title without scenes to be erased, select "Preview" (except for DVD+RWs).
4 Select "OK," and press ENTER.
The scene is erased, and the display asks whether to erase another scene.
- To continue, select "Yes," and repeat from step 2.
• To finish, select "No."
Hint
A chapter mark is inserted after the scene was erased. The chapter mark divides the title into separate chapters on either side of the mark.
Notes
- Images or sound may be momentarily interrupted at the point where you erase a section of a title.
- Sections shorter than five seconds may not be erased.
- For DVD+RWs, the erased section may be slightly different from the points you selected.
Erasing multiple titles (Erase Titles)
HDD
+RW
-RWVR
-RWVideo
+R
-R
You can select and erase more than one title at one time using the TOOLS menu.
1 Press TITLE LIST.
2 Press TOOLS to select "Erase Titles," and press ENTER.
The display for selecting titles to be erased appears.
3 Select a title, and press ENTER.
A check mark appears in the check box next to the selected title.
- To clear the check mark, press ENTER again.
- To clear all of check marks, select “Reset All.”

4 Repeat step 3 to select all of the titles you want to erase.
5 When you finish selecting titles, select "OK," and press ENTER.
The list of the titles to be erased appears for confirmation.
- To change the selection, select “Change,” and repeat from step 3.
6 Select "OK" and press ENTER.
The titles are erased.
Dividing a title (Divide)
HDD -RWVR *
If you want to dub a long title to a disc but do not want to reduce the picture quality, divide the title into two shorter titles. Note that dividing a title cannot be undone.
* Only playlist titles can be divided for DVD-RW (VR mode).
1 Press TITLE LIST.
Press TOOLS and select “Playlist” from the TOOLS menu to switch the Title Lists, if necessary.
2 Select a title, and press ENTER.
The sub-menu appears.
3 Select "Divide," and press ENTER.
The display for setting the dividing point appears. The title starts to play in the background.
- To return to the beginning of the title, press || and then press ◀◀◀.
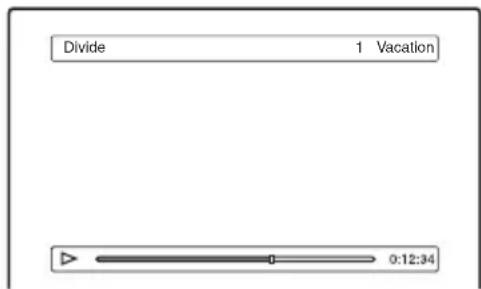
4 Select the dividing point by pressing ◀◀/▶▶, and press ENTER.
The display asks for confirmation.
- To change the dividing point, select "Change."
5 Select "OK," and press ENTER.
The display for entering the title name appears.
- To use the same title name as before, select "No."
6 Select "Yes," and press ENTER to enter a new name.
Follow the explanations on page 36. After you enter a new name, the title is divided in two.
Erasing all titles on the disc
HDD
+RW
-RWVR
-RW Video
+R
-R
1 Press TOOLS to select "Disc Info," and press ENTER.
The “Disc Information” display appears.
2 Select "Erase All," and press ENTER.
3 Select "OK," and press ENTER.
All titles on the disc are erased (except the protected titles).
Erasing titles to open up disc space (Disc Map)
+RW
-RW Video
When recording on a DVD+RW or DVD-RW (Video mode), the recorder searches for the largest open space and records there. Before you start, check the disc status by using Disc Map, and erase titles to create a space large enough for the recording.
1 Insert a disc and press TITLE LIST.
2 Press TOOLS to select "Disc Map," and press ENTER.
The "Disc Map" display appears.
- To check the open space, select the space by pressing / .

- When ◀ or ▶ appears on either side of the screen, you can scroll sideways by pressing ←/→.
3 Select a title by pressing ←/→, and press ENTER.
The display for selecting titles to be erased appears.
• To cancel the selection, press ENTER again.
• To erase more titles, repeat step 3.
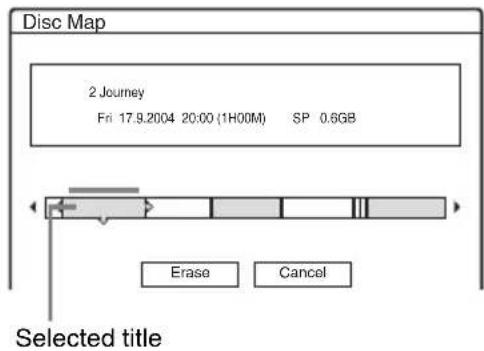
4 Select "Erase," and press ENTER.
The display asks for confirmation.
5 Select "OK," and press ENTER.
The selected titles are erased, freeing up disc space.
- To change the selection, select "Change."
Creating chapters manually
HDD
-RWVR
You can manually insert a chapter mark at any point you like during playback or recording.
Press CHAPTER MARK at the point where you want to divide the title into chapters.
Each time you press the button, "Marking..." appears on the screen and the scenes to the left and right of the mark become separate chapters.
To erase chapter marks
You can combine two chapters by erasing the chapter mark during playback.
Press ◀◀◀/▶▶ to search for a chapter number, and while displaying the chapter containing the chapter mark you want to erase, press CHAPTER MARK ERASE.
The current chapter combines with the previous chapter.
Notes
- When dubbing, any chapter marks you enter will be erased.
- To insert a chapter mark manually during recording, set "Auto Chapter" in "Features" setup to "Off."
Creating and Editing a Playlist
HDD -RWVR
Playlist edit allows you to edit or re-edit without changing the actual recordings. You can create up to 97 Playlist titles.
Note
Once you create a Playlist title from original titles, you will be unable to erase or edit the original titles.
1 Press TITLE LIST.
2 Press TOOLS to select "Create Playlist," and press ENTER.

3 Select the title you want to include in the Playlist title, and press ENTER.
The sub-menu appears.
“Capture”: Adds a section of the title to the Playlist title as one scene.
“Capture All”: Adds the entire title to the Playlist title as one scene. After capturing the title, go to step 8.
4 Select "Capture," and press ENTER.
The display for setting the start point (IN) appears. The title starts to play in the background.
- To return to the beginning of the title, press ▪ and then press ◀◀.
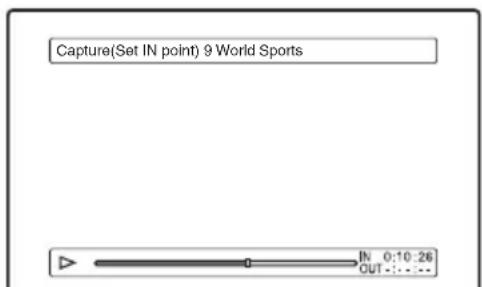
5 Select the IN point by pressing ◀◀/▶▶, and press ENTER.
The display for setting the end point (OUT) appears, and the title continues to play in the background.
6 Select the OUT point by pressing ◀◀/▶▶, and press ENTER.
The display asks for confirmation.
To reset the IN or OUT point, select "Change IN" or "Change OUT" and repeat step 5 or 6. To view the selected scene, select "Preview."
7 Select "OK," and ENTER.
The Scene List menu appears with all of the selected scenes.
Total duration of the selected scene
Total number of scenes

- To add more scenes, select "Add" and go to step 3.
- To preview all of the captured scenes in the listed order, select “Preview.”
8 Select the scene you want to re-edit, and press ENTER.
The sub-menu appears.
"Move": Changes the scene order.
“Erase”: Erases the scene. The selection is cancelled.
“Preview”: Displays thumbnail pictures of the scenes.
“Change IN”: Allows you to change the IN point, and repeat from step 5.
“Change OUT”: Allows you to change the OUT point, and repeat from step 6.
9 When you finish editing the Scene List, select "OK," and press ENTER.
The display for entering the title name appears. To enter a new name, select “Enter” (page 36).
10 Select "OK" to use the default name, and press ENTER.
To play the Playlist title
Press TOOLS while the Title List menu is turned on. Then, select “Playlist” and press ENTER. When the Title List (Playlist) menu appears, select a title and press ▷.

Hint
When a Playlist title is created, the IN and OUT points will become chapter marks, and each scene will become a chapter.

Note
The picture may pause when the edited scene is played.
Moving a Playlist title (Change Order)
-RWVR
You can change the Playlist title order within the Title List (Playlist).
1 Press TITLE LIST to turn on the Title List (Playlist) menu.
If the Title List (Original) menu appears, press TOOLS and select “Playlist.”
2 Select the title you want to move, and press ENTER.
The sub-menu appears.
3 Select "Change Order," and press ENTER.
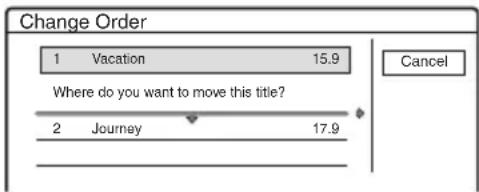
4 Select a new location for the title by pressing ↑/↓, and press ENTER.
The title moves to the new location.
Combining multiple Playlist titles (Combine)
HDD
-RWVR
1 Press TITLE LIST to turn on the Title List (Playlist) menu.
If the Title List (Original) menu appears, press TOOLS and select “Playlist.”
2 Press TOOLS to select "Combine," and press ENTER.
The display for selecting titles appears.
3 Select a title, and press ENTER.
A number indicating the order in which you selected the title appears.
To cancel the selection, press ENTER again.

4 Repeat step 3 to select all of the titles you want to combine.
To cancel all of the selections, select “Reset All.”
5 Select "OK," and press ENTER.
The list of titles to be combined appears. To change the selection, select “Change” and go to step 3.
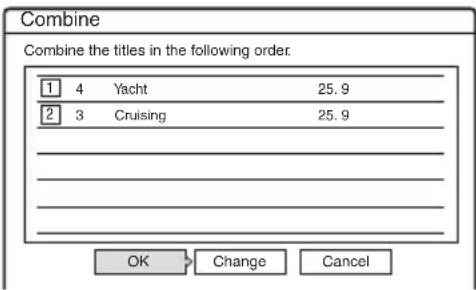
6 Select "OK," and press ENTER.
The display for selecting a title name from among the selected titles appears.
To enter a new name, select “Enter Text,” and follow the explanations on page 36.
To change the selection, select “Change” and go to step 3.
7 Select a name, and press ENTER.
The titles are combined.
Note
When the number of chapters in the title to be combined exceeds the limit, the chapters at the end are combined into a single chapter.
Dividing a Playlist title (Divide)
HDD
-RWVR
You can divide a Playlist title. For operations, see page 75.
Dubbing (HDD ↔ DVD)
Before Dubbing
HDD
+RW
-RWVR
-RWVideo
+R
-R
In this section, “dubbing” refers to “copying a recorded title on the internal hard disk drive (HDD) to another disc, or vice versa.” You can select to dub one title at a time (Title Dubbing – see “Dubbing a single title (Title Dub)” on page 81), or multiple titles all at once (Multiple Title Dubbing – see “Dubbing multiple titles (Dub Selected Titles)” on page 82).
Before you start, read the following precautions, which are common to both dubbing methods.
If you want to record from a digital video camera connected to the DV IN jack, see “DV Dubbing” on page 84. To record from equipment connected to the LINE IN jacks, see “Recording from connected equipment without a timer” on page 59.
Before you start...
- Select the disc type according to your needs (page 10). This recorder can record on various discs.
- You cannot record both the main and sub sound on a DVD+RW, DVD-RW (Video mode), DVD+R, or DVD-R. You can only record the main sound.
- Timer recordings and Synchro-Recording do not start during dubbing. Before you start, check the Timer List menu to see if there is any timer recording due to start during dubbing.
-
When “Auto Chapter” of “Features” setup is set to “On,” chapter marks are automatically inserted at approximately 6-minute intervals while dubbing from the HDD to a DVD, or when the recorder detects picture and sound changes while dubbing from a DVD to the HDD. The chapter marks in the dubbing source are not retained in the dubbed title.
-
For a title whose picture size (16:9 or 4:3) is mixed:
- When dubbed from the HDD to DVD-RW (Video mode) or DVD-R, the picture size is determined by the setting in “DVD Line Rec. Picture Size” (page 53).
- When dubbed from HDD to DVD+RW or DVD+R, the picture size is always 4:3.
- When dubbed from HDD to DVD-RW (VR mode), the originally recorded picture size is retained.
Hints
- When you dub a Playlist title, it is recorded as an Original title.
- When dubbed from a DVD to the HDD, the picture size and the sound types originally recorded are retained.
Notes
- To play a dubbed disc on other DVD equipment, finalise the disc (page 39).
- The recorder may not function as described depending on the disc status. Follow the instructions that appear on the screen.
- You cannot dub from DVD VIDEOs to the HDD.
- Thumbnails that you have set for the originally recorded title (page 34) will not be retained in the dubbed title.
About "Dub Mode"
With this recorder, the recording mode for dubbing is displayed as “Dub Mode.” Two dubbing method are available: High-speed Dubbing and Rec Mode Conversion Dubbing. Read the following and select according to the required time, disc space, and picture quality.
Dubbing at high-speed (High-speed Dubbing)

flowchart
graph LR
    A["HDD"] --> B["+RW /-RWvr /-RWVideo /+R"]
    B --> C["-R"]
Allows you to dub what you have stored in the HDD to a high-speed DVD (8x-speed DVD+RWs/6x-speed DVD-RWs/16x-speed DVD+Rs/16x-speed DVD-Rs, or slower versions of each disc type), without changing the recording mode.
Set “Dub Mode” to “Fast” in “Title Dub” or “Dub Selected Titles” display (page 81). You cannot select “Fast” when titles that cannot be dubbed at high speed are selected (such as the titles displayed in “Notes” below). The minimum required time is as follows (approximate).
Required times for High-speed Dubbing from HDD to DVD (for 60-minute programme) ^*1
| Speed^*2 | 6x 6x | *3 | 8x^*4 | 8x^*4 | 2.4x |
| Rec.mode | High-speedDVD-RW | High-speedDVD+RW | High-speedDVD-R | High-speedDVD+R | DVD+R(Double Layer) |
| HQ 10 min. 10 min. 8 min. 8 min. 25 min. | |||||
| HSP 6 min.40 sec. | 6 min.40 sec. | 5 min. | 5 min. | 16 min.40 sec. | |
| SP 5 min. 5 min. 3 min. | 45 sec. | 3 min.45 sec. | 12 min.30 sec. | ||
| LSP 4 min. 4 min. 3 min. 3 min. 10 min. | |||||
| LP 3 min.20 sec. | 3 min.20 sec. | 2 min.30 sec. | 2 min.30 sec. | 8 min.20 sec. | |
| EP 2 min.30 sec. | 2 min.30 sec. | 2 min. | 2 min. | 6 min.15 sec. | |
| SLP 1 min.40 sec. | 60min.*5 | 1 min.15 sec. | 60min.*5 | 60min.*5 | |
| SEP 1 min.15 sec. | 60min.*5 | 56 sec. | 60min.*5 | 60min.*5 | |
*1 The values in the above table are for reference only. Actual times for dubbing also require time for creating disc's control information and other data.
*2 This is the maximum recording speed of this recorder. The value may vary depending on the disc condition. Also, this recorder may be unable to record at the maximum speed for discs that support recording speeds exceeding the maximum value.
^3 The maximum drive speed of this recorder is 6x when using 6x-speed or faster DVD+RWs.
*4 The maximum drive speed of this recorder is 8x when using 8x-speed or faster DVD+Rs/DVD-Rs.
^5 High-speed dubbing is not available when dubbing titles recorded in SLP and SEP mode to DVD+RWs and DVD+Rs.
Notes
- High-speed Dubbing is not available for the following titles:
– Titles recorded in HQ+.
- Titles that contain both main and sub sounds (except DVD-RWs (VR mode)).
– Titles recorded in mixed picture size (4:3 and 16:9 etc.), (except DVD-RWs (VR mode)).
- When dubbed to a DVD-RW (Video mode)/DVD+RW/DVD+R/DVD-R, remnants of edited titles may remain on the disc. If you edit a title, use the Rec Mode Conversion Dubbing method. This will smooth out the pauses between the scenes.
- When dubbing to a DVD+R DL disc, the video may be momentarily interrupted at the point where the layers switch.
Rec Mode Conversion Dubbing
| HDD | ← | +RW | /-RWVR | /-RW Video | /+R |
| -R |
Allows you to dub from the HDD to a DVD or vice versa, in a dubbing mode that differs from the original recordings. For example, when you dub an HQ title (data size is large) in SP mode, you can reduce the data size, saving more titles using less space.
Select a mode different from the original recording in “Dub Mode” in the steps of “Dubbing a single title (Title Dub)” on page 81 or “Dubbing multiple titles (Dub Selected Titles)” on page 82.
When a title recorded to HDD in HQ or HQ+ mode is converted to another mode, the recorder automatically assigns an appropriate bit rate, thus retaining the original picture quality as much as possible.
Note
The picture quality will not improve even if a title is converted to a recording mode of better picture quality.
Dubbing restriction
You cannot dub movies and other DVD Videos to the HDD. Also, when dubbing from a DVD to the HDD, a gray, blank screen will be recorded for scenes that contain a copy protection signal.
| Copy protection signals | Dubbing | ||
| Copy-Free (No copy protection signal) | HDD | +RW | -RWVR |
| -RW Video | +R | ||
| -R | |||
| Copy-Once | HDD | -RWVR | * |
* CPRM-compatible DVD-RWs (VR mode) only CPRM (Content Protection for Recordable Media) is a coding technology that protects copyrights for images.
Move
HDD → -RWVR
Titles containing “Copy-Once” copy protection signals can be moved only from HDD to DVD-RW (VR mode)* (after the title is moved, the original title in the HDD is erased). The “Move” function is performed using the same procedure as dubbing (page 81). Titles containing “Copy-Once” copy protection signals are indicated with COPY.
Notes
- The following titles in the HDD cannot be moved.
- Protected titles
- Playlist titles
– Original titles referenced from the playlist
- If the move operation is stopped before completion, the title in the HDD is not erased.
* CPRM-compatible DVD-RWs (VR mode) only.
Dubbing
HDD +RW -RWVR -RWVideo +R -R
Dubbing a single title (Title Dub)
1 Insert the DVD that you are going to dub to or from.
2 Press HDD or DVD to select the source.
3 Press TITLE LIST to turn on the Title List menu.
4 Select a title, and press ENTER.
The sub-menu appears.
5 Select "Dubbing," and press ENTER.
The display for selecting the dubbing mode appears.
If a title with (page 81) is selected in the title list, a confirmation screen is displayed. To “Move,” select “Yes.”

1Size of the title (approximate)
2 Direction of dubbing
3 Available space on the disc to be dubbed (approximate)
4 Information about the title to be dubbed
5 Dubbing mode and the space that remains after dubbing (approximate)
6 Select "Dub Mode."
7 Select a dubbing mode by pressing ↑/↓.

flowchart
graph LR
    A["Fast*"] --> B["HQ SPHSP LSP"]
    B --> C["LPERSLPSEP"]
    A <--> D["←"]
    B <--> E["←"]
    C <--> F["←"]
* Appears when High-speed Dubbing is available for the title (page 79).
8 Select "Start," and press ENTER.
The dubbing indication appears in the front panel display (page 35).
To automatically adjust the dubbing mode (Auto Dub Mode)
If there is not enough available space on the target disc, the recorder automatically selects a dubbing mode with lower picture quality according to the available space. If there is insufficient disc space in the selected dubbing mode, the following display appears after step 8.

Select “Auto Dub Mode” and press ENTER to start dubbing. To manually select another dubbing mode, select “Reset,” and go to step 7.
To stop dubbing
Press TOOLS to select “Stop Dubbing,” and press ENTER. When asked for confirmation, select “Yes,” and press ENTER.
Hints
- If disc space is still insufficient for the selected dubbing mode, erase unnecessary parts of the title, or free up disc space by erasing titles on the disc (page 76).
- You can turn off the recorder during dubbing. The recorder completes dubbing even after being turned off.
Dubbing multiple titles (Dub Selected Titles)
A maximum of 30 selected titles can be dubbed at once. You can select the dubbing mode for each title.
1 Insert the DVD that you are going to dub to or from.
2 Press HDD or DVD to select the source.
3 Press TITLE LIST to turn on the Title List menu.
4 Press TOOLS to select "Dub Selected Titles," and press ENTER.

5 Select titles in the order you want to dub, and press ENTER.
The titles are numbered in the selected order. To cancel the selection, press ENTER again. If a title with (page 81) is selected in the title list, a confirmation screen is displayed. To “Move,” select “Yes.”
6 Repeat step 5 to select all of the titles you want to dub.
To make adjustments for each of the titles, select “Settings” (see “To adjust the settings for each title” below). To cancel all of the selections, select “Reset,” and go to step 5.
7 Select "Start," and press ENTER.
The dubbing indication appears in the front panel display (page 35).
To adjust the settings for each title
You can make detailed settings for each of the selected titles during Multiple Title Dubbing.
1 In step 6 of “Dubbing multiple titles (Dub Selected Titles)” on page 82, select “Settings” and press ENTER. The following display for making the adjustments appears. To re-select titles, select “Change,” and go to step 5 of “Dubbing multiple titles (Dub Selected Titles)” above. To have the recorder adjust the dubbing mode so all of the selected titles fit in, select “Auto mode.”

1 Total size of the selected titles
2 Direction of dubbing
3 Available space on the disc to be dubbed (approximate)
4 Information about the title to be dubbed (title name, original recording mode, dubbing mode, and data size after dubbing)
5 Order of dubbing
2 Select the title which you want to adjust, and press ENTER.
The sub-menu appears.
“Dub Mode”: Selects the dubbing mode for each title (page 79).
“Change Order”: Moves the title to change the dubbing order. Press ↑/↓ to select a new location, and press ENTER.
“Cancel”: Cancels the title selection. The title is excluded from dubbing.
3 Select an option, and press ENTER.
4 When you finish making adjustments, select "Start," and press ENTER.
To automatically adjust the dubbing mode (Auto Dub Mode)
If there is not enough available space on the target disc, the recorder automatically selects a dubbing mode with lower picture quality according to the available space. The same dubbing mode is set for all of the titles. If disc space is insufficient for the selected dubbing mode, the following display appears after step 7 of “Dubbing multiple titles (Dub Selected Titles)” on page 82.
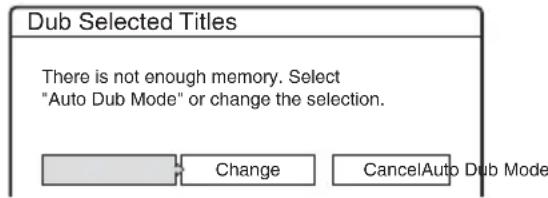
Select “Auto Dub Mode” and press ENTER. If you have selected only one title, select “OK.”
To stop dubbing
Press TOOLS to select “Stop Dubbing,” and press ENTER. When asked for confirmation, select “Yes,” and press ENTER.
Hints
- You can turn off the recorder during dubbing. The recorder completes dubbing even after being turned off.
- You can start Multiple Title Dubbing by selecting "DUBBING" from the System Menu.
DV Dubbing
Before DV Dubbing
This section explains dubbing with a digital video camera via the DV IN jack on the front panel. If you want to dub by way of the LINE IN jacks, see “Recording from connected equipment without a timer” on page 59.
To record from the DV IN jack
The DV IN jack on this recorder conforms to the i.LINK standard. You can connect any other equipment that has an i.LINK (DV) jack, and record digital signals.
Follow the instructions in “Preparing for DV dubbing,” and then move on to the section on dubbing. For more information about i.LINK, see “About i.LINK” on page 112.
Hint
If you plan to do additional editing on a disc after the initial dub, use the DV IN jack and record on a DVD-RW (VR mode) or HDD.
Preparing for DV dubbing
You can connect a digital video camera to the DV IN jack on the recorder to record or edit from a DV/Digital 8 format tape. Operation is straightforward because the recorder will fast forward and rewind the tape for you – you do not need to operate your digital video camera. Do the following to start using the “DV Edit” functions of this recorder.
See the instruction manual supplied with the digital video camera as well before connecting.
Notes
- The DV IN jack is for input only. It will not output signals.
-
You cannot use the DV IN jack when:
-
your digital video camera does not work with this recorder. Connect the camera to the LINE IN jack and follow the instructions of “Recording from connected equipment without a timer” on page 59.
- the input signal is not in DVC-SD format. Do not connect a MICRO MV format digital video camera even if it has an i.LINK jack.
– the images on the tape contain copy protection signals, which limit recording.
- If you want to play the disc on other DVD equipment, finalise the disc (page 39).
Hookups


: Signal flow
1 Press HDD or DVD to select the recording destination.
If you select DVD, insert a disc (see “Inserting a Disc” on page 29).
2 Insert the source DV/Digital 8 format tape into your digital video camera.
For the recorder to record or edit, your digital video camera must be set to video playback mode.
3 Press INPUT SELECT on the remote repeatedly to select "DV."
The front panel display changes as follows:

flowchart
graph LR
    A["Programme position"] --> B["L2L1→L4L3DV"]
    B --> C["Output"]
4 Press REC MODE on the remote repeatedly to select the recording mode.
The recording mode changes as follows:

flowchart
graph LR
    A["HQ SPHSP"] --> B["LSP"]
    C["SEP EPSLP"] <--_D["←"]
    E["← LP"] <--_F["←"]
For details about the recording mode, see page 48.
5 Press TOOLS on the remote to select "DV Audio Input," and press ENTER. Then, select the setting for the audio input.
“Stereo1” (default): Records original sound only. Normally select this when dubbing a DV format tape.
“Mix”: Records both stereo 1 and 2.
“Stereo2”: Records additional audio only.
Select “Mix” or “Stereo2” only if you have added a second audio channel when recording with your digital video camera.
You are ready to start dubbing. Select one of the dubbing methods on the following pages.
Hints
- You can turn off the recorder during dubbing. The recorder completes dubbing even after being turned off.
- You can adjust the settings for the recording picture before recording. See “Adjusting the recording picture quality and size” on page 53.
Notes
- You cannot connect more than one piece of digital video equipment to the recorder.
- You cannot control the recorder using another device or another recorder of the same model.
- You cannot record date, time, or the contents of the cassette memory onto the disc.
- If you record from a DV/Digital 8 format tape that is recorded in multiple sound tracks, such as a tape with multiple sampling frequencies (48 kHz, 44.1 kHz, or 32 kHz), no sound or an unnatural sound will be output when playing back the sampling frequency switch point on the disc.
- In order to use this recorder's “Auto Chapter” setting (page 86), be sure to correctly set the clock on your digital video camera before shooting.
- The recorded picture may be momentarily affected if the picture size of the source image changes, or if there is nothing recorded on the tape.
Recording an Entire DV Format Tape (One Touch Dubbing)
HDD
+RW
-RWVR
-RWVideo
+R
-R
You can record the entire contents of a DV/ Digital 8 format tape onto a disc with a single press of the ONE-TOUCH DUB button on the recorder. The recorder controls the digital video camera for the whole process, and completes the recording.
◆ How chapters are created
The contents dubbed to the HDD or DVD become a single title. When “Auto Chapter” of “Features” setup is set to “On,” this title is divided into chapters. When dubbing to the HDD or a DVD-RW (VR mode), each shooting session on the tape becomes a chapter on the disc. For other discs, the recorder divides the title into chapters at approximately 6-minute intervals.
Follow steps 1 to 5 of "Preparing for DV dubbing" on page 84, and press ONE-TOUCH DUB on the recorder.
The recorder rewinds the tape and then starts recording the tape contents.
When the recording is finished, the recorder rewinds the tape in the digital video camera.
To stop during recording
Open the remote's cover and press ■ REC STOP. Note that it may take a few seconds for the recorder to stop recording.
Hints
- If you set “Finalise Disc” of “One Touch Dubbing” to “Auto” in “Features” setup (page 100), the recorded disc (except DVD-RW (VR mode)) will automatically be finalised after recording is finished.
- You can play back a previously recorded title on the HDD while One Touch Dubbing is in progress.
Notes
- When a blank space between the recordings on the tape continues for more than five minutes, One Touch Dubbing ends automatically.
- The recorder records a blank for five minutes before it stops dubbing. To stop the blank recording, press ■ REC STOP.
Program Edit
HDD
+RW
-RWVR
-RWvideo
+R
-R
You can select scenes from a DV/Digital 8 format tape, and then automatically record selected scenes to the HDD or a DVD.
To use this function, you will do the following:
Connect your digital video camera and prepare for recording

Select and edit the scenes you want to dub
Using the recorder's remote control, fast forward or rewind the tape to select the scenes. At this point, the selected scenes are not copied to the disc. The recorder only remembers the IN and OUT points of the scenes that you selected for dubbing. You can also reset, erase, or change the order of the scenes.

Dub the selected scenes
After you have selected the scenes, the recorder will fast forward and rewind the tape automatically and record the scenes to the HDD or a DVD.
◆ How chapters are created
The contents dubbed to the HDD or DVD become a single title. When “Auto Chapter” of “Features” setup is set to “On,” this title is divided into chapters. When dubbing to the HDD or a DVD-RW (VR mode), each shooting session on the tape becomes a chapter on the disc. For other discs, the recorder divides the title into chapters at approximately 6-minute intervals.
1 Follow steps 1 to 5 of "Preparing for DV dubbing" on page 84, and press SYSTEM MENU.
2 Select "DV EDIT," and press ENTER.
The display asks if you want to start selecting scenes.

- If you have previously saved a programme, the display asks if you want to edit an existing programme or to create a new programme. To resume editing the existing programme, select “Saved Data,” and go to step 6.
3 Select "Start," and press ENTER.
The display for setting the IN point (start of the scene) appears.
The scene starts to play in the background.

4 Select the IN point by pressing ◀◀/▶▶, and press ENTER.
The display for setting the OUT point (end of the scene) appears. The scene starts to play in the background from the IN point.
5 Select the OUT point by pressing ◀◀/▶▶, and press ENTER.
The display asks if you want to add the selected scene to the Scene List menu.
To preview the scene, select "Preview."
To reset either the IN or OUT point, select "Change IN" or "Change OUT," and repeat from step 4.

6 Select "OK," and press ENTER.
A new Scene List menu appears with the selected scene.
To add a scene, select "Add."
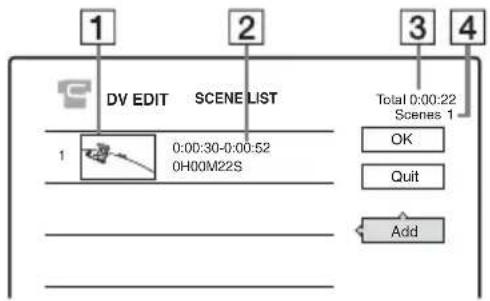
1 Thumbnail picture
2 Time information
3 Total duration of the program
4 Total number of scenes
7 When you finish adding scenes, select the scene you want to edit, and press ENTER.
The sub-menu appears.
"Move": Changes the scene order. Follow the explanations on the screen to change the order by pressing ↑/↓ and ENTER.
"Erase": Erases the scene. When asked for confirmation, select "OK."
"Preview": Plays the selected scene.
"Change IN": Changes the start of the scene. Repeat from step 4.
"Change OUT": Changes the end of the scene. Repeat from step 5.
8 When you finish editing the Scene List, select "OK," and press ENTER.
The display for entering the title name appears. To enter a new name, select "Enter," and follow the explanations on page 36.

9 Select "OK," and press ENTER.
The default title name is fixed, and the display asks if you want to start recording.
To change the disc media, select “Media” and press / . To change the dubbing mode, select “Dub Mode” and press / .

Data capacity required for the dubbing.
10 Select "Start," and press ENTER.
The recorder starts recording the tape contents as programmed.
- If the recording does not fit due to the dubbing mode you selected, the display asks if you want to continue.
To change the dubbing mode, select "Reset" and repeat from step 9.
To have the recorder adjust the dubbing mode, select “Auto Dub Mode.”
- If there is not enough disc space even after changing the dubbing mode, the display asks if you want to record halfway.
To continue, select "OK."
To stop during recording
Open the remote's cover and press ■ REC STOP.
Note that it may take a few seconds for the recorder to stop recording.
Notes
- Contents recorded to the HDD or a DVD may not be recorded as programmed if the tape's time code is not sequential or there are blanks between the recordings on the tape. In this case, see “Recording from connected equipment without a timer” on page 59.
- The start and end points of a programme may be different from what you have set if the source DV/Digital 8 format tape is in any of the following conditions:
– Recording mode was changed during the recording.
- There is a blank space in the recorded portion of the tape.
- If you set the beginning of the tape as the IN point and the end point as the OUT point, the IN and OUT points may move slightly during dubbing.
- You cannot set a scene to be shorter than one second.
Settings and Adjustments
Clock and Language Settings (Settings)
The “Settings” setup helps you to make clock and language settings for the recorder.
1 Press SYSTEM MENU while the recorder is in stop mode.
2 Select "SETUP," and press ENTER.
3 Select "Settings," and press ENTER.
The Settings display appears with the following options.

Clock
Normally the clock is set automatically thanks to the time and date information broadcasted by the local network package.
If the recorder does not receive a time signal from any service, you may set the clock manually. Therefore, please proceed as follows.
◆To set the clock manually
1 After step 3 above, select "Clock," and press ENTER.

2 Select "Present Time," and press ENTER.

3 Press ↑/↓ to set the day, and press →. Set the month, year, hour, and minutes in sequence. Press ←/→ to select the item to be set, then press ↑/↓ to set the numbers. The day of the week is set automatically.
To change the numbers, press ← to return to the item to be changed, and press ↑/↓.
4 Press ENTER to start the clock.
5 Press the ⬇ button to come back to the Settings display.
Language
DVD Menu (DVD VIDEO only)
Switches the language for the DVD menu.
Audio
Switches the language of the sound track.
When you select “Original,” the language given priority in the disc (DVD VIDEO only) or broadcasted by a digital channel is selected.
Subtitle
Switches the language of the subtitles recorded on the disc (DVD VIDEO only) or broadcasted by a digital channel (when available).
When you select "Audio Follow," the subtitle language changes according to the language you selected for the sound track.
Hint
If you select "Others" in "DVD Menu," "Subtitle," or "Audio," select and enter a language code from "Language Code List" on page 119 using the number buttons.
Note
If you select a language in "DVD Menu," "Subtitle," or "Audio" that is not recorded on the DVD VIDEO, one of the recorded languages will be automatically selected.
Digital TV settings (DTV Settings)
The DTV Settings Setup enables you to take full advantage of Digital TV Broadcasting services such as favourites channels setting or to prevent children's viewing unsuitable channels and programmes.
1 Press SYSTEM MENU while the recorder is in stop mode.
2 Select "SETUP," and press ENTER.
3 Select "DTV Settings," and press ENTER.
The DTV Settings Setup Display appears with the following options.

Favourites
The Favourite Display allows you to store and organize your favourite channels into one of four TV or four Radio lists.
Please refer to page 45 for detailed Favourites Channels settings.
Parental Lock
The Parental Lock Display enables you to lock certain channels you consider unsuitable and to set an age limit so that any programme classed above that age by the broadcaster is restricted.
1 After step 3 above, select "Parental Lock," and press ENTER.
- When you have already registered a password, the display for entering the password appears.
- If you have not yet registered a password, the display for registering a new password appears.
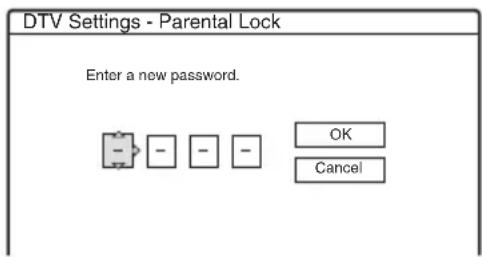
2 Enter your four-digit password using the ↑/↓ buttons or the number buttons, then select "OK" and press ENTER.
The Parental Lock menu appears

flowchart
graph TD
    A["Lock Channels"] --> B["Set Age Limit"]
    style A fill:#f9f,stroke:#333
    style B fill:#ccf,stroke:#333
Note
If you forget your password, you will have to reset it by selecting "Password" under "Factory Setup" in Options Setup (page 102).
◆To lock channels
1 Once the Parental Lock menu displayed, select "Lock Channels," and press ENTER.
The DTV Settings- Lock Channels display appears.

This display shows all the TV channels available to you.
2 Press the ↑/↓ buttons or enter a channel number to highlight a channel you want to lock, then press the ENTER button.
A locked channel is identified by the icon next to the programme number
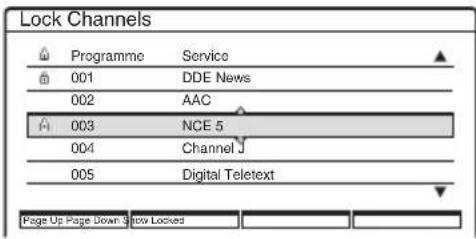
If you do not wish to lock one of the five channels in the display, press the RED or GREEN button to view the previous or next five channels available.
3 Press the 🔔 button to come back to the Parental Lock menu.
◆To unlock channels
1 In Step 2 above press the ↑/↓ buttons to highlight the channel you want to unlock, then press ENTER: the icon next to the programme number disappears.
2 Press the 🔔 button to come back to the Parental Lock menu.
Hints
- Press the BLUE button to view the list showing only the locked channels.
- Press the BLUE button once again when you wish to return to the previous channel list display.
- Press /while the Lock Channels display is turned on to change to the previous/next page.
◆ To set the Age Limit
1 Once the Parental Lock menu displayed, select "Set Age Limit," and press ENTER.
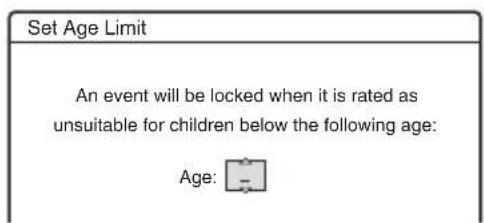
2 Press the ↑/↓ buttons to set the desired age limit and press ENTER.
Notes
• To operate correctly, this feature relies on the broadcaster sending the correct age classification for each programme.
- If you select the Parental Lock channel activated, "This channel has been locked" appears on the gray screen and it is recorded.
Tuning
The Tuning Display allows you to tune your recorder automatically or to hide unused or unwanted programmes and also change the order of the programmes on display. During these procedures you may be requested to enter your password. Refer to page 90 for information.
Follow steps 1 to 3 of “Digital TV settings (DTV Settings)” on page 90, then select “Tuning,” and press ENTER.
The DTV Settings - Tuning menu appears.

flowchart
graph LR
    A["Auto Tune"] --> B["Programme Hide"]
    B --> C["Programme Sort"]
Auto Tune
This option enables you to capture and store automatically all available channels.
1 Once the DTV Settings - Tuning menu displayed, select "Auto Tune," and press ENTER. The Auto Tune Start Display appears.

2 Select "Yes" in the menu option and press ENTER.
The Auto Tune display appears showing a tuning progress bar and the number of channels found.
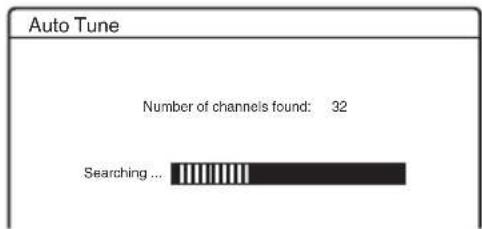
When Auto Tune has ended, a completion display appears indicating the number of TV and Radio channels that have been found and stored.
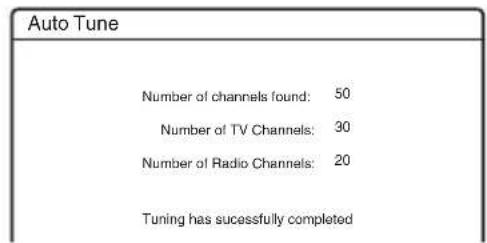
3 Press the ENTER button to remove the display and view the first channel captured.
Programme Hide
This option allows you to hide (disable) unused or unwanted channels.
The hidden programmes will be skipped when you press PROG +/- and will not appear in the EPG applications.
1 Once the DTV Settings - Tuning menu displayed, select "Programme Hide," and press ENTER.
The DTV Settings- Programme Hide display appears showing all the TV or Radio channels available to you.

2 Press the TV/RADIO button to display either the TV or Radio channels.
The Radio mode is indicated by the presence of a Radio icon in the display.
3 Press the ↑/↓ buttons or enter a channel number to highlight a channel you want to hide, then press the ENTER button.

If you do not wish to choose from one of the five channels in the display, press the RED or
GREEN button to view the previous or next five channels available.
4 Once you have hidden the unwanted channels as desired, press the ⬇ button repeatedly to return to the main menu.
◆Restoration of hidden programmes
Hidden channels are identified by an xcon next to the programme number.
In Step 3 above press the ↑/↓ buttons to highlight the channel you want to restore, then press ENTER: the ✗on next to the programme number disappears.
Hints
- Press the BLUE button to view the list showing only the hidden channels.
- Press the BLUE button once again when you wish to return to the standard programme hide display.
Programme Sort
This option allows you to change the channel order in the on-screen programme list.
1 Once the DTV Settings - Tuning menu displayed, select "Programme Sort," and press ENTER.
The Programme Sort Display appears showing the list of all tuned channels.

2 Press the ↑/↓ buttons or enter a programme number to highlight the channel you wish to move, then press the ENTER button.
A tick jcon appears next to the selected programme number and a Swap option appears in the display.
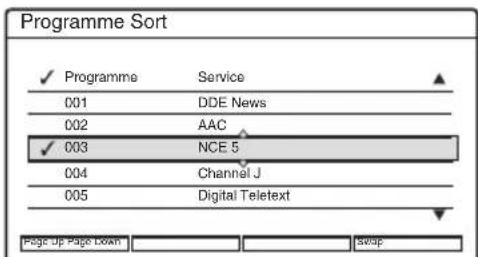
If you do not wish to choose from one of the five channels in the display, press the RED or
GREEN button to view the previous or next five channels available.
3 Press the ↑/↓ buttons to highlight the programme number you wish your selected channel to appear on.

4 Press the BLUE button to swap channel position. Your selected channel appears on the programme number selected in step 3.
5 Repeat this procedure to move other channels.
6 Once you have moved all channels as desired, press the 🔗 button repeatedly to return to the main menu.
Technical Information
Follow steps 1 to 3 of “Digital TV settings (DTV Settings)” on page 90, then select “Technical Information,” and press ENTER. The DTV Settings - Technical Information menu appears.

Manufacturer Information
This information screen shows you the current version of software installed in your recorder.
1 Once the DTV Settings - Technical Information displayed, select “Manufacturer Information,” and press ENTER.
2 After viewing the information displayed, press the ⬇ button to come back to the Technical Information menu.
Signal Strength
This information screen shows the signal strength of the broadcast you are watching.
1 Select “Signal Strength,” in the DTV Settings - Technical Information display and press ENTER. The Signal Strength display appears with the selected channel on view in the background.

The Signal Strength display coloured bars correspondences are as follows:
Good: (Green) Average: (Yellow) Poor: (Red)
2 Press the PROG +/- buttons to check the signal strength of the other tuned channels.
3 After viewing the information displayed, press the 🔗 button to come back to the Technical Information menu.
Digital Software Upgrade
Periodically Sony will issue upgrades for the software that was initially installed in your recorder. These upgrades will automatically be received and enabled. If desired, you can disable this option as follows:
1 Select “Digital Software Upgrade,” in the DTV Settings - Technical Information display and press ENTER.
The Digital Software Upgrade menu option appears
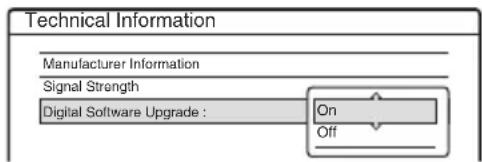
2 Press the ↑/↓ buttons to highlight "Off," and press ENTER.
Notes
- Sony recommend that you always leave this option set to “On”.
- To receive the upgrade, the unit must be powered on and watching a BBC channel. It will take up 30 minutes to upgrade the unit. The new software will be available once the unit has been placed into standby, and then back to normal operating mode.
Video Settings (Video)
Video settings will adjust items related to the image, such as size and colour.
Choose the settings according to the type of TV or tuner connected to the DVD recorder.
1 Press SYSTEM MENU while the recorder is in stop mode.
2 Select "SETUP," and press ENTER.
3 Select "Video," and press ENTER.
The “Video” setup appears with the following options. The default settings are underlined.
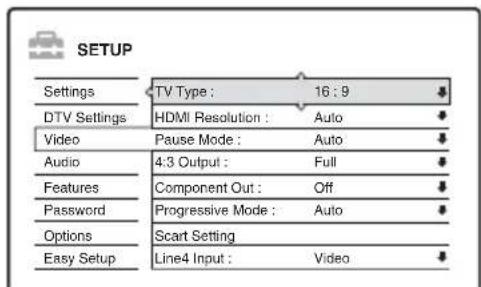
TV Type
Sets the picture size when playing back a title recorded from 16:9 size video (page 53) or a 16:9 size commercial DVD video.
Select the playback picture size according to the type of connected TV (wide-screen/wide mode TV or conventional 4:3 screen TV).
| 16:9 Select | this when connecting to a wide-screen TV or TV with a wide mode function. |
| 4:3 Letter Box | Select this when connecting to a 4:3 screen TV. Displays a wide picture with bands on the upper and lower portions of the screen. |
| 4:3 Pan Scan | Select this when connecting to a 4:3 screen TV. Automatically displays a wide picture on the entire screen and cuts off the portions that do not fit. |
16:9

natural_image
Simple line drawing of a mountain landscape with trees and a river (no text or symbols)4:3 Letter Box

4:3 Pan Scan

natural_image
Simple line drawing of a mountain landscape with trees and water (no text or symbols)Note
Depending on the disc, "4:3 Letter Box" may be selected automatically instead of "4:3 Pan Scan" or vice versa.
HDMI Resolution (RDR-HXD910 only)
Selects the type of video signals output from the HDMI OUT jack. When you select “Auto” (default), the recorder outputs video signals of the highest resolution acceptable for your TV. If the picture is not clear, natural or to your satisfaction, try another option that suits the disc and your TV/projector, etc. For details, refer also to the instruction manual supplied with the TV/projector, etc.
| Auto Normally, select this. | |
| 1920x1080i Sends 1920x1080i video signals. | |
| 1280x720p Sends 1280x720p video signals. | |
| 720x480/576p | Sends 720x480/576p video signals. |
Note
Even when a setting other than "Auto" is selected and the connected TV cannot accept the resolution, the recorder automatically adjusts the video signals that are suitable for the TV.
Pause Mode (HDD/DVDs only)
Selects the picture quality in pause mode.
| Auto The picture, including subjects that move dynamically, is output with no jitter. Normally select this position. |
| Frame The picture, including subjects that do not move dynamically, is output in high resolution. |
4:3 Output (RDR-HXD910 only)
This setting is effective only when you set “TV Type” in “Video” to “16:9.”
Note that this setting is effective only for HDMI connection.
| Full | Select this when you can change the aspect ratio on your TV. |
| Normal Select | this when you cannot change the aspect ratio on your TV. Shows a 16:9 aspect ratio signal with black bands on left and right sides of the image. |

16:9 aspect ratio TV
Component Out
Selects whether or not to output video signals from the COMPONENT VIDEO OUT jacks.
| On Outputs | the component video signals. Select this when you want to view progressive signals. |
| Off | Outputs no signals. |
Notes
- When you set "Line1 Output" to "RGB," you cannot set "Component Out" to "On."
- When you connect the recorder to a monitor or projector via only the COMPONENT VIDEO OUT jacks, do not select “Off.” If you select “Off” in this case, the picture may not appear.
Progressive Mode
DVD software can be divided into two types: film based software and video based software. Video based software is derived from TV, such as dramas and sit-coms, and displays images at 30 frames/60 fields (25 frames/50 fields) per second. Film based software is derived from film and displays images at 24 frames per second. Some DVD software contains both Video and Film. In order for these images to appear natural on your screen when output in PROGRESSIVE mode (50 or 60 frames per second), the progressive video signal needs to be converted to match the type of DVD software that you are watching. You can fine-tune the progressive 525p/625p video signal that is output when you press PROGRESSIVE (“PROGRESSIVE” lights up). Note that you must connect to a progressive format TV using the COMPONENT VIDEO OUT jacks (page 16).
| Auto Automatically detects the software type (Film-based or Video-based) and selects the appropriate conversion mode. Normally select this position. |
| Video Fixes the conversion mode to the mode for Video-based software. |
Scart Setting
Sets the method of inputting/outputting signals from the SCART jacks on the rear panel of the recorder. Select an option for each of the items below according to the combination of jacks and methods that you are going to use.
◆Line1 Output
Selects a method of outputting video signals for the LINE 1 - TV jack.
| RGB Outputs RGB signals. | |
| Outputs video signals. | |
| S Video Outputs S-video signals. | |
Notes
- If your TV does not accept S-video or RGB signals, no picture appears on the TV screen even if you select “S Video” or “RGB.” See the instructions supplied with your TV.
- You cannot select “RGB” when “Component Out” above is set to “On.”
- SMARTLINK is available only when “Video” is selected.
◆Line3 Input
Selects a method of inputting video signals for the LINE 3 jack. The picture will not be clear if this setting does not match the type of video input signal.
| /RGB | Inputs video signals or RGB signals. |
| S Video Inputs S-video signals. | |
◆ Line3 Output
Selects a method of outputting video signals for the LINE 3 jack.
| Outputs video signals. | |
| S Video Outputs S-video signals. | |
Line4 Input
Selects a method of inputting video signals for the LINE 4 IN jack on the rear panel of the recorder.
| Inputs video signals. | |
| S Video Inputs S-video signals. | |
Audio Settings (Audio)
The “Audio” setup allows you to adjust the sound according to the playback and connection conditions.
1 Press SYSTEM MENU while the recorder is in stop mode.
2 Select "SETUP," and press ENTER.
3 Select "Audio," and press ENTER.
The “Audio” setup appears with the following options. The default settings are underlined.

Audio ATT (attenuation)
If the playback sound is distorted, set this item to "On." The recorder reduces the audio output level. This function affects the output of the following jacks:
– LINE 2 OUT R-AUDIO-L jacks
- LINE 1 - TV jack
-LINE 3 jack
| On Select this when the playback sound from the speakers is distorted. | |
| Off | Normally select this position. |
Audio DRC (Dynamic Range Control) (DVDs only)
Makes the sound clear when the volume is turned down when playing a DVD that conforms to “Audio DRC.” This affects the output from the following jacks:
– LINE 2 OUT R-AUDIO-L jacks
- LINE 1 - TV jack
-LINE 3 jack
- DIGITAL OUT (OPTICAL or COAXIAL)/HDMI OUT (RDR-HXD910 only) jack only when “Dolby Digital” is set to “D-PCM” (page 97).
| Standard Normally select this position. | |
| TV Mode Makes low sounds clear even if you turn the volume down. | |
| Wide Range | Gives you the feeling of being at a live performance. |
Downmix (DVDs only)
Switches the method for mixing down to two channels when you play a DVD which has rear sound elements (channels) or is recorded in Dolby Digital format. For details on the rear signal components, see “4. Displaying the Playing Time and Play Information” on page 34. This function affects the output of the following jacks:
– LINE 2 OUT R-AUDIO-L jacks
- LINE 1 - TV jack
-LINE 3 jack
- DIGITAL OUT (OPTICAL or COAXIAL)/HDMI OUT (RDR-HXD910 only) jack when "Dolby Digital" is set to "D-PCM" (page 97).
| Dolby Surround | Normally select this position.Multi-channel audio signals are output to two channels forenjoying surround sounds. |
| Normal Multi | Multi-channel audio signals are downmixed to two channels for use with your stereo. |
Audio Connection
The following setup items switch the method of outputting audio signals when you connect a component such as an amplifier (receiver) with a digital input jack.
For connection details, see “Step 4: Connecting the Audio Cords” on page 20.
Select “Dolby Digital,” “MPEG,” “DTS,” “48kHz/96kHz PCM,” and “Audio(HDMI)” (RDR-HXD910 only) after setting “Digital Out” to “On.”
If you connect a component that does not accept the selected audio signal, a loud noise (or no sound) will come out from the speakers, and may affect your ears or cause speaker damage.
1 Select “Audio Connection” in “Audio,” and press ENTER.

2 Select "Digital Out," and press ENTER.
| On Normally select this position. | |
| Off The influence of the digital circuit upon the analogue circuit is minimal. |
3 Select "On," and press ENTER.
4 Set the digital output signal.
- Dolby Digital (HDD/DVDs only) Selects the type of Dolby Digital signal.
| D-PCM | Select this when the recorder is connected to an audio component lacking a built-in Dolby Digital decoder. The surround effects of output signals are determined by the “Downmix” setting item in “Audio” setup. |
| Dolby Digital | Select this when the recorder is connected to an audio component with a built-in Dolby Digital decoder. |
Note
If the HDMI OUT jack (RDR-HXD910 only) is connected to equipment not compatible with DOLBY DIGITAL signals, the “D-PCM” signals will be automatically output even when you select “Dolby Digital.”
- MPEG (DVD VIDEO only) Selects the type of MPEG audio signal.
| PCM | Select this when the recorder is connected to an audio component without a built-in MPEG decoder. If you play MPEG audio sound tracks, the recorder outputs stereo signals via the DIGITAL OUT (COAXIAL or OPTICAL) jack. |
| MPEG Select this when the recorder is connected to an audio component with a built-in MPEG decoder. | |
Note
If the HDMI OUT jack (RDR-HXD910 only) is connected to equipment not compatible with MPEG audio signals, the “PCM” signals will be automatically output even when you select “MPEG.”
• DTS (DVD VIDEO only)
Selects whether or not to output DTS signals.
| On Select this when the recorder is connected to an audio component with a built-in DTS decoder. | |
| Off | Select this when the recorder is connected to an audio component without a built-in DTS decoder. |
Note
When HDMI output (RDR-HXD910 only) is performed to equipment not compatible with DTS signals, the signals will not be output regardless of the “DTS” setting.
• 48kHz/96kHz PCM (DVD VIDEO only)
Selects the sampling frequency of the audio signal.
| 48kHz/16bit | The DVD video audio signal is converted to 48kHz/16bit and output. |
| 96kHz/24bit | All signals containing 96kHz/24bit are output without conversion. However, the signals are output at 48kHz/16bit if copyright-protected signals are contained. |
Notes
- “48kHz/96kHz PCM” setting has no effect when audio signals are output from the LINE 2 OUT (R-AUDIO-L) jacks. If the sampling frequency is 96kHz, signals are simply converted to 96kHz analog signals and output.
- When you use the DIGITAL OUT (COAXIAL or OPTICAL) jack to listen to MPEG audio signals and set “MPEG” to “MPEG” in “Audio” setup, no sound will come from your speakers if you select one of the Surround TVS modes.
- If the HDMI OUT jack (RDR-HXD910 only) is connected to equipment not compatible with 96 kHz signals, 48kHz PCM will be automatically output even when you select “96kHz/24bit.”
- Audio (HDMI) (RDR-HXD910 only) Selects the type of audio signal output from the HDMI OUT jack.
| AUTO Normally, select this position. Outputs the optimum audio signal that can be received by the TV based on the “Digital Out” settings (page 97). |
| PCM Converts Dolby Digital or 96 kHz PCM signals to 48kHz/16 bit PCM. |
Notes
- A loud noise (or no sound) will be output if you connect the recorder to a TV that is not compatible with DOLBY DIGITAL/DTS signals and “Auto” is selected. In this case, select “PCM.”
- Set “Digital Out” to “On” when outputting compressed audio signals to an HDMI compatible TV.
Recording and Parental Control Settings (Features)
The “Features” setup allows you to adjust recording and parental control settings.
1 Press SYSTEM MENU while the recorder is in stop mode.
2 Select "SETUP," and press ENTER.
3 Select "Features," and press ENTER.
The “Features” setup appears with the following options. The default settings are underlined.

TV Direct Rec (HDD/DVD+RW/DVD-RW/DVD+R/DVD-R only)
| On Allows you to easily record what you are watching on the TV using SMARTLINK. | |
| Off Turns off the TV Direct Rec function. |
Auto Chapter
Selects whether to automatically divide a recording (a title) into chapters during recording or dubbing.
| On | For the HDD or a DVD-RW (VR mode), the recorder detects changes in the picture and sound and automatically inserts chapter marks.For other recordable discs, the recorder inserts chapter marks at approximately 6-minute intervals. |
| Off No chapter mark is inserted. | |
Notes
- The actual chapter mark interval may vary depending on the amount of information contained in the video to be recorded.
- Chapter marks are automatically inserted where the recordings start on the tape when “Auto Chapter” is set to “On” during DV dubbing to the HDD or a DVD-RW (VR mode).
Parental Control (DVD VIDEO only)
Playback of some DVD VIDEOS can be limited according to a predetermined level, such as the age of the users. Scenes may be blocked or replaced with different scenes.
1 Select "Parental Control" in "Features," and press ENTER.
- If you have not entered a password, the display for registering a new password appears.

- When you have already registered a password, the display for entering the password appears.
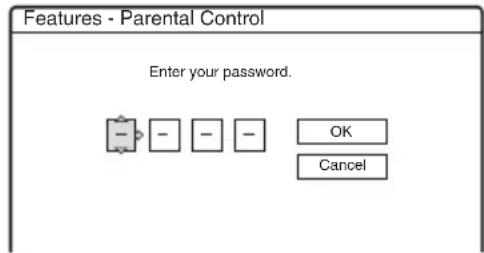
2 Enter your four-digit password using the number buttons, then select "OK" and press ENTER.
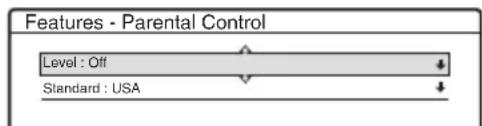
3 Select “Standard,” and press → or ENTER. The selection items for “Standard” are displayed.
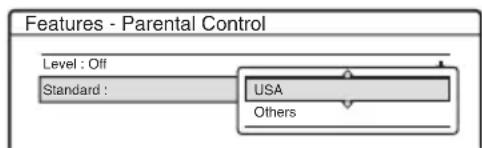
flowchart
graph TD
    A["Features - Parental Control"] --> B["Level : Off"]
    B --> C["Standard :"]
    C --> D["USA"]
    C --> E["Others"]
4 Select a geographic area as the playback limitation level, and press ENTER. The area is selected.
- When you select “Others,” press the number buttons to select and enter an area code in the table (page 119). Then select “OK” and press ENTER.
5 Select “Level,” and press ENTER. The selection items for “Level” are displayed.
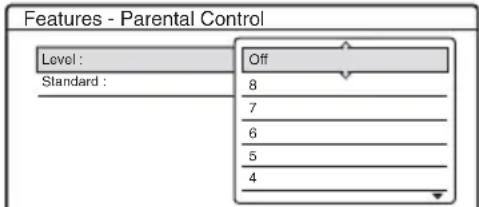
The lower the value, the stricter the limitation. Discs rated higher than the selected level will be restricted.
6 Select the level, and press ENTER. The Parental Control setting is complete.
To cancel the Parental Control setting for the disc, set "Level" to "Off" in step 6. To change the password, you will have to set it in the Password Setup Display (page 101).
Notes
- If you forget your password, you will have to reset it by selecting “Parental Control” of “Factory Setup” in “Options” setup (page 102).
- When you play discs which do not have the Parental Control function, playback cannot be limited on this recorder.
- Depending on the disc, you may be asked to change the Parental Control level while playing the disc. In this case, enter your password, then change the level.
One Touch Dubbing
Displays the following options for the One Touch Dub function.
◆Finalise Disc (for all recordable discs except DVD-RW in VR mode)
Selects whether or not to finalise the disc automatically following One Touch Dubbing (page 86).
| Auto Automatically finalises the disc following One Touch Dubbing. | |
| Manual | Allows you to finalise the disc manually. |
Synchro Rec
Selects the recording destination used for Synchro-Recording (page 58).
| Record to HDD | Records to the HDD. |
| Record to DVD | Records to DVDs. |
HQ Setting (HDD only)
Selects the HQ mode used for recording on the HDD (page 48).
| HQ+ Records in higher quality (approximate 15 Mbps). |
| HQ Records in the standard HQ mode. |
Colour System
Selects the colour system when playing VIDEO CDs (including Super VIDEO CDs).
| PAL | Plays a disc in PAL colour system. |
| NTSC Plays | a disc in NTSC colour system. |
Screen Saver
The screen saver image appears when you do not use the recorder for more than 10 minutes while an on-screen display, such as the System Menu, is displayed on your TV screen. The screen saver image helps prevent your display device from becoming damaged (ghosting).
| On | Turns on the screen saver function. |
| Off Turns off the function. | |
Parental Control (Password)
This “Password” Setup allow you to set or to modify the password that gives access to Parental Control settings.
1 Press SYSTEM MENU while the recorder is in stop mode.
2 Select "SETUP," and press ENTER.
3 Select "Password," and press ENTER.
The Password Setup Display appears
- If you have not yet set a password, the display for registering a new password appears.

- When you have already registered a password, the display for entering the password appears.

If you wish to change your password, first enter your current password using the number buttons, then select "OK" and press ENTER. The display for registering a new password appears.
4 Enter your new four-digit password using the number buttons, then select "OK" and press ENTER.
Note
If you forget your password, you will have to reset it by selecting “Parental Control” of “Factory Setup” in “Options” setup (page 102).
Disc and Remote Control Settings/Factory Settings (Options)
The “Options” setup allows you to set up other operational settings.
1 Press SYSTEM MENU while the recorder is in stop mode.
2 Select "SETUP," and press ENTER.
3 Select "Options," and press ENTER.
The “Options” setup appears with the following options. The default settings are underlined.

Format DVD-RW (DVD-RW only)
The recorder automatically starts formatting in VR mode or Video mode, whichever is selected below, when a new, unformatted DVD-RW is inserted.
| VR Automatically formats the disc in VR mode. |
| Video Automatically formats the disc in Video mode. |
Dimmer
Adjusts the lighting of the front panel display.
| Normal | Bright lighting. |
| Power Save | Low lighting. Turns off the lighting when the power is off. |
Note
When “Power Save” in “Options” setup is set to “On,” the front panel display is turned off during standby regardless of this setting.
Power Save
Selects whether this recorder is in power save mode when the power is turned off (standby).
| On Sets to power save mode. The front panel display is off when the recorder is in standby. | |
| Off Does not set to power save mode.Normally, select this. |
Notes
- Power Save mode does not function when a Synchro Recording is set, even when “Power Save” is set to “On.”
- The SMARTLINK features are not available when “Power Save” is set to “On.”
- The (Electronic Programme Guide) button located on the front panel is invalid when “Power Save” is set to “On” and the recorder is turned to off.
Auto Display
| On | Automatically displays information on the screen when the recorder is turned on, etc. |
| Off Displays | information only when DISPLAY is pressed. |
Command Mode
Changes the Command Mode of the recorder if other DVD equipment is assigned the same Command Mode. Be sure to match the Command Mode switch on the remote to the setting made here. For details, see “If you have a Sony DVD player or more than one Sony DVD recorder” on page 24.
| DVD1 Select this if the default Command Mode conflicts with other DVD equipment. | |
| DVD2 Select this if the default Command Mode conflicts with other DVD equipment. | |
| DVD3 | The default Command Mode of the recorder. |
Factory Setup
Allows you to select the setup settings by group, and return them to their default settings. Note that all of your previous settings will be lost.
1 Select "Factory Setup" in "Options," and press → or ENTER.
The display for selecting a group of settings appears.
2 Select the group of settings you want to return to default from “Settings,” “DTV Settings,” “Video,” “Audio,” “Features,” “Password,” “Options,” and “All,” and press → or ENTER.
3 Select "Start," and press ENTER.
The selected settings return to their default settings.
4 Press ENTER when "Finish" appears.
Easy Setup
(Resetting the Recorder)
Select this to run the "Easy Setup" programme.
1 Press SYSTEM MENU while the recorder is in stop mode.
2 Select "SETUP," and press ENTER.
3 Select "Easy Setup," and press ENTER.

4 Press ENTER.
5 Select "Start."
6 Follow the instructions for "Easy Setup" (page 25) from step 2.
Additional Information
Troubleshooting
If you experience any of the following difficulties while using the recorder, use this troubleshooting guide to help remedy the problem before requesting repairs. Should any problem persist, contact the Sony Customer Information Centre on
08705 111 999
(Monday-Friday from 8:30am to 6:00pm)
Power
The power does not turn on.
→ Check that the mains lead is connected securely.
Tuner
The channel is not found or stored or missed.
→ Make sure that your aerial is properly connected to the recorder.
→ Confirm with your dealer that you are in an area that can receive a digital signal.
→ Check your aerial installation.
Picture
There is no picture.
→ Re-connect all connecting cords securely.
→ The connecting cords are damaged.
→ Check the connection to your TV (page 15).
→ Switch the input selector on your TV (such as to "VCR") so that the signal from the recorder appears on the TV screen.
→ Check that “Scart Setting” in “Video” setup is set to the appropriate item that conforms to your system (page 95).
→ If you connect the recorder to your TV via only the COMPONENT VIDEO OUT jacks, set “Component Out” in “Video” setup to “On” (page 95).
→ This recorder cannot record NTSC signals.
→ A scrambled channel is selected.
→ When playing a double-layer DVD, the video and audio may be momentarily interrupted at the point where the layers switch.
Picture noise appears.
If the picture output signal from your recorder passes through your VCR to get to your TV, or if you are connected to a combination TV/VIDEO player, the copy-protection signal applied to some DVD programmes could affect picture quality. If you still experience this problem even when you connect your recorder directly to your TV, try connecting your recorder to your TV's S VIDEO input.
→ You have set the recorder to progressive format (the PROGRESSIVE indicator lights up) even though your TV cannot accept the progressive signal. In this case, press PROGRESSIVE until the PROGRESSIVE indicator turns off.
Even if your TV is compatible with progressive format (525p/625p) signals, the image may be affected when you set the recorder to progressive format. In this case, disconnect first the HDMI cord from the recorder (RDR-HXD910 only) and press PROGRESSIVE so that the PROGRESSIVE indicator turns off and the recorder is set to normal (interlace) format.
→ You are playing a DVD recorded in a colour system that is different from your TV.
→ Noises may appear in the pictures recorded on the HDD, which is due to the characteristics of HDD, and is not a malfunction.
→ When playing a double-layer DVD, the video and audio may be momentarily interrupted at the point where the layers switch.
There is no picture or the picture noise appears when connected to the HDMI OUT jack (RDR-HXD910 only).
→ Try the following: ①Turn the recorder off and on again. ②Turn the connected equipment off and on again. ③Disconnect and then connect the HDMI cord again.
If the HDMI OUT jack is used for video output, changing the “HDMI Resolution” setting in the “Video” setup may solve the problem (page 94). Connect the TV and the recorder using a video jack other than the HDMI OUT, and switch the TV’s input to the connected video input so that you can see the on-screen displays. Change the “HDMI Resolution” setting in the “Video” setup, and switch the TV’s input back to HDMI. If the picture still does not appear, repeat the steps and try other options.
→ The recorder is connected to an input device that is not HDCP compliant (page 16).
TV programme reception does not fill the screen.
→ Select the correct source using the INPUT SELECT button, or select a channel of any TV programme using the PROG +/- buttons.
Picture break up
→ Signal strength low.
→ Check aerial installation.
TV programme pictures are distorted.
→ Reorient or upgrade the TV aerial.
→ Adjust the picture (see the TV's instruction manual).
→ Place the recorder and TV farther apart.
→ Place the TV and any bunched aerial cables farther apart.
→ The RF cable is connected to the AERIAL OUT jack on the recorder. Connect the cable to the AERIAL IN jack.
TV channels cannot be changed.
→ The channel is hidden (page 92).
→ A timer recording started, which changed the channels.
→ The Parental Lock is activated (page 90).
The picture from equipment connected to the recorder's input jack does not appear on the screen.
→ If the equipment is connected to the LINE 1 - TV jack, select "L1" in the front panel display by pressing PROG +/- or INPUT SELECT.
If the equipment is connected to the LINE 2 IN jacks, select “L2” in the front panel display by pressing PROG +/- or INPUT SELECT.
If the equipment is connected to the LINE 4 IN jacks, select "L4" in the front panel display by pressing PROG +/- or INPUT SELECT.
If the equipment is connected to the LINE 3 jack, select "L3" in the front panel display by pressing PROG +/- or INPUT SELECT.
If the equipment is connected to the DV IN jack, (this is usually for a digital video camera connection), select "DV" in the front panel display by pressing PROG +/- or INPUT SELECT.
→ When an S video cable is connected to the recorder's LINE 4 IN jack, set "Line4 Input" in "Video" setup to "S Video" (page 96).
The playback picture or TV programme from the equipment connected through the recorder is distorted.
→ If the playback picture output from a DVD player, VCR, or tuner goes through your recorder before reaching your TV, the copy-protection signal applied to some programmes could affect picture quality. Disconnect the playback equipment in question and connect it directly to your TV.
The picture does not fill the screen.
→ Set “TV Type” in “Video” setup in accordance with the screen size of your TV (page 94).
The picture does not fill the screen, even though the picture size is set in "TV Type" in "Video" setup.
→ The picture size of the title is fixed.
The picture is black and white.
→ Check that “Line1 Output” of “Scart Setting” in “Video” setup is set to the appropriate item that conforms to your system (page 95).
→ If you are using a SCART cord, be sure to use one that is fully wired (21 pins).
Sound
There is no sound.
→ Re-connect all connections securely.
→ The connecting cord is damaged.
→ The input source setting on the amplifier or the connection to the amplifier is incorrect.
→ The recorder is in reverse play, fast-forward, slow motion, or pause mode.
→ If the audio signal does not come through the DIGITAL OUT (OPTICAL or COAXIAL)/HDMI OUT (RDR-HXD910 only) jacks, check the “Audio Connection” settings in “Audio” setup (page 97).
→ A scrambled channel is selected.
No sound is output from the HDMI OUT jack (RDR-HXD910 only).
→ Try the following: ①Turn the recorder off and on again. ②Turn the connected equipment off and on again. ③Disconnect and then connect the HDMI cord again.
→ The HDMI OUT jack is connected to a DVI device (DVI jacks do not accept audio signals).
The equipment connected to the HDMI OUT jack does not conform to the audio signal format, in this case set “Audio(HDMI)” of “Audio Connection” in “Audio” setup to “PCM” (page 98).
Sound distortion occurs.
→ Set “Audio ATT” in “Audio” setup to “On” (page 96).
Sound is noisy.
→ When playing a CD with DTS sound tracks, noise will come from the LINE 2 OUT R-AUDIO-L jacks, LINE 1 – TV jack, or LINE 3 jack (page 63).
The sound volume is low.
→ The sound volume is low on some DVDs. The sound volume may improve if you set “Audio DRC” in “Audio” setup to “TV Mode” (page 96).
→ Set “Audio ATT” in “Audio” setup to “Off” (page 96).
→ One of the Surround TVS effects is selected (page 64).
An alternate audio track cannot be recorded.
→ When recording from connected equipment, set “Line Audio Input” in TOOLS menu to “Bilingual” (page 59).
→ Any discs other than DVD-RWs (VR mode) cannot be used for recording both main and sub sounds.
→ If you have connected an AV amplifier to the DIGITAL OUT (OPTICAL or COAXIAL) jacks and want to change the audio track for a DVD-RW (VR mode) during playback, set “Dolby Digital” of “Audio Connection” in “Audio” setup to “D-PCM” (page 97).
Sound break up
→ Signal strength low.
→ Check aerial installation.
Playback
The recorder does not play any type of disc (except HDD).
→ The disc is upside down. Insert the disc with the labelled side facing up.
→ The disc is not correctly inserted.
→ Moisture has condensed inside the recorder. Remove the disc and leave the recorder turned on for about half an hour until the moisture evaporates.
→ If the disc was recorded on another recorder, the recorder cannot play the disc if it was not finalised (page 39).
The recorder does not start playback from the beginning.
→ Resume play was activated (page 61).
→ You have inserted a DVD whose Title menu or DVD menu automatically appears on the TV screen when it is first inserted. Use the menu to start playback.
The recorder starts playing automatically.
→ The DVD VIDEO features an auto playback function.
Playback stops automatically.
→ If the DVD has an auto pause signal, the recorder stops playback at the auto pause signal.
Some functions such as Stop, Search, or Slow-motion Play cannot be performed.
→ Depending on the DVD, you may not be able to do some of the operations above. See the instruction manual supplied with the disc.
The language for the sound track cannot be changed.
→ Multilingual tracks are not recorded on the DVD being played.
→ The DVD VIDEO prohibits the changing of the language for the sound track.
Try changing the language using the DVD VIDEO's menu.
The subtitle language cannot be changed or turned off.
→ Multilingual subtitles are not recorded on the DVD VIDEO.
→ The DVD VIDEO prohibits changing of the subtitles.
Try changing the subtitle using the DVD VIDEO's menu.
→ The subtitles cannot be changed for the titles recorded on this recorder.
The angles cannot be changed.
→ Multi-angles are not recorded on the DVD VIDEO being played.
→ You are trying to change the angles when “” does not appear on the TV screen (page 62).
→ The DVD VIDEO prohibits changing angles.
Try changing the angle using the DVD VIDEO's menu.
→ The angles cannot be changed for the titles recorded on this recorder.
The MP3 audio tracks do not play.
→ The MP3 audio tracks are not recorded in a format that the recorder can play (page 70).
The JPEG image files do not play.
→ The JPEG image files are not recorded in a format that the recorder can play (page 70).
→ Progressive JPEG images cannot be played.
TV Pause does not work.
→ You are recording to the HDD or the HDD is full.
Recording/Timer recording/Editing
The programme position cannot be changed from the programme position you are recording.
→ Set the TV's input source to "TV."
Recording does not start immediately after you press ● REC.
→ Operate the recorder only after “LOAD,” “FORMAT,” or “INFOWRITE” disappears from the front panel display.
Nothing was recorded even though you set the timer setting correctly.
→ There was a power failure during recording.
The recorder's internal clock stopped due to a power failure that lasted for more than 1 hour. Reset the clock (page 89).
→ The channel was hidden after the timer recording was set. See “Programme Hide” on page 92.
→ Disconnect the mains lead from the mains, and connect it again.
→ The programme contains copy protection signals that restrict copying.
→ Other timer setting overlapped the timer setting (page 57).
→ There is no DVD inside the recorder.
→ There is not enough disc space for the recording.
→ The recorder was in the process of DV Dubbing.
→ A scrambled channel is selected.
→ The Channel activated Parental Lock is selected.
Recording does not stop immediately after you press ■ REC STOP.
→ It will take a few seconds for the recorder to input disc data before recording can stop.
Recording does not stop after you press ■.
Open the remote's cover and press ■ REC STOP.
Timer recording is not complete or did not start from the beginning.
→ There was a power failure during recording. If the power recovers when there is a timer recording, the recorder resumes recording. Should the power failure continue for more than 1 hour, reset the clock (page 89).
→ Other timer setting overlapped the timer setting (page 57).
→ Disc space was not enough.
Contents previously recorded were erased.
→ Data that has been recorded on a DVD with a PC will be erased from the disc when the disc is inserted.
→ “Auto Title Erase” in the TOOLS menu (appears when you press TOOLS while the Timer List menu is turned on) is set to “On” (page 57).
→ The title was updated and recorded over (page 50).
Recording from the equipment with a timer
Nothing was recorded even though you set the Synchro-Rec setting correctly.
→ You forgot to turn off the connected equipment. Turn off the connected equipment and set the recorder to Synchro-Rec standby mode (page 58).
The recorder was not set to the Synchro-Recording standby mode. Press SYNCHRO REC to have the recorder stand by for recording. Make sure the SYNCHRO REC indicator lights up on the front panel (page 58).
→ The recorder is connected to the TV output jack of the connected equipment.
Synchro-Recording does not complete.
The timer setting for the connected equipment overlapped the recorder's timer setting (page 59).
→ There was a power failure during the recording.
The recorder automatically starts recording when the satellite receiver is turned on.
→ The Synchro-Rec function was activated. Turn off the satellite receiver and cancel the Synchro-Rec function (page 58).
Display
The clock has stopped.
→ Set the clock again (page 89).
→ The clock stopped due to a power failure that lasted for more than 1 hour. Reset the clock (page 89).
The TIMER REC indicator is flashing.
→ The disc does not have enough space.
→ Insert a recordable disc inside the recorder.
The recording mode indication is incorrect.
→ When the recording or dubbing is less than three minutes, the recording mode indication may be displayed incorrectly. The actual recording itself is correctly made in the selected recording mode.
→ After playing titles recorded in SLP and SEP mode, the recording mode indication may change depending on the recorded programme.
The clock does not appear in the front panel display.
→ “Dimmer” in “Options” setup is set to “Power Save” (page 101).
→ The “Power Save” in “Options” setup was set to “On,” and the recorder is in standby (page 102).
Remote control
The remote does not function.
→ Batteries are weak.
→ The remote is too far from the recorder.
The remote's manufacturer code returned to the default setting when you replaced the batteries. Reset the code (page 22).
→ Turn on the recorder.
→ The remote is not pointed at the remote sensor on the recorder.
→ Different command modes are set for the recorder and remote. Set the same command mode (page 24). The default command mode setting for this recorder and the supplied remote is DVD3.
→ Set the TV/DVD switch to DVD (page 23).
Other Sony equipment responds to the remote.
→ The same command mode is set for both the equipment and recorder. Set a different command mode for the recorder (page 24).
Others
The recorder does not operate properly.
→ Restart the recorder. Press down ⏻/⏻ on the recorder for more than ten seconds until “WELCOME” appears in the front panel display.
→ When static electricity, etc., causes the recorder to operate abnormally, turn off the recorder and wait until the clock appears in the front panel display. Then, unplug the recorder and after leaving it off for a while, plug it in again.
Five numbers or letters are displayed in the front panel display.
→ The self-diagnosis function was activated (see the table on page 109).
The disc tray does not open after you press ▲ (open/close).
→ It may take a few seconds for the disc tray to open after you have recorded or edited a DVD. This is because the recorder is adding disc data to the disc.
The disc tray does not open and "TRAY LOCKED" appears in the front panel display.
→ Contact your Sony dealer or local authorized Sony service facility.
"RECOVERY" appears in the front panel display.
The recorder's recovery function was activated when the recorder was turned on because the power was turned off or failed during recording. Leave the recorder on until “RECOVERY” disappears from the front panel display.
"HDD ERROR" appears in the front panel display.
The hard disk error occurred. Press down I/ ^① on the recorder for ten seconds until “WELCOME” appears in the front panel display. If this does not resolve the problem, format the recorder’s HDD by pressing down the HDD button on the recorder for more than ten seconds until “FORMAT” appears in the front panel display. Note that all the contents recorded on the HDD will be erased. If this does not fix the problem, contact your nearest Sony dealer.
"FAN ERROR" appears in the front panel display.
→ Check that the vent on the rear of the recorder is not blocked. Then, immediately disconnect the mains lead. Leave the recorder off for a while, then re-connect the mains lead, and press ⏻/⏻ on the recorder.
The Parental Lock does not work.
→ Check the Parental Lock options settings (page 90).
Mechanical sound is heard when the recorder is off.
→ While the recorder is updating the EPG information, operational noises (such as the internal fan) may be heard, even when the power is off. This is not a malfunction.
The disc tray does not open and you cannot remove the disc after you press ▲ (open/close).
→ Turn off the recorder. Once the clock appears in the front panel display, disconnect the mains lead. (If the recorder does not turn off or if the clock does not appear in the front panel display, disconnect the mains lead anyway.) Connect the mains lead again while pressing down ≡ on the recorder, and release the button when the disc tray opens. Then, keep ⏻/⏻ on the recorder pressed for about ten seconds until “WELCOME” appears in the front panel display.
"LOCKED" appears in the front panel display.
→ The disc tray is locked. Cancel the Child Lock (page 61).
Self-diagnosis Function (When letters/numbers appear in the display)
When the self-diagnosis function is activated to prevent the recorder from malfunctioning, a five-character service number (e.g., C 13 00) with a combination of a letter and four numbers appears in the front panel display. In this case, check the following table.
| First three characters of the service number | Cause and/or corrective action |
C 13 There is a problem in the HDD.
→ Contact your nearest Sony dealer or local authorized service facility.
The DVD is dirty.
→ Clean the disc with a soft cloth.
C 31 The DVD/CD is not inserted correctly.
→ Re-insert the disc correctly.
E XX To prevent a malfunction, the (xx is a number) recorder has performed the self-diagnosis function.
→ Contact your nearest Sony dealer or local authorized Sony service facility and give the five-character service number.
Example: E 61 10
Notes About This Recorder
On operation
- If the recorder is brought directly from a cold to a warm location, or is placed in a very damp room, moisture may condense on the lenses inside the recorder. Should this occur, the recorder may not operate properly. In this case, remove the disc and leave the recorder turned on for about half an hour until the moisture evaporates.
- When you move the recorder, take out any discs. If you don't, the disc may be damaged.
On adjusting volume
Do not turn up the volume while listening to a section with very low level inputs or no audio signals. If you do, the speakers may be damaged when a peak level section is played.
On cleaning
Clean the cabinet, panel, and controls with a soft cloth slightly moistened with a mild detergent solution. Do not use any type of abrasive pad, scouring powder or solvent such as alcohol or benzine.
About repairing the hard disk drive
- It may be necessary to access data stored on the hard disk for testing purposes; there is no intention to copy or store the data, titles or any other information.
- If replacement or initialization (format) is required, the hard disk will be formatted at our discretion. In this case, please note that all of the contents recorded there will be erased (including any data found to violate copyright law).
On cleaning discs
Do not use a commercially available cleaning disc. It may cause a malfunction.
Notes about the discs
- To keep the disc clean, handle the disc by its edge. Do not touch the surface. Dust, fingerprints, or scratches on the disc may cause it to malfunction.


- Do not expose the disc to direct sunlight or heat sources such as hot air ducts, or leave it in a car parked in direct sunlight as the temperature may rise considerably inside the car.
• After playing, store the disc in its case. - Clean the disc with a cleaning cloth. Wipe the disc from the centre out.

- Do not use solvents such as benzine, thinner, commercially available disc/lens cleaners, or anti static spray intended for vinyl LPs.
- Do not use the following discs.
- A disc that has a non-standard shape (e.g., card, heart).
– A disc with a label or sticker on it.
– A disc that has cellophane tape or sticker adhesive on it.
Specifications
System
Laser: Semiconductor laser
Transmission standards: DVB-T

Digital Video Broadcasting
Channel coverage: UHF channels B21 - B69
The above channel coverage merely ensures the channel reception within these ranges. It does not guarantee the ability to receive signals in all circumstances.
Aerial out: 75-ohm asymmetrical aerial socket
Video recording format: MPEG Video
Audio recording format/applicable bit
rate: Dolby Digital 2 ch/256 kbps
Inputs and outputs
LINE 2 OUT
(AUDIO): Phono jack/2 Vrms/10 kilohms
(VIDEO): Phono jack/1.0 Vp-p
(S VIDEO): 4-pin mini DIN/Y:1.0 Vp-p, C: 0.3 Vp-p (PAL)
LINE 2 IN/LINE 4 IN
(AUDIO): Phono jack/2 Vrms/more than 22 kilohms
(VIDEO): Phono jack/1.0 Vp-p
(S VIDEO): 4-pin mini DIN/Y:1.0 Vp-p, C: 0.3 Vp-p (PAL)
LINE 1 - TV: 21-pin
CVBS IN/OUT
S-Video/RGB OUT (upstream)
LINE 3: 21-pin
CVBS IN/OUT
S-Video/RGB IN
S-Video OUT (downstream)
DV IN: 4-pin/i.LINK S100
DIGITAL OUT (OPTICAL): Optical output jack/ -18 dBm (wave length: 660 nm)
DIGITAL OUT (COAXIAL): Phono jack/0.5 Vp-p/75 ohms
COMPONENT VIDEO OUT
HDMI OUT (RDR-HXD910 only):
Type A (19-pin)
General
Power requirements: 220-240 V AC, 50/60 Hz
Power consumption:
RDR-HXD710: 57 W
RDR-HXD910: 60 W
Dimensions (approx.): 430 × 75 × 328 mm (width/height/depth) incl. projecting parts
Hard disk drive capacity:
RDR-HXD710: 160 GB
RDR-HXD910: 250 GB
Mass (approx.):
RDR-HXD710: 5.2 Kg
RDR-HXD910: 5.3 Kg
Operating temperature: 5°C to 35°C
Operating humidity: 25% to 80%
Supplied accessories:
Audio/video cord (1)
Mains lead (1)
Aerial cable (1)
Remote commander (remote) (1)
R6 (size AA) batteries (2)
Specifications and design are subject to change without notice.
Compatible colour systems
This recorder is designed to record using the PAL colour system and play back using the PAL or NTSC colour systems.
About i.LINK
The DV IN jack on this recorder is an i.LINK-compliant DV IN jack. This section describes the i.LINK standard and its features.
What is i.LINK?
i.LINK is a digital serial interface for handling digital video, digital audio and other data in two directions between equipment having the i.LINK jack, and for controlling other equipment. i.LINK-compatible equipment can be connected by a single i.LINK cable. Possible applications are operations and data transactions with various digital AV equipment. When two or more i.LINK-compatible equipment are connected to this recorder in a daisy chain, operations and data transactions are possible with not only the equipment that this recorder is connected to but also with other devices via the directly connected equipment.
Note, however, that the method of operation sometimes varies according to the characteristics and specifications of the equipment to be connected, and that operations and data transactions are sometimes not possible on some connected equipment.
Note
Normally, only one piece of equipment can be connected to this recorder by the i.LINK cable (DV connecting cable). When connecting this recorder to i.LINK-compatible equipment having two or more i.LINK jacks (DV jacks), see the instruction manual of the equipment to be connected.
About the name "i.LINK"
i.LINK is a more familiar term for IEEE 1394 data transport bus proposed by SONY, and is a trademark approved by many corporations. IEEE 1394 is an international standard standardized by the Institute of Electrical and Electronics Engineers.
i.LINK baud rate
i.LINK's maximum baud rate varies according to the equipment. Three maximum baud rates are defined:
S100 (approx. 100 Mbps*)
S200 (approx. 200 Mbps)
S400 (approx. 400 Mbps)
The baud rate is listed under “Specifications” in the instruction manual of each equipment. It is also indicated near the i.LINK jack on some equipment.
The maximum baud rate of equipment on which it is not indicated such as this unit is “S100.”
When units are connected to equipment having a different maximum baud rate, the baud rate sometimes differs from the indicated baud rate.
* What is Mbps?
Mbps stands for megabits per second, or the amount of data that can be sent or received in one second. For example, a baud rate of 100 Mbps means that 100 megabits of data can be sent in one second.
i.LINK functions on this recorder
For details on how to dub when this recorder is connected to other video equipment having DV jacks, see page 84.
The DV jack on this recorder can only input DVC-SD signals. It cannot output signals. The DV jack will not accept MICRO MV signals from equipment such as a MICRO MV digital video camera with an i.LINK jack.
For further precautions, see the notes on page 84. For details on precautions when connecting this recorder, also see the instruction manuals for the equipment to be connected.
Required i.LINK cable
Use the Sony i.LINK 4-pin-to-4-pin cable (during DV dubbing).
i.LINK and i are trademarks.
Guide to Parts and Controls
For more information, see the pages in parentheses.
Remote
Buttons with an orange dot next to them can be used with your TV when the TV/DVD switch is set to TV.

24 (search) buttons
1 TV/DVD switch (22)
2 ▲ (open/close) button (29)
3 I/ (on/standby) button (25)
4 HDD button (31)
DVD button (29)
5→TV/VIDEO, TV/DVD button (22)
6 PROG (programme) +/- buttons (31)
The + button has a tactile dot*.
7Number buttons (51, 67) SET button (51) The number 5 button has a tactile dot*.
8 CLEAR/-- (ten digit) button (51)
9 △ (volume) +/- buttons (22)
10 Text button (45)
11 TV/RADIO button (45)
12 (audio) button (62)
The button has a tactile dot*.
13 TIMER button (49)
14 Coloured multimedia applications & interactive services control buttons (41)
15 SYSTEM MENU button (24, 86)
TITLE LIST button (32, 60, 68, 73)
GUIDE (Electronic Programme Guide)
button (41)
16 ←/↑/↓/→/ENTER button (25)
17 INFO button (43)
18 Favourite button (46)
19 TOOLS button (29)
20 RETURN button (56)
21 ←• (instant replay)/ •→ (instant advance)
buttons (32, 68)
22TOP MENU button (60)
23MENU button (60) (62)
25 ◀◀◀/▶▶▶ (previous/next) buttons (62)
26 ▷ (play) button (60)
II (pause) button (62)
■ (stop) button (60)
The ▷ button has a tactile dot*.
27● REC button (31)
■ REC PAUSE button (31)
■ REC STOP button (31)
28 CHAPTER MARK/CHAPTER MARK ERASE buttons (76)
29REC MODE button (31)
30 SYNCHRO REC button (58)
31 (subtitle) button (62)
32DISPLAY button (34) TIME/TEXT button (35)
33 (angle) button (62)
34 INPUT SELECT button (59, 85)
35 COMMAND MODE switch (DVD 1,2,3)
(24)
36 PROGRESSIVE button (19)
* Use the tactile dot as a reference when operating the recorder.
Front panel
RDR-HXD710/HXD910

1 I/ (on/standby) button (25)
2 Front panel display (35, 115)
3Disc tray (29)
4 ≜ (open/close) button (29)
5 TIMER REC indicator (50) SYNCHRO REC indicator (58)
6 HDD button/indicator (31) DVD button/indicator (29)
7 (remote sensor) (22)
8 ▷ (play) button (60)
II (pause) button (62)
■ (stop) button (60)
9● REC button (31)
■ REC PAUSE button (31)
■ REC STOP button (31)
10 DV IN jack (84)
11ONE-TOUCH DUB button (86)
12 SYSTEM MENU button (24)
TOOLS button (29)
13 ←/↑/↓/→/ENTER button (25)
14 RETURN button (25)
15 GUIDE (Electronic Programme Guide) button (41)
16 ◀◀◀/▶▶▶ (previous/next) buttons (62)
17PROGRAM +/- buttons (31) The + button has a tactile dot*.
18 REC MODE button (48)
INPUT SELECT button (59, 85)
19 LINE 2 IN (S VIDEO/VIDEO/L(MONO) AUDIO R) jacks (27)
Front panel display

1 HDD/DVD indicators
Displays the selected media and the playing/recording/dubbing status.
②Disc type*/recording format
3 Audio signal indicators (34)
4 TV indicator (31)
5 Displays the following (35): - Playing time/remaining time - Current title/chapter/track/index number - Recording time/recording mode - C l o c k - Programme position - TV Direct Rec indication (31): “TV” appears in the right most two digits.
6 (angle) indicator (62) 7 SMARTLINK indicator (18) 8 PROGRESSIVE indicator (19)
* Displays DATA CDs as "CD."
Hint
You can turn off the front panel display when the recorder is turned off by setting "Dimmer" to "Power Save" in "Options" setup (page 101).
Rear panel
RDR-HXD910
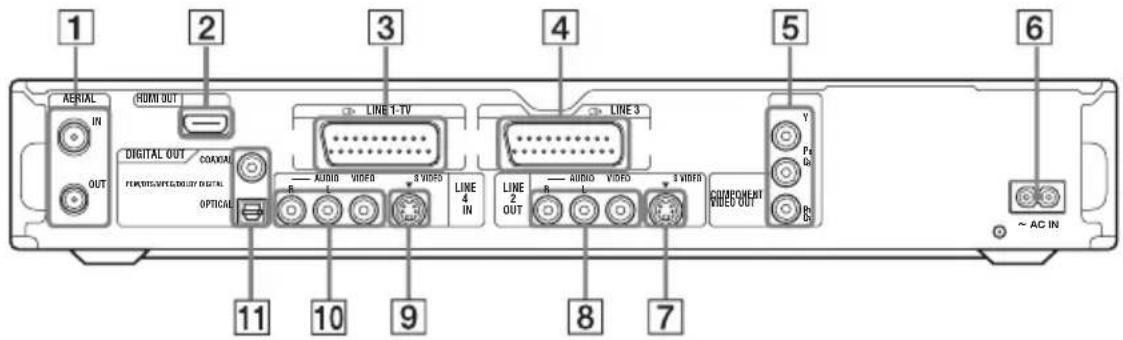
RDR-HXD710

① AERIAL IN/OUT jacks (15)
②HDMI OUT (high-definition multimedia interface out) jack (RDR-HXD910 only) (16)
③LINE 1 - TV jack (16)
4LINE 3 jack (26)
5COMPONENT VIDEO OUT (Y, P B/CB, PR/CR) jacks (16)
6 AC IN terminal (21)
7LINE 2 OUT (S VIDEO) jack (16)
⑧LINE 2 OUT (R-AUDIO-L/VIDEO) jacks (16, 20)
9LINE 4 IN (S VIDEO) jack (27)
10 LINE 4 IN (R-AUDIO-L/VIDEO) jacks (27)
11 DIGITAL OUT (COAXIAL/OPTICAL) jacks (20)
Glossary
Chapter (page 67)
Sections of a picture or a music feature that are smaller than titles. A title is composed of several chapters. Depending on the disc, no chapters may be recorded.
Copy protection signals (page 49)
Copy restriction set by copyright owners, etc. These signals are included in some software or TV programmes and restrict recording on this recorder.
Dolby Digital (page 97)
Digital audio compression technology developed by Dolby Laboratories. This technology conforms to multi-channel surround sound. The rear channel is stereo and there is a discrete subwoofer channel in this format. Dolby Digital provides the same discrete channels of high quality digital audio found in “Dolby Digital” theater surround sound systems.
Good channel separation is realized because all of the channel data is recorded discretely, and little deterioration occurs because all channel data processing is digital.
DTS (page 98)
Digital audio compression technology by Digital Theater Systems, Inc. This technology conforms to multi-channel surround sound. The rear channel is stereo and there is a discrete subwoofer channel in this format. DTS provides the same discrete channels of high quality digital audio.
Good channel separation is realized because all of the channel data is recorded discretely, and little deterioration occurs because all channel data processing is digital.
DVD+R (page 10)
A DVD+R (read “plus R”) is a recordable disc that is the same size as a DVD VIDEO. Contents can be recorded only once to a DVD+R, and will have the same format as a DVD VIDEO.
DVD+RW (page 10)
A DVD+RW (read “plus RW”) is a recordable and rewritable disc. DVD+RWs use a recording format that is comparable to the DVD VIDEO format.
DVD-R (page 10)
A DVD-R is a recordable disc that is the same size as a DVD VIDEO. Contents can be recorded only once to a DVD-R, and will have the same format as a DVD VIDEO.
DVD-RW (page 10)
A DVD-RW is a recordable and rewritable disc that is the same size as a DVD VIDEO. The DVD-RW has two different modes: VR mode and Video mode. DVDs created in Video mode have the same format as a DVD VIDEO, while discs created in VR (Video Recording) mode allow the contents to be programmed or edited.
DVD VIDEO (page 12)
A disc that contains up to eight hours of moving pictures on a disc the same diameter as a CD. The data capacity of a single-layer and single-sided DVD is 4.7 GB (Giga Byte), which is 7 times that of a CD. The data capacity of a double-layer and single-sided DVD is 8.5 GB, a single-layer and double-sided DVD is 9.4 GB, and double-layer and double-sided DVD is 17 GB. The picture data uses the MPEG 2 format, which is a worldwide standard of digital compression technology. The picture data is compressed to about 1/40 (average) of its original size. The DVD also uses a variable rate coding technology that changes the data to be allocated according to the status of the picture. Audio information is recorded in a multi-channel format, such as Dolby Digital, allowing you to enjoy a more real audio presence.
Furthermore, various advanced functions such as the multi-angle, multilingual, and Parental Control functions are provided on the DVD.
EPG (page 41)
The Electronic Programme Guide is a guide showing programmes which can be displayed on a conventional television (via the Digital Terrestrial Television tuner included in this recorder) as the now and next programmes or the television schedule for a day or more at a time.
Hard disk drive (page 3)
A hard disk drive is a whole mechanical system that consists of disks and drive. Disks are flat, circular, rigid plates coated with a thin magnetic media. Magnetic heads record data on the rapidly spinning disks, and this enables the speedy and efficient reading and writing of data.
HDMI (High-Definition Multimedia Interface) (page 16)
HDMI is an interface that supports both video and audio on a single digital connection. The HDMI connection carries standard to high definition video signals and multi-channel audio signals to AV components such as HDMI equipped TVs, in digital form without degradation.
The HDMI specification supports HDCP (High-bandwidth Digital Contents Protection), a copy protection technology that incorporates coding technology for digital video signals.
Interlace format (page 19)
Interlace format shows every other line of an image as a single “field” and is the standard method for displaying images on television. The even number field shows the even numbered lines of an image, and the odd numbered field shows the odd numbered lines of an image.
MPEG Audio (page 97)
International standard coding system used to compress audio digital signals authorized by ISO/IEC. MPEG 2, used on DVDs, conforms to up to 7.1-channel surround.
Original (page 72)
Titles actually recorded on a HDD/DVD-RW (VR mode). Erasing original titles frees up disc space.
Playlist (page 72)
Playback information created from the actual recordings on a HDD/DVD-RW (VR mode). A Playlist leaves the original titles as they are, and contains only the information needed to control playback. A Playlist title takes up very little disc space.
Progressive format (page 19)
Compared to the Interlace format that alternately shows every other line of an image (field) to create one frame, the Progressive format shows the entire image at once as a single frame. This means that while the Interlace format can show 25-30 frames/50-60 fields in one second, the Progressive format can show 50/60 frames in one second. The overall picture quality increases and still images, text, and horizontal lines appear sharper.
Title (page 67)
The longest section of a picture or music feature on a DVD, movie, etc., in video software, or the entire album in audio software.
Track (page 67)
Sections of a music feature on a CD/VIDEO CD (the length of a song).
Language Code List
For details, see page 89.
The language spellings conform to the ISO 639: 1988 (E/F) standard.
Code Language Code Language Code Language Code Language
| 1027 | Afar | 1183 | Irish | 1347 | Maori | 1507 | Samoan |
| 1028 | Abkhazian | 1186 | Scots Gaelic | 1349 | Macedonian | 1508 | Shona |
| 1032 | Afrikaans | 1194 | Galician | 1350 | Malayalam | 1509 | Somali |
| 1039 | Amharic | 1196 | Guarani | 1352 | Mongolian | 1511 | Albanian |
| 1044 | Arabic | 1203 | Gujarati | 1353 | Moldavian | 1512 | Serbian |
| 1045 | Assamese | 1209 | Hausa | 1356 | Marathi | 1513 | Siswati |
| 1051 | Aymara | 1217 | Hindi | 1357 | Malay | 1514 | Sesotho |
| 1052 | Azerbaijani | 1226 | Croatian | 1358 | Maltese | 1515 | Sundanese |
| 1053 | Bashkir | 1229 | Hungarian | 1363 | Burmese | 1516 | Swedish |
| 1057 | Byelorussian | 1233 | Armenian | 1365 | Nauru | 1517 | Swahili |
| 1059 | Bulgarian | 1235 | Interlingua | 1369 | Nepali | 1521 | Tamil |
| 1060 | Bihari | 1239 | Interlingue | 1376 | Dutch | 1525 | Telugu |
| 1061 | Bislama | 1245 | Inupiak | 1379 | Norwegian | 1527 | Tajik |
| 1066 | Bengali; Bangla | 1248 | Indonesian | 1393 | Occitan (Afan)Oromo | 1528 | Thai |
| 1253 | Icelandic | 1403 | 1529 | Tigrinya | |||
| 1067 | Tibetan | 1254 | Italian | 1408 | Oriya | 1531 | Turkmen |
| 1070 | Breton | 1257 | Hebrew | 1417 | Punjabi | 1532 | Tagalog |
| 1079 | Catalan | 1261 | Japanese | 1428 | Polish | 1534 | Setswana |
| 1093 | Corsican | 1269 | Yiddish | 1435 | Pashto; | 1535 | Tonga |
| 1097 | Czech | 1283 | Javanese | Pushto | 1538 | Turkish | |
| 1103 | Welsh | 1287 | Georgian | 1436 | Portuguese | 1539 | Tsonga |
| 1105 | Danish | 1297 | Kazakh | 1463 | Quechua | 1540 | Tatar |
| 1109 | German | 1298 | Greenlandic | 1481 | Rhaeto- | 1543 | Twi |
| 1130 | Bhutani | 1299 | Cambodian | Romance | 1557 | Ukrainian | |
| 1142 | Greek | 1300 | Kannada | 1482 | Kirundi | 1564 | Urdu |
| 1144 | English | 1301 | Korean | 1483 | Romanian | 1572 | Uzbek |
| 1145 | Esperanto | 1305 | Kashmiri | 1489 | Russian | 1581 | Vietnamese |
| 1149 | Spanish | 1307 | Kurdish | 1491 | Kinyarwanda | 1587 | Volapük |
| 1150 | Estonian | 1311 | Kirghiz | 1495 | Sanskrit | 1613 | Wolof |
| 1151 | Basque | 1313 | Latin | 1498 | Sindhi | 1632 | Xhosa |
| 1157 | Persian | 1326 | Lingala | 1501 | Sangho | 1665 | Yoruba |
| 1165 | Finnish | 1327 | Laothian | 1502 | Serbo- | 1684 | Chinese |
| 1166 | Fiji | 1332 | Lithuanian | Croatian | 1697 | Zulu | |
| 1171 | Faroese | 1334 | Latvian; | 1503 | Singhalese | ||
| 1174 | French | Lettish | 1505 | Slovak | |||
| 1181 | Frisian | 1345 | Malagasy | 1506 | Slovenian | 1703 | Not specified |
Area Code
For details, see page 100.
Code Area Code Area Code Area Code Area
| 2044 Argentina | 2165 Finland | 2362 Mexico | 2149 Spain |
| 2047 Australia | 2174 France | 2376 Netherlands | 2499 Sweden |
| 2046 Austria | 2109 Germany | 2390 New Zealand | 2086 Switzerland |
| 2057 Belgium | 2248 India | 2379 Norway | 2528 Thailand |
| 2070 Brazil | 2238 Indonesia | 2427 Pakistan | 2184 United Kingdom |
| 2079 Canada | 2254 Italy | 2424 Philippines | |
| 2090 Chile | 2276 Japan | 2436 Portugal | |
| 2092 China | 2304 Korea | 2489 Russia | |
| 2115 Denmark | 2363 Malaysia | 2501 Singapore |
Digital TV Channel List
Only the main transmitters are listed. For further details or updates refer to the web site http://www.bbc.co.uk/reception/transmitters/tv_trans/index.shtml
| MAIN TRANSMITTERS | BBC | ITV&C4 | SDN | MuxB | MuxC | MuxD |
London & South East
| 1 | Bluebell Hill 5924 27 45 42 39 |
| 2 | Crystal Palace 25 22 32 28 34 29 |
| 3 | D o v e r 6 8 6 1 5 5 5 8 5 7 6 0 |
| 4 | Heathfield 34 2948 47 54 51 |
| 5 | Oxford 34 68 51 52 48 29 |
South-West
| 6 | Beacon Hill 52 61 58 54 56 64 | |
| 7 | Caradon Hill 34 31 48 21 24 27 | |
| 8 | Huntshaw Cross | 54 58 61 64 53 57 |
| 9 | Redruth | 3942 45 4943 50 |
| 10 | Stockland Hill | 22 28 25 32 30 34 |
Channel Islands
| 11 | Fremont Point | No Digital Transmission | |||||
| South | |||||||
| 12 | Hannington | 50 | 43 | 40 | 46 | 44 | 41 |
| 13 | Midhurst | 56 | 65 | 62 | 5964 | 60 | |
| 14 | Rowridge | 23 | 28 | 30 | 32 | 26 | 33 |
| West | |||||||
| 15 | Mendip | 5955 | 62 | 65 | 56 | 67 | |
| East | |||||||
| 16 | Sandy Heath | 42 | 45 | 43 | 67 | 40 | 46 |
| 17 | Sudbury | 49 | 68 | 48 | 39 | ||
| 18 | Tacolneston | 63 | 60 | 53 | 58 | 61 | 64 |
Midlands (West)
| 19 | Ridge Hill | 53 57 60 63 42 45 |
| 20 | Sutton Coldfield | 41 44 47 51 52 55 |
| 21 | The Wrekin A | 21 31 24 27 53 57 |
| Midlands (East) | ||
| 22 | Waltham | 4923 26 33 45 42 |
Northern Ireland
| 23 | Brougher Mountain | 30 34 23 26 2933 |
| 24 | Divis | 2933 23 26 48 34 |
| 25 | Limavady | 67 58 53 57 60 63 |
North
| 26 | Belmont | 30 48 68 66 60 57 |
| 27 | Emley Moor | 52 40 43 46 50 49 |
North-West
| 28 | Winter Hill | 56 66 68 67 60 63 |
| North-East | ||
| 29 | Bilsdale | 34 21 31 24 27 42 |
| 30 | Caldbeck | 25 23 26 3945 42 |
| 31 | Chatton | 40 50 43 46 47 51 |
| 32 | Pontop Pike 48 55 5962 65 53 | |
Scotland
| 33 | Angus | 68 66 5962 56 65 |
| 34 | Black Hill | 41 47 44 51 55 65 |
| 35 | Sandale | No Digital Transmission |
| 36 | Bressay | 21 24 27 31 66 68 |
| 37 | Craigkelly | 33 2923 26 42 39 |
| 38 | Darvel | 22 25 32 28 30 34 |
| 39 | Durris | 30 34 52 51 41 44 |
| 40 | Etishal 34 30 22 25 28 32 | |
| 41 | Keelylang Hill | 48 52 41 44 47 51 |
| 42 | Knock More | 34 30 53 57 60 56 |
| 43 | Rosemarkie | 47 51 41 44 46 50 |
| 44 | Rumster Forest | 28 22 25 32 62 59 |
| 45 | Selkirk 53 57 60 63 66 56 | |
Wales
| 46 | Blaenplwyf | 28 22 25 32 2933 |
| 47 | Carmel | 55 65 5962 68 66 |
| 48 | Llanddona | 50 54 58 61 64 46 |
| 49 | Moel-y-Parc | 54 58 61 64 30 34 |
| 50 | Presely | 47 51 3942 45 49 |
| 51 | Wenvoe | 30 34 40 50 43 46 |

Index
Words in quotations appear in the on-screen displays.
Numerics
16:9 25, 94
4:3 Letter Box 25, 94
"4:3 Output" 95
4:3 Pan Scan 25, 94
“48kHz/96kHz PCM” 98
A
"A-B Erase" 74
Adjusting
playback picture 63
playback sound 64
recording picture 53
Aerial 15
Album 35, 71
Album number 35
"Album Search" 67
Angle 62
Area code 119
Audio 62, 96
"Audio Connection" 25
Audio cord 20
"Audio DRC" 96
"Audio Filter" 64
"Audio" 89
"Audio Settings" 64
"Auto Chapter" 99
"Auto Display" 102
"Auto Title Erase" 57
Auto Tune 25, 91
"AV SYNC" 64
B
Batteries 22
“Bilingual” 58, 59
“BNR” 63
“Brightness” 54, 63
C
“C NR” 63
"Capture All" 77
"Capture" 77
CD 12
"Change IN" 77, 87
"Change OUT" 77, 87
Chapter 35, 54, 76, 117
CHAPTER MARK 76
CHAPTER MARK ERASE 76
Chapter number 35
"Chapter Search" 67
Chasing Playback 65
"Check Overlap" 55, 56
Checking/changing/cancel-
ling timer settings (Timer List) 56
Child Lock 61
Cleaning discs 110
Clock 25, 89
"Colour" 54, 63
"Colour System" 100
Colour systems 111
"Combine" 78
"Command Mode" 24, 102
"Component Out" 95
Component video input 16
COMPONENT VIDEO OUT 17
Connecting 16
the aerial cable 15
the audio cords 20
the video cords 16
"Contrast" 54, 63
Controlling TVs with the re- mote 22
Copy control signals 49
Copy protection 117
Copy-Free 49
Copy-Never 49
Copy-Once 49
CPRM 10
"Create Playlist" 77
Creating chapters 76
D
DATA CD 12
"Digital Out" 97
Digital Services
Digital Text viewing 44
EPG 41
Favourites 45
Index 47
Programme information 43
Digital Software Upgrade 93
Digital video camera 84
"Dimmer" 101
"Disc Info" 29, 38, 76
Disc Map 76
Disc Settings 29, 38, 76, 101
Disc space 30
Disc types 10
Display
front panel display 35, 115
"Divide" 75
Dolby Digital 20, 97, 117
"Downmix" 97
DTS 98, 117
“Dub Mode” 79, 88
Dubbing
“Dub Mode” 79
High-speed Dubbing 79
Rec Mode Conversion
Dubbing 80
"Settings" 83
"DV Audio Input" 85
DV Dubbing 84
One Touch Dubbing 86, 100
Program Edit 86
“DV EDIT” 87
DV IN 84
“DVD Line Rec. Picture Size” 54
“DVD Menu” 89
DVD VIDEO 12, 117
DVD+R 10, 117
DVD+RW 10, 117
DVD-R 10, 117
DVD-RW 10, 117
DVD-RWs (Video mode) 73
"DVE" 63
E
Easy Setup 25, 103
Editing 72, 77
DV Edit 84
Enter characters 36
EPG
Viewing a list of available channels 41
Viewing programmes related to a specific category. 42
"Erase All" 76
"Erase" 56, 73, 77, 87
"Erase Titles" 75
"Extend Rec" 50
F
"Factory Setup" 102
Favourites
Deleting a channel from the Favourites List 46
Moving to a different fa- vourite list 46
Setting a favourite list 45
Watching or listening to a favourite channel 46
"Features" 99
"File Search" 67
"Finalise Disc" 100
"Finalise" 39
Finalising 39
"Format DVD-RW" 101
"Format" 29
Formatting 29
Freeze Frame 62
Front panel 114
Front panel display 35, 115
G
GB 30
H
Handling discs 110
“HDD Line Rec. Picture Size” 53
HDMI
"Audio (HDMI)" 98
"HDMI Resolution" 94
HDMI OUT 16, 17
"Hue" 63
|
i.LINK 112
Index 47
INPUT SELECT 59, 85
Interlace 118
Interlace format 118
J
JPEG image files 68
L
Labelling 38
Language 89
LINE 2 IN 27
LINE 3 26
LINE 4 IN 27
"Line Audio Input" 58, 59
"Line1 Output" 95
"Line3 Input" 96
"Line3 Output" 96
"Line4 Input" 96
M
Mains Lead 21
Manual Clock Set 89
Manufacturer Information 93
MENU 60
Menu
DVD's Menu 60
Top menu 60
“Mix” 85
“MNR” 63
"Modify" 56
"Move" 77, 87
MP3 audio tracks 68
MPEG 97, 118
N
Number buttons 37
0
One Touch Dubbing 86, 100
One Touch Menu 61
One Touch Play 61
One Touch Timer 50
"Options" 101
Original 33, 72, 118
P
Page mode 33
Parental Control 61, 99
Parental Lock 90
Parts and controls 113
"Password" 101
"Pause Mode" 95
"PB Video Equalizer" 63
PBC 60
Picture quality 53, 63
Picture size 53
"Play Beginning" 61
Play mode 35
Playable discs 12
Playback 12, 35, 60, 62
fast forward 62
fast reverse 62
freeze frame 62
instant advance 62
instant replay 62
JPEG image files 68
MP3 audio tracks 68
resume play 61
scan audio 60
slow-motion play 62
Playing status bar 35
Playlist 33, 72, 77, 118
"Power Save" 102
"Present Time" 89
"Preview" 77, 87
Programme Edit 86
Programme Hide 92
Programme information 43
Programme Sort 92
Progressive 19, 118
"Progressive Mode" 95
"Protect Disc" 38
"Protect" 73
Protection
disc 38
title 73
Q
Quick guide to disc types 10
Quick Timer 53
R
Rear panel 116
REC 31
Rec Mode Adjust 50
"Rec Mode" 53
"Rec NR" 54
REC PAUSE 31
"Rec Settings" 53
REC STOP 86
"Rec Video Equalizer" 54
Recordable discs 10
Recording 48, 58, 99
picture adjustment 53
recording format 10
recording mode 32, 48
recording time 32
"Update" 50
while watching another
programme 31
Recording time 48
RECOVERY 108
Region code 13
Remaining time 35
Remote 22, 113
Resetting the recorder 103
Resume Play 61
"RGB" 25, 95
S
S VIDEO 16
“S Video” 25, 95
Scan Audio 60
"Scart Setting" 95
Scene List 77
Screen Saver 100
"Search" 67
Searching
fast reverse/fast forward 62
locating the beginning of
the title/chapter/track 62
scan audio 60
search mode 67
visual search 67
SET 23, 37
"Set Thumbnail" 73
Signal Strength 93
Simultaneous Rec and Play 66
Slow-motion play 62
SMARTLINK 18
Sort 33
Sound quality 64
"Stereo1" 85
"Stereo2" 85
Subtitle 62, 89
Super VIDEO CD 12
Surround 64
Synchro Rec 58
T
Technical Information 93
Thumbnail picture 34
"Time Search" 67
TIME/TEXT 35
TIMER 49
Timer List 56
Timer recording
check/change/cancel 55, 56
EPG timer setting 51
manual setting 49
Rec Mode Adjust 50
Synchro Rec 58
Title 35, 118
TITLE LIST 60
Title List 32, 60
Sort 33
Thumbnail 34
"Title Name" 73
Title number 35
"Title Search" 67
TOP MENU 60
Track 118
"Track Search" 67
Troubleshooting 104
"TV Direct Rec" 31, 99
TV Pause 65
"TV Type" 25, 94
TV/DVD switch 22
TV/VIDEO 31
TVS (TV Virtual Surround)
64
U
"Unfinalise" 40
Unfinalising 40
Usable discs 10, 12
V
VIDEO CD 12
Video cord 16
"Video" 25, 95, 94
Video input 16
Video mode 10
"Video Settings" 63
Visual Search 67
VR mode 10, 72
Y
"Y NR" 63

Printed on 100% recycled paper.

Sony Corporation Printed in Hungary




- DVD Recorder
- Important Information
- Please ensure you have the following information available before calling the helpline:
- Notes:
- WARNING
- Disposal of Old Electrical & Electronic Equipment (Applicable in the European Union and other European countries with separate collection systems)
- CAUTION
- Notice for customers in the United Kingdom and Republic of Ireland
- Precautions
- On safety
- About the hard disk drive
- About repairing the hard disk drive
- On power sources
- On placement
- On recording
- Copyrights
- Copy guard function
- IMPORTANT NOTICE
- About this manual
- Check your model name
- Table of Contents
- Hookups and Settings 14
- Seven Basic Operations — Getting to Know Your DVD Recorder
- Guide to Digital Services 41
- Timer Recording 48
- Playback 60
- Erasing and Editing 72
- Dubbing (HDD DVD) 79
- DV Dubbing 84
- Settings and Adjustments 89
- Additional Information 104
- Ways to Use Your DVD Recorder
- Quick Guide to Disc Types
- Usable disc versions (as of March 2005)
- Discs that cannot be recorded on
- playable discs
- Discs that cannot be played
- Note on playback operations of DVD VIDEOS/VIDEO CDs
- Region code (DVD VIDEO only)
- Music discs encoded with copyright protection technologies
- Note on DualDiscs
- Notes
- Hooking Up the Recorder
- Step 1: Unpacking
- Step 2: Connecting the Aerial Cable
- Step 3: Connecting the Video Cords/HDMI Cords
- A Connecting to a SCART input jack
- B Connecting to a video input jack
- © Connecting to an S VIDEO input jack
- D Connecting to component video input jacks (Y, P_B/C_B , P_R/C_R )
- E Connecting to an HDMI input jack (RDR-HXD910 only\*)
- When playing "wide screen" images
- If you are connecting to a VCR
- About the SMARTLINK features (for SCART connections only)
- Hint
- Using the PROGRESSIVE button
- ◆Progressive
- ◆Interlace
- Step 4: Connecting the Audio Cords
- A Connecting to audio L/R input jacks
- B Connecting to a digital audio input jack
- Step 5: Connecting the Mains Lead
- Step 6: Preparing the Remote
- Controlling TVs with the remote
- Release I/⏻.
- To operate the TV/DVD button (for SCART connections only)
- Code numbers of controllable TVs
- Controlling the volume of your AV amplifier (receiver) with the remote
- Code numbers of controllable AV amplifiers (receivers)
- If you have a Sony DVD player or more than one Sony DVD recorder
- Press SYSTEM MENU.
- Select "SETUP," and press ENTER.
- Select "Options," and press ENTER.
- Select "Command Mode," and press ENTER.
- Select the Command mode (DVD1, DVD2, or DVD3), and press ENTER.
- Slide the COMMAND MODE switch on the remote so it matches the mode you selected above.
- To return to the previous step
- Step 7: Easy Setup
- Turn on the recorder and switch the input selector on your TV so that the signal from the recorder appears on your TV screen.
- Press ENTER.
- ◆Auto Tune
- ◆Clock
- ◆TV Type
- ◆ Component Out
- ◆Line1 Output
- ◆Audio Connection
- Press ENTER when "Finish" appears.
- Hints
- Connecting a VCR or Similar Device
- Connecting to the LINE 3 jack
- Connecting to the LINE 2 IN or LINE 4 IN jacks
- Connecting to a Satellite or Digital Tuner
- If the satellite tuner can output RGB signals
- If you want to use the Synchro Rec function
- Inserting and Formatting a DVD Disc (Disc Info)
- Inserting a Disc
- Formatting a DVD disc (Disc Info)
- Move the cursor down the TOOLS menu until "Disc Info" is selected, and press ENTER.
- Select "Format," and press ENTER.
- Select "OK," and press ENTER.
- Note
- Recording a Programme
- Press HDD or DVD.
- Press PROG +/- to select the programme position or input source you want to record.
- Press REC MODE repeatedly to select the recording mode.
- Press ● REC.
- To stop recording
- To pause recording
- To watch another TV programme while recording
- TV Direct Rec
- Checking the disc status while recording
- Press DISPLAY twice during recording.
- Playing the Recorded Programme (Title List)
- Press TITLE LIST.
- Select a title, and press ENTER.
- Select "Play," and press ENTER.
- To stop playback
- To scroll the list display by page (Page mode)
- About the Title List for HDD/DVD-RWs (VR mode)
- To change the title order (Sort)
- To change a title thumbnail picture (Thumbnail) (HDD/DVD-RW in VR mode only)
- To turn off the Title List
- Displaying the Playing Time and Play Information
- Press DISPLAY repeatedly.
- ◆ Display 1
- Title number/name
- ◆ Display 2
- Checking the playing/remaining time
- Press TIME/TEXT repeatedly.
- ◆ Front panel display
- Changing the Name of a Recorded Programme
- Press ←/↑/↓/→ to select the character you want to enter, and press ENTER.
- Repeat steps 4 and 5 to enter the remaining characters.
- Select "Finish," and press ENTER.
- To use the number buttons
- Labelling and Protecting a Disc
- Labelling a disc
- Protecting a disc
- -RWVR
- Playing the Disc on Other DVD Equipment (Finalise)
- Unfinalising a disc
- For DVD-RWs (Video mode)
- For DVD-RWs (VR mode)
- Guide to Digital Services
- EPG (Electronic Programme Guide)
- Viewing a list of available channels
- Press the button to display the EPG.
- Press the ←/↑/↓/→ buttons or enter a channel number using the number buttons to move around the list.
- Press the GREEN button to toggle the display between the 2 hours schedule viewing (half hour time slots) and the 30 minutes schedule viewing (15 minutes time slots).
- Press the /buttons to display the previous/next ten channels.
- Press the BLUE/YELLOW buttons to view the next or previous 24 hours programme schedule.
- Select a programme you wish to view. Once highlighted, press the ENTER button.
- Select "View Channel," and press ENTER to view the programme.
- Viewing programmes related to a specific category.
- Press the RED button. The category pop-up list appears.
- Press the ↑/↓ buttons to highlight the category you want, then press the ENTER button.
- To scroll the Category display by page (Page mode)
- Programme information
- Displaying the programme information
- Press the button to display the programme information screen.
- To scroll the Information display by page (Page mode)
- Viewing a digital text service
- Selecting digital text from dedicated digital teletext channels
- Select a dedicated channel that is broadcasting digital text.
- Once the text page is displayed (this may take some time), follow the on-screen instructions to obtain your required selection.
- Selecting digital text from other channels
- Favourites
- Setting a favourite list
- Select "Favourites," and press ENTER
- Press the TV/RADIO button to display either your favourite TV or favourite Radio channels at any time.
- Press the ↑/↓ buttons or enter a channel number to highlight a channel you want to add as a favourite, then press the ENTER button.
- Deleting a favourite channel
- Moving to a different favourite list
- While a Favourite List is displayed, press repeatedly the YELLOW button on the remote control until the favourite list you want to view is displayed.
- To add a channel to this new list, press the ↑/↓ buttons to highlight the channel you wish to add and press the ENTER button.
- When you have stored all your favourite channels, press the RETURN button repeatedly to come back to normal operation.
- Watching or listening to a favourite channel
- While in normal operation mode, press the button on the remote control.
- To scroll the Favourite List display by page (Page mode)
- Index
- Timer Recording
- Before Recording
- Before you start recording...
- Recording mode
- "HQ+" recording mode
- Unrecordable pictures
- Timer Recording (Standard/EPG)
- Setting the timer manually (Standard)
- Select an item using ←/→ and adjust using ↑/↓.
- Select "OK," and press ENTER.
- To stop recording during timer recording
- Rec Mode Adjust
- If the timer settings overlap
- To confirm, change, or cancel timer recording
- To extend the recording duration time while recording
- One Touch Timer
- Recording TV programmes using the EPG application
- Press the button to display the EPG.
- Press the ←/↑/↓/→ buttons or enter a channel number using the number buttons to move around the list.
- Select a current time TV/radio broadcast or a future programme you wish to record. Once highlighted, press the ENTER button.
- Select "Timer," and press ENTER.
- Select "OK," and press ENTER.
- ◆Some examples of timer event icon types are as follows:
- To scroll the EPG display by page (Page mode)
- Using the Quick Timer function
- Press ● REC repeatedly to set the duration.
- To cancel the Quick Timer
- Adjusting the recording picture quality and size
- Before recording starts, press TOOLS to select "Rec Settings," and press ENTER.
- Select the item you want to adjust, and press ENTER.
- Adjust the setting using ←/↑/↓/→, and press ENTER.
- Creating chapters in a title
- When recording on the HDD or a DVD-RW (VR mode)
- When recording on other recordable discs
- Checking/Changing/ Cancelling Timer Settings (EPG)
- Press the ←/↑/↓/→ buttons to select a future timer event you want to check/change/cancel. Once highlighted, press the ENTER button.
- Press the ↑/↓ buttons to select the options. Once highlighted, press the ENTER button.
- Checking/Changing/ Cancelling Timer Settings (Timer List)
- When the timer settings overlap
- When the recordings start at the same time
- When the end time of one recording and the start time of another are the same
- To turn off the Timer List
- Automatically erasing old titles (Auto Title Erase)
- HDD
- Press TIMER LIST.
- Press TOOLS to select "Auto Title Erase," and press ENTER.
- Select "On," and press ENTER.
- Recording From Connected Equipment
- Recording from connected equipment with a timer (Synchro Rec)
- To cancel Synchro Rec
- If the timer settings of a Synchro-Recording and another timer recording overlap
- Recording from connected equipment without a timer
- Press INPUT SELECT to select an input source according to the connection you made.
- Select the line input audio when recording a bilingual programme on DVD-RWs (VR mode).
- Press REC MODE repeatedly to select the recording mode.
- Press II REC PAUSE to set this recorder to record pause.
- Insert the source tape into the connected equipment and set to playback pause.
- At the same time, press ■ REC PAUSE on this recorder and the pause or play button on the connected equipment.
- If you connect a digital video camera with a DV IN jack
- Playback
- Playing
- Select the title, and press ENTER.
- To use the DVD's Menu
- To play VIDEO CDs with PBC functions
- To playback quickly with sound (Scan Audio)
- To resume playback from the point where you stopped (Resume Play)
- To play restricted DVDs (Parental Control)
- To lock the disc tray (Child Lock)
- One Touch Play
- One Touch Menu
- Playback options
- Notes on playing DTS sound tracks on a CD
- Notes on playing DVDs with a DTS sound track
- Adjusting the picture quality
- Press TOOLS during playback to select "Video Settings," and press ENTER.
- Select an item, and press ENTER.
- Press ←/→ to adjust the setting, and press ENTER.
- Adjusting the sound quality
- Press TOOLS during playback to select "Audio Settings," and press ENTER.
- Press ←/↑/↓/→ to select the option, and press ENTER.
- Pausing a TV Broadcast (TV Pause)
- While viewing a TV broadcast with this recorder, press Ⅱ.
- Press ▪ or ▷ again to resume watching the programme.
- Playing from the beginning of the programme you are recording (Chasing Playback)
- HDD -RWVR
- Press TOOLS while recording to select "Chasing Playback," and press ENTER.
- Playing a previous recording while making another (Simultaneous Rec and Play)
- Example: Play another title on the HDD while recording to the HDD.
- Example: Play a DVD while recording to the HDD.
- Searching for a Title/ Chapter/Track, etc.
- Searching by Thumbnail (Visual Search)
- Press TOOLS during playback to select "Visual Search," and press ENTER.
- Select a scene using ↔/→ , and press ENTER.
- Searching by title number or time code
- Press TOOLS during playback to select a search method, and press ENTER.
- Press the number buttons to select the number of the title, chapter, track, time code, etc., you want.
- Press SET.
- Playing MP3 Audio Tracks or JPEG Image Files
- Selecting an MP3 album or track
- To fast review or forward a track
- To go to the previous or next MP3 audio track
- To go to the previous or next album
- Selecting a JPEG album or image
- Press TITLE LIST.
- Select an album, and press ENTER.
- Select "View Album," and press ENTER.
- Select an image, and press ENTER.
- To stop viewing the JPEG image
- To view the previous or next picture
- To rotate a picture
- To change the slideshow speed
- About MP3 audio tracks and JPEG image files
- Note on MultiSession/Border discs
- MP3 audio tracks or JPEG image files that the recorder can play
- About playback order of albums, tracks, and files
- Structure of disc contents
- Erasing and Editing
- Before Editing
- Edit options for the HDD and DVD-RWs (VR mode)
- To edit original titles
- To create and edit Playlist titles
- Edit options for DVD+RWs/DVD-RWs (Video mode)/DVD+Rs/DVD-Rs
- Erasing and Editing a Title
- Select a title, and press ENTER.
- Select an option, and press ENTER.
- Erasing a chapter (Delete Chapter)
- Erasing a section of a title (A-B Erase)
- HDD +RW -RWVR
- Erasing multiple titles (Erase Titles)
- Dividing a title (Divide)
- Erasing all titles on the disc
- Erasing titles to open up disc space (Disc Map)
- Select a title by pressing ←/→, and press ENTER.
- Creating chapters manually
- Press CHAPTER MARK at the point where you want to divide the title into chapters.
- To erase chapter marks
- Creating and Editing a Playlist
- To play the Playlist title
- Moving a Playlist title (Change Order)
- Combining multiple Playlist titles (Combine)
- Dividing a Playlist title (Divide)
- Dubbing (HDD ↔ DVD)
- Before Dubbing
- Before you start...
- About "Dub Mode"
- Dubbing at high-speed (High-speed Dubbing)
- Dubbing restriction
- Move
- HDD → -RWVR
- Dubbing
- HDD +RW -RWVR -RWVideo +R -R
- Dubbing a single title (Title Dub)
- Select a dubbing mode by pressing ↑/↓.
- Select "Start," and press ENTER.
- To automatically adjust the dubbing mode (Auto Dub Mode)
- To stop dubbing
- Dubbing multiple titles (Dub Selected Titles)
- Select titles in the order you want to dub, and press ENTER.
- Repeat step 5 to select all of the titles you want to dub.
- Select "Start," and press ENTER.
- To adjust the settings for each title
- DV Dubbing
- Before DV Dubbing
- To record from the DV IN jack
- Preparing for DV dubbing
- Press HDD or DVD to select the recording destination.
- Insert the source DV/Digital 8 format tape into your digital video camera.
- Press INPUT SELECT on the remote repeatedly to select "DV."
- Press REC MODE on the remote repeatedly to select the recording mode.
- Press TOOLS on the remote to select "DV Audio Input," and press ENTER. Then, select the setting for the audio input.
- Recording an Entire DV Format Tape (One Touch Dubbing)
- ◆ How chapters are created
- Follow steps 1 to 5 of "Preparing for DV dubbing" on page 84, and press ONE-TOUCH DUB on the recorder.
- To stop during recording
- Program Edit
- Connect your digital video camera and prepare for recording
- Select and edit the scenes you want to dub
- Dub the selected scenes
- Follow steps 1 to 5 of "Preparing for DV dubbing" on page 84, and press SYSTEM MENU.
- Select "DV EDIT," and press ENTER.
- Select "Start," and press ENTER.
- Select the IN point by pressing ◀◀/▶▶, and press ENTER.
- Select the OUT point by pressing ◀◀/▶▶, and press ENTER.
- When you finish adding scenes, select the scene you want to edit, and press ENTER.
- When you finish editing the Scene List, select "OK," and press ENTER.
- Select "OK," and press ENTER.
- Select "Start," and press ENTER.
- Settings and Adjustments
- Clock and Language Settings (Settings)
- Clock
- ◆To set the clock manually
- Language
- DVD Menu (DVD VIDEO only)
- Audio
- Subtitle
- Digital TV settings (DTV Settings)
- Parental Lock
- ◆To lock channels
- ◆To unlock channels
- ◆ To set the Age Limit
- Tuning
- Auto Tune
- Programme Hide
- ◆Restoration of hidden programmes
- Programme Sort
- Technical Information
- Manufacturer Information
- Signal Strength
- Digital Software Upgrade
- Video Settings (Video)
- TV Type
- HDMI Resolution (RDR-HXD910 only)
- Pause Mode (HDD/DVDs only)
- 4:3 Output (RDR-HXD910 only)
- Component Out
- Progressive Mode
- Scart Setting
- ◆Line3 Input
- ◆ Line3 Output
- Line4 Input
- Audio Settings (Audio)
- Audio ATT (attenuation)
- Audio DRC (Dynamic Range Control) (DVDs only)
- Downmix (DVDs only)
- Audio Connection
- • DTS (DVD VIDEO only)
- • 48kHz/96kHz PCM (DVD VIDEO only)
- Recording and Parental Control Settings (Features)
- Auto Chapter
- Parental Control (DVD VIDEO only)
- One Touch Dubbing
- ◆Finalise Disc (for all recordable discs except DVD-RW in VR mode)
- Synchro Rec
- HQ Setting (HDD only)
- Colour System
- Screen Saver
- Parental Control (Password)
- Disc and Remote Control Settings/Factory Settings (Options)
- Format DVD-RW (DVD-RW only)
- Dimmer
- Power Save
- Auto Display
- Command Mode
- Factory Setup
- Easy Setup
- (Resetting the Recorder)
- Additional Information
- Troubleshooting
- 111 999
- Power
- The power does not turn on.
- Tuner
- The channel is not found or stored or missed.
- Picture
- There is no picture.
- Picture noise appears.
- There is no picture or the picture noise appears when connected to the HDMI OUT jack (RDR-HXD910 only).
- TV programme reception does not fill the screen.
- Picture break up
- TV programme pictures are distorted.
- TV channels cannot be changed.
- The picture from equipment connected to the recorder's input jack does not appear on the screen.
- The playback picture or TV programme from the equipment connected through the recorder is distorted.
- The picture does not fill the screen.
- The picture does not fill the screen, even though the picture size is set in "TV Type" in "Video" setup.
- The picture is black and white.
- Sound
- There is no sound.
- No sound is output from the HDMI OUT jack (RDR-HXD910 only).
- Sound distortion occurs.
- Sound is noisy.
- The sound volume is low.
- An alternate audio track cannot be recorded.
- Sound break up
- The recorder does not play any type of disc (except HDD).
- The recorder does not start playback from the beginning.
- The recorder starts playing automatically.
- Playback stops automatically.
- Some functions such as Stop, Search, or Slow-motion Play cannot be performed.
- The language for the sound track cannot be changed.
- The subtitle language cannot be changed or turned off.
- The angles cannot be changed.
- The MP3 audio tracks do not play.
- The JPEG image files do not play.
- TV Pause does not work.
- Recording/Timer recording/Editing
- The programme position cannot be changed from the programme position you are recording.
- Recording does not start immediately after you press ● REC.
- Nothing was recorded even though you set the timer setting correctly.
- Recording does not stop immediately after you press ■ REC STOP.
- Recording does not stop after you press ■.
- Timer recording is not complete or did not start from the beginning.
- Contents previously recorded were erased.
- Recording from the equipment with a timer
- Nothing was recorded even though you set the Synchro-Rec setting correctly.
- Synchro-Recording does not complete.
- The recorder automatically starts recording when the satellite receiver is turned on.
- Display
- The clock has stopped.
- The TIMER REC indicator is flashing.
- The recording mode indication is incorrect.
- The clock does not appear in the front panel display.
- Remote control
- The remote does not function.
- Other Sony equipment responds to the remote.
- Others
- The recorder does not operate properly.
- Five numbers or letters are displayed in the front panel display.
- The disc tray does not open after you press ▲ (open/close).
- The disc tray does not open and "TRAY LOCKED" appears in the front panel display.
- "RECOVERY" appears in the front panel display.
- "HDD ERROR" appears in the front panel display.
- "FAN ERROR" appears in the front panel display.
- The Parental Lock does not work.
- Mechanical sound is heard when the recorder is off.
- The disc tray does not open and you cannot remove the disc after you press ▲ (open/close).
- "LOCKED" appears in the front panel display.
- Self-diagnosis Function (When letters/numbers appear in the display)
- Notes About This Recorder
- On operation
- On adjusting volume
- On cleaning
- On cleaning discs
- Notes about the discs
- Specifications
- About i.LINK
- What is i.LINK?
- About the name "i.LINK"
- i.LINK baud rate
- i.LINK functions on this recorder
- Required i.LINK cable
- Guide to Parts and Controls
- Remote
- Front panel
- Front panel display
- Rear panel
- Glossary
- Chapter (page 67)
- Copy protection signals (page 49)
- Dolby Digital (page 97)
- DTS (page 98)
- DVD+R (page 10)
- DVD+RW (page 10)
- DVD-R (page 10)
- DVD-RW (page 10)
- DVD VIDEO (page 12)
- EPG (page 41)
- Hard disk drive (page 3)
- HDMI (High-Definition Multimedia Interface) (page 16)
- Interlace format (page 19)
- MPEG Audio (page 97)
- Original (page 72)
- Playlist (page 72)
- Progressive format (page 19)
- Title (page 67)
- Track (page 67)
- Language Code List
- Area Code
- Digital TV Channel List
- Numerics
- A
- B
- C
- D
- E
- F
- G
- H
- |
- J
- L
- M
- N
- 0
- P
- Q
- R
- S
- T
- U
- V
- Y
Brand : SONY
Model : RDR-HXD710
Category : DVD Recorder