Plonk - Synthesizer Intellijel - Free user manual and instructions
Find the device manual for free Plonk Intellijel in PDF.


| Product Type | Physical Modeling Percussion Synthesizer (Eurorack Module) |
| Width | 12 hp (approx. 61 mm) |
| Maximum Depth | 44 mm |
| Weight | Approx. 150 g (estimated) |
| Power Consumption | 170 mA @ +12V, 6 mA @ -12V |
| Polyphony | 2 voices (duophonic) |
| Preset Storage | 128 presets in onboard flash memory |
| Audio Processing | 48 kHz sample rate |
| Exciter Types | Mallet and Noise (with adjustable mix, stiffness, filters, envelope) |
| Resonator Types | String, Beam, Marimba, Drumhead, Membrane, Plate |
| Modulation Inputs | X, Y, MOD, PITCH, VEL, DECAY (all with attenuverters) |
| Audio Output | Mono (OUT jack) |
| Connectivity | Mini-B USB for MIDI SysEx preset transfer and firmware updates |
| Firmware Updatable | Yes, via USB |
| Panel Controls | Encoder, PITCH knob + button, TRIGGER button, DECAY knob, X knob, Y knob, LOAD, SAVE, EXCITER, OBJECT, MOD, CONFIG, X, Y buttons |
| Quick Start | Connect OUT to audio, set knobs to 12 o'clock, DECAY fully CW, press TRIGGER to hear sound |
| Calibration | Factory calibrated; manual calibration available via CONFIG menu using precision voltage source |
| Maintenance | Clean with a dry, soft cloth. Keep away from moisture and extreme temperatures. |
| Safety | Disconnect power before installation. Ensure correct power cable orientation (red stripe to -12V). Use in Eurorack case with adequate power supply. |
| Spare Parts & Repairability | Contact Intellijel customer support for service or replacement parts. Module is not user-serviceable beyond power cable connection. |
Frequently Asked Questions - Plonk Intellijel
User questions about Plonk Intellijel
0 question about this device. Answer the ones you know or ask your own.
Ask a new question about this device
Download the instructions for your Synthesizer in PDF format for free! Find your manual Plonk - Intellijel and take your electronic device back in hand. On this page are published all the documents necessary for the use of your device. Plonk by Intellijel.
USER MANUAL Plonk Intellijel
Physical Modeling Percussion Synthesizer
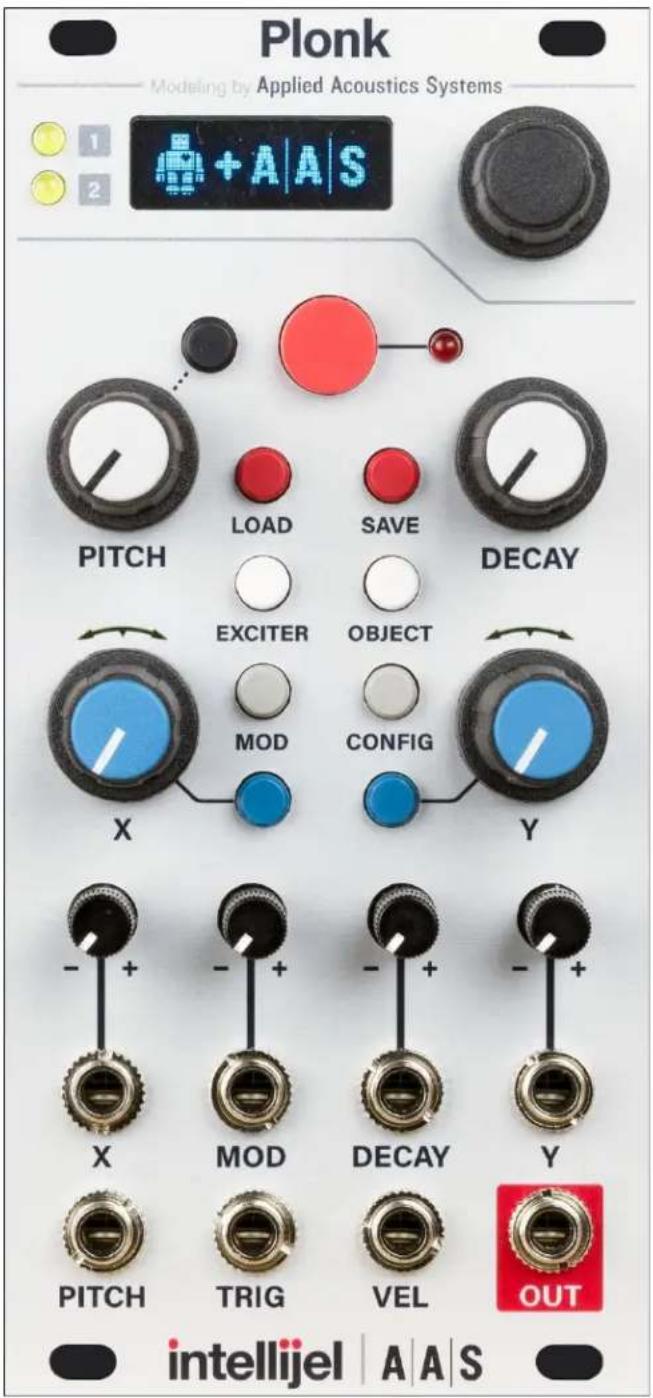
Table of Contents
Table of Contents
Overview
Features
Installation
Before Your Start
Installing Your Module
Quick Start
Front Panel
Controls
Inputs and Outputs
Parameter Menus
Pitch Parameters
Octave
Quantize
Exciter Parameters
Mallet / Noise Mix
Mallet Stiffness
Noise Density
Noise Lowpass Cutoff
Noise Lowpass Q
Noise Highpass Cutoff
Noise Highpass Q
Noise Attack
Noise Decay
Noise Envelope Type
Object Parameters
Resonator Type
Resonator Decay
Resonator Low Cut
Resonator Position
Resonator Tone
Resonator Inharmonicity
Resonator Pitch Envelope Amount
Resonator Pitch Envelope Time
Polyphony
VAR X and Y Destinations
MOD Destinations
Choke Resonator / Noise / Both
Preset Select
CONFIG Settings
Gain
VEL Mode
Init Preset
Send Presets
Loading and Saving Presets
Preset Overview
Loading
Saving
Preset Transfer
Downloading Presets to a Computer
Uploading Presets from a Computer
Calibration
Technical Specifications
Overview
Plonk uses a technique known as physical modelling to synthesize, with great realism, the way in which sound is produced by acoustic instruments. The Plonk module is itself focused primarily on creating percussive sounds — both pitched and un-pitched; natural and unnatural; acoustic-sounding or totally electronic.
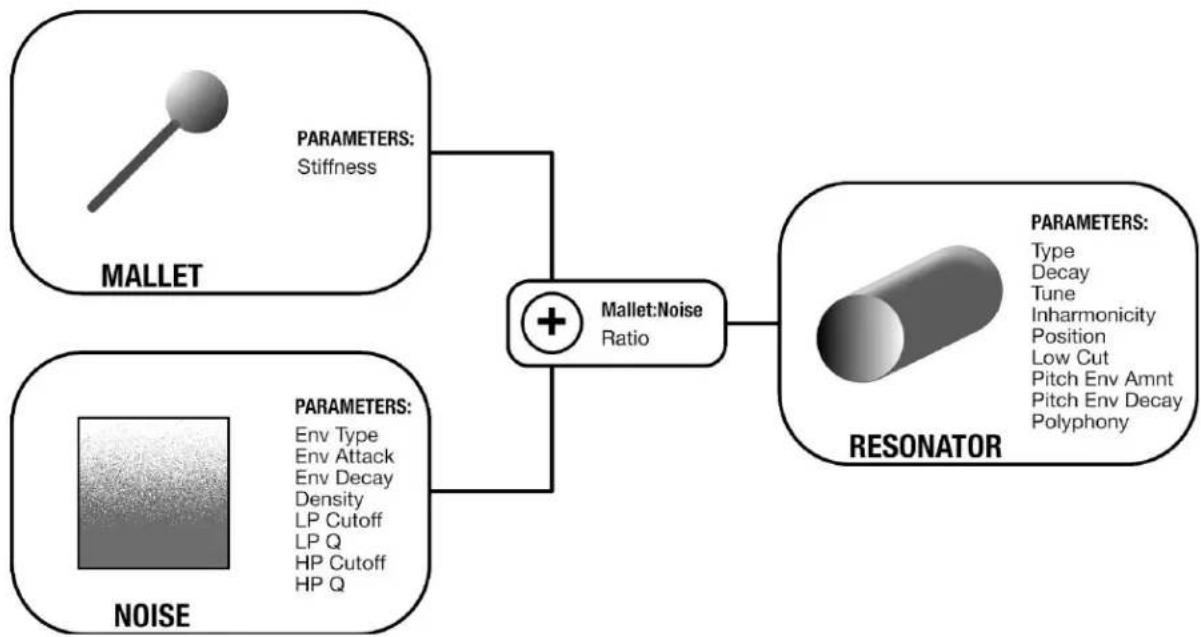
Plonk does this by breaking sound creation into two distinct elements — the exciter and the resonator. The exciter is a mathematical model of the device used to strike a particular surface. Plonk, because it's percussion oriented, has two types of exciters: one modelled on a mallet, and the other providing a noise source. The resonator is a virtualization of the object being struck, which vibrates, resonates and creates the body of a sound. Plonk offers several types of resonators: beam; marimba; drumhead; membrane; plate; and string.
Plonk provides numerous parameters that let you shape, mold and design both the exciter and the resonator, thus enabling you to synthesize the sound of striking or scraping almost any type of object — real or imagined. In this way, Plonk can accurately model the sounds of kicks, snares, toms, cymbals, claps, tablas, congas and all manner of traditional percussion instruments. It can also model pitched percussive instruments, like vibes, marimbas, and even bass or guitar-like tones. Of course, it also excels at modelling instruments that heretofore never existed.
flowchart
graph TD
    A["Mallet"] --> B["STIFFNESS"]
    C["NOISE"] --> D["ENV Type"]
    C --> E["Env Attack"]
    C --> F["Env Decay"]
    C --> G["Density"]
    C --> H["LP Cutoff"]
    C --> I["LP Q"]
    C --> J["HP Cutoff"]
    C --> K["HP Q"]
    L["Mallet:Noise Ratio"] --> D
    L --> E
    L --> J
    L --> K
    M["RESONATOR"] --> N["TYPE"]
    M --> O["Decay"]
    M --> P["Tune"]
    M --> Q["Inharmonicity"]
    M --> R["Position"]
    M --> S["Low Cut"]
    M --> T["Pitch Env Amnt"]
    M --> U["Pitch Env Decay"]
    M --> V["Polyphony"]
Best of all, the sounds created by Plonk are not static — any sound you design can respond dynamically to velocity, as well as four different modulation inputs. This means the sound of
Plonk can change completely from note-to-note (or strike-to-strike). Because of this, Plonk is actually a duophonic (2-voice) module, which lets the sound of one note decay naturally when a second note (possibly employing an entirely different set of modelling values) is struck. Thus, hitting a new note does not choke the sound of the previously struck note (unless you want it to, of course)!
Plonk stores up to 128 patches in its internal memory, and ships with many presets programmed by professional sound designers and composers. You may overwrite these patches if you wish, and banks of patches may be transferred via MIDI System Exclusive over Plonk's built-in mini-USB port to facilitate offline storage by programs or websites that support this capability.
Plonk was developed in cooperation with Montreal-based Applied Acoustics Systems — physical modelling pioneers, and the creators of Tassman, Lounge Lizard, String Studio, Ultra Analog, Chromaphone and numerous other plugins. It is with great pleasure that Intellijel brings the potential of this physical modelling technology to a hands-on, CV-laden device capable of the sort of dynamic control and sonic exploration that modular synthesists demand.
Features
- Two-voice polyphonic.
- 128 preset slots.
- Presets transferrable over embedded USB-MIDI interface.
• 48 kHz processing rate.
• Firmware updatable via USB
Installation
Intellijel Eurorack modules are designed to be used with a Eurorack-compatible case and power supply.
Before Your Start
Before installing a new module in your case you must ensure your case's power supply has sufficient available capacity to power the module:
- Sum up the specified +12V current draw for all modules, including the new one. Do the same for the -12 V and +5V current draw. The current draw will be specified in the manufacturer's technical specifications for each module.
- Compare each of the sums to specifications for your case's power supply.
- Only proceed with installation if none of the values exceeds the power supply's specifications. Otherwise you must remove modules to free up capacity or upgrade your power supply.
You will also need to ensure you have enough free space (hp) as well as free power headers in your case to fit the new module.
You can use a tool like ModularGrid to assist in your planning. Failure to adequately power your modules may result in damage to your modules or power supply. If you are unsure, please contact us before proceeding.
Installing Your Module
When installing or removing a module from your case always turn off the power to the case and disconnect the power cable. Failure to do so may result in serious injury or equipment damage.
Ensure the 10-pin connector on the power cable is connected correctly to the module before proceeding. The red stripe on the cable must line up with the -12V pins on the module's power connector. The pins are indicated with the label -12V, a white stripe next to the connector, the words "red stripe", or some combination of those indicators.
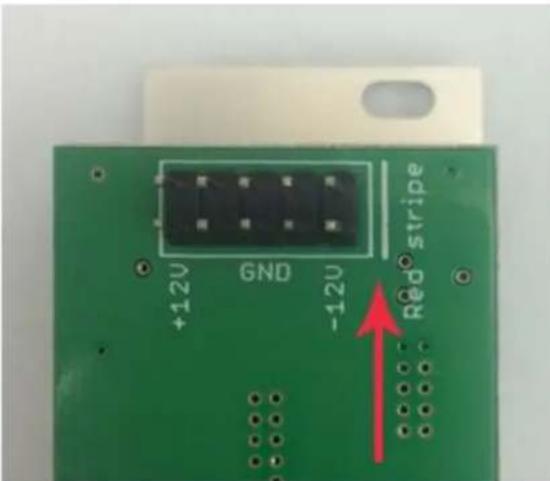
Most modules will come with the cable already connected but it is good to double check the orientation. Be aware that some modules may have headers that serve other purposes so ensure the cable is connected to the right one.
The other end of the cable, with a 16-pin connector, connects to the power bus board of your Eurorack case. Ensure the red stripe on the cable lines up with the -12V pins on the bus board. On Intellijel power supplies the pins are labelled with the label "-12V" and a thick white stripe:
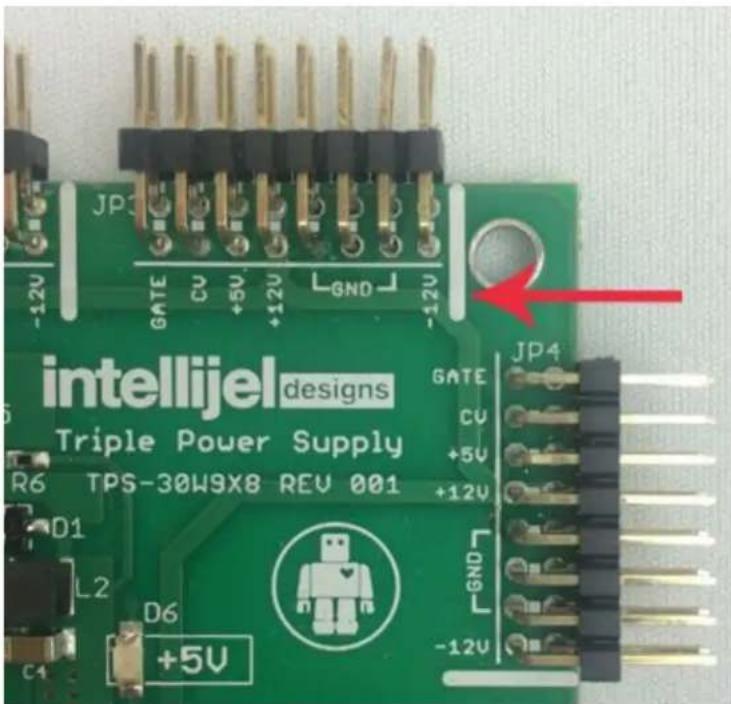
If you are using another manufacturer's power supply, check their documentation for instructions.
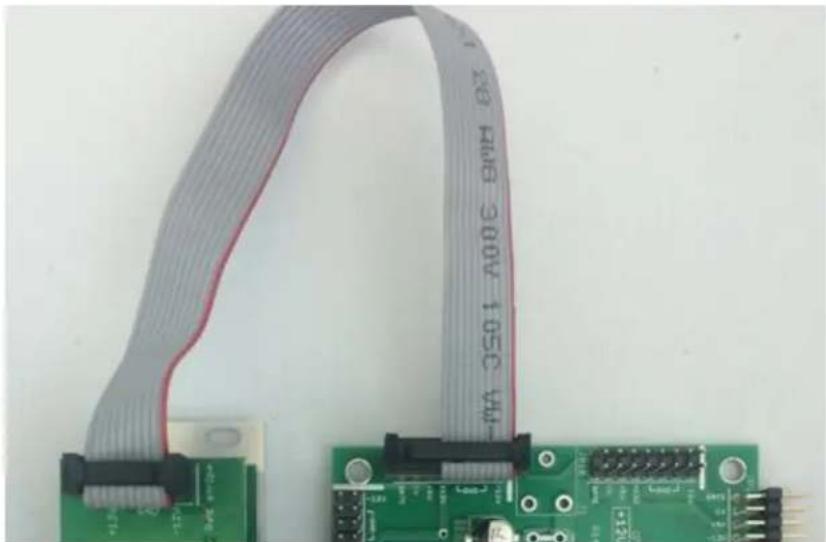
Once connected, the cabling between the module and power supply should resemble the picture below:
natural_image
Close-up of a green circuit board with a white flexible ribbon and connector, no visible text or symbols on the main components.Before reconnecting power and turning on your modular system, double check that the ribbon cable is fully seated on both ends and that all the pins are correctly aligned. If the pins are misaligned in any direction or the ribbon is backwards you can cause damage to your module, power supply, or other modules.
After you have confirmed all the connections, you can reconnect the power cable and turn on your modular system. You should immediately check that all your modules have powered on and are functioning correctly. If you notice any anomalies, turn your system off right away and check your cabling again for mistakes.
Quick Start
Make some noise:
- When you start up your Eurorack system with Plonk the very first time it will load the default patch.
- Connect the jack labelled OUT to your system's audio output.
- Set the PITCH, X, and Y knobs to the 12 o'clock position. Set the DECAY knob fully clockwise.
- Push the big red TRIGGER button. You should hear a sound!
- Experiment by turning the X and Y knobs to see how the sound changes.
- Push the LOAD button to enter the preset loading menu. Turn the ENCODER to select another preset. You can click the TRIGGER at any time to preview a preset. Click the ENCODER to load it.
Use a sequencer:
- Connect the gate output of your sequencer to the TRIG input of the Plonk.
- Connect the pitch output of your sequencer to the PITCH input of the Plonk.
- Run the sequencer, you should hear the Plonk make noise.
- If your sequencer has a secondary CV output, connect it to the VEL input for velocity control.
Switch between sounds:
- Connect a sequencer track, LFO, or other voltage output into the MOD input.
- Change the voltage as Plonk is being triggered. You'll hear it switch between kick, snare, and hi-hat sounds depending on the voltage at the input. This is because the default preset (1) uses Preset Step mode on the MOD input to shift between different preset sounds. Presets 1, 5, 9 and 13 are called kits because they use this feature.
Load another preset:
- Click the LOAD button and turn the ENCODER to scroll through the list of factory presets. You can use the red trigger button or the TRIG input to preview presets as you browse. When you find one you like, click the ENCODER to load it.
Now that you've played with some of the factory sounds, check out the Exciter Parameters and Object Parameters sections to learn how to make your own!
Front Panel
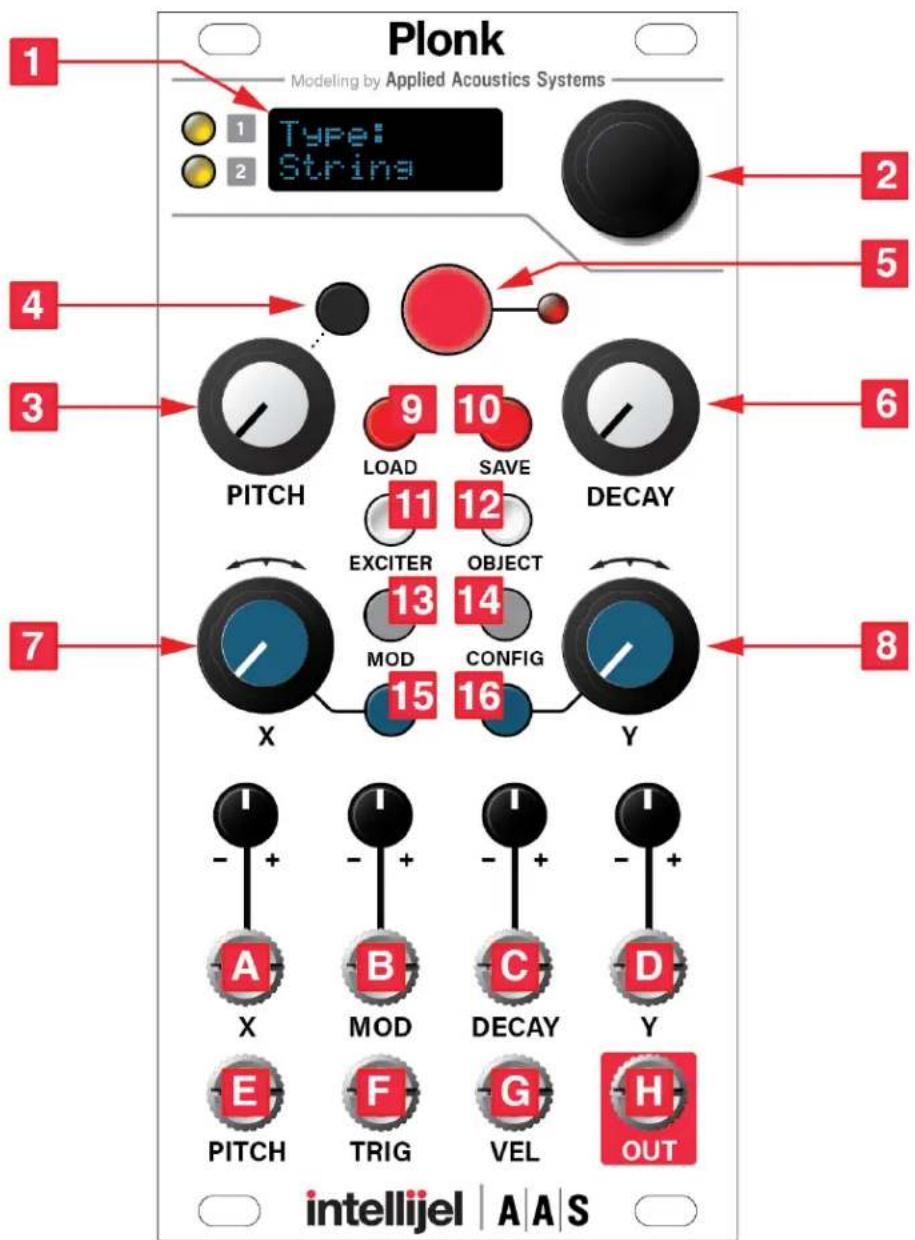
Controls
- DISPLAY - Used to display the parameters and settings menus. To conserve screen lifetime there is a screensaver which activates after 15 minutes and blanks the screen. Pushing any button or turning the encoder will turn the screen back on and reset the timer. The two LEDs change brightness to reflect the amplitude of the two voices' audio signals.
- ENCODER - Used to navigate the various parameter and settings menus. The encoder's function is context-dependant and is described in the sections where it is used.
- PITCH Knob - Tunes the base pitch of the module. The function of the knob is further controlled by the PITCH Button nearby. The root of the configured base octave is played when this knob is at the 12 o'clock position and 0 V are applied at the PITCH input.
- PITCH Button - Accesses the PITCH menu that is used to control the PITCH Knob behaviour. See the PITCH Parameters section for more details.
- TRIGGER Button - Manually triggers the exciter. Useful for previewing sounds or hand-operated sequencing.
- DECAY Knob - Scales the overall sound decay time by scaling both the noise envelope decay and the resonator decay times. When the knob is fully clockwise the decay times are at 100% of their programmed values.
- X Knob - Bipolar control for manually modulating the VAR X destination.
- Y Knob - Bipolar control for manually modulating the VAR Y destination.
- LOAD Button - Accesses the LOAD menu which is used for loading presets from the onboard flash memory. See the Loading and Saving Presets section for more details.
- SAVE Button - Access the SAVE menu which is used for saving presets to the onboard flash memory. See the section Loading and Saving Presets section for more details.
- EXCITER Button - Accesses the EXCITER parameters menu. While in this menu, turn the ENCODER to scroll through the available parameters and view their settings. Clicking the ENCODER or OBJECT button a second time will move the cursor to the current parameter's value. The value can then be edited by turning the ENCODER. Click the ENCODER or OBJECT button to return to scrolling through parameters. More details about the parameters are in the Exciter Parameters section.
- OBJECT Button - Accesses the OBJECT parameters menu. While in this menu, turn the ENCODER to scroll through the available parameters and view their settings. Clicking the ENCODER or OBJECT button a second time will move the cursor to the current parameter's value. The value can then be edited by turning the ENCODER. Click the ENCODER or OBJECT button to return to scrolling through parameters. More details about the parameters are in the Object Parameters section.
-
MOD Button - Accesses the MOD assignment menu. This is described in more detail in the MOD Destinations section.
-
CONFIG Button - Accesses the CONFIG menu.
- X Button - Accesses the VAR X assignment screen. This is described in more detail in the VAR X and Y Destinations section.
- Y Button - Accesses the VAR Y assignment menu. This menu behaves the same as the VAR X menu, but for the Y input.
Inputs and Outputs
A. X - CV offset for the VAR X destination. The accompanying attenuverter can be used to scale and flip the incoming voltage. Range of ±5 V. See the VAR X and Y Destinations section for more details.
B. MOD - CV input for the MOD destination modulation. The accompanying attenuverter can be used to scale and flip the incoming voltage. Range of ±5 V. If the selected destination is triggered by a gate then any voltage above 1.5 V is sufficient.
C. DECAY - CV offset for the DECAY control. The accompanying attenuverter can be used to scale and flip the incoming voltage. Range of ±5 V.
D. Y - CV offset for the VAR Y destination. Behaves the same as the X input, but for VAR Y.
E. PITCH - 1 V/octave pitch input. Summed with the position of the PITCH knob. Range of ±5 V. The pitch is updated only while the TRIG input is high.
F. TRIG - Triggers the exciter in response to a gate. The gate must have a duration of at least one millisecond to be detected by the module. If the preset's noise envelope is set to AHR, the envelope remains in the hold stage for the duration of the gate.
G. VEL - Velocity input. Range of +5 V and normalled to +5 V. Controls the velocity or volume of the sound, depending on the VEL Mode setting in the CONFIG menu. See the VEL Mode section for more details.
H. OUT - Mono audio output.
Parameter Menus
Pitch Parameters
The PITCH parameters are accessed via the black button near the PITCH knob and can be used to alter the pitch behaviour. Pressing the ENCODER or PITCH button toggles between selecting parameters and editing parameter values.
Octave
Sets the base octave. The root note of the base octave is played when the PITCH knob is at the 12 o'clock position and 0 V are applied at the PITCH input.
Quantize
When the quantize setting is disabled the PITCH knob can be used to continuously sweep the base pitch by ±2 octaves from the selected octave's root note. When enabled, the quantize setting causes the PITCH knob to step through notes of the chromatic scale.
Exciter Parameters
Plonk sounds can use two exciters: a mallet and noise. The mallet is a momentary impulse while the noise is white noise that can be shaped by a lowpass filter, highpass filter, and amplitude envelope. The filters are applied in series so together they can be used as a bandpass filter. Each sound can use either one or both of the exciters, depending on the mix setting.
Mallet / Noise Mix
The “Mix” parameter controls the level balance between the mallet and noise exciters. When set to 100:0, only the mallet excites the resonator. When set to 0:100, only the noise excites the resonator. Intermediate values are a blend between the two.
Mallet Stiffness
Adjusts the stiffness or firmness of the mallet. A stiffer mallet results in a snappier, shorter, crisper attack envelope. A mallet that's softer (lower stiffness value) creates a rounder, more full-bodied attack sound. Tap your desk with the sharpened end of a pencil and make note of the sound it makes. Then tap your desk with the pencil's eraser. Even though the same surface
(resonator) is being used, notice that the resulting sounds are dramatically different. That's the sonic characteristic controlled by the Mallet Stiffness parameter.
Noise Density
Controls the rate at which the random noise is generated. At lower values, individual clicks can be heard, which can sound like particles hitting the surface of the resonator. Increasing the density will increase the number of clicks generated in a given interval of time until the output becomes continuous white noise.
With appropriate envelope and filter settings, a noise density between 50 and 100 can be good for bowed sounds or snares.
Noise Lowpass Cutoff
Sets the cutoff frequency of the lowpass filter applied to the white noise exciter.
Noise Lowpass Q
Sets the resonance of the lowpass filter.
Noise Highpass Cutoff
Sets the cutoff frequency of the highpass filter applied to the white noise exciter. Try to keep this value below that of the Noise Lowpass Cutoff.
Noise Highpass Q
Sets the resonance of the highpass filter.
Noise Attack
Sets the duration of the attack stage of the noise amplitude envelope.
Noise Decay
Sets the duration of the decay stage of the noise amplitude envelope.
Noise Envelope Type
Sets the type of noise envelope used.
In AR mode the envelope simply goes through the attack and release stages. This is suitable for most percussive sounds.
In AHR mode an additional hold stage is added which keeps the envelope high for as long a gate is applied at the TRIG input. This is useful for articulated sounds such as sustained basses, effects, or dynamic percussion sounds such as open high hats where you want to vary the length of the sound.
Object Parameters
The resonator parameters menu is accessed by pushing the OBJECT button.
In Plonk, sounds are produced by feeding the output of the Exciter into an acoustic object model called a resonator.
Mathematically, a complex sound can be decomposed into elementary components called partials. The relative frequencies of the partials are specific to the type of object: the partials of a string will follow the ideal harmonic series, while those of a drumhead will be bunched closer together.
The material of the resonator will have an effect on the relative decay of the partials, while the position at which it is excited will have an effect on the relative amplitude of the partials.
The resonator section also includes an embedded envelope generator that can be used to change the pitch during sound playback. The envelope is a simple linear envelope triggered each time the exciter is triggered.
Resonator Type
Selects from one of the six resonator types:
- String – a plain string. Good for plucked or bowed sounds.
- Beam – a rectangular beam with constant cross-section. Good for bells, chimes, claves, woodblocks and other small percussions.
- Marimba – a beam with variable cross-section, producing more harmonic overtones. Good for chromatic percussions like marimbas and vibraphones.
- Drumhead – circular membrane. Good for various drum sounds.
- Membrane – rectangular membrane. Good for various drum sounds. More dissonant than the drumhead resonator.
- Plate – rectangular plate. Good for cymbals, gongs, bells and other metallic or wooden percussions.
Resonator Decay
Sets the resonator decay time. This affects all partials equally.
Resonator Low Cut
Attenuates the lower partials when clearer or brighter sounds are desired. Set to 0 to hear the full spectrum of the resonator.
Resonator Position
Controls where the exciter signal is applied on the resonator. This affects the relative amplitude of the partials. Varies from the edge (0) to the middle of the object (127).
When the resonator is excited in the middle, many of its partials are completely attenuated, resulting in a hollower sound. This is especially obvious for the string which loses all of its even harmonics and sounds like a filtered analog square wave.
Resonator Tone
Changes the relative decay of the partials. Perceptually, this parameter affects the object's material. Depending on the resonator type, lower values may evoke wood, nylon or plastic, while higher values may evoke metal or glass.
Resonator Inharmonicity
Changes the frequency ratio of the partials relative to the root frequency. The range of this parameter is bipolar, from -64 to +63. Negative values will bring the partials closer together, while positive values will spread them.
Large inharmonicity values have a major impact on the timbre of the resonator: a string with a large negative or positive inharmonicity value will not sound like a string anymore.
Resonator Pitch Envelope Amount
Sets the amount that the internal pitch envelope affects the resonator pitch. The range of this parameter is bipolar, from -64 (-1 octave) to +63 (+1 octave).
Resonator Pitch Envelope Time
Sets the length of time it takes for the internal pitch envelope to reach its final value.
Polyphony
Sets the polyphony of the resonator, either 1 or 2.
If polyphony is set to 1 and a trigger is received while a sound is decaying, the first sound will be choked before the new one begins.
If polyphony is set to 2 and a trigger is received while a sound is decaying, the first sound will continue to ring out. Any modulation being applied will be locked at its last value. The new sound will be assigned to the other voice and all modulation will affect this sound only. If both voices are in use and a trigger is received, the new sound will be assigned to the oldest playing voice.
VAR X and Y Destinations
Pressing either of the dedicated X or Y buttons will enter the modulation destination selection screen for the X and Y knobs and CV inputs. Turn the ENCODER to select a new destination and then click to confirm. The modulation knob and CV input is then summed with the value of the selected exciter or object parameter.
Once in the modulation destination selection screen you can push the X or Y button a second time to set the DEPTH of the respective control. The DEPTH allows you to configure how much the full range of the modulation offsets the selected parameter. The options are LOW (±16), MEDIUM (±32), HIGH (±64) and FULL (±128).
MOD Destinations
Pressing the MOD button will enter the modulation destination selection screen for the MOD input. Turn the ENCODER to select a new destination and then click to confirm.
There are two types of MOD destinations, those that simply modulate an exciter or object parameter, and those with special functions. The modulations work just like those for the X and Y input except that they do not have a dedicated knob on the panel. The special functions are described below.
Once in the MOD destination selection screen you can push MOD button a second time to set the DEPTH of modulation. The DEPTH allows you to configure how much the full range of the modulation offsets the selected parameter. The options are LOW (±16), MEDIUM (±32), HIGH (±64) and FULL (±128). Note that the menu is only accessible for destinations which affect exciter or object parameters.
Choke Resonator / Noise / Both
The three choke destinations can be used to immediately choke either the resonator, noise exciter, or both. When a gate is detected at the MOD input a fast envelope will quickly bring down the level. This is useful for designing sounds that have a very long resonator or noise decay but then being able to cut them off with another gate source, for example open hihats or drones.
Preset Step
Preset selection mode is indicated by the "Preset Step" destination. This destination has two additional parameters that are accessed by clicking the ENCODER. The display will indicate Pst A:B where A and B are numbers that indicate the first and last preset controlled by the selection.
Now whenever Plonk receives a trigger it will read the voltage on the MOD input and switch to a new preset before making a sound. A voltage of 0 V will select the first preset A and a voltage of + or - 5 V will select the last preset B. Any voltage in between 0 - 5 will select another preset in the range, proportional to the amount of voltage applied.
Selecting a preset in this way is subject to the following conditions:
- All exciter and object parameters will be replaced with those of the selected preset. If the current preset (the one with the mod destination set to Preset Select) is within the range, its parameters will be used.
- The EXCITER and OBJECT buttons still edit the parameters of only the current preset.
- The X, Y, and VEL settings from the current preset are retained.
- The GAIN is controlled by the selected preset.
- When switching presets, the effect is polyphonic so the previous sound is allowed to ring out.
Randomize
When you set the Mod Destination to "Randomize," a trigger received on Plonk's MOD input will instantly randomize every Exciter and Object parameter (with the exception of polyphony).
TIP: Sending a trigger to the MOD input is not the only way to randomize a patch. You can also do it manually by setting the Mod Destination to "Randomize," then pressing the encoder knob. Each time you press the encoder knob a new random patch is generated — perfect for those times when you need a little serendipitous inspiration.
Morph
With Mod Destination set to "Morph," Plonk uses the MOD input CV to morph between the Exciter and Object settings of the current preset and a destination preset you select with the encoder knob. Specifically:
- On the Mod Destination screen, rotate the encoder to select "Morph," then click the encoder. A number will appear to the right of the word, "Morph."
- Click the encoder again to highlight the number.
- Rotate the encoder to select the patch number you want to Morph into, then press the encoder again. Now, any CV received at the MOD input will morph between the values of the currently loaded preset and the one you just selected in the Mod Destination menu.
NOTE: Plonk does not morph between resonator types. So the loaded preset's resonator type (String, Beam, Marimba, etc.) is used regardless of the resonator type assigned to the destination preset. However, all other resonator and exciter parameters do morph.
CONFIG Settings
Gain
Adjusts the overall gain of the current patch from -20 dB to +12 dB. This can be used to account for variances in volume of different patches due to their synthesis parameters.
VEL Mode
Sets the behaviour of the VEL input. There are three settings:
- accent - This is the default setting. In this mode the note played will be accented whenever a gate signal is present at the VEL input. If no cable is plugged into the input, all notes will be accented.
- dynamics - In this mode the strength of the exciter is proportional to the voltage at the VEL input. This is useful for directly articulating the strength of the notes with the velocity output of a MIDI-CV converter or a sequencer track.
- volume - In this mode the voltage at the VEL input directly controls the final output level of the synthesizer. This is best suited for volume effects like tremolo, fade-in/fade-out, and other envelope effects.
Init Preset
Initializes the current settings to a default preset which is a useful starting point. Any unsaved settings will be lost.
Send Presets
Sends all saved presets over USB-MIDI. See The MIDI Preset Transfer section for more details.
Loading and Saving Presets
Because of the large number of parameters involved in physical modelling, Plonk has an onboard flash memory that allows storage of up to 128 preset settings. The preset storage functions are accessed via the SAVE and LOAD buttons. When Plonk first starts it will load the last used preset.
Preset Overview
It's important to recognize that Plonk's concept of a "preset" is slightly different than a programmable synthesizer's concept of a "preset."
On a typical programmable synth, recalling a preset sets every parameter to the value stored within it — regardless of the current position of its knobs. But Plonk presets follow a different dictate. Because Plonk is a eurorack module, which is designed to be modulated and controlled by other modules in a larger system, its panel knobs are always live. That is, when you recall a preset, every parameter is set to its saved value, however any value presently under the control of a front panel knob (or CV input) takes the current value of that knob or CV input into account!
Strange? Not really. Plonk is not designed to simply recall and trigger static sounds. Instead, it's designed to live and breathe — to be modulated and tweaked, and to change presets in real time while simultaneously being modulated. Think of it like this: a single snare drum doesn't produce just one sound, but rather a variety of sounds depending on how hard you hit it; where you hit it; what you hit it with; and how you tune it. But these sounds all still come from the same snare drum, and that snare drum is analogous to a Plonk preset.
Because of this, it's possible to load a preset that doesn't sound exactly like you expect (or remember). That's probably because the current position of Plonk's front panel knobs are overriding some saved parameter values. For example, if you recall a sound that you thought should have a long decay time but is short and snappy sounding, it's probably because the DECAY knob is turned down.
So when auditioning Plonk presets, remember to tweak all the knobs while you listen — real instruments are dynamic in nature, and Plonks presets are designed to reflect that dynamism — loading not just a static snapshot of a sound, but a range of sonic nuances that can be achieved (through modulation) by a single preset.
Loading
To enter the preset load menu, click the LOAD button. Turning the ENCODER will scroll through the available presets and also temporarily load their settings so the sound can be previewed. Click the ENCODER to replace the current sound with the currently selected preset, otherwise click any button to exit the menu and return to the current sound. Clicking the LOAD button again while in this menu will return to the last loaded preset and also return the sound to its current settings. The currently loaded preset will be indicated by a star next to the preset number.
Saving
To enter the preset save menu, click the SAVE button. Turn the ENCODER to find a slot in which to save the current module settings. The last loaded slot is indicated with a star next to the preset number. The menu displays the name of the preset in the selected slot on the second line of the display. Once you've decided on a slot you can either click the ENCODER or the SAVE button.
If you click the ENCODER the name will change to the last loaded preset name and the menu will enter the name editing mode. Turn the ENCODER to change the current character, click the ENCODER to advance to the next character. Once you reach the end of the name, the cursor will jump to the first line with the text "N". Turn the ENCODER until it reads "Y" and then click to confirm save.
If you click the SAVE button the preset name will be immediately filled with the last used preset name. The cursor will jump to the first line with the text "N". Turn the ENCODER until it reads "Y" and then click to confirm save.
Preset Transfer
It is possible to transfer presets to and from the Plonk using MIDI System Exclusive messages via the embedded USB-MIDI interface. When connected to a computer via a Mini-B USB cable, the Plonk will act as a USB-MIDI device. You can then use a software tool to transfer presets back and forth. We recommend the following:
- Laser Mammoth (macOS or Windows, via Chrome browser)
- SysEx Librarian (macOS)
- MIDI-OX (Windows)
Downloading Presets to a Computer
First set up your SysEx transfer program to record incoming SysEx data. In SysEx Librarian this is the "Record Many" button.
Once your SysEx transfer program is ready to receive messages, perform the following on Plonk:
- Click the CONFIG button.
- Turn the ENCODER till the display reads "Send Presets".
- Click the ENCODER. If you haven't yet connected the USB cable to the back of the module the display will read "Connect USB". Once the USB cable is connected it will read "Click ENC to begin".
- Click the ENCODER to begin SysEx transmission.
- Once your SysEx transfer software has received 128 messages and the display reads "Presets Sent" the preset transfer process is complete. You can now push any button to exit this menu.
Uploading Presets from a Computer
To upload presets to the Plonk from a .syx file simply play back the file to the Plonk's USB-MIDI interface from a computer using the SysEx transfer program of your choice.
Ensure you are not triggering the Plonk while uploading presets as the module may be too busy processing DSP to accept all the SysEx messages, causing some presets to not be uploaded correctly.
It is also recommended you leave a pause between messages of 500ms to give Plonk time to save a preset before transmitting the next one. This delay should be configurable in the preferences of your SysEx transfer program.
Calibration
Plonk comes already calibrated from the factory, but if for some reason you need to adjust the calibration, here's how:
- Click the CONFIG button.
- Turn the ENCODER till the display indicates "Start calibration".
- Click the ENCODER. The screen will indicate "Pitch 0V" with a number below.
- Connect a precision voltage source such as a MIDI-CV converter or quantizer to the PITCH input. Ensure nothing is connected to any of the other inputs.
- Set the voltage source to 0V. The number on the display should be around 52000.
- Click the ENCODER. The screen will indicate "Pitch 1V" with a number below.
- Set the voltage source to 1V. The number on the display should be around 42000.
- Click the ENCODER. The screen will indicate "Calibrated!" and the calibration will be saved in permanent storage.
- Click any button to exit the calibration, or click the ENCODER to restart. If you click the encoder again by accident, you can still push another button to exit without worrying about your calibration getting messed up. Nothing is saved until you reach the end of the calibration process.
Technical Specifications
| Width | 12 hp |
| Maximum Depth | 44 mm |
| Current Draw | 170 mA @ +12V6 mA @ -12V |
Firmware Changelog
1.0 (July 20, 2017)
- Initial release

- Table of Contents
- Overview
- Features
- Installation
- Before Your Start
- Installing Your Module
- Quick Start
- Make some noise:
- Use a sequencer:
- Switch between sounds:
- Load another preset:
- Controls
- Inputs and Outputs
- Parameter Menus
- Pitch Parameters
- Octave
- Quantize
- Exciter Parameters
- Mallet / Noise Mix
- Mallet Stiffness
- Noise Density
- Noise Lowpass Cutoff
- Noise Lowpass Q
- Noise Highpass Cutoff
- Noise Highpass Q
- Noise Attack
- Noise Decay
- Noise Envelope Type
- Object Parameters
- Resonator Type
- Resonator Decay
- Resonator Low Cut
- Resonator Position
- Resonator Tone
- Resonator Inharmonicity
- Resonator Pitch Envelope Amount
- Resonator Pitch Envelope Time
- Polyphony
- VAR X and Y Destinations
- MOD Destinations
- Choke Resonator / Noise / Both
- Preset Step
- Randomize
- Morph
- CONFIG Settings
- Gain
- VEL Mode
- Init Preset
- Send Presets
- Loading and Saving Presets
- Preset Overview
- Loading
- Saving
- Preset Transfer
- Downloading Presets to a Computer
- Uploading Presets from a Computer
- Calibration
- Technical Specifications
- Firmware Changelog
Brand : Intellijel
Model : Plonk
Category : Synthesizer